audio SKODA SUPERB 2005 1.G / (B5/3U) DX Navigation System Manual
[x] Cancel search | Manufacturer: SKODA, Model Year: 2005, Model line: SUPERB, Model: SKODA SUPERB 2005 1.G / (B5/3U)Pages: 75, PDF Size: 3.09 MB
Page 2 of 75
RADIO NAVIGATION SYSTEM1
EQUIPMENT ILLUSTRATION
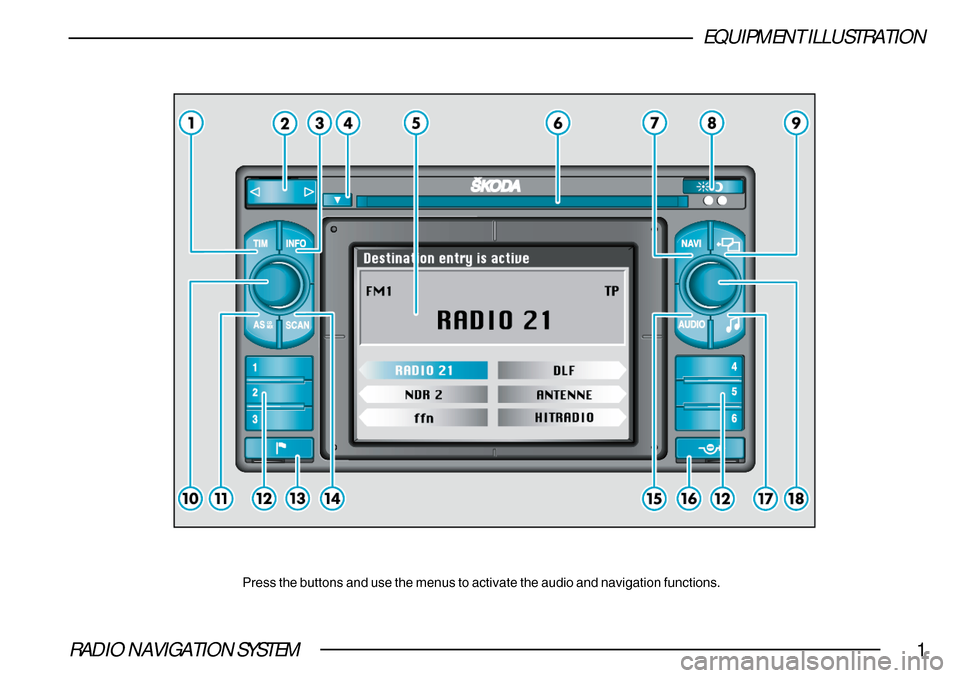
Press the buttons and use the menus to activate the audio and navigation\
functions.
Page 3 of 75
RADIO NAVIGATION SYSTEM2
QUICK REFERENCE
11 11
1 TIM button to activate up to 9 automatically stored traffic
information messages with a maximum length of 4 minutes,
to activate the recording function and to interrupt a
traffic message 21
22 22
2 Radio mode
Rocker switch for automatic and manual seek tuning, 16
to select and repeat recorded traffic messages 21
CD mode
To select CD titles up/down 24
33 33
3 INFO button to display the complete destination address,
to repeat the most recent voice output during active route
guidance
44 44
4 CD eject button 7
55
55
5 Display 8
66
66
6 CD-ROM slot for the navigation CD
77
77
7 NAVI button to activate the main navigation menu
and to cancel route guidance 26
88 88
8 Button to switch manually between day and night display 8
99
99
9 button to return to the previous or main menu
and to cancel activated functions
00
00
0 Rotary/pushbutton to switch the system on/off (press), 10
volume control (turn)
!! !!
! Radio mode
AS button to automatically save and recall the six
strongest TP, FM and AM radio stations in memory bank 2 16
CD mode
CD MIX button: to play CD tracks in random order 24
@@ @@
@ Radio mode
Station buttons 1 - 6 to save and recall 12 radio
stations for TP, FM and AM in 2 memory banks 16, 17
CD mode
To select a CD from the magazine 24
## ##
# Button to save a flagged destination
(current vehicle position) 38
$$ $$
$ Radio mode
SCAN button to scan (10 seconds) all the radio stations
saved (TP, FM and AM) 18
CD mode
To scan CD tracks 24
%% %%
% AUDIO button to activate sources selection menus
(Select sound source - TP, FM, AM, CD, TV/VIDEO)
or to switch to the Audio screen 12
^^ ^^
^ Button to activate the traffic congestion function,
alternate route calculation 55
&& &&
& Tone button to activate the tone adjustment menu
(bass, treble, balance and fader adjustment)
and volume setup 14
For systems with the Digital Sound Package (DSP)
this button also adjusts the sound features 15
** **
* Menu knob to mark (turn) and confirm (press) menu items, 20
to access submenus, to select switching modes,
to select the basic settings for sound and volume
in the sound menu 15
Page 4 of 75
RADIO NAVIGATION SYSTEM3
CONTENTS
INTRODUCTION
The Radio Navigation System MFD............ 5
Important information .................................. 6
Changing the navigation CD-ROM .............. 7
Display ......................................................... 8
Menu structure ............................................. 8
Selecting and confirming menu fields ......... 9
Map and symbol displays ............................ 9
Switching the system on/off ...................... 10
AUDIO
Audio menu - overview.............................. 12
Sound menu - overview ............................. 14
Radio mode ............................................... 16
– Station seek tuning ................................ 16
– Storing radio stations automatically
(AS function) .......................................... 16
– Storing radio stations ............................. 17
– Recalling the radio station ..................... 18
– Scanning the radio stations ................... 18
– Radio mode with RDS and
RDS Regional ........................................ 18
– Traffic information .................................. 20
– Traffic Information Memory (TIM) .......... 21
CD changer (extra feature) ....................... 22
– CD magazine ......................................... 22
– Switching to CD mode ........................... 24
– CD functions .......................................... 24
– Notes on using the CD changer ............ 25
NAVIGATION
Main navigation menu - overview .............. 26
Enter destination ........................................ 27
– Town ...................................................... 28
– Street and intersection ........................... 30
– Town centre ........................................... 32
– Special destinations ............................... 32
– From the destination memory ................ 35
– To the flagged destination ..................... 38
– Selecting the destination from the map . 40
Route options ............................................ 42
Starting route guidance ............................. 44
Cancelling route guidance ......................... 45
Making settings in the map menu ............. 46
Information mode ....................................... 48
Destination memories ................................ 49
– Enter/change short name ...................... 50
– Editing the Top 10 memory ................... 51
– Deleting destinations from the
destination memory ............................... 53
Traffic congestion function ......................... 55
Travel guide ............................................... 60
Making settings .......................................... 61
Anti-theft coding ......................................... 63
Page 13 of 75
RADIO NAVIGATION SYSTEM12
AUDIO
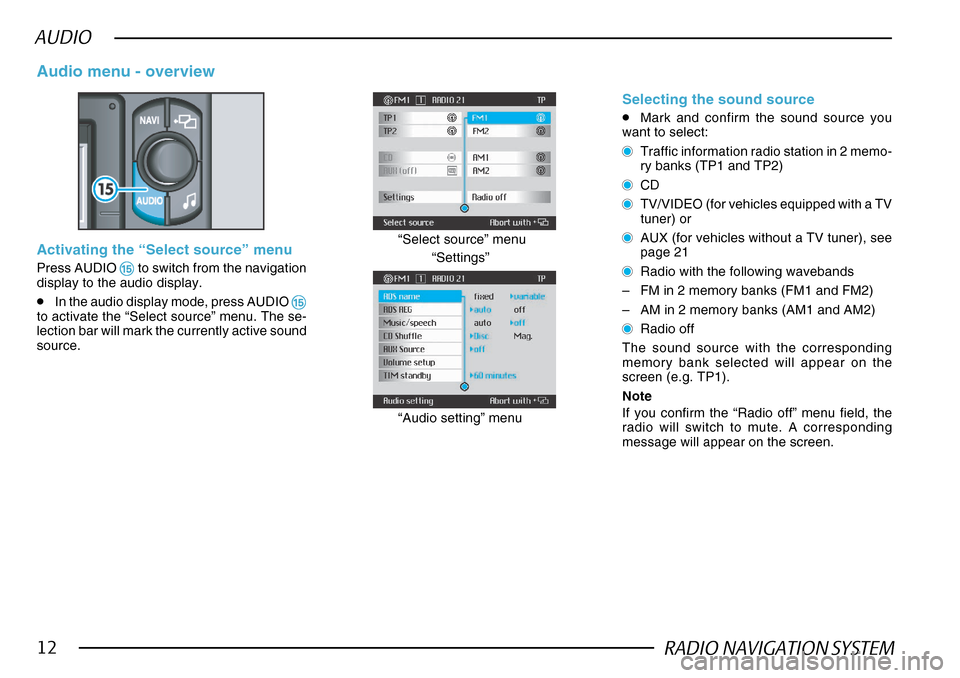
Activating the “Select source” menu
Press AUDIO %% %%
% to switch from the navigation
display to the audio display.
•In the audio display mode, press AUDIO %%
%%
%to activate the “Select source” menu. The se-
lection bar will mark the currently active sound
source.
Audio menu - overview
“Settings”
“Select source” menu
“Audio setting” menu
Selecting the sound source
•Mark and confirm the sound source you
want to select:
Traffic information radio station in 2 memo-
ry banks (TP1 and TP2)
CD
TV/VIDEO (for vehicles equipped with a TV
tuner) or
AUX (for vehicles without a TV tuner), see
page 21
Radio with the following wavebands
– FM in 2 memory banks (FM1 and FM2)
– AM in 2 memory banks (AM1 and AM2)
Radio off
The sound source with the corresponding
memory bank selected will appear on the
screen (e.g. TP1).
Note
If you confirm the “Radio off” menu field, the
radio will switch to mute. A corresponding
message will appear on the screen.
Page 14 of 75
RADIO NAVIGATION SYSTEM13
AUDIO
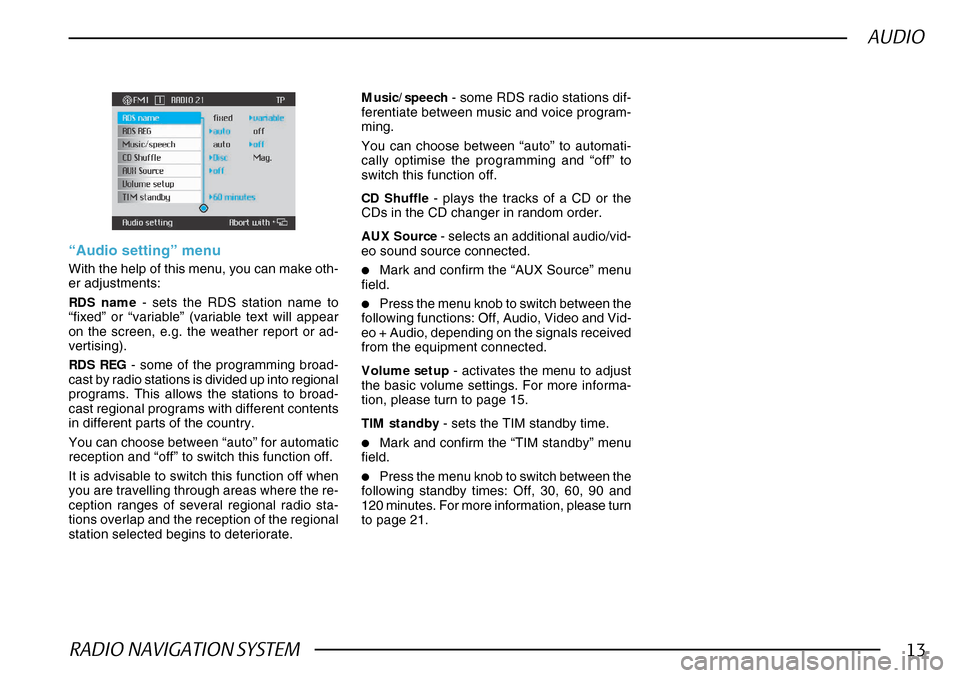
CD Shuffle - plays the tracks of a CD or the
CDs in the CD changer in random order.
AUX Source - selects an additional audio/vid-
eo sound source connected.
•Mark and confirm the “AUX Source” menu
field.
•Press the menu knob to switch between the
following functions: Off, Audio, Video and Vid-
eo + Audio, depending on the signals received
from the equipment connected.
Volume setup - activates the menu to adjust
the basic volume settings. For more informa-
tion, please turn to page 15.
TIM standby - sets the TIM standby time.
•Mark and confirm the “TIM standby” menu
field.
•Press the menu knob to switch between the
following standby times: Off, 30, 60, 90 and
120 minutes. For more information, please turn
to page 21.
“Audio setting” menu
With the help of this menu, you can make oth-
er adjustments:
RDS name - sets the RDS station name to
“fixed” or “variable” (variable text will appear
on the screen, e.g. the weather report or ad-
vertising).
RDS REG - some of the programming broad-
cast by radio stations is divided up into regional
programs. This allows the stations to broad-
cast regional programs with different contents
in different parts of the country.
You can choose between “auto” for automatic
reception and “off” to switch this function off.
It is advisable to switch this function off when
you are travelling through areas where the re-
ception ranges of several regional radio sta-
tions overlap and the reception of the regional
station selected begins to deteriorate. Music/speech
- some RDS radio stations dif-
ferentiate between music and voice program-
ming.
You can choose between “auto” to automati-
cally optimise the programming and “off” to
switch this function off.
Page 15 of 75
RADIO NAVIGATION SYSTEM14
AUDIO
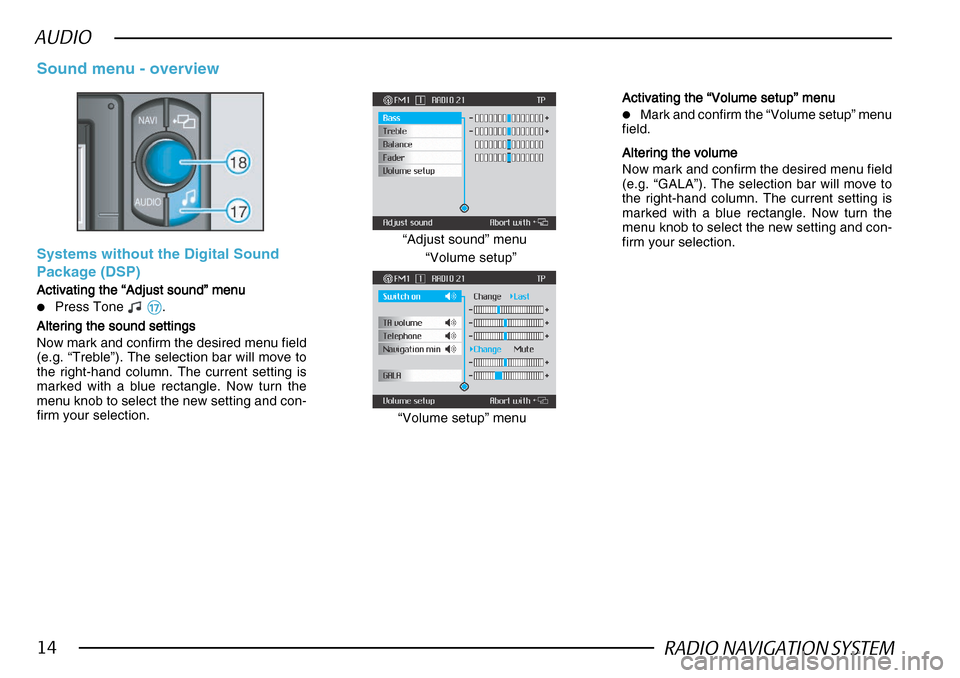
Sound menu - overview
Systems without the Digital Sound
Package (DSP)
Activating the “Adjust sound” menu
Activating the “Adjust sound” menu Activating the “Adjust sound” menu
Activating the “Adjust sound” menu
Activating the “Adjust sound” menu
•Press Tone && &&
&.
Altering the sound settings
Altering the sound settings Altering the sound settings
Altering the sound settings
Altering the sound settings
Now mark and confirm the desired menu field
(e.g. “Treble”). The selection bar will move to
the right-hand column. The current setting is
marked with a blue rectangle. Now turn the
menu knob to select the new setting and con-
firm your selection. “Volume setup”
“Adjust sound” menu
“Volume setup” menu
Activating the “Volume setup” menu
Activating the “Volume setup” menu Activating the “Volume setup” menu
Activating the “Volume setup” menu
Activating the “Volume setup” menu
•Mark and confirm the “Volume setup” menu
field.
Altering the volume
Altering the volume Altering the volume
Altering the volume
Altering the volume
Now mark and confirm the desired menu field
(e.g. “GALA”). The selection bar will move to
the right-hand column. The current setting is
marked with a blue rectangle. Now turn the
menu knob to select the new setting and con-
firm your selection.
Page 16 of 75
RADIO NAVIGATION SYSTEM15
AUDIO
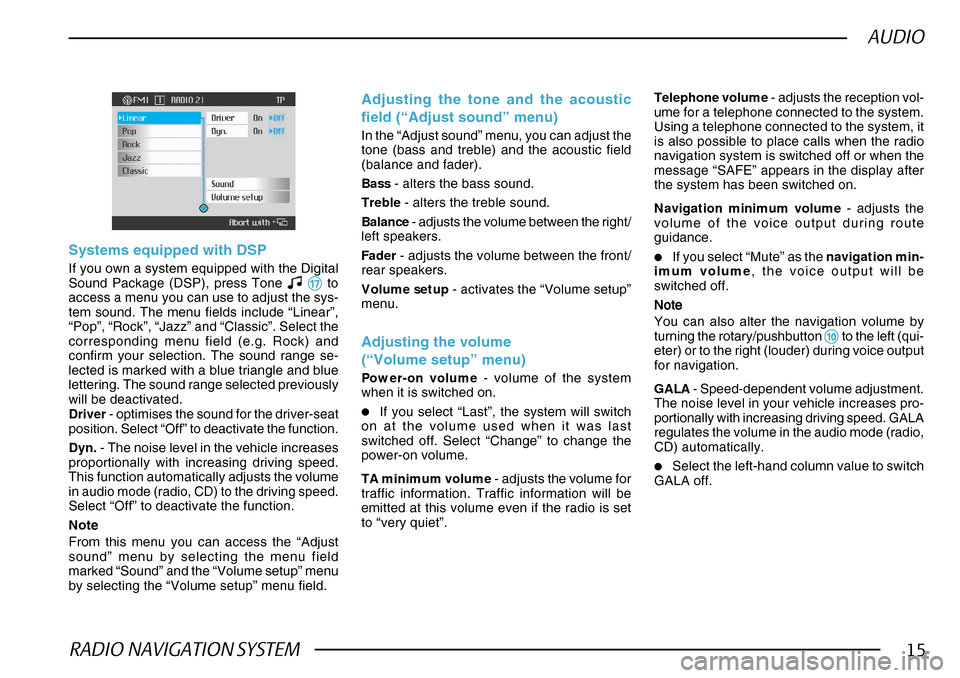
Systems equipped with DSP
If you own a system equipped with the Digital
Sound Package (DSP), press Tone && &&
& to
access a menu you can use to adjust the sys-
tem sound. The menu fields include “Linear”,
“Pop”, “Rock”, “Jazz” and “Classic”. Select the
corresponding menu field (e.g. Rock) and
confirm your selection. The sound range se-
lected is marked with a blue triangle and blue
lettering. The sound range selected previously
will be deactivated.
Driver - optimises the sound for the driver-seat
position. Select “Off” to deactivate the function.
Dyn. - The noise level in the vehicle increases
proportionally with increasing driving speed.
This function automatically adjusts the volume
in audio mode (radio, CD) to the driving speed.
Select “Off” to deactivate the function.
Note
From this menu you can access the “Adjust
sound” menu by selecting the menu field
marked “Sound” and the “Volume setup” menu
by selecting the “Volume setup” menu field.
Adjusting the tone and the acoustic
field (“Adjust sound” menu)
In the “Adjust sound” menu, you can adjust the
tone (bass and treble) and the acoustic field
(balance and fader).
Bass - alters the bass sound.
Treble - alters the treble sound.
Balance - adjusts the volume between the right/
left speakers.
Fader - adjusts the volume between the front/
rear speakers.
Volume setup - activates the “Volume setup”
menu.
Adjusting the volume
(“Volume setup” menu)
Power-on volume - volume of the system
when it is switched on.
•If you select “Last”, the system will switch
on at the volume used when it was last
switched off. Select “Change” to change the
power-on volume.
TA minimum volume - adjusts the volume for
traffic information. Traffic information will be
emitted at this volume even if the radio is set
to “very quiet”. Telephone volume
- adjusts the reception vol-
ume for a telephone connected to the system.
Using a telephone connected to the system, it
is also possible to place calls when the radio
navigation system is switched off or when the
message “SAFE” appears in the display after
the system has been switched on.
Navigation minimum volume - adjusts the
volume of the voice output during route
guidance.
•If you select “Mute” as the navigation min-
imum volume , the voice output will be
switched off.
NoteNote NoteNote
Note
You can also alter the navigation volume by
turning the rotary/pushbutton
00 00
0 to the left (qui-
eter) or to the right (louder) during voice output
for navigation.
GALA - Speed-dependent volume adjustment.
The noise level in your vehicle increases pro-
portionally with increasing driving speed. GALA
regulates the volume in the audio mode (radio,
CD) automatically.
•Select the left-hand column value to switch
GALA off.
Page 17 of 75
RADIO NAVIGATION SYSTEM16
AUDIO
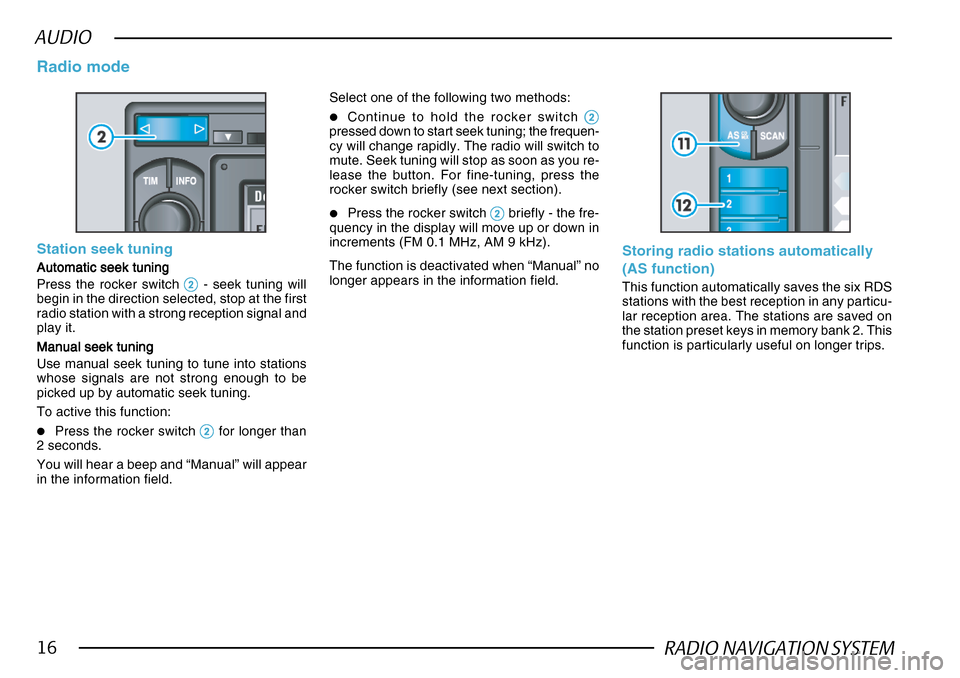
Station seek tuning
Automatic seek tuning
Automatic seek tuning Automatic seek tuning
Automatic seek tuning
Automatic seek tuning
Press the rocker switch
22 22
2 - seek tuning will
begin in the direction selected, stop at the first
radio station with a strong reception signal and
play it.
Manual seek tuning
Manual seek tuning Manual seek tuning
Manual seek tuning
Manual seek tuning
Use manual seek tuning to tune into stations
whose signals are not strong enough to be
picked up by automatic seek tuning.
To active this function:
•Press the rocker switch 22 22
2 for longer than
2 seconds.
You will hear a beep and “Manual” will appear
in the information field.
Radio mode
Select one of the following two methods:
•Continue to hold the rocker switch 22 22
2pressed down to start seek tuning; the frequen-
cy will change rapidly. The radio will switch to
mute. Seek tuning will stop as soon as you re-
lease the button. For fine-tuning, press the
rocker switch briefly (see next section).
•Press the rocker switch 22 22
2 briefly - the fre-
quency in the display will move up or down in
increments (FM 0.1 MHz, AM 9 kHz).
The function is deactivated when “Manual” no
longer appears in the information field.
Storing radio stations automatically
(AS function)
This function automatically saves the six RDS
stations with the best reception in any particu-
lar reception area. The stations are saved on
the station preset keys in memory bank 2. This
function is particularly useful on longer trips.
Page 18 of 75
RADIO NAVIGATION SYSTEM17
AUDIO
For FMFor FM For FMFor FM
For FM
•Press AS !!
!!
! for longer than 2 seconds.
The system will automatically look for and store
the six RDS stations with the strongest recep-
tion signals. “Autostore” will appear in the dis-
play.
After the process has been completed, the
strongest radio station will begin to play.
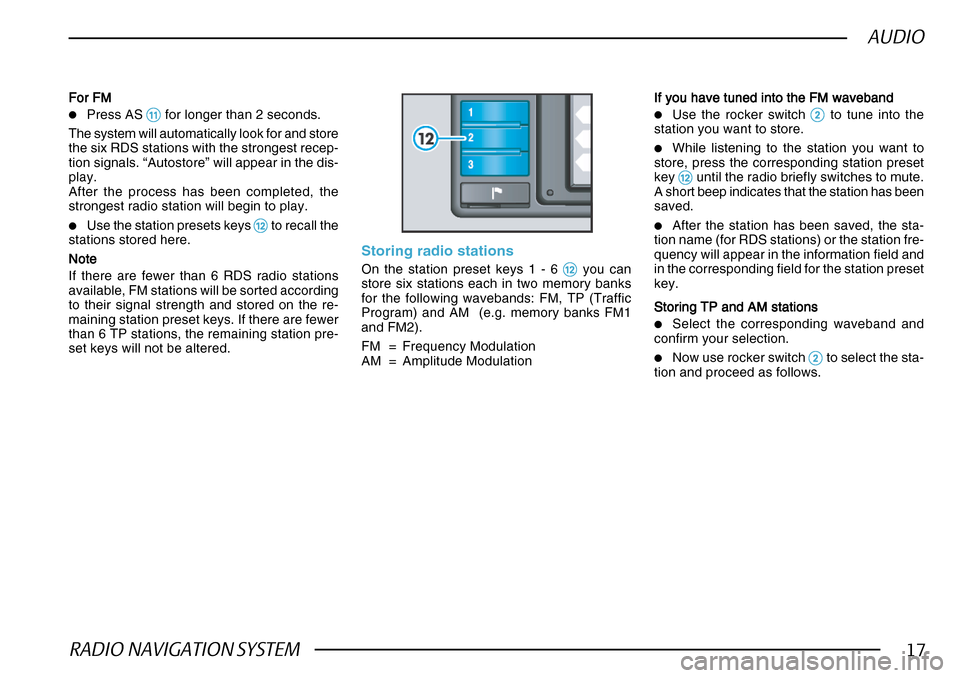
•Use the station presets keys @@ @@
@ to recall the
stations stored here.
NoteNote
NoteNote
Note
If there are fewer than 6 RDS radio stations
available, FM stations will be sorted according
to their signal strength and stored on the re-
maining station preset keys. If there are fewer
than 6 TP stations, the remaining station pre-
set keys will not be altered.
Storing radio stations
On the station preset keys 1 - 6 @@ @@
@ you can
store six stations each in two memory banks
for the following wavebands: FM, TP (Traffic
Program) and AM (e.g. memory banks FM1
and FM2).
FM = Frequency Modulation
AM = Amplitude Modulation
If you have tuned into the FM waveband
If you have tuned into the FM waveband If you have tuned into the FM waveband
If you have tuned into the FM waveband
If you have tuned into the FM waveband
•Use the rocker switch 22 22
2 to tune into the
station you want to store.
•While listening to the station you want to
store, press the corresponding station preset
key
@@ @@
@ until the radio briefly switches to mute.
A short beep indicates that the station has been
saved.
•After the station has been saved, the sta-
tion name (for RDS stations) or the station fre-
quency will appear in the information field and
in the corresponding field for the station preset
key.
Storing TP and AM stations
Storing TP and AM stations Storing TP and AM stations
Storing TP and AM stations
Storing TP and AM stations
•Select the corresponding waveband and
confirm your selection.
•Now use rocker switch 22 22
2 to select the sta-
tion and proceed as follows.
Page 19 of 75
RADIO NAVIGATION SYSTEM18
AUDIO
NotesNotes NotesNotes
Notes
For RDS stations, the regional status is also
saved along with the program name.
The memory will not be deleted if the battery
is disconnected.
Any radio station you tune into is automatically
compared with the stations saved on the sta-
tion preset keys
@@ @@
@ (Autocompare). If the PI
code for RDS stations (see page 18) or the
frequency of stations without RDS is identical,
the corresponding station preset key number
will also appear in the status line (e.g.: “FM1
1 Radio 21”).
The field of the station preset selected is
marked in blue in the radio information display.
Recalling the radio station
To recall a station you have saved , just press
the corresponding station preset key briefly @@ @@
@.
The corresponding program name or the fre-
quency will appear in the information display.
If the frequency is not within reception range,
the system will automatically select a suitable
alternate frequency for the station selected
(best-station function).
NoteNote NoteNote
Note
Just press the key briefly, otherwise you will
save the station you are currently tuned into
on that station preset key.
Scanning the radio stations
You can scan all the stations on a waveband
(TP, FM and AM) one after the other for 10
seconds.
•Use the “Select source” menu to select the
desired waveband.
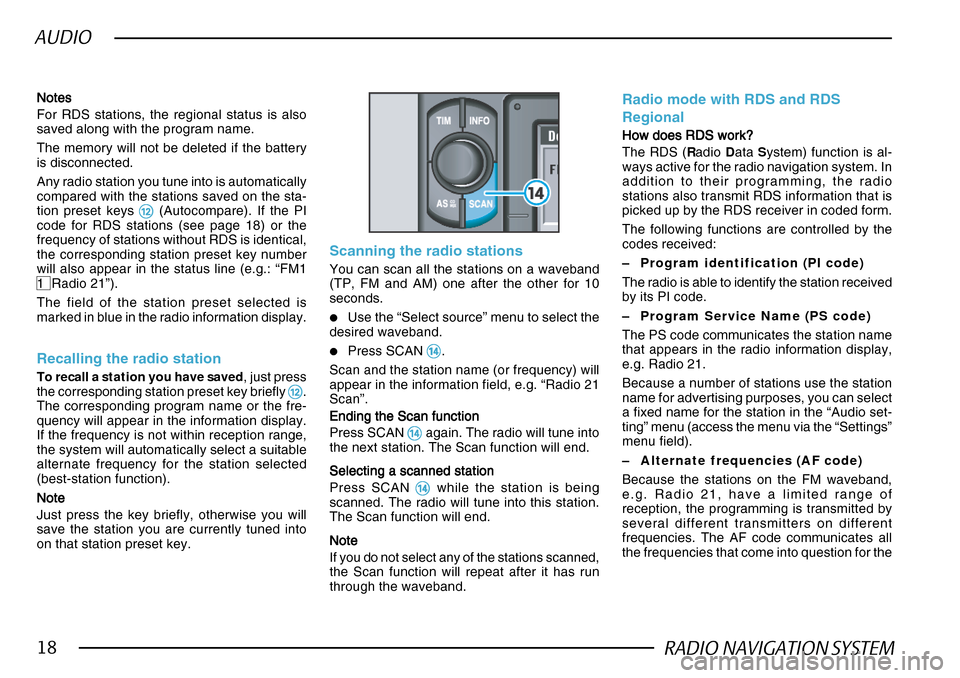
•Press SCAN $$ $$
$.
Scan and the station name (or frequency) will
appear in the information field, e.g. “Radio 21
Scan”.
Ending the Scan function
Ending the Scan function Ending the Scan function
Ending the Scan function
Ending the Scan function
Press SCAN
$$ $$
$ again. The radio will tune into
the next station. The Scan function will end.
Selecting a scanned station
Selecting a scanned station Selecting a scanned station
Selecting a scanned station
Selecting a scanned station
Press SCAN
$$ $$
$ while the station is being
scanned. The radio will tune into this station.
The Scan function will end.
NoteNote NoteNote
Note
If you do not select any of the stations scanned,
the Scan function will repeat after it has run
through the waveband.
Radio mode with RDS and RDS
Regional
How does RDS work?
How does RDS work? How does RDS work?
How does RDS work?
How does RDS work?
The RDS ( Radio Data System) function is al-
ways active for the radio navigation system. In
addition to their programming, the radio
stations also transmit RDS information that is
picked up by the RDS receiver in coded form.
The following functions are controlled by the
codes received:
– Program identification (PI code)
The radio is able to identify the station received
by its PI code.
– Program Service Name (PS code)
The PS code communicates the station name
that appears in the radio information display,
e.g. Radio 21.
Because a number of stations use the station
name for advertising purposes, you can select
a fixed name for the station in the “Audio set-
ting” menu (access the menu via the “Settings”
menu field).
– Alternate frequencies (AF code)
Because the stations on the FM waveband,
e.g. Radio 21, have a limited range of
reception, the programming is transmitted by
several different transmitters on different
frequencies. The AF code communicates all
the frequencies that come into question for the