lights SKODA SUPERB 2006 1.G / (B5/3U) Service Manual
[x] Cancel search | Manufacturer: SKODA, Model Year: 2006, Model line: SUPERB, Model: SKODA SUPERB 2006 1.G / (B5/3U)Pages: 281, PDF Size: 12.67 MB
Page 66 of 281
Lights and Visibility65
Using the systemSafetyDriving TipsGeneral MaintenanceBreakdown assistanceTechnical Data
Windshield wiper and wash system
Windshield wiper
You can operate the windscreen wipers and automatic
wipe/wash using the windscreen wiper lever.
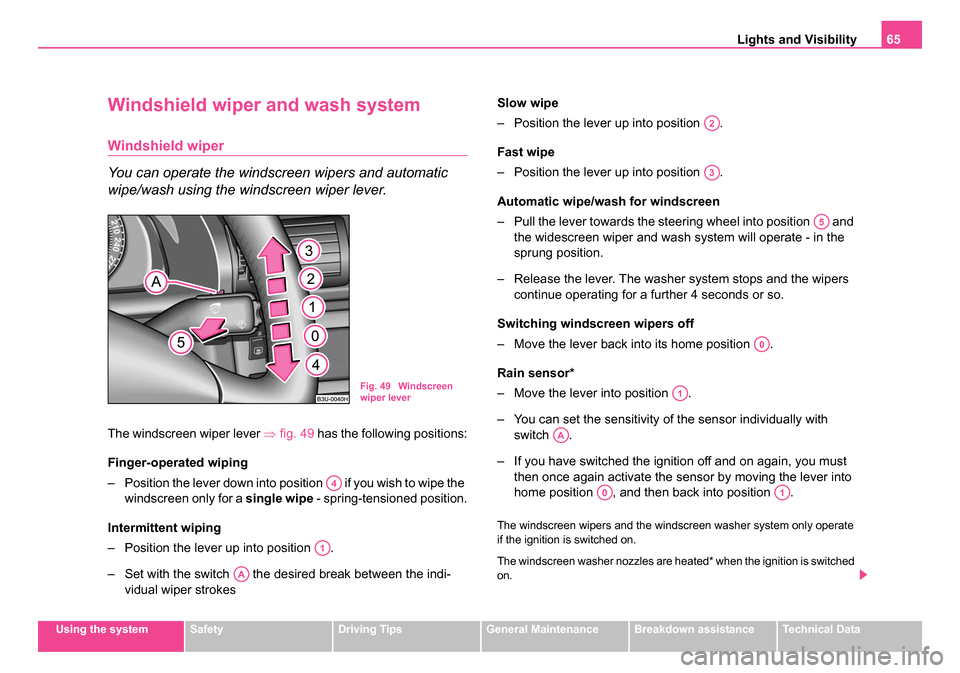
The windscreen wiper lever ⇒fig. 49 has the following positions:
Finger-operated wiping
– Position the lever down into position if you wish to wipe the windscreen only for a single wipe - spring-tensioned position.
Intermittent wiping
– Position the lever up into position .
– Set with the switch the desired break between the indi- vidual wiper strokes Slow wipe
– Position the lever up into position .
Fast wipe
– Position the lever up into position .
Automatic wipe/w
ash for windscreen
– Pull the lever towards the steering wheel into position and the widescreen wiper and wash system will operate - in the
sprung position.
– Release the lever. The washer system stops and the wipers
continue operating for a further 4 seconds or so.
Switching windscreen wipers off
– Move the lever back into its home position .
Rain sensor*
– Move the lever into position .
– You can set the sensitivity of the sensor individually with switch .
– If you have switched the ignition off and on again, you must then once again activate the sensor by moving the lever into
home position , and then back into position .
The windscreen wipers and the windscreen washer system only operate
if the ignition is switched on.
The windscreen washer nozzles are heated* when the ignition is switched
on.
Fig. 49 Windscreen
wiper lever
A4
A1
AA
A2
A3
A5
A0
A1
AA
A0A1
NKO B5 20.book Page 65 Monday, July 3, 2006 2:09 PM
Page 67 of 281

Lights and Visibility
66
The rain sensor* automatically regulates the break between the individual
wiper strokes depending on the intensity of the rain.
Top up with wash liquid ⇒page 233.
WARNING
•Properly maintained windscreen wiper blades are essential for
clear visibility and safe driving ⇒page 67.
•Do not use the windscreen washer system at low temperatures,
without heating the windscreen beforehand. Otherwise the window
cleaner could freeze on the windscreen and restrict the view to the
front.
•The rain sensor only operates as a support. The driver is not
released from the responsibility to set the function of the wind-
screen wipers manually dependi ng on the visibility conditions.
Caution
In frosty weather, please first of all check whether the windscreen wiper
blades are not frozen to the windscreen before switching them on.
Switching on windscreen wipers when the blades are frozen to the wind-
screen may result in damage both to the blades and the motor of the wind-
screen wipers!
Headlight cleaning system*
The headlight lenses are cleaned, when low beam or main beam are
switched on by holding ⇒page 65 the lever for about 2 seconds in the
position .
The headlight washer nozzles are moved forward out of the bumper by the
water pressure for cleaning the headlights.
You should remove stubborn dirt (such as insect residues) from the head-
light lenses at regular intervals, for example when refuelling. Please refer
to the following guidelines ⇒page 209, “The headlight lenses”.
You should remove any snow from the fixtures of the washer nozzles and
clear ice in winter with a de-icing spray in order to ensure proper operation
of the cleaning system.
Fig. 50 Headlight with
washer nozzle
extended
A5
NKO B5 20.book Page 66 Monday, July 3, 2006 2:09 PM
Page 68 of 281

Lights and Visibility67
Using the systemSafetyDriving TipsGeneral MaintenanceBreakdown assistanceTechnical Data
Replacing the wiper blades
Taking off the wiper blade
– Fold windscreen wiper arm out from the windscreen and posi-
tion the wiper blade at right angles to the wiper arm ⇒fig. 51.
– Press the securing spring in the direction of arrow and press the wiper blade to the windscreen at the same time in
the direction of arrow ⇒.
Attaching a wiper blade
– Push the wiper blade onto the wiper arm. The securing spring must click into place audibly.
Wiper blades in proper condition are essential to obtain good visibility.
Wiper blades should not be allowed to become dirtied by dust, insect
remains and preserving wax. Juddering or smearing of the wiper blades could then be due to wax resi-
dues left on the windscreen by vehicle washing in automatic vehicle wash
systems. It is therefore important to
degrease the lips of the wiper blades
after every pass through an automatic vehicle wash system .
WARNING
•If the windscreen wipers are handled carelessly, there is a risk
of damage to the windscreen.
•You should clean the wiper blades regularly with a windscreen
cleaner in order to avoid any smears. Clean a wiper blade with a
sponge or cloth if it is very dirty, for example from insect residues.
•Replace the wiper blades once or twice a year for safety
reasons. We recommend having the windscreen wiper blades
purchased at a Škoda Service Partner.
Rear-view mirror
Manual dimming interior rear-view mirror
Basic setting
– Pull the lever on the bottom edge of the mirror forward.
Dimming mirror
– Pull the lever on the bottom edge of the mirror back.
Fig. 51 Wiper blade for
the windscreen wiper
AA
AB
NKO B5 20.book Page 67 Monday, July 3, 2006 2:09 PM
Page 69 of 281

Lights and Visibility
68
Automatic dimming interior mirror*
Switching on the automatic dimming
– Press the button - the warning light lights up ⇒fig. 52.
Switching off the automatic dimming
– Press again the button - the warning light goes out .
If the automatic dimming is switched on, the mirror dims automatically
depending on the light striking the mirror from the rear. The mirror has no
lever on the bottom edge of the mirror. When the interior lights are
switched on or the reverse gear is engaged, the mirror always moves back
into the basic position.
Note
•Automatic mirror dimming operates only properly if the sun screen* for
the rear window is not in use or the light striking the rear of the interior
rear-view mirror is not affected by other objects.
•Do not affix any stickers in front of the light sensor, so that you do not
impair the automatic dimming function or put it out of operation.
Exterior mirror with entry lighting*
The lighting is positioned on the bottom edge of the exte-
rior mirror.
The light beam is aimed at the entry area of the front doors after the car is
unlocked.
The light comes on after the doors have been locked or on opening the
front door. The lighting goes out about 30 seconds after the doors are
closed or if the ignition is switched on.
If the doors remain open, the lighting goes out automatically after about
10 minutes provided the ignition is not switched on.
Fig. 52 Automatic
dimming interior mirror
ABAA
ABAA
NKO B5 20.book Page 68 Monday, July 3, 2006 2:09 PM
Page 70 of 281
Lights and Visibility69
Using the systemSafetyDriving TipsGeneral MaintenanceBreakdown assistanceTechnical Data
Electrically adjustable rear mirror
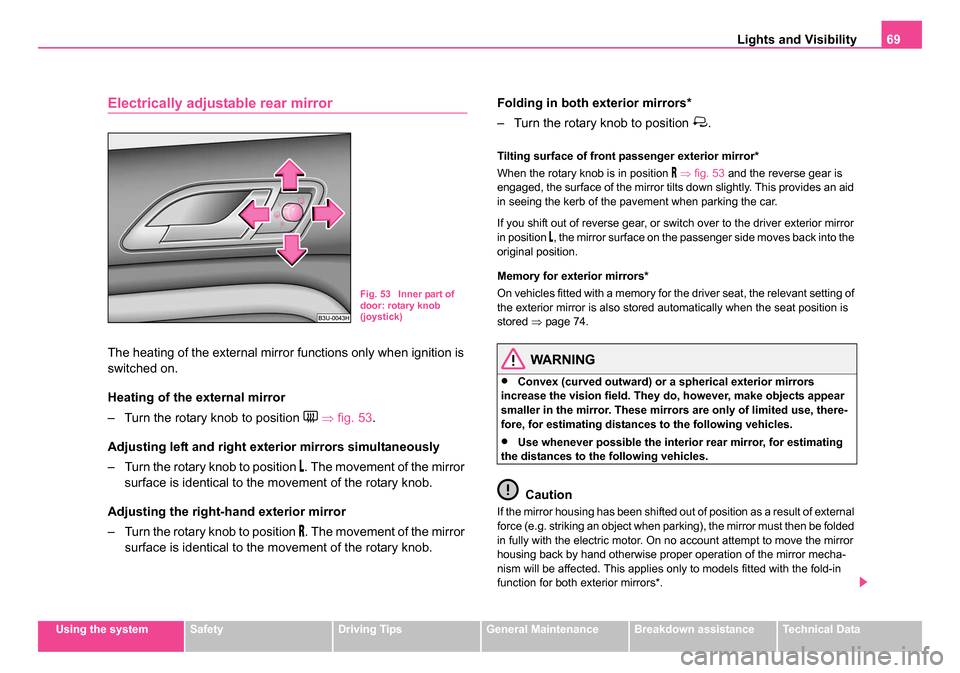
The heating of the external mirror functions only when ignition is
switched on.
Heating of the external mirror
– Turn the rotary knob to position
⇒ fig. 53 .
Adjusting left and right exterior mirrors simultaneously
– Turn the rotary knob to position
. The movement of the mirror
surface is identical to the movement of the rotary knob.
Adjusting the right-hand exterior mirror
– Turn the rotary knob to position
. The movement of the mirror
surface is identical to the movement of the rotary knob. Folding in both exterior mirrors*
– Turn the rotary knob to position
.
Tilting surface of front passenger exterior mirror*
When the rotary knob is in position
⇒ fig. 53 and the reverse gear is
engaged, the surface of the mirror tilts down slightly. This provides an aid
in seeing the kerb of the pavement when parking the car.
If you shift out of reverse gear, or switch over to the driver exterior mirror
in position
, the mirror surface on the passenger side moves back into the
original position.
Memory for exterior mirrors*
On vehicles fitted with a memory for the driver seat, the relevant setting of
the exterior mirror is also stored automatically when the seat position is
stored ⇒page 74.
WARNING
•Convex (curved outward) or a spherical exterior mirrors
increase the vision field. They do, however, make objects appear
smaller in the mirror. These mirrors are only of limited use, there-
fore, for estimating distances to the following vehicles.
•Use whenever possible the interior rear mirror, for estimating
the distances to the following vehicles.
Caution
If the mirror housing has been shifted out of position as a result of external
force (e.g. striking an object when parking), the mirror must then be folded
in fully with the electric motor. On no account attempt to move the mirror
housing back by hand otherwise proper operation of the mirror mecha-
nism will be affected. This applies only to models fitted with the fold-in
function for both exterior mirrors*.
Fig. 53 Inner part of
door: rotary knob
(joystick)
NKO B5 20.book Page 69 Monday, July 3, 2006 2:09 PM
Page 71 of 281
Lights and Visibility
70
Note
•Do not touch the surfaces of the exterior mirrors if the exterior mirror
heater is switched on.
•You can set the exterior mirrors by hand, if the power setting function
fails at any time, by pressing on the edge of the mirror surface.
•Contact your specialist garage if a fault exists with the power setting of
the exterior mirrors.
NKO B5 20.book Page 70 Monday, July 3, 2006 2:09 PM
Page 112 of 281
Heating and air conditioning system 111
Using the systemSafetyDriving TipsGeneral MaintenanceBreakdown assistanceTechnical Data
•Open the air outlet vents 3 and 4 ,
•Switch on the cooling system by pressing button ,
•We recommend that you briefly switch on the recirculated air mode
with the pushbutton .
Optimum cooling
•Turn the control dial to the left up to the stop and the temperature
can then be increased by turning the regulator to the right according to the
prevailing conditions,
•Blower switch in position 1, 2 , or 3;
•Turn the air distribution control into the position ,
•Open the air outlet vents 3 and 4 ,
•Switch on the cooling system by pressing button ,
•We recommend setting the air outlet vents 3 and 4 in such a way that
the air flows to the rear over the heads of the occupants. Do not press
button - recirculated air mode.
Fresh air mode - ventilation
•Turn the control dial ⇒page 109, fig. 107 to the left up to the stop,
•Blower switch in the desired position,
•Turn the air distribution control into the position ,
•Open air outlet vents 3 and 4 ⇒ page 112, fig. 108 ,
•Switch off the cooling by pressing button ,
•Switch off the recirculated air mode by pressing button .
Fresh air is also supplied to the rear footwell if you select air outlet vents
5 with the aid of the air distribution control .
Recirculated air mode
In recirculated air mode air is sucked out of the interior of
the vehicle and then fed back into the interior.
Recirculated air mode prevents polluted air outside the vehicle
from getting into the vehicle, for example when driving through a
tunnel or when standing in a traffic jam.
Switching recircul ated air mode on
– Press switch ⇒page 109, fig. 107 the switch symbol
lights up.
Switching recirculated air mode off
– Press button again, the button symbol
goes out.
Recirculated air mode is switched off automatically or cannot be switched
on, if the air distribution control ⇒page 109, fig. 107 is in position .
WARNING
You should not leave recirculated air mode on over a longer period
of time, as “stale” air may result in fatigue in the driver and occu-
pants, divert your attention and al so cause the windows to mist up.
The risk of having an accident increases. Switch recirculated air
mode off as soon as the windows begin misting up.
AE
AD
AA
AB
AC
AE
AD
AA
AB
AC
AE
AD
AC
AC
NKO B5 20.book Page 111 Monday, July 3, 2006 2:09 PM
Page 117 of 281

Heating and air conditioning system
116
– Set a temperature between +18 °C (64 °F) and +29 °C (86 °F).
Recirculated air mode in ECON mode
– Press the button .
– After this, press the button .
When the ECON mode is operating, ECON appears in the display. ECON
mode operates only within the control temperature range from +18 °C (64
°F) up to +29 °C (86 °F).
Once a temperature has been set, it is maintained constant fully automat-
ically. This is achieved by automatically varying the temperature of the
outflowing air, the blower stages and the air distribution. The system also
takes into account bright sunlight which eliminates the need to alter the
settings manually.
The ECON mode is switched off when pressing button , or .
Please note that, in the ECON mode, the interior temperature cannot be
lower than the outside temperature. The interior is not cooled and the air
is not dehumidified.
If you select the temperature below +18 °C (64 °F), LO appears in the
display. If you select a temperature higher than + 29 °C (86 °F), HI
appears in the display. In the position LO the recirculated air is not
warmed up. In the HI position, the system operates continuously with
maximum heating capacity.
Please refer to the information regarding recirculated air mode
⇒ page 116.
Recirculated air mode
In recirculated air mode air is sucked out of the interior of
the vehicle and then fed back into the interior.
Recirculated air mode prevents polluted air outside the vehicle
from getting into the vehicle, for example when driving through a
tunnel or when standing in a traffic jam.
Switching recirculated air mode on
– Press button , the symbol
lights up on the display.
Switching recirculated air mode off
– Once again press the button or the button , the symbol
goes out on the display.
WARNING
You should not leave recirculated air mode on over a longer period
of time, as “stale” air may result in fatigue in the driver and occu-
pants, divert your attention and al so cause the windows to mist up.
The risk of having an accident increases. Switch recirculated air
mode off as soon as the windows begin misting up.
Note
If the windscreen is misted up, first of all press the button and then
the button . After the windscreen has been demisted, once again press
the button .
ECON
AUTO
AUTO
AUTOAUTO
NKO B5 20.book Page 116 Monday, July 3, 2006 2:09 PM
Page 123 of 281
Starting-off and Driving
122
WARNING
•When driving, the ignition key must always be in the position
(ignition switched on) without the engine running. This position is
indicated by the warning lights coming on. If this is not the case, it
could result in unexpected locking of the steering wheel - risk of
accident!
•Only remove the ignition key from the ignition lock when the
vehicle has come to a standstill (put on the handbrake or select the
selector lever position P). The steering lock can engage immedi-
ately - risk of accident!
•Always withdraw the ignition key if you are going to leave the
vehicle, even for a short time. This is particularly important if chil-
dren are left in the vehicle. The children might otherwise start the
engine or operate electrical equi pment (e.g. power windows) - risk
of injury!
Starting the engine
General
You can only start the engine only using an original ignition
key.
•Place the gearshift lever into neutral (or place the selector lever to the
position P or N in the case of an automatic gearbox) and put on the hand-
brake firmly before starting the engine.
•The clutch pedal should be fully depressed when starting the engine
which means that the starter only has to crank the engine.
•Let go of the key as soon as the engine starts otherwise there may be
damage to the starter. The engine running noises may louder at first be louder for a short time
after starting the cold engine until oil pressure can be built up in the
hydraulic valve clearance compensation. This is quite normal and is not
an operating problem.
If the engine does not start ...
You can use the battery of another vehicle as a jump-start aid
⇒
page 255.
It is only possible to tow-start vehicles fitted with a manual gearbox. The
tow-starting distance must not be more than 50 metres ⇒page 257.
WARNING
•Never run the engine in non ventilated or enclosed areas. The
exhaust gases of the engine contain besides the odorless and
colourless carbon monoxide a poisonous gas - hazard! Carbon
monoxide can cause unconsciousness and death.
•Never leave your vehicle unattended with the engine running.
Caution
•The starter may only be operated (ignition key position ), if the
engine is not running. If the starter is immediately operated after switching
off the engine, the starter or the engine can be damaged.
•Avoid high engine revolutions, full throttle and high engine loads as
long as the engine has not yet reached its normal operating temperature
- risk of damaging the engine!
•Vehicles which are fitted with an exhaust gas catalytic converter
should not be tow-started over a distance of more than 50 metres.
A2
A3
NKO B5 20.book Page 122 Monday, July 3, 2006 2:09 PM
Page 126 of 281

Starting-off and Driving125
Using the systemSafetyDriving TipsGeneral MaintenanceBreakdown assistanceTechnical Data
The reversing lights will come on once reverse gear is engaged, provided
the ignition is on.
WARNING
Never engage the reverse gear when driving - risk of accident!
Note
•One should not lay the hand on the shift lever while driving the vehicle.
The pressure of the hand will be transferred to the gearshift forks in the
gearbox. This can, over a period of time, lead to early wear of the gearshift
forks.
•Depress the clutch pedal fully when changing gears, in order to avoid
unnecessary wear and damage.
Handbrake
Applying the handbrake
– Pull the handbrake lever up fully.
Releasing the handbrake
– Pull the handbrake lever up slightly and at the same time
press in the locking button ⇒fig. 118 .
– Hold the button pressed and push the handbrake lever down fully ⇒ .
The handbrake warning light lights up when the handbrake is applied,
provided the ignition is on.
A warning signal sounds and the following text appears in the display* if
you have inadvertently driven off with the handbrake applied:
"Handbrake on"
The handbrake warning is activated if you drive at a speed of more than 5
km/h for more than 3 seconds.
WARNING
•Please note that the handbrake must be fully released. A hand-
brake which is only partially released can result in the rear brakes
overheating which will have a nega tive effect on the operation of
the brake system - risk of accident! In addition this can result in
premature wear of the rear brake pads.
•Never leave children unattended in the vehicle. The children
might, for example, release the handbrake or take the vehicle out of
gear. The vehicle might then move off - risk of accident!
Fig. 118 Centre
console: Handbrake
NKO B5 20.book Page 125 Monday, July 3, 2006 2:09 PM