lights SKODA SUPERB 2006 1.G / (B5/3U) Repair Manual
[x] Cancel search | Manufacturer: SKODA, Model Year: 2006, Model line: SUPERB, Model: SKODA SUPERB 2006 1.G / (B5/3U)Pages: 281, PDF Size: 12.67 MB
Page 200 of 281

Driving and the Environment199
Using the systemSafetyDriving TipsGeneral MaintenanceBreakdown assistanceTechnical Data
Motoring abroad
General
Other circumstances may exist abroad.
It is also possible, in certain countries, that the Škoda Service Partner
network is limited or has not been established yet. This is the reason why
obtaining certain spare parts may be somewhat complicated and
specialist garage personnel may only be able to make limited repairs.
Škoda Auto a.s. in the Czech Republic and relevant importers are happy
to provide information about technical aspects of the vehicle, required
maintenance work and possibilities for getting repairs done.
Unleaded petrol
A vehicle fitted with a petrol engine must always be refuelled with
unleaded petrol ⇒page 193. The automobile associations can provide
you with information regarding the locations of filling stations which offer
unleaded petrol.
Headlight
The low beam of your headlights is set asymmetrically. It illuminates the
side of the road on which you are driving to a greater extent. If you drive
abroad on the other side of the road, you will dazzle oncoming traffic.
It is necessary in order to avoid dazzling oncoming traffic to stick a sticker
over a certain part of the headlights. Headlight stickers can be obtained as a spare part from the Skoda Service
Partners.
Headlights with Xenon lamps are designed for driving in countries with
traffic on the right or on the left. Have this done always at a Škoda Service
Partner.
Note
You can obtain further information regarding masking over or converting
the headlights from your Škoda Service Partner.
Avoiding damage to your vehicle
When driving on poor roads and lanes or when driving over kerbstones,
steep ramps etc., you must pay particular attention to ensuring that any
low-slung parts of the vehicle, such as spoiler and exhaust, do not touch
the ground and get damaged.
This particularly applies to models with a lowered suspension (sport
suspension) and also when your vehicle is fully laden.
NKO B5 20.book Page 199 Monday, July 3, 2006 2:09 PM
Page 202 of 281
Towing a trailer201
Using the systemSafetyDriving TipsGeneral MaintenanceBreakdown assistanceTechnical Data
be found in your vehicle registrati
on documents or in the brochure -
Technical Data .
Distribution of the load
Distribute the load in the trailer in such a way that any heavy items are
located as close as possible to the axle. Secure the items to prevent them
slipping.
Tyre pressure
Select the tyre inflation pressure on your vehicle for that of “fully laden”,
⇒ page 236. The inflation pressure of the tyres fitted to the trailer adjust
in accordance with the manufacturer's recommendation.
Exterior mirrors
You have to have additional exterior mirrors fitted if you are not able to see
the traffic behind the trailer with the standard rear-view mirrors. Both exte-
rior mirrors should be attached to folding arms. Adjust the mirrors so that
they provide you with an adequate field of view to the rear.
Headlights
Before starting off with a hitched trailer, also check the setting of the head-
lights. Alter the setting as necessary with the aid of the headlight beam
adjuster ⇒page 58.
Detachable ball head
The ball rod is detachable on vehicles which feature a factory-fitted towing
device. It is stowed together with separate fitting instructions in the spare
wheel well in the luggage compartment of the vehicle.
Further information on the towing device ⇒page 202.
Note
•We recommend that you also have your vehicle inspected between
service intervals if you tow a trailer frequently.
•The handbrake on the towing vehicle must be put on when coupling
and decoupling the trailer.
Driving Tips
Particular caution is required when towing a trailer.
– Do not, as far as possible, drive with your vehicle unladen and the trailer laden.
– Do not make full use of the legal maximum speeds. This applies in particular to downhill sections.
– Apply the brakes in good time.
– Keep a check on the coolant temperature gauge if the outside temperature is high.
Distribution of weight
The distribution of the weight is very poor if your vehicle is unladen and
the trailer is laden. Maintain a particularly low speed if you cannot avoid
driving with this combination.
Driving speed
Do not drive faster than 80 km/hour for safety reasons. This also applies
for countries in which higher speeds are allowed.
The fact that the driving stability of the vehicle + trailer combination
reduces with increasing speed means that the legally allowed speed
should not be used when there are unfavourable road, weather or wind
conditions, particularly near accident black spots.
NKO B5 20.book Page 201 Monday, July 3, 2006 2:09 PM
Page 210 of 281

Taking care of your vehicle and cleaning the vehicle 209
Using the systemSafetyDriving TipsGeneral MaintenanceBreakdown assistanceTechnical Data
Caution
Never remove snow or ice from the glass parts with warm or hot water -
risk of formation of cracks in the glass!
The headlight lenses
Please do not use any aggressive cleaning or chemical solvent products
- risk of damage to the plastic lenses Please use soap and clean warm
water.
Caution
Never wipe the headlights dry and do not use any sharp objects for
cleaning the plastic lenses, this may result in damage to the protective
paintwork and consequently in formation of cracks on the headlight
lenses, e.g through effect of chemical products.
Door and window seals
The rubber seals on the doors, boot lid, bonnet and windows remain
supple and last longer if you treat them from time to time with a rubber
care product (e.g. with a silicone-free oil in the spray). You also avoid
premature wear of the seals and prevent leakages in this way. It is also
easier to open the doors. Rubber seals which are well cared for also do
not stick together in cold winter weather.
Locks
We recommend that you use the spray from Škoda original accessories
with regreasing and anticorrosive effect for de-icing locks.
Note
When washing your vehicle, ensure that as little water as possible gets
into the locks.
Wheels
Steel wheels
You should also thoroughly wash the wheels and wheel trims when giving
your vehicle its regular wash. This prevents any brake dust, dirt and road
salt from sticking to the wheel hubs. You can remove stubborn brake abra-
sion adhering to the wheels with an industrial cleaner. Touch up any
damage to the paintwork on the wheels before rust is able to form.
Light alloy wheels
Regular care of light alloy wheels is necessary in order to retain their deco-
rative appearance over long periods. It is particularly important to remove
any road salt and brake abrasion from light alloy wheels every two weeks,
otherwise the surface will suffer. Wash thoroughly and then treat the
wheels with a protective product for light alloy wheels which does not
contain any acidic components. You should provide the wheel hubs with a
hard wax layer every three months. You must not use any products which
cause abrasion when treating the wheel hubs. Any damage to the paint
layer on the wheel hubs must be touched up immediately.
We recommend using a preservative from Škoda genuine accessories
offered by your Škoda dealer.
NKO B5 20.book Page 209 Monday, July 3, 2006 2:09 PM
Page 235 of 281

Inspecting and Replenishing
234
The windshield washer reservoir contains the cleaning fluid for the wind-
screen and for the headlamp cleaning system*. The reservoir is located in
the front left of the engine compartment ⇒fig. 182 .
The reservoir has a capacity of 4 liters.
Clear water is not sufficient to intensively clean the windscreen and head-
lights. We therefore recommend using clean washing water together with
the screen cleaner from Škoda genuine accessories (in winter additionally
with antifreeze) which is capable of removing stubborn dirt. Follow the
instructions for use on the packaging when using screen cleaning prod-
ucts.
You should always add antifreeze to the cleaning water in winter even if
your vehicle is fitted with heated windscreen washer nozzles*.
It is also possible in exceptional cases to use methylated spirits when no
screen cleaner with antifreeze is available. The concentration of methyl-
ated spirits must not be more than 15 %. Please note, however, that the
antifreeze protection at this concentration is only adequate down to -5°C.
WARNING
Read and observe the warning notes ⇒ page 219, “Working in the
engine compartment” before working in the engine compartment.
Caution
•On no account should you add radiator antifreeze or other additives to
the windscreen washer fluid.
•If the vehicle is fitted with headlight cleaning system, you should only
add cleaning products which do not attack the polycarbonate coating of
the headlights to the windscreen washer fluid. Please contact your Škoda
Service Partner, who will tell you which cleaning agent you can use.
Note
Do not take the filter out of the windscreen wash container when filling it
up again with liquid otherwise dirt can get into the liquid transportation
system and can lead to faults in operation of the windscreen wash
system.
NKO B5 20.book Page 234 Monday, July 3, 2006 2:09 PM
Page 249 of 281

Breakdown assistance
248
•Do not drive with this spare wheel at more than 80 km/h - risk of acci-
dent. Avoid accelerating at full throttle, sharp braking and fast cornering.
•The inflation pressure for this spare wheel is identical to the inflation
pressure of the standard tyres.
•Use this spare wheel only to reach the nearest specialist garage as it
is not intended for continuous use.
Changing a wheel
Preliminary work
The following steps should be carried out before actually
changing the wheel.
– If it is necessary to change a wheel, park the vehicle as far away as possible from the traffic flow. The place you choose
should be level.
– Have all the occupants get out. While changing a wheel, the
occupants of the vehicle should not stand on the road (e.g.
behind a crash barrier).
– Apply the handbrake firmly.
– Engage 1st gear or if your vehicle is fitted with an automatic
gearbox, position the selector lever into position P .
– If a trailer is coupled, uncouple it.
– Take the vehicle tool kit and the spare wheel ⇒ page 247
out of the luggage compartment.
WARNING
•If you find yourself in flowing traffic switch on the hazard
warning lights system and place the warning triangle on the side of
the road at the prescribed distance from your vehicle while
observing all national legal provisions. In this way you are
protecting not only yourself but also other road users.
•Never start the engine with the vehicle sitting on the raised jack
- danger of suffering injury!
Caution
If you have to change a wheel on a slope first block the opposite wheel
with a stone or similar object in order to secure the vehicle from unexpect-
edly rolling away.
Note
Comply with the national legal regulations.
Changing a wheel
Always change a wheel on a level surface as far as possible.
– Take off the full wheel trim* ⇒page 249 or the caps
⇒ page 251.
– In the case of light alloy wheels remove the wheel trim cap ⇒page 250.
– Slacken the wheel bolts ⇒page 251.
NKO B5 20.book Page 248 Monday, July 3, 2006 2:09 PM
Page 258 of 281
Breakdown assistance257
Using the systemSafetyDriving TipsGeneral MaintenanceBreakdown assistanceTechnical Data
out the battery being ignited by the strong spark which results from
the engine being started.
•Do not affix the cable end to parts of the fuel and brake
system.
•Run the jump-start cables so that they cannot be caught by any
rotating parts in the engine compartment.
•Do not bend over the batteries - risk of caustic burns!
•The vent screws of the battery cells must be tightened firmly.
•Keep any sources of ignition (naked flame, smouldering ciga-
rettes etc.) away from the battery - risk of an explosion!
Tow-starting and towing vehicle
General
Please pay attention to the following instructions if you are going
to use a tow rope:
Driver of the towing vehicle
– Do not drive off until the tow rope is taught.
– Release the clutch particularly gently when starting off or depress the accelerator particularly gently if your vehicle is
fitted with an automatic gearbox. Driver of the towed vehicle
– Switch the ignition on so that the steering wheel is not blocked
and you can also operate the turn signal lights, the headlight
flasher, the windscreen wipers and windscreen washer
system.
– Take the vehicle out of gear or move the selector lever into position N if your vehicle is fitted with an automatic gearbox.
– Note that the brake servo unit and power steering only operate if the engine is running. You will require significantly greater
physical force to depress the brake pedal and to steer the
vehicle if the engine is not running.
– Ensure that the tow rope is always kept taught.
Tow rope or tow bar
A tow bar is safest way of towing a vehicle and also minimizes any
shocks. You can use a tow rope only if a suitable tow bar is not available.
The tow rope must be elastic to protect the vehicle. Thus one should only
use plastic fibre rope or a rope made out of a similarly elastic material.
Attach the tow rope or the tow bar only to the towing eyes provided for
this purpose ⇒page 258, “Front towing eye” and ⇒page 258, “Rear
towing eye”.
Driving style
Towing another vehicle requires a certain amount of practice. Both drivers
should be familiar with the particular points about towing a vehicle.
Unskilled drivers should not attempt to tow in another vehicle or to be
towed in.
One should be constantly vigilant not to allow impermissibly high towing
forces or jerky loadings. There is always a risk of excessive stresses and
WARNING (continued)
A4
NKO B5 20.book Page 257 Monday, July 3, 2006 2:09 PM
Page 262 of 281
Fuses and light bulbs261
Using the systemSafetyDriving TipsGeneral MaintenanceBreakdown assistanceTechnical Data
Caution
•Never attempt to “repair” fuses and also do not replace them with a
fuse of a higher amperage - risk of fire! This may also cause damage at
another part of the electrical system.
•Have the electrical system checked as quickly as possible by a
specialist garage if a newly inserted fuse blows again after a short time.
Note
We recommend that you have these fuses replaced by a specialist
garage.
Fuse assignment
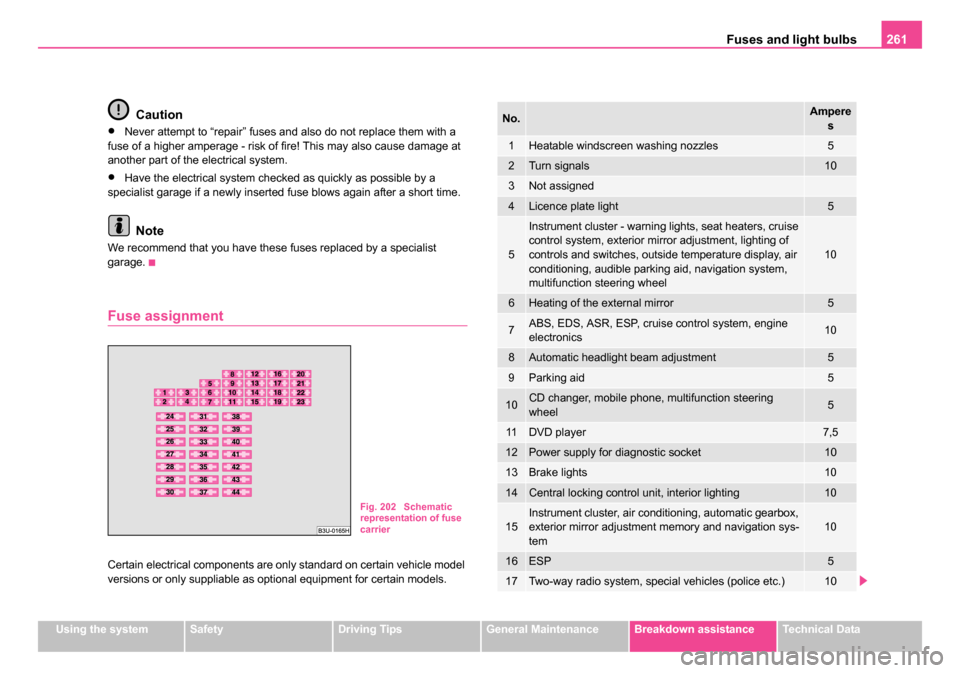
Certain electrical components are only standard on certain vehicle model
versions or only suppliable as optional equipment for certain models.
Fig. 202 Schematic
representation of fuse
carrier
No.Ampere
s
1Heatable windscreen washing nozzles5
2Turn signals10
3Not assigned
4Licence plate light5
5
Instrument cluster - warning lights, seat heaters, cruise
control system, exterior mirror adjustment, lighting of
controls and switches, outside temperature display, air
conditioning, audible parking aid, navigation system,
multifunction steering wheel
10
6Heating of the external mirror5
7ABS, EDS, ASR, ESP, cruise control system, engine
electronics10
8Automatic headlight beam adjustment5
9Parking aid5
10CD changer, mobile phone, multifunction steering
wheel5
11DVD player7,5
12Power supply for diagnostic socket10
13Brake lights10
14Central locking control unit, interior lighting10
15Instrument cluster, air conditioning, automatic gearbox,
exterior mirror adjustment memory and navigation sys-
tem10
16ESP5
17Two-way radio system, special vehicles (police etc.)10
NKO B5 20.book Page 261 Monday, July 3, 2006 2:09 PM
Page 263 of 281
Fuses and light bulbs
262
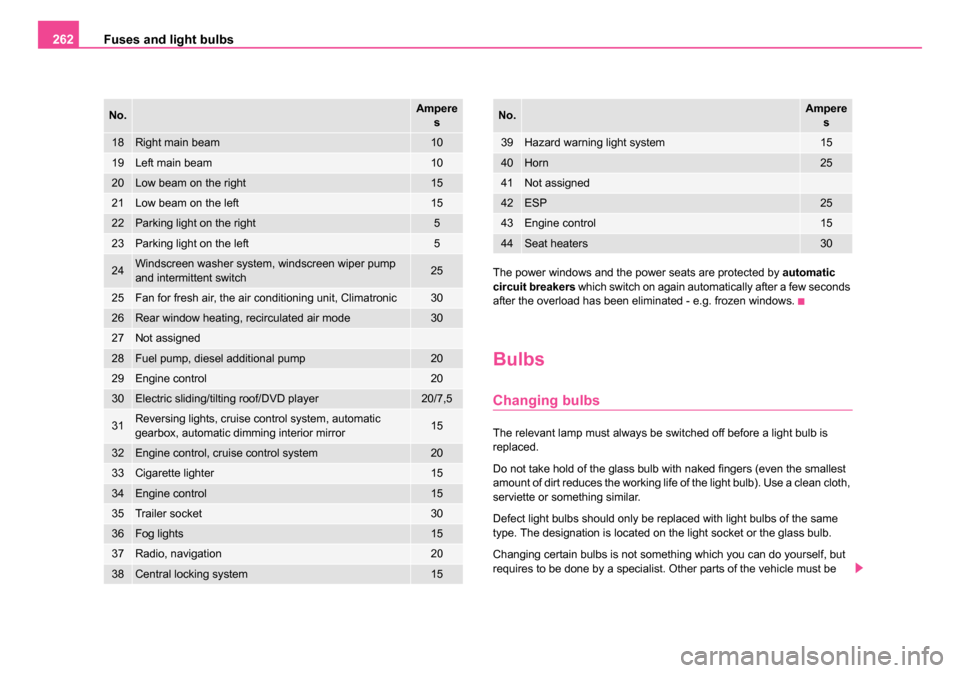
The power windows and the power seats are protected by automatic
circuit breakers which switch on again automatically after a few seconds
after the overload has been eliminated - e.g. frozen windows.
Bulbs
Changing bulbs
The relevant lamp must always be switched off before a light bulb is
replaced.
Do not take hold of the glass bulb with naked fingers (even the smallest
amount of dirt reduces the working life of the light bulb). Use a clean cloth,
serviette or something similar.
Defect light bulbs should only be replaced with light bulbs of the same
type. The designation is located on the light socket or the glass bulb.
Changing certain bulbs is not something which you can do yourself, but
requires to be done by a specialist. Other parts of the vehicle must be
18Right main beam10
19Left main beam10
20Low beam on the right15
21Low beam on the left15
22Parking light on the right5
23Parking light on the left5
24Windscreen washer system, windscreen wiper pump
and intermittent switch25
25Fan for fresh air, the air conditioning unit, Climatronic30
26Rear window heating, recirculated air mode30
27Not assigned
28Fuel pump, diesel additional pump20
29Engine control20
30Electric sliding/tilting roof/DVD player20/7,5
31Reversing lights, cruise control system, automatic
gearbox, automatic dimming interior mirror15
32Engine control, cruise control system20
33Cigarette lighter15
34Engine control15
35Trailer socket30
36Fog lights15
37Radio, navigation20
38Central locking system15
No.Ampere s
39Hazard warning light system15
40Horn25
41Not assigned
42ESP25
43Engine control15
44Seat heaters30
No.Amperes
NKO B5 20.book Page 262 Monday, July 3, 2006 2:09 PM
Page 264 of 281
Fuses and light bulbs263
Using the systemSafetyDriving TipsGeneral MaintenanceBreakdown assistanceTechnical Data
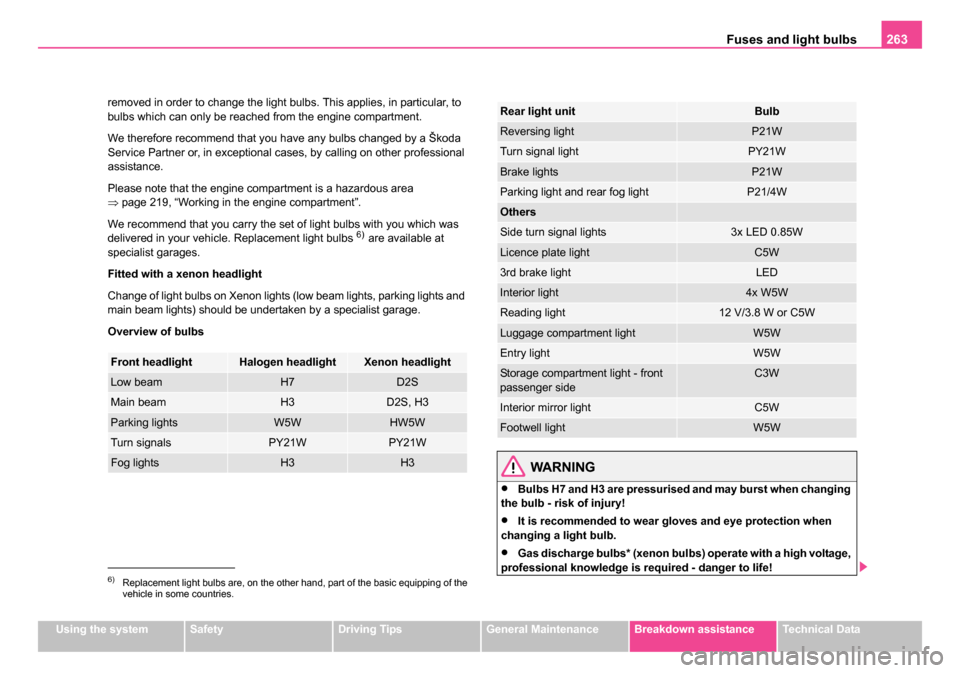
removed in order to change the light bulbs. This applies, in particular, to
bulbs which can only be reached from the engine compartment.
We therefore recommend that you have any bulbs changed by a Škoda
Service Partner or, in exceptional cases, by calling on other professional
assistance.
Please note that the engine compartment is a hazardous area
⇒
page 219, “Working in the engine compartment”.
We recommend that you carry the set of light bulbs with you which was
delivered in your vehicle. Replacement light bulbs
6) are available at
specialist garages.
Fitted with a xenon headlight
Change of light bulbs on Xenon lights (low beam lights, parking lights and
main beam lights) should be undertaken by a specialist garage.
Overview of bulbs
WARNING
•Bulbs H7 and H3 are pressurised and may burst when changing
the bulb - risk of injury!
•It is recommended to wear gloves and eye protection when
changing a light bulb.
•Gas discharge bulbs* (xenon bulbs) operate with a high voltage,
professional knowledge is required - danger to life!
6)Replacement light bulbs are, on the other hand, part of the basic equipping of the
vehicle in some countries.
Front headlightHalogen headlightXenon headlight
Low beamH7D2S
Main beamH3D2S, H3
Parking lightsW5WHW5W
Turn signalsPY21WPY21W
Fog lightsH3H3
Rear light unitBulb
Reversing lightP21W
Turn signal lightPY21W
Brake lightsP21W
Parking light and rear fog lightP21/4W
Others
Side turn signal lights3x LED 0.85W
Licence plate lightC5W
3rd brake lightLED
Interior light4x W5W
Reading light12 V/3.8 W or C5W
Luggage compartment lightW5W
Entry lightW5W
Storage compartment light - front
passenger sideC3W
Interior mirror lightC5W
Footwell lightW5W
NKO B5 20.book Page 263 Monday, July 3, 2006 2:09 PM
Page 266 of 281

Fuses and light bulbs265
Using the systemSafetyDriving TipsGeneral MaintenanceBreakdown assistanceTechnical Data
Luggage compartment light
– Insert a small screwdriver into the slot next to the light
⇒fig. 205 and carefully press out the light.
– Unplug the connector.
– Take the faulty bulb out of the fixture and insert a new one.
– Plug in plug.
– Insert the light first of all on the side opposite the arrow and press it in carefully - until it locks in place.
Interior lights at the front
Fig. 205 Luggage
compartment: Lighting
Fig. 206 Interior lights
at the front for vehicles
without an electric
sliding/tilting roof
Fig. 207 Interior lights
at the front for vehicles
with an electric
sliding/tilting roof
NKO B5 20.book Page 265 Monday, July 3, 2006 2:09 PM