steering SKODA SUPERB 2007 1.G / (B5/3U) User Guide
[x] Cancel search | Manufacturer: SKODA, Model Year: 2007, Model line: SUPERB, Model: SKODA SUPERB 2007 1.G / (B5/3U)Pages: 259, PDF Size: 14.71 MB
Page 86 of 259

Seats and Stowage85
Using the systemSafetyDriving TipsGeneral MaintenanceBreakdown assistanceTechnical Data
Storage compartment for spectacles*
The stowage compartment is located above the front left window.
– The storage compartment is opened by folding it out in the direction
of the arrow ⇒fig. 97 .
WARNING
The storage compartment must always be closed when driving for safety
reasons!
Stowage compartment below steering wheel
You can use this stowage compartment, for example, for inserting the car
documentation.
Stowage compartment in door panel
Fig. 97 Stowage
compartment for specta-
clesFig. 98 Dash panel:
Stowage compartments
below steering wheel
Fig. 99 Stowage
compartment in door
panel
NKO B5 20.book Page 85 Friday, March 2, 2007 1:46 PM
Page 88 of 259

Seats and Stowage87
Using the systemSafetyDriving TipsGeneral MaintenanceBreakdown assistanceTechnical Data
Armrest with stowage compartment
You can use the cover of the compartment as an armrest. The
armrest is adjustable for height and length.
Opening stowage compartment
– Fold out the top cover of the arm rest ⇒fig. 102 .
Closing stowage compartment
– First of all fold the cover of the armrest in the direction of arrow fully to the top ⇒fig. 102 and then to the bottom. Opening cooling air inlet in stowage compartment
– Turn the rotary switch to the left as far as the end position
⇒fig. 103 .
Closing cooling air inlet in stowage compartment
– Turn the rotary switch to the right as far as the end position .
The cooling air flows into the stowage comp artment only when the air conditioning
is in the cooling mode. If the air conditioning is operating in the heating mode or if
you do not wish to use the cooling syst em of the stowage compartment, you can
close the cooling air inlet.
Note
If the armrest is pulled forward, ensure that it does not restrict you when steering
the car.
Rear seat armrest with storage compartment
– You can fold down the armrest to enhance occupant comfort.
The armrest includes a stowage compar tment. You open the compartment by
pressing the button on the front side of the armrest and raising the cover. A drinks
Fig. 102 Armrest
between driver and front
passenger seat
B1Z-0042HB1Z-0042H
Fig. 103 Storage
compartment: Using
cooling system
A1
A2
B1Z-0042HB1Z-0042HFig. 104 Armrest of rear
seats:
NKO B5 20.book Page 87 Friday, March 2, 2007 1:46 PM
Page 100 of 259

Starting-off and Driving99
Using the systemSafetyDriving TipsGeneral MaintenanceBreakdown assistanceTechnical Data
Starting-off and Driving
Setting steering wheel position
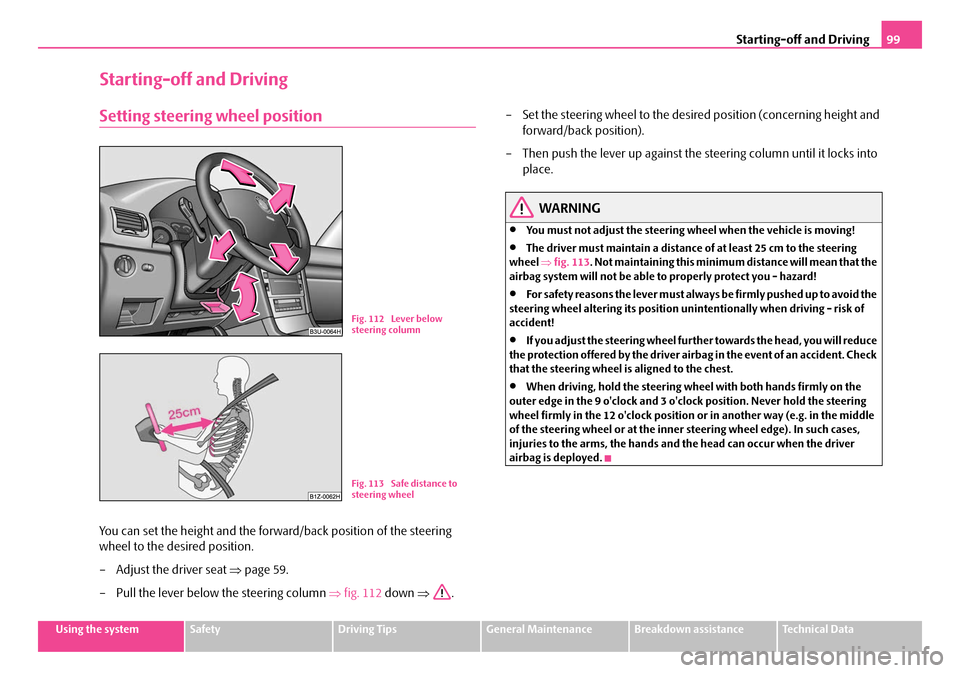
You can set the height and the forw ard/back position of the steering
wheel to the desired position.
– Adjust the driver seat ⇒page 59.
– Pull the lever below the steering column ⇒fig. 112 down ⇒. – Set the steering wheel to the desired position (concerning height and
forward/back position).
– Then push the lever up against the steering column until it locks into place.
WARNING
•You must not adjust the steering wh eel when the vehicle is moving!
•The driver must maintain a distance of at least 25 cm to the steering
wheel ⇒fig. 113 . Not maintaining this minimum distance will mean that the
airbag system will not be able to properly protect you - hazard!
•For s a fe t y re a s ons the le v e r m ust a lwa y s b e fi rm l y pus he d up t o a vo id the
steering wheel altering its position unintentionally when driving - risk of
accident!
•If you adjust the steering wheel furthe r towards the head, you will reduce
the protection offered by the driver airb ag in the event of an accident. Check
that the steering wheel is aligned to the chest.
•When driving, hold the steering wheel with both hands firmly on the
outer edge in the 9 o'clock and 3 o'clock position. Never hold the steering
wheel firmly in the 12 o'clock position or in another way (e.g. in the middle
of the steering wheel or at the inner steering wheel edge). In such cases,
injuries to the arms, the hands and the head can occur when the driver
airbag is deployed.
Fig. 112 Lever below
steering column
Fig. 113 Safe distance to
steering wheel
NKO B5 20.book Page 99 Friday, March 2, 2007 1:46 PM
Page 101 of 259

Starting-off and Driving
100
Ignition lock
Petrol engines
- ignition switched off, engine off
- ignition switched on
- start engine
Diesel engines - fuel supply interrupted, ignition switched off, engine off
- heating glow plugs on, ignition switched on
•You should not switch on any major elec trical components during the heating
period otherwise the vehicle batt ery will be drained unnecessarily.
- start engine
Applies to all models:
Position
To lock the steering , with the ignition key withdrawn, turn the steering wheel until
the steering locking pin is heard to engage. You should always lock the steering as
a general rule if you leave your vehicle. This acts as a deterrent against possible theft
of your vehicle ⇒.
Position Move the steering wheel back and forward a little if the ignition key cannot, or
cannot easily be turned into this position
, in order to release the steering lock.
Position
The engine is started in this position. At the same time switched on low beam or
main beam or other electrical compon ents with major power consumption are
briefly switched off. The ignition key moves back into position when one
releases the key.
The ignition key must be turned back into position each time before starting the
engine again. The starter repeat lock in th e ignition lock prevents the starter being
engaged when the engine is r unning and thus getting damaged.
Ignition key withdrawal lock (automatic gearbox)
You can only withdraw the ignition key after switching off the ignition if the selector
lever is in position P.
WARNING
•When driving, the ignition key must always be in the position (igni-
tion switched on) without the engine running. This position is indicated by
the warning lights coming on. If this is not the case, it could result in unex-
pected locking of the steerin g wheel - risk of accident!
•Only remove the ignition key from the ignition lock when the vehicle has
come to a standstill (put on the handbrake or select the selector lever posi-
tion P). The steering lock can enga ge immediately - risk of accident!
•Always withdraw the ignition key if you are going to leave the vehicle,
even for a short time. This is particularly important if children are left in the
vehicle. The children might otherwise st art the engine or operate electrical
equipment (e.g. power windows) - risk of injury!
Fig. 114 Ignition lock
positions
A1
A2
A3
A1
A2
A3
A1
A2
A3
A2
A1
A2
NKO B5 20.book Page 100 Friday, March 2, 2007 1:46 PM
Page 116 of 259

Communicating and Navigating115
Using the systemSafetyDriving TipsGeneral MaintenanceBreakdown assistanceTechnical Data
Communicating and Navigating
Multifunction steering wheel*
Introduction
The assignment of the pushbuttons in the steering wheel may differ depending on
the vehicle equipment.
The buttons , , and ⇒fig. 126 make it possible to operate the main
functions of the cruise control system, of the radio and mobile phone. Refer to the
more detailed information in the relevant operating instructions.
f the headlights are switched on, the bu ttons in the steering wheel come on.
Operating cruise control system
The cruise control system is operated with the buttons and , but on
version which is also fitted with mobile phone only by button
⇒fig. 126 . Switching on and off
– The cruise control system is
switched on by sliding the switch
⇒ page 106 into the ON position.
– The cruise control system is switched off by sliding the switch fully
to the right into the OFF position.
Storing a speed
– Switch the cruise control system on.
– After the car has reached the desired speed, briefly press the button ⇒ fig. 126 in the position SET-. The car maintains the stored speed
without you having to depress the accelerator pedal.
Changing a stored speed
– You can reduce the stored speed by pressing the button ⇒fig. 126
in the position SET-. If you press and hold the button, the speed of the
car is reduced continuously. Once the car has reached the desired
speed, release the rocker button. The set speed is then stored in the
memory.
– If you release the rocker button when the car is travelling at a speed of
less than 30 km/h, the speed is not stored, the memory is erased. It is
then necessary to again store the speed with the button in the
position SET
after an increase in speed of the vehicle to more than
30 km/h.
–You can increase the stored speed by pressing the button in the
position RES+. Pressing and holding down the slide switch will cause
the speed of the vehicle to be increased continuously. Once the car
has reached the desired speed, release the rocker button. The set
speed is then stored in the memory.
Fig. 126 Multifunction
steering wheel: control
buttons
A1A2A3A4
A1A2
A1
AA
AA
A1
A1
A1
A1
NKO B5 20.book Page 115 Friday, March 2, 2007 1:46 PM
Page 117 of 259

Communicating and Navigating
116
Switching off the cruise control system temporarily
– On the version not fitted with a mobile phone, the cruise control system is switched off temporarily with the button ⇒page 115,
fig. 126 in the position CANCEL, on the version fitted with mobile
phone, by pushing the switch into the intermediate position ahead
of the position OFF ⇒ page 107.
– You can resume the stored speed by pressing the button in the position RES+.
For further methods of temporarily swit ching off the cruise control system
⇒ page 107.
Please refer to the following guidelines ⇒ page 106.
WARNING
First ensure that it is not too high for the traffic conditions which exist at that
moment before resuming the stored speed.
Operating radio and CD player
The radio is operated with buttons and , but on the version fitted
with a mobile phone by buttons , and ⇒page 115, fig. 126 .
Radio
– You can set the radio, cassette player, CD player and radio data system louder or softer by pressing button (positions
and .
– You can search forward or back within the frequency search for different radio stations by pressing button (positions
and ).
Cassette player
– You can run the tape forward or back by pressing the button (posi- tions
and ). CD-player
– You can select the titles forward or back by pressing the button
(positions
and ).
Radio data system (RDS)*
You can select the recorded radio traffic messages by moving forward or back in
stages by pressing th e button (positions
and ).
On the version fitted with mobile phone, you must press button in the position
MODE in order to switch over to the radio mode.
Operating mobile phone
– You can operate the mobile phone with buttons , and
⇒fig. 127 .
– You can switch over from the radio mode to the phone mode (or back again) by pressing the bu tton in the position MODE.
– You can accept or end a telephone call or select from the phonebook
by briefly pressing the button in the position
.
– You can refuse a telephone call by pressing the button in the posi- tion
for more than 2 seconds.
A2
AA
A1
A3A4
A2A3A4
A3
A4
A4
A4
A4
A2
Fig. 127 Multifunction
steering wheel: control
buttons
A2A3A4
A2
A2
A2
NKO B5 20.book Page 116 Friday, March 2, 2007 1:46 PM
Page 118 of 259

Communicating and Navigating117
Using the systemSafetyDriving TipsGeneral MaintenanceBreakdown assistanceTechnical Data
– You can make the volume of the te lephone call louder or softer by
pressing the button in the position
or
– You call scroll through the telephone memory for names by briefly pressing the button in the position
or .
– You can scroll alphabetically upward (A to Z) or downward (Z to A)
within the telephone memory by pressing for some considerable time
the button in the position
and .
If you switch over with the button MODE on the multifunction steering wheel
⇒ page 116, fig. 127 to phone mode and the mobile phone is not in the adapter,
INSERT PHONE appears in the display. After inserting the mobile phone,
PHONE IN appears on the display.
Afterwards PHONE STARTUP appears on the display an d the system transmits the
data from the mobile phone to the information display. The following is shown one
after the other on the display:
•DIALED CALLS LOADING: xxx
•RCVD CALLS LOADING: xxx
•MISSED CALLS LOADING: xxx
•PHONEBOOK LOADING
One cannot scroll through the phonebook du ring data transfer out of the mobile
phone. After the data transfer has ended, the first name out of the phonebook is
shown on the display
You can scroll through the individual menus by pressing the button in the posi-
tion
or ⇒ page 116, fig. 127 .
Select the entry you want by pressi ng the button in the position
.
You will reach one level higher in the me nu by pressing the button in the posi-
tion MODE .
In the main menu you can select the following entries:
•PHONEBOOK
•SETUP
•LAST CALLS
•RECEIVED CALLS
•MISSED CALLS
In the menu SETUP you can select the following entries:
•LANGUAGE - Here you can set in which la nguage the messages should be
displayed. You can select one of the following languages: Czech, English, German,
Italian, French, Spanish. The set language is displayed inversely.
•MEMORY - Here you can set which telephon e memory should be transmitted
into the information display after insertin g the mobile phone in the adapter. You
can choose between the phonebook PHONE PHONEBOOK and the memory of
the SIM card SIM PHONEBOOK The set memory is displayed inversely.
•Certain mobile phones do not have any phone phonebook, but only a phone-
book in the memory of the SIM card.
•Overview of the next possible functions and read outs:
A3
A4
A4
A4
A2
A2
ActivityRead out in display
Selected call numberCALLING name
or
CALLING number
accepted callCALL name or
CALL number
or
CALL
Call rejectedCALL REJECTED
Call terminatedEND OF CALL
Number engagedLINE ENGAGED
No service foundNO SERVICE
Enter PIN codeENTER PIN CODE
NKO B5 20.book Page 117 Friday, March 2, 2007 1:46 PM
Page 119 of 259

Communicating and Navigating
118
Note
•If the setting of the memory is changed, you must take the mobile phone out of
the adapter and insert it again in order to transmit the data from the newly set
memory into the information display.
•If you do not operate the mobile phone (do not scroll in the memory, do no call,
etc.) it switches automatically ov er to radio mode after 60 seconds.
•If you switch the ignition off and leave the mobile phone inserted in the adapter,
the system switches off automaticall y the mobile phone after 30 minutes.
•If you have stored in the phonebook name s with special characters (ticks, lines
etc.), the special characters will not alwa ys be correctly displayed on the informa-
tion display.
•The function of the convenience operating feature with the buttons on the
multifunction steering wheel is not available on all mobile phones and adapters.
Please contact your Škoda Service Partner, who will tell you which adapter and
which mobile phone you can use.
CD changer*
Take out and insert CD magazine
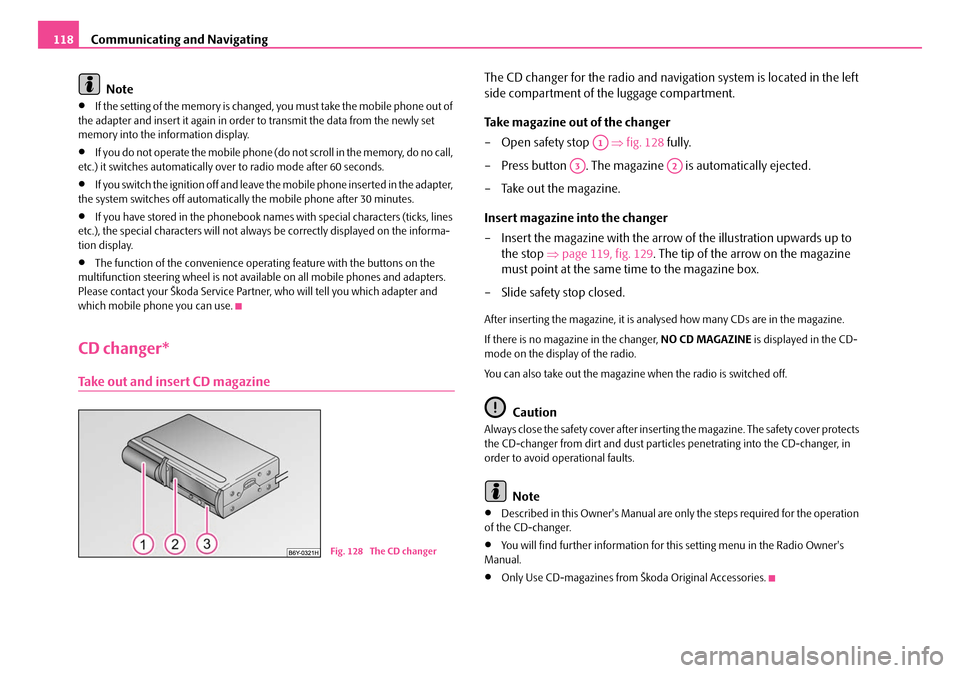
The CD changer for the radio and navigation system is located in the left
side compartment of the luggage compartment.
Take magazine out of the changer
– Open safety stop ⇒fig. 128 fully.
– Press button . The magazine is automatically ejected.
– Take out the magazine.
Insert magazine into the changer
– Insert the magazine with the arrow of the illustration upwards up to the stop ⇒page 119, fig. 129 . The tip of the arrow on the magazine
must point at the same time to the magazine box.
– Slide safety stop closed.
After inserting the magazine, it is analysed how many CDs are in the magazine.
If there is no magazine in the changer, NO CD MAGAZINE is displayed in the CD-
mode on the display of the radio.
You can also take out the magazine when the radio is switched off.
Caution
Always close the safety cover after insertin g the magazine. The safety cover protects
the CD-changer from dirt and dust partic les penetrating into the CD-changer, in
order to avoid operational faults.
Note
•Described in this Owner's Manual are only the steps required for the operation
of the CD-changer.
•You will find further information for this setting menu in the Radio Owner's
Manual.
•Only Use CD-magazines from Škoda Original Accessories.
Fig. 128 The CD changer
A1
A3A2
NKO B5 20.book Page 118 Friday, March 2, 2007 1:46 PM
Page 126 of 259

Passive Safety125
Using the systemSafetyDriving TipsGeneral MaintenanceBreakdown assistanceTechnical Data
Safety
Passive Safety
Basic information
Driving the safe way
Passive safety measures reduce the risk of injury in accident situa-
tions.
In this section you will find important inform ation, tips and notes on the subject of
passive safety in your vehicle. We ha ve combined everything here which you
should be familiar with, for example, regarding seat belts, airbags, child seats and
safety of children. It is therefore importan t, in particular, to comply with the notes
and warnings in this section for your own interest and in the interest of those trav-
elling with you.
WARNING
•This chapter contains important information on how to use the vehicle
for the driver and his occupants. You will find further information on safety,
which concerns you and those travelling with you, in the following chapters
of this Owner's Manual.
•The complete on-board literature should always be in the vehicle. This
applies in particular, if you rent out or sell the vehicle.
Safety equipment
The safety equipment is part of the occupant protection and it can
reduce the risk of injuries in accident situations.
“Do not put at risk” your safety and the safety of those travelling with you . In the
event of an accident, the safety equipmen t can reduce the risk of injuries. The
following list contains part of th e safety equipment in your vehicle:
•Three-point seat belts for all the seats,
•belt force limiter for front and side rear seats,
•belt tensioner for front and side rear seats,
•seat belt height adjuster for front seats,
•front airbags,
•side airbags,
•head airbags*,
•anchoring points for child seat using the “ISOFIX” system,
•head restraint adjustable for height,
•adjustable steering column.
The specified safety equipment works toge ther, in order to optimally protect you
and those travelling with you in accident situations. The safety equipment does not
protect you or the people travelling with you, if you or your occupants adopt an
incorrect seated position or the equipmen t is not correctly adjusted or used.
Fo r t h i s re a s o n y o u w i l l b e p ro v i d e d w i th i n fo rm a ti o n o n w hy t h i s e q u i p m e nt i s v e r y
important, how it protects you and the o ccupants, what should be observed when
using the equipment and how you and the pe ople travelling with you can make full
use of the existing safety equipment. This Owner's Manual contains important
warning notes, which you and those travelli ng with you should pay attention to in
order to reduce a risk of injury.
Safety concerns everybody!
NKO B5 20.book Page 125 Friday, March 2, 2007 1:46 PM
Page 128 of 259

Passive Safety127
Using the systemSafetyDriving TipsGeneral MaintenanceBreakdown assistanceTechnical Data
Correct seated position
Correct seated position for the driver
Correct seated position for the driver is important for safe and
relaxed driving.
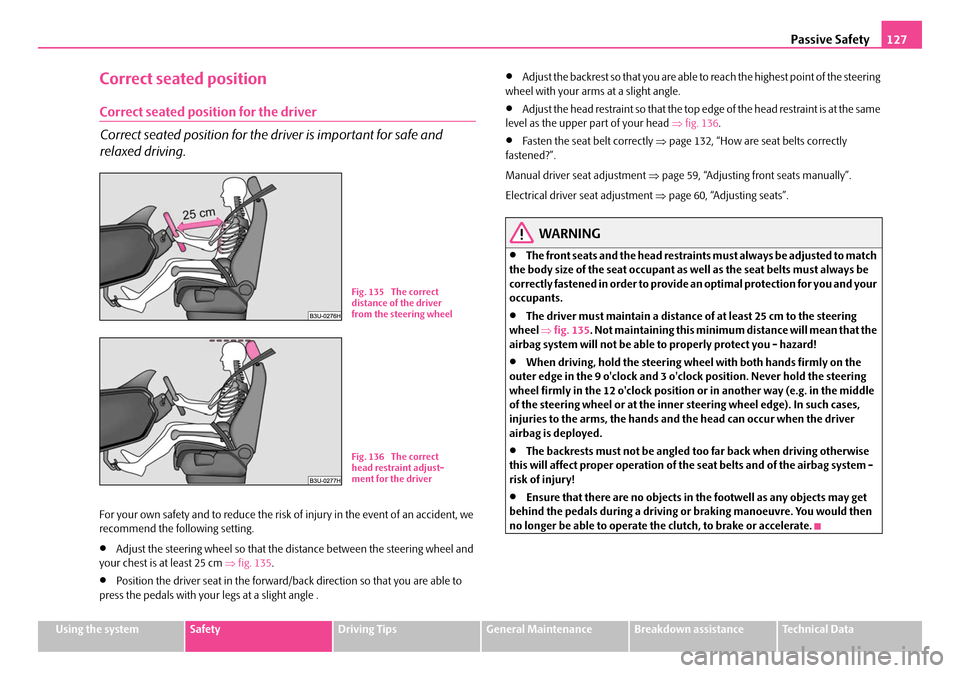
For your own safety and to reduce the risk of injury in the event of an accident, we
recommend the following setting.
•Adjust the steering wheel so that the distance between the steering wheel and
your chest is at least 25 cm ⇒fig. 135 .
•Position the driver seat in the forward/back direction so that you are able to
press the pedals with your legs at a slight angle .
•Adjust the backrest so that you are able to reach the highest point of the steering
wheel with your arms at a slight angle.
•Adjust the head restraint so that the top edge of the head restraint is at the same
level as the upper part of your head ⇒ fig. 136.
•Fasten the seat belt correctly ⇒page 132, “How are seat belts correctly
fastened?”.
Manual driver seat adjustment ⇒page 59, “Adjusting front seats manually”.
Electrical driver seat adjustment ⇒ page 60, “Adjusting seats”.
WARNING
•The front seats and the head restraints must always be adjusted to match
the body size of the seat occupant as well as the seat belts must always be
correctly fastened in order to provide an optimal protection for you and your
occupants.
•The driver must maintain a distance of at least 25 cm to the steering
wheel ⇒fig. 135 . Not maintaining this minimum distance will mean that the
airbag system will not be able to properly protect you - hazard!
•When driving, hold the steering wheel with both hands firmly on the
outer edge in the 9 o'clock and 3 o'clock position. Never hold the steering
wheel firmly in the 12 o'clock position or in another way (e.g. in the middle
of the steering wheel or at the inner steering wheel edge). In such cases,
injuries to the arms, the hands and the head can occur when the driver
airbag is deployed.
•The backrests must not be angled to o far back when driving otherwise
this will affect proper operation of the seat belts and of the airbag system -
risk of injury!
•Ensure that there are no objects in the footwell as any objects may get
behind the pedals during a driving or braking manoeuvre. You would then
no longer be able to operate the clutch, to brake or accelerate.
Fig. 135 The correct
distance of the driver
from the steering wheel
Fig. 136 The correct
head restraint adjust-
ment for the driver
NKO B5 20.book Page 127 Friday, March 2, 2007 1:46 PM