service SKODA SUPERB 2007 1.G / (B5/3U) Owner's Guide
[x] Cancel search | Manufacturer: SKODA, Model Year: 2007, Model line: SUPERB, Model: SKODA SUPERB 2007 1.G / (B5/3U)Pages: 259, PDF Size: 14.71 MB
Page 63 of 259

Seats and Stowage
62
Note
•When storing settings with the memory buttons, we recommend that you begin
with the front button and assign a memory button to each additional driver.
•Each new setting stored with the same button erases the previous setting.
•Each time you store the seat and exterior mirror settings for driving forward you
also have to re-store the individual settin g of the exterior mirror on the passenger
side for reversing.
Assigning remote control to the memory buttons
After storing the settings of the seat and exterior mirrors, you have 10
seconds in order to assign the remote control to the appropriate memory
button.
– Withdraw the ignition key.
– Press the release button ⇒page 38 and hold it pressed for 1 second
until an audible signal confirms th at the setting has been stored. The
setting is stored with the memory button which you have selected.
If you wish to be able to retrieve the settings which are stored in the memory by also
using the remote control, you have to assign the remote control to a memory
button in each case.
We recommend that you assign one of the two remote controls supplied with your
car, to the front memory button, and the other remote control key to the middle
memory button.
If you wish, you can obtain an additional key with radio remote control from a
Škoda Service Partner and then assign the radio remote control to the rear memory
button.
Note
•If the remote control had previously been assigned to another memory button,
this setting is then erased by the new assignment.
•If you assign the remote control to a memory button which has already been
assigned to a remote control, the old assignment is also replaced by a new assign-
ment in this case.
•The assignment of the remote control to a memory button is retained, however,
after reassigning the seats and exterior mirrors.
Retrieving seat and exterior mirror settings for driving forward
You can retrieve the stored settings either with the memory buttons
or with the remote control*.
Retrieving settings with memory buttons
– For safety reasons, you can only retr ieve the seat and mirror settings if
the ignition is switched off. You have a choice of two different ways of
retrieving the settings:
– One-touch automatic memory: with the driver door open, operate
the desired memory button ⇒page 61, fig. 55 with one-touch.
The seat and the exterior mirrors now move automatically into the
stored position.
– Memory keying: with the driver door open or closed, press and hold
the desired memory button until the seat and the exterior mirrors
have moved into the stored position.
Retrieving settings with remote control
– If the driver door is closed and the ignition is switched off, briefly press the unlock button of the remote control ⇒page 38 and then open the
door.
– The seat and exterior mirrors now move automatically into the stored
positions.
AD
AD
NKO B5 20.book Page 62 Friday, March 2, 2007 1:46 PM
Page 78 of 259

Seats and Stowage77
Using the systemSafetyDriving TipsGeneral MaintenanceBreakdown assistanceTechnical Data
Lowering folding box
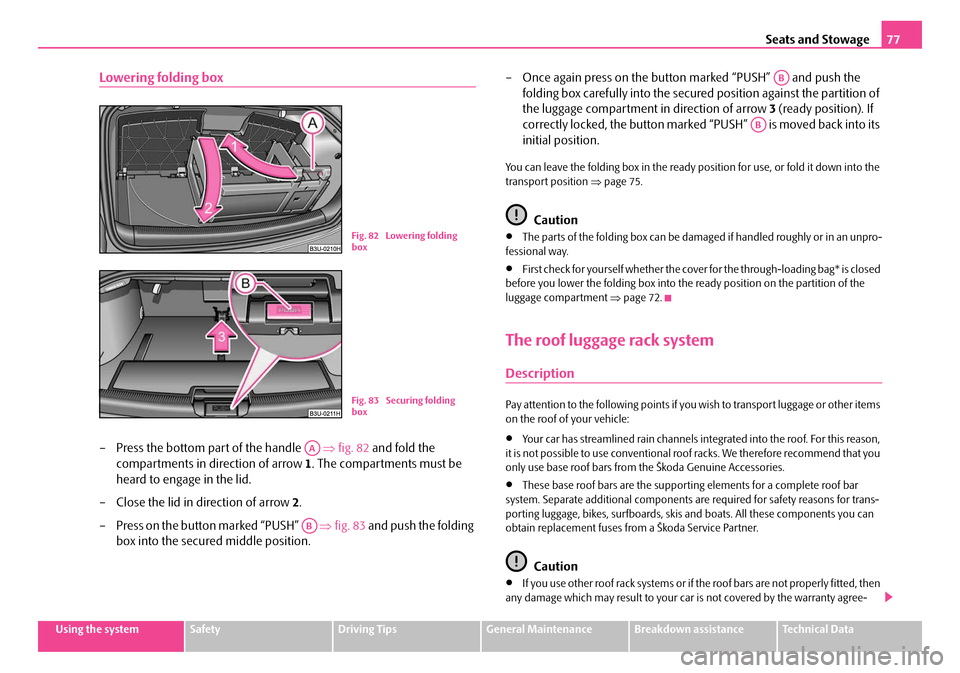
– Press the bottom part of the handle ⇒fig. 82 and fold the
compartments in direction of arrow 1. The compartments must be
heard to engage in the lid.
– Close the lid in direction of arrow 2.
– Press on the button marked “PUSH” ⇒fig. 83 and push the folding
box into the secured middle position. – Once again press on the button marked “PUSH” and push the
folding box carefully into the secured position against the partition of
the luggage compartment in direction of arrow 3 (ready position). If
correctly locked, the button marked “PUSH” is moved back into its
initial position.
You can leave the folding box in the ready position for use, or fold it down into the
transport position ⇒page 75.
Caution
•The parts of the folding box can be dama ged if handled roughly or in an unpro-
fessional way.
•First check for yourself whether the cover for the through-loading bag* is closed
before you lower the folding box into the ready position on the partition of the
luggage compartment ⇒page 72.
The roof luggage rack system
Description
Pay attention to the following points if yo u wish to transport luggage or other items
on the roof of your vehicle:
•Your car has streamlined rain channels in tegrated into the roof. For this reason,
it is not possible to use conventional r oof racks. We therefore recommend that you
only use base roof bars from the Škoda Genuine Accessories.
•These base roof bars are the supporti ng elements for a complete roof bar
system. Separate additional components are required for safety reasons for trans-
porting luggage, bikes, surfboards, skis and boats. All these components you can
obtain replacement fuses from a Škoda Service Partner.
Caution
•If you use other roof rack sy stems or if the roof bars are not properly fitted, then
any damage which may result to your ca r is not covered by the warranty agree-
B1Z-0042HB1Z-0042HFig. 82 Lowering folding
box
B1Z-0042HB1Z-0042HFig. 83 Securing folding
box
AA
AB
AB
AB
NKO B5 20.book Page 77 Friday, March 2, 2007 1:46 PM
Page 99 of 259

Heating and air conditioning system
98
Switching Climatronic system off
If the symbols in the display flash for about 15 seconds after the igni-
tion is switched on, switch the Clim atronic system off as this indicates
an operational fault.
– Continue pressing the button until OFF is shown in the display
⇒ .
– Drive to the nearest Škoda Service Partner and have the Climatronic system checked.
WARNING
•If the Climatronic system is switched off (OFF), there is no supply of fresh
air from the outside. “Stale air” may result in fatigue in the driver and occu-
pants, reduce attention levels and also cause the windows to mist up. The
risk of having an accident increases.
•Do not switch the Climatronic system off for longer than necessary.
NKO B5 20.book Page 98 Friday, March 2, 2007 1:46 PM
Page 118 of 259

Communicating and Navigating117
Using the systemSafetyDriving TipsGeneral MaintenanceBreakdown assistanceTechnical Data
– You can make the volume of the te lephone call louder or softer by
pressing the button in the position
or
– You call scroll through the telephone memory for names by briefly pressing the button in the position
or .
– You can scroll alphabetically upward (A to Z) or downward (Z to A)
within the telephone memory by pressing for some considerable time
the button in the position
and .
If you switch over with the button MODE on the multifunction steering wheel
⇒ page 116, fig. 127 to phone mode and the mobile phone is not in the adapter,
INSERT PHONE appears in the display. After inserting the mobile phone,
PHONE IN appears on the display.
Afterwards PHONE STARTUP appears on the display an d the system transmits the
data from the mobile phone to the information display. The following is shown one
after the other on the display:
•DIALED CALLS LOADING: xxx
•RCVD CALLS LOADING: xxx
•MISSED CALLS LOADING: xxx
•PHONEBOOK LOADING
One cannot scroll through the phonebook du ring data transfer out of the mobile
phone. After the data transfer has ended, the first name out of the phonebook is
shown on the display
You can scroll through the individual menus by pressing the button in the posi-
tion
or ⇒ page 116, fig. 127 .
Select the entry you want by pressi ng the button in the position
.
You will reach one level higher in the me nu by pressing the button in the posi-
tion MODE .
In the main menu you can select the following entries:
•PHONEBOOK
•SETUP
•LAST CALLS
•RECEIVED CALLS
•MISSED CALLS
In the menu SETUP you can select the following entries:
•LANGUAGE - Here you can set in which la nguage the messages should be
displayed. You can select one of the following languages: Czech, English, German,
Italian, French, Spanish. The set language is displayed inversely.
•MEMORY - Here you can set which telephon e memory should be transmitted
into the information display after insertin g the mobile phone in the adapter. You
can choose between the phonebook PHONE PHONEBOOK and the memory of
the SIM card SIM PHONEBOOK The set memory is displayed inversely.
•Certain mobile phones do not have any phone phonebook, but only a phone-
book in the memory of the SIM card.
•Overview of the next possible functions and read outs:
A3
A4
A4
A4
A2
A2
ActivityRead out in display
Selected call numberCALLING name
or
CALLING number
accepted callCALL name or
CALL number
or
CALL
Call rejectedCALL REJECTED
Call terminatedEND OF CALL
Number engagedLINE ENGAGED
No service foundNO SERVICE
Enter PIN codeENTER PIN CODE
NKO B5 20.book Page 117 Friday, March 2, 2007 1:46 PM
Page 119 of 259

Communicating and Navigating
118
Note
•If the setting of the memory is changed, you must take the mobile phone out of
the adapter and insert it again in order to transmit the data from the newly set
memory into the information display.
•If you do not operate the mobile phone (do not scroll in the memory, do no call,
etc.) it switches automatically ov er to radio mode after 60 seconds.
•If you switch the ignition off and leave the mobile phone inserted in the adapter,
the system switches off automaticall y the mobile phone after 30 minutes.
•If you have stored in the phonebook name s with special characters (ticks, lines
etc.), the special characters will not alwa ys be correctly displayed on the informa-
tion display.
•The function of the convenience operating feature with the buttons on the
multifunction steering wheel is not available on all mobile phones and adapters.
Please contact your Škoda Service Partner, who will tell you which adapter and
which mobile phone you can use.
CD changer*
Take out and insert CD magazine
The CD changer for the radio and navigation system is located in the left
side compartment of the luggage compartment.
Take magazine out of the changer
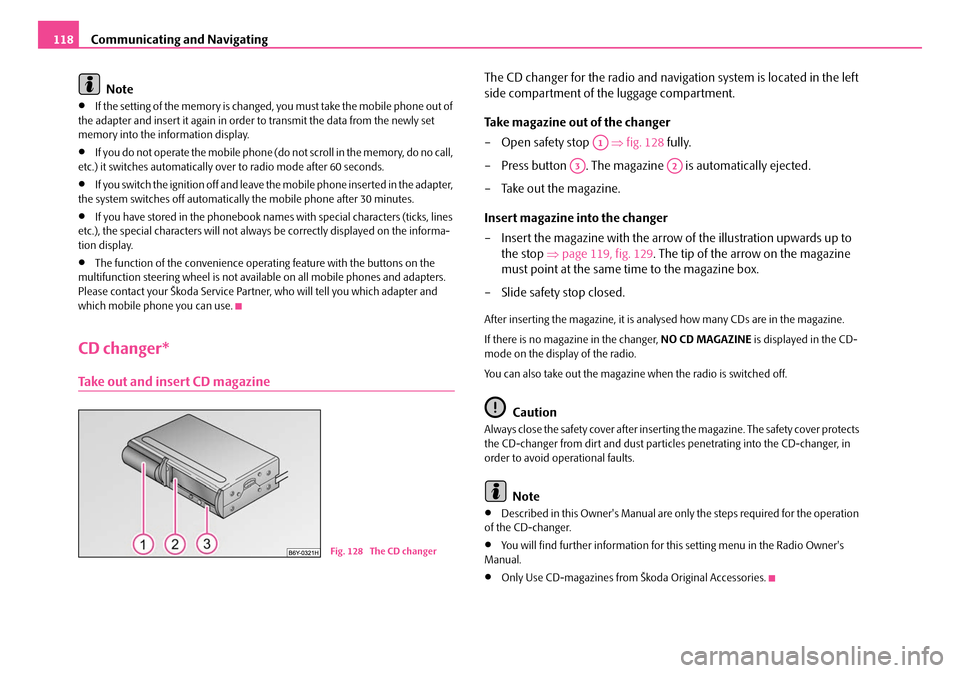
– Open safety stop ⇒fig. 128 fully.
– Press button . The magazine is automatically ejected.
– Take out the magazine.
Insert magazine into the changer
– Insert the magazine with the arrow of the illustration upwards up to the stop ⇒page 119, fig. 129 . The tip of the arrow on the magazine
must point at the same time to the magazine box.
– Slide safety stop closed.
After inserting the magazine, it is analysed how many CDs are in the magazine.
If there is no magazine in the changer, NO CD MAGAZINE is displayed in the CD-
mode on the display of the radio.
You can also take out the magazine when the radio is switched off.
Caution
Always close the safety cover after insertin g the magazine. The safety cover protects
the CD-changer from dirt and dust partic les penetrating into the CD-changer, in
order to avoid operational faults.
Note
•Described in this Owner's Manual are only the steps required for the operation
of the CD-changer.
•You will find further information for this setting menu in the Radio Owner's
Manual.
•Only Use CD-magazines from Škoda Original Accessories.
Fig. 128 The CD changer
A1
A3A2
NKO B5 20.book Page 118 Friday, March 2, 2007 1:46 PM
Page 121 of 259

Communicating and Navigating
120
Fa u lt d i sp la y s
On the radio display the following fault displays can be displayed:
•NO CD CHANGER - CD-changer is not co nnected to the magazine.
•NO CD MAGAZINE - no magazine in the CD-changer.
•NO CD - the selected compartment in the magazine of the CD-changer is
empty.
•SURFACE - in the selected compartment the CD with playback side is inserted
upwards.
Tips for operating the CD-changer
Please pay attention to the following notes for operating the CD-changer.
•Only clean CDs without scratches and damages should be used, in order to
guarantee a proper, high-quality CD-playback.
•Affix no labels to the CDs.
•Always store non-used CDs in the CD-s torage from the Škoda genuine accesso-
ries provided for this as well as in the original folding box.
•Never expose CDs to direct sun rays.
•Use a soft, non-fluffy cloth to clean the CDs. Wipe the CD straight-lined from
the middle to the outside. Strong dirt mu st be eliminated with usual CD-cleaner.
•Please never use liquids such as gasoline , paint thinner or disk cleaner, other-
wise the surface of the CD could get damaged.
Precaution measures for laser equipment
Laser equipment is classifi ed according to DIN IEC 76 (CO) 6/VDE 0837 in the
safety categories 1 - 4.
The Škoda CD-changer correspond s to the safety category 1. The laser used for equipment of category 1 is to such an extent energy-poor and/or
shielded that there is no risk of danger
when used in accordance with the regula-
tion.
WARNING
Please always pay full attention to the traffic situation around you!
Note
Do not remove the equipment cover. The equipment does not contain any parts,
which can be serviced by the user.
Warranty
The same guarantee conditions apply for our factory-fitted radio system as for new
vehicles.
Note
A damage in the sense of the warranty must not be the result from improper
handling of the system or from unprofes sional repair attempts. In addition, no
external damage must be present.
NKO B5 20.book Page 120 Friday, March 2, 2007 1:46 PM
Page 123 of 259

Communicating and Navigating
122
– First insert the adapter without the mobile phone into the mount in the direction of arrow ⇒page 121, fig. 132 until the adapter is
touching the stop. Press the adapter slightly in the direction of arrow until it locks into position.
– Plug the adapter cable into the mobile phone socket. The socket is located on the mobile phone mount below.
– Switch on the ignition.
– Wait approximately 20 seconds, switch off the ignition and pull the ignition key out of the ignition lock.
– Insert the mobile phone into the adapter (as specified in manufac- turer's instructions) and switch on the ignition.
Removing the mobile phone and adapter
– Press the button and remove the mobile telephone.
An initialisation mu st be carried out:
•after the first connection of the adapter,
•after reconnecting the battery,
•after pulling out the adapter cable from the power socket for the mobile phone.
This enables you to make full use of the ad vantages of a normal carphone (“hands-
free system” using a microphone integrated in the vehicle, optimal transmission of
signals using an external aerial etc.). The battery of the mobile phone is also
constantly charged.
Please contact your Škoda Service Partner if there are any points which are not
clear.
Please also refer to the additional instructions ⇒page 123, “Mobile phones and
two-way radio systems”.
Telephone pre-installation at the front or rear* (GSM III)
Initialisation of the adapter
– Withdraw the ignition key.
– Insert the adapter into the mount (the mobile phone must not be inserted in the adapter).
– Plug the adapter cable into the mobile phone socket.
– Switch on the ignition.
AB
A1
A2
AA
AC
Fig. 133 Universal tele-
phone connection at the
front
B1Z-0042HB1Z-0042H
Fig. 134 Universal tele-
phone connection at the
rear
AAAB
NKO B5 20.book Page 122 Friday, March 2, 2007 1:46 PM
Page 124 of 259

Communicating and Navigating123
Using the systemSafetyDriving TipsGeneral MaintenanceBreakdown assistanceTechnical Data
– Wait approximately 20 seconds, switch off the ignition and pull the
ignition key out of the ignition lock.
– Insert the mobile phone into the adapter (as specified in manufac- turer's instructions) and switch on the ignition.
An initialisation must be carried out:
•after the first connection of the adapter,
•after reconnecting the battery,
•after pulling out the adapter cable from the power socket for the mobile phone.
This enables you to make full use of the advantages of a normal carphone (“hands-
free system” using a microphone integrated in the vehicle, optimal transmission of
signals using an external aerial etc.). The battery of the mobile phone is also
constantly charged.
A telephone mount is factory-fitted for the front mobile phone and for the rear
mobile phone. The front telephone mount is located on the front centre console
⇒ page 122, fig. 133 , the rear on the rear centre console ⇒page 122, fig. 134 .
Adapter (Cullmann) and mobile phone are not factory-fitted by Škoda Auto.
Please also refer to the additional instructions ⇒page 123, “Mobile phones and
two-way radio systems”.
Note
For technical reasons it is not possible to use simultaneously the front and rear
mobile phone. Ensure that the adapter is always inserted only in the bracket
.
Mobile phones and two-way radio systems
The installation of a mobile phone and tw o-way radio system in a vehicle should
only be carried out by a Škoda Dealer.
Škoda Auto a.s. permits the operation of mobile phones and two-way radio
systems with a professionally installed external aerial and a maximum transmission
power of up to 10 watts. Our specialist garage is also happy to inform you about the possibilities available
for installing and operating mobile telephones and radio transmitters which have
an output greater than 10 watts. The Škoda Service Partners can provide you with
details about the technical possibilities for retrofitting of mobile telephones and
radio transmitters.
The operation of commercially available mo
bile phones or two-way radio systems
may cause operational problems in the electronic systems of your car. The reasons
for this may be:
•no external aerial,
•external aerial incorrectly installed,
•transmission power gr eater than 10 watts.
You should therefore not operate a mobile phone or two-way radio system
inside the vehicle without the use of an external aerial, or with an external aerial
which has been incorrectly installed.
You should also be aware of the fact that only an external aerial makes it possible
to achieve the optimal range of such equipment.
WARNING
•If a mobile phone or two-way radio sy stem is operated inside the vehicle
without using an external aerial, or wi th an external aerial which has been
incorrectly installed, the result can be excessive electromagnetic fields
which may cause harm to your health.
•Please always pay full attention to the traffic situation around you!
•You must not install two-way radio systems, mobile phones or mounts
on the covers of the airbags or within the immediate deployment range of
airbags. This might result in injuries to the occupants in the event of an acci-
dent!
Note
Please also refer to the operating instructions of the mobile phones and two-way
radio systems.
AAAB
NKO B5 20.book Page 123 Friday, March 2, 2007 1:46 PM
Page 135 of 259

Seat belts
134
Taking seat belts off
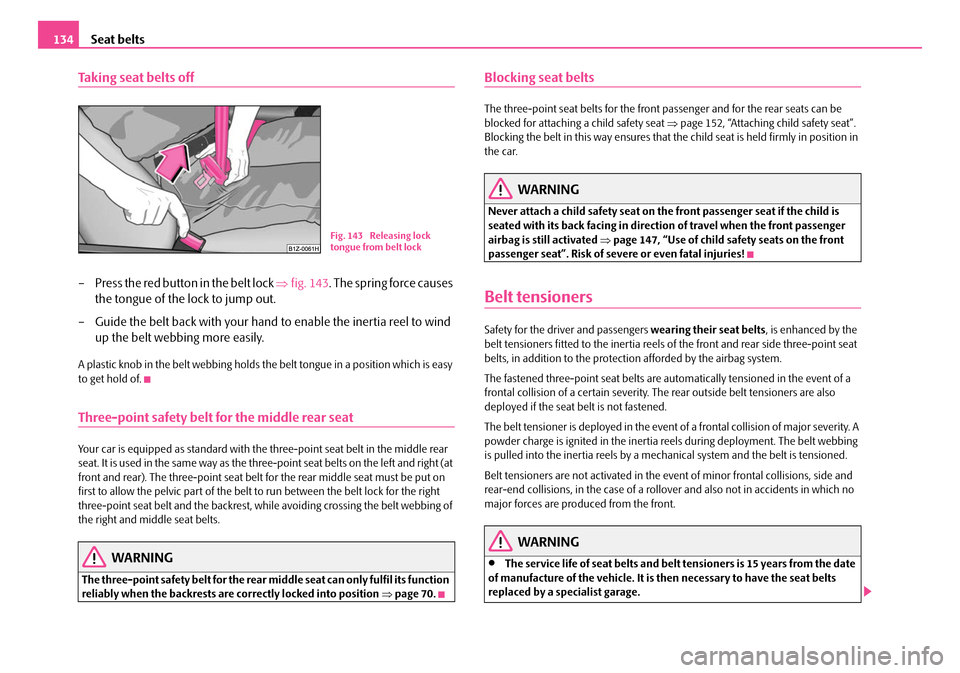
– Press the red button in the belt lock ⇒fig. 143 . The spring force causes
the tongue of the lock to jump out.
– Guide the belt back with your hand to enable the inertia reel to wind
up the belt webbing more easily.
A plastic knob in the belt webbing holds the belt tongue in a position which is easy
to get hold of.
Three-point safety belt for the middle rear seat
Your car is equipped as standa rd with the three-point seat belt in the middle rear
seat. It is used in the same way as the three-point seat belts on the left and right (at
front and rear). The three-point seat belt for the rear middle seat must be put on
first to allow the pelvic part of the belt to run between the belt lock for the right
three-point seat belt and the backrest, whil e avoiding crossing the belt webbing of
the right and middle seat belts.
WARNING
The three-point safety belt for the rear middle seat can only fulfil its function
reliably when the backrests are correctly locked into position ⇒page 70.
Blocking seat belts
The three-point seat belts for the front passenger and for the rear seats can be
blocked for attaching a child safety seat ⇒ page 152, “Attaching child safety seat”.
Blocking the belt in this way ensures that th e child seat is held firmly in position in
the car.
WARNING
Never attach a child safety seat on the front passenger seat if the child is
seated with its back facing in direct ion of travel when the front passenger
airbag is still activated ⇒page 147, “Use of child safety seats on the front
passenger seat”. Risk of severe or even fatal injuries!
Belt tensioners
Safety for the driver and passengers wearing their seat belts, is enhanced by the
belt tensioners fitted to the inertia reels of the front and rear side three-point seat
belts, in addition to the protecti on afforded by the airbag system.
The fastened three-point seat belts are au tomatically tensioned in the event of a
frontal collision of a certain severity. Th e rear outside belt tensioners are also
deployed if the seat belt is not fastened.
The belt tensioner is deployed in the event of a frontal collision of major severity. A
powder charge is ignited in the inertia reels during deployment. The belt webbing
is pulled into the inertia reels by a mech anical system and the belt is tensioned.
Belt tensioners are not activated in the ev ent of minor frontal collisions, side and
rear-end collisions, in the ca se of a rollover and also not in accidents in which no
major forces are produced from the front.
WARNING
•The service life of seat belts and belt tensioners is 15 years from the date
of manufacture of the vehicle. It is then necessary to have the seat belts
replaced by a specialist garage.
Fig. 143 Releasing lock
tongue from belt lock
NKO B5 20.book Page 134 Friday, March 2, 2007 1:46 PM
Page 136 of 259

Seat belts135
Using the systemSafetyDriving TipsGeneral MaintenanceBreakdown assistanceTechnical Data
•Any work on the belt tightener syst em, including removal and installa-
tion of system components because of other repair work, must only be
carried out by a specialist garage.
•The protective function of the system is only adequate for a single acci-
dent. If the belt tensioners have been deployed, it is then necessary to
replace the entire system.
•The Owner's Manual must also be ha nded over to the new owner if the
vehicle is sold.
Note
•Smoke is generated when the belt tensioners are deployed. This is not an indi-
cation of a fire in the vehicle.
•It is essential to pay attention to relevant safety regulations if the vehicle or indi-
vidual parts of the system are scrapped. Škoda Service Partners are familiar with
these regulations and will be able to provide you with detailed information in this
respect.
•When disposing of vehicle or parts of the system, it is important to comply with
the national legal requirements.
WARNING (continued)
NKO B5 20.book Page 135 Friday, March 2, 2007 1:46 PM