oil pressure SKODA SUPERB 2007 1.G / (B5/3U) Owner's Manual
[x] Cancel search | Manufacturer: SKODA, Model Year: 2007, Model line: SUPERB, Model: SKODA SUPERB 2007 1.G / (B5/3U)Pages: 259, PDF Size: 14.71 MB
Page 22 of 259
Instruments and Indicator/Warning Lights21
Using the systemSafetyDriving TipsGeneral MaintenanceBreakdown assistanceTechnical Data
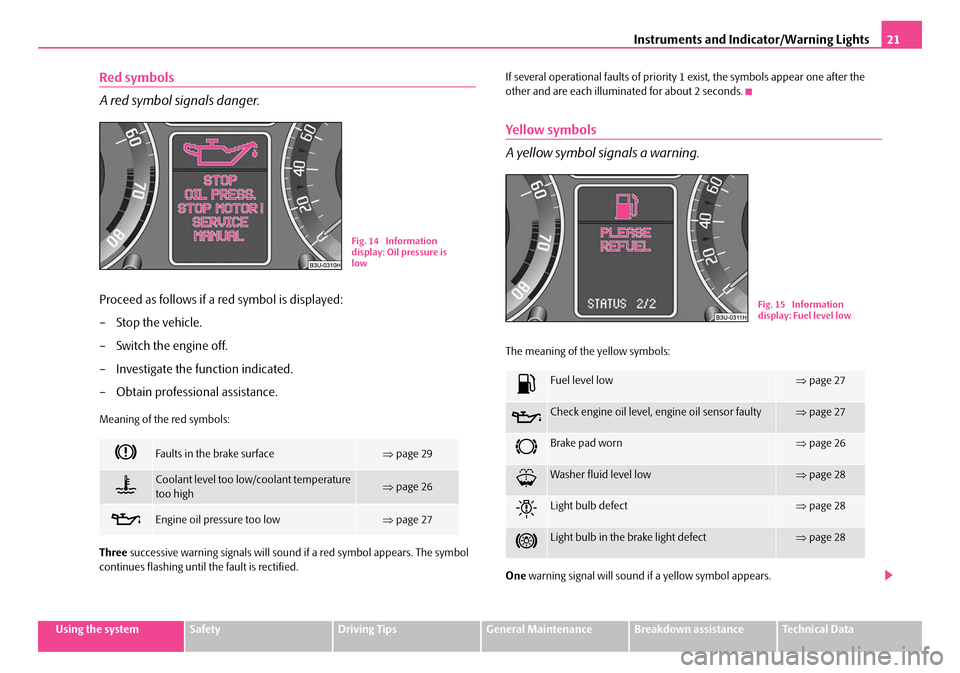
Red symbols
A red symbol signals danger.
Proceed as follows if a red symbol is displayed:
– Stop the vehicle.
– Switch the engine off.
– Investigate the function indicated.
– Obtain professional assistance.
Meaning of the red symbols:
Three successive warning signals will sound if a red symbol appears. The symbol
continues flashing until the fault is rectified. If several operational faults of priority 1 exist, the symbols appear one after the
other and are each illumi
nated for about 2 seconds.
Yellow symbols
A yellow symbol signals a warning.
The meaning of the yellow symbols:
One warning signal will sound if a yellow symbol appears.
Faults in the brake surface⇒page 29
Coolant level too low/coolant temperature
too high⇒page 26
Engine oil pressure too low⇒page 27
Fig. 14 Information
display: Oil pressure is
low
Fuel level low⇒page 27
Check engine oil level, engine oil sensor faulty⇒page 27
Brake pad worn⇒page 26
Washer fluid level low⇒page 28
Light bulb defect⇒page 28
Light bulb in the brake light defect⇒page 28
Fig. 15 Information
display: Fuel level low
NKO B5 20.book Page 21 Friday, March 2, 2007 1:46 PM
Page 28 of 259
Instruments and Indicator/Warning Lights27
Using the systemSafetyDriving TipsGeneral MaintenanceBreakdown assistanceTechnical Data
Bonnet
The warning light comes on when the ignition is switched on if the bonnet is
unlocked.
Fuel reserve
The warning light comes on, if the fuel level is still below 8 litres.
A peep sounds as an addi tional warning signal.
The following text will be displayed in the information display*: PLEASE REFUEL
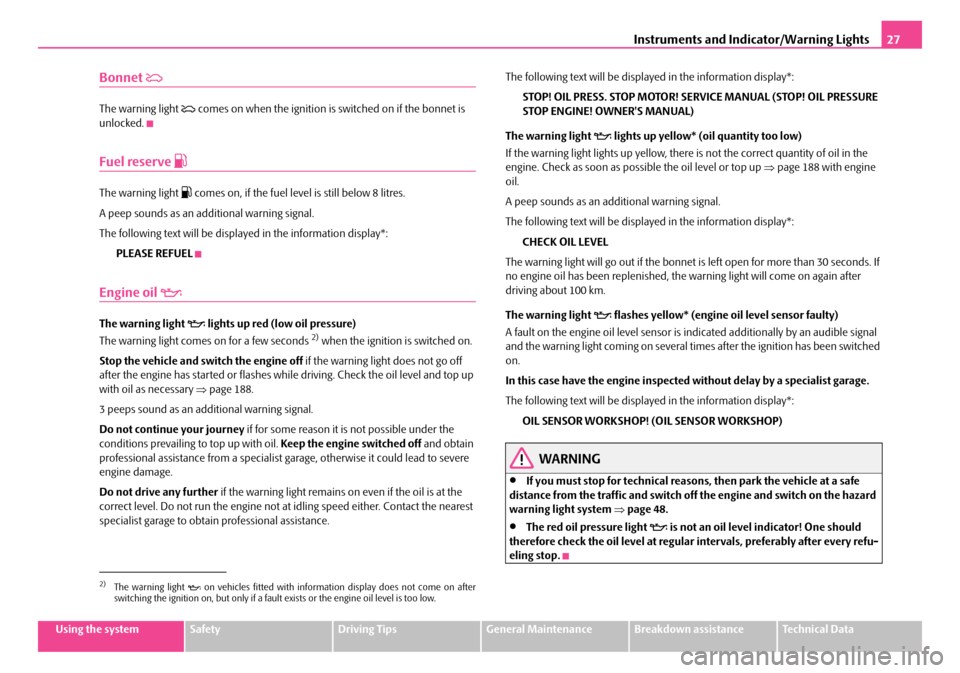
Engine oil
The warning light lights up red (low oil pressure)
The warning light comes on for a few seconds 2) when the ignition is switched on.
Stop the vehicle and switch the engine off if the warning light does not go off
after the engine has started or flashes while driving. Check the oil level and top up
with oil as necessary ⇒page 188.
3 peeps sound as an additional warning signal.
Do not continue your journey if for some reason it is not possible under the
conditions prevailing to top up with oil. Keep the engine switched off and obtain
professional assistance from a specialist garage, otherwise it could lead to severe
engine damage.
Do not drive any further if the warning light remains on even if the oil is at the
correct level. Do not run the engine not at idling speed either. Contact the nearest
specialist garage to obtain professional assistance. The following text will be displayed in the information display*:
STOP! OIL PRESS. STOP MOTOR! SERVICE MANUAL (STOP! OIL PRESSURE
STOP ENGINE! OWNER'S MANUAL)
The warning light
lights up yellow* (oil quantity too low)
If the warning light lights up yellow, there is not the correct quantity of oil in the
engine. Check as soon as possible the oil level or top up ⇒ page 188 with engine
oil.
A peep sounds as an ad ditional warning signal.
The following text will be displayed in the information display*: CHECK OIL LEVEL
The warning light will go out if the bonnet is left open for more than 30 seconds. If
no engine oil has been replenished, the warning light will come on again after
driving about 100 km.
The warning light
flashes yellow* (engine oil level sensor faulty)
A fault on the engine oil level sensor is in dicated additionally by an audible signal
and the warning light coming on several ti mes after the ignition has been switched
on.
In this case have the engine inspecte d without delay by a specialist garage.
The following text will be displayed in the information display*: OIL SENSOR WORKSHOP! (OIL SENSOR WORKSHOP)
WARNING
•If you must stop for technical reasons, then park the vehicle at a safe
distance from the traffic and switch off the engine and switch on the hazard
warning light system ⇒ page 48.
•The red oil pressure light is not an oil level indicator! One should
therefore check the oil level at regular intervals, preferably after every refu-
eling stop.
2)The warning light on vehicles fitted with information display does not come on after
switching the ignition on, but only if a fault exists or the engine oil level is too low.
NKO B5 20.book Page 27 Friday, March 2, 2007 1:46 PM
Page 102 of 259
Starting-off and Driving101
Using the systemSafetyDriving TipsGeneral MaintenanceBreakdown assistanceTechnical Data
Starting the engine
General
You can only start the engine only using an original ignition key.
•Place the gearshift lever into neutral (or place the selector lever to the position
P or N in the case of an automatic gearbox) and put on the handbrake firmly before
starting the engine.
•The clutch pedal should be fully depressed when starting the engine which
means that the starter only has to crank the engine.
•Let go of the key as soon as the engine starts otherwise there may be damage
to the starter.
The engine running noises may louder at first be louder for a short time after
starting the cold engine until oil pressure can be built up in the hydraulic valve
clearance compensation. This is quite normal and is not an operating problem.
If the engine does not start ...
You can use the battery of anothe r vehicle as a jump-start aid ⇒page 215.
It is only possible to tow-start vehicl es fitted with a manual gearbox. The tow-
starting distance must not be more than 50 metres ⇒page 217.
WARNING
•Never run the engine in non ventilat ed or enclosed areas. The exhaust
gases of the engine contain besides the odorless and colourless carbon
monoxide a poisonous gas - hazard! Carbon monoxide can cause uncon-
sciousness and death.
•Never leave your vehicle unattended with the engine running.
Caution
•The starter may only be operated (ignition key position ), if the engine is not
running. If the starter is immediately oper ated after switching off the engine, the
starter or the engine can be damaged.
•Avoid high engine revolutions, full throttle and high engine loads as long as the
engine has not yet reached it s normal operating temperature - risk of damaging the
engine!
•Vehicles which are fitted wi th an exhaust gas catalytic converter should not be
tow-started over a distance of more than 50 metres.
For the sake of the environment
Never warm up the engine when the vehicle is standing. Drive off right away.
Through this the engine reaches its operating temperature more rapidly and the
pollutant emissions are lower.
Petrol engines
These engines are fitted with a starter system which selects the correct fuel/air
mixture for every external air temperature.
•Do not operate accelerator before and when starting engine.
•Interrupt the attempt at starting after 10 seconds if the engine does not start
right awayand wait for about 30 seconds before repeating the attempt.
•It is possible that the fuse on the electric al fuel pump is defect if the engine still
does not start. Check the fuse and replace it if necessary ⇒page 220.
•If the engine does not start, contact th e nearest specialist garage to obtain
professional assistance.
It may be necessary, if the engine is very hot, to slightly depress the accelerator
after the engine has started.
Diesel engines
Glow plug system
Diesel engines are equipped with a glow plug system, the preglow period being
controlled automatically in line with the coolant temperature and outside temper-
ature.
The preglow indicator light
comes on after the ignition has been switched on.
A3
NKO B5 20.book Page 101 Friday, March 2, 2007 1:46 PM
Page 159 of 259
Intelligent Technology
158
Brakes
What has a negative effect on braking efficiency?
Wear-and-tear
Wear-and-tear to the brake pads is greatly dependent on the operating conditions
of the vehicle and your style of driving. Particularly if you drive a great deal in towns
and over short distances or if you adopt a sporty style of driving, it may be neces-
sary to have the thickness of the brake pads inspected at a specialist garage
between the service inspections.
Wet roads or road salt
There may be a certain delay before the brakes take full effect under certain condi-
tions such as when driving through water, during heavy rain showers or after the
vehicle has been washed in an automatic vehicle wash, since the brake discs and
brake pads may be moist or even have a coating of ice on them in winter. You
should dry the brakes as soon as possib le (by applying and releasing the brakes
several times, if the road conditions and the traffic situation allows it).
There also may be a certain delay before the full braking efficiency is available when
driving on roads which have been treated wi th road salt if you have not used the
brakes for some considerable time beforeha nd. The layer of salt on the brake discs
and brake pads must first be rubb ed off when you apply the brakes.
Corrosion
Corrosion on the brake discs and dirt on th e bake pads occur if the vehicle has been
parked for a long period and if you do not make much use of the braking system.
We recommend cleaning the brake discs by firmly applying the brakes at a fairly
high speed if you do not make much use of the braking system or if surface corro-
sion is present ⇒.
Faults in the brake surface
If you notice that the braking distance has suddenly become longer and that the
brake pedal can be depressed further, it is possible that a brake circuit of the dual-
circuit brake system has failed. Drive, in such cases, to the nearest specialist garage
without delay in order to have the problem rectified. Drive at a reduced speed while
on your way to the dealer and adapt your style of driving to the higher brake pedal
pressure required. Low brake fluid level
An insufficient level of brake fluid may result in problems in the brake system. The
level of the brake fluid is monitored electronically
⇒page 29, “Brake system ”.
WARNING
•Only apply the brakes for the purpos e of drying and cleaning the brake
discs if the traffic conditions permit this. Do not place any other road users
in jeopardy.
•When retrospectively mounting a front spoiler, solid wheel hubs etc. one
must ensure that the air supply to the front wheel brakes is not reduced
otherwise the braking sy stem could run too hot.
•Allow for the fact that new brake pads do not achieve their full braking
efficiency until approximately 200 kilo metres. New brake pads must be first
“run in” before they develop their optimal friction force. You can, however,
compensate for this slightly reduced braking force by increasing the pres-
sure on the brake pedal. This guidelin e also applies to any new brake pads
installed at a future date.
Caution
•Never allow the brakes to ru b by applying slight pressure if you do not wish to
brake the vehicle. This causes the brakes to overheat and can also result in a longer
braking distance and excessive wear.
•Before negotiating a steep downhill sect ion, please reduce your speed, shift
down into the next lower gear (manual ge arbox) or select a lower driving stage
(automatic gearbox). This enables you to make full use of the braking power of the
vehicle and reduces the strain on the brakes . Any additional braking should be done
intermittently, not continuously.
Brake booster
The brake booster boosts the pressure which you generate with the brake pedal.
The necessary pressure is only gene rated when the engine is running.
NKO B5 20.book Page 158 Friday, March 2, 2007 1:46 PM
Page 161 of 259
Intelligent Technology
160
pedal firmly and hold it in this position in order to achieve the shortest possible
braking distance.
The Brake Assist is able to help you achieve a shorter braking distance in emergency
situations by rapidly producing the pressure required in the brake system. It fully
exploits the attributes of the ABS. After you release the brake pedal, the function of
the Brake Assist is automatically switched off and the brakes operate in the normal
way.
WARNING
•The Brake Assist is also not able to overcome the physical limits of your
car in terms of the braking distance required.
•Adapt your speed to the conditions of the road surface and to the traffic
situation.
•The increased safety offered by the Brake Assist must not tempt you to
take a greater safety risk than otherwise.
Power steering
Power steering assists the driver in steering the vehicle and reduces the physical
force needed for steering.
The steering characteristics can be changed by a specialist garage.
It is still possible to fully steer the vehicle if the power steering fails or if the engine
is not running (vehicle being towed in). The only difference is that greater physical
effort is required.
If the steering is turned to full lock when the car is stationary, you will place great
stresses on the power steering system. Turning the steering to full lock in such a
situation will be accompanied by noises. In addition, the idling speed of the engine
will drop briefly.
Caution
Do not leave the steering at full lock for more than 15 seconds when the engine is
running - risk of damagi ng the power steering!
Note
•Have the steering inspected as soon as po ssible by a specialist garage if there is
a leak or fault in the system.
•The power steering requires a special hydraulic oil. The oil reservoir is located
at the front left of the engine compartment ⇒page 186. The correct hydraulic oil
level is important for proper oper ation of the power steering system.
Diesel particle filter* (diesel engine)
In the diesel particle filter the resulting soot particles are collected
and burnt during the combustion of diesel fuel.
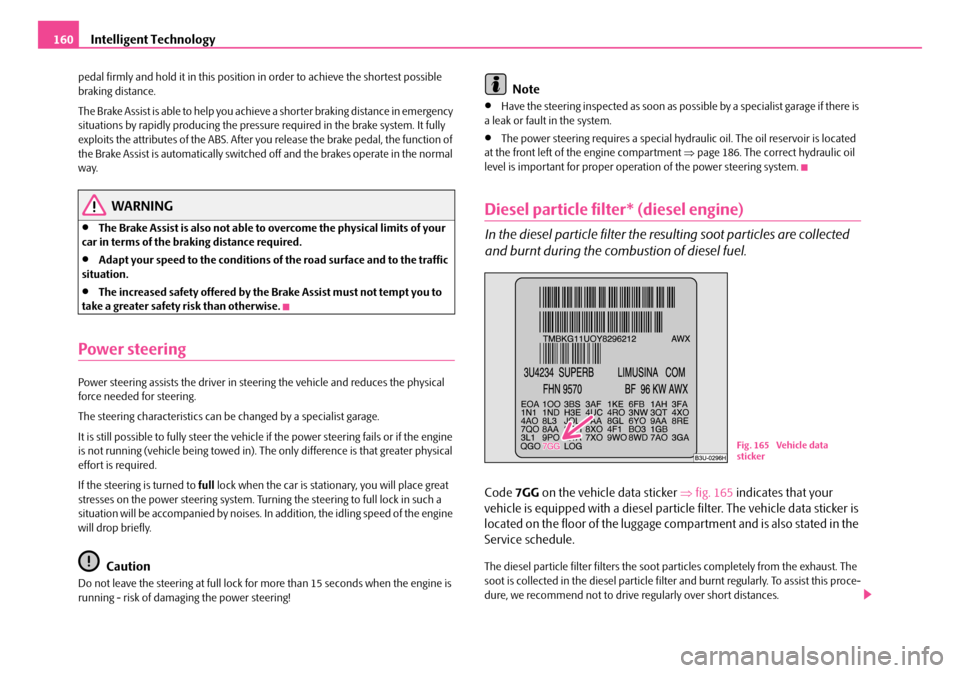
Code 7GG on the vehicle data sticker ⇒fig. 165 indicates that your
vehicle is equipped with a diesel particle filter. The vehicle data sticker is
located on the floor of the luggage com partment and is also stated in the
Service schedule.
The diesel particle filter filters the soot particles completely from the exhaust. The
soot is collected in the diesel particle filter and burnt regularly. To assist this proce-
dure, we recommend not to drive regularly over short distances.
Fig. 165 Vehicle data
sticker
NKO B5 20.book Page 160 Friday, March 2, 2007 1:46 PM
Page 175 of 259

Taking care of your vehicle and cleaning the vehicle
174
Automatic vehicle wash systems
The paintwork of the vehicle is sufficiently resistant that the vehicle can be washed
normally in automatic vehicle wash plants without any problem. The actual stress
to which the paintwork is subjected, however, depends greatly on the design of the
vehicle wash system, the filtering of the water and the type of washing and care
products used. If the paintwork of your vehicle appears mat after being washed or
even has scratches, point this out to the operator of the vehicle wash plant. Use a
different vehicle wash plant, if necessary.
There are no particular points to note be fore washing your vehicle in such a plant
other than the usual precautionary measur es (closing windows and sliding/tilting
roof, moving any factory-fitted aerials down flat against the bodywork, etc.).
If you have any particular atta ch e d p a r t s f i t te d t o y o u r c a r - s u ch a s s p o i l e r, ro o f ra ck
system, two-way radio aerial - it is best to first of all consult the operator of the car
wash plant.
It is important to degrease the lips of the windscreen wiper rubbers after passing
through the automatic vehicle wash system.
Caution
Do not screw the swivelling down roof aeri al tight before washing the vehicle in an
automatic vehicle wash sy stem - risk of damage!
Washing vehicle by hand
It is important to first soften the dirt with plenty of water and rinse it off as thor-
oughly as possible before wa shing your vehicle by hand.
One should then clean the vehicle using a soft washing sponge, washing glove or
a washing brush and only slight pressure. Work from the top to the bottom -
beginning with the roof. Only place slight pressure on the vehicle paintwork during
cleaning Only use a car shampoo for stubborn dirt.
Wash out the sponge or washing glove thoroughly at short intervals.
Clean wheels, door sills and similar parts last. Use a second sponge for such areas. Rinse off the vehicle well after giving it a wash and dry it off using a chamois leather.
WARNING
•The ignition should always be switched off when you wash your vehicle -
risk of accident!
•Protect your hands and arms from sharp-edged metal parts when you
are cleaning the underfloor, the inside of the wheel housings or the wheel
trims - risk of cuts.
Caution
•Do not wash your vehicle in bright sunlight - risk of paint damage.
•Ensure that the jet of water is not aimed directly at the locks or at the door and
panel joints if you spray your vehicle in winter down with a hose - risk of freezing.
•Do not use any insect sponges, rough ki tchen sponges or similar cleaning prod-
ucts - risk of damage to the surface of paintwork.
For the sake of the environment
Only wash your vehicle at washing bays specifically reserved for this purpose. This
ensures that no water which may be cont aminated by oil flows into the sewage
system. It is not even permitted to wash your vehicle in certain areas except at such
specific washing bays.
Washing with a high-pressure cleaner
When you wash your vehicle with a high-pressure cleaner, it is essential to comply
with the instructions for use of the cleaning equipment. This applies in particular to
the pressure used and to the spraying distance . Maintain a sufficiently large
distance to soft materials such as rubber hoses or insulation material.
On no account use circular spray nozzles or so-called dirt cutters!
NKO B5 20.book Page 174 Friday, March 2, 2007 1:46 PM
Page 191 of 259
Inspecting and Replenishing
190
Caution
•Other coolant additives may cause operational problems which, in partic-
ular, involves significantly reducing the anticorrosion effect.
•Any faults or problems resulting from corrosion may cause a loss of
coolant and, as a consequence of th is, result in major engine damage.
Inspecting the coolant level
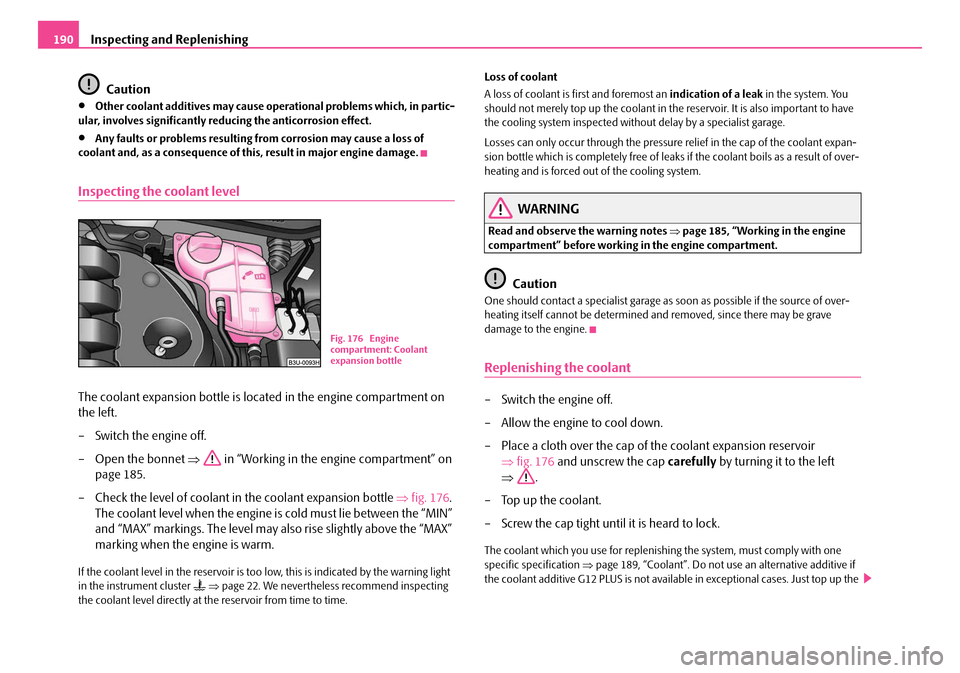
The coolant expansion bottle is located in the engine compartment on
the left.
– Switch the engine off.
– Open the bonnet ⇒ in “Working in the engine compartment” on
page 185.
– Check the level of coolant in the coolant expansion bottle ⇒fig. 176 .
The coolant level when the engine is cold must lie between the “MIN”
and “MAX” markings. The level may also rise slightly above the “MAX”
marking when the engine is warm.
If the coolant level in the reservoir is too low, this is indicated by the warning light
in the instrument cluster ⇒ page 22. We nevertheless recommend inspecting
the coolant level directly at th e reservoir from time to time. Loss of coolant
A loss of coolant is first and foremost an
indication of a leak in the system. You
should not merely top up the coolant in the reservoir. It is also important to have
the cooling system inspected without delay by a specialist garage.
Losses can only occur through the pressure relief in the cap of the coolant expan-
sion bottle which is completely free of leaks if the coolant boils as a result of over-
heating and is forced out of the cooling system.
WARNING
Read and observe the warning notes ⇒page 185, “Working in the engine
compartment” before working in the engine compartment.
Caution
One should contact a specialist garage as soon as possible if the source of over-
heating itself cannot be determined and removed, since there may be grave
damage to the engine.
Replenishing the coolant
– Switch the engine off.
– Allow the engine to cool down.
– Place a cloth over the cap of the coolant expansion reservoir ⇒fig. 176 and unscrew the cap carefully by turning it to the left
⇒ .
– Top up the coolant.
– Screw the cap tight until it is heard to lock.
The coolant which you use for replenishing the system, must comply with one
specific specification ⇒page 189, “Coolant”. Do not use an alternative additive if
the coolant additive G12 PLUS is not available in exceptional cases. Just top up the
B1Z-0042HB1Z-0042H
Fig. 176 Engine
compartment: Coolant
expansion bottle
NKO B5 20.book Page 190 Friday, March 2, 2007 1:46 PM
Page 211 of 259

Breakdown assistance
210
WARNING
•If you find yourself in flowing traffic switch on the hazard warning lights
system and place the warning triangle on the side of the road at the
prescribed distance from your vehicl e while observing all national legal
provisions. In this way you are protecting not only yourself but also other
road users.
•Never start the engine with the vehicle sitting on the raised jack - danger
of suffering injury!
Caution
If you have to change a wheel on a slope first block the opposite wheel with a stone
or similar object in order to secure th e vehicle from unexpectedly rolling away.
Note
Comply with the national legal regulations.
Changing a wheel
Always change a wheel on a level surface as far as possible.
– Take off the full wheel trim* ⇒page 211 or the caps ⇒page 211.
– In the case of light alloy wheels remove the wheel trim cap ⇒page 211.
– Slacken the wheel bolts ⇒page 212.
– Jack up the vehicle until the wheel to be changed is clear of the ground
⇒ page 213.
– Unscrew the wheel bolts and place them on a clean surface (cloth, paper etc.).
– Take off the wheel. – Fit on the spare wheel and tighten the wheel bolts slightly.
– Lower the car.
– Tighten the wheel bolts firmly, al
ternately and diagonally using the
wheel wrench ⇒page 212.
– Mount the full wheel trim/w heel trim cap or the caps.
Note
•All bolts must be clean and must turn easily.
•You must never grease or oil the wheel bolts!
•When fitting on unidirectional tyres, ensure that the tyres rotate in the correct
direction ⇒page 199.
Subsequent steps
After changing the wheel, you must perform the following steps.
– Stow and attach the replaced wheel in the spare wheel well.
– Stow the vehicle tool kit in the space provided.
– Check the tyre pressure on the spare wheel just mounted as soon as
possible.
– Have the tightening torque of the wheel bolts checked with a torque
wrench as soon as possible. The tightening torque for steel and light
alloy wheels must be 120 Nm.
– Have the defective tyre repaired as soon as possible.
WARNING
It is necessary to observe the guidelines given on ⇒page 201, “New tyres
and wheels” if the vehicle is subseq uently fitted with tyres which are
different to those it was fitted with at the works.
NKO B5 20.book Page 210 Friday, March 2, 2007 1:46 PM