spare wheel SKODA SUPERB 2008 2.G / (B6/3T) Owner's Manual
[x] Cancel search | Manufacturer: SKODA, Model Year: 2008, Model line: SUPERB, Model: SKODA SUPERB 2008 2.G / (B6/3T)Pages: 272, PDF Size: 18.25 MB
Page 5 of 272
Contents
4
Head airbags* . . . . . . . . . . . . . . . . . . . . . . . . . . . . . . . .
Deactivating an airbag . . . . . . . . . . . . . . . . . . . . . . . .
Transporting children safely . . . . . . . . . . . . . . . . . .
What you should know about transporting children!
Child seat . . . . . . . . . . . . . . . . . . . . . . . . . . . . . . . . . . . .
Attaching a child seat using the “ISOFIX” system .
Attaching child seat using the “Top Tether” system
Driving Tips. . . . . . . . . . . . . . . . . . . . . . . . . . . . . .
Intelligent Technology . . . . . . . . . . . . . . . . . . . . . . . .
Electronic stability programme (ESP)* . . . . . . . . . .
Brakes . . . . . . . . . . . . . . . . . . . . . . . . . . . . . . . . . . . . . . .
Brake booster . . . . . . . . . . . . . . . . . . . . . . . . . . . . . . . .
Antilock brake system (ABS) . . . . . . . . . . . . . . . . . . .
Brake Assist* . . . . . . . . . . . . . . . . . . . . . . . . . . . . . . . . .
Uphill-Start off-Assist* . . . . . . . . . . . . . . . . . . . . . . . .
Electromechanical power steering . . . . . . . . . . . . .
Tyre inflation pressure-control system* . . . . . . . . .
Diesel particle filter* (diesel engine) . . . . . . . . . . . .
Driving and the Environment. . . . . . . . . . . . . . . . .
A new engine . . . . . . . . . . . . . . . . . . . . . . . . . . . . . . . . .
New tyres . . . . . . . . . . . . . . . . . . . . . . . . . . . . . . . . . . . .
New brake pads . . . . . . . . . . . . . . . . . . . . . . . . . . . . . .
Catalytic converter . . . . . . . . . . . . . . . . . . . . . . . . . . . .
Driving in an economical and environmentally
conscious manner . . . . . . . . . . . . . . . . . . . . . . . . . . . .
Environmental compatibility . . . . . . . . . . . . . . . . . . .
Motoring abroad . . . . . . . . . . . . . . . . . . . . . . . . . . . . .
Avoiding damage to your vehicle . . . . . . . . . . . . . .
To w i n g a t r a i l e r. . . . . . . . . . . . . . . . . . . . . . . . . . . . . . . .
Towing a trailer . . . . . . . . . . . . . . . . . . . . . . . . . . . . . . .
General Maintenance. . . . . . . . . . . . . . .
Taking care of your vehicle and cleaning the
vehicle. . . . . . . . . . . . . . . . . . . . . . . . . . . . . . . . . . . . . . . . .
General . . . . . . . . . . . . . . . . . . . . . . . . . . . . . . . . . . . . . .
Care of the exterior of vehicle . . . . . . . . . . . . . . . . . .
Care of the interior of vehicle . . . . . . . . . . . . . . . . . .
Fuel. . . . . . . . . . . . . . . . . . . . . . . . . . . . . . . . . . . . . . . . . . . .
Petrol . . . . . . . . . . . . . . . . . . . . . . . . . . . . . . . . . . . . . . . .
Diesel . . . . . . . . . . . . . . . . . . . . . . . . . . . . . . . . . . . . . . . .
Refuelling . . . . . . . . . . . . . . . . . . . . . . . . . . . . . . . . . . . .
Inspecting and Replenishing. . . . . . . . . . . . . . . . . .
Engine compartment . . . . . . . . . . . . . . . . . . . . . . . . .
Engine oil . . . . . . . . . . . . . . . . . . . . . . . . . . . . . . . . . . . .
Cooling system . . . . . . . . . . . . . . . . . . . . . . . . . . . . . . .
Brake fluid . . . . . . . . . . . . . . . . . . . . . . . . . . . . . . . . . . .
Battery . . . . . . . . . . . . . . . . . . . . . . . . . . . . . . . . . . . . . . .
Windshield washer system . . . . . . . . . . . . . . . . . . . .
Wheels and Tyres. . . . . . . . . . . . . . . . . . . . . . . . . . . . . .
Wheels . . . . . . . . . . . . . . . . . . . . . . . . . . . . . . . . . . . . . .
Accessories, changes and replacement of partsAccessories and replacement parts . . . . . . . . . . . . .
Technical changes . . . . . . . . . . . . . . . . . . . . . . . . . . . .
Breakdown assistance. . . . . . . . . . . . . .
Breakdown assistance . . . . . . . . . . . . . . . . . . . . . . . .
First-aid box* . . . . . . . . . . . . . . . . . . . . . . . . . . . . . . . . .
Warning triangle . . . . . . . . . . . . . . . . . . . . . . . . . . . . . .
Fire extinguisher* . . . . . . . . . . . . . . . . . . . . . . . . . . . . .
Vehicle tool kit . . . . . . . . . . . . . . . . . . . . . . . . . . . . . . . .
Tyre repair kit* . . . . . . . . . . . . . . . . . . . . . . . . . . . . . . . .
Spare wheel . . . . . . . . . . . . . . . . . . . . . . . . . . . . . . . . . .
Changing a wheel . . . . . . . . . . . . . . . . . . . . . . . . . . . . .
Jump-starting . . . . . . . . . . . . . . . . . . . . . . . . . . . . . . . .
Tow-starting and towing vehicle . . . . . . . . . . . . . . .
Fuses and light bulbs. . . . . . . . . . . . . . . . . . . . . . . . . .
Electric fuses . . . . . . . . . . . . . . . . . . . . . . . . . . . . . . . . .
Bulbs . . . . . . . . . . . . . . . . . . . . . . . . . . . . . . . . . . . . . . . .
Technical Data . . . . . . . . . . . . . . . . . . . . . . . . . .
Technical Data. . . . . . . . . . . . . . . . . . . . . . . . . . . . . . . . .
General information . . . . . . . . . . . . . . . . . . . . . . . . . . .
Used abbreviations . . . . . . . . . . . . . . . . . . . . . . . . . . .
Performances . . . . . . . . . . . . . . . . . . . . . . . . . . . . . . . . .
Weight . . . . . . . . . . . . . . . . . . . . . . . . . . . . . . . . . . . . . . .
Identification details . . . . . . . . . . . . . . . . . . . . . . . . . .
Fuel consumption according to the regulations
(99/100/EU) . . . . . . . . . . . . . . . . . . . . . . . . . . . . . . . . . .
Dimensions . . . . . . . . . . . . . . . . . . . . . . . . . . . . . . . . . .
1.8 ltr./118 kW TSI - EU 4 . . . . . . . . . . . . . . . . . . . . . . .
1.9 ltr./77 kW TDI PD - EU 4 . . . . . . . . . . . . . . . . . . . .
2.0 ltr./103 kW TDI PD - EU 4 . . . . . . . . . . . . . . . . . . .
Index . . . . . . . . . . . . . . . . . . . . . . . . . . . . . . . . . . . . . . . .
167
168
171
171
174
177
178
179
179
179
182
183
183
183
184
184
185
186
187
187
187
187
188
188
192
192
193
194
194 197
197
197
197
202
205
205
205
206
208
208
210
213
215
216
220
222
222
228
228
228
229
229
229
229
229
230
230
231
231
236
237241
241
246
255
255
255
255
255
255
255
256
257
258
260
262
265
NKO B6 20.book Page 4 Wednesday, March 26, 2008 3:15 PM
Page 82 of 272
Seats and Stowage81
Using the systemSafetyDriving TipsGeneral MaintenanceBreakdown assistanceTechnical Data
A loop is located on the floor covering of the luggage compartment
⇒page 80,
fig. 77 . When handling the spare wheel, you ca n fix the raised floor covering on a
hook at the luggage compartment cover.
Luggage net*
The luggage net is designed for the tranportation of lighter objects.
WARNING
•In the luggage net you must only store objects (up to a total weight of 1.5
kg). Heavy objects are not secured sufficiently - risk of injury!
•No objects with sharp edges should be stored in the luggage net, because
they can damage the luggage net.
The luggage compartment cover
You can use the luggage compar tment cover behind the head
restraints for storing light and soft items.
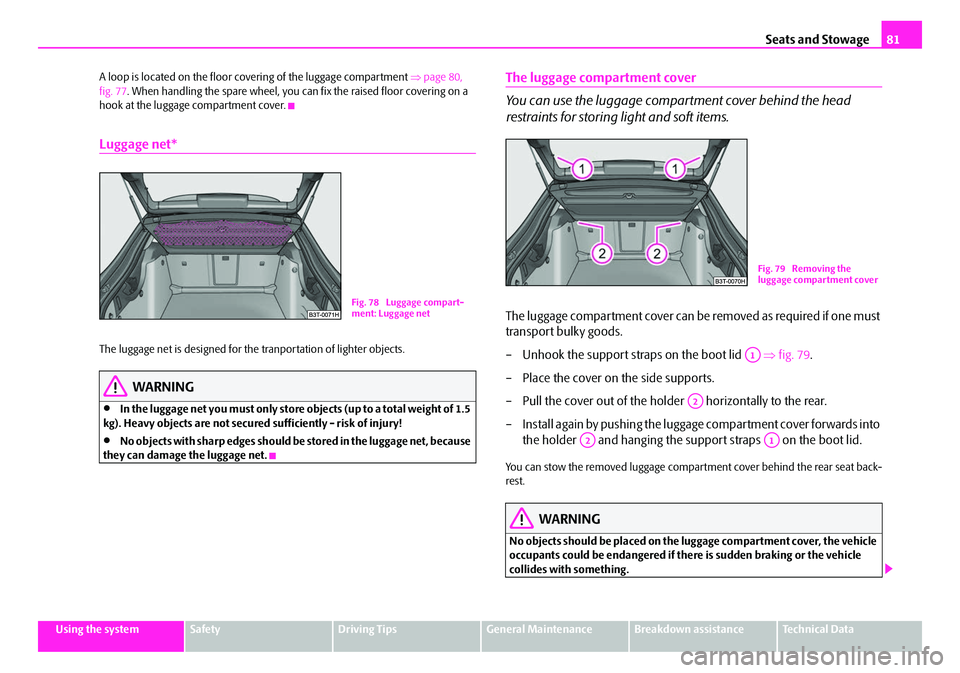
The luggage compartment cover can be removed as required if one must
transport bulky goods.
– Unhook the support straps on the boot lid ⇒fig. 79 .
– Place the cover on the side supports.
– Pull the cover out of the holder horizontally to the rear.
– Install again by pushing the luggage compartment cover forwards into the holder and hanging the suppo rt straps on the boot lid.
You can stow the removed luggage compartment cover behind the rear seat back-
rest.
WARNING
No objects should be placed on the luggage compartment cover, the vehicle
occupants could be endangered if there is sudden braking or the vehicle
collides with something.
Fig. 78 Luggage compart-
ment: Luggage net
Fig. 79 Removing the
luggage compartment cover
A1
A2
A2A1
NKO B6 20.book Page 81 Wednesday, March 26, 2008 3:15 PM
Page 118 of 272

Starting-off and Driving117
Using the systemSafetyDriving TipsGeneral MaintenanceBreakdown assistanceTechnical Data
people who wear such clothing are not recognised by the sensors of the
parking aid.
Note
•Only the front parking aid operates if you are towing a trailer (applies only to
models which feature a factory-fitted towing device*).
•If a warning signal sounds for about 3 seconds after activating the system and
there is no obstacle close to your car, th is indicates a system fault. The fault is
confirmed additionally when the symbol
flashes in the button ⇒page 116,
fig. 125 . Have the fault rectified by a specialist workshop.
•The sensors must be kept clean and free of ice to enable the parking aid to
operate properly.
•If the parking aid is activated and the se lector lever of the automatic gearbox is
in the position , warning signal indicates interruption (vehicle can no longer
move).
Park Assist*
Description and important information
The park assist assists you when parkin g in a suitable parallel parking place
between two vehicles or behind a vehicle.
The park assist automatically searches fo r suitable parking spaces after switching
on the ignition and when driving up to 30 km/h.
During the parking procedure the park assist only takes over the steering move-
ments, the pedals continue to be operated by the driver.
Function of the system is based on:
•Length and depth measurement of the parking spaces when driving
•Evaluation of the size of the parking space
•Definition of the correct position of the vehicle for parking
•Calculating the line on which the vehi cle drives backwards into the parking
place
•Actuation of the steering force assistance , automatic spinning of the wheels of
the front axle when parking.
WARNING
The park assist does not take away th e responsability from the driver when
parking.
•Pay particular attention to small chil dren and animals as they would not
be recognised by the sensors of the parking aid.
•Under certain circumstances, surfaces of certain objects and types of
clothing cannot reflect the signal of the park assist or the parking aid. Thus,
these objects or people who wear such clothing are not recognised by the
sensors of the parking aid.
•The external sound source of the park assist and the parking aid can be
disruptively influenced and under unfavourable conditions, objects or
people cannot be recognised by the sensors of the parking aid.
Caution
•If other vehicles are parked behind or on the kurb, th e park assist guides your
vehicle beyond the kurb or onto it. Make su re that the wheels or the wheel rims of
your vehicle are not damaged and if necessary intervene in time.
•You should satisfy yourself before parking that there is no small obstacle, such
as a rock, thin post, trailer drawbar etc., in front or behind your vehicle. Such an
obstacle might not be within the range detected by the sensors.
•Under certain circumstances, surfaces or structures of certain objects such as
wire mesh fences, powder snow etc..., cannot be recognised by the system.
•The evaluation of the parking place an d the parking procedure depends on the
circumference of the wheels. The system does not function correctly if your vehicle
is mounted with wheels of non-permissible size, snow chains or a temporary spare
wheel (in order to reach the nearest work shop). If the tyres other than those
excepted by the manufacturer are mounted, the resulting position of the vehicle in
WARNING (continued)
AP
NKO B6 20.book Page 117 Wednesday, March 26, 2008 3:15 PM
Page 184 of 272

Intelligent Technology185
Using the systemSafetyDriving TipsGeneral MaintenanceBreakdown assistanceTechnical Data
Tyre inflation pressure-control system*
The tyre inflation pressure-control system compares with the aid of the ABS sensors
the speed and also the rolling circumference of the individual wheels. If the rolling
circumference of a wheel is changed, the warning light
lights up in the dash
panel insert ⇒page 32. The rolling circumference of the tyre can change if:
•the tyre inflation pressure is too low,
•the structure of the tyre is damaged,
•the vehicle is loaded on one side,
•the wheels of an axle are loaded heavily (e.g. when towing a trailer or when
driving uphill or downhill),
•snow chains are mounted,
•the temporary spare wheel is mounted,
•one wheel per axle was changed.
Basic setting of tyre inflation pressure-control system
After changing the tyre inflation pressures or after changing one or several wheels,
a basic setting of the system must be carried out as follows.
•Inflate all tyres to the specified inflation pressure ⇒page 222.
•Switch on the ignition.
•Press button ⇒ fig. 177 for more than 2 seconds. While pressing the
button, the warning light lights up. At the same time the memory of the system is erased and the new calibration is star
ted, which is confirmed with an audible
signal and then the warning light
goes out.
•If the warning light does not go out after the basic setting, there is a fault in
the system. Have the vehicle inspected by your nearest specialist garage.
Warning light
lights up
If the tyre inflation pressure of at least on e wheel is insufficiently inflated in compar-
ison to the stored basic value, the warning light
⇒ lights up.
Warning light
flashes
If the warning light flashes, there is a system fault. Have the vehicle inspected by
your nearest specialist garage.
WARNING
•When the warning light lights up, immediately reduce the speed and
avoid sudden steering and brake mano euvres. Please stop the vehicle
without delay at the nearest possible stop and inspect the tyres and their
inflation pressures.
•The driver is responsible for the correc t tyre inflation pressures. For this
reason, the tyre inflation pressures must be checked regularly.
•Under certain circumstances (e.g. sporty style of driving, wintry or
unpaved roads) the warning light can be delayed or does not light up at
all.
•The tyre inflation pressure-control system does not take away the
responsability from the driver for the correct tyre inflation pressure.
Note
The tyre inflation pressure-control system:
•does not replace the regular tyre inflatio n pressure control, because the system
cannot detect an even pressure loss,
•cannot warn in case of very rapid tyre inflation pressure loss, e.g. in case of
sudden tyre damage. In this case carefully bring the vehicle to a standstill without
sudden steering movements and without sharp braking.
Fig. 177 Button for setting
the tyre inflation pressure
control value
NKO B6 20.book Page 185 Wednesday, March 26, 2008 3:15 PM
Page 194 of 272

Towing a trailer195
Using the systemSafetyDriving TipsGeneral MaintenanceBreakdown assistanceTechnical Data
should be attached to folding arms. Adjust
the mirrors so that they provide you with
an adequate field of view to the rear.
Headlights
Before starting off with a hitched trailer, also check the setting of the headlights.
Alter the setting as necessary with th e aid of the headlight beam adjuster
⇒ page 59, “Headlamp range adjustment* ”.
Detachable ball head
The ball rod is detachable on vehicles which feature a factory-fitted towing device.
It is stowed together with separate fitting instructions in the spare wheel well in the
luggage compartment of the vehicle.
Further information on the towing device ⇒page 196.
Note
•We recommend that you also have yo ur vehicle inspected between service
intervals if you tow a trailer frequently.
•The handbrake on the towing vehicle must be put on when coupling and
decoupling the trailer.
Driving Tips
Particular caution is required when towing a trailer.
– Do not, as far as possible, drive with your vehicle unladen and the
trailer laden.
– Do not make full use of the legal maximum speeds. This applies in particular to downhill sections.
– Apply the brakes in good time.
– Keep a check on the coolant temperature gauge if the outside temper- ature is high.
Distribution of weight
The distribution of the weight is very poor if your vehicle is unladen and the trailer
is laden. Maintain a particularly low speed if you cannot avoid driving with this
combination.
Driving speed
Do not drive faster than 80 km/hour for safety reasons. This also applies for coun-
tries in which higher speeds are allowed.
The fact that the driving stability of the vehicle + trailer combination reduces with
increasing speed means that the legally allowed speed should not be used when
there are unfavourable road, weather or wind conditions, particularly near accident
black spots.
You must always reduce your speed immedi ately as soon as you detect even just
the slightest swaying of the trailer. On no account attempt to stop the trailer from
“swaying” by accelerating.
Apply the brakes in good time! If the trailer is fitted with a trailer brake, apply the
brakes gently at first and then brake firmly . This will avoid brake jolts resulting from
the trailer wheels locking. Shift down gears in good time before negotiating a down-
hill section to allow the engine to also act as a brake.
Engine overheating
Please keep a check on the coolant temperature gauge if you have to negotiate a
lengthy slope in a low gear at a high engine speed when the outside temperature is
very high ⇒page 11, “Coolant temperature gauge”.
If the needle of the coolant temperature gauge moves into the right-hand area or
even the red area of the scale, reduce yo ur speed immediately. Stop and switch off
the engine if the warning light
in the instrument cluste r begins flashing. Wait a
few minutes and check the level of coolant in the coolant expansion bottle
⇒ page 214, “Inspecting the coolant level”.
Please refer to the following guidelines ⇒page 31, “Coolant temperature/ Coolant
quantity ”.
The coolant temperature can be reduced by switching on the heating.
Any increase in the cooling effect of the coolant fan through shifting down a gear
and increasing the engine speed is not possible since the fan speed is independent
NKO B6 20.book Page 195 Wednesday, March 26, 2008 3:15 PM
Page 195 of 272

Towing a trailer
196
of the engine speed. One should also not drop a gear for this reason when towing
a trailer as long as the en gine can manage the slope without any drop in speed.
Detachable towing device*
The detachable ball head of the towing device is stowed in a box for the car tool kit
in the spare wheel well in the luggage compartment.
An instruction for correct installation an d removal of the ball head of the towing
device is supplied with the ball head
Inspect the ball head to ensure that it is properly locked each time before setting off.
The inspection is performed by turning the closed locking lever downwards. If the
locking lever can only be turned around a small angle (approx. 5°), the locking
mechanism is O.K. After the inspection pull the locking lever back again to its stop.
The towing device must not be used, if it does not wish to close or the locking lever
turns slightly in the closed position.
WARNING
Do not use any aids or tools for installing or removing the ball head. This
might result in damage to the locking mechanism to the extent that the
safety of the towing device is no longer assured - risk of an accident.
Note
•Do not carry out any modifications or repairs to the ball head or to any other
components on the towing device.
•Contact a specialist garage if you en counter any problems using the device.
•Never unlock the ball head with a trailer coupled to it.
•You should take off the ball head if you drive without towing a trailer. Inspect
whether the end cover properly seals off the mounting shaft.
•Remove the ball head beforehand if yo u wish to clean your vehicle using a
steam jet. Ensure that the end cover properly seals the mounting shaft.
•It is recommended to wear gloves when installing and removing.
Fig. 182 Detachable ball
head
NKO B6 20.book Page 196 Wednesday, March 26, 2008 3:15 PM
Page 222 of 272

Wheels and Tyres223
Using the systemSafetyDriving TipsGeneral MaintenanceBreakdown assistanceTechnical Data
setting off on a long trip. Please do not
forget the spare wheel when checking the
tyres.
The tyre inflation pressures for summer tyres are indicated on the inside of the fuel
filler flap ⇒ page 222, fig. 195 . The inflation pressures for winter tyres are 20 kPa
(0.2 bar) higher than those for summer tyres ⇒page 226.
The tyre pressure should be at the highest pressure specified for your vehicle at all
times.
The tyre inflation pressure of the emergency spare wheel R 18 is 420 kPa (4.2 bar).
Always check the inflation pressure of ty res when cold. Do not reduce the higher
pressure of warm tyres. Adapt the inflation pressure of the tyres accordingly if your
vehicle is carrying a significantly higher payload.
Driving style
Fast cornering, sharp acceleration and braking (squealing tyres) increase wear-and-
tear on your tyres.
Balancing wheels
The wheels of a new vehicle are balanced. There are a wide range of influences
when driving which may result in an im balance and which makes themselves felt
through vibration in the steering.
You should have the wheels rebalanced since any imbalance increases wear-and-
tear on the steering, the suspension and tyres. A wheel must also be rebalanced
when a new tyre is fitted and each time a tyre is repaired.
Wheel alignment errors
Incorrect wheel alignment at the front and rear will not only increase wear-and-tear
on the tyres but will also has an adverse effect on vehicle safety. Contact your
specialist garage if you notice any unusual tyre wear.
WARNING
•If the inflation pressure is too low, the tyre must perform a greater flexing
work. At higher speeds the tyre will warm up as a result of this. This can
result in tread separation and even a tyre blowout.
•Immediately replace the damaged rims or tyres.
For the sake of the environment
Tyres which are insufficiently inflated increase your fuel consumption.
Wear indicators
The base of the tread of the original tyres has wear indicators 1.6 mm high, installed
at right angles to the direction of travel. These wear indicators are located at 6 - 8
points depending on the make and are evenly spaced around the circumference of
the tyre ⇒fig. 196 . Markings on the walls of the tyres through the letters “TWI”,
triangular symbols or other symbols identify the position of the wear indicators.
A remaining tread of just 1.6 mm, measured in the grooves of the tread next to the
wear indicators, means that your tyres have reached their legally permissible
minimum tread depth.
WARNING
•You must have your tyres replaced with new ones at the latest when the
wear indicators have been worn do wn. The legally permissible minimum
tread depth should be observed.
•Worn tyres do not provide the necessary adhesion to the road surface at
high speeds on wet roads. One could experience “aquaplaning” (uncon-
trolled movements of the vehicle - “swimming” on a wet road surface).
Fig. 196 Tyre tread with wear
indicators
NKO B6 20.book Page 223 Wednesday, March 26, 2008 3:15 PM
Page 224 of 272

Wheels and Tyres225
Using the systemSafetyDriving TipsGeneral MaintenanceBreakdown assistanceTechnical Data
The date of manufacture
is als o stated o n the tyre wa ll (pos si bl y only on the inside
of wheel):
DOT ... 20 08...
means, for example, that the tyre was ma nufactured in the 20th week of the year
2008.
Any spare wheel which differs from the tyres fitted to the vehicle (e.g. winter tyres
or low-profile tyres) should only be used only for a short time in the event of a
puncture and when adopting an appropriately cautious style of driving. It should be
replaced as quickly as possible by a normal wheel.
WARNING
•Only use those tyres or wheel rims which have been approved for your
model of Škoda Auto a.s. vehicle. Failure to observe this instruction will
adversely affect the road safety of your vehicle - risk of accident! Approval
and licencing of your vehicle on publ ic roads may also become void as a
result.
•You must on no account drive at a hi gher speed than is permissible for
your tyres - risk of an accident resulting from tyre damage and loss of control
over your vehicle.
•Tyres which are 6 years old or more should only be fitted in exceptional
cases and when adopting an appropriately cautious style of driving.
•Never fit tyres which have already be en used without having adequate
knowledge of their previous history. Tyres age even if they have not been
used at all or only very little. A spare tyre must only be used in exceptional
cases and only then when adopting an appropriately cautious style of
driving.
•Do not, where possible, replace indivi dual tyres but at least replace them
on both wheels of a given axle at the same time. Always fit the tyres with the
deeper tread depth to the front wheels.
For the sake of the environment
Old tyres must be disposed of in conf ormity with the appropriate regulations.
Note
It is not normally possible to fit wheels from other models of cars for technical
reasons. This may also apply in certain circumstances to the wheels of the same
type of vehicle.
Wheel bolts
Wheels and wheel bolts are matched to each other in terms of design. Each time
you fit other wheels - e.g. light alloy wheels or wheels with winter tyres - you must
therefore also use the matching wheel bolts of the correct length and shape of
spherical cap. This is essent ial to ensure that the wheels are tightly fitted and that
the brake system operates properly.
If you retrofit wheel trims (or have this done), please also ensure that an adequate
flow of air remains assured for cooling the brake system.
The Škoda Service Partners are instructed in the technical possibilities which exist
regarding converting or retrofitting wheels, tyres and wheel trim.
WARNING
•In case of incorrect treatment of th e wheel bolts, the wheel can loosen
when the car is moving - risk of accident!
•The wheel bolts must be clean and must turn easily. However, they must
never be treated with grease or oil.
•If the wheel bolts are tightened to a too low tightening torque, the rim
can lossen when the car is moving - risk of accident! A tightening torque
which is too high can damage the bolts and threads and this can result in
permanent deformation of the contact surfaces on the rims.
Caution
The prescribed tightening torque of the wheel bolts for steel and light alloy wheels
is 120 Nm.
NKO B6 20.book Page 225 Wednesday, March 26, 2008 3:15 PM
Page 225 of 272

Wheels and Tyres
226
Winter tyres
The handling of your vehicle will be signi ficantly improved when driving on wintry
roads if you fit winter tyres. Summer tyres do not offer the same grip on ice, snow
and at temperatures below 7 °C because of their construction (width, rubber blend,
tread pattern). This particularly applie s to vehicles which are equipped with low-
profile tyres or high-speed tyres (code index H or V on wall of tyre).
Winter tyres must be mounted on all four wheels to obtain the best handling char-
acteristics.
You must only fit those types of winter tyre which are approved for your vehicle. The
permissible sizes of winter tyres are stated in your vehicle documents. Approvals
may differ because of national legislation.
Please remember that the tyres should be in flated to 20 kPa (0.2 bar) more than is
the case for summer tyres ⇒page 222, fig. 195 .
Winter tyres no longer offer the same winter performance once the tyre tread has
worn down to a depth of about 4 mm.
Ageing also causes winter tyres to lose most of their winter performance properties
- even in cases where the remaining tread depth is still clearly more than 4 mm.
Speed restrictions apply to winter tyres as well as to summer tyres ⇒page 224,
⇒ .
You can fit winter tyres of a lower speed category to your vehicle provided that you
also do not drive faster than the permissible maximum speed for such tyres, even
if the possible maximum speed of your ve hicle is higher. The corresponding tyre
category can damage the tyres when exceeding the permissible maximum speed.
Please pay attention to the notes if you decide to fit winter tyres ⇒page 222.
You can also fit so-called “all-year tyres” instead of winter tyres.
Please contact your specialist garage if there are any points which are not clear who
will be able to provide you with information regarding the maximum speed for your
tyres.
WARNING
You must on no account drive your car at more than the permissible
maximum speed for your winter tyres - risk of an accident resulting from
tyre damage and loss of control over your car.
For the sake of the environment
Fit your summer tyres on again in good time since summer tyres offer you better
grip and handling on roads which are free of snow and ice as well as ar tempera-
tures below 7 °C - the braking distance is shorter, there is less tyre noise, tyre wear
is reduced and fuel consumption is reduced.
Note
Please observe the various differing legal requirements regarding tyres.
Unidirectional tyres*
The direction of rotation of the tyres is marked by arrows on the wall of the tyre.
This indicates the direction of rotation of the tyre, and it is essential that the tyres
are fitted on to run in this direction. On ly then are the tyres able to provide the
optimal properties in terms of grip, lo w noise, wear-and-tear and aquaplaning.
Should it be necessary to fit on a spare wheel in exceptional cases with a tyre not
dedicated to the running direction or in o pposite running direction, please adopt a
cautious style of driving as the tyre is no longer able to provide optimal grip and
handling in such a situation. This particul arly important on wet roads. Please refer
to the notes ⇒page 231, “Spare wheel”.
You should have the defective tyre replac ed as soon as possible and restore the
correct direction of rotation on all tyres
Snow chains
Snow chains must only be mounted on the front wheels.
NKO B6 20.book Page 226 Wednesday, March 26, 2008 3:15 PM
Page 229 of 272

Breakdown assistance
230
WARNING
If the fire extinguisher is not correc tly attached, in case of sudden manoeu-
vres or an accident it can be “thrown” through the interior compartment and
cause injuries.
Note
•The fire extinguisher must comply with the relevant and valid legal require-
ments.
•Pay attention to the expiration date of the fire extinguisher. If the fire extin-
guisher is used after the expiration date, its proper function is no longer assured.
•The fire extinguisher is only supplied in certain countries within the scope of
delivery.
Vehicle tool kit
The vehicle tool kit and the lifting jack are stored in a locable box in the spare wheel
⇒ fig. 200 . There is also space here for the removable ball for the trailer towing
device*. The box is attached with a strap on the spare wheel.
The vehicle tool kit contains the following parts (depending on equipment fitted):
•Hook for pulling off a full wheel trim,
•Plastic clip for a wheel bolt cover,
•Wheel wrench,
•To w i n g e y e ,
•Adapter for the wheel bolts lock*,
•Replacement lamp,
•Torx wrench.
After using the lifting jack, screw in the arm of the lifting jack fully before placing it
back in its stowage area.
WARNING
•The factory-supplied lifting jack is only intended for your model of
vehicle. On no account attempt to lift a heavier vehicle or other loads - risk
of injury!
•Ensure that the vehicle tool kit is safely attached in the luggage compart-
ment.
Note
Ensure that the box is alwa ys secured with the strap.
Tyre repair kit*
The tyre repair kit is intended for the repair of minor tyre defects. The tyre repair kit
contains a compressor, inflation bottle, operating instructions and accessories.
The repair with the tyre repair kit is not at all intended to replace a permanent
repair on the tyre, this repair only serves to reach the next specialist garage. The
repair can be undertaken on the vehicle immediately. Please read the attached
instructions carefully before the repair.
The tyre repair kit is located in a textile bag. There is a velcro fastener on the under-
side of the bag, with which the bag is atta ched to the floor covering of the luggage
compartment in such a way that the side of the bag rests on the right side of the
luggage compartment and on the seat backrest.Fig. 200 Luggage compart-
ment: Storage compartment
for vehicle too kit
NKO B6 20.book Page 230 Wednesday, March 26, 2008 3:15 PM