engine SKODA SUPERB 2009 2.G / (B6/3T) Repair Manual
[x] Cancel search | Manufacturer: SKODA, Model Year: 2009, Model line: SUPERB, Model: SKODA SUPERB 2009 2.G / (B6/3T)Pages: 294, PDF Size: 21.33 MB
Page 216 of 294

Taking care of your vehicle and cleaning the vehicle
215
Using the system
Safety
Driving Tips
General Maintenance
Breakdown assistance
Technical Data
WheelsSteel wheels You should also thoroughly wash the wheels and wheel trims when giving your vehicle its regular wash. This prevents an
y brake dust, dirt and road salt from
sticking to the wheel hubs. You can remove
stubborn brake abrasion adhering to
t h e w h e e l s w i t h a n i n d u s tr i a l c l e a n e r. To u c h u p a n y d a m a g e to t h e p a i n tw o r k o n th e wheels before rust is able to form. Light alloy wheels Regular care of light alloy wheels is necessary in order to retain their decorative appearance over long periods. It is partic
ularly important to remove any road salt
and brake abrasion from light alloy wheels every two weeks, otherwise the light metal will suffer. Wash thoroughly and th
en treat the wheels with a protective
product for light alloy wheels which does
not contain any acidic components. You
should provide the wheel hubs with a hard wax layer every three months. You must not use any products which cause abrasi
on when treating the wheel hubs. Any
damage to the paint layer on the whee
l hubs must be touched up immediately.
We recommend using a preservative from
Škoda genuine accessories offered by
your Škoda dealer.
WARNING
One should remember when cleaning th
e wheels that moisture, ice and road
salt may adversely affect braking ef
ficiency - risk of an accident!
Note
Severe layers of dirt on th
e wheels can also result in
wheel imbalance. This may
show itself in the form of a wheel vibration which is transmitted to the steering wheel which, in certain circumstances, ca
n cause premature wear
of the steering.
This means it is necessary to remove the dirt.
Underbody protectionThe underside of your vehicl
e is protected for life against chemical and mechanical
influences. One cannot, however, completely rule out damage to the
protective layer
when
driving so we recommend that you inspect the protective layer on the underside of your vehicle and on the chassis at certain in
tervals - this is best done at the begin-
ning and end of the winter - and to touch up any damaged areas. The authorised Škoda Service Partners have suitable
spray products
available as
well as the necessary equipment and are familiar with the instructions for use. It is therefore best to have such touch-up work or additional corrosion protection measures carried out by an authorised Škoda Service Partner.
WARNING
Never use additional underbody protection or corrosion-protection agents for the exhaust pipes, catalytic converte
rs, diesel particle
filter or heat
shields. When the engine reaches its operating temperature, these substances might ignite - risk of fire!Protection of hollow spacesAll the cavities of your vehicle which are at
risk from corrosion are protected for life
by a layer of
protective wax
applied in the factory.
This wax protection does not require to be
inspected or re-treated. Please remove
any small amount of wax which flows out of
the cavities at high temperatures with
a plastic scraper and clean the spot using petroleum cleaner.
WARNING
Safety and environmental protection regulations should observed when using petroleum cleaner to re
move wax - a risk of fire!
s2dk.1.book Page 215 Wednesday, April 8, 2009 12:23 PM
Page 217 of 294

Taking care of your vehicle and cleaning the vehicle
216
Engine compartmentGood corrosion protection is very importan
t, particularly in winter when one often
drives over its salt-strewn roads. One should therefore clean the whole engine compartment before and after the salt spre
ading period and treat with preservative
in order to prevent the salt from being destructive. The authorised Škoda Service Partners have the cleaning agents and preservatives recommended by the manufacturer and also the required equipment.
WARNING
•
It is necessary to observe the guidelines given in the chapter before
working on the engine compartment
⇒page 223, “Working in the engine
compartment”.•
Let the engine cool down before
cleaning the engine compartment.
Caution
•
Engine cleaning may be only be und
ertaken when the ignition is off.
•
It is recommended to cover the generator before washing the engine compart-
ment.
For the sake of the environment
The dirty water produced by
washing the engine has washed away petrol, and resi-
dues of grease and oil and should therefor
e be cleaned by an oil separator. This is
why engine washing should only be undertake
n in a specialist garage or at a fueling
station (when these are fitted with the required equipment).
Care of the interior of vehiclePlastic parts, artificial leather and clothsYou can clean plastic parts and artificial le
ather with a moist cloth. You should only
treat such parts with special
solvent-free plastic cleaning and care products
it
does prove to be adequate. Upholstery cloth and cloth trim on the
doors, luggage compartment cover, head-
liner etc. are best treated with special
cleaning products, using if necessary a
dry
foam
and a soft sponge or brush.
We recommend using a cleaning product
from Škoda genuine accessories offered
by your Škoda dealer.
Caution
Solvent-free cleaners attack the material and can damage it.Fabric covers of electrically heated seatsDo
not clean
the seat covers moist as this may result in damage to the seat heating
system. Clean such covers using special agents, for example dry foam.Natural leather Natural leather requires quite particular care and attention.Leather should be treated from time
to time according the following
guidelines depending on how much it is used. Normal cleaning – Clean soiled areas of the leather
with slightly moistened cotton or
woollen cloth.
s2dk.1.book Page 216 Wednesday, April 8, 2009 12:23 PM
Page 220 of 294

Fuel
219
Using the system
Safety
Driving Tips
General Maintenance
Breakdown assistance
Technical Data
FuelPetrolGrades of petrolThere are various grades of petrol. Please read
⇒page 267, “Technical Data” in
order to know which grade of petrol your
vehicle requires. You will also find the
same information affixed to the inside of
the fuel filler flap of your vehicle
⇒ page 220, fig. 199
.
A distinction is made between unleaded an
d leaded petrol. All Škoda vehicles with
petrol engines are equipped with a catalyti
c converter and must therefore be only
driven with
unleaded petrol
. Unleaded petrol
complies with the
standard
DINEN228
.
The individual grades of petr
ol are distinguished by their
octane number
(RON).
Please adopt the following procedure if the grade of petrol which you normally use is not be available in
exceptional circumstances.
•
Engines which need
unleaded premium petrol 95 RON
can also be run on
unleaded regular petrol 91 RON. This does, however, result in a slight loss in performance. If, in an emergency, the only fuel availa
ble is one which has a lower octane number
than that required by the engine then only drive at medium engine speeds and lower engine loadings. You can make unlimited use of fuel whic
h has a higher octane
number than that
required by the engine. There will, howeve
r, be no advantages gained by this in
terms of engine performance and fuel consumption! The handling, performance and
life of your engine are determined to a significant
extent by the quality of the fuel.
Do not use any petrol additives.
Use a fuel
complying with
the standard.
You can find further information on refuelling
⇒page 220, “Refuelling”.
Caution
•
Filling the tank even only once with lead
ed petrol will result in the catalytic
converter being destroyed.•
Operating the engine with petrol of a lo
w octane number can result in engine
damage at high revolutions or severe engine loading.DieselDiesel fuelYour vehicle can be operated with
diesel fuel
, which complies with the standard
DIN EN 590
.
Fuel additives You must not use fuel additives, so-called “flow improvers” (petrol and similar products) in diesel fuel. If the quality of the diesel fuel is poor, it is then necessary to drain the
fuel filter
more often than stated in the Service schedule. You can find information on refuelling
⇒page 220, “Refuelling”.
Caution
•
Use fuel which complies with the standard
DIN EN 590
. Filling the tank even
only once, which does not comply with th
e standard, can result
in damage to the
fuel system.•
Water which has collected in the fuel fi
lter can result in engine problems.
•
Your vehicle is not adapted
for use of biofuel (RME), therefore this fuel must not
be refuelled and driven. Using this fuel (RME) can lead to damage to the engine or the fuel system.
s2dk.1.book Page 219 Wednesday, April 8, 2009 12:23 PM
Page 222 of 294
Fuel
221
Using the system
Safety
Driving Tips
General Maintenance
Breakdown assistance
Technical Data
Closing fuel filler cap – Screw on the fuel filler cap by turning it to the right until it is heard to
click.
– Close the fuel filler flap until it locks.The correct grade of fuel for your vehicle as
well as the tyre size and inflation pres-
sures are stated on a sticker affixed to the
inside of the fuel filler flap. Further infor-
mation on fuel
⇒page 219.
The fuel tank has a capacity of about 60 litres.
WARNING
Pay attention to any legal requirements if
you do carry a spare canister in the
vehicle. We do not recommend carrying any fuel canisters in your vehicle for safety reasons. The canister can be da
maged in the event of an accident and
fuel may leak out.
Caution
•
Before refuelling it is necessary to switch off the auxiliary heating system (auxil-
iary heating and ventilation) *.•
Remove any fuel which has spilled onto the paintwork of your vehicle immedi-
ately - risk of paint damage!•
Vehicles fitted with catalytic converter sh
ould never be allowed to let the fuel
tank to run completely empty. An irregular
supply of fuel to the engine can result in
misfiring and unburnt fuel may get into the exhaust system, which may result in overheating and damage to the catalytic converter.•
Make sure that the valve is not pressed into the filler tube when inserting the
pump nozzle into the filler tube. Otherwis
e you are unintentionally filling up the
volume, which in case of heat can cause an
expansion of the fuel. This can lead to
an overflow of fuel or damage
to parts of the fuel reservoir.
•
T h e f u e l t a n k i s f u l l j u s t a s s o o n a s t h
e pump nozzle switches off for the first time,
provided the nozzle has been operated properly. Do not continue refuelling - otherwise the expansion volume is filled up.
s2dk.1.book Page 221 Wednesday, April 8, 2009 12:23 PM
Page 223 of 294
Inspecting and replenishing
222
Inspecting and replenishingEngine compartmentBonnet remote releaseBonnet remote release – Pull the unlocking lever below the
dash panel on the driver's side
⇒
fig. 200
.
The bonnet jumps out of its lock as a result of the spring force.
Opening and closing the bonnet.Opening the bonnet – Unlock the bonnet
⇒
fig. 200
.
– Ensure that the arms of the windsc
reen wipers are correctly in place
against the windscreen
before opening
the bonnet otherwise
damage could occur to the paintwork.
– Press the locking button
⇒
fig. 201
, the bonnet is then unlocked.
– Grasp the bonnet at the bottom part
of the radiator grille and lift it
towards the top so that it is held opened by the gas pressure support.
Closing the bonnet – You can overcome the force of the gas pressure support by pulling the
bonnet towards the bottom.
– Allow the bonnet to drop from a height
of about 30 cm into the lock -
bonnet
do not press down on it
!
Fig. 200 Bonnet release lever
Fig. 201 Radiator grille: Lever of the locking button
s2dk.1.book Page 222 Wednesday, April 8, 2009 12:23 PM
Page 224 of 294
Inspecting and replenishing
223
Using the system
Safety
Driving Tips
General Maintenance
Breakdown assistance
Technical Data
WARNING
•
Never open the bonnet if you see that steam or coolant is flowing out of
the engine compartment - risk of scaldi
ng! Wait long enough until the steam
or coolant has stopped escaping.•
For safety reasons, the bonnet must always be properly closed when
driving. One should therefore check that
the lock has in fact engaged prop-
erly after closing the bonnet.•
Stop your vehicle immediately while driv
ing if you notice that the lock is
not properly engaged and close the bonne
t properly - risk of an accident!
Caution
Ensure that the arms of the windscreen
wipers are correctly
in place against the
windscreen before opening the bonnet otherwise damage could occur to the paintwork.Working in the engine compartment Particular care is required when carrying out any work in the engine compartment!There is a risk of injuries, scalding,
accidents and fire when working in the
engine compartment, e.g. inspecting and replenishing oil and other fluids. For this reason, it is essential to comply with the warning instructions stated below and with the general applicable
rules of safety. The engine compart-
ment of your car is a hazardous area
⇒
.
WARNING
•
Never open the bonnet if you see that steam or coolant is flowing out of
the engine compartment - risk of scaldi
ng! Wait long enough until the steam
or coolant has stopped escaping.•
Switch off the engine and pull out the ignition key.
•
Apply the handbrake firmly.
•
If your vehicle is fitted with a ma
nual gearbox, move the gearshift lever
into Neutral, or if it is fitted with
automatic gearbox, move the selector lever
into position P.•
Allow the engine to cool down.
•
Keep children clear of the engine compartment.
•
Never spill oil and other fluids over the hot engine. Such fluids (e.g. the
antifreeze contained in the coolant) may ignite!•
Avoid short circuits in the electrical system - particularly on the battery.
•
Never place your hand into the radiator fan as long as the engine is still
warm. The fan might suddenly start running!•
Never open the cap of the coolant expa
nsion bottle as long
as the engine
is still warm. The cooling system is pressurized!•
Cover over the cap of the coolant expansion reservoir with a large cloth
when opening it as protection for your
face, hands and arms from hot steam
or hot coolant.•
Do not let objects, such as e.g cleani
ng cloth or tools lie in the engine
compartment.•
If you wish to work under the vehicle, you must secure the vehicle from
rolling away and support it with suitable supporting blocks: the car jack is not sufficient for this - risk of injury!•
In cases where it be necessary to carry out inspection work when the
engine is running there is an additional risk from rotating parts (e.g. the V- ribbed belt, alternator, radiator fan) and from the high-voltage ignition system. Please observe in addition the following.
− Never touch the electrical cabl
es of the ignition system.
− Absolutely avoid any jewellery, loose items of clothing or long hair from getting into the rotating parts of the engine - Hazard! Therefore remove any jewellery beforehand, tie up your hair and wear tight fitting clothing.
•
Please also comply with the warnin
g instructions stated below when
carrying out any essential work on th
e fuel system or on the electrical
system.
WARNING (continued)
s2dk.1.book Page 223 Wednesday, April 8, 2009 12:23 PM
Page 225 of 294
Inspecting and replenishing
224
−Always separate the car batter
y from the electrical system.
− Do not smoke. − Never carry out any work close to naked flames. − Always keep a working fire
extinguisher at hand.
Caution
When replenishing fluids in the engine, always ensure that the fluids are on no account mixed up. This may result in ma
jor operating problems and also vehicle
damage!Overview of the engine compartment The main inspection pointsFig. 202 Diesel engine 1.9 litre/77 kW
Coolant expansion bottle . . . . . . . . . . . . . . . . . . . . . . . . . . . . . . . . . . . Windshield washer fluid reservoir . . . . . . . . . . . . . . . . . . . . . . . . . . . Engine oil filler opening . . . . . . . . . . . . . . . . . . . . . . . . . . . . . . . . . . . . . Engine oil dipstick . . . . . . . . . . . . . . . . . . . . . . . . . . . . . . . . . . . . . . . . . . Brake fluid reservoir . . . . . . . . . . . . . . . . . . . . . . . . . . . . . . . . . . . . . . . . Battery (below a cover) . . . . . . . . . . . . . . . . . . . . . . . . . . . . . . . . . . . . . Note
The location of the inspection points in
the engine compartment of petrol and
diesel engines is practically identical.Engine oilCheck engine oil level The dipstick indicates the level of oil in the engine.Checking the oil level – Ensure that the vehicle is positioned on a level surface. – Switch the engine off. – Open the bonnet
⇒
page 223.
WARNING (continued)
A1
227
A2
234
A3
225
A4
224
A5
228
A6
229
Fig. 203 Dipstick
s2dk.1.book Page 224 Wednesday, April 8, 2009 12:23 PM
Page 226 of 294

Inspecting and replenishing
225
Using the system
Safety
Driving Tips
General Maintenance
Breakdown assistance
Technical Data
– Wait a few minutes and pull out the oil dipstick. – Wipe off the dipstick with a clea
n cloth and insert it again fully.
– Then withdraw the dipstick ag
ain and read off the oil level.
Oil level within range – You must
not
top up the oil.
Oil level within range – You
may
top up the oil. It is possible that the oil level may then be
within range after doing this.
Oil level within range – You
must
top up the oil
⇒
page 225. It is sufficient, once this is done,
to keep the oil level within range .
It is normal for the engine to consume oi
l. The oil consumption may be as much as
0.5 l/1 000 km depending on your style of
driving and the conditions under which
you operate your vehicle. Th
e oil consumption may be sl
ightly higher than this
during the first 5 000 kilometres. One should therefore check the oil level at regular intervals, preferably every time after the fuel tank is filled or after driving for long stretches. We recommend maintaining the oil level within the range -
but not above this
,
if the engine has been operating at high loads, for example during a lengthy motorway trip during the
summer months, towing a trai
ler or negotiating a high
mountain pass. The warning light in the instrument cluster* will indicate
⇒page 42, “Engine oil
level
” whether the oil level is too low. In this case, check the oil level as soon as
possible. Top up with an appropriate quantity of oil.
Caution
•
The oil level must on no account ex
tend beyond the ra
nge . Danger of
damaging the catalytic converter.
•
Do not continue your journey
if for some reason it is not possible under the
conditions prev
ailing to top up with oil.
Switch of the engine and contact
and
obtain professional assistance from a specialist garage.
Note
Engine oil specifications
⇒page 270.
Replenishing engine oil– Inspecting the engine oil level
⇒
page 224.
– Unscrew the cap of the engine oil filler opening.– Pour in a suitable grade of oil in portions of 0.5 litres
⇒
page 270.
– Inspect the oil level
⇒
page 224, “Check engine oil level”.
– Carefully screw on the cap of the filler opening and push the dipstick
in fully.
WARNING
•
Avoid dripping oil onto hot parts of the engine when topping up will oil -
a risk of fire!•
Read and observe the warning notes
⇒page 223, “Working in the engine
compartment” before working in the engine compartment.
For the sake of the environment
The oil level must on no account be above the range
⇒page 224. Oil will other-
wise be drawn in through the crankcas
e ventilation and may pass through the
exhaust system to atmosphere. The oil ma
y combust in the catalytic converter and
damage it.
AAAB
AA
AC
AB
AA
AA
Aa
s2dk.1.book Page 225 Wednesday, April 8, 2009 12:23 PM
Page 227 of 294

Inspecting and replenishing
226
Changing engine oilThe engine oil must be changed at the intervals stated in the Service schedule or according to the service interval indicator
⇒page 20, “Service Interval Display”.
WARNING
•
Only carry out the engine oil change, if you have the required profes-
sional knowledge!•
Read and observe the warning notes
⇒page 223, “Working in the engine
compartment” before working in the engine compartment.•
Let the engine cool down - risk of burning from hot oil.
•
Wear an eye protection - risk of
caustic burns due to oil splashes.
•
Oil is toxic! Store old oil in a safe place out of the reach of children and
unauthorized persons until you dispose of it properly.
Caution
You must not pour any additives into th
e engine oil - risk of engine damage!
Damage, which results from such product, are excluded from the warranty.
For the sake of the environment
•
You must on no account pour oil into the ground or into the sewage system.
•
In view of the problems involved in prop
erly disposing of old oil, the necessary
special tools and the knowledge required for such work, we recommend that you have the oil and oil filter change carried
out by an authorised Škoda Service Partner.
Note
After your skin has come in contact with
the oil, you must thoroughly wash your
skin.
Cooling systemCoolant The job of the coolant is to cool the engine.The cooling system does not require an
y maintenance under normal operating
conditions. The coolant consis
ts of water with a concentration of coolant additive
of 40 %. This mixture not only provides
antifreeze protection down to -25°C but
also protects the cooling and heating system
from corrosion. It also prevents the
formation of scale and significantly increases the boiling point of the coolant. You must therefore not reduce the concentration of antifreeze agent in the coolant by adding water, also not
during the summer months or in countries with a warm
climate.
The concentration of coolant additive in the coolant must be at least
40%. You can increase the amount of antifreeze
in the coolant if a higher concentration
of antifreeze is necessary for climatic
reasons but only up to 60% (antifreeze
protection down to approx. -40°C). The an
tifreeze protection tails off above that
concentration. Vehicles exported to countri
es with a cold climate (e.g. Sweden, Norway, Finland)
are already factory-filled with a coolant which offers antifreeze protection down to about -35°C. In these countries the concentr
ation of coolant additive should be at
least 50 %. Coolant The cooling system is factory-filled with c
oolant (purple in colour), which complies
with the specification TL-VW 774 G. We recommend that you use the same co
olant additive - G12 PLUS-PLUS (purple
in colour) for topping up the system. Please contact an authorised Škoda Service Partner if you have any questions regarding the coolant or if you wish
to fill up with a different coolant.
An authorised Škoda Service Partner can
also supply you with the correct coolant
additives.
s2dk.1.book Page 226 Wednesday, April 8, 2009 12:23 PM
Page 228 of 294
Inspecting and replenishing
227
Using the system
Safety
Driving Tips
General Maintenance
Breakdown assistance
Technical Data
Caution
•
Other coolant additives may cause operational problems which, in partic-
ular, involves significantly redu
cing the anticorrosion effect.
•
Any faults or problems resulting from corrosion may cause a loss of
coolant and, as a consequence of th
is, result in major engine damage.
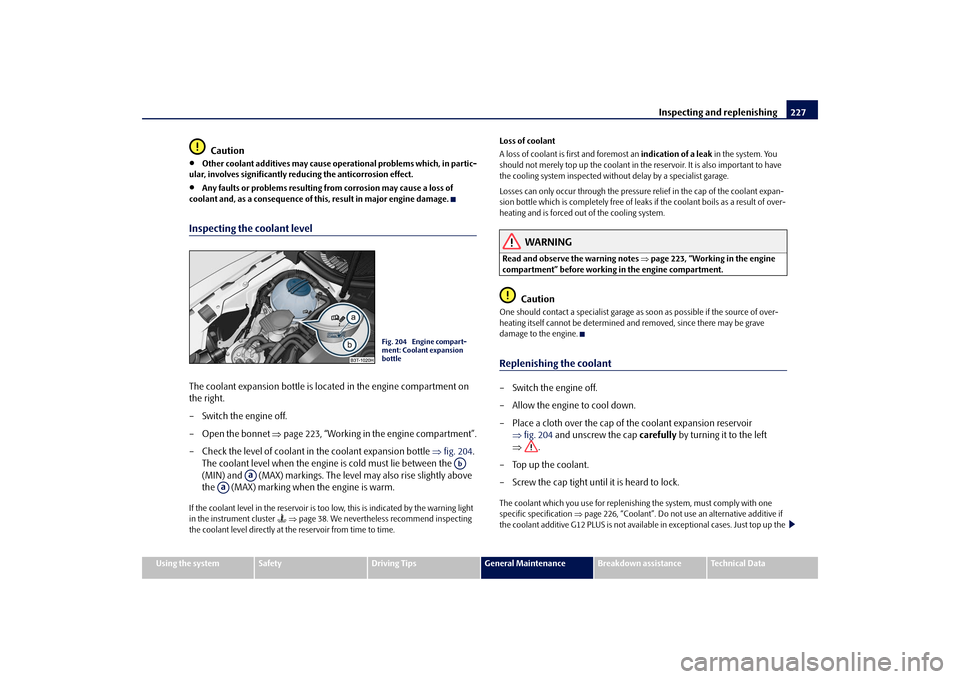
Inspecting the coolant levelThe coolant expansion bott
le is located in the engine compartment on
the right. – Switch the engine off. – Open the bonnet
⇒
page 223, “Working in the engine compartment”.
– Check the level of coolant in
the coolant expansion bottle
⇒
fig. 204
.
The coolant level when the engine is cold must lie between the (MIN) and (MAX) markings. The level may also rise slightly above the (MAX) marking when the engine is warm.
If the coolant level in the reservoir is too low, this is indicated by the warning light in the instrument cluster
⇒page 38. We nevertheless recommend inspecting
the coolant level directly at the reservoir from time to time.
Loss of coolant A loss of coolant is first and foremost an
indication of a leak
in the system. You
should not merely top up the coolant in the
reservoir. It is also important to have
the cooling system inspected without delay by a specialist garage. Losses can only occur through the pressure relief in the cap of the coolant expan- sion bottle which is completely free of leak
s if the coolant boils as a result of over-
heating and is forced out of the cooling system.
WARNING
Read and observe the warning notes
⇒page 223, “Working in the engine
compartment” before working in the engine compartment.
Caution
One should contact a specialist garage as
soon as possible if the source of over-
heating itself cannot be determined
and removed, since there may be grave
damage to the engine.Replenishing the coolant– Switch the engine off. – Allow the engine to cool down.– Place a cloth over the cap of the coolant expansion reservoir
⇒
fig. 204
and unscrew the cap
carefully
by turning it to the left
⇒
.
– Top up the coolant. – Screw the cap tight until it is heard to lock.The coolant which you use for replenishi
ng the system, must comply with one
specific specification
⇒page 226, “Coolant”. Do not use an alternative additive if
the coolant additive G12 PLUS is not available in exceptional cases. Just top up the
Fig. 204 Engine compart- ment: Coolant expansion bottle
Ab
Aa
Aa
s2dk.1.book Page 227 Wednesday, April 8, 2009 12:23 PM