sensor SKODA SUPERB 2010 2.G / (B6/3T) Owner's Manual
[x] Cancel search | Manufacturer: SKODA, Model Year: 2010, Model line: SUPERB, Model: SKODA SUPERB 2010 2.G / (B6/3T)Pages: 287, PDF Size: 16.59 MB
Page 13 of 287
The brief instruction
12
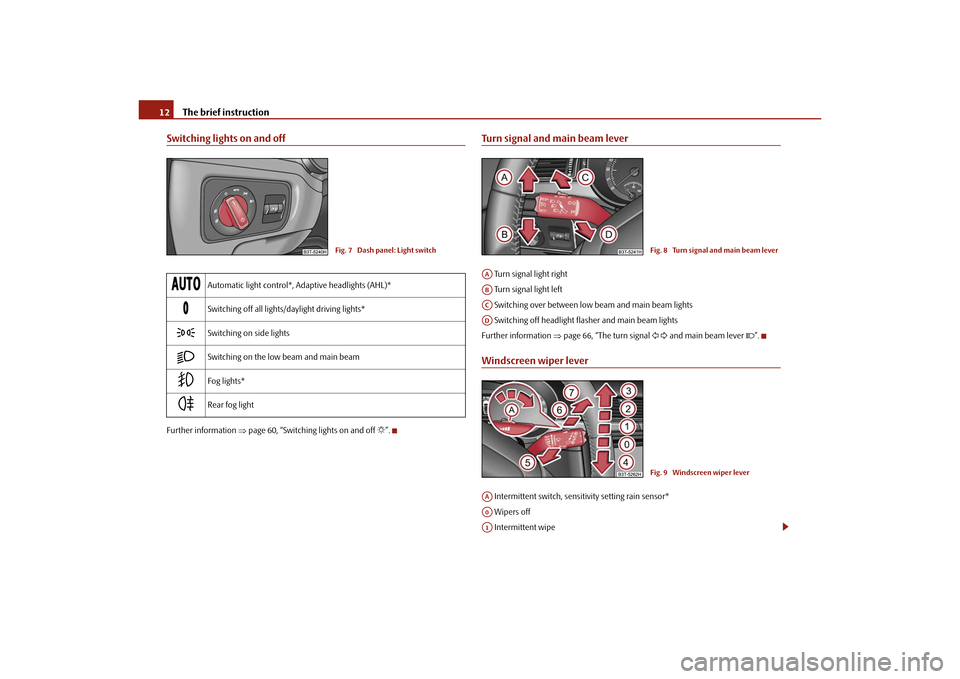
Switching lights on and offFurther information page 60, “Switching lights on and off ”.
Turn signal and main beam lever Turn signal light right
Turn signal light left
Switching over between low beam and main beam lights
Switching off headlight fl asher and main beam lights
Further information page 66, “The turn signal and main beam lever ”.Windscreen wiper lever Intermittent switch, sensitivity setting rain sensor*
Wipers off
Intermittent wipe
Automatic light control*, Adaptive headlights (AHL)*
Switching off all lights/daylight driving lights*
Switching on side lights
Switching on the low beam and main beam
Fog lights*
Rear fog light
Fig. 7 Dash panel: Light switch
Fig. 8 Turn signal and main beam lever
AAABACAD
Fig. 9 Windscreen wiper lever
AAA0A1
s3fg.2.book Page 12 Friday, April 30, 2010 12:17 PM
Page 26 of 287
Instruments and warning lights25
Using the system
Safety
Driving Tips
General Maintenance
Breakdown assistance
Technical Data
– Investigate the function indicated.
– Obtain professional assistance.
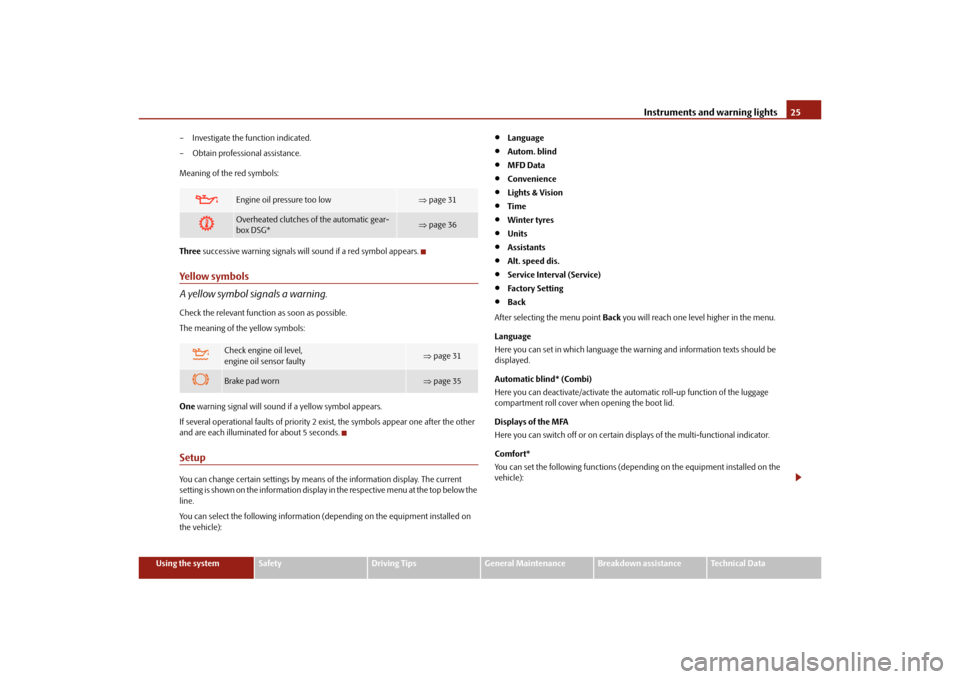
Meaning of the red symbols:
Three
successive warning signals will sound if a red symbol appears.
Yellow symbols
A yellow symbol signals a warning.Check the relevant function as soon as possible.
The meaning of the yellow symbols:
One warning signal will sound if a yellow symbol appears.
If several operational faults of priority 2 exist, the symbols appear one after the other
and are each illuminated for about 5 seconds.SetupYou can change certain setti ngs by means of the information display. The current
setting is shown on the information display in the respective menu at the top below the
line.
You can select the following information (d epending on the equipment installed on
the vehicle):
Language
Autom. blind
MFD Data
Convenience
Lights & Vision
Time
Winter tyres
Units
Assistants
Alt. speed dis.
Service Interval (Service)
Factory Setting
Back
After selecting the menu point Back you will reach one level higher in the menu.
Language
Here you can set in which language the warning and information texts should be
displayed.
Automatic blind* (Combi)
Here you can deactivate/activate the automatic roll-up function of the luggage
compartment roll cover when opening the boot lid.
Displays of the MFA
Here you can switch off or on certain displays of the multi-functional indicator.
Comfort*
You can set the following f unctions (depending on the equipment installed on the
vehicle):
Engine oil pressure too low
page 31
Overheated clutches of the automatic gear-
box DSG*
page 36
Check engine oil level,
engine oil sensor faulty
page 31
Brake pad worn
page 35
s3fg.2.book Page 25 Friday, April 30, 2010 12:17 PM
Page 27 of 287
Instruments and warning lights
26
Lights and Visibility
Here you can set how long the light should stay on for the function Coming/Leaving
Home. Furthermore you can here switch on or off the functions daylight driving lights,
automatic rear window wiper, conven ience turn signal and travel mode.
After selecting the menu Fa c t o r y s e t t i n g the factory setting is established again.
After selecting the menu point travel mode, you can activate / deactivate the mode
“tourist light”. This mode makes it possible to drive in countries with opposing traffic system, driving on the left/right, without dazzling the oncoming vehicles. Further infor-
mation
page 64, “Tourist light”.
Time
Here you can set the time, the time format (12 or 24 hour indicator) and the time
change summer/winter time.
Winter tyres
Here you can set at which speed a warning signal should sound. This function is used
for e.g winter tyres with the permissible maximum speed less than the maximum
speed of the vehicle.
When exceeding the speed, the following is displayed on the information display*:
Winter tyres max. speed ... km/h
Measures
Here you can set the units for temperat ure, consumption and distance driven.
Assistant
Here you can adjust the tones of the acoustic signals of the parking aid*.
Second speed
Here you can switch on the display of the second speed in mph or in km/h
2).
Service
Here you can have the kilometers still to be driven and the days until the following
service interval shown and the Service Interval Display reset.
Factory Setting
After selecting the menu Factory Setting the factory setting of the information display
is established again.
Rain closing
On vehicles with rain sensor you can switch on or off the
function for automatic closing of the windows and the
sliding/tilting roof in case of ra in and locked vehicle. If it is
not raining and the function is set, the windows including
the sliding/tilting roof are closed automatically after
approx. 12 hours.
Door open
Here you can switch on or off the functions for opening a
single door and automatic closin g, this also applies to the
KESSY system*.
ATA c o n fi r m
Here you can set if a signal to ne should sound additionally
when activating or deactivating the anti-theft alarm system
.
Window op.
Here you can set the convenience mode only for the driver
window or for all the windows.
Mirror down
Here you can switch on or off the function for mirror low-
ering on the front passenger side when engaging the
reverse gear
a).
a)This function is only available on vehicles with an electrically adjustable driver seat.Mirror adjust.
Here you can switch on or off the function for left and right
exterior mirror adjustment simultaneously.
Fa cto r y se tt ing
After selecting this menu the convenience setting is reset
to factory setting. The following is displayed in the infor-
mation display:
Factory setting for convenience is set
2)Valid for countries where the values ar e indicated in British measuring units.
s3fg.2.book Page 26 Friday, April 30, 2010 12:17 PM
Page 33 of 287
Instruments and warning lights
32
The warning light will go out if the bonnet is le ft open for more than 30 seconds. If no
engine oil has been replenished, the warning light will come on again after driving
about 100 km.
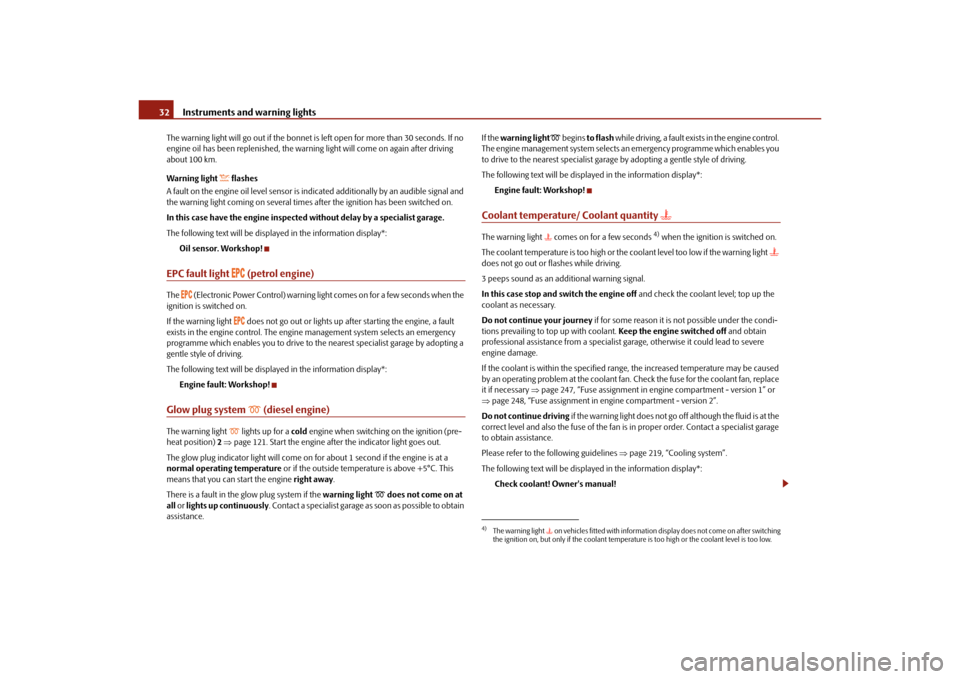
Warning light
flashes
A fault on the engine oil level sensor is indicated additionally by an audible signal and
the warning light coming on several times after the ignition has been switched on.
In this case have the engine inspected without delay by a specialist garage.
The following text will be displayed in the information display*:
Oil sensor. Workshop!
EPC fault light
(petrol engine)
The
(Electronic Power Control) warning light comes on for a few seconds when the
ignition is switched on.
If the warning light
does not go out or lights up after starting the engine, a fault
exists in the engine control. The engine management system selects an emergency
programme which enables you to drive to the nearest specialist garage by adopting a
gentle style of driving.
The following text will be displayed in the information display*:
Engine fault: Workshop!
Glow plug system
(diesel engine)
The warning light
lights up for a cold engine when switching on the ignition (pre-
heat position) 2 page 121. Start the engine after the indicator light goes out.
The glow plug indicato r light will come on for about 1 second if the engine is at a
normal operating temperature or if the outside temperature is above +5°C. This
means that you can start the engine right away.
There is a fault in the glow plug system if the warning light
does not come on at
all or lights up continuously . Contact a specialist garage as soon as possible to obtain
assistance. If the
warning light
begins to flash while driving, a fault exists in the engine control.
The engine management system selects an emergency programme which enables you
to drive to the nearest specialist garage by adopting a gentle style of driving.
The following text will be displayed in the information display*:
Engine fault: Workshop!
Coolant temperature/ Coolant quantity
The warning light comes on for a few seconds
4) when the ignition is switched on.
The coolant temperature is too high or the coolant level too low if the warning light
does not go out or flashes while driving.
3 peeps sound as an additional warning signal.
In this case stop and switch the engine off and check the coolant level; top up the
coolant as necessary.
Do not continue your journey if for some reason it is not possible under the condi-
tions prevailing to top up with coolant. Keep the engine switched off and obtain
professional assistance from a specialist garage, otherwise it could lead to severe
engine damage.
If the coolant is within the specified range, the increased temperature may be caused
by an operating problem at the coolant fan. Check the fuse for the coolant fan, replace
it if necessary page 247, “Fuse assignment in engi ne compartment - version 1” or
page 248, “Fuse assignment in engine compartment - version 2”.
Do not continue driving if the warning light does not go off although the fluid is at the
correct level and also the fuse of the fan is in proper order. Contact a specialist garage
to obtain assistance.
Please refer to the following guidelines page 219, “Cooling system”.
The following text will be displayed in the information display*: Check coolant! Owner's manual!
4)The warning light on vehicles fitted with information display does not come on after switching
the ignition on, but only if the coolant temperature is too high or the coolant level is too low.
s3fg.2.book Page 32 Friday, April 30, 2010 12:17 PM
Page 41 of 287
Unlocking and locking
40
Only the driver's door can be unlocked or locked using the key if the central locking
system fails page 43, “Emergency unlocking and lo cking of the driver's door”. You
can lock or unlock manually the other doors and the boot lid.
Emergency locking of the door page 43.
Emergency unlocking of the boot lid page 48.
KESSY system* - DescriptionThe KESSY system (Keyless Entry Start Exit System) enables a comfort unlocking and
locking of the vehicle and a start-up without ac tively using the remote control key. It is
sufficient to carry the key with you, for example in your pocket, for unlocking and
locking the vehicle or for starting the engine.
The functions of the central locking system , the safe securing system* and the anti-
theft alarm system* correspond to vehicles without KESSY system. Only the control
elements are different.
Control elements of the system:
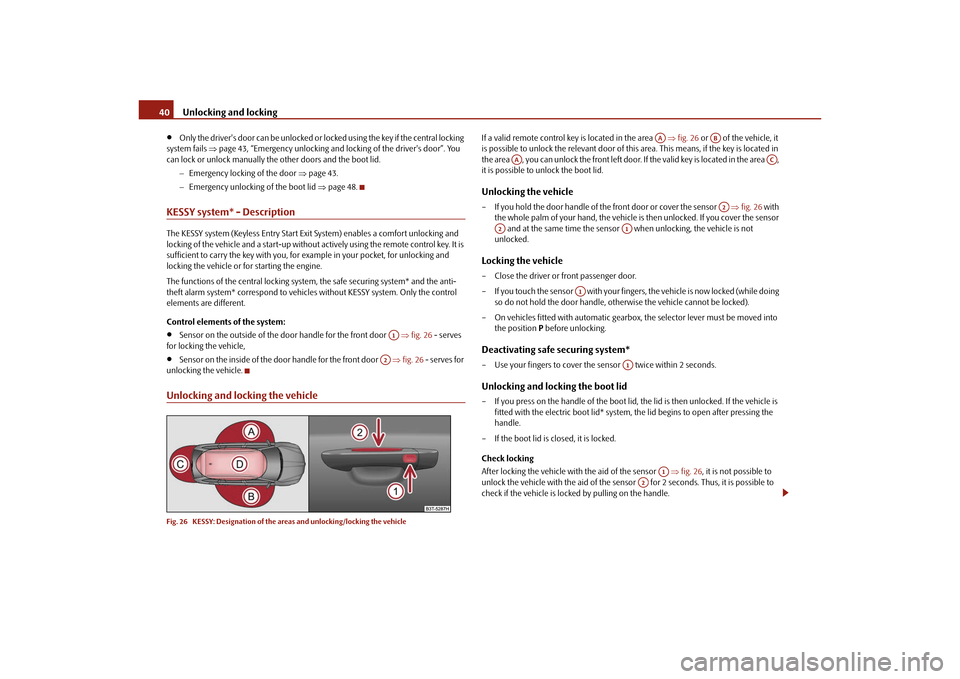
Sensor on the outside of the door handle for the front door fig. 26 - serves
for locking the vehicle,
Sensor on the inside of the d oor handle for the front door fig. 26 - serves for
unlocking the vehicle.
Unlocking and locking the vehicleFig. 26 KESSY: Designation of the areas and unlocking/locking the vehicle
If a valid remote control key is located in the area fig. 26 or of the vehicle, it
is possible to unlock the relevant door of this area. This means, if the key is located in
the area , you can unlock the front left door. If the valid key is located in the area ,
it is possible to unlock the boot lid.Unlocking the vehicle– If you hold the door handle of the front door or cover the sensor fig. 26 with
the whole palm of your hand, the vehicle is then unlocked. If you cover the sensor and at the same time the sensor when unlocking, the vehicle is not
unlocked.Locking the vehicle– Close the driver or front passenger door.
– If you touch the sensor with your finger s, the vehicle is now locked (while doing
so do not hold the door handle, othe rwise the vehicle cannot be locked).
– On vehicles fitted with automatic gearbox, the selector lever must be moved into
the position P before unlocking.Deactivating safe securing system*– Use your fingers to cover the sensor twice within 2 seconds.Unlocking and locking the boot lid– If you press on the handle of the boot lid, the lid is then unlocked. If the vehicle is
fitted with the electric boot lid* system, the lid begins to open after pressing the
handle.
– If the boot lid is closed, it is locked.
Check locking
After locking the vehicle with the aid of the sensor fig. 26 , it is not possible to
unlock the vehicle with the aid of the sensor for 2 seconds. Thus, it is possible to
check if the vehicle is locked by pulling on the handle.
A1
A2
AA
AB
AA
AC
A2
A2
A1
A1
A1
A1
A2
s3fg.2.book Page 40 Friday, April 30, 2010 12:17 PM
Page 42 of 287
Unlocking and locking41
Using the system
Safety
Driving Tips
General Maintenance
Breakdown assistance
Technical Data
Caution
After leaving the vehicle, it does not lock automatically, this is why you should pay
attention to the procedure for locking the vehicle page 40.
Note
If the vehicle battery or the battery in the remote control key is weak or discharged,
perhaps the vehicle cannot be unlocked or locked via KESSY. In such a case, use the
emergency unlocking or locking of the driver's door, see Owner's Manual.Further possibilites of lockingProtection against inadvertently locking the key in the vehicle
If the key, which was used to lock the vehicle, remains in the vehicle in the area
page 40, fig. 26 after locking and closing all of the doors including the boot lid, the
protection against inadvertently locking the key in the vehicle is activated and the
vehicle unlocks itself again.
You are informed about the activation of the protection against inadvertently locking
the key in the vehicle by the turn signal lights flashing and the message Key in vehicle
which appears in the information display* or Key in vehicle which appears in the
display of the instrument cluster. Additiona lly, on vehicles which are fitted with the
anti-theft alarm system*, an audible signal sounds.Messages in the instrument clusterA few warning and information texts of the KESSY system in the information display*
or in the display of the instrument cluster:
Key not found or No Key
This message is displayed when the engine is started and the system cannot detect a
valid key in the vehicle. This can occur if the key is outside the vehicle, the battery in the
key is discharged, the key is defective or the electromagnetic field is strongly disturbed.
This message is also displayed when the ignition is switched on or the engine is
running and the system cannot detect a valid key in the vehicle. Keyless defective or Check Keyless
There is a fault in the KESSY system, contact your specialist garage.
Renew key battery! or Key Battery
Low voltage is present in the battery of th
e remote control key, change the battery.
Parking the vehicleIf the vehicle is not unlocked within 60 hours, the sensors page 40, fig. 26 and
in the handle of the front passenger's d oor are automatically deactivated. For reac-
tivation, one of the following conditions must be met:
Unlocking the driver's door with the aid of the sensor page 40, fig. 26 ,
pressing the handle of the boot lid,
unlocking the vehicle using the button on the remote control key,
emergency unlocking of the driver 's door (see Owner's Manual).
If the vehicle is not unlocked within 90 hour s, the sensors and in the handle of
the driver's door are also automatically deactivated page 40, fig. 26. For reactiva-
tion, one of the following conditions must be met:
unlocking the vehicle using the button on the remote control key,
emergency unlocking of the driver 's door (see Owner's Manual).
Convenience operation of the windowsIf you hold your finger on the sensor page 40, fig. 26 for more than 2 seconds
while locking the vehicle, the opened windows and the panoramic sliding roof are
closed. If you lift your finger off the sens or , the closing process is interrupted. If you
touch the sensor again, the closing process of the windows and the panoramic
sliding roof continues.
If you immediately touch the sensor or pull on the handle during the closing
process of the windows and the panoramic sliding roof initiated by sensor , all of the
windows and the panoramic sliding roof are opened again.
AD
A1
A2
A2A1
A2
A1
A1
A1
A2
A1
s3fg.2.book Page 41 Friday, April 30, 2010 12:17 PM
Page 55 of 287

Unlocking and locking
54
You must try to close the window once agai n within 10 seconds after the window has
gone down twice, even if the obstacle was not yet removed, the closing process is
stopped. During this time it is not poss ible to automatically close the window. The
force limiter is still switched on.
The force limiter is only switched off, if you attempt to close the window within the next
10 seconds - the window closes now with full strength!
If you wait longer than 10 seconds, the force limiter is switched on again.
WARNING
You should take particular care when closing the windows! You may otherwise
suffer severe injuries as a result of getting an arm, for example, jammed in the
window!Window convenience operationYou can open and close the electrically po wered windows as follows when unlocking
and locking the vehicle (only close the slid ing/tilting roof or the panoramic sliding
roof):
Opening a window
by holding the pressed unlock button on the remote control,
by holding the pressed top part of the butt on for the central locking system in the
driver door,
Closing a window
by holding the pressed lock button on the remote control,
by holding the pressed bottom part of the button for the central locking system in
the driver door,
by holding the key in the driver 's lock in the lock position page 43,
on the KESSY* system, by covering the sensor page 40, fig. 26 .
You can interrupt the opening or closing operation of the windows immediately by
releasing the key or the lock button.
WARNING
The system is fitted with a force limiter page 53. If there is an obstacle, the
closing process is stopped and the window goes down by several centimeters.
You should then take particular care when closing the windows! You may
otherwise suffer severe injuries as a re sult of getting an arm, for example,
jammed in the window!
Note
The convenience opening of the windows with the aid of the key in the driver's lock is
only possible within 45 seconds after deac tivating or activating the alarm system.Operational faultsElectrically operated power windows do not operate
If the battery has been disconnected and then reconnected while the window was
opened, the electrically operated power windows do not operate. The system must be
activated. Proceed as follows in order to re-establish the function:
Switch on the ignition.
you can close the window by pulling th e respective switch on the top edge
release the switch
you must pull the respective switch again in upward direction for approx. 3
seconds.
Operation in winter
Ice accumulating on the surface of the wi ndows during the winter may result in a
greater resistance when closing the windows and the window may stop and go down
several centimetres.
It is necessary to put the force limiter out of operation in order to close the window
page 53, “Force limiter of the power windows”.
WARNING
The system is fitted with a force limiter page 53. If there is an obstacle, the
closing process is stopped and the window goes down by several centimeters.
A2
s3fg.2.book Page 54 Friday, April 30, 2010 12:17 PM
Page 57 of 287

Unlocking and locking
56WARNING
Close the sliding/tilting roof carefully - risk of injury!Convenience operationYou can also close an open sliding/tilting roof from the outside.
– Keep the lock button on the radio remote control pressed or hold the key in the
locking cylinder of the driver's door in the lock position, or when using the KESSY*
system keep your finger on the sensor page 40, fig. 26 until the sliding/tilting
roof is closed .
The closing operation stops when one re leases the key or the lock button.
WARNING
Close the sliding/tilting roof carefully - ri sk of injury! The force limiter does not
operate with the convenience closing.Electric sliding/tilting roof with solar cells*If there is sufficient bright sunlight, the solar cells on the sliding/tilting roof deliver
power for the fresh air blower. Further information page 114.
The operation of the sliding/tilting roof with solar cells is the same as of a normal
sliding/tilting roof.
Emergency operationFig. 42 Detail of the headliner: Point for positioning screwdriver / emergency operationYou can close and/or open the sliding/tilting roof by hand if the system is defect.
– Position the flat blade of a screwdriver carefully against the rear edge of the cover of the electrical drive fig. 42 - left.
–Pull the cover down.
– Insert an Allen key, Group 4, up to the stop into the opening and close and/or open the sliding/tilting roof fig. 42 - right.
– Press on the cover again by first of all in serting the plastic lugs and then pushing the
cover up.
– Have the malfunction rectified by a specialist garage.
On vehicles fitted with a storage compartm ent for spectacles*, this compartment must
be opened before removing the cover for the emergency operation page 103.
Note
It is necessary after each emergency operation to move the sliding/tilting roof into the
basic position. Here you have to turn the control dial forward to the switch position
page 55, fig. 41 and press for about 10 seconds.
A1
AA
s3fg.2.book Page 56 Friday, April 30, 2010 12:17 PM
Page 59 of 287

Unlocking and locking
58
Opening and closing the sun screenYou can open or close the sun screen se parately with the aid of the buttons fig. 44 .Opening– Briefly press the button fig. 44 in order to fully open.
– Press the button and hold it pressed in order to open in the desired position.
The opening process stops when one releases the button.Closing– Briefly press the button fig. 44 in order to fully close.
– Press the button and hold it pressed in order to close in the desired position.
The closing process stops when one releases the button.Convenience operationThe panoramic sliding roof and the sun screen can also be operated from the outside
using the remote control key or when using the KESSY* system with the aid of the
sensor page 40, fig. 26.Closing the panoramic sliding roof– Hold down the lock button on the remote control key, or when using the KESSY*
system keep your finger on the sensor page 40, fig. 26 , until the panoramic
sliding roof is closed. The panoramic sliding roof and the sun screen are closed
together. After releasing the button, or lifting your
finger off the sensor when using the
KESSY* system, the closing process is immediately interrupted.
Tilting the panoramic sliding roof– Hold down the unlock button on the remote control key until the panoramic sliding roof is tilted. When tilting the panoramic sliding roof, the sun screen opens at the
same time.
Note
The force limiter also operates for convenience closing.
The panoramic sliding roof can only be tilted but not opened when the conven-
ience operating feature is being used.
Emergency operationFig. 45 Detail of the headliner: Points fo r positioning screwdriver / emergency operationYou can close and/or open the panoramic slid ing roof by hand if the system is defec-
tive.
– Position the flat blade of a screwdriver carefully against the rear edge of the cover of the electrical drive fig. 45 .
–Pull the cover down.
– Insert an Allen key, Group 4, up to the stop into the opening and close or open the panoramic sliding roof.
Fig. 44 Buttons for sun screen
AE
AE
AF
AF
A1
A1
A1
AA
AB
s3fg.2.book Page 58 Friday, April 30, 2010 12:17 PM
Page 62 of 287
Lights and Visibility61
Using the system
Safety
Driving Tips
General Maintenance
Breakdown assistance
Technical Data
Daylight driving lightsSwitching on daylight driving lights– Switch on the ignition without turning the light switch out of the position 0.Deactivating the function daylight driving lights– Pull the turn signal light lever towards the steering wheel up to 3 seconds after
switching on the ignition and at the same time, slide it to the bottom and hold it in
this position for at least 3 seconds.Activating the function daylight driving lights– Pull the turn signal light lever towards the steering wheel up to 3 seconds after
switching on the ignition and at the same time, slide it to the top and hold it in this
position for at least 3 seconds.
In some countries, the national legal provisions require that the rear parking lights
come on together with the bulbs for daylight driving lights when activating the function
daylight driving lights.
On vehicles which are fitted with bulbs for daylight driving lights in the fog lights, the
parking lights do not come on when activa ting the function daylight driving lights.
When the daylight driving lights are switched on, the lighting of the instrument cluster
is switched on as well.
On vehicles fitted with an information displa y*, you can also activate or deactivate in
the menu the function da ylight driving lights:
SETUP
Lights & Vision (Lights & Vision)
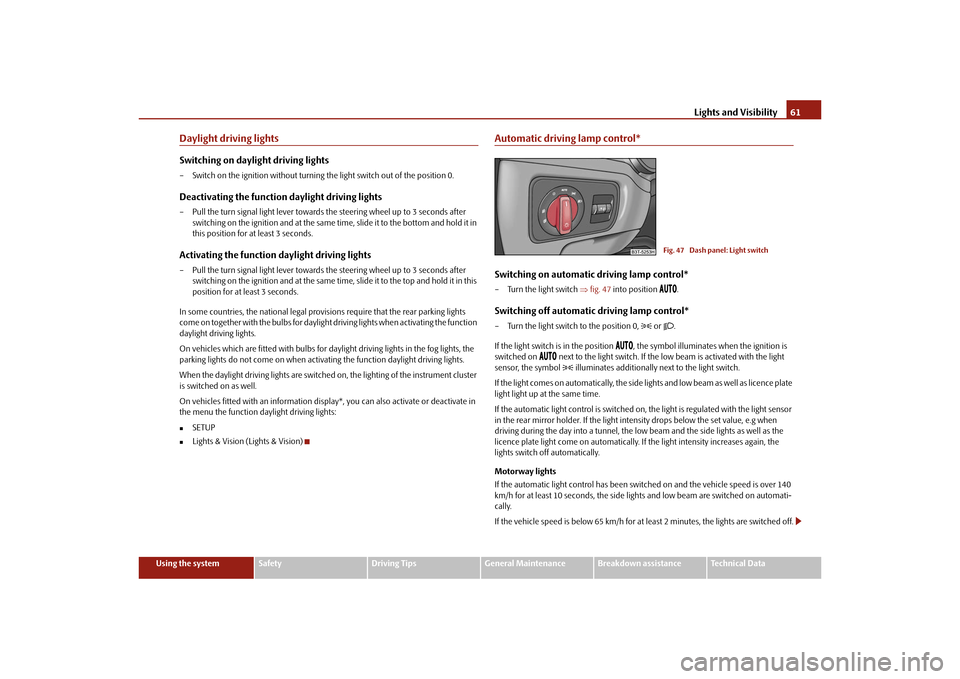
Automatic driving lamp control*Switching on automatic driving lamp control*– Turn the light switch fig. 47 into position
.
Switching off automatic driving lamp control*– Turn the light switch to the position 0,
or .
If the light switch is in the position
, the symbol illuminates when the ignition is
switched on
next to the light switch. If the low beam is activated with the light
sensor, the symbol illuminates additionally next to the light switch.
If the light comes on automatically, the side lights and low beam as well as licence plate
light light up at the same time.
If the automatic light control is switched on, the light is regulated with the light sensor
in the rear mirror holder. If the light intensity drops below the set value, e.g when
driving during the day into a tunnel, the low beam and the side lights as well as the
licence plate light come on automatically. If the light intensity increases again, the
lights switch off automatically.
Motorway lights
If the automatic light control has been swit ched on and the vehicle speed is over 140
km/h for at least 10 seconds, the side ligh ts and low beam are switched on automati-
cally.
If the vehicle speed is below 65 km/h for at least 2 minutes, the lights are switched off.
Fig. 47 Dash panel: Light switch
s3fg.2.book Page 61 Friday, April 30, 2010 12:17 PM