phone SKODA SUPERB 2010 2.G / (B6/3T) Owner's Manual
[x] Cancel search | Manufacturer: SKODA, Model Year: 2010, Model line: SUPERB, Model: SKODA SUPERB 2010 2.G / (B6/3T)Pages: 287, PDF Size: 16.59 MB
Page 3 of 287
Introduction
2
On-board literature
The on-board literature for your vehicle consists of this “ Owner's Manual”
as well as a “ Service schedule ” and a “Help on the road ”. There can also be
a variety of other additional operating manuals and instructions on-board
(e.g. an operating manual for the radio) depending on the vehicle model and
equipment.
If one of the publications listed above is missing, please contact an author-
ised Škoda dealer immediately, where one will be glad to assist you in such
matters.
One should note that the details give n in the vehicle's papers always
take precedence over those in the Owner's Manual.
Owner's Manual
This Owner's Manual describes the current scope of equipment. Certain
items of equipment listed are only inst alled later on and only envisaged for
particular markets. The illustrations can differ in minor details from your
vehicle; they are only intended for general information.
In addition to information regarding all the controls and equipment, the
Owner's Manual also contains important information regarding care and
operation for your safety and also to retain the value of your vehicle. To
provide you with valuable tips and ai ds. You will learn how you can operate
your vehicle safely, economically and in an environmentally conscious
way.
For safety reasons, please also pay attention to the information on
accessories, modifications and replacement of parts page 234.
The other chapters of the Owner's Manua l are also important, however, for
proper treatment of your car - in addition to regular care and maintenance -
helps to retain its value and in many cases is also one of the conditions for
possible warranty claims. The Service schedule
contains:
Vehicle data,
Service intervals,
Overview of the service work,
Service proof,
Confirmation of mobility warranty
(only valid in certain countries),
important information on the warranty.
The confirmations of the carried out se rvice work are one of the conditions
for possible warranty claims.
Please always present the Service schedule when you take your car to an
authorised Škoda Service Partner.
If the Service schedule is missing or worn, please contact your authorised
Škoda Service Partner, where your car is serviced regularly. You will receive a
duplicate, in which the previously carried out service work are confirmed.
Help on the road
contains the most important telephone numbers in individual countries as
well as the addresses and telephone numbers of Škoda importers.
s3fg.2.book Page 2 Friday, April 30, 2010 12:17 PM
Page 4 of 287
Contents3
Using the system
Safety
Driving Tips
General Maintenance
Breakdown assistance
Technical Data
ContentsLayout of this Owner's Manual
(explanations)
. . . . . . . . . . . . . . . . . . . . . . . . . .
Using the system
. . . . . . . . . . . . . . . . . . . . . .
Cockpit
. . . . . . . . . . . . . . . . . . . . . . . . . . . . . . . . . . . . . . . .
Overview . . . . . . . . . . . . . . . . . . . . . . . . . . . . . . . . . . . .
The brief instruction
. . . . . . . . . . . . . . . . . . . . . . . . . .
Basic functions and important information . . . . .
Instruments and warning lights
. . . . . . . . . . . . . . .
Overview of the instrument cluster . . . . . . . . . . . . .
Engine revolutions counter . . . . . . . . . . . . . . . . . . . .
Speedometer . . . . . . . . . . . . . . . . . . . . . . . . . . . . . . . .
Coolant temperature gauge . . . . . . . . . . . . . . . . . . .
Fuel gauge . . . . . . . . . . . . . . . . . . . . . . . . . . . . . . . . . . .
Counter for distance driven . . . . . . . . . . . . . . . . . . .
Service Interval Display . . . . . . . . . . . . . . . . . . . . . . .
Digital clock . . . . . . . . . . . . . . . . . . . . . . . . . . . . . . . . . .
Shift recommendation for changing gears* . . . . .
Multi-functional indicator (onboard computer)*
Information display* . . . . . . . . . . . . . . . . . . . . . . . . . .
Auto Check Control* . . . . . . . . . . . . . . . . . . . . . . . . . .
Warning lights . . . . . . . . . . . . . . . . . . . . . . . . . . . . . . . .
Unlocking and locking
. . . . . . . . . . . . . . . . . . . . . . . .
Key . . . . . . . . . . . . . . . . . . . . . . . . . . . . . . . . . . . . . . . . . .
Changing the battery in the remote control key .
Electronic immobiliser . . . . . . . . . . . . . . . . . . . . . . . .
Child safety lock . . . . . . . . . . . . . . . . . . . . . . . . . . . . . .
Central locking system . . . . . . . . . . . . . . . . . . . . . . . .
Remote control . . . . . . . . . . . . . . . . . . . . . . . . . . . . . . .
Description . . . . . . . . . . . . . . . . . . . . . . . . . . . . . . . . . .
Unlocking and locking car . . . . . . . . . . . . . . . . . . . . .
Synchronisation of the remote control . . . . . . . . . .
Anti-theft alarm system* . . . . . . . . . . . . . . . . . . . . . . Power windows . . . . . . . . . . . . . . . . . . . . . . . . . . . . . . .
Electric sliding/tilting roof* . . . . . . . . . . . . . . . . . . . . .
Panoramic sliding roof* (Combi) . . . . . . . . . . . . . . .
Lights and Visibility
. . . . . . . . . . . . . . . . . . . . . . . . . . . .
Lights . . . . . . . . . . . . . . . . . . . . . . . . . . . . . . . . . . . . . . . .
Interior lighting . . . . . . . . . . . . . . . . . . . . . . . . . . . . . . .
Luggage compartment light (Combi) . . . . . . . . . . . .
Visibility . . . . . . . . . . . . . . . . . . . . . . . . . . . . . . . . . . . . . .
Windshield wiper and wash system . . . . . . . . . . . . .
Rear-view mirror . . . . . . . . . . . . . . . . . . . . . . . . . . . . . .
Exterior mirror . . . . . . . . . . . . . . . . . . . . . . . . . . . . . . . .
Exterior mirror with entry lighting* . . . . . . . . . . . . .
Automatic dimming exterior mirror* . . . . . . . . . . . .
Seats and Stowage
. . . . . . . . . . . . . . . . . . . . . . . . . . . . .
Front seats . . . . . . . . . . . . . . . . . . . . . . . . . . . . . . . . . . . .
Adjusting front seats electrically* . . . . . . . . . . . . . . .
Head restraints . . . . . . . . . . . . . . . . . . . . . . . . . . . . . . . .
Middle rear head restraint . . . . . . . . . . . . . . . . . . . . .
Rear seats . . . . . . . . . . . . . . . . . . . . . . . . . . . . . . . . . . . .
luggage compartment . . . . . . . . . . . . . . . . . . . . . . . . .
Variable loading floor in the luggage compartment*
(Combi) . . . . . . . . . . . . . . . . . . . . . . . . . . . . . . . . . . . . . .
Net partition* (Combi) . . . . . . . . . . . . . . . . . . . . . . . .
The roof rack* . . . . . . . . . . . . . . . . . . . . . . . . . . . . . . . .
Cup holder . . . . . . . . . . . . . . . . . . . . . . . . . . . . . . . . . . .
Ashtray . . . . . . . . . . . . . . . . . . . . . . . . . . . . . . . . . . . . . . .
Cigarette lighter*, power sockets . . . . . . . . . . . . . . .
Storage compartments . . . . . . . . . . . . . . . . . . . . . . . .
Air conditioning system
. . . . . . . . . . . . . . . . . . . . . . .
Introduction . . . . . . . . . . . . . . . . . . . . . . . . . . . . . . . . . .
Air outlet vents . . . . . . . . . . . . . . . . . . . . . . . . . . . . . . . .
Climatic (semi-automatic air conditioning system)
Climatronic* (automatic air conditioning) . . . . . . .
Auxiliary heating (auxiliary heating and ventilation)*
Starting-off and Driving
. . . . . . . . . . . . . . . . . . . . . . .
Setting steering wheel position . . . . . . . . . . . . . . . .
Ignition lock . . . . . . . . . . . . . . . . . . . . . . . . . . . . . . . . . .
Starting the engine . . . . . . . . . . . . . . . . . . . . . . . . . . . .
KESSY system* . . . . . . . . . . . . . . . . . . . . . . . . . . . . . . .
Parking aid* . . . . . . . . . . . . . . . . . . . . . . . . . . . . . . . . . .
Park Assist* . . . . . . . . . . . . . . . . . . . . . . . . . . . . . . . . . .
Cruise control system (CCS)* . . . . . . . . . . . . . . . . . .
Automatic gearbox DSG*
. . . . . . . . . . . . . . . . . . . . .
Automatic gearbox DSG* . . . . . . . . . . . . . . . . . . . . . .
Communication
. . . . . . . . . . . . . . . . . . . . . . . . . . . . . . .
Multifunction steering wheel* . . . . . . . . . . . . . . . . .
Mobile phones and two-way radio systems . . . . .
Universal telephone preinstallation GSM II* . . . . .
Voice control . . . . . . . . . . . . . . . . . . . . . . . . . . . . . . . . .
Music playback via Bluetooth® . . . . . . . . . . . . . . . .
Universal telephone preinstallation GSM IIl* . . . .
Voice control . . . . . . . . . . . . . . . . . . . . . . . . . . . . . . . . .
Connection to the internet . . . . . . . . . . . . . . . . . . . .
Music playback via Bluetooth® . . . . . . . . . . . . . . . .
Multimedia . . . . . . . . . . . . . . . . . . . . . . . . . . . . . . . . . .
Safety
. . . . . . . . . . . . . . . . . . . . . . . . . . . . . . . . . . . . . . .
Passive Safety
. . . . . . . . . . . . . . . . . . . . . . . . . . . . . . . . .
Basic information . . . . . . . . . . . . . . . . . . . . . . . . . . . . .
Correct seated position . . . . . . . . . . . . . . . . . . . . . . .
Seat belts
. . . . . . . . . . . . . . . . . . . . . . . . . . . . . . . . . . . . . .
Why seat belts? . . . . . . . . . . . . . . . . . . . . . . . . . . . . . . .
The physical principle of a frontal collision . . . . . .
Important safety information regarding the use of seat
belts . . . . . . . . . . . . . . . . . . . . . . . . . . . . . . . . . . . . . . . . .
How are seat belts correctly fastened? . . . . . . . . . .
6799101015151516161617171819192324273737373838384949495050
52555760606770717377777878808081848485879295979899100100109109110111114117
121121121122125128130133136136142142145145150151152157158158159161161161162165165165166167
s3fg.2.book Page 3 Friday, April 30, 2010 12:17 PM
Page 10 of 287
Cockpit9
Using the system
Safety
Driving Tips
General Maintenance
Breakdown assistance
Technical Data
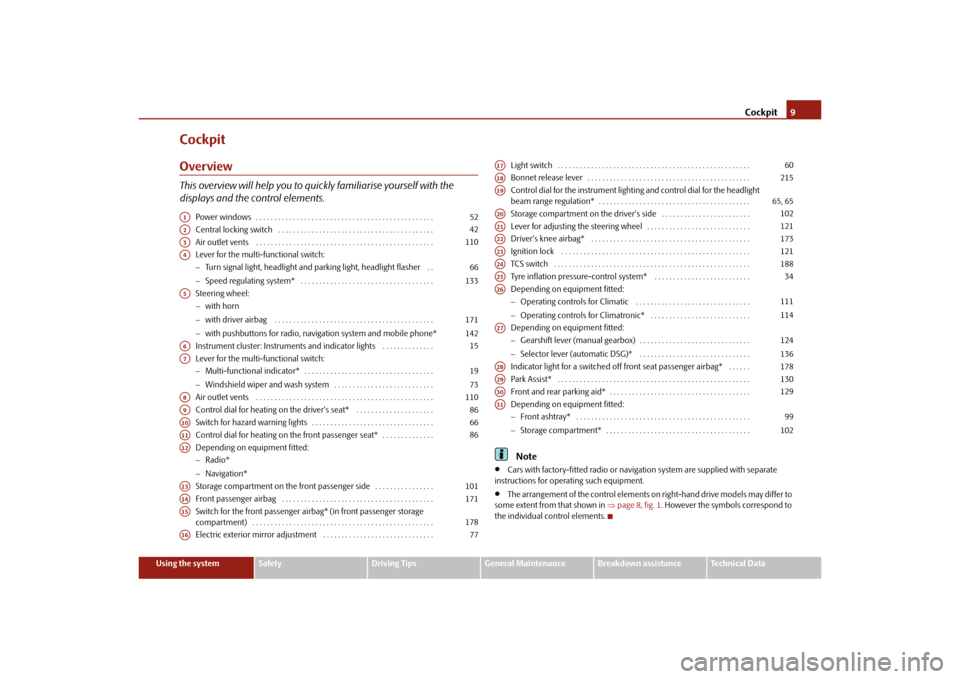
CockpitOverviewThis overview will help you to quic kly familiarise yourself with the
displays and the control elements.
Power windows . . . . . . . . . . . . . . . . . . . . . . . . . . . . . . . . . . . . . . . . . . . . . . . .
Central locking switch . . . . . . . . . . . . . . . . . . . . . . . . . . . . . . . . . . . . . . . . . .
Air outlet vents . . . . . . . . . . . . . . . . . . . . . . . . . . . . . . . . . . . . . . . . . . . . . . . .
Lever for the multi-functional switch:
Turn signal light, headlight and parking light, headlight flasher . .
Speed regulating system* . . . . . . . . . . . . . . . . . . . . . . . . . . . . . . . . . . . .
Steering wheel:
with horn
with driver airbag . . . . . . . . . . . . . . . . . . . . . . . . . . . . . . . . . . . . . . . . . . .
with pushbuttons for radio, navi gation system and mobile phone*
Instrument cluster: Instruments and indicator lights . . . . . . . . . . . . . .
Lever for the multi-functional switch:
Multi-functional indicator* . . . . . . . . . . . . . . . . . . . . . . . . . . . . . . . . . . .
Windshield wiper and wash system . . . . . . . . . . . . . . . . . . . . . . . . . . .
Air outlet vents . . . . . . . . . . . . . . . . . . . . . . . . . . . . . . . . . . . . . . . . . . . . . . . .
Control dial for heating on the driver's seat* . . . . . . . . . . . . . . . . . . . . .
Switch for hazard warning lights . . . . . . . . . . . . . . . . . . . . . . . . . . . . . . . . .
Control dial for heating on the front passenger seat* . . . . . . . . . . . . . .
Depending on equipment fitted:
Radio*
Navigation*
Storage compartment on the front passenger side . . . . . . . . . . . . . . . .
Front passenger airbag . . . . . . . . . . . . . . . . . . . . . . . . . . . . . . . . . . . . . . . . .
Switch for the front passenger ai rbag* (in front passenger storage
compartment) . . . . . . . . . . . . . . . . . . . . . . . . . . . . . . . . . . . . . . . . . . . . . . . . .
Electric exterior mirror adjustment . . . . . . . . . . . . . . . . . . . . . . . . . . . . . . Light switch . . . . . . . . . . . . . . . . . . . . . . . . . . . . . . . . . . . . . . . . . . . . . . . . . . . .
Bonnet release lever . . . . . . . . . . . . . . . . . . . . . . . . . . . . . . . . . . . . . . . . . . . .
Control dial for the instrument lighting and control dial for the headlight
beam range regulation* . . . . . . . . . . . . . . . . . . . . . . . . . . . . . . . . . . . . . . . . .
Storage compartment on the driver's side . . . . . . . . . . . . . . . . . . . . . . . .
Lever for adjusting the steering wheel . . . . . . . . . . . . . . . . . . . . . . . . . . . .
Driver's knee airbag* . . . . . . . . . . . . . . . . . . . . . . . . . . . . . . . . . . . . . . . . . . .
Ignition lock . . . . . . . . . . . . . . . . . . . . . . . . . . . . . . . . . . . . . . . . . . . . . . . . . . .
TCS switch . . . . . . . . . . . . . . . . . . . . . . . . . . . . . . . . . . . . . . . . . . . . . . . . . . . . .
Tyre inflation pressure-control system* . . . . . . . . . . . . . . . . . . . . . . . . . .
Depending on equipment fitted:
Operating controls for Climatic . . . . . . . . . . . . . . . . . . . . . . . . . . . . . . .
Operating controls for Climatronic* . . . . . . . . . . . . . . . . . . . . . . . . . . .
Depending on equipment fitted:
Gearshift lever (manual gearbox) . . . . . . . . . . . . . . . . . . . . . . . . . . . . . .
Selector lever (automatic DSG)* . . . . . . . . . . . . . . . . . . . . . . . . . . . . . .
Indicator light for a switched off front seat passenger airbag* . . . . . .
Park Assist* . . . . . . . . . . . . . . . . . . . . . . . . . . . . . . . . . . . . . . . . . . . . . . . . . . . .
Front and rear parking aid* . . . . . . . . . . . . . . . . . . . . . . . . . . . . . . . . . . . . . .
Depending on equipment fitted:
Front ashtray* . . . . . . . . . . . . . . . . . . . . . . . . . . . . . . . . . . . . . . . . . . . . . . .
Storage compartment* . . . . . . . . . . . . . . . . . . . . . . . . . . . . . . . . . . . . . . .
Note
Cars with factory-fitted radio or naviga tion system are supplied with separate
instructions for operating such equipment.
The arrangement of the control elements on right-hand drive models may differ to
some extent from that shown in page 8, fig. 1 . However the symbols correspond to
the individual control elements.
A1
52
A2
42
A3
110
A4
66133
A5
171142
A6
15
A7
1973
A8
110
A9
86
A10
66
A11
86
A12A13
101
A14
171
A15
178
A16
77
A17
60
A18
215
A19
65, 65
A20
102
A21
121
A22
173
A23
121
A24
188
A25
34
A26
111114
A27
124136
A28
178
A29
130
A30
129
A31
99102
s3fg.2.book Page 9 Friday, April 30, 2010 12:17 PM
Page 24 of 287
Instruments and warning lights23
Using the system
Safety
Driving Tips
General Maintenance
Breakdown assistance
Technical Data
Information display*IntroductionThe information display provides you with information in a convenient way
concerning the current operating state of your vehicle . The information system also
provides you with data (depending on the equipment installed in the vehicle) relating
to the radio, mobile phone, multi-function al indicator, navigation system and auto-
matic gearbox.
Certain functions and operating conditions are always being checked on the vehicle
when the ignition is switched on and also while driving.
Functional faults, if required repair work and other information are indicated by red
symbols page 24 and yellow symbols page 25.
Lighting up of certain symbols is comb ined with an acoustic warning signal.
Information and texts giving warnings are also shown in the display page 27.
The display of text is possible in the following languages: Czech, English, German, French, Italian, Spanish, Portuguese, Russian and Chinese.
You can select the desired language in the setting menu.
The following information can be shown in the display (depending on the equipment
installed on the vehicle):
Caution
Pull out the ignition key while having contact with the display (for example when
cleaning) in order to prevent any damage.
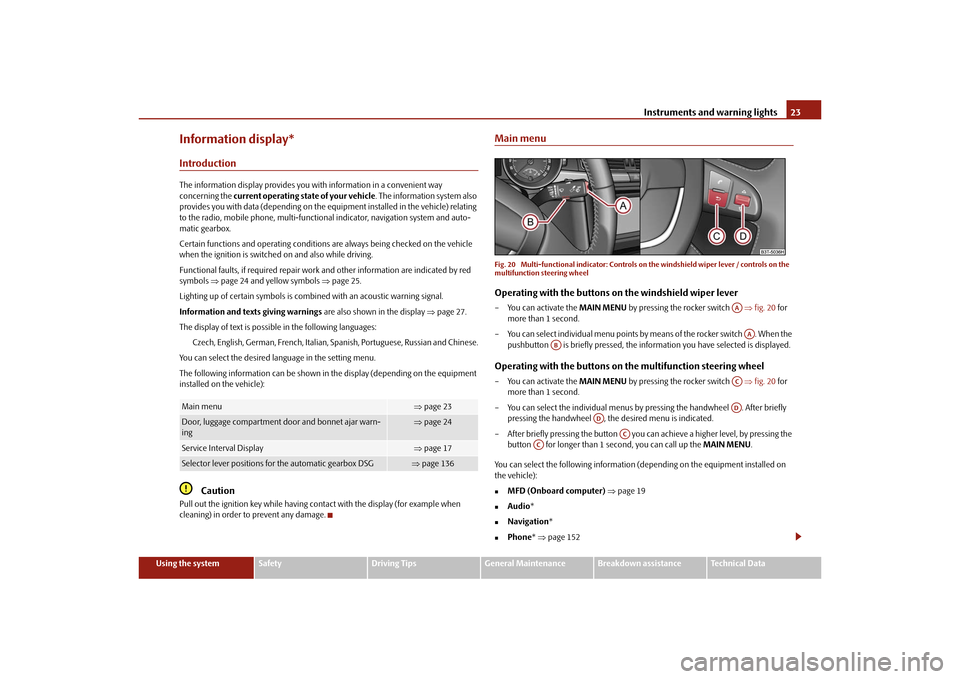
Main menuFig. 20 Multi-functional indica tor: Controls on the windshield wiper lever / controls on the
multifunction steering wheelOperating with the buttons on the windshield wiper lever– You can activate the MAIN MENU by pressing the rocker switch fig. 20 for
more than 1 second.
– You can select indivi dual menu points by means of the rocker switch . When the
pushbutton is briefly pressed, the information you have selected is displayed.Operating with the buttons on the multifunction steering wheel– You can activate the MAIN MENU by pressing the rocker switch fig. 20 for
more than 1 second.
– You can select the individual menus by pressing the handwheel . After briefly
pressing the handwheel , th e desired menu is indicated.
– After briefly pressing the button you can achieve a higher level, by pressing the
button for longer than 1 second, you can call up the MAIN MENU.
You can select the following information (d epending on the equipment installed on
the vehicle):
MFD (Onboard computer) page 19
Audio *
Navigation *
Phone* page 152
Main menu
page 23
Door, luggage compartment door and bonnet ajar warn-
ing
page 24
Service Interval Display
page 17
Selector lever positions fo r the automatic gearbox DSG
page 136
AAAA
AB
ACAD
AD
AC
AC
s3fg.2.book Page 23 Friday, April 30, 2010 12:17 PM
Page 50 of 287
Unlocking and locking49
Using the system
Safety
Driving Tips
General Maintenance
Breakdown assistance
Technical Data
– You can unlock the lid by moving it in the direction of the arrow.
– Open the boot lid from the outside.
Caution
In an emergency, you can unlock the boot li
d with the vehicle key, however only in a
critical situation - risk of damaging the key.Remote controlDescriptionYou can use the remote control key:
to unlock and lock the car,
unlock or open the boot lid,
Opening and closing window.
The transmitter with the battery is housed in the handle of the remote control key. The
receiver is located in the interior of the car. The operating range of the remote control
key is approx. 30 m. But this range of the remote control can be reduced if the batteries
are weak.
The key has a fold-open key bit which can be used for unlocking and locking the car
manually and also for starting the engine.
If a lost key is replaced or if the receiver unit has been repaired or a new unit installed,
it is then necessary for an authorised Škoda Service Partner to initialise the system.
Only after this is it possible to again use the remote control key.Note
The remote control is automatically deactivated when the ignition is switched on.
The operation of the remote control may temporarily be affected by interference
from transmitters close to th e car and which operate in the same frequency range (e.g.
mobile phone, TV transmitter).
The battery must be replaced, ideally by an authorised Škoda Service Partner, if the
central locking or anti-theft alarm system does react to the remote control at less than
3 metres away.
If the driver door is opened, the vehi cle cannot be locked using the remote
control.
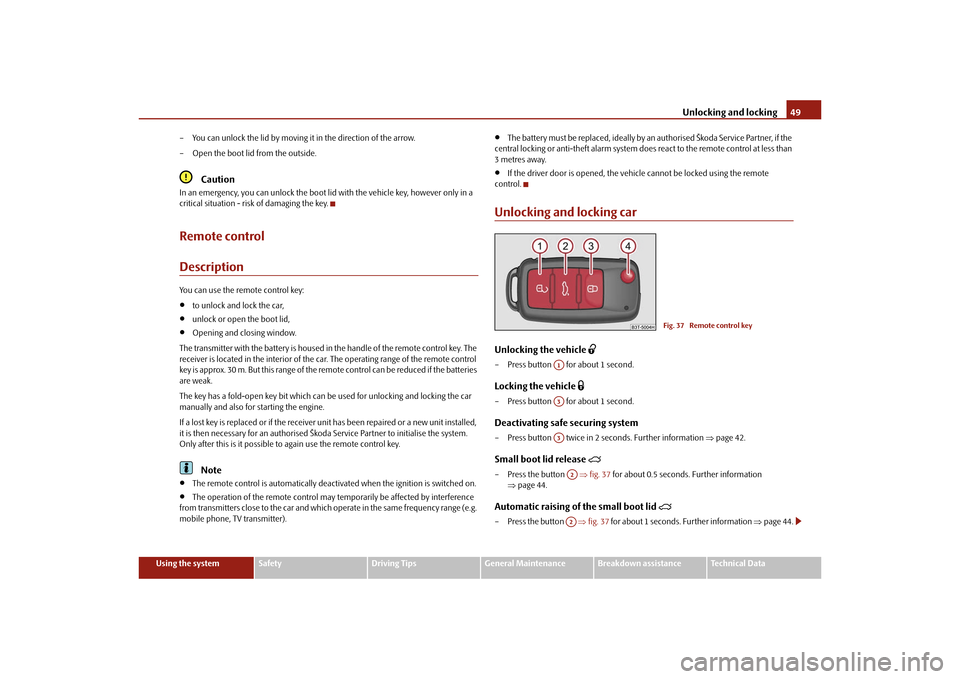
Unlocking and locking carUnlocking the vehicle
– Press button for about 1 second.Locking the vehicle
– Press button for about 1 second.Deactivating safe securing system– Press button twice in 2 seconds. Further information page 42.Small boot lid release
– Press the button fig. 37 for about 0.5 seconds. Further information
page 44.Automatic raising of the small boot lid
– Press the button fig. 37 for about 1 seconds. Further information page 44.
Fig. 37 Remote control key
A1A3A3A2A2
s3fg.2.book Page 49 Friday, April 30, 2010 12:17 PM
Page 146 of 287
Communication145
Using the system
Safety
Driving Tips
General Maintenance
Breakdown assistance
Technical Data
Note
The loudspeakers in the vehicle are matched to a power output of the radio and
navigation system of 4x 20°W.
For the equipment sound system*, the loudspeakers are matched to a power
output of the amplifier of 4x40°W + 6x20 W.
Mobile phones and two-way radio systemsThe installation of a mobile phone and two-way radio system in a vehicle should be
carried out by a specialist garage.
Škoda Auto permits the operation of mobile phones and two-way radio systems with
a professionally installed external aerial and a maximum transmission power of up to
10 watts.
It is essential that you inform a specialist garage about the possibilites to assemble and
operate mobile phones and two-way radio sets which have a power output of more
than 10 W. They will inform you which technical possibilities exist for retrofitting
mobile phones.
When using a mobille phone inside the vehicl e, which is not inserted into the phone
adapter, and thus has no connection to the external aerial, the electromagnetic radia-
tion can exceed the current limit value. We therefore recommend to operate a mobile
phone in the vehicle only when it is conne cted to an external aerial via the phone
adapter. This improves the quality of the connection.
Operation of mobile phones or two-way ra dio systems may interfere with functioning
of the electronic systems of your vehicle. The reasons for this may be:
no external aerial,
external aerial incorrectly installed,
transmission power greater than 10 watts.
WARNING
If a mobile phone or a two-way radio system is operated in the vehicle
without using a special external aerial or an external aerial which has been
incorrectly installed, this can increase the strength of the electromagnetic field
in the interior of the vehicle.
Please concentrate fully at all times on your driving!
You must not install two-way radio systems, mobile phones or mounts on
the covers of the airbags or within the immediate deployment range of airbags.
This might result in injuries to the occupants in the event of an accident.
Never leave a mobile phone on a seat, on the dash panel or in another area,
from which it can be thrown during a sudden braking manoeuver, an accident
or a collision. In this case, the occupants of the vehicle might be injured.Note
Observe the country-specific regulations for the use of mobile phones in vehicles.Universal telephone preinstallation GSM II*IntroductionThe universal telephone preinstallation GSM II is a built-in “hands-free system”, it
provides a voice operated convenience mode via the multifunction steering wheel* or
the navigation system*.
All communication between a telephone and the hands-free system of your vehicle
can only be established with the help of the Bluetooth
® technology. The adapter*
serves only for charging the telephone and fo r transmitting the signal to the external
aerial of the vehicle.
To ensure an optimum signal transmission, always leave the telephone with the
adapter* in the telephone mount.
a)Only valid for the navigation system Columbus.
s3fg.2.book Page 145 Friday, April 30, 2010 12:17 PM
Page 147 of 287
Communication
146
Furthermore the volume can be changed indivi dually during the call at any time with
the button for setting the radio* or navigation system* or with the buttons on the
multifunction steering wheel*.
WARNING
Pay attention primarily to the traffic situation! As the driver you are fully
responsible for road safety. Use the teleph one system only to such an extent, so
that you are in full control of your vehicle at any time.
Note
Please refer to the following guidelines page 145.
Should you have any questions, please contact an authorised Škoda Service
Par tner.
Phone PhonebookA phone phonebook is part of the mobile ph one preinstallation with voice control. In
the phone phonebook there are 2500 free memory locations available. This phone
phonebook can be used in line with the mobile telephone.
After the first connection of the telephone, the system begins to load the phone book
from the phone and the SIM card into the memory of the control unit.
Each time the telephone has establishe d a new connection with the hands-free
system, an update of the relevant phone b ook is performed. The updating can take a
few minutes. During this time the phone book, which was stored after the last update
was completed, is available. Newly stored telephone numbers are only shown after the
updating has ended.
If the number of contacts loaded exceed s 2 500, the phone book is not complete.
If a telephone event (e.g. incoming or outgoing call, dialogue of the voice control)
occurs during the updating pr ocedure, the updating is interrupted. After the telephone
event has ended, the updating starts anew.
Connection of the mobile phone with the hands-free systemIn order to connect a mobile phone with th e hands-free system, it is necessary to
connect the telephone to the hands-free sy stem. Detailed information on this is
provided in the operating instructions of your mobile phone. The following steps must
be carried out for the connection:
– Activate the Bluetooth
® in your telephone and the visibility of the mobile phone.
– Switch on the ignition.
– Select the menu Phone - Phone search in the information display and wait until
the control unit has ended the search.
– Select your mobile phone in the menu of the units found.
–Confirm the PIN (as standard 1234).
– If the hands-free system announces (as standard Skoda UHV) on the display of the
mobile phone, enter the PIN (as standard 1234) within 30 seconds and wait until
the connection is established.
11)
– After ending the connection, confirm in the information display that a new user profile was created.
If no more free space is available for creating a new user profile, delete an existing user
profile.
If you have not managed to connect your mobile phone with the hands-free system
within 3 minutes after switching on the ignition, switch the ignition off and then again
on. The visibility of the hands-free system is established again for 3 minutes. The visi-
bility of the Bluetooth
® device is automatically switched off if the vehicle starts off or
if the mobile phone connects to the device.
During the connecting procedure, no other mobile phone may be connected with the
hands-free system.
Up to four mobile phones ca n be paired to the hands-free system, whereby only one
mobile phone can communicate with the hands-free system.
11)Some mobile phones have a menu, in which the authorization for establishing a Bluetooth
®
connection is performed via the input of a code. If the input for the authorization is necessary, it
must always be performed when re-e stablishing the Bluetooth connection.
s3fg.2.book Page 146 Friday, April 30, 2010 12:17 PM
Page 148 of 287
Communication147
Using the system
Safety
Driving Tips
General Maintenance
Breakdown assistance
Technical Data
Connection with an already paired mobile phone
After switching on the ignition, the connect
ion is automatically established for the
already paired mobile phone
11). Check on the mobile unit if the automatic connection
was established.
Disconnecting the connection
By withdrawing the ignition key.
By disconnecting the device in the information display.
By disconnecting the device in the mobile phone.
Solving connection problems
If the system announces No paired phone found , check the operating state of the
telephone:
Is the telephone switched on?
Is the PIN code entered?
Is Bluetooth
® active?
Is the visibility of the mobile phone active?
Was the telephone already paired with the hands-free system?
WARNING
In the event of air transport, the Bluetooth
® function of the hands-free system
must be switched off by a specialist garage!
Note
Not valid for all mobile phones which enable a communication via Bluetooth
®.
You can ask at an authorised Škoda Service Partner if your telephone is compatible
with the universal telephone preinstallation GSM II.
If a suitable adapter is available for your mobile phone, use your mobile phone
exclusively in the adapter so that the radiation in the vehicle drops to a minimum.
Inserting the mobile phone into the adapter ensures an optimal sending and
receiving power and offers at the same ti me the advantage of the battery charging.
The range of the Bluetooth
® connection to the hands-free system is restricted to
the vehicle interior. The range is dependent on local factors, e.g. obstacles between the devices and mutual interferences with other de
vices. If your mobile phone is e.g. in a
jacket pocket, this can lead to diffic ulties when establishing the Bluetooth
® connection
with the hands-free system or the data transfer.
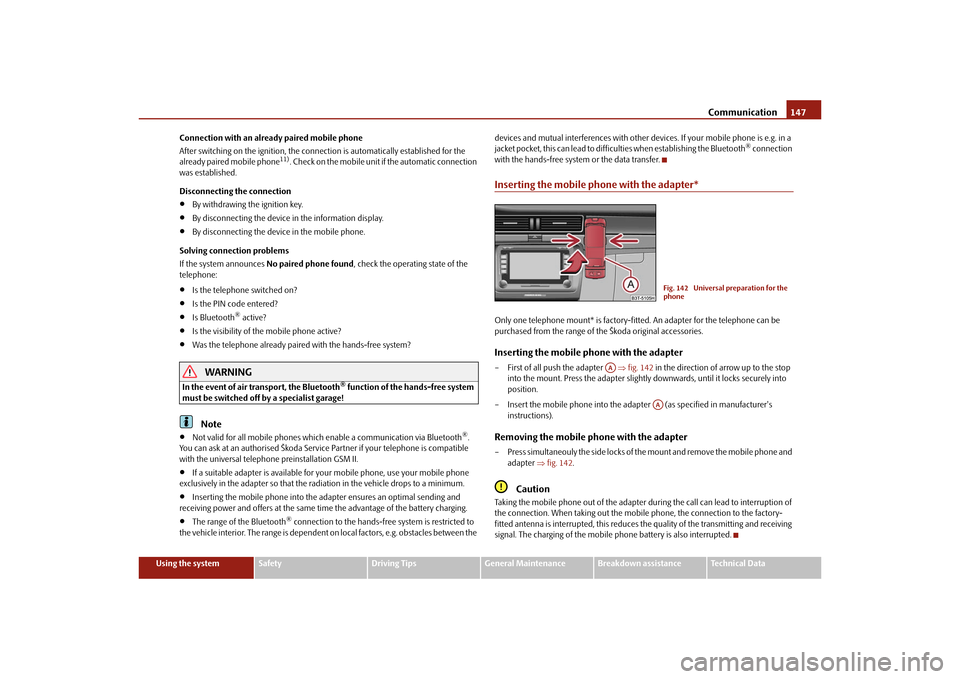
Inserting the mobile phone with the adapter*Only one telephone mount* is factory-fitted. An adapter for the telephone can be
purchased from the range of the Škoda original accessories.Inserting the mobile phone with the adapter– First of all push the adapter fig. 142 in the direction of arrow up to the stop
into the mount. Press the adapter slightly downwards, until it locks securely into
position.
– Insert the mobile phone into the adap ter (as specified in manufacturer's
instructions).Removing the mobile phone with the adapter– Press simultaneouly the side locks of the mount and remove the mobile phone and adapter fig. 142 .
Caution
Taking the mobile phone out of the adapter du ring the call can lead to interruption of
the connection. When taking out the mobi le phone, the connection to the factory-
fitted antenna is interrupted, this reduces the quality of the transmitting and receiving
signal. The charging of the mobile phone battery is also interrupted.
Fig. 142 Universal preparation for the
phone
AA
AA
s3fg.2.book Page 147 Friday, April 30, 2010 12:17 PM
Page 149 of 287
Communication
148
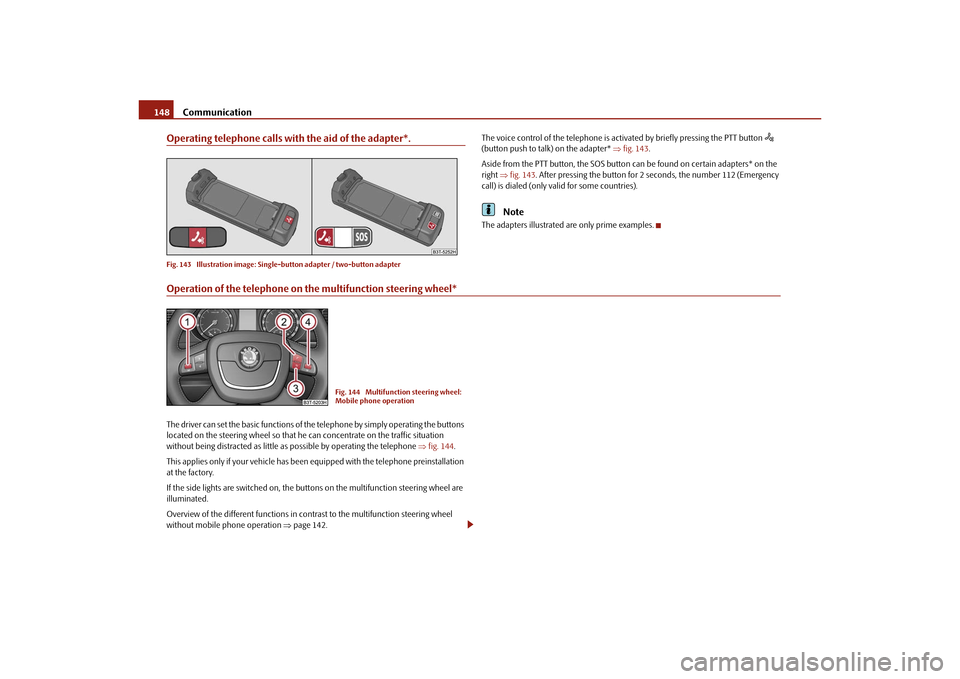
Operating telephone calls with the aid of the adapter*.Fig. 143 Illustration image: Single -button adapter / two-button adapter
The voice control of the telephone is acti vated by briefly pressing the PTT button
(button push to talk) on the adapter* fig. 143 .
Aside from the PTT button, the SOS button can be found on certain adapters* on the
right fig. 143 . After pressing the button for 2 seconds, the number 112 (Emergency
call) is dialed (only valid for some countries).
Note
The adapters illustrated are only prime examples.
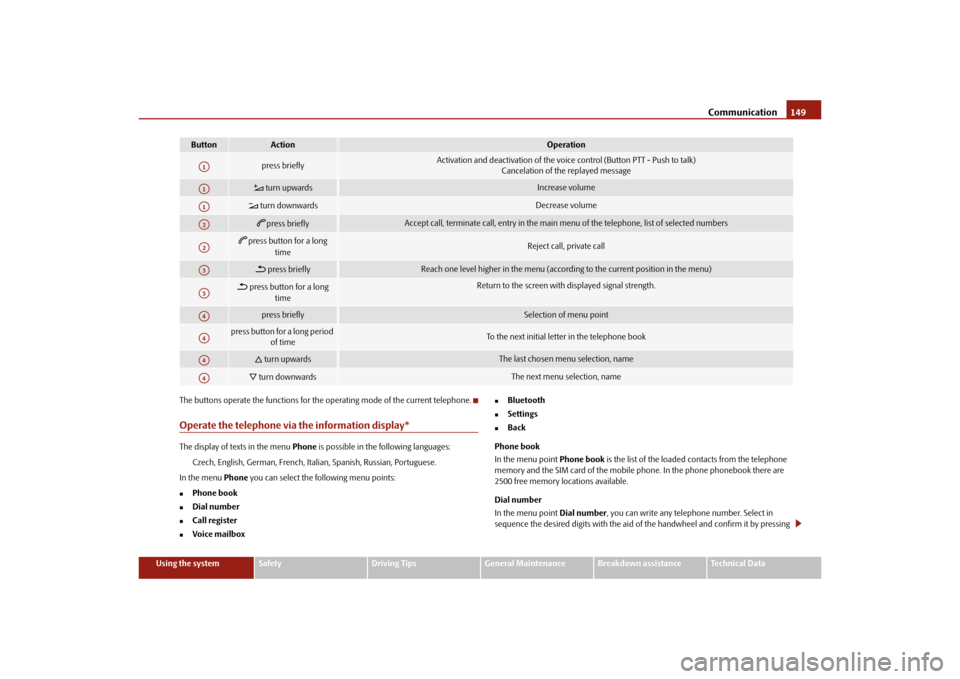
Operation of the telephone on the multifunction steering wheel*The driver can set the basic functions of the telephone by simply operating the buttons
located on the steering whee l so that he can concentrate on the traffic situation
without being distracted as little as possible by operating the telephone fig. 144 .
This applies only if your vehicle has been equipped with the telephone preinstallation
at the factory.
If the side lights are switched on, the butt ons on the multifunction steering wheel are
illuminated.
Overview of the different functions in contrast to the multifunction steering wheel
without mobile phone operation page 142.
Fig. 144 Multifunction steering wheel:
Mobile phone operation
s3fg.2.book Page 148 Friday, April 30, 2010 12:17 PM
Page 150 of 287
Communication149
Using the system
Safety
Driving Tips
General Maintenance
Breakdown assistance
Technical Data
The buttons operate the functions for the operating mode of the current telephone.
Operate the telephone via the information display*The display of texts in the menu
Phone is possible in the following languages:
Czech, English, German, French, Italia n, Spanish, Russian, Portuguese.
In the menu Phone you can select the following menu points:
Phone book
Dial number
Call register
Voice mailbox
Bluetooth
Settings
Back
Phone book
In the menu point Phone book is the list of the loaded contacts from the telephone
memory and the SIM card of the mobile phone. In the phone phonebook there are
2500 free memory locations available.
Dial number
In the menu point Dial number, you can write any telephone number. Select in
sequence the desired digits with the aid of the handwheel and confirm it by pressing
Button
Action
Operation
press briefly
Activation and deactivation of the voice control (Button PTT - Push to talk) Cancelation of the replayed message
turn upwards
Increase volume
turn downwards
Decrease volume
press briefly
Accept call, terminate call, entry in the main menu of the telephone, list of selected numbers
press button for a long
time
Reject call, private call
press briefly
Reach one level higher in the menu (accordi ng to the current position in the menu)
press button for a long
time
Return to the screen with displayed signal strength.
press briefly
Selection of menu point
press button for a long period of time
To the next initial letter in the telephone book
turn upwards
The last chosen menu selection, name
turn downwards
The next menu selection, name
A1A1A1A2A2A3A3A4A4A4A4
s3fg.2.book Page 149 Friday, April 30, 2010 12:17 PM