fuel SKODA SUPERB 2010 2.G / (B6/3T) User Guide
[x] Cancel search | Manufacturer: SKODA, Model Year: 2010, Model line: SUPERB, Model: SKODA SUPERB 2010 2.G / (B6/3T)Pages: 287, PDF Size: 16.59 MB
Page 29 of 287
Instruments and warning lights
28
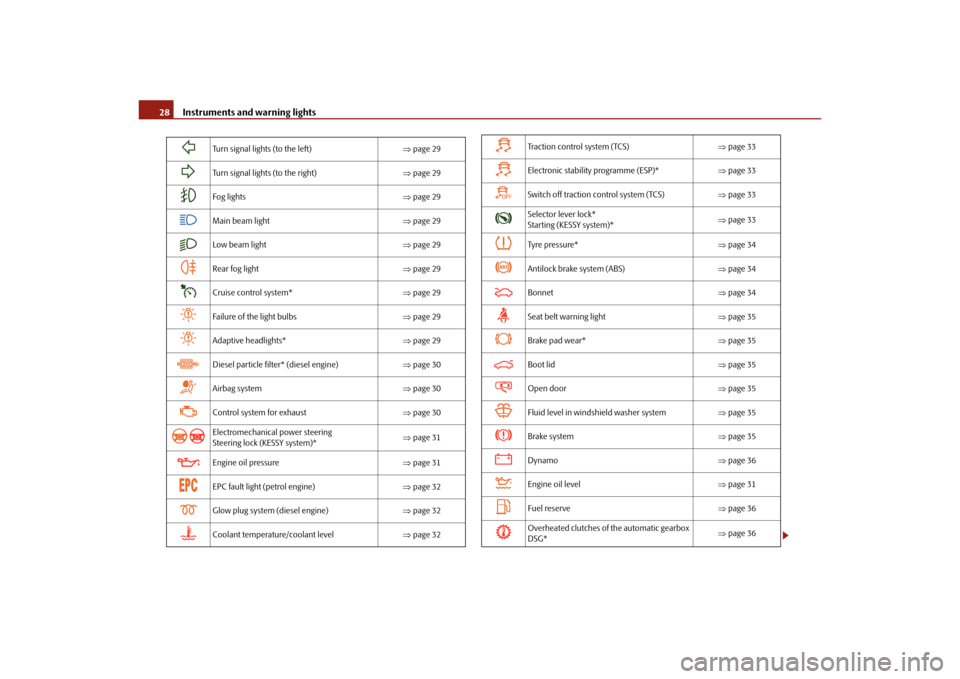
Turn signal lights (to the left) page 29
Turn signal lights (to the right) page 29
Fog lights page 29
Main beam light page 29
Low beam light page 29
Rear fog light page 29
Cruise control system* page 29
Failure of the light bulbs page 29
Adaptive headlights* page 29
Diesel particle filter* (diesel engine) page 30
Airbag system page 30
Control system for exhaust page 30
Electromechanical power steering
Steering lock (KESSY system)*
page 31
Engine oil pressure page 31
EPC fault light (petrol engine) page 32
Glow plug system (diesel engine) page 32
Coolant temperature/coolant level page 32
Tra c t i o n c o n t r o l s y s t e m ( TC S ) page 33
Electronic stability programme (ESP)* page 33
Switch off traction control system (TCS) page 33
Selector lever lock*
Starting (KESSY system)*
page 33
Tyre pressure* page 34
Antilock brake system (ABS) page 34
Bonnet page 34
Seat belt warning light page 35
Brake pad wear* page 35
Boot lid page 35
Open door page 35
Fluid level in windshield washer system page 35
Brake system page 35
Dynamo page 36
Engine oil level page 31
Fuel reserve page 36
Overheated clutches of the automatic gearbox
DSG*
page 36
s3fg.2.book Page 28 Friday, April 30, 2010 12:17 PM
Page 32 of 287
Instruments and warning lights31
Using the system
Safety
Driving Tips
General Maintenance
Breakdown assistance
Technical Data
If the warning light does not go out after starting the engine or it lights up when driving,
a fault exists in an exhaust relevant co
mponent. The engine management system
selects an emergency programme which enables you to drive to the nearest specialist
garage by adopting a gentle style of driving.
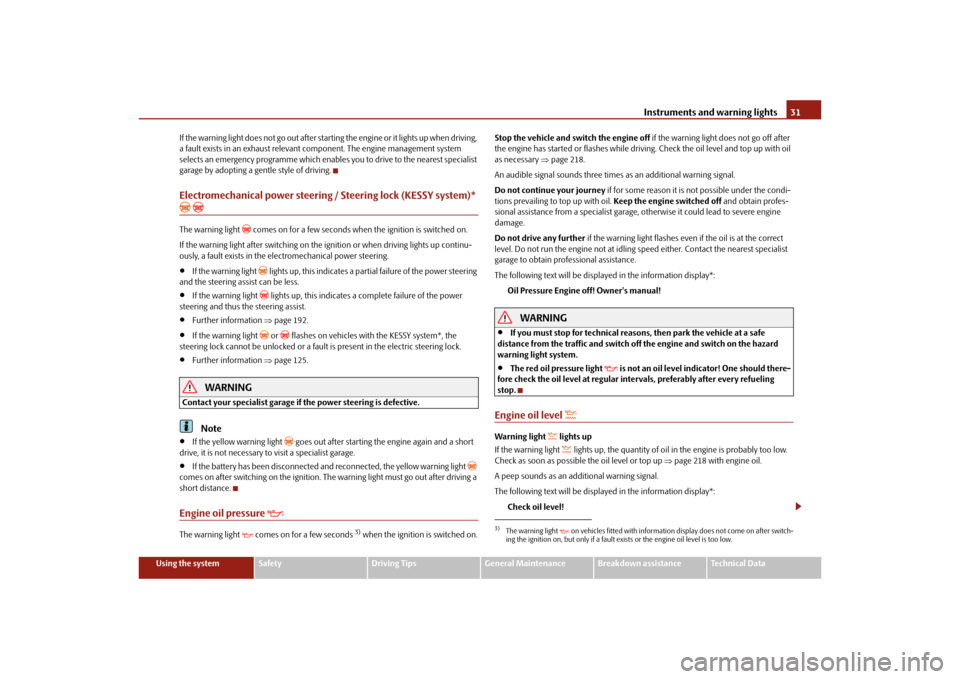
Electromechanical power steering / Steering lock (KESSY system)*
The warning light
comes on for a few seconds when the ignition is switched on.
If the warning light after switching on the ig nition or when driving lights up continu-
ously, a fault exists in the electromechanical power steering.
If the warning light
lights up, this indicates a partial failure of the power steering
and the steering assist can be less.
If the warning light
lights up, this indicates a complete failure of the power
steering and thus the steering assist.
Further information page 192.
If the warning light
or flashes on vehicles with the KESSY system*, the
steering lock cannot be unlocked or a fault is present in the electric steering lock.
Further information page 125.
WARNING
Contact your specialist garage if the power steering is defective.
Note
If the yellow warning light
goes out after starting the engine again and a short
drive, it is not necessary to visit a specialist garage.
If the battery has been di sconnected and reconnected, the yellow warning light
comes on after switching on the ignition. Th e warning light must go out after driving a
short distance.
Engine oil pressure
The warning light comes on for a few seconds
3) when the ignition is switched on. Stop the vehicle and switch the engine off
if the warning light does not go off after
the engine has started or flashes while driving. Check the oil level and top up with oil
as necessary page 218.
An audible signal sounds three times as an additional warning signal.
Do not continue your journey if for some reason it is not possible under the condi-
tions prevailing to top up with oil. Keep the engine switched off and obtain profes-
sional assistance from a specialist garage, otherwise it could lead to severe engine
damage.
Do not drive any further if the warning light flashes even if the oil is at the correct
level. Do not run the engine not at idling speed either. Contact the nearest specialist
garage to obtain professional assistance.
The following text will be displayed in the information display*:
Oil Pressure Engine off! Owner's manual!
WARNING
If you must stop for technical reasons, then park the vehicle at a safe
distance from the traffic and switch of f the engine and switch on the hazard
warning light system.
The red oil pressure light
is not an oil level indicator! One should there-
fore check the oil level at regular inte rvals, preferably after every refueling
stop.
Engine oil level
Warning light
lights up
If the warning light lights up, the quantity of oil in the engine is probably too low.
Check as soon as possible the oil level or top up page 218 with engine oil.
A peep sounds as an additional warning signal.
The following text will be displayed in the information display*: Check oil level!
3)The warning light on vehicles fitted with information display does not come on after switch-
ing the ignition on, but only if a fault exists or the engine oil level is too low.
s3fg.2.book Page 31 Friday, April 30, 2010 12:17 PM
Page 37 of 287
Instruments and warning lights
36
One should get used to high pedal forces, lo ng braking distances and long free play of
the brake pedal when driving to the next specialist garage.
For further information on the brake system page 189, “Brakes”.
Handbrake applied
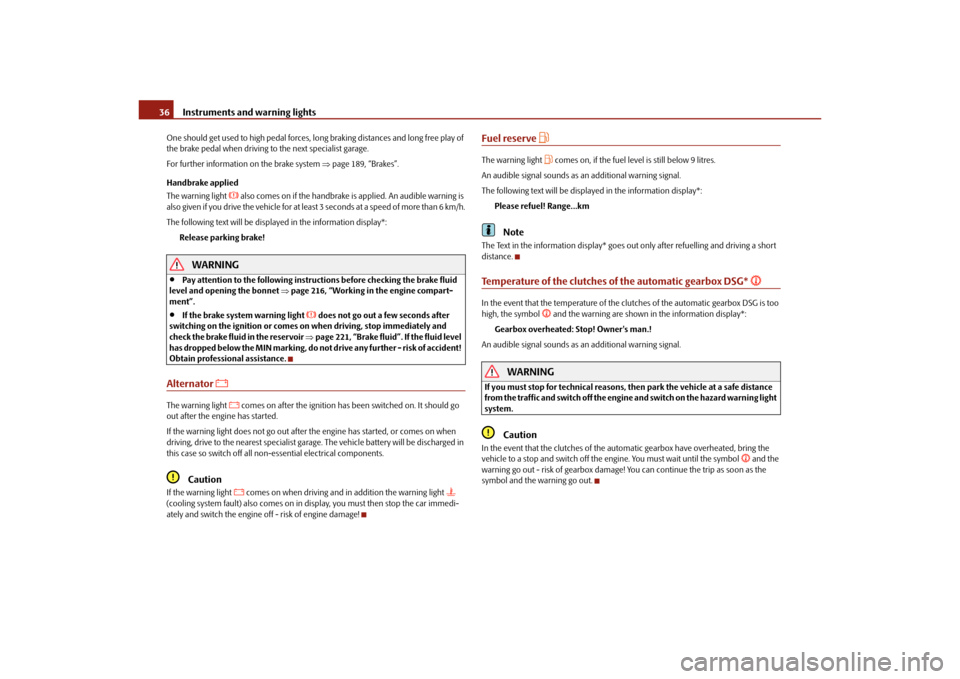
The warning light
also comes on if the handbrake is applied. An audible warning is
also given if you drive the vehicle for at least 3 seconds at a speed of more than 6 km/h.
The following text will be displayed in the information display*:
Release parking brake!
WARNING
Pay attention to the following instruct ions before checking the brake fluid
level and opening the bonnet page 216, “Working in the engine compart-
ment”.
If the brake system warning light
does not go out a few seconds after
switching on the ignition or comes on when driving, stop immediately and
check the brake fluid in the reservoir page 221, “Brake fluid”. If the fluid level
has dropped below the MIN marking, do no t drive any further - risk of accident!
Obtain professional assistance.
Alternator
The warning light
comes on after the ignition has been switched on. It should go
out after the engine has started.
If the warning light does not go out after the engine has started, or comes on when
driving, drive to the nearest specialist garage. The vehicle battery will be discharged in
this case so switch off all non- essential electrical components.
Caution
If the warning light
comes on when driving and in addition the warning light
(cooling system fault) also comes on in di splay, you must then stop the car immedi-
ately and switch the engine off - risk of engine damage!
Fuel reserve
The warning light
comes on, if the fuel level is still below 9 litres.
An audible signal sounds as an additional warning signal.
The following text will be displayed in the information display*: Please refuel! Range...km
Note
The Text in the information display* goes ou t only after refuelling and driving a short
distance.Temperature of the clutches of the automatic gearbox DSG*
In the event that the temperature of the clutches of the automatic gearbox DSG is too
high, the symbol
and the warning are shown in the information display*:
Gearbox overheated: Stop! Owner's man.!
An audible signal sounds as an additional warning signal.
WARNING
If you must stop for technical reasons, then park the vehicle at a safe distance
from the traffic and switch off the engine and switch on the hazard warning light
system.
Caution
In the event that the clutches of the auto matic gearbox have overheated, bring the
vehicle to a stop and switch off the en gine. You must wait until the symbol
and the
warning go out - risk of gearbox damage! Yo u can continue the trip as soon as the
symbol and the warning go out.
s3fg.2.book Page 36 Friday, April 30, 2010 12:17 PM
Page 39 of 287

Unlocking and locking
38For the sake of the environment
Dispose of a used battery in accord ance with environmental regulations.
Note
Pay attention to the correct polarity when changing the battery.
The replacement battery must have the same specification as the original battery.
If it is still not be possible to unlock or lock the vehicle with the remote control key
even after replacing the battery, this means that the system has to be synchronised
page 50.
Electronic immobiliserThe electronic immobiliser prevents the vehicle being operated by an
unauthorised person.An electronic chip is integrated in the head of the key. The immobiliser is deactivated
with the aid of this chip when the key is in serted in the ignition lock. The electronic
immobiliser is automatically activated when you withdraw the ignition key from the
lock.
Note
It is only possible to start the engine of your car with a Genuine Škoda key with the
matching code.
Child safety lockThe child safety lock prevents the re ar door from being opened from the
inside.The rear doors are equipped with a child safe ty lock. You can switch the child safety
lock on and off using the vehicle key.Switching child safety lock on– Use the vehicle key to turn the slit in the rear door to the left in the direction of the
arrow fig. 25 .Switching child safety lock off– Use the vehicle key to turn the slit to the right against the direction of the arrow.
So long as the child safety lock is switched on it is not possible to open the door from
the inside with the door opening lever. In this case the door can be opened only from
the outside.Central locking systemDescriptionUnlocking or locking the vehicle causes all the doors and the fuel filler flap to be
unlocked or locked at the same time by th e central locking system. The boot lid is
Fig. 25 Child safety locks on the rear
doors
s3fg.2.book Page 38 Friday, April 30, 2010 12:17 PM
Page 40 of 287
Unlocking and locking39
Using the system
Safety
Driving Tips
General Maintenance
Breakdown assistance
Technical Data
unlocked when opening. Afterwards you can open the boot lid by pressing the handle
on the lower edge of the boot lid
page 44.
Operation of the central locking system is possible:
with a remote control key page 49,
using the buttons for the central locking system page 42,
from the outside using the vehicle key page 43, “Emergency unlocking and
locking of the driver's door”.
Indicator light in the driver's door
After locking the vehicle the indicator light fl ashes for 2 seconds fast, then more slowly.
If the vehicle is locked and the safe securing system page 42 is not operating, the
indicator light in the driver door flashes for about 2 seconds fast, goes out and starts to
flash slowly after about 30 seconds.
If the indicator light first of all flashes fast for about 2 seconds, afterwards lights up for
about 30 seconds without interruption and th en flashes slowly, there is a fault in the
system of the central locking or in the inte rior monitor and in the towing protection
monitoring* page 51. Visit a specialist garage to obtain assistance.
Convenience operatio n of the windows
One can open and close the windows when opening and closing the vehicle
page 54.
Opening a single door*
This function makes it possible to only unlock the driver's door. The other doors and
the fuel filler flap remain locked and ar e only unlocked after repetitive unlocking.
You can have the function opening a single door activated by an authorised Škoda
Service Partner on request or you can activate it yourself with the aid of the Informa-
tion display* page 25.
Unlocking a vehicle side door*
This selection function enables to unlock both doors on the driver's side. The other
doors and the fuel filler flap remain locked and are only unlocked after repetitive
unlocking. You can have the function opening a single
door activated by an authorised Škoda
Service Partner on request or you can activate it yourself with the aid of the Informa-
tion display* page 25.
Unlocking the vehicle with the KESSY system*
This selection function enables to unlock all th e doors, individual doors, both doors on
the left and right vehicle side or to unlock the driver and front passenger door at the
same time. The other doors and the fuel fille r flap remain locked and are only unlocked
after repetitive unlocking using the unlock button on the remote control page 37,
fig. 23 or the button for the central locking system page 42, fig. 27 .
You can have the function opening a single door activated by an authorised Škoda
Service Partner on request or you can activate it yourself with the aid of the Informa-
tion display* page 25.
Automatic locking and unlocking*
All the doors and the boot lid are locked au tomatically once the car reaches a speed of
about 15 km/h.
If the ignition key is withdrawn, the car is then automatically unlocked again. In addi-
tion, it is possible for the driver or front pa ssenger to unlock the vehicle by pressing the
central locking button
page 42 or by pulling the door opening lever on one of the
front doors.
You can have the function of the automatic lo cking activated by a specialist garage on
request or you can also activate it yourself with the aid of the Information display*
page 25.
WARNING
Locking the doors prevents involuntary op ening in an exceptional situation (an
accident). Locked doors prevent unwanted entry into the vehicle from outside,
for example at road crossings. Locked do ors do, however, make it more difficult
for rescuers to get into the vehicle in an emergency - danger to life!
Note
In the event of an accident in which the airbags are deployed, the locked doors are
automatically unlocked in order to enable rescuers to gain access to the vehicle.
s3fg.2.book Page 39 Friday, April 30, 2010 12:17 PM
Page 72 of 287
Lights and Visibility71
Using the system
Safety
Driving Tips
General Maintenance
Breakdown assistance
Technical Data
– Lever off the cover of the rechargeable ba
tteries with a narrow and pointed object
at the point of the lock-off clips page 70, fig. 58 .
– Remove the faulty rechargeable batteries from the lamp.
– Insert the new rechargeable batteries.
– Insert the cover of the rechargeable batteries and press on it until it is heard to lock
in place.
WARNING
Pay particular attention when using the narrow and pointed object to change
the rechargeable batteries - risk of injury.
Caution
We recommend having the faulty rechargeab le batteries replaced by a specialist
garage. If the lamp is not corr ectly opened, it can be damaged.
For the sake of the environment
Dispose of the faulty rechargeable batteries in accordance with environmental regula-
tions.
Note
Pay attention to the correct polarity wh en replacing the rechargeable batteries.
The replacement rechargeable batteries must have the same specification as the
original rechargeable batteries. If other ty pes of rechargeable batteries are used, the
power output can be reduced and it can lead to a malfunction of the lamp.
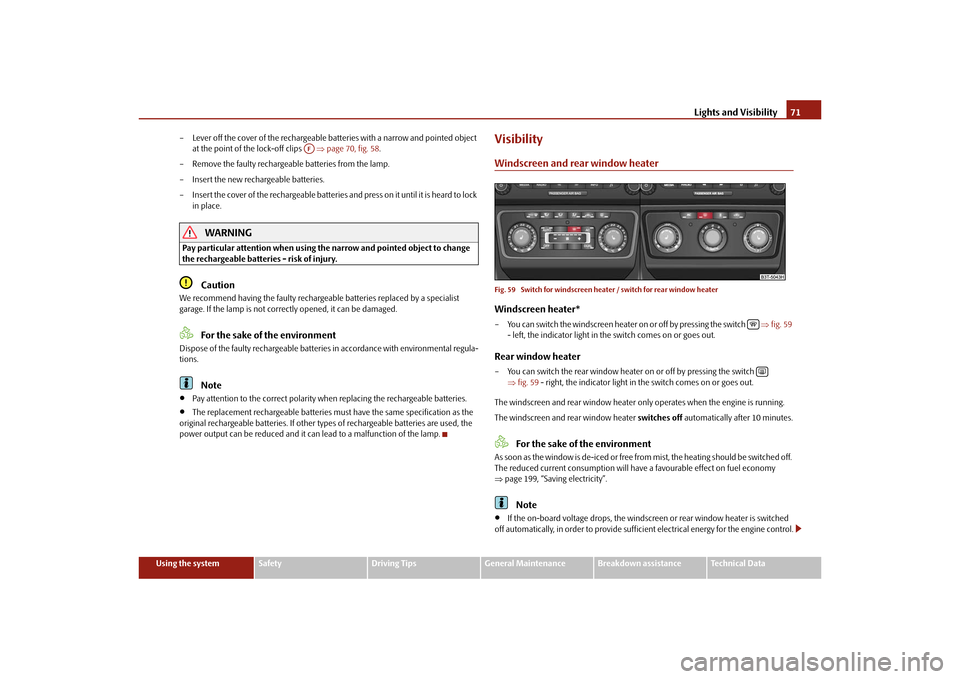
VisibilityWindscreen and rear window heaterFig. 59 Switch for windscreen heat er / switch for rear window heaterWindscreen heater*– You can switch the windscreen heater on or off by pressing the switch fig. 59
- left, the indicator light in th e switch comes on or goes out.Rear window heater– You can switch the rear window heater on or off by pressing the switch
fig. 59 - right, the indicator light in the switch comes on or goes out.
The windscreen and rear wind ow heater only operates when the engine is running.
The windscreen and rear window heater switches off automatically after 10 minutes.
For the sake of the environment
As soon as the window is de-iced or free from mist, the heating should be switched off.
The reduced current consumption will have a favourable effect on fuel economy
page 199, “Saving electricity”.
Note
If the on-board voltage drops, the windscre en or rear window heater is switched
off automatically, in order to provide sufficient electrical energy for the engine control.
AF
s3fg.2.book Page 71 Friday, April 30, 2010 12:17 PM
Page 76 of 287
Lights and Visibility75
Using the system
Safety
Driving Tips
General Maintenance
Breakdown assistance
Technical Data
Caution
In frosty weather, please firs t of all check whether the windscreen wiper blades are not
frozen to the windscreen before switching them on. Switching on windscreen wipers
when the blades are frozen to the windscreen may result in damage both to the blades
and the motor of the windscreen wipers!
Note
If the slower page 73, fig. 63 or the faster wiper setting is switched on and
the vehicle speed decreases to below 4 km/h, the lower wiper step is switched on
automatically. At a speed increase of more than 8 km/h the previous wiper setting is
established again.
If there is an obstacle on the windscreen, the wiper will try to push away the
obstacle. If the obstacle continues to bloc k the wiper, the wiper stops automatically
after 5 attempts to eliminate the obstacle, in order to avoid a damage to the wiper.
Remove the obstacle and and switch on the wiper again.
The content of the windscreen washer fluid reservoir is 3 litres. On vehicles which
are equipped with a headlight cleaning syst em*, the content of the reservoir is 5.5
litres.
Automatic rear window wiper* (Combi)If the windshield wiper lever is in the position page 73, fig. 63 or , the rear
window wiper carries out a wiping process ev ery 30 seconds or 10 seconds at a speed
above 5 km/h.
When the rain sensor* is active (the lever is in the position ) the function is only
active if the front window wipers continue to operate (no break between each wiping
process).
Activation/deactivation
The function of the automatic rear window wiper is activated/deactivated in the infor-
mation display* in the menu:
Setup
Lights & Vision (Lights & Vision)
Rear wiper
Note
The function of the automatic rear window wi per is only valid for Combi vehicles which
are equipped with the information display*. The function is activated in the factory.Position of the rear window wiper (Combi)Each second time the ignition is switched off, the wiper blade is tilted. Thus, the life of
the wiper blade is prolonged. As standard this function is activated and it can be deac-
tivated as follows:Deactivating– Switch on the ignition.
– Push the operating level into the position page 73, fig. 63 five times in
succession within 5 seconds.
– Switch off the ignition. After switching on th e ignition again, the position of the rear
window wiper is deactivated.
The activation of the position of the rear window wiper is carried out in the same way
as the deactivation.Headlight cleaning system*The headlights are being cleaned after the windscreen has been sprayed for the first
time and fifth time, the low beam or main beam are switched on and the windscreen
wiper lever was held in the position page 73, fig. 63 for about 1 second.
The headlight washer nozzles are moved forward out of the bumper by the water pres-
sure for cleaning the headlights.
You should remove stubborn dirt (such as in sect residues) from the headlight lenses at
regular intervals, for example when refuelling . Please refer to the following guidelines.
You should remove any snow from the fixtur es of the washer nozzles and clear ice in
winter with a de-icing spray in order to ensure proper operation of the cleaning
system.
A2
A3
A2
A3
A1
A6
A5
s3fg.2.book Page 75 Friday, April 30, 2010 12:17 PM
Page 98 of 287
Seats and Stowage97
Using the system
Safety
Driving Tips
General Maintenance
Breakdown assistance
Technical Data
– Push the net partition housing in the oppo
site direction of arrow as far as the
stop.
– Fold the rear seats back into their original position.
WARNING
Pay attention that the rear seat backrest is correctly interlocked. It is only then
that the three-point seat belt for the middle seat can reliably fulfil its function.The roof rack*DescriptionPay attention to the following points if you wish to transport luggage or other items on
the roof of your vehicle:
A special roof luggage rack system was de veloped for the vehicle, that is why you
should only use a roof luggage rack which has been released for use by Škoda Auto.
The base carrier is the basis for a complete roof luggage rack system. Separate
additional holders are required for safety reasons for transporting luggage, bikes, surf-
boards, skis and boats.
The basic version of the roof luggage rack system and further components are
obtainable as accessories from the authorised Škoda Service Partners.Caution
If you use other roof rack systems or if the roof bars are not properly fitted, then any
damage which may result to your car is not covered by the warranty agreements. It is
therefore essential to pay attention to the fitting instructions supplied with the roof
luggage rack system.
On models fitted with a power sliding/ti lting roof or a panoramic sliding roof,
ensure that the opened sliding/tilting roof or the panoramic sliding roof does not strike
any items of luggage transported on the roof.
Ensure that the opened boot lid does not collide with the roof load.
For the sake of the environment
The increased aerodynamic drag results in a higher fuel consumption. One should
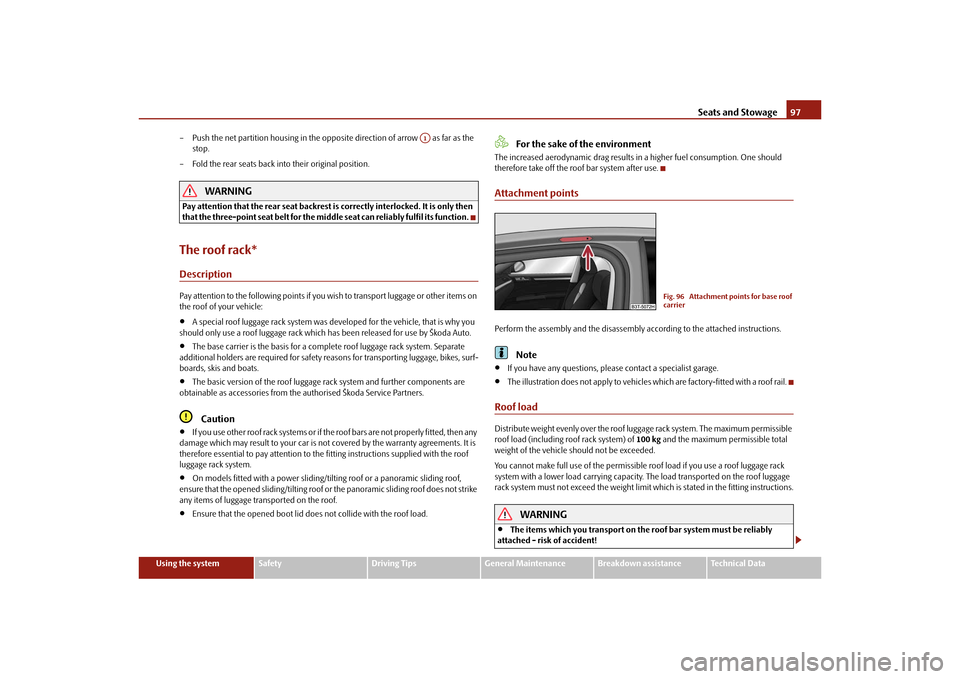
therefore take off the roof bar system after use.Attachment pointsPerform the assembly and the disassembly according to the attached instructions.
Note
If you have any questions, please contact a specialist garage.
The illustration does not apply to vehicles which are factory-fitted with a roof rail.
Roof loadDistribute weight evenly over the roof luggage rack system. The maximum permissible
roof load (including roof rack system) of 100 kg and the maximum permissible total
weight of the vehicle should not be exceeded.
You cannot make full use of th e permissible roof load if you use a roof luggage rack
system with a lower load carr ying capacity. The load transported on the roof luggage
rack system must not exceed the weight limit which is stated in the fitting instructions.
WARNING
The items which you transport on the roof bar system must be reliably
attached - risk of accident!
A1
Fig. 96 Attachment points for base roof
carrier
s3fg.2.book Page 97 Friday, April 30, 2010 12:17 PM
Page 110 of 287
Air conditioning system109
Using the system
Safety
Driving Tips
General Maintenance
Breakdown assistance
Technical Data
Air conditioning systemIntroductionDescription and informationIf the cooling system is switched on, the temperature and air humidity drops in the
vehicle. The wellbeing of the occupants of the car is enhanced as a result of this partic-
ularly at high outside temperatures and a high air humidity. The system prevents the
windows misting up during th e cold season of the year.
The heating effect is dependent upon the c oolant temperature, thus full heat output
only occurs when the engine has reached its operating temperature.
It is possible to briefly activate recirculat ed air mode in order to enhance the cooling
effect - Climatic page 113, Climatronic page 116.
The air inlet in front of the windscreen must be free of ice, snow or leaves in order to
ensure that the heating and cooling systems operate properly.
After switching on the cooling Condensation from the evaporator of the air condi-
tioning may drip down and form a puddle be low the vehicle. This is quite normal and
not an indication of a leak!
WARNING
For your own safety and that of other road users, ensure that all the
windows are free of ice, snow and mistin g. Please familiarize yourself about
how to correctly operate th e heating and ventilation systems, how to demist
and defrost the windows, as well as with the cooling mode.
You should not leave recirculated air mode on over a longer period of time,
as “stale” air may result in fatigue in the driver and occupants, divert your
attention and also cause the windows to mist up. The risk of having an accident
increases. Switch recirculated air mode off as soon as the windows begin
misting up.
Note
The used air streams out through the air removal openings in the luggage compart-
ment.
If the cooling system has not been switched on for a lengthy period, odours may
be produced at the evaporator because of deposits. Switch the cooling system on at
least once a month for approximately 5 minu tes at the highest blower stage - also
during the cold season of the year - in order to avoid such odours. Also open a window
for a short time.
We recommend that you do not smoke in the vehicle when the recirculating air
mode is operating since the smoke which is drawn at the evaporator from the interior
of the vehicle forms deposits in the evapor ator of the air conditioning system. This
produces a permanent odour when the air conditioning system is operating which can
only be eliminated through considerable effort and expense (replacement of
compressor).
Please refer to the information regarding the recirculated air mode for Climatic
page 113 or for Climatronic page 116.
Using the air conditioning system economicallyThe compressor on the air conditioning syst em uses power from the engine when in
cooling mode which will effect the fuel consumption.
It recommended to open the windows or the doors of a vehicle for which the interior
has been strongly heated through the effect of direct sunlight in order to allow the
heated air to escape.
The cooling system should not be switched on while travelling when the window is
open.
The desired interior temperature can also be achieved without switching in the cooling
system just by switching to fresh air mode.
For the sake of the environment
When you economize on fuel, you also reduce pollutant emissions.
s3fg.2.book Page 109 Friday, April 30, 2010 12:17 PM
Page 118 of 287
Air conditioning system117
Using the system
Safety
Driving Tips
General Maintenance
Breakdown assistance
Technical Data
Defrosting windscreenDefrosting windscreen - switching on– Press the button page 114, fig. 122.Defrosting windscreen - switching off– Once again press the button or the button .
The temperature control is controlled automatically. More air flows out of the air outlet
vents 1.Auxiliary heating (auxiliary heating and ventilation)*Description and important information
The auxiliary heating (auxiliary heating and ventilation) heats or
supplies the interior of the vehicl e with fresh air independent of the
engine.Auxiliary heating (auxiliary heating)
The auxiliary heating (auxiliary heating) functions in connection with the Climatic or
Climatronic.
It can be used when stationary, when engi ne is switched off for preheating of the
vehicle as well as while driving (e.g. during the heating phase of the engine).
The engine is also preheated when the vehicle is stationary and the engine is switched
off, if the auxiliary heating is switched on. This is not valid for the engines 3.6 ltr./191 kW
FSI and 1.9 ltr./77 kW TDI.
The auxiliary heating (auxiliary heating) wa rms up the coolant during the combustion
of fuel from the vehicle tank. The coolant warms up the air, which (if the blower speed
is not set to zero) flows in to the occupant compartment.
Auxiliary ve ntilation
The auxiliary ventilation enables fresh air to flow into the vehicle interior by switching
off the engine, whereby the interior temperature is effectively decreased (e.g. with the
vehicle parked in the sun).
WARNING
The auxiliary heating must never be operated in closed rooms - risk of
poisoning!
The auxiliary heating must not be running during refueling - risk of fire.
The exhaust pipe of the auxiliary heatin g is located on the underside of the
vehicle. Therefore do not place the vehicle, if you wish to operate the auxiliary
heating, in such a way that the exhaust gases of the auxiliary heating can come
easily into contact with inflammable mate rials (e.g. dry grass) or easily inflam-
mable substances (e .g. fuel run out).Note
If the auxiliary heating runs, the fuel consumption comes from the vehicle tank.
Therefore the auxiliary heating should not be operated, if there is very little fuel in the
tank.
The exhaust pipe of the auxiliary heating, which is located on the underside of the
vehicle, must not be clogged and th e exhaust flow must not be blocked.
If the auxiliary heating and ventilation is running, the vehicle battery discharges. If
the auxiliary heating and ventilation has been operated several times over a longer
period, the vehicle must be driven a few ki lometers in order to recharge the vehicle
battery.
The auxiliary heating only switches the bl ower on, if it has achieved a coolant
temperature of approx. 50 °C.
At low outside temperatures, this can result in a formation of water vapour in the
area of the engine compartment. This is qu ite normal and is not an operating problem.
After switching off the auxiliary heating, the coolant pump runs for a short period.
The auxiliary heating and ventilation does not switch on or comes on, if the vehicle
battery indicates a low loading state.
The auxiliary heating (auxiliary heating) does not switch on, if the following was
shown in the information display or before switching off the ignition: Please refuel!
The air inlet in front of the windscreen must be free of ice, snow or leaves in order
to ensure that the auxiliary heating operates properly.
AUTO
s3fg.2.book Page 117 Friday, April 30, 2010 12:17 PM