fuel SKODA SUPERB 2010 2.G / (B6/3T) Owner's Manual
[x] Cancel search | Manufacturer: SKODA, Model Year: 2010, Model line: SUPERB, Model: SKODA SUPERB 2010 2.G / (B6/3T)Pages: 287, PDF Size: 16.59 MB
Page 4 of 287
Contents3
Using the system
Safety
Driving Tips
General Maintenance
Breakdown assistance
Technical Data
ContentsLayout of this Owner's Manual
(explanations)
. . . . . . . . . . . . . . . . . . . . . . . . . .
Using the system
. . . . . . . . . . . . . . . . . . . . . .
Cockpit
. . . . . . . . . . . . . . . . . . . . . . . . . . . . . . . . . . . . . . . .
Overview . . . . . . . . . . . . . . . . . . . . . . . . . . . . . . . . . . . .
The brief instruction
. . . . . . . . . . . . . . . . . . . . . . . . . .
Basic functions and important information . . . . .
Instruments and warning lights
. . . . . . . . . . . . . . .
Overview of the instrument cluster . . . . . . . . . . . . .
Engine revolutions counter . . . . . . . . . . . . . . . . . . . .
Speedometer . . . . . . . . . . . . . . . . . . . . . . . . . . . . . . . .
Coolant temperature gauge . . . . . . . . . . . . . . . . . . .
Fuel gauge . . . . . . . . . . . . . . . . . . . . . . . . . . . . . . . . . . .
Counter for distance driven . . . . . . . . . . . . . . . . . . .
Service Interval Display . . . . . . . . . . . . . . . . . . . . . . .
Digital clock . . . . . . . . . . . . . . . . . . . . . . . . . . . . . . . . . .
Shift recommendation for changing gears* . . . . .
Multi-functional indicator (onboard computer)*
Information display* . . . . . . . . . . . . . . . . . . . . . . . . . .
Auto Check Control* . . . . . . . . . . . . . . . . . . . . . . . . . .
Warning lights . . . . . . . . . . . . . . . . . . . . . . . . . . . . . . . .
Unlocking and locking
. . . . . . . . . . . . . . . . . . . . . . . .
Key . . . . . . . . . . . . . . . . . . . . . . . . . . . . . . . . . . . . . . . . . .
Changing the battery in the remote control key .
Electronic immobiliser . . . . . . . . . . . . . . . . . . . . . . . .
Child safety lock . . . . . . . . . . . . . . . . . . . . . . . . . . . . . .
Central locking system . . . . . . . . . . . . . . . . . . . . . . . .
Remote control . . . . . . . . . . . . . . . . . . . . . . . . . . . . . . .
Description . . . . . . . . . . . . . . . . . . . . . . . . . . . . . . . . . .
Unlocking and locking car . . . . . . . . . . . . . . . . . . . . .
Synchronisation of the remote control . . . . . . . . . .
Anti-theft alarm system* . . . . . . . . . . . . . . . . . . . . . . Power windows . . . . . . . . . . . . . . . . . . . . . . . . . . . . . . .
Electric sliding/tilting roof* . . . . . . . . . . . . . . . . . . . . .
Panoramic sliding roof* (Combi) . . . . . . . . . . . . . . .
Lights and Visibility
. . . . . . . . . . . . . . . . . . . . . . . . . . . .
Lights . . . . . . . . . . . . . . . . . . . . . . . . . . . . . . . . . . . . . . . .
Interior lighting . . . . . . . . . . . . . . . . . . . . . . . . . . . . . . .
Luggage compartment light (Combi) . . . . . . . . . . . .
Visibility . . . . . . . . . . . . . . . . . . . . . . . . . . . . . . . . . . . . . .
Windshield wiper and wash system . . . . . . . . . . . . .
Rear-view mirror . . . . . . . . . . . . . . . . . . . . . . . . . . . . . .
Exterior mirror . . . . . . . . . . . . . . . . . . . . . . . . . . . . . . . .
Exterior mirror with entry lighting* . . . . . . . . . . . . .
Automatic dimming exterior mirror* . . . . . . . . . . . .
Seats and Stowage
. . . . . . . . . . . . . . . . . . . . . . . . . . . . .
Front seats . . . . . . . . . . . . . . . . . . . . . . . . . . . . . . . . . . . .
Adjusting front seats electrically* . . . . . . . . . . . . . . .
Head restraints . . . . . . . . . . . . . . . . . . . . . . . . . . . . . . . .
Middle rear head restraint . . . . . . . . . . . . . . . . . . . . .
Rear seats . . . . . . . . . . . . . . . . . . . . . . . . . . . . . . . . . . . .
luggage compartment . . . . . . . . . . . . . . . . . . . . . . . . .
Variable loading floor in the luggage compartment*
(Combi) . . . . . . . . . . . . . . . . . . . . . . . . . . . . . . . . . . . . . .
Net partition* (Combi) . . . . . . . . . . . . . . . . . . . . . . . .
The roof rack* . . . . . . . . . . . . . . . . . . . . . . . . . . . . . . . .
Cup holder . . . . . . . . . . . . . . . . . . . . . . . . . . . . . . . . . . .
Ashtray . . . . . . . . . . . . . . . . . . . . . . . . . . . . . . . . . . . . . . .
Cigarette lighter*, power sockets . . . . . . . . . . . . . . .
Storage compartments . . . . . . . . . . . . . . . . . . . . . . . .
Air conditioning system
. . . . . . . . . . . . . . . . . . . . . . .
Introduction . . . . . . . . . . . . . . . . . . . . . . . . . . . . . . . . . .
Air outlet vents . . . . . . . . . . . . . . . . . . . . . . . . . . . . . . . .
Climatic (semi-automatic air conditioning system)
Climatronic* (automatic air conditioning) . . . . . . .
Auxiliary heating (auxiliary heating and ventilation)*
Starting-off and Driving
. . . . . . . . . . . . . . . . . . . . . . .
Setting steering wheel position . . . . . . . . . . . . . . . .
Ignition lock . . . . . . . . . . . . . . . . . . . . . . . . . . . . . . . . . .
Starting the engine . . . . . . . . . . . . . . . . . . . . . . . . . . . .
KESSY system* . . . . . . . . . . . . . . . . . . . . . . . . . . . . . . .
Parking aid* . . . . . . . . . . . . . . . . . . . . . . . . . . . . . . . . . .
Park Assist* . . . . . . . . . . . . . . . . . . . . . . . . . . . . . . . . . .
Cruise control system (CCS)* . . . . . . . . . . . . . . . . . .
Automatic gearbox DSG*
. . . . . . . . . . . . . . . . . . . . .
Automatic gearbox DSG* . . . . . . . . . . . . . . . . . . . . . .
Communication
. . . . . . . . . . . . . . . . . . . . . . . . . . . . . . .
Multifunction steering wheel* . . . . . . . . . . . . . . . . .
Mobile phones and two-way radio systems . . . . .
Universal telephone preinstallation GSM II* . . . . .
Voice control . . . . . . . . . . . . . . . . . . . . . . . . . . . . . . . . .
Music playback via Bluetooth® . . . . . . . . . . . . . . . .
Universal telephone preinstallation GSM IIl* . . . .
Voice control . . . . . . . . . . . . . . . . . . . . . . . . . . . . . . . . .
Connection to the internet . . . . . . . . . . . . . . . . . . . .
Music playback via Bluetooth® . . . . . . . . . . . . . . . .
Multimedia . . . . . . . . . . . . . . . . . . . . . . . . . . . . . . . . . .
Safety
. . . . . . . . . . . . . . . . . . . . . . . . . . . . . . . . . . . . . . .
Passive Safety
. . . . . . . . . . . . . . . . . . . . . . . . . . . . . . . . .
Basic information . . . . . . . . . . . . . . . . . . . . . . . . . . . . .
Correct seated position . . . . . . . . . . . . . . . . . . . . . . .
Seat belts
. . . . . . . . . . . . . . . . . . . . . . . . . . . . . . . . . . . . . .
Why seat belts? . . . . . . . . . . . . . . . . . . . . . . . . . . . . . . .
The physical principle of a frontal collision . . . . . .
Important safety information regarding the use of seat
belts . . . . . . . . . . . . . . . . . . . . . . . . . . . . . . . . . . . . . . . . .
How are seat belts correctly fastened? . . . . . . . . . .
6799101015151516161617171819192324273737373838384949495050
52555760606770717377777878808081848485879295979899100100109109110111114117
121121121122125128130133136136142142145145150151152157158158159161161161162165165165166167
s3fg.2.book Page 3 Friday, April 30, 2010 12:17 PM
Page 5 of 287
Contents
4
Airbag system
. . . . . . . . . . . . . . . . . . . . . . . . . . . . . . . . .
Description of the airbag system . . . . . . . . . . . . . . .
Front airbags . . . . . . . . . . . . . . . . . . . . . . . . . . . . . . . . .
Driver's knee airbag* . . . . . . . . . . . . . . . . . . . . . . . . .
Side airbags* . . . . . . . . . . . . . . . . . . . . . . . . . . . . . . . . .
Head airbags* . . . . . . . . . . . . . . . . . . . . . . . . . . . . . . . .
Deactivating an airbag . . . . . . . . . . . . . . . . . . . . . . . .
Transporting children safely
. . . . . . . . . . . . . . . . . .
What you should know about transporting children!
Child seat . . . . . . . . . . . . . . . . . . . . . . . . . . . . . . . . . . . .
Attaching a child seat us ing the “ISOFIX” system .
Attaching child seat using the “Top Tether” system
Driving Tips
. . . . . . . . . . . . . . . . . . . . . . . . . . . . . .
Intelligent Technology
. . . . . . . . . . . . . . . . . . . . . . . .
Electronic stability programme (ESP)* . . . . . . . . . .
Brakes . . . . . . . . . . . . . . . . . . . . . . . . . . . . . . . . . . . . . . .
Brake booster . . . . . . . . . . . . . . . . . . . . . . . . . . . . . . . .
Antilock brake system (ABS) . . . . . . . . . . . . . . . . . . .
Brake Assist* . . . . . . . . . . . . . . . . . . . . . . . . . . . . . . . . .
Uphill Start Assist* . . . . . . . . . . . . . . . . . . . . . . . . . . . .
Electromechanical power steering . . . . . . . . . . . . .
Tyre pressure monitoring system* . . . . . . . . . . . . . .
Diesel particle filter* (diesel engine) . . . . . . . . . . . .
Driving and the Environment
. . . . . . . . . . . . . . . . .
The first 1 500 kilometres and then afterwards . .
Catalytic converter . . . . . . . . . . . . . . . . . . . . . . . . . . . .
Driving in an economical and environmentally
conscious manner . . . . . . . . . . . . . . . . . . . . . . . . . . . .
Environmental compatibility . . . . . . . . . . . . . . . . . . .
Motoring abroad . . . . . . . . . . . . . . . . . . . . . . . . . . . . .
Avoiding damage to your vehicle . . . . . . . . . . . . . .
Driving through bodies of water on roads . . . . . . .
Towing a trailer
. . . . . . . . . . . . . . . . . . . . . . . . . . . . . . . .
Towing a trailer . . . . . . . . . . . . . . . . . . . . . . . . . . . . . . .
General Maintenance
. . . . . . . . . . . . . . .
Taking care of your ve hicle and cleaning the
vehicle
. . . . . . . . . . . . . . . . . . . . . . . . . . . . . . . . . . . . . . . . .
General . . . . . . . . . . . . . . . . . . . . . . . . . . . . . . . . . . . . . .
Care of the exterior of vehicle . . . . . . . . . . . . . . . . . .
Care of the interior of vehicle . . . . . . . . . . . . . . . . . .
Fuel
. . . . . . . . . . . . . . . . . . . . . . . . . . . . . . . . . . . . . . . . . . . .
Petrol . . . . . . . . . . . . . . . . . . . . . . . . . . . . . . . . . . . . . . . .
Diesel . . . . . . . . . . . . . . . . . . . . . . . . . . . . . . . . . . . . . . . .
Refuelling . . . . . . . . . . . . . . . . . . . . . . . . . . . . . . . . . . . .
Inspecting and replenishing
. . . . . . . . . . . . . . . . . . .
Engine compartment . . . . . . . . . . . . . . . . . . . . . . . . . .
Engine oil . . . . . . . . . . . . . . . . . . . . . . . . . . . . . . . . . . . . .
Cooling system . . . . . . . . . . . . . . . . . . . . . . . . . . . . . . .
Brake fluid . . . . . . . . . . . . . . . . . . . . . . . . . . . . . . . . . . . .
Battery . . . . . . . . . . . . . . . . . . . . . . . . . . . . . . . . . . . . . . .
Windshield washer system . . . . . . . . . . . . . . . . . . . . .
Wheels and Tyres
. . . . . . . . . . . . . . . . . . . . . . . . . . . . . .
Wheels . . . . . . . . . . . . . . . . . . . . . . . . . . . . . . . . . . . . . . .
Accessories, changes and replacement of partsAccessories and replacement parts . . . . . . . . . . . . .
Technical changes . . . . . . . . . . . . . . . . . . . . . . . . . . . . .
Vehicles of category N1 . . . . . . . . . . . . . . . . . . . . . . . .Breakdown assistance
. . . . . . . . . . . . . .
Breakdown assistance
. . . . . . . . . . . . . . . . . . . . . . . . .
First-aid box* . . . . . . . . . . . . . . . . . . . . . . . . . . . . . . . . .
Warning triangle* . . . . . . . . . . . . . . . . . . . . . . . . . . . . .
Fire extinguisher* . . . . . . . . . . . . . . . . . . . . . . . . . . . . .
Vehicle tool kit . . . . . . . . . . . . . . . . . . . . . . . . . . . . . . . .
Tyre repair kit* . . . . . . . . . . . . . . . . . . . . . . . . . . . . . . . .
Spare wheel* . . . . . . . . . . . . . . . . . . . . . . . . . . . . . . . . .
Changing a wheel . . . . . . . . . . . . . . . . . . . . . . . . . . . . .
Jump-starting . . . . . . . . . . . . . . . . . . . . . . . . . . . . . . . . .
Tow-starting and towing vehicle . . . . . . . . . . . . . . . .
Fuses and light bulbs
. . . . . . . . . . . . . . . . . . . . . . . . .
Electric fuses . . . . . . . . . . . . . . . . . . . . . . . . . . . . . . . . .
Bulbs . . . . . . . . . . . . . . . . . . . . . . . . . . . . . . . . . . . . . . . .
Technical Data
. . . . . . . . . . . . . . . . . . . . . . . . . .
Technical Data
. . . . . . . . . . . . . . . . . . . . . . . . . . . . . . . .
General information . . . . . . . . . . . . . . . . . . . . . . . . . .
Used abbreviations . . . . . . . . . . . . . . . . . . . . . . . . . . .
Performances . . . . . . . . . . . . . . . . . . . . . . . . . . . . . . . .
Weight . . . . . . . . . . . . . . . . . . . . . . . . . . . . . . . . . . . . . . .
Identification details . . . . . . . . . . . . . . . . . . . . . . . . . .
Fuel consumption according to the ECE standards and
EU guidelines . . . . . . . . . . . . . . . . . . . . . . . . . . . . . . . .
Dimensions . . . . . . . . . . . . . . . . . . . . . . . . . . . . . . . . . .
Engine oil specifications . . . . . . . . . . . . . . . . . . . . . . .
1.4 ltr./92 kW TSI - EU5 . . . . . . . . . . . . . . . . . . . . . . . .
1.8 ltr./118 (112) kW TSI - EU5 / EU2 / BS4 . . . . . .
2.0 ltr./147 kW FSI - EU5 . . . . . . . . . . . . . . . . . . . . . . .
3.6 ltr./191 kW FSI - EU5 / EU2 / (BS4) . . . . . . . . . .
1.9 ltr./77 kW TDI PD - EU4 . . . . . . . . . . . . . . . . . . . .
2.0 ltr./103 kW TDI CR DPF - EU5 / (EU4 / BS4) . .
2.0 ltr./125 kW TDI CR DPF - EU5 . . . . . . . . . . . . . . .
Index
. . . . . . . . . . . . . . . . . . . . . . . . . . . . . . . . . . . . . . . .
170170171173174176178180180182185186187187187189190191191192192192193195195196196199200200201202202
205205205205209212212212213215215217219221222226228228234234234234235235235235235236236236237241242
246246251257257257257257257257258259260262264266268270272274277
s3fg.2.book Page 4 Friday, April 30, 2010 12:17 PM
Page 7 of 287
Layout of this Owner's Manual (explanations)
6
Layout of this Owner's Manual (explanations)The Owner's Manual has been systematically designed, in order to make it easy for you
to find and absorb the information you require.Chapters, table of contents and subject indexThe text of the Owner's manual is divided into relatively short sections which are
combined into easy-to-read chapters. The chapter you are reading at any particular
moment is highlighted at the bottom right of the page.
The Table of contents is arranged according to the chapters and the detailed Subject
index at the end of the Owner's Manual helps you to rapidly find the information you
are looking for.SectionsThe majority of Sections apply to all models.
Since there is a wide range of different equipment and options available it is clearly
unavoidable, despite dividing the contents into sections, that mention may be made
of equipment whic h is not fitted to your vehicle.Brief information and instructionsEach section has a Heading.
This is followed by Brief information (in large italic lettering), which tells you the
subject which is dealt with in this section.
Most of the illustrations are accompanied by an Instruction (in relatively large letters)
which explains to you in a straightforw ard way the action you have to take. Work steps
which have to be carried out are illustrated with a hyphen.Direction indicationsAll direction indications such as “left”, “right”, “front”, “rear” relate to the direction of
travel of the vehicle.Explanation of symbols Equipment which is marked in such a way is only standard on certain vehicle model
versions or only suppliable as opti onal equipment for certain models. End of a section.
The section is continued on the next page.NotesAll four kinds of notes, which are used in th e text, are always stated at the end of the
respective section.
WARNING
The most important notes are marked with the heading WARNING. These
WARNING notes draw your attention to a serious risk of accident or injury.
While reading the text you will frequent ly encounter a double arrow followed
by a small warning symbol. This symbol is intended to draw your attention to a
WARNING note at the end of the section to which you must pay careful atten-
tion.
Caution
A Caution note draws your attention to the possib ility of damage to your vehicle (e.g.
damage to gearbox), or points ou t general risks of an accident.
For the sake of the environment
An Environmental note draws your attention to environmental protection aspects.
This is where you will, for example, find tips aimed at reducing your fuel consumption.
Note
A normal Note draws your attention in a general way to important information.
s3fg.2.book Page 6 Friday, April 30, 2010 12:17 PM
Page 14 of 287
The brief instruction13
Using the system
Safety
Driving Tips
General Maintenance
Breakdown assistance
Technical Data
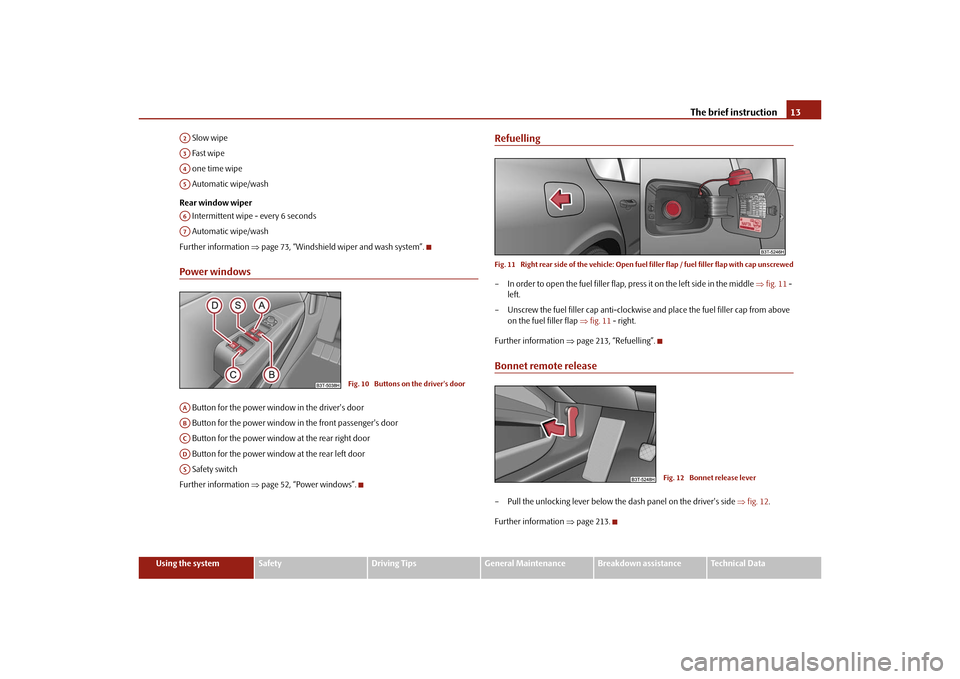
Slow wipe
Fast wipe
one time wipe
Automatic wipe/wash
Rear window wiper Intermittent wipe - every 6 seconds
Automatic wipe/wash
Further information page 73, “Windshield wiper and wash system”.
Power windows Button for the power window in the driver's door
Button for the power window in the front passenger's door
Button for the power window at the rear right door
Button for the power window at the rear left door
Safety switch
Further information page 52, “Power windows”.
RefuellingFig. 11 Right rear side of the ve hicle: Open fuel filler flap / fuel filler flap with cap unscrewed– In order to open the fuel filler flap, press it on the left side in the middle fig. 11 -
left.
– Unscrew the fuel filler ca p anti-clockwise and place the fuel filler cap from above
on the fuel filler flap fig. 11 - right.
Further information page 213, “Refuelling”.Bonnet remote release– Pull the unlocking lever below the dash panel on the driver's side fig. 12 .
Further information page 213.
A2A3A4A5A6A7
Fig. 10 Buttons on the driver's door
AAABACADAS
Fig. 12 Bonnet release lever
s3fg.2.book Page 13 Friday, April 30, 2010 12:17 PM
Page 16 of 287
Instruments and warning lights15
Using the system
Safety
Driving Tips
General Maintenance
Breakdown assistance
Technical Data
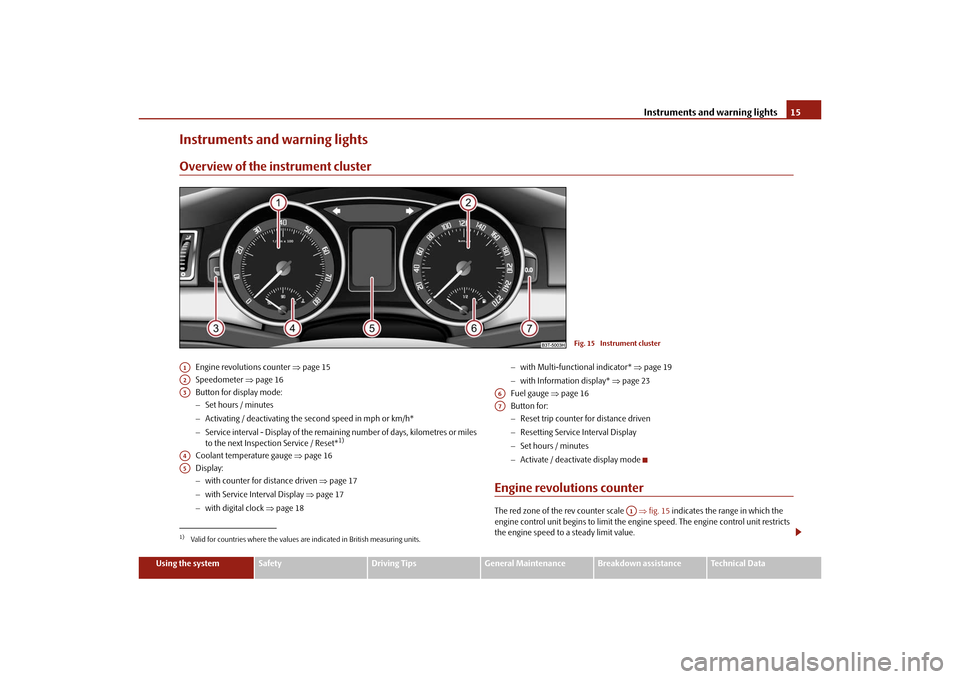
Instruments and warning lightsOverview of the instrument cluster
Engine revolutions counter page 15
Speedometer page 16
Button for display mode:
Set hours / minutes
Activating / deactivating the second speed in mph or km/h*
Service interval - Display of the remaining number of days, kilometres or miles
to the next Inspection Service / Reset*
1)
Coolant temperature gauge page 16
Display:
with counter for distance driven page 17
with Service Interval Display page 17
with digital clock page 18
with Multi-functional indicator* page 19
with Information display* page 23
Fuel gauge page 16
Button for:
Reset trip counter for distance driven
Resetting Service Interval Display
Set hours / minutes
Activate / deactivate display mode
Engine revolutions counterThe red zone of the rev counter scale fig. 15 indicates the range in which the
engine control unit begins to limit the engi ne speed. The engine control unit restricts
the engine speed to a steady limit value.
Fig. 15 Instrument cluster
1)Valid for countries where the values are indicated in British measuring units.A1A2A3A4A5
A6A7
A1
s3fg.2.book Page 15 Friday, April 30, 2010 12:17 PM
Page 17 of 287
Instruments and warning lights
16
Shift into the next higher gear or select th e selector lever position D of the automatic
gearbox before reaching the red zone of the rev counter scale.
Avoid high engine speeds du ring the driving time and before the engine has been
warmed up to operating temperature page 195.
For the sake of the environment
Shifting up early helps you sa ve fuel and reduce the operating noise of your vehicle.SpeedometerWarning against excessive speeds*
An acoustic warning signal will sound when the vehicle speed exceeds 120 kilometres
per hour. The acoustic warning signal will switch off again when the vehicle speed goes
below this speed limit.
Note
This function is only valid for some countries.Coolant temperature gaugeThe coolant temperature gauge page 15, fig. 15 operates only when the ignition
is switched on.
In order to avoid any damage to the engine, please pay attention to the following notes
regarding the temperature ranges:
Cold range
If the pointer is in the left-hand area of the scale it means that the engine has not yet
reached its operating temperatur e. Avoid running at high engine speeds, at full throttle
and at severe engine loads.
The operating range
The engine has reached its operating temper ature as soon as the pointer moves into
the mid-range of the scale. The pointer may also move further to the right at high engine loads and high outside temperatures. This is not critical provided the warning
symbol
in the instrument cl
uster does not flash.
If the symbol in the instrument cluster flashes it means that either the coolant
temperature is too high or the coolant level is too low. Observe the guidelines
page 32, “Coolant temperature/ Coolant quantity ”.
WARNING
Pay attention to the warning notes page 216, “Working in the engine
compartment” before opening the bonn et and inspecting the coolant level.
Caution
Additional headlights and other attached components in front of the fresh air inlet
impair the cooling efficiency of the coolant. There is then a risk of the engine over-
heating at high outside temper atures and high engine loads.Fuel gaugeThe fuel gauge page 15, fig. 15 only operates when the ignition is switched on.
The fuel tank has a capacity of about 60 litres. The warning symbol
in the instrument
cluster lights up when the pointer reaches the reserve marking. There are now about
10.5 litres of fuel remaining in the ta nk. This symbol is a reminder for you, that you
must refuel .
The following will be displayed in the information display*: Please refuel!
An audible signal sounds as an additional warning signal.
Caution
Never run the fuel tank completely empty! An irregular supply of fuel can lead to irreg-
ular engine running. Unburnt fuel may get into the exhaust system and damage the
catalytic converter.
A4
A6
s3fg.2.book Page 16 Friday, April 30, 2010 12:17 PM
Page 18 of 287
Instruments and warning lights17
Using the system
Safety
Driving Tips
General Maintenance
Breakdown assistance
Technical Data
Note
After filling up, it can occur that during dy namic driving (e.g. numerous curves, braking,
driving downhill and climbing a steep hill) the fuel gauge indicates approx. a fraction
less. When stopping or during less dynamic driving, the correct fuel supply quantity is
indicated. This effect is not a fault.Counter for distance drivenThe distance which you have driven with yo ur vehicle is shown in kilometres (km). In
some countries the measuring unit “mile” is used.
Reset button
If you hold the reset button page 15 pressed for about 1 second, the trip counter
is set back to zero.
Trip counter for distance driven
The trip counter indicates the distance which you have driven since it was last reset -
in steps of 100 metres or 1/10 of a mile.
Counter for distance driven
The counter for distance driven indicates th e total distance in kilometers or miles
which the vehicle has been driven.
Fa u l t d i s p l a y
If there is a fault in the instru ment cluster, the constant text Error appears in the display.
Have the fault rectified as soon as possible by a specialist workshop.
WARNING
Never seek to adjust the trip counter for distance driven while driving for safety
reasons!
Note
If vehicles which are fitted with the inform ation display* the display of the second
speed is activated in mph or km/h, this driving speed is indicated instead of the
counter for the total distance driven.
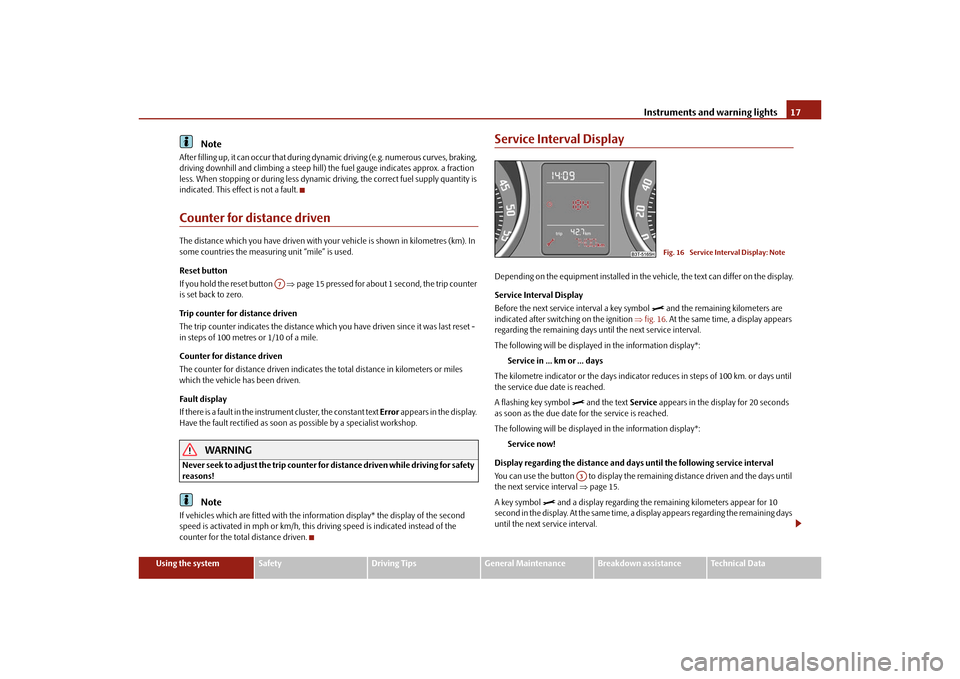
Service Interval DisplayDepending on the equipment installed in the vehicle, the text can differ on the display.
Service Interval Display
Before the next service interval a key symbol
and the remaining kilometers are
indicated after switching on the ignition fig. 16 . At the same time, a display appears
regarding the remaining days until the next service interval.
The following will be displayed in the information display*:
Service in ... km or ... days
The kilometre indicator or the days indicator reduces in steps of 100 km. or days until
the service due date is reached.
A flashing key symbol
and the text Service appears in the display for 20 seconds
as soon as the due date for the service is reached.
The following will be displayed in the information display*:
Service now!
Display regarding the distance and days until the following service interval
You can use the button to display the rema ining distance driven and the days until
the next service interval page 15.
A key symbol
and a display regarding the remaining kilometers appear for 10
second in the display. At the same time, a display appears regarding the remaining days
until the next service interval.
A7
Fig. 16 Service Interval Display: Note
A3
s3fg.2.book Page 17 Friday, April 30, 2010 12:17 PM
Page 20 of 287
Instruments and warning lights19
Using the system
Safety
Driving Tips
General Maintenance
Breakdown assistance
Technical Data
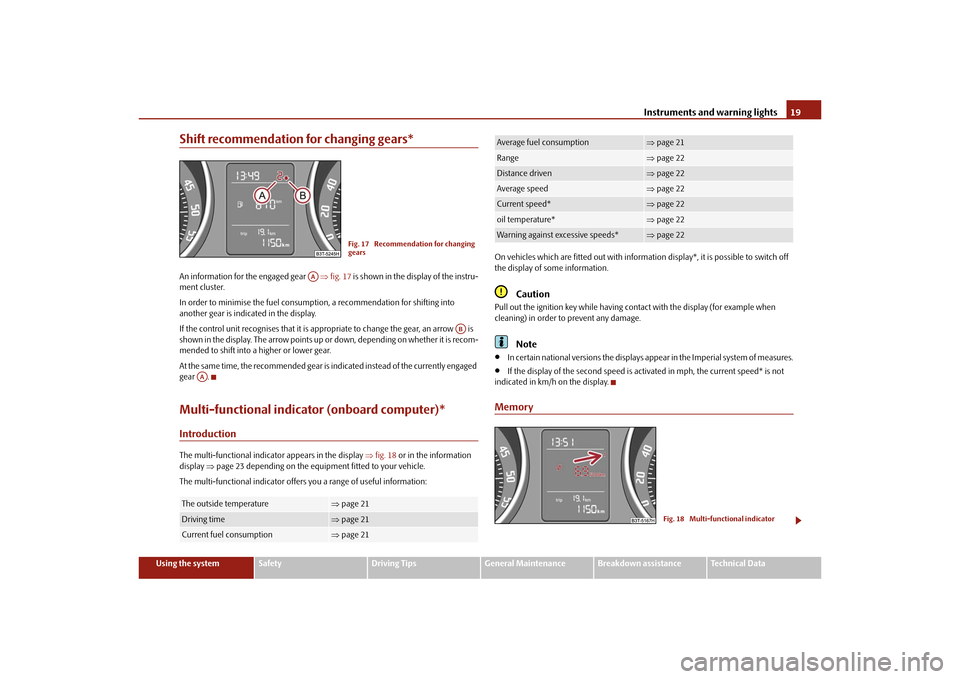
Shift recommendation for changing gears*An information for the engaged gear fig. 17 is shown in the display of the instru-
ment cluster.
In order to minimise the fuel consumptio n, a recommendation for shifting into
another gear is indicated in the display.
If the control unit recognises that it is a ppropriate to change the gear, an arrow is
shown in the display. The arrow points up or down, depending on whether it is recom-
mended to shift into a higher or lower gear.
At the same time, the recommended gear is indicated instead of the currently engaged
gear .Multi-functional indicator (onboard computer)*IntroductionThe multi-functional indicator appears in the display fig. 18 or in the information
display page 23 depending on the equipm ent fitted to your vehicle.
The multi-functional indicator offers you a range of useful information: On vehicles which are fitted out with informat
ion display*, it is possible to switch off
the display of some information.
Caution
Pull out the ignition key while having contact with the display (for example when
cleaning) in order to prevent any damage.
Note
In certain national versions the displays appear in the Imperial system of measures.
If the display of the second speed is acti vated in mph, the current speed* is not
indicated in km/h on the display.
Memory
The outside temperature
page 21
Driving time
page 21
Current fuel consumption
page 21
Fig. 17 Recommendation for changing
gears
AA
AB
AA
Average fuel consumption
page 21
Range
page 22
Distance driven
page 22
Average speed
page 22
Current speed*
page 22
oil temperature*
page 22
Warning against excessive speeds*
page 22
Fig. 18 Multi-functional indicator
s3fg.2.book Page 19 Friday, April 30, 2010 12:17 PM
Page 22 of 287
Instruments and warning lights21
Using the system
Safety
Driving Tips
General Maintenance
Breakdown assistance
Technical Data
Setting function to zero– Select the memory you want.
– Press the button or for more than 1 second.
The following readouts of the selected memo ry will be set to zero with the button
on the windshield wiper lever or with th e button on the multifunction steering
wheel:
average fuel consumption,
distance driven,
average speed,
Driving time.
You can only operate the multi-functional in dicator when the ignition is switched on.
After the ignition is switched on, the fu nction displayed is the one which you last
selected before switching off the ignition.
Outside temperatureThe outside temperature appears in the disp lay when the ignition is switched on.
If the outside temperature drops below +4 °C, a snow flake symbol (warning signal for
ice on the road) appears before the temperature indicator and a warning signal
sounds. After pressing the rocker switch page 20, fig. 19 on the windshield wiper
lever or the button page 20, fig. 19 on the multifunction steering wheel*, the
function shown last is indicated.
WARNING
Do not only rely upon the information given on the outside temperature display
that there is no ice on the road. Please note that black ice may also be present
on the road surface even at temperatures around +4°C - warning, drive with
care!Driving timeThe driving time which has elapsed since the memory was last erased, appears in the
display. If you wish to measure the driving ti me as of a particular time, you must set the memory to zero at this moment in time by pressing the button
page 20, fig. 19
on the windshield wiper lever or the handwheel page 20, fig. 19 on the multi-
function steering wheel* for longer than 1 second.
The maximum time indicated in both memories is 19 hours and 59 minutes and on
vehicles which are fitted with information display*, it is 99 hours and 59 minutes. The
indicator is set back to null if this period is exceeded.
Current consumptionThe current fuel consumption level is shown in the display in litres/100 km. This infor-
mation can help you to adapt your style of driving to the fuel consumption you wish to
achieve.
The display appears in litres/hour if the vehicle is stationary or driving at a low speed.
The indicated value will be updated every 0.5 seconds while you are driving.Average fuel consumptionThe average fuel consumption since the memory was last erased is shown in the
display in litres/100 km page 19. This information can help you to adapt your style
of driving to the fuel cons umption you wish to achieve.
If you wish to determine the average fuel consumption over a certain period of time
you must set the memory to zero at the st art of the measurement using the button
on the windshield wiper lever page 20, fig. 19 or with the handwheel on the
multifunction st eering wheel* page 20, fig. 19 . A zero appears in the display for the
first 100 m you drive after erasing the memory.
The indicated value will be updated every 5 seconds while you are driving.
Note
The amount of fuel consumed will not be indicated.
AB
AD
AB
AD
AA
AC
AB
AD
AB
AD
s3fg.2.book Page 21 Friday, April 30, 2010 12:17 PM
Page 23 of 287
Instruments and warning lights
22
RangeThe estimated range in kilometres is shown on the display. It indicates the distance you
can still drive with your vehi cle based on the present level of fuel in the tank for the
same style of driving.
The readout is shown in steps of 10 km. After lighting up of the indicator light for the
fuel reserve the display is shown in steps of 5 km.
The fuel consumption for the last 50 km is taken as a basis for calculating the range. If
you drive in a more economical manner from this moment on, the range will be
increased accordingly.
If the memory is set to zero (after disconnecting the battery), th e fuel consumption of
10 ltr./100 km is calculated for the range; afterwards the value is adapted accordingly
to the style of driving.Distance drivenThe distance driven since the memory was last erased appears in the display
page 19. If you wish to measure the distance driven of a particular time, you must
set the memory to zero at this moment in time by pressing the button page 20,
fig. 19 on the windshield wiper lever or the handwheel on the multifunction
steering wheel* page 20, fig. 19 .
The maximum distance indicated in both memo ries is 1 999 km or on vehicles with
information display*, it is 9 999 km. The indicator is set back to null if this period is
exceeded.Average speedThe average speed since the memory was last erased is shown in the display in
km/hour page 19. If you wish to determine the average vehicle speed over a certain
period of time, you must set the memory to zero at the start of the measurement using
the button page 20, fig. 19 on the windshield wiper lever or with the handwheel
on the multifunction steering wheel* page 20, fig. 19 .
A zero appears in the display for the first 100 m you drive after erasing the memory.
The indicated value will be updated every 5 seconds while you are driving.
Current speed*The current speed which is identical to the display of the speedometer page 15,
fig. 15 is indicated on the display.oil temperature*The oil temperature appears in the display when the ignition is switched on. If the oil
temperature is lower than 50°C or if a fault in the system for checking the oil tempera-
ture is present, three lines are displayed instead of the oil temperature.Warning against excessive speedsWarning against excessive speeds
This function enables you to set a speed limit, e.g. if you drive in town. A text in the
display is intended to draw your attention to the fact that you have exceeded the set
speed limit.
You can set the desired speed limit as follows:
Select the menu point Speed warning --- km/h (warning at --- km/h). .
Drive e.°g at a speed of 50 km/h.
Press the button page 20, fig. 19 on the windshield wi per lever or the hand-
wheel on the multifunction steering wheel* page 20, fig. 19 . Speed warning
50 km/h (warning at 50 km/h) is displayed in the information display*. You can
increase or reduce this value with the bu tton on the windshield wiper lever or by
turning the handwheel on the multifunction steering wheel*.
The value is stored by repeated pressing of the button on the windshield wiper
lever or the handwheel on the multifunction steering wheel*.
If you now exceed the set speed limit, Speed 50 km/h exceeded will be shown in the
display. This message is indicated for as long as the speed is reduced below the set
limit or switch off the message by pressing the button on the windshield wiper lever
page 20, fig. 19 or the handwheel on the multifunction stee ring wheel*
page 20, fig. 19 .
An audible signal sounds as an additional warning signal.
The set speed limit remains stored even after switching off the ignition.
AB
AD
AB
AD
A2
AB
AD
AA
AD
AB
AD
AB
AD
s3fg.2.book Page 22 Friday, April 30, 2010 12:17 PM