display SKODA SUPERB 2010 2.G / (B6/3T) Owner's Guide
[x] Cancel search | Manufacturer: SKODA, Model Year: 2010, Model line: SUPERB, Model: SKODA SUPERB 2010 2.G / (B6/3T)Pages: 287, PDF Size: 16.59 MB
Page 76 of 287
Lights and Visibility75
Using the system
Safety
Driving Tips
General Maintenance
Breakdown assistance
Technical Data
Caution
In frosty weather, please firs t of all check whether the windscreen wiper blades are not
frozen to the windscreen before switching them on. Switching on windscreen wipers
when the blades are frozen to the windscreen may result in damage both to the blades
and the motor of the windscreen wipers!
Note
If the slower page 73, fig. 63 or the faster wiper setting is switched on and
the vehicle speed decreases to below 4 km/h, the lower wiper step is switched on
automatically. At a speed increase of more than 8 km/h the previous wiper setting is
established again.
If there is an obstacle on the windscreen, the wiper will try to push away the
obstacle. If the obstacle continues to bloc k the wiper, the wiper stops automatically
after 5 attempts to eliminate the obstacle, in order to avoid a damage to the wiper.
Remove the obstacle and and switch on the wiper again.
The content of the windscreen washer fluid reservoir is 3 litres. On vehicles which
are equipped with a headlight cleaning syst em*, the content of the reservoir is 5.5
litres.
Automatic rear window wiper* (Combi)If the windshield wiper lever is in the position page 73, fig. 63 or , the rear
window wiper carries out a wiping process ev ery 30 seconds or 10 seconds at a speed
above 5 km/h.
When the rain sensor* is active (the lever is in the position ) the function is only
active if the front window wipers continue to operate (no break between each wiping
process).
Activation/deactivation
The function of the automatic rear window wiper is activated/deactivated in the infor-
mation display* in the menu:
Setup
Lights & Vision (Lights & Vision)
Rear wiper
Note
The function of the automatic rear window wi per is only valid for Combi vehicles which
are equipped with the information display*. The function is activated in the factory.Position of the rear window wiper (Combi)Each second time the ignition is switched off, the wiper blade is tilted. Thus, the life of
the wiper blade is prolonged. As standard this function is activated and it can be deac-
tivated as follows:Deactivating– Switch on the ignition.
– Push the operating level into the position page 73, fig. 63 five times in
succession within 5 seconds.
– Switch off the ignition. After switching on th e ignition again, the position of the rear
window wiper is deactivated.
The activation of the position of the rear window wiper is carried out in the same way
as the deactivation.Headlight cleaning system*The headlights are being cleaned after the windscreen has been sprayed for the first
time and fifth time, the low beam or main beam are switched on and the windscreen
wiper lever was held in the position page 73, fig. 63 for about 1 second.
The headlight washer nozzles are moved forward out of the bumper by the water pres-
sure for cleaning the headlights.
You should remove stubborn dirt (such as in sect residues) from the headlight lenses at
regular intervals, for example when refuelling . Please refer to the following guidelines.
You should remove any snow from the fixtur es of the washer nozzles and clear ice in
winter with a de-icing spray in order to ensure proper operation of the cleaning
system.
A2
A3
A2
A3
A1
A6
A5
s3fg.2.book Page 75 Friday, April 30, 2010 12:17 PM
Page 79 of 287
Lights and Visibility
78
Heating of the external mirror
– Turn the rotary knob to position
page 77, fig. 67 .
Adjusting left and right exterior mirrors simultaneously– Turn the rotary knob to position
. The movement of the mirror surface is identical
to the movement of the rotary knob.
The adjustment of both mirrors simultaneously or each individual mirror is possible in
the information display table on page 26 in the menu point Mirror adjust.
Adjusting the right-hand exterior mirror– Turn the rotary knob to position
. The movement of the mirror surface is identical
to the movement of the rotary knob.
Switching off operating control– Turn the rotary knob to position
.
Folding in both exterior mirrors*– Turn the rotary knob to position
.
Folding exterior mirrors* using the key with radio remote control– If all the windows are clos ed, press the unlock button page 49, fig. 37 on the
radio remote control for approx. 2 seconds.
Tilting surface of front passenger exterior mirror*
When the rotary knob is in position
page 77, fig. 67 and the reverse gear is
engaged, the surface of the mirror tilts down slightly. This provides an aid in seeing the
kerb of the pavement when parking the car.
The mirror returns into its initial position, after the rotary knob is moved out of the
position
and put into another position or if the speed is more than 15 km/h.
Memory for exterior mirrors*
On vehicles fitted with a memory for the driver seat, the relevant setting of the exterior
mirror is also stored automatically when the seat position is stored.
WARNING
Convex (curved outward) or spherical (differently curved) exterior mirrors
increase the vision field. They do, however, make objects appear smaller in the
mirror. These mirrors are only of limited use, therefore, for estimating distances
to the following vehicles.
Use whenever possible the interior rear mirror, for estimating the distances
to the following vehicles.Note
Do not touch the surfaces of the exterior mirrors if the exterior mirror heater is
switched on.
You can set the exterior mirrors by hand, if the power setting function fails at any
time by pressing on the edge of the mirror surface.
Contact your specialist garage if a fault exists with the power setting of the exterior
mirrors.
Exterior mirror with entry lighting*The lighting is positioned on the bo ttom edge of the exterior mirror.The light beam is aimed at the entry area of the front doors after the car is unlocked.
The light comes on after the doors have been locked or on opening the front door. The
lighting goes out about 30 seconds after th e doors are closed or if the ignition is
switched on.
If the doors remain open, the lighting go es out automatically after about 10 minutes
provided the ignition is not switched on.Automatic dimming exterior mirror*The exterior mirrors are dimmed together with the interior mirror. If the automatic
dimming is switched on, the mirror dims automatically depending on the light
striking the mirror from the rear.
A3
s3fg.2.book Page 78 Friday, April 30, 2010 12:17 PM
Page 92 of 287

Seats and Stowage91
Using the system
Safety
Driving Tips
General Maintenance
Breakdown assistance
Technical Data
Caution
Please ensure that the heating elements of the rear window heater are not damaged
as a result of objects placed in this area.
Note
Opening the tailgate also lifts up the luggage compartment cover.Foldable luggage compartment cover (Combi)Fig. 84 Luggage compartment: foldable lugga ge compartment cover / removing foldable
luggage compartment coverPulling out– Pull the foldable luggage compartment cover as far as the stop into the secured
position fig. 84 .Folding– Press the cover in the handle area in direction of arrow fig. 84 , the cover rolls
up automatically into position . The cove r is fully rolled up by pressing once
again.Removing– The fully folded luggage compartment cover can be removed to transport bulky goods by pressing on the side of the cross rod in direction of arrow fig. 84
and taking it out by moving it in direction of arrow .
WARNING
No objects should be placed on the luggage compartment cover.Automatic foldable luggage compartment cover* (Combi)
The automatic rolling up of the fo ldable luggage compartment cover
enables an easier entry in to the luggage compartment.– Open the boot lid. The foldable luggage compartment cover rolls up automatically
in the position page 91, fig. 84 .
– The cover rolls up fully by pressing the cover in the handle area in direction of
arrow .
When the boot lid is opened quickly, the automatic rolling up of the foldable luggage
compartment cover is blocked for a delay time of approx. 2 seconds.
The function of the automatic rolling up of the foldable luggage compartment cover
can be activated/deactivated in the information display* in the menu:
SETUP
Autom. blindWARNING
No objects should be placed on the luggage compartment cover.
A2
A3
A1
A4
A5
A1
A3
s3fg.2.book Page 91 Friday, April 30, 2010 12:17 PM
Page 115 of 287
Air conditioning system
114
Climatronic* (automatic air conditioning)Description
The Climatronic system is a combination of an automatic heating, fresh
air and cooling system which provides optimal comfort for the occu-
pants of the car.The Climatronic maintains fu lly automatically a convenience temperature. This is
achieved by automatically varying the temper ature of the outflowing air, the blower
stages and the air distribution. The system also takes into account sunlight which elim-
inates the need to alter the settings manually. The automatic mode page 115
ensures maximum wellbeing of the occupants at all times of the year.
Description of Climatronic system
The cooling operates only if the following conditions are met:
engine running,
outside temperature above approx. +2°C,
switched on.
The AC compressor is switched off at a hi gh coolant temperature in order to provide
cooling at a high load of the engine.
Recommended setting for all periods of the year:
Set the desired temperature, we recommend 22°C.
Press the button fig. 122 .
Move the air outlet vents 2 and 3 so that the air flow is directed slightly upwards.
Aeration of the vehicle when ignition is switched off*
On vehicles fitted with power sliding/tilting roof with solar cells* the fresh air blower is
automatically switched over to “solar mo de” if the sun rays are sufficient after
switching off the ignition. The solar cells on the sliding/tilting roof deliver power for the
fresh air blower. This supplies the interior of the car with fresh air.
For an optimum ventilation, the air outlet vents 2 and 3 page 110, fig. 119 must be
opened.
The ventilation functions only when the sliding/tilting roof is closed.
Note
On vehicles equipped with a factory-fitted radio* or navigation*, the information of
the Climatronic is also shown on the display. This function can be switched off, see
operating instructions of the radio* or the navigation system*.Overview of the control elements
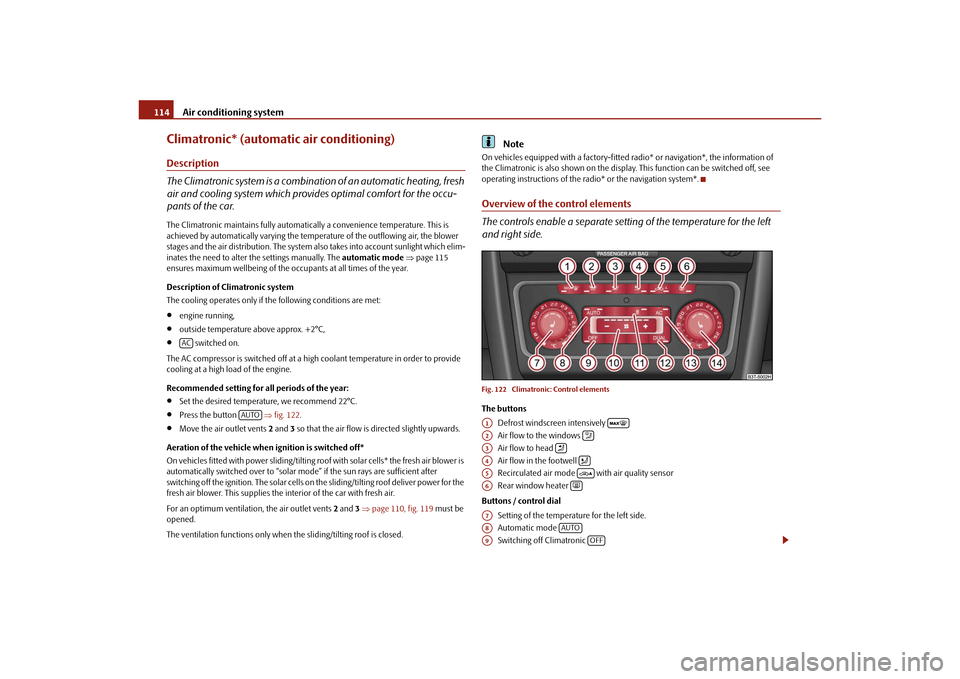
The controls enable a separate setting of the temperature for the left
and right side.Fig. 122 Climatronic: Control elementsThe buttons
Defrost windscreen intensively
Air flow to the windows
Air flow to head
Air flow in the footwell
Recirculated air mode with air quality sensor
Rear window heater
Buttons / control dial Setting of the temperature for the left side.
Automatic mode
Switching off Climatronic
AC
AUTO
A1
A2
A3
A4
A5
A6
A7A8
AUTO
A9
OFF
s3fg.2.book Page 114 Friday, April 30, 2010 12:17 PM
Page 117 of 287

Air conditioning system
116
Recirculated air mode
In recirculated air mode air is sucked out of the interior of the vehicle
and then fed back into the interior. When the automatic air distribution
control is switched on, an air quality sensor measures the concentration
of pollutants in the drawn-in air.Recirculated air mode prevents polluted air outside the vehicle from getting into the
vehicle, for example when driving through a t unnel or when standing in a traffic jam. If
a considerable increase in concentration of pollutants is recognized by the air quality
sensor, when the automatic air distribution control is switched on, the air distribution
control will temporarily be switched off. If the concentration of pollutants decreases to
the normal level, the air distribution control is automatically switched off so that fresh
air can be guided into the vehicle interior.Switching recirculated air mode on– Press the button repeatedly until the warning light on the left side of the
button lights up.Switch on automatic air distribution control– Press the button repeatedly until the warning light on the right side of the
button lights up.Switch off automatic air distribution control temporarily– If the air quality sensor does not switch on the air distribution control automatically
when there is a nauseating smell, you can switch it on yourself by pressing the
button *. The warning light lights up in the button on the left side.Switching recirculated air mode off– Press the button or press the button repetitively, until the warning
lights in the button go out.
WARNING
You should not leave recirculated air mode on over a longer period of time, as
“stale” air may result in fatigue in the driver and occupants, divert your atten- tion and also cause the windows to mist up. The risk of having an accident
increases. Switch recirculated air mo
de off as soon as the windows begin
misting up.
Note
If the windscreen mists up, press the button page 114, fig. 122 . After
the windscreen has been demisted, press the button .
The automatic air distribution control operates only if the outside temperature is
higher than approx. 2°C.
Controlling blower
There are a total of seven blower stages available.The Climatronic system controls the blower st ages automatically in line with the inte-
rior temperature. You can also, however, adap t the blower stages manually to suit your
particular needs.
– Press again the button on the left side (reduce blower speed) or on the right
side (increase blower speed).
If you switch off the blower, th e Climatronic is switched off.
The set blower speed is displayed above the button when the respective number
of warning lights come on.
WARNING
“Stale air” may result in fatigue in the driver and occupants, reduce atten-
tion levels and also cause the windows to mist up. The risk of having an accident
increases.
Do not switch the Climatronic system off for longer than necessary.
Switch the Climatronic system on as soon as the windows mist up.
AUTO
WARNING (continued)
A1AUTO
s3fg.2.book Page 116 Friday, April 30, 2010 12:17 PM
Page 118 of 287
Air conditioning system117
Using the system
Safety
Driving Tips
General Maintenance
Breakdown assistance
Technical Data
Defrosting windscreenDefrosting windscreen - switching on– Press the button page 114, fig. 122.Defrosting windscreen - switching off– Once again press the button or the button .
The temperature control is controlled automatically. More air flows out of the air outlet
vents 1.Auxiliary heating (auxiliary heating and ventilation)*Description and important information
The auxiliary heating (auxiliary heating and ventilation) heats or
supplies the interior of the vehicl e with fresh air independent of the
engine.Auxiliary heating (auxiliary heating)
The auxiliary heating (auxiliary heating) functions in connection with the Climatic or
Climatronic.
It can be used when stationary, when engi ne is switched off for preheating of the
vehicle as well as while driving (e.g. during the heating phase of the engine).
The engine is also preheated when the vehicle is stationary and the engine is switched
off, if the auxiliary heating is switched on. This is not valid for the engines 3.6 ltr./191 kW
FSI and 1.9 ltr./77 kW TDI.
The auxiliary heating (auxiliary heating) wa rms up the coolant during the combustion
of fuel from the vehicle tank. The coolant warms up the air, which (if the blower speed
is not set to zero) flows in to the occupant compartment.
Auxiliary ve ntilation
The auxiliary ventilation enables fresh air to flow into the vehicle interior by switching
off the engine, whereby the interior temperature is effectively decreased (e.g. with the
vehicle parked in the sun).
WARNING
The auxiliary heating must never be operated in closed rooms - risk of
poisoning!
The auxiliary heating must not be running during refueling - risk of fire.
The exhaust pipe of the auxiliary heatin g is located on the underside of the
vehicle. Therefore do not place the vehicle, if you wish to operate the auxiliary
heating, in such a way that the exhaust gases of the auxiliary heating can come
easily into contact with inflammable mate rials (e.g. dry grass) or easily inflam-
mable substances (e .g. fuel run out).Note
If the auxiliary heating runs, the fuel consumption comes from the vehicle tank.
Therefore the auxiliary heating should not be operated, if there is very little fuel in the
tank.
The exhaust pipe of the auxiliary heating, which is located on the underside of the
vehicle, must not be clogged and th e exhaust flow must not be blocked.
If the auxiliary heating and ventilation is running, the vehicle battery discharges. If
the auxiliary heating and ventilation has been operated several times over a longer
period, the vehicle must be driven a few ki lometers in order to recharge the vehicle
battery.
The auxiliary heating only switches the bl ower on, if it has achieved a coolant
temperature of approx. 50 °C.
At low outside temperatures, this can result in a formation of water vapour in the
area of the engine compartment. This is qu ite normal and is not an operating problem.
After switching off the auxiliary heating, the coolant pump runs for a short period.
The auxiliary heating and ventilation does not switch on or comes on, if the vehicle
battery indicates a low loading state.
The auxiliary heating (auxiliary heating) does not switch on, if the following was
shown in the information display or before switching off the ignition: Please refuel!
The air inlet in front of the windscreen must be free of ice, snow or leaves in order
to ensure that the auxiliary heating operates properly.
AUTO
s3fg.2.book Page 117 Friday, April 30, 2010 12:17 PM
Page 119 of 287
Air conditioning system
118
So that warm air can flow into the vehicl e interior after switching on the auxiliary
heating, you must maintain the temperat ure normally selected by you (we recom-
mend 22°C). It is recommended to put the air flow in the position
.
On vehicles with DPF (diesel particle filter) the warm coolant heats up the engine.
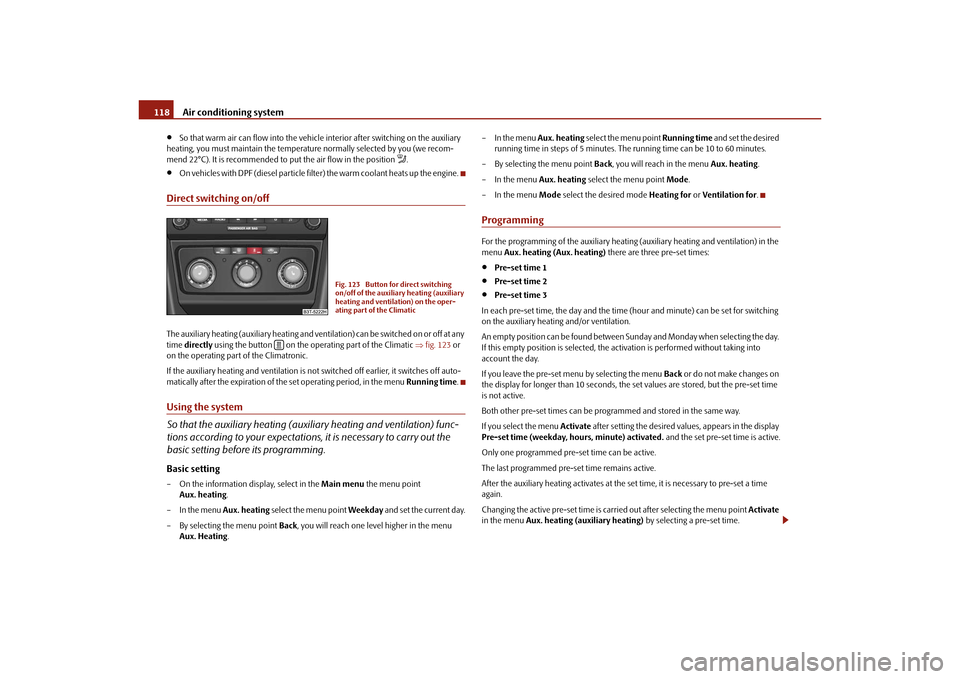
Direct switching on/offThe auxiliary heating (auxiliary heating and vent ilation) can be switched on or off at any
time directly using the button on the operating part of the Climatic fig. 123 or
on the operating part of the Climatronic.
If the auxiliary heating and ventilation is not switched off earlier, it switches off auto-
matically after the expiration of the set operating period, in the menu Running time.Using the system
So that the auxiliary heating (auxiliary heating and ventilation) func-
tions according to your expectations, it is necessary to carry out the
basic setting before its programming.Basic setting– On the information display, select in the Main menu the menu point
Aux. heating .
– In the menu Aux. heating select the menu point Weekday and set the current day.
– By selecting the menu point Back, you will reach one level higher in the menu
Aux. Heating . – In the menu
Aux. heating select the menu point Running time and set the desired
running time in steps of 5 minutes. The running time can be 10 to 60 minutes.
– By selecting the menu point Back, you will reach in the menu Aux. heating.
– In the menu Aux. heating select the menu point Mode.
– In the menu Mode select the desired mode Heating for or Ventilation for .
ProgrammingFor the programming of the auxiliary heating (auxiliary heating and ventilation) in the
menu Aux. heating (Aux. heating) there are three pre-set times:
Pre-set time 1
Pre-set time 2
Pre-set time 3
In each pre-set time, the day and the time (hour and minute) can be set for switching
on the auxiliary heating and/or ventilation.
An empty position can be found between S unday and Monday when selecting the day.
If this empty position is selected, the activation is performed without taking into
account the day.
If you leave the pre-set menu by selecting the menu Back or do not make changes on
the display for longer than 10 seconds, the set values are stored, but the pre-set time
is not active.
Both other pre-set times can be prog rammed and stored in the same way.
If you select the menu Activate after setting the desired values, appears in the display
Pre-set time (weekday, hours, minute) activated. and the set pre-set time is active.
Only one programmed pre-set time can be active.
The last programmed pre-set time remains active.
After the auxiliary heating activates at the set time, it is necessary to pre-set a time
again.
Changing the active pre-set time is carried out after selecting the menu point Activate
in the menu Aux. heating (auxiliary heating) by selecting a pre-set time.
Fig. 123 Button for direct switching
on/off of the auxiliary heating (auxiliary
heating and ventilation) on the oper-
ating part of the Climatic
s3fg.2.book Page 118 Friday, April 30, 2010 12:17 PM
Page 120 of 287

Air conditioning system119
Using the system
Safety
Driving Tips
General Maintenance
Breakdown assistance
Technical Data
The prerequisite for the correct switching on of the auxiliary heating (auxiliary heating
and ventilation) according to the programmed
pre-set time is the correct setting of the
current time and the weekday page 118.
If the system is running, a wa rning light in the button for direct switching on/off of the
auxiliary heating lights up.
The running system deactivate s after expiration of the operating period or is deacti-
vated earlier by pressing the button for dire ct switching on/off of the auxiliary heating
page 118.
A random pre-set time can be deactivated by selecting the menu point Deactivate in
the menu Activate.
After selecting the menu Fa c t o r y s e t t i n g in the menu Aux. heating , it is possible to
return to the factory setting.
Radio remote control
The auxiliary heating (auxiliary heating and ventilation) can be
switched on or off with the remote control.– For switching on, press the button .
– For switching off, press the button .
The transmitter and the battery are housed in the housing of the remote control. The
receiver is located in the interior of the car.
If the battery is properly charged, the effective range is up to 600 m. For switching on
or off the auxiliary heating, hold the remo te control vertically with the antenna
fig. 124 towards the top. You must not cover over the antenna with the fingers or the
palm of the hand. Obstacles between the ra dio remote control and the vehicle, bad
weather conditions and a weaker batt ery can clearly reduce the range.
The auxiliary heating can only be switched on or off with the radio remote control, if
the distance between the radio remote control and the vehicle is at least 2 m.
Warning light in the radio remote control
The warning light in the radio remote control fig. 124 indicates after a keystroke if
the remote control signal was received by the auxiliary heating and if the battery is
adequately charged.
Caution
There are electronic components in the radio remote control, protect the remote
control against water, severe shocks and direct sun rays.
Fig. 124 Auxiliary heating: Radio
remote control
ONOFF
AA
Display warning light
Importance
Lights up green for 2 seconds.
The auxiliary heating was switched on.
Lights up red for 2 seconds.
The auxiliary heating was switched off.
Slowly flashes green for 2 seconds.
The ignition signal was not received.
Quickly flashes green for 2 seconds.
The auxiliary heating is blocked, e. g
because the tank is nearly empty or there
is a fault in the auxiliary heating.
Flashes red for 2 seconds.
The switch off signal was not received.
Lights up orange for 2 seconds, then
green or red.
The battery is weak, however the switch-
ing on or off signal was received.
Lights up orange for 2 seconds, then
flashes green or red.
The battery is weak, however the switch-
ing on or off signal was not received.
Flashes orange for 5 seconds.
The battery is discharged, however the
switching on or off signal was not
received.
s3fg.2.book Page 119 Friday, April 30, 2010 12:17 PM
Page 123 of 287
Starting-off and Driving
122
You should not switch on any major elec trical components during the heating
period otherwise the vehicle battery will be drained unnecessarily.
- start engine
Applies to all models:
Position
To lock the steering , with the ignition key withdrawn, turn the steering wheel until the
steering locking pin is heard to engage. You should always lock the steering as a general
rule if you leave your vehicle. This acts as a deterrent against possible theft of your
vehicle .
Position
Move the steering wheel back and forward a little if the ignition key cannot, or cannot
easily be turned into this position, in order to release the steering lock.
Position
The engine is started in this position. At th e same time switched on low beam or main
beam or other electrical components wi th major power consumption are briefly
switched off. The ignition key moves back into position when one releases the key.
The ignition key must be turned back into position each time before starting the
engine again. The starter repeat lock in th e ignition lock prevents the starter being
engaged when the engine is r unning and thus getting damaged.
Ignition key withdrawal lock (automatic gearbox)
You can only withdraw the ignition key after switching off the ignition if the selector
lever is in position P.
WARNING
When driving, the ignition key must always be in the position (ignition
switched on) without the engine running. This position is indicated by the
warning lights coming on. If this is not the case, it could result in unexpected
locking of the steering wh eel - risk of accident!
Only remove the ignition key from the ignition lock when the vehicle has
come to a standstill (by applying the handbrake or moving the selector lever
into the position P). The steering lock can engage imme diately - risk of acci-
dent!
Always withdraw the ignition key if you are going to leave the vehicle, even
for a short time. This is particularly important if children are left in the vehicle.
The children might otherwise start the engi ne or switch on electrical equipment
(e.g. power windows) - risk of accident or injury!
Starting the engineGeneral
You can only start the engine only using an original ignition key.
Place the gearshift lever into neutral (or place the selector lever to the position P or
N in the case of an automatic gearbox) and put on the handbrake firmly before starting
the engine.
Before starting, it is necessary to depres s the clutch pedal and to hold it pressed
until the engine starts. If you start the engi ne without depressing the clutch pedal, the
engine does not start and a message is shown in the display of the instrument cluster
to remind you of th e necessity to depress the clutch pedal.
Before starting the engine, on vehicles fitted with automatic gearbox with the
KESSY system*, it is necessary to depress th e brake pedal and to hold it pressed until
the engine starts. If you start the engine without depressing the brake pedal, the engine
does not start and a message is shown in the display of the instrument cluster to
remind you of the necessity to depress the brake pedal.
Let go of the key as soon as the engine starts otherwise there may be damage to
the starter.
The engine running noises may louder at first be louder for a short time after starting
the cold engine until oil pressure can be built up in the hydraulic valve clearance
compensation. This is quite normal and is not an operating problem.
If the engine does not start ...
You can use the battery of anothe r vehicle as a jump-start aid page 241.
It is only possible to tow-start vehicles fi tted with a manual gearbox. The tow-starting
distance must not be more than 50 metres.
A3
A1A2A3
A2
A1
A2
WARNING (continued)
s3fg.2.book Page 122 Friday, April 30, 2010 12:17 PM
Page 126 of 287
Starting-off and Driving125
Using the system
Safety
Driving Tips
General Maintenance
Breakdown assistance
Technical Data
– Hold the button pressed and push the handbrake lever down fully
.
The handbrake warning light
lights up when the handbrak e is applied, provided the
ignition is on.
A warning signal sounds and the following text appears in the display* if you have inad-
vertently driven off with the handbrake applied:
Release parking brake!
The handbrake warning is acti vated if you drive at a speed of more than 6 km/h for
more than 3 seconds.
WARNING
Please note that the handbrake must be fully released. A handbrake which
is only partially released can result in the rear brakes overheating which will
have a negative effect on the operation of the brake system - risk of accident! In
addition this can result in premature wear of the rear brake pads.
Never leave children unattended in the vehicle. The children might, for
example, release the handbrake or take the vehicle out of gear. The vehicle
might then move off - risk of accident!Caution
After the car has come to a stop, always firs t of all apply the handbrake firmly before
then additionally engaging a gear (manual gearbox) or moving the selector lever into
position P (automatic gearbox).KESSY system*IntroductionThe KESSY system makes it possible to switch the ignition on/off and to start/stop the
engine without actively using the key.
Unlocking and locking the steeringIt is necessary that a valid key is in th e vehicle in order to unlock the steering.Unlocking the steering– Open the driver door and enter the vehicle.
– When closing the driver door, the steering is unlocked.Locking the steering– Bring the vehicle to a stop.
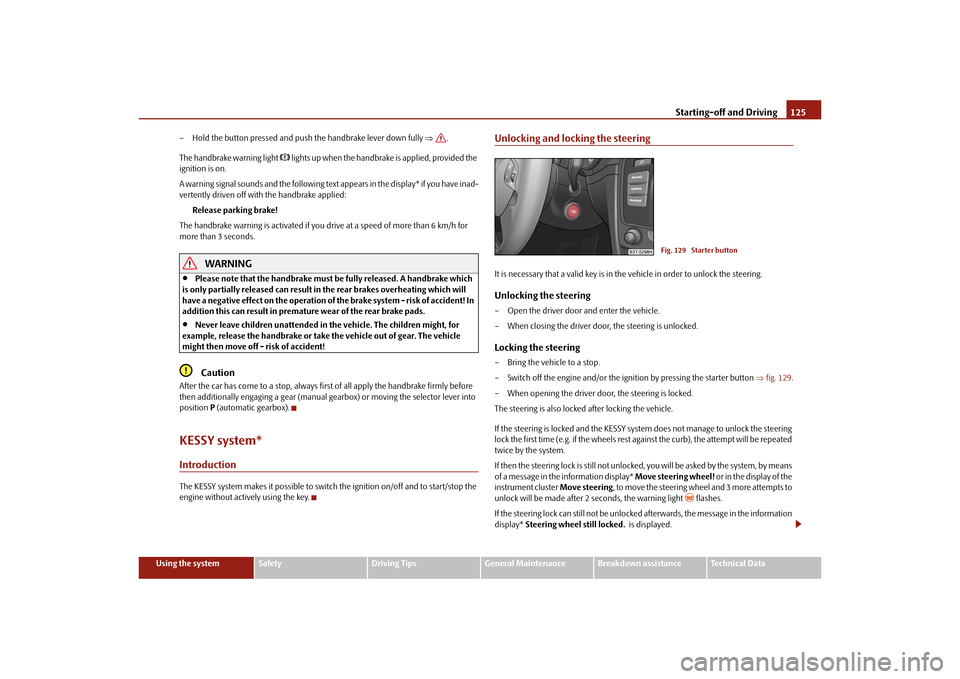
– Switch off the engine and/or the ignition by pressing the starter button fig. 129 .
– When opening the driver door, the steering is locked.
The steering is also locked after locking the vehicle.
If the steering is locked and the KESSY syst em does not manage to unlock the steering
lock the first time (e.g. if the wheels rest against the curb), the attempt will be repeated
twice by the system.
If then the steering lock is still not unlocke d, you will be asked by the system, by means
of a message in the information display* Move steering wheel! or in the display of the
instrument cluster Move steering, to move the steering wheel and 3 more attempts to
unlock will be made after 2 seconds, the warning light
flashes.
If the steering lock can still not be unlocke d afterwards, the message in the information
display* Steering wheel still locked. is displayed.
Fig. 129 Starter button
s3fg.2.book Page 125 Friday, April 30, 2010 12:17 PM