window SKODA SUPERB 2010 2.G / (B6/3T) Owner's Guide
[x] Cancel search | Manufacturer: SKODA, Model Year: 2010, Model line: SUPERB, Model: SKODA SUPERB 2010 2.G / (B6/3T)Pages: 287, PDF Size: 16.59 MB
Page 115 of 287
Air conditioning system
114
Climatronic* (automatic air conditioning)Description
The Climatronic system is a combination of an automatic heating, fresh
air and cooling system which provides optimal comfort for the occu-
pants of the car.The Climatronic maintains fu lly automatically a convenience temperature. This is
achieved by automatically varying the temper ature of the outflowing air, the blower
stages and the air distribution. The system also takes into account sunlight which elim-
inates the need to alter the settings manually. The automatic mode page 115
ensures maximum wellbeing of the occupants at all times of the year.
Description of Climatronic system
The cooling operates only if the following conditions are met:
engine running,
outside temperature above approx. +2°C,
switched on.
The AC compressor is switched off at a hi gh coolant temperature in order to provide
cooling at a high load of the engine.
Recommended setting for all periods of the year:
Set the desired temperature, we recommend 22°C.
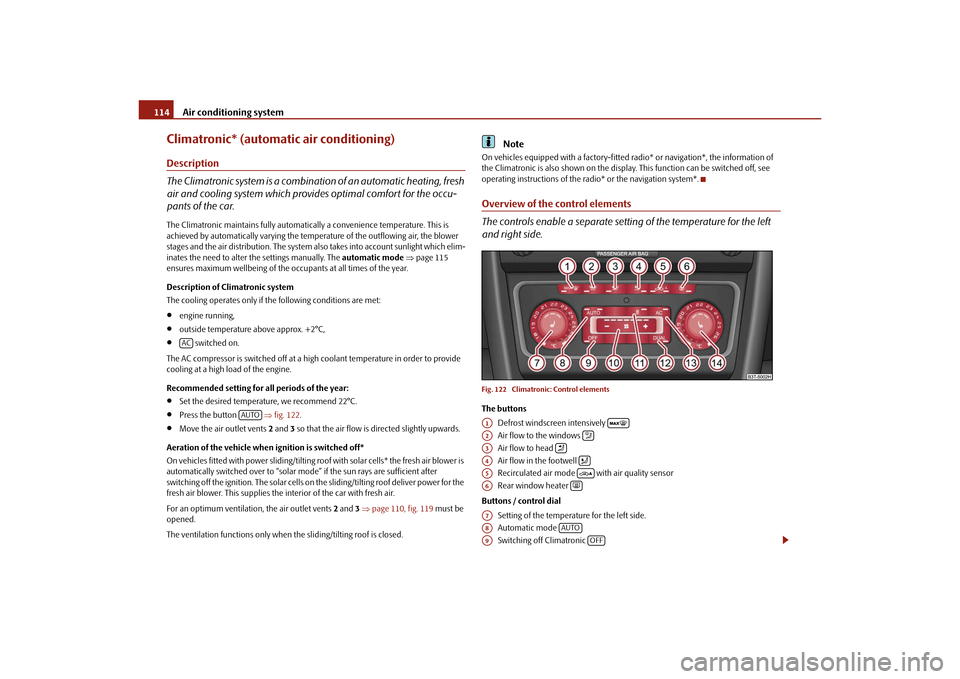
Press the button fig. 122 .
Move the air outlet vents 2 and 3 so that the air flow is directed slightly upwards.
Aeration of the vehicle when ignition is switched off*
On vehicles fitted with power sliding/tilting roof with solar cells* the fresh air blower is
automatically switched over to “solar mo de” if the sun rays are sufficient after
switching off the ignition. The solar cells on the sliding/tilting roof deliver power for the
fresh air blower. This supplies the interior of the car with fresh air.
For an optimum ventilation, the air outlet vents 2 and 3 page 110, fig. 119 must be
opened.
The ventilation functions only when the sliding/tilting roof is closed.
Note
On vehicles equipped with a factory-fitted radio* or navigation*, the information of
the Climatronic is also shown on the display. This function can be switched off, see
operating instructions of the radio* or the navigation system*.Overview of the control elements
The controls enable a separate setting of the temperature for the left
and right side.Fig. 122 Climatronic: Control elementsThe buttons
Defrost windscreen intensively
Air flow to the windows
Air flow to head
Air flow in the footwell
Recirculated air mode with air quality sensor
Rear window heater
Buttons / control dial Setting of the temperature for the left side.
Automatic mode
Switching off Climatronic
AC
AUTO
A1
A2
A3
A4
A5
A6
A7A8
AUTO
A9
OFF
s3fg.2.book Page 114 Friday, April 30, 2010 12:17 PM
Page 116 of 287
Air conditioning system115
Using the system
Safety
Driving Tips
General Maintenance
Breakdown assistance
Technical Data
Setting the blower speed
Depending on the vehicle equipment: Butto
n for direct switching on/off of auxil-
iary heating* page 117, or switching on/off of windscreen heater*
Switching on/off of the temperature setting in dual mode
Switching cooling on and off
Setting of the temperature for the right side.
Note
Below the top row of buttons is located the interior temperature sensor. Do not glue
or cover over the sensor, otherwise it could have an unfavourable effect on the
Climatronic.Automatic mode
The automatic mode is used in order to maintain a constant tempera-
ture and to demist the windows in the interior of the car.Switching automatic mode on– Set a temperature between +18 °C and +26 °C.
– Move the air outlet vents 2 and 3 page 110, fig. 119 , so that the air flow is
directed slightly upwards.
– Press the button . In the right or left top corner a warning light lights up, depending on which unit was last selected.
If the warning light in the top right corner of the button lights up, the
Climatronic operates in “HIGH” mode. The “HIGH” mode is the standard setting of the
Climatronic.
When pressing again the button , the Climatronic changes into the “LOW” mode
and the warning light in the top left corner lights up. The Climatronic uses only in this
mode the lower blower speed. However taking into account the noise level, this is
more comfortable, yet be aware that the effectiveness of the air conditioning system is
reduced particularly if the vehicle is fully occupied.
By pressing again the button , you change into the “HIGH” mode. The automatic mode is switched off by pres
sing the button for the air distribution or
increasing or decreasing the blower speed. The temperature is nevertheless
regulated.
switching cooling on and offswitching cooling on and off– Press the button . The warning light lights up in the button.
– When you again press the switch , the cooling system is switched off. The warning light in the button goes out. Only the function of the ventilation remains
active when no lower temperature than the outside temperature can be reached.Setting temperatureYou can separate the interior temperature for the left and right side separately.
– You can set the temperature for both sides after switching on the ignition with the control dial .
– If you wish to set the temperature for the right side, turn the control dial . The warning light in the button lights up, this indicates that differing tempera-
tures for the left and right side can be set.
If the warning light in the button ligh ts up, the temperature for both sides
cannot be set with the control dial . You can reinitiate this function by pressing the
button . The warning light in the button which indicates the possibility to set
differing temperatures for the left and right side, goes out.
You can set the interior temperature between +18°C and +26°C. The interior temper-
ature is regulated automatically within this range. If you chose a temperature lower
than +18°C, a blue symbol lights up at the start of the numerical scale. If you chose a
temperature higher than +26°C, a red symbol lights up at the end of the numerical
scale. In both limit positions the Climatro nic operates at maximum cooling or heating
capacity, respectively. The temperatur e is not controlled in this case.
Lengthy and uneven distribution of the air flow out of the vents (in particular at the leg
area) and large differences in temperature, for example when getting out of the vehicle,
can result in chills in sensitive persons.
A10
A11
A12
DUAL
A13
AC
A14
AUTO
AUTO
AUTOAUTO
AC
AC
A7
A14
DUALDUALA7
DUAL
s3fg.2.book Page 115 Friday, April 30, 2010 12:17 PM
Page 117 of 287

Air conditioning system
116
Recirculated air mode
In recirculated air mode air is sucked out of the interior of the vehicle
and then fed back into the interior. When the automatic air distribution
control is switched on, an air quality sensor measures the concentration
of pollutants in the drawn-in air.Recirculated air mode prevents polluted air outside the vehicle from getting into the
vehicle, for example when driving through a t unnel or when standing in a traffic jam. If
a considerable increase in concentration of pollutants is recognized by the air quality
sensor, when the automatic air distribution control is switched on, the air distribution
control will temporarily be switched off. If the concentration of pollutants decreases to
the normal level, the air distribution control is automatically switched off so that fresh
air can be guided into the vehicle interior.Switching recirculated air mode on– Press the button repeatedly until the warning light on the left side of the
button lights up.Switch on automatic air distribution control– Press the button repeatedly until the warning light on the right side of the
button lights up.Switch off automatic air distribution control temporarily– If the air quality sensor does not switch on the air distribution control automatically
when there is a nauseating smell, you can switch it on yourself by pressing the
button *. The warning light lights up in the button on the left side.Switching recirculated air mode off– Press the button or press the button repetitively, until the warning
lights in the button go out.
WARNING
You should not leave recirculated air mode on over a longer period of time, as
“stale” air may result in fatigue in the driver and occupants, divert your atten- tion and also cause the windows to mist up. The risk of having an accident
increases. Switch recirculated air mo
de off as soon as the windows begin
misting up.
Note
If the windscreen mists up, press the button page 114, fig. 122 . After
the windscreen has been demisted, press the button .
The automatic air distribution control operates only if the outside temperature is
higher than approx. 2°C.
Controlling blower
There are a total of seven blower stages available.The Climatronic system controls the blower st ages automatically in line with the inte-
rior temperature. You can also, however, adap t the blower stages manually to suit your
particular needs.
– Press again the button on the left side (reduce blower speed) or on the right
side (increase blower speed).
If you switch off the blower, th e Climatronic is switched off.
The set blower speed is displayed above the button when the respective number
of warning lights come on.
WARNING
“Stale air” may result in fatigue in the driver and occupants, reduce atten-
tion levels and also cause the windows to mist up. The risk of having an accident
increases.
Do not switch the Climatronic system off for longer than necessary.
Switch the Climatronic system on as soon as the windows mist up.
AUTO
WARNING (continued)
A1AUTO
s3fg.2.book Page 116 Friday, April 30, 2010 12:17 PM
Page 123 of 287
Starting-off and Driving
122
You should not switch on any major elec trical components during the heating
period otherwise the vehicle battery will be drained unnecessarily.
- start engine
Applies to all models:
Position
To lock the steering , with the ignition key withdrawn, turn the steering wheel until the
steering locking pin is heard to engage. You should always lock the steering as a general
rule if you leave your vehicle. This acts as a deterrent against possible theft of your
vehicle .
Position
Move the steering wheel back and forward a little if the ignition key cannot, or cannot
easily be turned into this position, in order to release the steering lock.
Position
The engine is started in this position. At th e same time switched on low beam or main
beam or other electrical components wi th major power consumption are briefly
switched off. The ignition key moves back into position when one releases the key.
The ignition key must be turned back into position each time before starting the
engine again. The starter repeat lock in th e ignition lock prevents the starter being
engaged when the engine is r unning and thus getting damaged.
Ignition key withdrawal lock (automatic gearbox)
You can only withdraw the ignition key after switching off the ignition if the selector
lever is in position P.
WARNING
When driving, the ignition key must always be in the position (ignition
switched on) without the engine running. This position is indicated by the
warning lights coming on. If this is not the case, it could result in unexpected
locking of the steering wh eel - risk of accident!
Only remove the ignition key from the ignition lock when the vehicle has
come to a standstill (by applying the handbrake or moving the selector lever
into the position P). The steering lock can engage imme diately - risk of acci-
dent!
Always withdraw the ignition key if you are going to leave the vehicle, even
for a short time. This is particularly important if children are left in the vehicle.
The children might otherwise start the engi ne or switch on electrical equipment
(e.g. power windows) - risk of accident or injury!
Starting the engineGeneral
You can only start the engine only using an original ignition key.
Place the gearshift lever into neutral (or place the selector lever to the position P or
N in the case of an automatic gearbox) and put on the handbrake firmly before starting
the engine.
Before starting, it is necessary to depres s the clutch pedal and to hold it pressed
until the engine starts. If you start the engi ne without depressing the clutch pedal, the
engine does not start and a message is shown in the display of the instrument cluster
to remind you of th e necessity to depress the clutch pedal.
Before starting the engine, on vehicles fitted with automatic gearbox with the
KESSY system*, it is necessary to depress th e brake pedal and to hold it pressed until
the engine starts. If you start the engine without depressing the brake pedal, the engine
does not start and a message is shown in the display of the instrument cluster to
remind you of the necessity to depress the brake pedal.
Let go of the key as soon as the engine starts otherwise there may be damage to
the starter.
The engine running noises may louder at first be louder for a short time after starting
the cold engine until oil pressure can be built up in the hydraulic valve clearance
compensation. This is quite normal and is not an operating problem.
If the engine does not start ...
You can use the battery of anothe r vehicle as a jump-start aid page 241.
It is only possible to tow-start vehicles fi tted with a manual gearbox. The tow-starting
distance must not be more than 50 metres.
A3
A1A2A3
A2
A1
A2
WARNING (continued)
s3fg.2.book Page 122 Friday, April 30, 2010 12:17 PM
Page 151 of 287
Communication
150
the handwheel. You can select the numbers 0 - 9, the symbols +,
, # and the func-
tions Delete, Call, Cancel .
Call register
In the menu point Call register, you can select the following menu points:
Missed calls
Received calls
Last calls
Voice mailbox
In the menu Voice mailbox , it is possible to set the number of the voice mailbox and
then dial the number.
Bluetooth
In the menu Bluetooth you can select the following menu points:
User - the overview of the stored users
New user - Search for new telephones which are in the reception range
Visibility - Switching on the visibility of the telephone unit for other devices
Media player
Active device
Paired devices
Search
Phone name - the possibility to change the name of the telephone unit (pre-set
SKODA UHV)
Settings
In the menu Settings you can select the following menu points:
Phone book
Update
List
Surname
First name
Ring tone Back
Return in the basic menu of the telephone.
Voice controlDialogueThe period, in which the telephone system is ready to receive voice commands and
carry out the voice commands, is called DIALOGUE. The system gives audible feedback
and guides you if necessary th
rough the relevant functions.
Switch on voice control (dialogue)
You can start or end the dialogue at any time by pressing the PTT button
on the
adapter* page 148, fig. 143 or on the multifunction steering wheel* page 148.
If the system does not recognise your command, it repeats the first part of the aid and
thus a new entry is possible. After the 2nd error the system repeats the second part of
the aid. After the 3rd error the answer “ Cancel” is given and the dialogue is ended.
Switching off voice control (dialogue)
You can end the dialogue at any ti me by pressing the PTT button
on the adapter*
page 148, fig. 143 or on the multifunction steering wheel* page 148 or with the
voice command CANCEL.
Only the message just repeated can be ended by briefly pressing the PTT button
during the message.
When receiving an incoming call, the dialog ue is immediately interrupted and you can
accept the call by pressing the button
on the multifunction steering wheel* or by
pressing the button for receiving a call directly on your telephone.
Optimum understanding of the voice commands depends on the following
factors:
Speak with a normal tone of voice withou t intonation and excessive voice pauses.
Avoid insufficient articulation.
Close the doors, windows and sliding roof, in order to reduce or stop disturbing
exterior noise.
s3fg.2.book Page 150 Friday, April 30, 2010 12:17 PM
Page 158 of 287

Communication157
Using the system
Safety
Driving Tips
General Maintenance
Breakdown assistance
Technical Data
Volume
Phone settings
Select operator
Automatic
Manual
Network mode
Off time
SIM mode - applies to telephones with the rSAP profile in which two SIM cards
can be inserted - there is the possibility to select which SIM card may be connected
with the hands-free system and the possibility to select the name for the SIM card
SIM mode 1
SIM mode 2
GPRS - You can ask a network provider about the settings of the access point for an
internet connection
Switch off ph. - switching off the telephone unit (telephone remains connected)
Back
Return in the main menu of the information display.
Voice controlDialogueThe period, in which the telephone system is ready to receive voice commands and
carry out the voice commands, is called DI ALOGUE. The system gives audible feedback
and guides you if necessary through the relevant functions.
The volume can be changed at any time with the control button of the radio* or the
navigation system* or with the buttons on the multifunction steering wheel*.
Switch on voice control (dialogue)
You can start the dialogue at any time by pressing the PTT button
on the multifunc-
tion steering wheel* page 154. If the system does not recognise your command, it repeats the first part of the aid and
thus a new entry is possible. After the 2nd error the system repeats the second part of
the aid. After the 3rd error the answer “
Cancel” is given and the dialogue is ended.
Switching off voice control (dialogue)
You can end the dialogue at any time by pr essing the PTT button on the multifunction
steering wheel* page 154 or with the voice command CANCEL.
Only the message just repeated can be ended by briefly pressing the PTT button
during the message.
The dialogue of the incoming call is immediately interrupted and you can accept the
call by pressing the button
on the multifunction steering wheel*.
Optimum understanding of the voice commands depends on the following
factors:
Speak with a normal tone of voice withou t intonation and excessive voice pauses.
Avoid insufficient articulation.
Close the doors, windows and sliding roof, in order to reduce or stop disturbing
exterior noise.
It is recommended to speak louder at higher speeds, so that the tone of your voice
is louder than the increased surrounding noise.
During the dialogue avoid additional noise in the vehicle, e.g. simultaneously
talking occupants.
Do not speak, if the system makes an announcement.
The microphone for voice control is inserted in the moulded headliner and
directed to the driver and front passenger. Therefore the driver and the front passenger
can operate the equipment.
Voice commandsThe voice control is possible in the following languages:
German, English, French, Italian, Spanish, Portuguese and Czech.
s3fg.2.book Page 157 Friday, April 30, 2010 12:17 PM
Page 163 of 287
Passive Safety
162
Ensure that the lighting and the turn signal system are functioning properly.
Inspect the tyre inflation pressure.
Ensure that all the windows offer a good visibility to the outside.
Safely attach the items of luggage page 87, “Loading the luggage compartment”.
Ensure that no objects can obstruct the pedal.
Adjust the mirror, the front seat and the head restraint to match your body size.
Point out to your occupants that the head restraints must be adjusted to match
their body size.
Protect the children in suitable child seats with correctly fastened seat belts
page 180, “Transporting children safely”.
Adopt the correct seated position page 162, “Correct seated position”. Also
inform your occupants to adopt the correct seated position.
Fasten the seat belt correctly. Also inform your occupants to properly fasten the
seat belts page 167, “How are seat belts correctly fastened?”.
What influences the driving safety?
The driving safety is primarily determined by the style of driving and the
personal behaviour of all the occupants.The driver is fully responsible for himself an d his occupants. If your driving safety is
effected, you place yourself and the oncomi ng traffic at risk. Please refer to the
following guidelines.
Do not get distracted from concentrating on the traffic situation, e.g. by your occu-
pants or mobile phone calls.
Never drive when your driving ability is impaired, e.g. through medication, alcohol,
drugs.
Keep to the traffic regulations and the permissible speed limit.
Adjust the driving speed at all times to the road condition as well as to the traffic
and weather conditions.
Take regular breaks on long journe ys - at the latest every two hours.
Correct seated positionCorrect seated position for the driver
Correct seated position for the driver is important for safe and relaxed
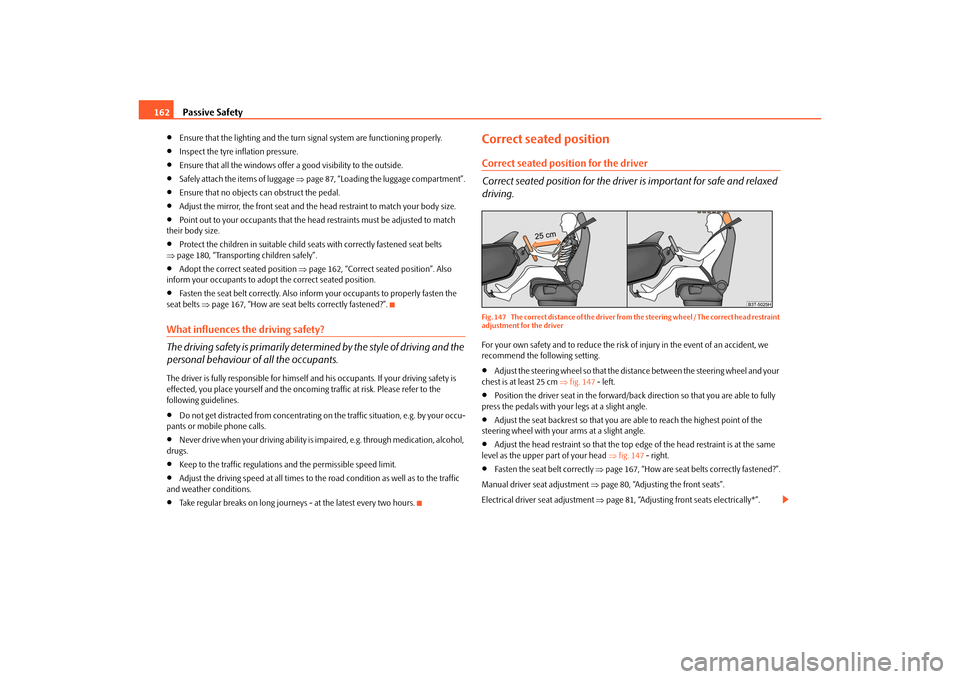
driving.Fig. 147 The correct distance of the driver from the steering wheel / The correct head restraint
adjustment for the driverFor your own safety and to reduce the risk of injury in the event of an accident, we
recommend the following setting.
Adjust the steering wheel so that the distance between the steering wheel and your
chest is at least 25 cm fig. 147 - left.
Position the driver seat in the forward/back direction so that you are able to fully
press the pedals with your legs at a slight angle.
Adjust the seat backrest so that you are able to reach the highest point of the
steering wheel with your arms at a slight angle.
Adjust the head restraint so that the top edge of the head restraint is at the same
level as the upper part of your head fig. 147 - right.
Fasten the seat belt correctly page 167, “How are seat belts correctly fastened?”.
Manual driver se at adjustment page 80, “Adjusting the front seats”.
Electrical driver seat adjustment page 81, “Adjusting front seats electrically*”.
s3fg.2.book Page 162 Friday, April 30, 2010 12:17 PM
Page 164 of 287

Passive Safety163
Using the system
Safety
Driving Tips
General Maintenance
Breakdown assistance
Technical Data
WARNING
The front seats and the head restraints must always be adjusted to match
the body size of the seat occupant as well as the seat belts must always be
correctly fastened in order to provide an optimal protection for you and your
occupants.
The driver must maintain a distance of at least 25 cm to the steering wheel
page 162, fig. 147 - left. Not maintaining this minimum distance will mean
that the airbag system will not be able to properly protect you - hazard!
When driving, hold the st eering wheel with both hands firmly on the outer
edge in the 9 o'clock and 3 o'clock po sition. Never hold the steering wheel
firmly in the 12 o'clock position or in another way (e.g. in the middle of the
steering wheel or at the inner steering wheel edge). In such cases, injuries to the
arms, the hands and the head can occur when the driver airbag is deployed.
The seat backrests must not be angled too far back when driving otherwise
this will affect proper operation of the se at belts and of the airbag system - risk
of injury!
Ensure that there are no objects in the footwell as any objects may get
behind the pedals during a driving or braking manoeuvre. You would then no
longer be able to operate the clutch, to brake or accelerate.
Correct seated position for the front passenger
The fro n t p assen ger must mai n tai n a d i stan ce of a t l ea st 25 c m from th e
dash panel so that the airbag offers him the greatest possible safety it is
deployed.For the safety of the front passenger and to reduce the risk of injury in the event of an
accident, we recommend the following setting.
Adjust the front passenger seat as far as possible to the rear.
Adjust the head restraint so that the top edge of the head restraint is at the same
level as the upper part of your head page 162, fig. 147 - right.
Fasten the seat belt correctly page 167, “How are seat belts correctly fastened?”.
In exceptional cases the front pass enger airbag can be deactivated page 178,
“Deactivating an airbag”. Manual front passenger adjustment
page 80, “Adjusting the front seats”.
Electrical front passenger seat adjustment page 81, “Adjusting front seats electri-
cally*”.
WARNING
The front seats and the head restraints must always be adjusted to match
the body size of the seat occupant as well as the seat belts must always be
correctly fastened in order to provide an optimal protection for you and your
occupants.
The front passenger must maintain a distance of at least 25 cm to the dash
panel. Not maintaining this minimum distance will mean that the airbag
system will not be able to properly protect you - hazard!
Always keep your feet in the footwel l when the vehicle is being driven -
never place your feet on the instrument panel, out of the window or on the
surfaces of the seats. You will be exposed to increased risk of injury if it becomes
necessary to apply the brake or in the ev ent of an accident. If an airbag is
deployed, you may suffer fatal injuries wh en adopting an incorrect seated posi-
tion!
The seat backrests must not be angled too far back when driving otherwise
this will affect proper operation of the se at belts and of the airbag system - risk
of injury!
Correct seated position for the occupants on the rear seats
Occupants on the rear seats must sit upright, keep the feet in the foot-
well and must have their se at belts correctly fastened.To reduce the risk of injury in the event of a sudden braking manoeuvre or an accident,
the occupants on the rear seats must observe the following.
Adjust the head restraints so that the top edge of the head restraints is at the same
level as the upper part of your head page 162, fig. 147 .
Fasten the seat belt correctly page 167, “How are seat belts correctly fastened?”.
If you are transporting page 180, “Transporting children safely” children in the
vehicle, please use a suitable child restraint system.
s3fg.2.book Page 163 Friday, April 30, 2010 12:17 PM
Page 165 of 287
Passive Safety
164WARNING
T h e h e a d re s t ra i n t s m u s t a l w a y s b e a d j u s t e d t o m a t c h t h e b o d y s i z e , i n o rd e r
to offer an optimal protection for you and your occupants.
Always keep your feet in the footwell when the car is being driven - never
put your feet out of the window or on the surfaces of the seats. You will be
exposed to increased risk of injury if it becomes necessary to apply the brake or
in the event of an accident. If an airbag is deployed, you may suffer fatal injuries
when adopting an incorrect seated position!
If the occupants on the rear seats are not sitting upright, the risk of injury is
increased due to incorrect routing of the seat belt.
Examples of an incorrect seated position
An incorrect seated position can lead to severe injuries or death for the
occupants.Seat belts offer their optimum protection only if the webbing of the seat belts is prop-
erly routed. Incorrect seated positions considerably reduce the protective functions of
the seat belts and therefore increase the risk of injury due to an incorrect routing of the
seat belt. The driver is fully responsible for himself and the occupants, in particular for
the children. Do not permit an occupant to adopt an incorrect seated position when
the car is moving.
The following list contains the examples of seated positions which are dangerous for
the occupants. This list is not complete, howe ver we would like you to get interested in
this subject.
Therefore, while the car is moving never:
stand up in the vehicle,
stand up on the seats,
kneel onto the seats,
tilt the seat backrest fully to the back,
lean against the dash panel,
lie on the rear seats,
only sit on the front area of the seat,
sit to the side,
lean out of the window,
put the feet out of the window,
put the feet on the dash panel,
put the feet on the seat upholstery,
occupy the footwell,
have the seat belt not fastened,
occupy the luggage compartment.
WARNING
If the occupant adopts an incorrect seated position, he is exposed to life-
threatening injuries, in case he is hit by a deployed airbag.
Before setting off, please adopt the correct seated position and do not
change this seated position while the car is moving. Also advise your occupants
to adopt the correct seated position and not to change this seated position
while the car is moving.
s3fg.2.book Page 164 Friday, April 30, 2010 12:17 PM
Page 178 of 287

Airbag system177
Using the system
Safety
Driving Tips
General Maintenance
Breakdown assistance
Technical Data
Function of the head airbags
The risk of injury to the head and neck area is reduced in the event of a
side collision by fully inflated head airbags.In the case of a side collision the head airbag is deployed together with the relevant
side airbag and the belt tensioner on the si de of the car on which the accident occurs
fig. 160 .
If the system is deployed, the airbags are filled with propellant gas and extend over the
entire area of the side wind ow including the door pillar page 177, fig. 160 .
The protection offered by the head airbags is thus available simultaneously both to the
front occupants of the car seated on the side on which the accident occurs, as well as
to the rear occupants. Any impact of the head against parts of the interior or objects
outside of the car, is cushioned by the in flated head airbag. The reduction in any
impact to the head and the resultant minimi zing of any movements of the head addi-
tionally reduce the risk of injuries to the neck area. The head airbag also offers addi-
tional protection in the case of an offset impact by covering the front door pillar.
In certain accident situations, the front, side and head airbag are simultaneously
deployed.
The airbags inflate in fractions of a second an d at a high speed in order to be able to
offer that additional protection in the even t of an accident. A grey white, non harmful
gas is released when airbag is inflated. This is perfectly normal and is not an indication
of a fire in the vehicle.
Important safety information on the head airbag
Correct use of the airbag system cons iderably reduces the risk of injury!
WARNING
It is essential to always switch off page 178, “Deactivating an airbag” the
front passenger airbag when attachin g a child safety seat on the front
passenger seat where the child is seated with its back facing in direction of
travel (in some countries also when the chil d is facing the direction of travel). If
this is not done, there is a risk of the child suffering severe or even fatal injuries
if the front passenger airbag is deploy ed. In certain countries national legal
provisions also require that the side or head passenger airbags be deactivated.
When transporting a child on the front passenger seat, please comply with the
appropriate national regulations regarding the use of child safety seats.
There must not be any objects in the deployment area of the head airbags
which might prevent the airbags from inflating properly.
Only hang light items of clothing on the clothes hooks to the vehicle. Never
leave any heavy or sharp-edged objects in the pockets of the items of clothing.
In addition, it is not permitted to use clothes hangers for hanging up items of
clothing.
The airbag control unit operates together with the sensors, which are
attached in the front doors. For this reason no adjustments must be carried out
at the doors as well as at the door panels (for example additional installation of
loudspeakers). Resulting da mages can have a negative affect on the operation
of the airbag system. All work on the front doors and their panels must only be
carried out by a specialist garage.
There must not be any other persons (e .g. children) or animals between the
car occupant and the deployment area of the head airbag. In addition, none of
the occupants should lean their head out of the window when driving, or
extend their arms and hands out of the window.
The sun visors must not be swivelled to the side windows into the deploy-
ment area of the head airbags if any obje cts, such as ball-point pens etc. are
attached to them. This might result in injuries to the occupants if the head
airbag is deployed.
Installing impermissible accessories in the area of the head airbags may
considerably impair the protection offered by the head airbag in the event of it
Fig. 160 Inflated head airbag
s3fg.2.book Page 177 Friday, April 30, 2010 12:17 PM