headlight bulb SKODA SUPERB 2010 2.G / (B6/3T) Owner's Manual
[x] Cancel search | Manufacturer: SKODA, Model Year: 2010, Model line: SUPERB, Model: SKODA SUPERB 2010 2.G / (B6/3T)Pages: 287, PDF Size: 16.59 MB
Page 29 of 287
Instruments and warning lights
28
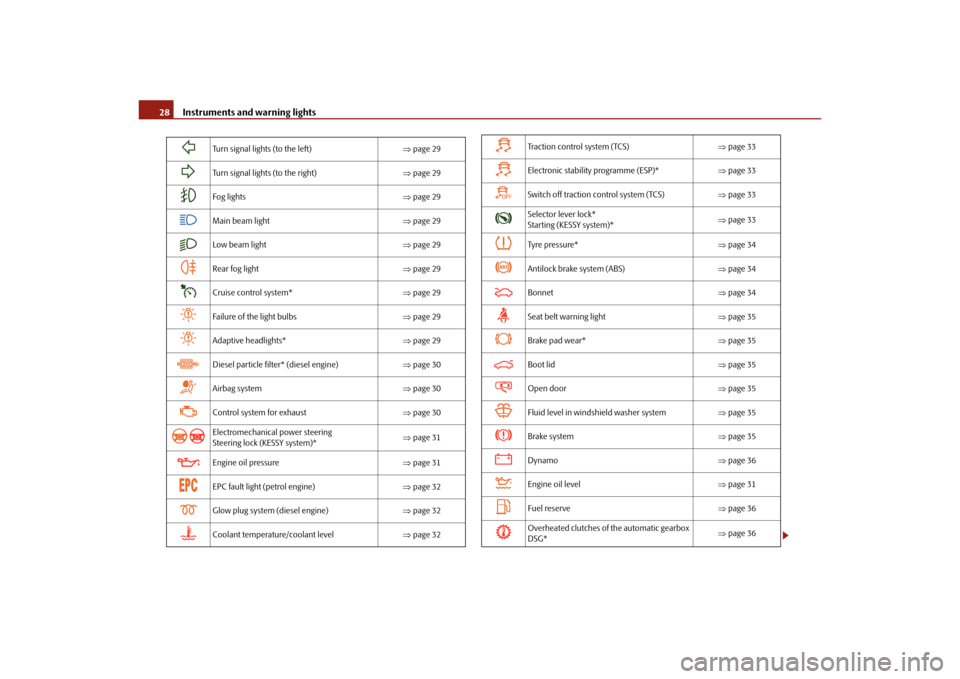
Turn signal lights (to the left) page 29
Turn signal lights (to the right) page 29
Fog lights page 29
Main beam light page 29
Low beam light page 29
Rear fog light page 29
Cruise control system* page 29
Failure of the light bulbs page 29
Adaptive headlights* page 29
Diesel particle filter* (diesel engine) page 30
Airbag system page 30
Control system for exhaust page 30
Electromechanical power steering
Steering lock (KESSY system)*
page 31
Engine oil pressure page 31
EPC fault light (petrol engine) page 32
Glow plug system (diesel engine) page 32
Coolant temperature/coolant level page 32
Tra c t i o n c o n t r o l s y s t e m ( TC S ) page 33
Electronic stability programme (ESP)* page 33
Switch off traction control system (TCS) page 33
Selector lever lock*
Starting (KESSY system)*
page 33
Tyre pressure* page 34
Antilock brake system (ABS) page 34
Bonnet page 34
Seat belt warning light page 35
Brake pad wear* page 35
Boot lid page 35
Open door page 35
Fluid level in windshield washer system page 35
Brake system page 35
Dynamo page 36
Engine oil level page 31
Fuel reserve page 36
Overheated clutches of the automatic gearbox
DSG*
page 36
s3fg.2.book Page 28 Friday, April 30, 2010 12:17 PM
Page 30 of 287
Instruments and warning lights29
Using the system
Safety
Driving Tips
General Maintenance
Breakdown assistance
Technical Data
WARNING
If you do not pay attention to the warning lights coming on and the corre-
sponding descriptions and warning notes, this may result in severe body inju-
ries or major vehicle damage.
The engine compartment of your car is a hazardous area. There is a risk of
injuries, scalding, accident s and fire when working in the engine compartment,
e.g. inspecting and replenishing oil and other fluids. It is also essential to
observe all warnings page 216, “Working in the engine compartment”.Note
The arrangement of the indicator lights depends on the model version. The
symbols shown in the following functional description are to be found as indicator
lights in the instrument cluster.
Operational faults are shown in the instrument cluster as red symbols (priority 1 -
danger) or yellow symbols (priority 2 - warning).
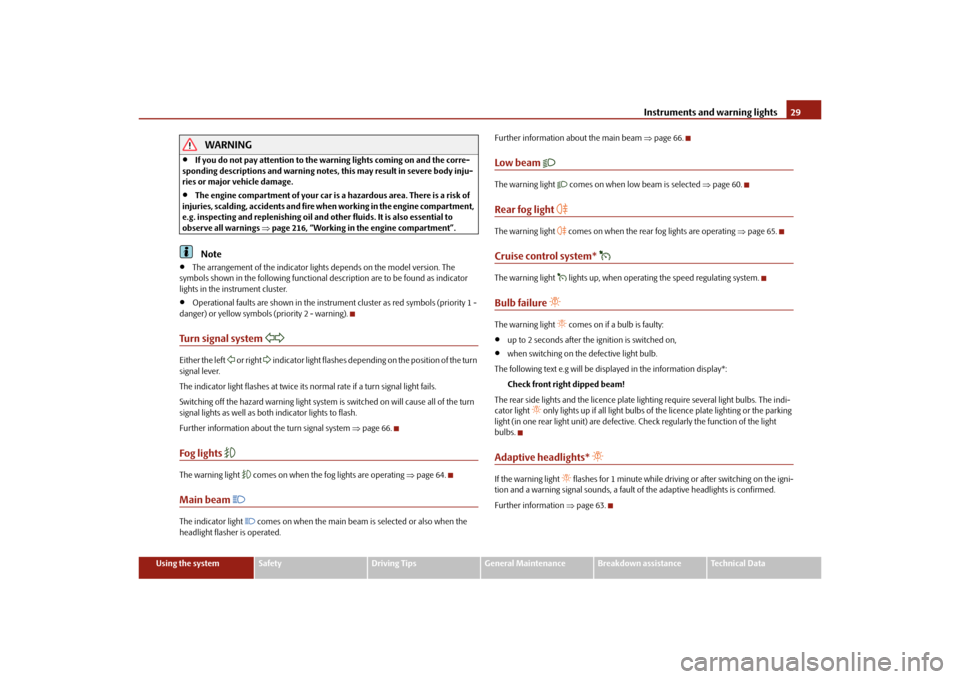
Turn signal system
Either the left
or right
indicator light flashes depending on the position of the turn
signal lever.
The indicator light flashes at twice its normal rate if a turn signal light fails.
Switching off the hazard warning light system is switched on will cause all of the turn
signal lights as well as both indicator lights to flash.
Further information about the turn signal system page 66.
Fog lights
The warning light
comes on when the fog lights are operating page 64.
Main beam
The indicator light
comes on when the main beam is selected or also when the
headlight flasher is operated. Further information about the main beam
page 66.
Low beam
The warning light
comes on when low beam is selected page 60.
Rear fog light
The warning light
comes on when the rear fog lights are operating page 65.
Cruise control system*
The warning light
lights up, when operating the speed regulating system.
Bulb failure
The warning light
comes on if a bulb is faulty:
up to 2 seconds after the ignition is switched on,
when switching on the defective light bulb.
The following text e.g will be displayed in the information display*: Check front right dipped beam!
The rear side lights and the licence plate lighting require several light bulbs. The indi-
cator light
only lights up if all light bulbs of the licence plate lighting or the parking
light (in one rear light unit) are defective. Check regularly the function of the light
bulbs.
Adaptive headlights*
If the warning light
flashes for 1 minute while driving or after switching on the igni-
tion and a warning signal sounds, a fault of the adaptive headlights is confirmed.
Further information page 63.
s3fg.2.book Page 29 Friday, April 30, 2010 12:17 PM
Page 65 of 287
Lights and Visibility
64
Mode motorway
In the mode “motorway” the dispersion of the co ne of light is so widespread, that it illu-
minates also the left (and right)
7) lane of the motorway, so that the driver can react in
time to an obstacle or any other danger. The mode is activated stepwise as of a speed
of 90 km/h. It gains its greatest effectiveness at speeds above 120 km/h.
Tourist light
This mode makes it possible to drive in countries with opposing traffic system, driving
on the left/right, without dazzling the oncoming vehicles. When the mode “tourist
light” is active, the above mentioned modes and the side to side swivel of the headlight
is deactivated.
The mode “tourist light” is activated / deac tivated via the information display* in the
menu:
SETUP
Tr a v e l m o d e
Off
On
Cornering lights
The cornering lights are used to illuminate the curves by means of the cone of light
swiveling together with the front headlight with Xenon lights*. This function is active
when the speed of the car increases to more than 10km/h.
The swiveling function of the headlights ca n be switched off / on via the menu point
Assistants in the main menu of the information display* page 23.WARNING
If the cornering ligh ts are defective, the headlights are automatically lowered to
the emergency position, whic h prevents a possible dazzling of oncoming traffic.
Thus the illuminated length of the road is shortened. Drive carefully and have
the car inspected immediatel y by a specialist garage.
Note
The AHL system* complements the functions of the fog lights with the function
“CORNER” page 64 and the function of the dy namic headlamp beam adjustment*.
The System AHL* is solely delivered with Bi-Xenon gas discharge bulbs for low
beam and main beam lights.
Fog lights
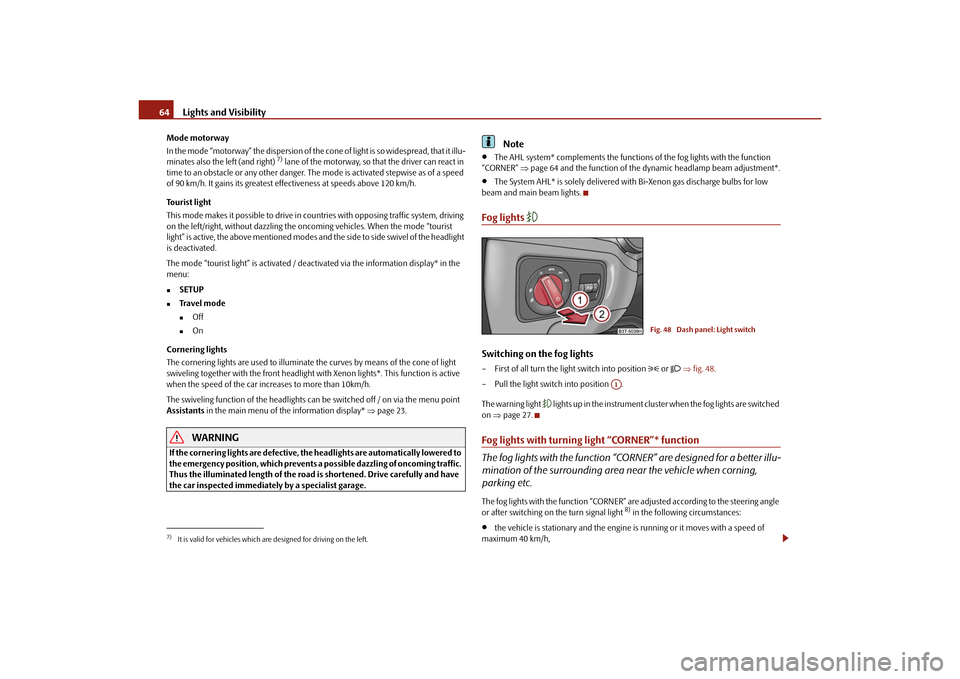
Switching on the fog lights– First of all turn the light switch into position
or fig. 48 .
– Pull the light switch into position .
The warning light
lights up in the instrument cluste r when the fog lights are switched
on page 27.
Fog lights with turning light “CORNER”* function
The fog lights with the function “CORNER” are designed for a better illu-
mination of the surrounding area near the vehicle when corning,
parking etc.The fog lights with the function “CORNER” ar e adjusted according to the steering angle
or after switching on the turn signal light
8) in the following circumstances:
the vehicle is stationary and the engine is running or it moves with a speed of
maximum 40 km/h,
7)It is valid for vehicles which are designed for driving on the left.
Fig. 48 Dash panel: Light switch
A1
s3fg.2.book Page 64 Friday, April 30, 2010 12:17 PM
Page 67 of 287
Lights and Visibility
66
– Turn the control dial page 65, fig. 50 until you have adjusted the low beam so
that oncoming traffic is not dazzled.
Settings
The positions correspond approximately to the following vehicle loads:
Front seats occupied, luggage compartment empty.
All seats occupied, luggage compartment empty.
All seats occupied, luggage compartment laden.
Driver seat occupied, lu ggage compartment laden.
Caution
Set the headlight beam adjustment in such a way as to avoid dazzling oncoming traffic.
Note
The Bi-Xenon bulbs* adapt automatically to the load and driving state of the vehicle
(e.g. speed, accelerating, braking) when the ig nition is switched on and when driving.
Vehicles which are not equipped with Bi-Xenon bulbs* do not have a manual headlight
range adjustment control.Switch for hazard warning lights
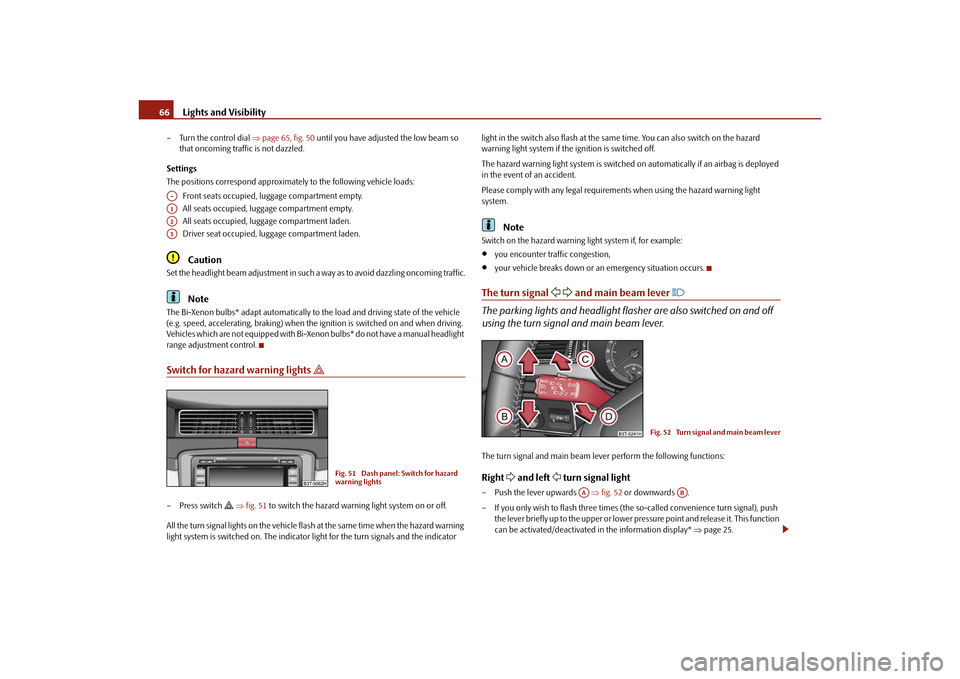
– Press switch
fig. 51 to switch the hazard warning light system on or off.
All the turn signal lights on the vehicle flas h at the same time when the hazard warning
light system is switched on. The indicator light for the turn signals and the indicator light in the switch also flash at the same time. You can also switch on the hazard
warning light system if the ignition is switched off.
The hazard warning light system is switched
on automatically if an airbag is deployed
in the event of an accident.
Please comply with any legal requirements when using the hazard warning light
system.
Note
Switch on the hazard warning light system if, for example:
you encounter traffic congestion,
your vehicle breaks down or an emergency situation occurs.
The turn signal
and main beam lever
The parking lights and headlight flasher are also switched on and off
using the turn signal and main beam lever.The turn signal and main beam le ver perform the following functions:Right
and left
turn signal light
– Push the lever upwards fig. 52 or downwards .
– If you only wish to flash three times (the so-called convenience turn signal), push
the lever briefly up to the upper or lower pr essure point and release it. This function
can be activated/deactivated in the information display* page 25.
A-A1A2A3
Fig. 51 Dash panel: Switch for hazard
warning lights
Fig. 52 Turn signal and main beam lever
AA
AB
s3fg.2.book Page 66 Friday, April 30, 2010 12:17 PM
Page 68 of 287
Lights and Visibility67
Using the system
Safety
Driving Tips
General Maintenance
Breakdown assistance
Technical Data
– Turn signal for changing lanes - in order to
only flash briefly, move the lever up or
down to the pressure point and hold it in this position.
Main beam
– Switch on the low beam.
– Push the lever forwards in direction of arrow (spring-tensioned position).
– If you push the lever towards the steering wheel in direction of arrow (spring-
tensioned position) the main beam is switched off.Headlight flasher
– Pull the lever towards the steering wheel (spring-tensioned position) in direction
of arrow - the main beam and warning light
in the instrument cluster come
on.
Parking light
– Switch off the ignition.
– Push the lever up or down - the right-hand or left-hand parking light is switched
on.
Information concerning the function of the lights.
The turn signal system only operates when the igniti on is switched on. The corre-
sponding warning light
or in the instrument cluster also flashes.
The turn signal is automatically cancelled after negotiating a curve.
The indicator light flashes at twice its normal rate if a bulb of the turn signal light
fails.
The side light and rear light on the appropriate side of the vehicle are switched on
when the parking light is selected. The parking light only operates if the ignition is
switched off.Caution
Use main beam or the headlight flasher only if this does not risk dazzling other road
users.
Note
If you have switched on the right or left turn signal light and you switch off the igni-
tion, the parking light is not automatically switched on.
Use only in accordance with the legal requirements the described lighting and
signal systems.
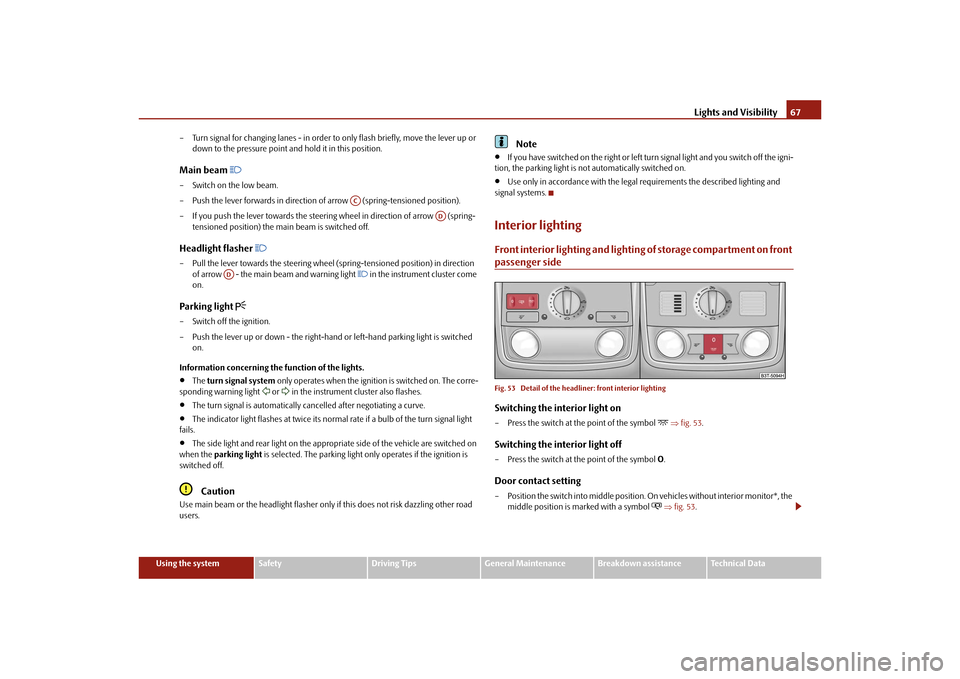
Interior lightingFront interior lighting and lighting of storage compartment on front passenger sideFig. 53 Detail of the headliner: front interior lightingSwitching the interior light on– Press the switch at the point of the symbol
fig. 53 .
Switching the interior light off– Press the switch at the point of the symbol O.Door contact setting– Position the switch into middle position. On vehicles without interior monitor*, the
middle position is marked with a symbol
fig. 53 .
AC
AD
AD
s3fg.2.book Page 67 Friday, April 30, 2010 12:17 PM
Page 248 of 287
Fuses and light bulbs247
Using the system
Safety
Driving Tips
General Maintenance
Breakdown assistance
Technical Data
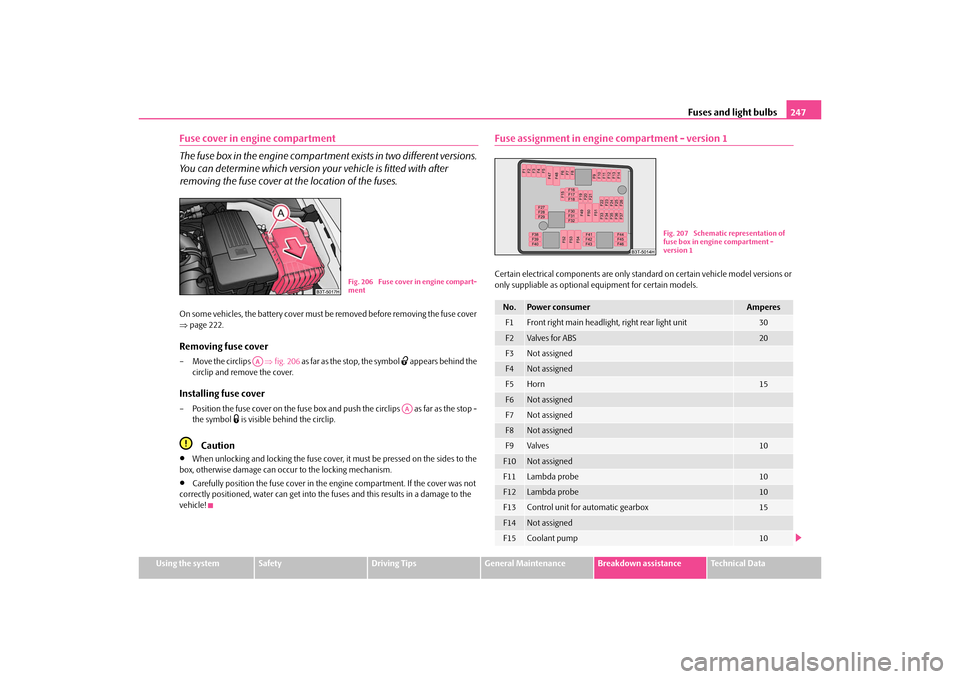
Fuse cover in engine compartment
The fuse box in the engine compartment exists in two different versions.
You can determine which version your vehicle is fitted with after
removing the fuse cover at the location of the fuses.On some vehicles, the battery cover must be removed before removing the fuse cover
page 222.Removing fuse cover– Move the circlips fig. 206 as far as the stop, the symbol
appears behind the
circlip and remove the cover.
Installing fuse cover– Position the fuse cover on the fuse box and push the circlips as far as the stop -
the symbol
is visible behind the circlip.
Caution
When unlocking and locking the fuse cover, it must be pressed on the sides to the
box, otherwise damage can occur to the locking mechanism.
Carefully position the fuse cover in the engine compartment. If the cover was not
correctly positioned, water can get into the fuses and this results in a damage to the
vehicle!
Fuse assignment in engine compartment - version 1Certain electrical components are only stan dard on certain vehicle model versions or
only suppliable as optional equipment for certain models.
Fig. 206 Fuse cover in engine compart-
ment
AA
AA
No.
Power consumer
Amperes
F1
Front right main headlight, right rear light unit
30
F2
Valves for ABS
20
F3
Not assigned
F4
Not assigned
F5
Horn
15
F6
Not assigned
F7
Not assigned
F8
Not assigned
F9
Valves
10
F10
Not assigned
F11
Lambda probe
10
F12
Lambda probe
10
F13
Control unit for automatic gearbox
15
F14
Not assigned
F15
Coolant pump
10
Fig. 207 Schematic representation of
fuse box in engine compartment -
version 1
s3fg.2.book Page 247 Friday, April 30, 2010 12:17 PM
Page 249 of 287
Fuses and light bulbs
248
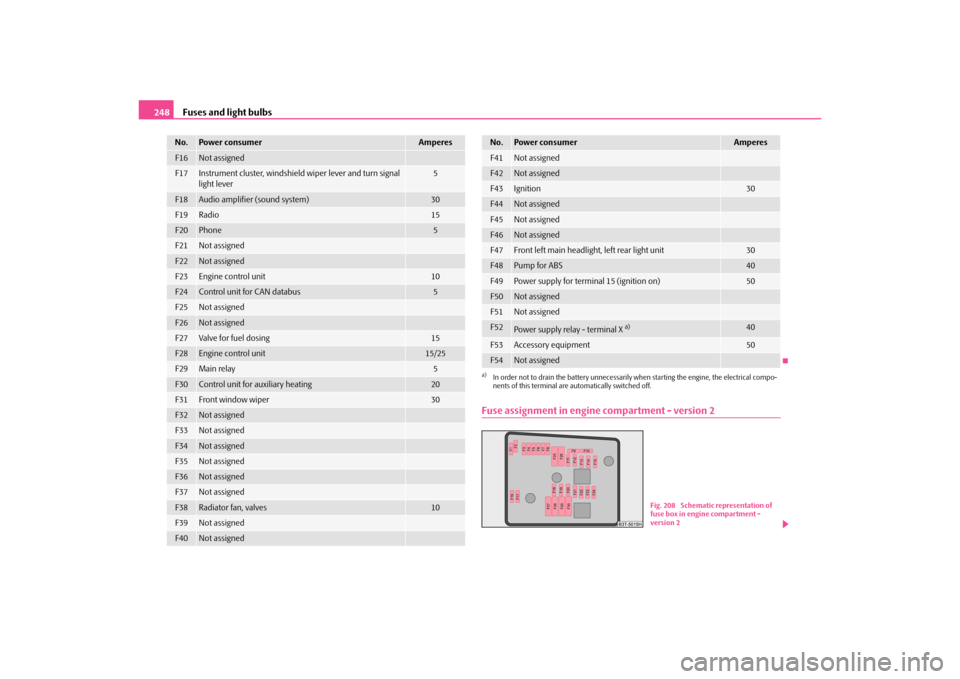
Fuse assignment in engine compartment - version 2
F16
Not assigned
F17
Instrument cluster, windshield wiper lever and turn signal
light lever
5
F18
Audio amplifier (sound system)
30
F19
Radio
15
F20
Phone
5
F21
Not assigned
F22
Not assigned
F23
Engine control unit
10
F24
Control unit for CAN databus
5
F25
Not assigned
F26
Not assigned
F27
Va lve for f uel d osi ng
15
F28
Engine control unit
15/25
F29
Main relay
5
F30
Control unit for auxiliary heating
20
F31
Front window wiper
30
F32
Not assigned
F33
Not assigned
F34
Not assigned
F35
Not assigned
F36
Not assigned
F37
Not assigned
F38
Radiator fan, valves
10
F39
Not assigned
F40
Not assigned
No.
Power consumer
Amperes
F41
Not assigned
F42
Not assigned
F43
Ignition
30
F44
Not assigned
F45
Not assigned
F46
Not assigned
F47
Front left main headlight, left rear light unit
30
F48
Pump for ABS
40
F49
Power supply for terminal 15 (ignition on)
50
F50
Not assigned
F51
Not assigned
F52
Power supply relay - terminal X
a)
40
F53
Accessory equipment
50
F54
Not assigned
a)In order not to drain the battery unnecessarily when starting the engine, the electrical compo-
nents of this terminal are automatically switched off.No.
Power consumer
Amperes
Fig. 208 Schematic representation of
fuse box in engine compartment -
version 2
s3fg.2.book Page 248 Friday, April 30, 2010 12:17 PM
Page 250 of 287
Fuses and light bulbs249
Using the system
Safety
Driving Tips
General Maintenance
Breakdown assistance
Technical Data
Certain electrical components are only standard on certain vehicle model versions or
only suppliable as optional
equipment for certain models.
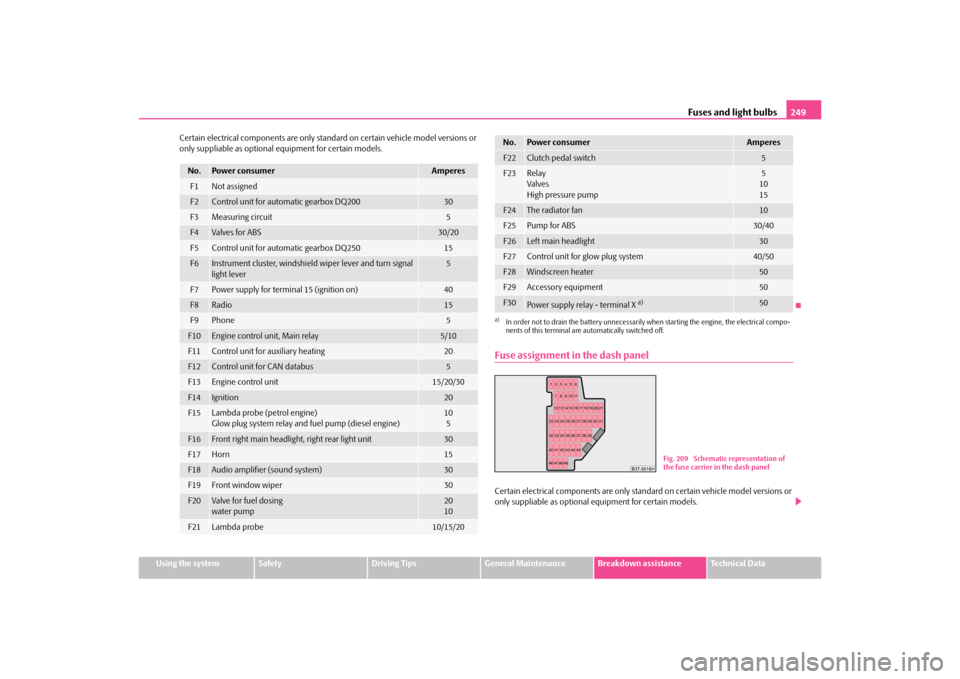
Fuse assignment in the dash panelCertain electrical components are only stan dard on certain vehicle model versions or
only suppliable as optional equipment for certain models.
No.
Power consumer
Amperes
F1
Not assigned
F2
Control unit for automatic gearbox DQ200
30
F3
Measuring circuit
5
F4
Va lve s for AB S
30/20
F5
Control unit for automatic gearbox DQ250
15
F6
Instrument cluster, windshield wiper lever and turn signal
light lever
5
F7
Power supply for terminal 15 (ignition on)
40
F8
Radio
15
F9
Phone
5
F10
Engine control unit, Main relay
5/10
F11
Control unit for auxiliary heating
20
F12
Control unit for CAN databus
5
F13
Engine control unit
15/20/30
F14
Ignition
20
F15
Lambda probe (petrol engine)
Glow plug system relay and fuel pump (diesel engine)
10
5
F16
Front right main headlight, right rear light unit
30
F17
Horn
15
F18
Audio amplifier (sound system)
30
F19
Front window wiper
30
F20
Va lve for f uel d osi ng
water pump
20
10
F21
Lambda probe
10/15/20
F22
Clutch pedal switch
5
F23
Relay
Valves
High pressure pump
5
10
15
F24
The radiator fan
10
F25
Pump for ABS
30/40
F26
Left main headlight
30
F27
Control unit for glow plug system
40/50
F28
Windscreen heater
50
F29
Accessory equipment
50
F30
Power supply relay - terminal X
a)
50
a)In order not to drain the battery unnecessarily wh en starting the engine, the electrical compo-
nents of this terminal are automatically switched off.No.
Power consumer
Amperes
Fig. 209 Schematic representation of
the fuse carrier in the dash panel
s3fg.2.book Page 249 Friday, April 30, 2010 12:17 PM
Page 251 of 287
Fuses and light bulbs
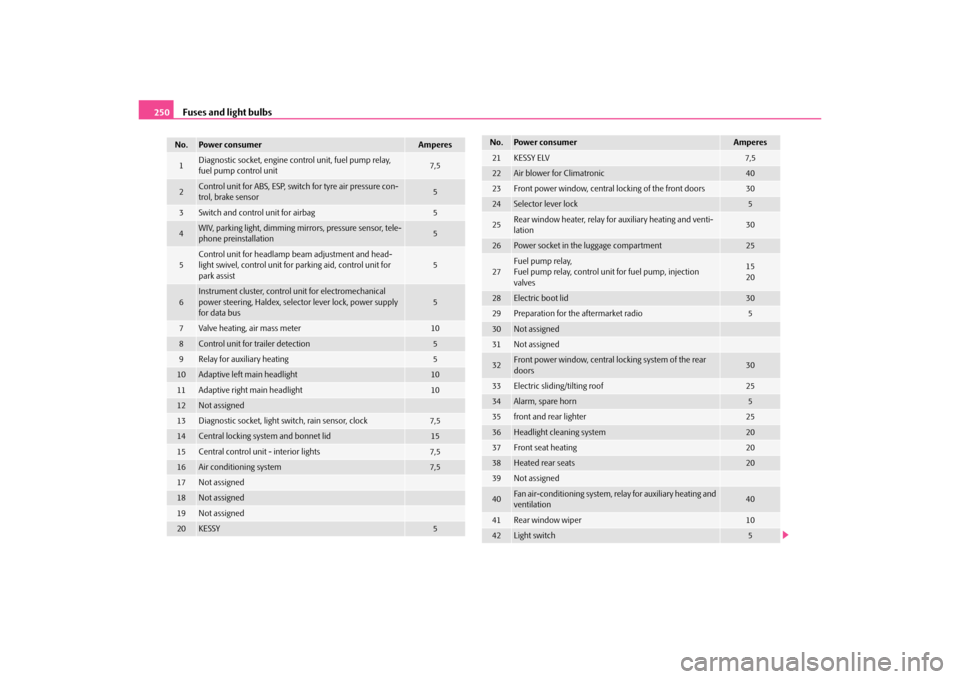
250No.
Power consumer
Amperes
1
Diagnostic socket, engine control unit, fuel pump relay,
fuel pump control unit
7,5
2
Control unit for ABS, ESP, switch for tyre air pressure con-
trol, brake sensor
5
3
Switch and control unit for airbag
5
4
WIV, parking light, dimming mirrors, pressure sensor, tele-
phone preinstallation
5
5
Control unit for headlamp beam adjustment and head-
light swivel, control unit for parking aid, control unit for
park assist
5
6
Instrument cluster, control unit for electromechanical
power steering, Haldex, selector lever lock, power supply
for data bus
5
7
Valve heating, air mass meter
10
8
Control unit for trailer detection
5
9
Relay for auxiliary heating
5
10
Adaptive left main headlight
10
11
Adaptive right main headlight
10
12
Not assigned
13
Diagnostic socket, light switch, rain sensor, clock
7,5
14
Central locking system and bonnet lid
15
15
Central control unit - interior lights
7,5
16
Air conditioning system
7,5
17
Not assigned
18
Not assigned
19
Not assigned
20
KESSY
5
21
KESSY ELV
7,5
22
Air blower for Climatronic
40
23
Front power window, central locking of the front doors
30
24
Selector lever lock
5
25
Rear window heater, relay for auxiliary heating and venti-
lation
30
26
Power socket in the luggage compartment
25
27
Fuel pump relay,
Fuel pump relay, control unit for fuel pump, injection
valves
15
20
28
Electric boot lid
30
29
Preparation for the aftermarket radio
5
30
Not assigned
31
Not assigned
32
Front power window, central locking system of the rear
doors
30
33
Electric sliding/tilting roof
25
34
Alarm, spare horn
5
35
front and rear lighter
25
36
Headlight cleaning system
20
37
Front seat heating
20
38
Heated rear seats
20
39
Not assigned
40
Fan air-conditioning system, re lay for auxiliary heating and
ventilation
40
41
Rear window wiper
10
42
Light switch
5
No.
Power consumer
Amperes
s3fg.2.book Page 250 Friday, April 30, 2010 12:17 PM
Page 252 of 287
Fuses and light bulbs251
Using the system
Safety
Driving Tips
General Maintenance
Breakdown assistance
Technical Data
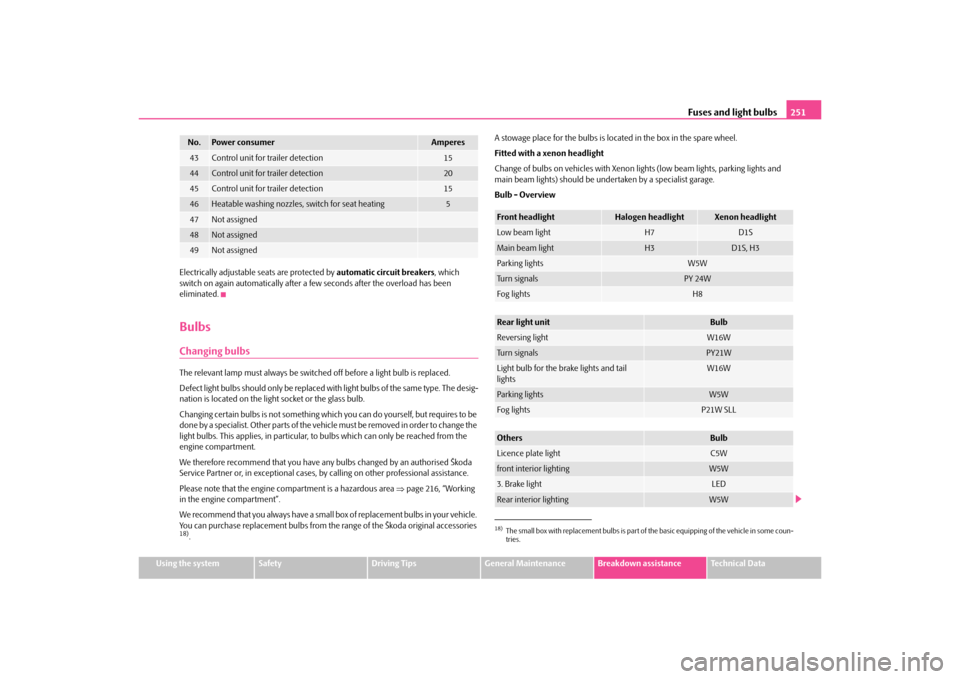
Electrically adjustable seats are protected by
automatic circuit breakers, which
switch on again automatically after a few seconds after the overload has been
eliminated.
BulbsChanging bulbsThe relevant lamp must always be switch ed off before a light bulb is replaced.
Defect light bulbs should only be replaced with light bulbs of the same type. The desig-
nation is located on the ligh t socket or the glass bulb.
Changing certain bulbs is not something whic h you can do yourself, but requires to be
done by a specialist. Other parts of the vehicle must be removed in order to change the
light bulbs. This applies, in particular, to bulbs which can only be reached from the
engine compartment.
We therefore recommend that you have an y bulbs changed by an authorised Škoda
Service Partner or, in exceptional cases, by calling on other professional assistance.
Please note that the engine compartment is a hazardous area page 216, “Working
in the engine compartment”.
We recommend that you always have a small box of replacement bulbs in your vehicle.
You can purchase replacement bulbs from th e range of the Škoda original accessories 18). A stowage place for the bulbs is located in the box in the spare wheel.
Fitted with a xenon headlight
Change of bulbs on vehicles with Xenon lights (low beam lights, parking lights and
main beam lights) should be undertaken by a specialist garage.
Bulb - Overview43
Control unit for trailer detection
15
44
Control unit for trailer detection
20
45
Control unit for trailer detection
15
46
Heatable washing nozzles, switch for seat heating
5
47
Not assigned
48
Not assigned
49
Not assigned
No.
Power consumer
Amperes
18)The small box with replacement bulbs is part of
the basic equipping of the vehicle in some coun-
tries.Front headlight
Halogen headlight
Xenon headlight
Low beam light
H7
D1S
Main beam light
H3
D1S, H3
Parking lights
W5W
Turn signals
PY 24W
Fog lights
H8
Rear light unit
Bulb
Reversing light
W16W
Turn signals
PY21W
Light bulb for the brake lights and tail
lights
W16W
Parking lights
W5W
Fog lights
P21W SLL
Others
Bulb
Licence plate light
C5W
front interior lighting
W5W
3. Brake light
LED
Rear interior lighting
W5W
s3fg.2.book Page 251 Friday, April 30, 2010 12:17 PM