key SKODA SUPERB 2010 Owner´s Manual
[x] Cancel search | Manufacturer: SKODA, Model Year: 2010, Model line: SUPERB, Model: SKODA SUPERB 2010Pages: 252, PDF Size: 16.33 MB
Page 5 of 252
Table of Contents
Board literature4
Notes
5
Structure and more information about the
Operating Instructions
6
Abbreviations
Safety
Passive Safety
8
General information
8
Correct and safe seated position
9
Seat belts
12
Using seat belts
12
Inertia reels and belt tensioners
15
Airbag system
16
Description of the airbag system
16
Airbag overview
17
Deactivating airbags
20
Transporting children safely
22
Child seat
22
Fastening systems
25
Operation
Cockpit
29
Overview
28
Instruments and Indicator Lights
30
Instrument cluster
30
Warning lights
34
Information system
42
Driver information system
42
Multifunction display (MFD)
44MAXI DOT display46Service interval display48
Unlocking and opening
50
Unlocking and locking
50
Anti-theft alarm system
55
Luggage compartment lid
57
Electric boot lid (Superb Combi)
59
Electrical power windows
61
Electric sliding/tilting roof
64
Panoramic sliding/tilting roof (Superb Estate)
65
Lights and visibility
67
Lights
67
Interior lights
73
Visibility
75
Windscreen wipers and washers
77
Rear mirror
79
Seats and practical features
81
Adjusting the seats
81
Seat features
85
Practical features
88
Luggage compartment
97
Removable light (Superb Combi)
103
Variable loading floor in the luggage
compartment (Estate)
104
Extending variable loading floor with
integrated aluminium rails and fastening
elements (Superb Combi)
105
Net partition (Superb Combi)
107
Roof rack
108
Air conditioning system
110
Heating, ventilation, cooling
110
Air conditioning system (manual air
conditioning system)
112Climatronic (automatic air conditioning
system)115
Auxiliary heating (auxiliary heating and
ventilation)
118
Communication and multimedia
121
General information
121
Universal telephone preinstallation GSM II
124
Universal telephone preinstallation GSM IIl
126
Wi-Fi
130
Voice control
131
Multimedia
134
Driving
Starting off and Driving
138
Starting and stopping the engine using the
key
138
Starting and stopping the engine - KESSY
140
Brakes
143
Manual gear changing and pedals
144
Automatic transmission
145
Running in
148
Economical driving and environmental
sustainability
149
Avoiding damage to your vehicle
152
Driving abroad
153
Assist systems
154
Brake assist systems
154
Parking aid
156
Park assist
157
Cruise Control System
161
START STOP
162
Fatigue detection (break recommendation)
165
Tyre pressure monitoring
165
Hitch and trailer
166
Hitch
166
Trailer
1702Table of Contents
Page 15 of 252
Seat belts
Using seat belts
Introduction
Fig. 3
Driver wearing seat belt
This chapter contains information on the following subjects:
The physical principle of a frontal collision
13
Fastening and unfastening seat belts
14
Belt height adjustment on the front seats
15
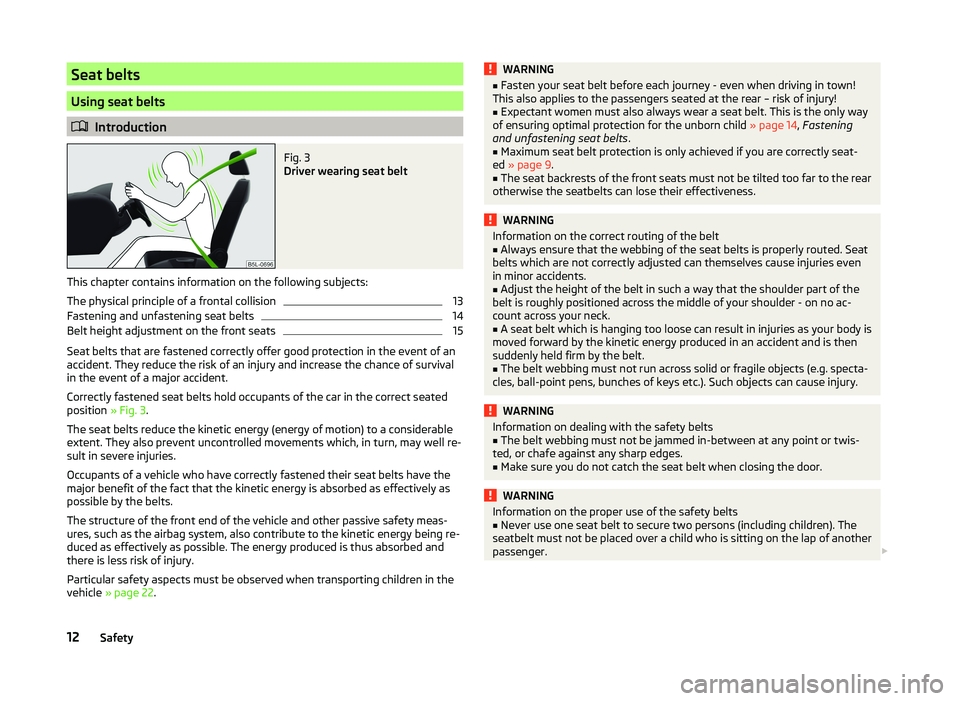
Seat belts that are fastened correctly offer good protection in the event of an
accident. They reduce the risk of an injury and increase the chance of survival
in the event of a major accident.
Correctly fastened seat belts hold occupants of the car in the correct seated
position » Fig. 3.
The seat belts reduce the kinetic energy (energy of motion) to a considerable
extent. They also prevent uncontrolled movements which, in turn, may well re-
sult in severe injuries.
Occupants of a vehicle who have correctly fastened their seat belts have the
major benefit of the fact that the kinetic energy is absorbed as effectively as
possible by the belts.
The structure of the front end of the vehicle and other passive safety meas-
ures, such as the airbag system, also contribute to the kinetic energy being re-
duced as effectively as possible. The energy produced is thus absorbed and
there is less risk of injury.
Particular safety aspects must be observed when transporting children in the
vehicle » page 22 .
WARNING■
Fasten your seat belt before each journey - even when driving in town!
This also applies to the passengers seated at the rear – risk of injury!■
Expectant women must also always wear a seat belt. This is the only way
of ensuring optimal protection for the unborn child » page 14, Fastening
and unfastening seat belts .
■
Maximum seat belt protection is only achieved if you are correctly seat-
ed » page 9 .
■
The seat backrests of the front seats must not be tilted too far to the rear
otherwise the seatbelts can lose their effectiveness.
WARNINGInformation on the correct routing of the belt■Always ensure that the webbing of the seat belts is properly routed. Seat
belts which are not correctly adjusted can themselves cause injuries even
in minor accidents.■
Adjust the height of the belt in such a way that the shoulder part of the
belt is roughly positioned across the middle of your shoulder - on no ac-
count across your neck.
■
A seat belt which is hanging too loose can result in injuries as your body is
moved forward by the kinetic energy produced in an accident and is then
suddenly held firm by the belt.
■
The belt webbing must not run across solid or fragile objects (e.g. specta-
cles, ball-point pens, bunches of keys etc.). Such objects can cause injury.
WARNINGInformation on dealing with the safety belts■The belt webbing must not be jammed in-between at any point or twis-
ted, or chafe against any sharp edges.■
Make sure you do not catch the seat belt when closing the door.
WARNINGInformation on the proper use of the safety belts■Never use one seat belt to secure two persons (including children). The
seatbelt must not be placed over a child who is sitting on the lap of another
passenger. 12Safety
Page 19 of 252
Airbag system
Description of the airbag system
Introduction
This chapter contains information on the following subjects:
System description
16
Airbag deployment
16
The airbag system provides, as a supplement to the seat belts, additional oc-
cupant protection during severe frontal and side collisions.
WARNING■ An airbag can only offer you optimal protection in combination with a
fastened seat belt .■
The airbag is not a substitute for the seat belt, but instead forms part of
the complete passive vehicle safety concept.
■
To ensure passengers are protected with the greatest possible effect
when the airbag is deployed, the front seats must be correctly adjusted to
match the body size » page 9, Correct and safe seated position .
■
If you do not fasten the seat belts when driving, lean too far forward or
adopt an incorrect seated position, you are exposing yourself to increased
risk of injury in the event of an accident.
WARNINGInformation on the use of the airbag system■If there is a fault, the airbag system must be checked by a specialist ga-
rage immediately. Otherwise, there is a risk of the airbag not being activa-
ted in the event of an accident.■
No modifications of any kind must be made to parts of the airbag system.
■
Any work on the airbag system including the installation and removal of
system components due to other repair work (e.g. removal of the steering
wheel) must only be carried out by a specialist garage.
■
Never make any changes to the front bumper or the bodywork.
■
It is prohibited to manipulate individual parts of the airbag system, as this
might result in the airbag being deployed.
■
The protective function of the airbag system is sufficient for only one ac-
cident. The airbag system must then be replaced if the airbag has been de-
ployed.
System description
Read and observe
on page 16 first.
The functional status of the airbag system is indicated by the warning light
in the instrument cluster » page 40.
When the airbags are deployed, they fill with gas and inflate.
A grey white or red, non-harmful gas is released when the airbag is inflated.
This is perfectly normal and is not an indication of a fire in the vehicle.
Depending on the vehicle equipment, the airbag system consists of the
following modules.
› Electronic control unit.
› Front airbag for the driver and the front passenger
» page 17.
› Driver’s knee airbag
» page 18.
› Side airbags
» page 19.
› Head airbags
» page 20.
› Airbag warning light in the instrument cluster
» page 40.
› Key switch for the front passenger airbag
» page 21.
› Warning light for the front passenger airbag deactivation/activation in the
middle of the dash panel » page 21.
Note
■
The airbag system needs no maintenance during its working life.■If you sell your vehicle, provide the complete vehicle documentation to the
new owner. Please note that the information relating to the possibility of de-
activating the front passenger airbag must be included!■
When disposing of vehicle or parts of the airbag system, it is important to
comply with the national legal requirements.
Airbag deployment
Read and observe
on page 16 first.
The airbags inflate in fractions of a second and at a high-speed in order to beable to offer additional protection in the event of an accident.
The airbag system is only functional when the ignition is switched on.
In certain accident situations, the several airbags may be deployed simultane-
ously.
16Safety
Page 22 of 252
WARNING■Adjust the driver's seat in a forward/back direction so that there is a gap
of at least 10 cm between the legs B and the dash panel in the vicinity of
the knee airbag » Fig. 10. If it is not possible to meet this requirement due
to your body size, visit a specialist garage.■
The surface of the airbag module in the lower part of the dash panel be-
low the steering column not have stickers attached, be covered or modified
in any other way. This part should only be cleaned with a cloth that is dry or
has been moistened with water. No objects must be attached to the cover
of the airbag module or located within the immediate vicinity.
■
Do not attach any bulky and heavy objects (bunch of keys etc.) to the igni-
tion key. These can be ejected by the knee airbag when it is deployed and
can cause injuries.
Note
In vehicles with a driver's knee airbag, a symbol with is located on the
side panel on the driver's side.
Side airbags
Fig. 11
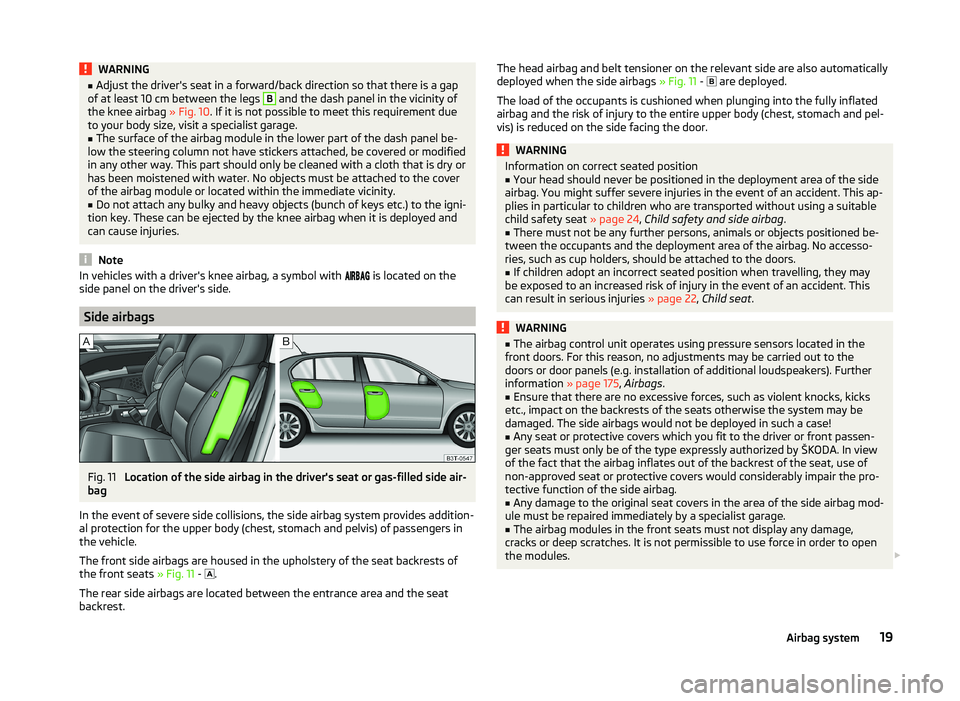
Location of the side airbag in the driver's seat or gas-filled side air-
bag
In the event of severe side collisions, the side airbag system provides addition-
al protection for the upper body (chest, stomach and pelvis) of passengers in
the vehicle.
The front side airbags are housed in the upholstery of the seat backrests of
the front seats » Fig. 11 -
.
The rear side airbags are located between the entrance area and the seat backrest.
The head airbag and belt tensioner on the relevant side are also automatically
deployed when the side airbags » Fig. 11 - are deployed.
The load of the occupants is cushioned when plunging into the fully inflated
airbag and the risk of injury to the entire upper body (chest, stomach and pel-
vis) is reduced on the side facing the door.WARNINGInformation on correct seated position■Your head should never be positioned in the deployment area of the side
airbag. You might suffer severe injuries in the event of an accident. This ap-
plies in particular to children who are transported without using a suitable
child safety seat » page 24, Child safety and side airbag .■
There must not be any further persons, animals or objects positioned be-
tween the occupants and the deployment area of the airbag. No accesso-
ries, such as cup holders, should be attached to the doors.
■
If children adopt an incorrect seated position when travelling, they may
be exposed to an increased risk of injury in the event of an accident. This
can result in serious injuries » page 22, Child seat .
WARNING■
The airbag control unit operates using pressure sensors located in the
front doors. For this reason, no adjustments may be carried out to the
doors or door panels (e.g. installation of additional loudspeakers). Further
information » page 175, Airbags .■
Ensure that there are no excessive forces, such as violent knocks, kicks
etc., impact on the backrests of the seats otherwise the system may be
damaged. The side airbags would not be deployed in such a case!
■
Any seat or protective covers which you fit to the driver or front passen-
ger seats must only be of the type expressly authorized by ŠKODA. In view
of the fact that the airbag inflates out of the backrest of the seat, use of
non-approved seat or protective covers would considerably impair the pro-
tective function of the side airbag.
■
Any damage to the original seat covers in the area of the side airbag mod-
ule must be repaired immediately by a specialist garage.
■
The airbag modules in the front seats must not display any damage,
cracks or deep scratches. It is not permissible to use force in order to open
the modules.
19Airbag system
Page 24 of 252
Deactivating airbags
Deactivating an airbag should be considered in cases such as the ones below. › If using a rear-facing child seat on the front passenger seat (due to different
legal regulations, the airbag must be deactivated if using a forwards-facing
child seat in some countries) » page 22, Transporting children safely .
› If it is not possible to maintain a distance of at least 25 cm between the mid-
dle of the steering wheel and chest, despite the driver's seat being correctly
adjusted.
› If special attachments are required in the area of the steering wheel because
of a physical disability.
› If different seats have been fitted (e.g. orthopaedic seats without side air-
bags).
The front passenger airbag can be switched off with the key-operated
switch » page 21 , Deactivating the front passenger airbag .
We recommend that you ask a ŠKODA service partner to deactivate any other airbags.
Monitoring the airbag system
The operational capability of the airbag system is monitored electronically,
even if one of the airbags is switched off.
Airbag deactivated using diagnostic equipment › The warning light
illuminates for approx. 4 seconds after switching on the
ignition and then flashes again for approx. 12 seconds.
Front passenger airbag deactivated using the key switch in the storage com-
partment
› The warning light
illuminates for approx. 4 seconds after switching on the
ignition.
› The
3
» Fig. 13 on page 21 warning light illuminates when the igni-
tion is switched on.
Note
■ The national regulations for switching off airbags must be observed.■A ŠKODA service partner will be able to inform you which, if any, of your vehi-
cle's airbags can or must be deactivated.Deactivating the front passenger airbagFig. 13
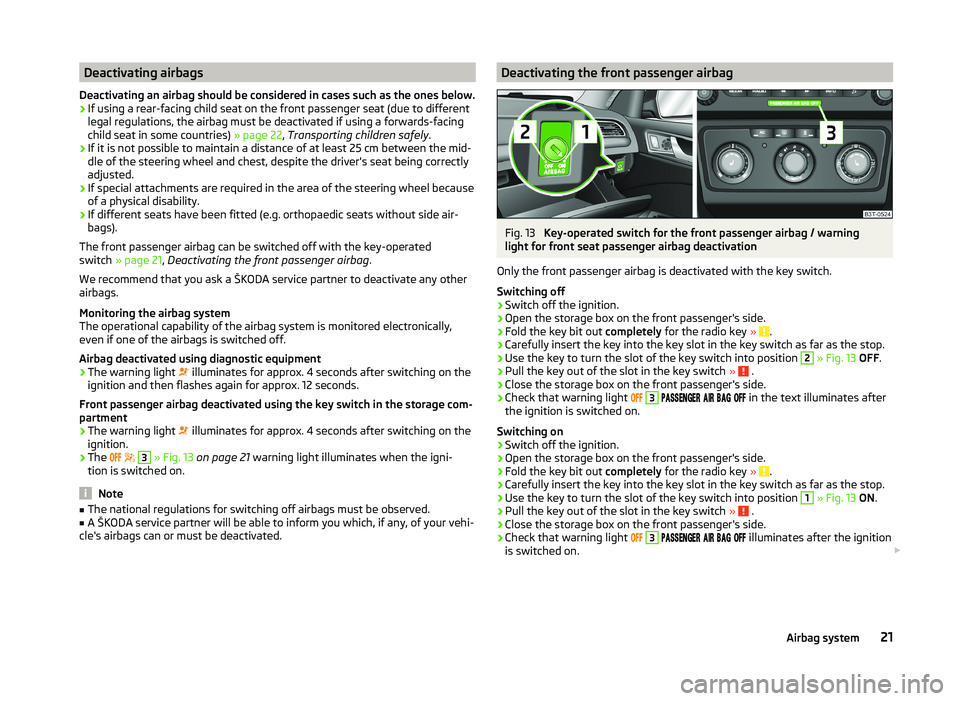
Key-operated switch for the front passenger airbag / warning
light for front seat passenger airbag deactivation
Only the front passenger airbag is deactivated with the key switch.
Switching off
›
Switch off the ignition.
›
Open the storage box on the front passenger's side.
›
Fold the key bit out completely for the radio key » .
›
Carefully insert the key into the key slot in the key switch as far as the stop.
›
Use the key to turn the slot of the key switch into position
2
» Fig. 13 OFF .
›
Pull the key out of the slot in the key switch » .
›
Close the storage box on the front passenger's side.
›
Check that warning light
3
in the text illuminates after
the ignition is switched on.
Switching on
›
Switch off the ignition.
›
Open the storage box on the front passenger's side.
›
Fold the key bit out completely for the radio key » .
›
Carefully insert the key into the key slot in the key switch as far as the stop.
›
Use the key to turn the slot of the key switch into position
1
» Fig. 13 ON .
›
Pull the key out of the slot in the key switch » .
›
Close the storage box on the front passenger's side.
›
Check that warning light
3
illuminates after the ignition
is switched on.
21Airbag system
Page 25 of 252
WARNING■The driver is responsible for whether the airbag is switched on or switch-
ed off.■
Only switch off the airbag when the ignition is switched off! Otherwise a
fault can occur in the system for deactivating the airbag.
■
If the warning light
is flashing, the front passenger airbag will not be
deployed in an accident. Have the airbag system checked by a specialist ga-
rage immediately.
■
The key cannot be inserted in the key switch while driving. ■ Shocks can cause the key to turn in the slot and trigger the airbag!
■ The airbag could be triggered unexpectedly in an accident - it may result
in injury or death!
CAUTION
An insufficiently folded out key bit can damage the key switch!Transporting children safely
Child seat
Introduction
This chapter contains information on the following subjects:
Use of a child seat on the front passenger seat
23
Use of the child seat in the front passenger seat
24
Child safety and side airbag
24
Classification of child seats
25
Use of child seats fastened with a seat belt
25
Children are generally safer on the rear seats than on the front passenger
seat.
In contrast to adults, the muscles and bone structure of children are not yet
fully developed. Thus children are exposed to increased risk of injury.
Children should be transported in accordance with the relevant statutory pro-
visions.
Child seats that comply with the ECE-R 44 standard must be used. The ECE-R
standard stands for: Economic Commission for Europe - Regulation.
Child seats that comply with the ECE-R 44 standard are identified with a test
mark that cannot be removed: a capital E in a circle and the certification num-
ber below
WARNING■ The national legal requirements must be observed when using child
seats.■
One should never carry children, and also not babies! - on one's lap.
■
Never leave children unattended in the vehicle. Certain outside climatic
conditions can cause life-threatening temperatures in the vehicle.
■
The child must be secured in the vehicle during the entire journey! Other-
wise, the child would be thrown through the vehicle in the event of an acci-
dent, causing fatal injuries to both the child and other occupants.
22Safety
Page 32 of 252
Operation
Cockpit
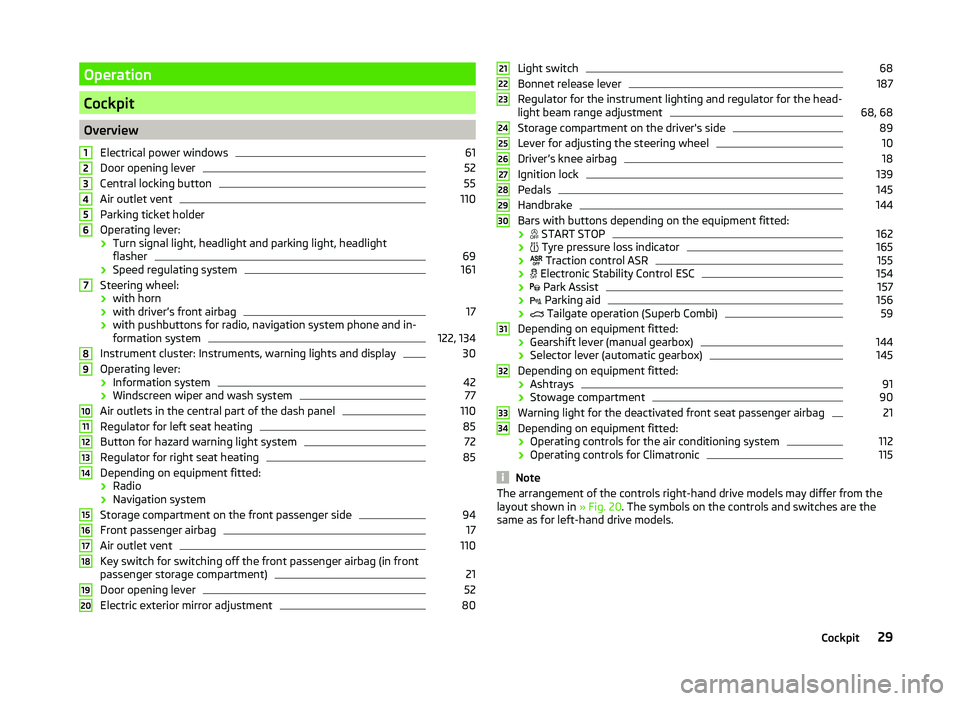
OverviewElectrical power windows
61
Door opening lever
52
Central locking button
55
Air outlet vent
110
Parking ticket holder
Operating lever: › Turn signal light, headlight and parking light, headlight
flasher
69
› Speed regulating system
161
Steering wheel:
› with horn
› with driver’s front airbag
17
› with pushbuttons for radio, navigation system phone and in-
formation system
122, 134
Instrument cluster: Instruments, warning lights and display
30
Operating lever:
› Information system
42
›Windscreen wiper and wash system
77
Air outlets in the central part of the dash panel
110
Regulator for left seat heating
85
Button for hazard warning light system
72
Regulator for right seat heating
85
Depending on equipment fitted:
› Radio
› Navigation system
Storage compartment on the front passenger side
94
Front passenger airbag
17
Air outlet vent
110
Key switch for switching off the front passenger airbag (in front
passenger storage compartment)
21
Door opening lever
52
Electric exterior mirror adjustment
801234567891011121314151617181920Light switch68
Bonnet release lever
187
Regulator for the instrument lighting and regulator for the head-
light beam range adjustment
68, 68
Storage compartment on the driver's side
89
Lever for adjusting the steering wheel
10
Driver’s knee airbag
18
Ignition lock
139
Pedals
145
Handbrake
144
Bars with buttons depending on the equipment fitted:
›
START STOP
162
›
Tyre pressure loss indicator
165
›
Traction control ASR
155
›
Electronic Stability Control ESC
154
›
Park Assist
157
›
Parking aid
156
›
Tailgate operation (Superb Combi)
59
Depending on equipment fitted:
› Gearshift lever (manual gearbox)
144
›Selector lever (automatic gearbox)
145
Depending on equipment fitted:
› Ashtrays
91
›Stowage compartment
90
Warning light for the deactivated front seat passenger airbag
21
Depending on equipment fitted:
› Operating controls for the air conditioning system
112
›
Operating controls for Climatronic
115
Note
The arrangement of the controls right-hand drive models may differ from the
layout shown in » Fig. 20. The symbols on the controls and switches are the
same as for left-hand drive models.212223242526272829303132333429Cockpit
Page 35 of 252
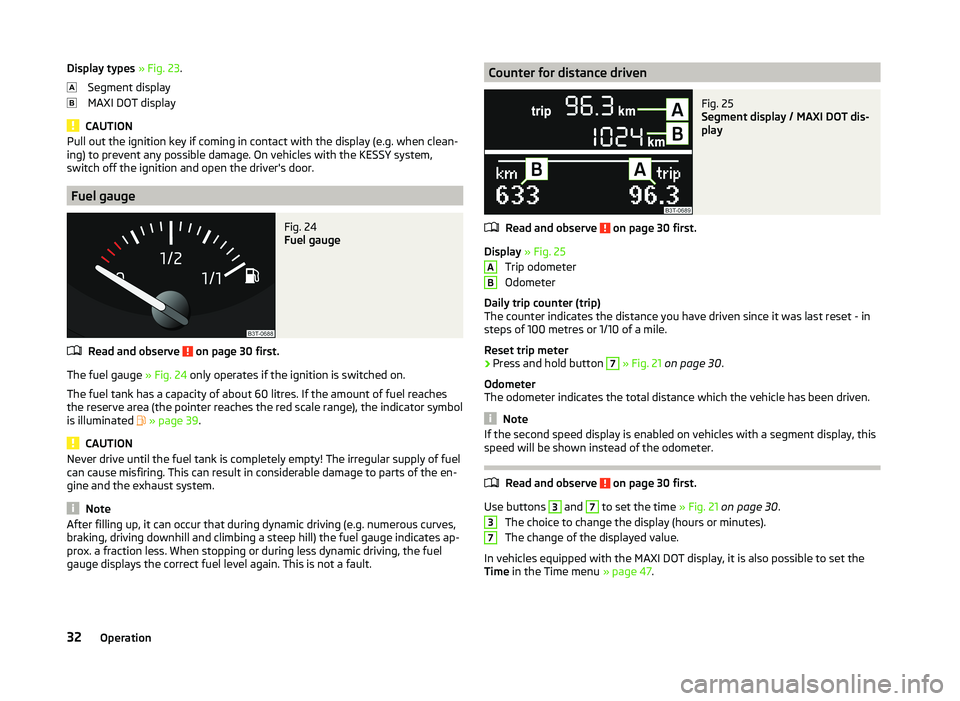
Display types » Fig. 23 .
Segment display
MAXI DOT display
CAUTION
Pull out the ignition key if coming in contact with the display (e.g. when clean-
ing) to prevent any possible damage. On vehicles with the KESSY system,
switch off the ignition and open the driver's door.
Fuel gauge
Fig. 24
Fuel gauge
Read and observe on page 30 first.
The fuel gauge » Fig. 24 only operates if the ignition is switched on.
The fuel tank has a capacity of about 60 litres. If the amount of fuel reaches the reserve area (the pointer reaches the red scale range), the indicator symbol
is illuminated
» page 39 .
CAUTION
Never drive until the fuel tank is completely empty! The irregular supply of fuel
can cause misfiring. This can result in considerable damage to parts of the en-
gine and the exhaust system.
Note
After filling up, it can occur that during dynamic driving (e.g. numerous curves,
braking, driving downhill and climbing a steep hill) the fuel gauge indicates ap-
prox. a fraction less. When stopping or during less dynamic driving, the fuel
gauge displays the correct fuel level again. This is not a fault.Counter for distance drivenFig. 25
Segment display / MAXI DOT dis-
play
Read and observe on page 30 first.
Display » Fig. 25
Trip odometer
Odometer
Daily trip counter (trip)
The counter indicates the distance you have driven since it was last reset - in
steps of 100 metres or 1/10 of a mile.
Reset trip meter
›
Press and hold button
7
» Fig. 21 on page 30 .
Odometer
The odometer indicates the total distance which the vehicle has been driven.
Note
If the second speed display is enabled on vehicles with a segment display, this
speed will be shown instead of the odometer.
Read and observe on page 30 first.
Use buttons
3
and
7
to set the time » Fig. 21 on page 30 .
The choice to change the display (hours or minutes).
The change of the displayed value.
In vehicles equipped with the MAXI DOT display, it is also possible to set the
Time in the Time menu » page 47.
AB3732Operation
Page 36 of 252
Display of the second speedRead and observe
on page 30 first.
The display can show the current speed in mph 1)
.
This feature is provided for driving in countries with different units for speed.
MAXI DOT display
The display of the second speed can be set in the Alt. speed dis. menu
item » page 47 , Settings .
Segment display
›
Press the
3
» Fig. 21 on page 30 key repeatedly, until the odometer display
flashes » page 32 .
›
Press the
7
key while the display is flashing.
The second speed is displayed instead of the odometer.
Display of the second speed can be disabled in the same way.
Display in rear centre console
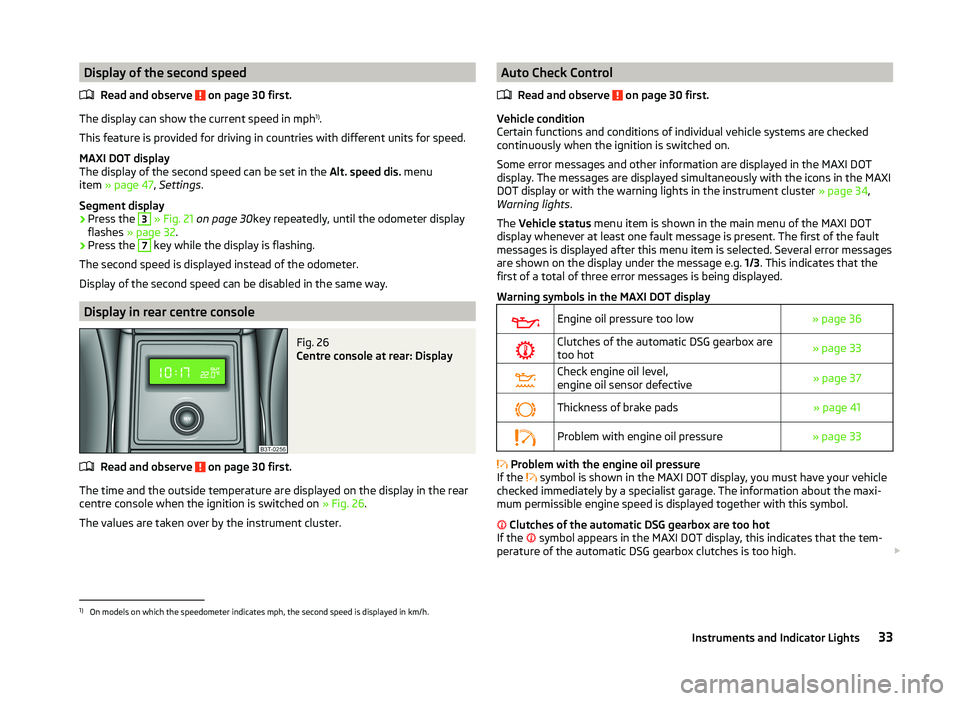
Fig. 26
Centre console at rear: Display
Read and observe on page 30 first.
The time and the outside temperature are displayed on the display in the rear
centre console when the ignition is switched on » Fig. 26.
The values are taken over by the instrument cluster.
Auto Check Control
Read and observe
on page 30 first.
Vehicle condition
Certain functions and conditions of individual vehicle systems are checked
continuously when the ignition is switched on.
Some error messages and other information are displayed in the MAXI DOT
display. The messages are displayed simultaneously with the icons in the MAXI
DOT display or with the warning lights in the instrument cluster » page 34,
Warning lights .
The Vehicle status menu item is shown in the main menu of the MAXI DOT
display whenever at least one fault message is present. The first of the fault
messages is displayed after this menu item is selected. Several error messages
are shown on the display under the message e.g. 1/3. This indicates that the
first of a total of three error messages is being displayed.
Warning symbols in the MAXI DOT display
Engine oil pressure too low» page 36Clutches of the automatic DSG gearbox are
too hot» page 33Check engine oil level,
engine oil sensor defective» page 37Thickness of brake pads» page 41Problem with engine oil pressure» page 33
Problem with the engine oil pressure
If the symbol is shown in the MAXI DOT display, you must have your vehicle
checked immediately by a specialist garage. The information about the maxi-
mum permissible engine speed is displayed together with this symbol.
Clutches of the automatic DSG gearbox are too hot
If the symbol appears in the MAXI DOT display, this indicates that the tem-
perature of the automatic DSG gearbox clutches is too high.
1)
On models on which the speedometer indicates mph, the second speed is displayed in km/h.
33Instruments and Indicator Lights
Page 43 of 252
Airbag systemRead and observe
on page 35 first.
If the warning light
illuminates , there is a fault in the airbag system.
The following message is shown in the MAXI DOT display. Fault: Airbag
The operational capability of the airbag system is monitored electronically,
even if one of the airbags is switched off.
If a front, side or head airbag or belt tensioner has been switched off using
the vehicle system tester:
› The warning light
illuminates for approximately 4 seconds after the igni-
tion is switched on and then flashes again for approximately 12 seconds.
The following message is shown in the MAXI DOT display. Airbag/belt tensioner deactivated.
If the front passenger's front airbag was switched off using the key-operat-
ed switch on the side of the dash panel on the passenger side:
› The warning light
illuminates for approximately 4 seconds after the igni-
tion is switched on;
› The deactivated air bag is indicated by the illumination of the warning light
in the middle of the dash panel
» page 21.
WARNINGWhen a fault in the airbag system occurs, there is a risk of the system not
being triggered in the event of an accident. Therefore, this must be
checked immediately by a specialized company.
Tyre inflation pressure
Read and observe
on page 35 first.
The warning light is illuminated
If while driving, the warning light illuminates, a tyre pressure change has oc-
curred.
An audible signal sounds as a warning signal.
›
Immediately reduce speed and avoid sudden steering and braking manoeu-
vres.
› Stop the vehicle, turn the ignition off and check the tyres and their inflation
pressure » page 198 .›
Correct the tyre pressure, if necessary or replace the wheel » page 205 or
use the repair kit » page 209.
›
Store the tyre pressure values in the system » page 166.
The warning light
flashes for about 1 min. and remains lit
If the warning light
flashes for approximately 1 minute and stays on, there
may be a fault in the tyre pressure monitoring system.
›
Stop the vehicle, turn the ignition off and start the engine again.
If the warning light
flashes again after the engine has started, there is a
system error.
Seek help from a specialist garage.
The following reasons can explain the warning light being illuminated.
› The vehicle is loaded on one side. Distribute loads as evenly as possible.
› The wheels of one axle are loaded more heavily (e.g. when towing a trailer or
when driving uphill or downhill).
› Snow chains are mounted.
› A wheel has been changed.
Store the tyre pressure values in the system » page 166.
CAUTION
Under certain circumstances (e.g. sporty style of driving, wintry or unpaved
roads) the warning light in the instrument cluster can be delayed or does
not light up at all.
Note
The warning light illuminates after the ignition is switched on if the vehi-
cle's battery has been disconnected and reconnected. If the warning light does
not go out after moving a short distance, this means that there is an error in
the system. Seek help from a specialist garage.
Windscreen washer fluid level
Read and observe
on page 35 first.
If the windscreen washer fluid level is too low, the warning light
illumi-
nates .
40Operation