check engine light SKODA SUPERB 2012 2.G / (B6/3T) User Guide
[x] Cancel search | Manufacturer: SKODA, Model Year: 2012, Model line: SUPERB, Model: SKODA SUPERB 2012 2.G / (B6/3T)Pages: 235, PDF Size: 5.86 MB
Page 162 of 235
Note
Observe the recommended gear » page 11, Recommended gear .ÐAvoiding full throttle
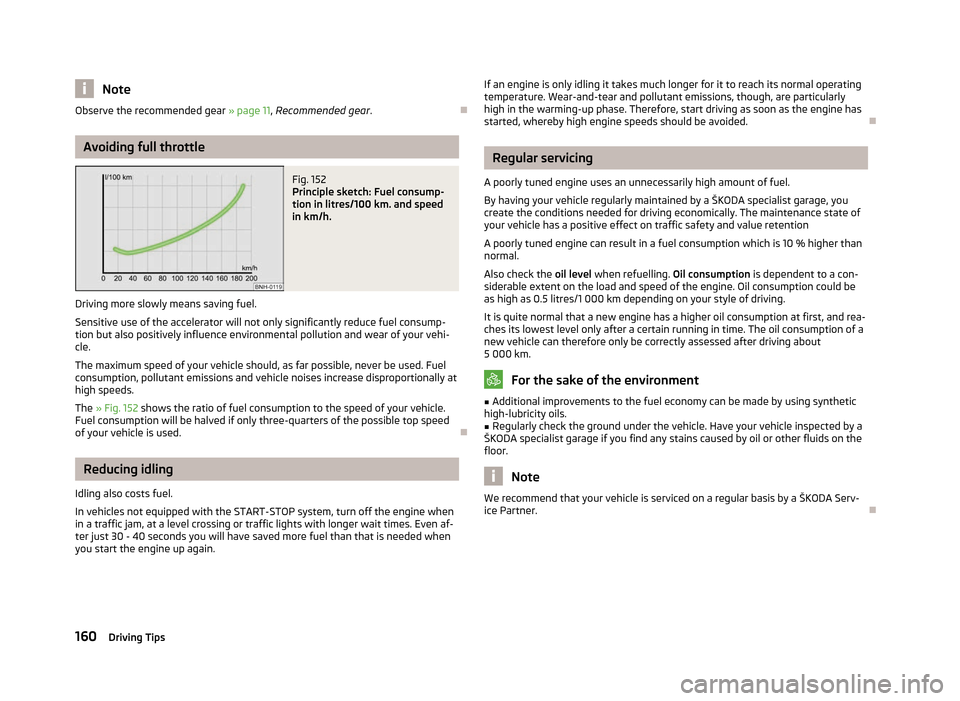
Fig. 152
Principle sketch: Fuel consump-
tion in litres/100 km. and speed
in km/h.
Driving more slowly means saving fuel.
Sensitive use of the accelerator will not only significantly reduce fuel consump-
tion but also positively influence environmental pollution and wear of your vehi-
cle.
The maximum speed of your vehicle should, as far possible, never be used. Fuel
consumption, pollutant emissions and vehicle noises increase disproportionally at
high speeds.
The » Fig. 152 shows the ratio of fuel consumption to the speed of your vehicle.
Fuel consumption will be halved if only three-quarters of the possible top speed
of your vehicle is used. ÐReducing idling
Idling also costs fuel.
In vehicles not equipped with the
START-STOP system, turn off the engine when
in a traffic jam, at a level crossing or traffic lights with longer wait times. Even af-
ter just 30 - 40 seconds you will have saved more fuel than that is needed when
you start the engine up again. If an engine is only idling it takes much longer for it to reach its normal operating
temperature. Wear-and-tear and pollutant emissions, though, are particularly
high in the warming-up phase. Therefore, start driving as soon as the engine has
started, whereby high engine speeds should be avoided. Ð Regular servicing
A poorly tuned engine uses an unnecessarily high amount of fuel.
By having your vehicle regularly maintained by a ŠKODA
specialist garage, you
create the conditions needed for driving economically. The maintenance state of
your vehicle has a positive effect on traffic safety and value retention
A poorly tuned engine can result in a fuel consumption which is 10 % higher than
normal.
Also check the oil level when refuelling. Oil consumption is dependent to a con-
siderable extent on the load and speed of the engine. Oil consumption could be
as high as 0.5 litres/1 000 km depending on your style of driving.
It is quite normal that a new engine has a higher oil consumption at first, and rea-
ches its lowest level only after a certain running in time. The oil consumption of a
new vehicle can therefore only be correctly assessed after driving about
5 000 km. For the sake of the environment
■ Additional improvements to the fuel economy can be made by using synthetic
high-lubricity oils.
■ Regularly check the ground under the vehicle. Have your vehicle inspected by a
ŠKODA specialist garage if you find any stains caused by oil or other fluids on the
floor. Note
We recommend that your vehicle is serviced on a regular basis by a ŠKODA Serv-
ice Partner. Ð
160 Driving Tips
Page 166 of 235
Towing a trailer
Towing a trailer
Technical requirements
If your vehicle has already been factory-fitted with a towing device or is fitted
with a towing device from ŠKODA Original Accessories, then it meets all of the
technical requirements and national legal provisions for towing a trailer.
On vehicles with a towing device, the ball rod is detachable and is stowed togeth-
er with separate operating instructions in the spare wheel well or in the compart-
ment for the spare wheel within the boot » page 196, Vehicle tool kit.
Your vehicle is fitted with a 13-pin power socket for the electrical connection be-
tween the vehicle and trailer. If the trailer that is to be towed has a 7-pin connec-
tor, you can use a suitable adapter from
ŠKODA Original Accessories.
If a towing device is retrofitted, it must be completed in accordance with the
manufacturer's specifications. Note
If you have any questions, please contact a ŠKODA Service Partner. ÐLoading a trailer
Loading a trailer
The vehicle/trailer combination must be balanced, whereby the maximum permis-
sible drawbar load must be utilised. If the drawbar load is too low, it jeopardises
the performance of the vehicle/trailer combination.
Distribution of the load
Distribute the load in the trailer in such a way that heavy items are located as
close to the axle as possible. Secure the items from slipping.
The distribution of the weight is very poor if your vehicle is unladen and the trail-
er is laden. Maintain a particularly low speed if you cannot avoid driving with this
combination. Tyre pressure
Correct the tyre inflation pressure on your vehicle for a
“full load” » page 188 ,
Service life of tyres.
Trailer load
The permissible trailer load must not be exceeded under any circumstan-
ces » page 216, Technical data .
The trailer loads specified apply only to altitudes up to 1 000 metres above mean
sea level. As the engine output drops at an increasing altitude due to the declin-
ing air pressure and therefore the climbing ability is also reduced, this means that
the maximum permissible towed weight must be reduced by 10 % for every fur-
ther increase of 1 000 m in height. The towed weight comprises the actual weight
of the (loaded) towing vehicle and the (loaded) trailer. Always drive particularly
carefully with the trailer.
The trailer and drawbar load information on the type plate of the towing device
are merely test data for the towing device The vehicle-specific values are detailed
in the vehicle documents. WARNING
■ If the maximum permissible axle and drawbar load and the maximum per-
missible total or towed weight of the vehicle and the trailer are exceeded this
can cause accidents and serious injuries.
■ Slipping loads can significantly affect the stability and safety of the vehicle/
trailer combination, causing accidents and serious injuries. Ð Towing a trailer
Exterior mirrors
You have to have additional exterior mirrors fitted if you are not able to see the
traffic behind the trailer with the standard rear-view mirrors. The national legal
requirements must be observed.
Headlights
The headlight settings must be checked before starting a journey with a coupled
trailer. If necessary, adjust the settings with the headlight beam adjust-
ment » page 53, Headlight beam adjustment .
Driving speed
For safety reasons, do not drive faster than the maximum permissible speed indi-
cated on the trailer. £
164 Driving Tips
Page 167 of 235
Immediately reduce your speed as soon as even the slightest swaying of the trail-
er is detected. Never attempt to stop the trailer from “swaying” by accelerating.
Brakes
Apply the brakes in good time! If the trailer is fitted with a trailer brake, apply the
brakes gently at first, then brake firmly. This will avoid brake jolts resulting from
the trailer wheels locking. On downhill sections shift down a gear in good time to
also use the engine as a brake.
Trailer stabilisation
The trailer stabilisation is an extension of the stabilisation control that works in
conjunction with the counter-steering assistance to reduce the amount the trail-
er "sways". After turning on the ignition, the ESC indicator light in the instru-
ment cluster lights up for about 2 seconds longer than the ABS indicator light.
Prerequisites for stabilising the trailer.
› The towing device is factory-fitted or a compatible towing device has been ret-
rofitted.
› The ESC is active. The indicator light
or in the instrument cluster is not illu-
minated.
› The trailer is electrically connected to the towing vehicle by means of the trailer
socket.
› The speed is higher than approx. 60 km/h.
› Trailers must have a fixed drawbar.
› The ESC works for both braked and unbraked trailers.
Trailer is connected to the anti-theft alarm system. › If the vehicle is factory-fitted with an anti-theft alarm system and a towing de-
vice.
› If the trailer is electrically connected to the towing vehicle by means of the trail-
er socket.
› If the electrical system of the vehicle and trailer is fully functional.
› If the vehicle is locked with the car key and the anti-theft alarm system is acti-
vated.
When the vehicle is locked, the alarm is activated as soon as the electrical con-
nection to the trailer is interrupted.
Always deactivate the anti-theft alarm system before a trailer is connected/dis-
connected. Otherwise, the anti-theft alarm system could accidentally be trig-
gered » page 33 , Anti-theft alarm system . Engine overheating
If the needle for the coolant temperature gauge moves into the right-hand area
or the red area of the scale, the speed must be reduced immediately. Stop and
switch off the engine if the indicator light
in the instrument cluster starts to
flash. Wait a few minutes and check the level of coolant in the coolant expansion
bottle » page 180 , Checking the coolant level .
The following guidelines must be observed » page 21, Coolant temperature/cool-
ant level .
The coolant temperature can be reduced by switching on the heating. WARNING
■ The increased safety offered by the trailer stabilisation must not tempt you
to take greater risks than otherwise. ■ Adapt your speed to the conditions of the road surface and to the traffic sit-
uation.
■ Improper or incorrectly connected electric cables can energise the trailer and
cause functional faults to the vehicle's entire electrical system as well as acci-
dents and severe injuries.
■ Any work on the electrical system must be carried out only by ŠKODA spe-
cialist garages.
■ Never directly connect the trailer's electrical system with the electrical con-
nections for the tail lights or other current sources. CAUTION
■ The trailer stabilisation need not be able to correctly detect all of driving situa-
tions.
■ Trailers that sway slightly are not always detected by the trailer stabilisation
and thus are not stabilised accordingly.
■ Release the pressure on the accelerator pedal if the system is being regulated.
■ Avoid abrupt and sudden driving/braking manoeuvres.
■ When the ball rod is removed, the mounting shaft must be sealed with an ap-
propriate cover. This prevents foreign matter from penetrating into the mounting
shaft. See the fitting instructions for the towing device. £
165
Towing a trailer
Page 180 of 235
›
Let the bonnet drop into the lock carrier lock from a height of around 20 cm –
do not push it in .
Check that the bonnet is closed properly. ÐEngine compartment overview
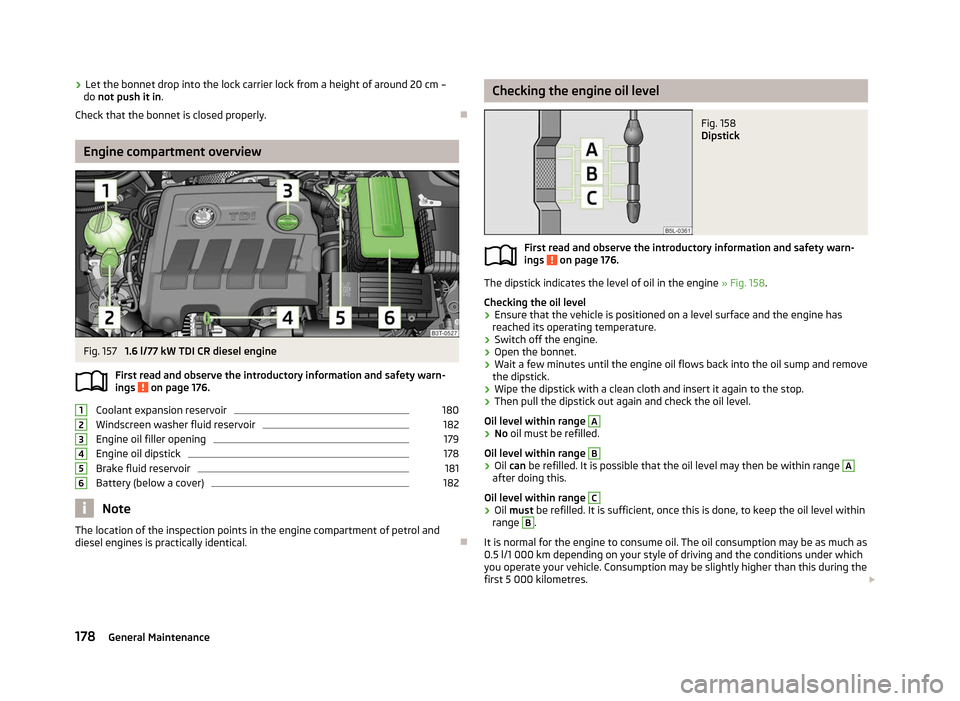
Fig. 157
1.6 l/77 kW TDI CR diesel engine
First read and observe the introductory information and safety warn-
ings on page 176.
Coolant expansion reservoir 180
Windscreen washer fluid reservoir 182
Engine oil filler opening 179
Engine oil dipstick 178
Brake fluid reservoir 181
Battery (below a cover) 182
Note
The location of the inspection points in the engine compartment of petrol and
diesel engines is practically identical. Ð
ä 1
2
3
4
5
6 Checking the engine oil level
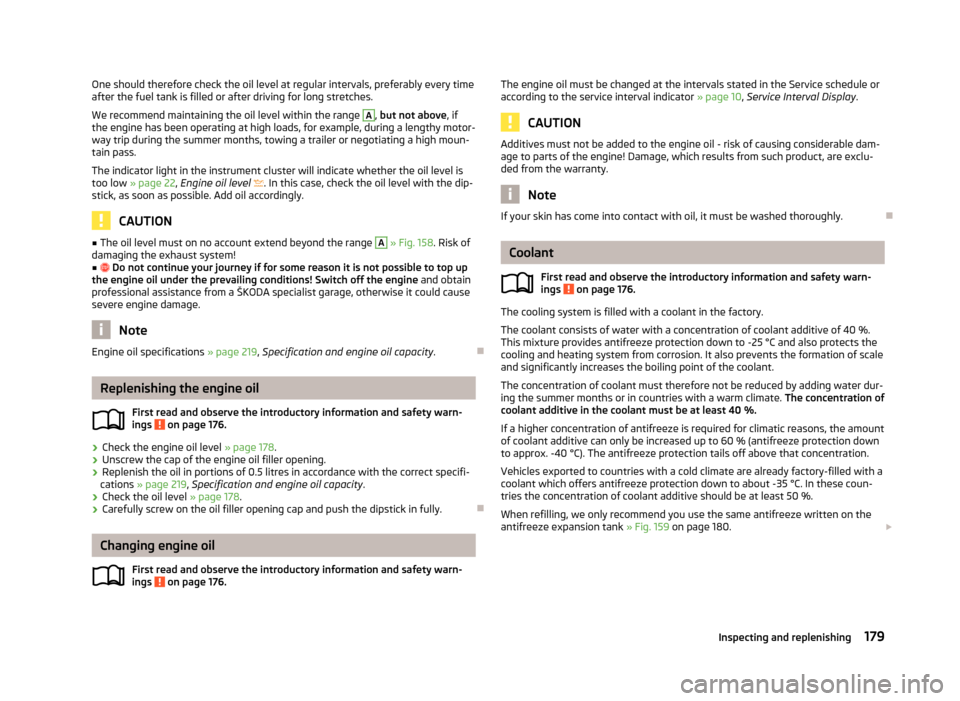
Fig. 158
Dipstick
First read and observe the introductory information and safety warn-
ings on page 176.
The dipstick indicates the level of oil in the engine
» Fig. 158.
Checking the oil level
› Ensure that the vehicle is positioned on a level surface and the engine has
reached its operating temperature.
› Switch off the engine.
› Open the bonnet.
› Wait a few minutes until the engine oil flows back into the oil sump and remove
the dipstick.
› Wipe the dipstick with a clean cloth and insert it again to the stop.
› Then pull the dipstick out again and check the oil level.
Oil level within range A
›
No oil must be refilled.
Oil level within range B
›
Oil can
be refilled. It is possible that the oil level may then be within range A
after doing this.
Oil level within range C
›
Oil must be refilled. It is sufficient, once this is done, to keep the oil level within
range B
.
It is normal for the engine to consume oil. The oil consumption may be as much as
0.5 l/1 000 km depending on your style of driving and the conditions under which
you operate your vehicle. Consumption may be slightly higher than this during the
first 5 000 kilometres. £
ä
178 General Maintenance
Page 181 of 235
One should therefore check the oil level at regular intervals, preferably every time
after the fuel tank is filled or after driving for long stretches.
We recommend maintaining the oil level within the range
A
, but not above
, if
the engine has been operating at high loads, for example, during a lengthy motor-
way trip during the summer months, towing a trailer or negotiating a high moun-
tain pass.
The indicator light in the instrument cluster will indicate whether the oil level is
too low » page 22, Engine oil level . In this case, check the oil level with the dip-
stick, as soon as possible. Add oil accordingly. CAUTION
■ The oil level must on no account extend beyond the range A
» Fig. 158
. Risk of
damaging the exhaust system!
■ Do not continue your journey if for some reason it is not possible to top up
the engine oil under the prevailing conditions! Switch off the engine and obtain
professional assistance from a
ŠKODA specialist garage, otherwise it could cause
severe engine damage. Note
Engine oil specifications » page 219, Specification and engine oil capacity .Ð Replenishing the engine oil
First read and observe the introductory information and safety warn-
ings on page 176.
›
Check the engine oil level
» page 178.
› Unscrew the cap of the engine oil filler opening.
› Replenish the oil in portions of 0.5 litres in accordance with the correct specifi-
cations » page 219, Specification and engine oil capacity .
› Check the oil level
» page 178.
› Carefully screw on the oil filler opening cap and push the dipstick in fully. ÐChanging engine oil
First read and observe the introductory information and safety warn-
ings on page 176.ä
ä The engine oil must be changed at the intervals stated in the Service schedule or
according to the service interval indicator » page 10, Service Interval Display. CAUTION
Additives must not be added to the engine oil - risk of causing considerable dam-
age to parts of the engine! Damage, which results from such product, are exclu-
ded from the warranty. Note
If your skin has come into contact with oil, it must be washed thoroughly. Ð Coolant
First read and observe the introductory information and safety warn-
ings on page 176.
The cooling system is filled with a coolant in the factory.
The coolant consists of water with a concentration of coolant additive of 40 %.
This mixture provides antifreeze protection down to -25 °C and also protects the
cooling and heating system from corrosion. It also prevents the formation of scale
and significantly increases the boiling point of the coolant.
The concentration of coolant must therefore not be reduced by adding water dur-
ing the summer months or in countries with a warm climate. The concentration of
coolant additive in the coolant must be at least 40 %.
If a higher concentration of antifreeze is required for climatic reasons, the amount
of coolant additive can only be increased up to 60 % (antifreeze protection down
to approx. -40 °C). The antifreeze protection tails off above that concentration.
Vehicles exported to countries with a cold climate are already factory-filled with a
coolant which offers antifreeze protection down to about -35 °C. In these coun-
tries the concentration of coolant additive should be at least 50 %.
When refilling, we only recommend you use the same antifreeze written on the
antifreeze expansion tank » Fig. 159 on page 180. £
ä
179
Inspecting and replenishing
Page 182 of 235

Coolant capacity
Petrol engines Capacities (in litres)
1.4 ltr./92 kW TSI 7.7
1.8 ltr/112 kW TSI
1.8 ltr/118 kW TSI 8.6
2.0 ltr./147 kW TSI 8.6
3.6 l/191 kW FSI 9.0Diesel engines
Capacities (in litres)
1.6 ltr./77 kW TDI CR 8.4
2.0 ltr./103 kW TDI CR 8.4
2.0 ltr./125 kW TDI CR 8.4CAUTION
■ Other coolant additives that do not comply with the correct specifications can
above all significantly reduce the anticorrosion effect.
■ Any faults resulting from corrosion may cause a loss of coolant and can conse-
quently result in major engine damage! Note
On vehicles that are fitted with an auxiliary heater (auxiliary heating and ventila-
tion), the coolant capacity is approx. 1 l larger. ÐChecking the coolant level
Fig. 159
Engine compartment: Coolant
expansion reservoir
First read and observe the introductory information and safety warn-
ings on page 176.
ä The coolant expansion bottle is located in the engine compartment.
› Switch off the engine.
› Open the bonnet
» page 177.
› Check the level of coolant in the coolant expansion bottle.
» Fig. 159. The cool-
ant level when the engine is cold must lie between the B
(MIN) and A
(MAX)
markings. The level may also rise slightly above the A
(MAX) marking when the
engine is warm.
If the coolant level in the coolant expansion tank is too low, this is indicated by
the indicator light lighting up in the instrument cluster » page 21, Coolant tem-
perature/coolant level . We still recommend inspecting the coolant level directly
at the reservoir from time to time.
Loss of coolant
A loss of coolant is first and foremost an indication of a leak in the system. Do
not merely top up the coolant. Have the cooling system checked by a
ŠKODA spe-
cialist garage immediately. CAUTION
If a fault causes the engine to overheat, we recommend visiting a ŠKODA Service
Partner immediately, otherwise serious engine damage may occur. Ð Replenishing the coolant
First read and observe the introductory information and safety warn-
ings on page 176.
›
Switch off the engine.
› Allow the engine to cool.
› Place a cloth over the cap of the coolant expansion reservoir
» Fig. 159 on
page 180
and unscrew the cap carefully.
› Replenish the coolant.
› Turn the cap until it clicks into place.
Do not use an alternative additive if the specified coolant is not available in an
emergency. In this case, just use water and have the correct mixing ratio of water
and the coolant additive restored by a ŠKODA
specialist garage as soon as possi-
ble.
Only use new coolant to top up the system. £
ä
180 General Maintenance
Page 183 of 235

Do not fill the coolant above the mark A
(max.)
» Fig. 159 on page 180! Excess
coolant heats up and then is forced out of the cooling system through the pres-
sure relief valve in the cap. WARNING
■ The coolant additive and thus all of the coolant is harmful to your health.
Avoid contact with the coolant. Coolant vapours are also harmful to health.
Therefore always safely store the coolant additive in its original container out
of the reach of children - risk of poisoning!
■ If any coolant splashes into your eyes, immediately rinse out your eyes with
clear water and contact a doctor as soon as possible.
■ You should also consult a doctor without delay if you have inadvertently
swallowed coolant. CAUTION
Do not continue your journey, if it is not possible to top up the coolant under
the prevailing conditions . Contact a
ŠKODA Service Partner to avoid the risk of
serious engine. ÐRadiator fan
First read and observe the introductory information and safety warn-
ings on page 176.
The radiator fan is driven by an electric motor and controlled according to the
coolant temperature.
After switching off the ignition, the radiator fan can intermittently continue to op-
erate for approx. 10 minutes. Ð
ä Checking the brake fluid
Fig. 160
Engine compartment: Brake fluid
reservoir
First read and observe the introductory information and safety warn-
ings on page 176.
The brake fluid reservoir is located in the engine compartment.
› Switch off the engine.
› Open the bonnet
» page 177.
› Check the level of brake fluid in the reservoir
» Fig. 160. The level must be be-
tween the
“MIN” and “MAX” markings.
When driving, a slight drop in the fluid level is caused by the wear-and-tear and
automatic adjustment of the brake pads, and is therefore perfectly normal.
There may be an indication of a leak in the brake system, however, if the fluid lev-
el drops significantly within a short time or if it drops below the “MIN” marking. If
the brake fluid level is too low, this is indicated by the indicator light lighting
up in the instrument cluster » page 20, Brake system . WARNING
If the fluid level has dropped below the MIN marking, do not continue your
journey - risk of accident! Seek help from a
ŠKODA specialist garage.Ð
ä
181
Inspecting and replenishing
Page 184 of 235

Changing the brake fluid
First read and observe the introductory information and safety warn-
ings on page 176.
Brake fluid absorbs moisture. Over time it therefore absorbs moisture from the
environment. Excessive water in the brake fluid may be the cause of corrosion in
the brake system. The water content also lowers the boiling point of the brake
fluid.
The brake fluid must comply with the following standards or specifications:
› VW 50114;
› FMVSS 116 DOT4. WARNING
Using old brake fluid can result in severe stress on the brakes because of the
formation of vapour bubbles in the brake system. This greatly impairs the
braking efficiency and thus also the safety of your vehicle. CAUTION
Brake fluid damages the paintwork of the vehicle. ÐWindscreen washer system
Fig. 161
Engine compartment: Wind-
screen washer fluid reservoir
First read and observe the introductory information and safety warn-
ings on page 176.ä
ä
The windscreen washer fluid reservoir contains the cleaning fluid for the wind-
screen or rear window and for the headlight cleaning system. The windscreen
washer fluid reservoir is located in the engine compartment.
The capacity of the reservoir is about 3 litres or about 5.5
litres on vehicles that
have a headlight cleaning system.
Clear water is not sufficient to intensively clean the windscreen and headlights.
We therefore recommend using clean water with a screen cleaner (including anti-
freeze in the winter) that is able to remove stubborn dirt.
Antifreeze should always be added to the cleaning water in the winter even if the
vehicle is fitted with heated windscreen washer nozzles.
Under exceptional circumstances, methylated spirits can also be used if no screen
cleaner with antifreeze is available. The concentration of methylated spirits must
not be more than 15 %. The freeze protection at this concentration is sufficient
only to -5 °C. CAUTION
■ Under no circumstances must radiator antifreeze or other additives be added to
the windscreen washer fluid.
■ If the vehicle is fitted with a headlight cleaning system, only cleaning products
which do not attack the polycarbonate coating of the headlights must be added
to the windscreen washer fluid. Note
Do not remove the filter from the windscreen washer fluid reservoir when replen-
ishing it with liquid otherwise the liquid transportation system can be contamina-
ted, which can cause the windscreen washer system to malfunction. Ð Vehicle battery
ä
Introduction
This chapter contains information on the following subjects:
Battery cover 184
Checking the battery electrolyte level 185
Operation in winter 185
£
182 General Maintenance
Page 187 of 235

Checking the battery electrolyte level
Fig. 163
Vehicle battery: Electrolyte level
indicator
First read and observe the introductory information and safety warn-
ings on page 182.
We recommend you have the electrolyte level checked by a ŠKODA specialist ga-
rage from time to time, especially in the following cases.
› High outside temperatures.
› Long daily drives
› After each charge
» page 185.
On vehicles with a vehicle battery fitted with a colour indicator, the so-called
magic eye » Fig. 163, the electrolyte level can be determined by looking at the
change in colour.
Air bubbles can influence the colour of the indicator. For this reason carefully
knock on the indicator before carrying out the check.
› Black colour - electrolyte level is correct.
› Colourless or light yellow colour - electrolyte level too low, the battery must be
replaced. Note
■ The battery electrolyte level is periodically checked by a ŠKODA Service Partner
as part of the Inspection Service. ■ For technical reasons, on vehicles with the description “AGM”, the electrolyte
level cannot be checked. ■ Vehicles with a START-STOP system are fitted with a battery control unit for
checking the energy level for the recurring engine start. Ð
ä Operation in winter
First read and observe the introductory information and safety warn-
ings on page 182.
At low temperatures, the vehicle battery only has part of the initial power output
that it has at normal temperatures.
A discharged vehicle battery may already freeze at temperatures just below 0
°C.
We therefore recommend that you have the battery checked and, if necessary, re-
charged by a ŠKODA Service Partner before the start of the winter.
Ð Charging a vehicle battery
First read and observe the introductory information and safety warn-
ings on page 182.
A properly charged vehicle battery is essential for reliably starting the engine.
›
Switch off the ignition and all of the electrical components.
› Only for “quick-charging”: Disconnect both battery cables (first of all “negative”,
then
“positive”).
› Attach the terminal clamps of the charger to the battery terminals (red =
“posi-
tive
”, black = “negative”).
› Only now plug the mains cable of the charger into the power socket and switch
on the device.
› When charging is completed: Switch off the charger and remove the mains ca-
ble from the power socket.
› Only then disconnect the charger's terminal clamps.
› Reconnect the cables to the battery, if necessary (first of all
“positive”, then
“negative
”).
It is not normally necessary to disconnect the cables of the battery if you re-
charge the vehicle battery using low amperages (as for example from a mini-
charger). Refer to the instructions of the charger manufacturer.
A charging current of 0.1 multiple of the total vehicle battery capacity (or lower)
must be used until full charging is achieved.
It is, however, necessary to disconnect both cables before charging the battery
with high amperages, so-called “ quick-charging”. £
ä
ä
185
Inspecting and replenishing
Page 188 of 235

“Quick-charging” the vehicle battery is
dangerous and requires a special charger
and specialist knowledge. We therefore recommend having the quick charging of
vehicle batteries undertaken by a
ŠKODA specialist garage.
The vent plugs of the vehicle battery should not be opened for charging. CAUTION
On vehicles with the START/STOP system, the pole terminal of the charger must
not be connected directly to the negative terminal of the vehicle battery, but only
to the engine earth » page 204, Jump-starting in vehicles with the
START-STOP
system . ÐDisconnecting and reconnecting the vehicle battery
First read and observe the introductory information and safety warn-
ings on page 182.
On disconnecting and reconnecting the vehicle battery the following functions
are initially deactivated or are no longer able to operate fault-free.
Operation Operating measure
Electrical power window (operational faults) » page 43
Panoramic sliding roof (operational faults) » page 46
Enter the radio/navigation system code num-
ber » User manual of the radio
or »
user manual of the navigation
system
Setting the clock » page 11
Data in the multifunction display are deleted. » page 12Note
We recommend having the vehicle checked by a ŠKODA Service Partner to ensure
the full functionality of all electrical systems. ÐReplacing the vehicle battery
First read and observe the introductory information and safety warn-
ings on page 182.ä
ä When replacing a battery, the new vehicle battery must have the same capacity,
voltage, amperage and be the same size. Suitable types of vehicle batteries can
be purchased from a
ŠKODA Service Partner.
We recommend that the battery is replaced by a ŠKODA Service Partner, where
the new vehicle battery will be installed properly and the original battery will be
disposed of in accordance with national regulations. Ð Automatic load deactivation
First read and observe the introductory information and safety warn-
ings on page 182.
An intelligent vehicle power management system automatically takes various
measures at high loads on the vehicle battery to prevent discharging of the bat-
tery: This manifests itself by the following:
› The idling speed is raised to allow the generator to deliver more electricity to
the electrical system.
› Where appropriate large consumers of power, e.g. seat heaters, rear window
heaters, voltage supply to the 12V power socket, have their power limited or in
case of emergency shut off completely. Note
Despite such intervention by the vehicle electric system management, the vehicle
battery may be drained. For example, when the ignition is switched on a long time
with the engine turned off or the side or parking lights are turned on during lon-
ger parking. Driving comfort is not put at risk by any shutting off of consumers.
Often the driver is not aware of it having taken place. Ð ä
186 General Maintenance