SKODA SUPERB 2013 2.G / (B6/3T) Amundsen Navigation System Manual
Manufacturer: SKODA, Model Year: 2013, Model line: SUPERB, Model: SKODA SUPERB 2013 2.G / (B6/3T)Pages: 30, PDF Size: 2.46 MB
Page 11 of 30
Digital radio reception DAB
DAB (Digital Audio Broadcasting) is the digital transmission of radio programmes
based on the DAB, DAB+ or DMB standards. It allows multiple stations to be
transmitted in a single frequency in the form of a so-called ensemble. It also al-
lows for the transmission of additional data and information (e.g. messages,
sport, weather, warnings, etc.)
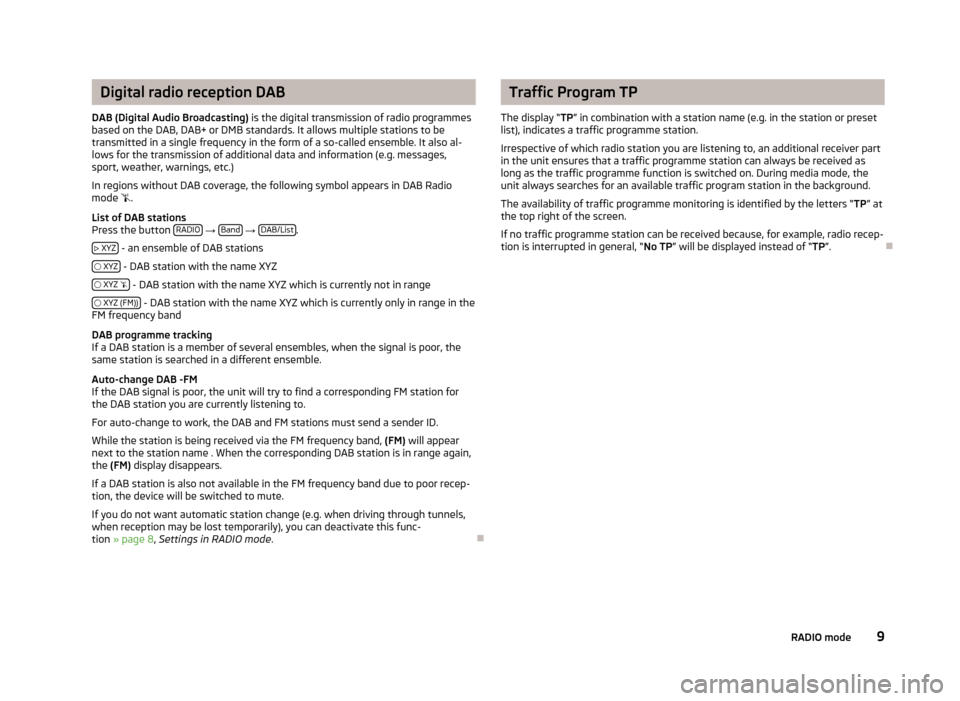
In regions without DAB coverage, the following symbol appears in DAB Radio
mode .
List of DAB stations
Press the button RADIO
→ Band
→ DAB/List.
XYZ
- an ensemble of DAB stations
XYZ
- DAB station with the name XYZ
XYZ
- DAB station with the name XYZ which is currently not in range
XYZ (FM))
- DAB station with the name XYZ which is currently only in range in the
FM frequency band
DAB programme tracking
If a DAB station is a member of several ensembles, when the signal is poor, the
same station is searched in a different ensemble.
Auto-change DAB -FM
If the DAB signal is poor, the unit will try to find a corresponding FM station for
the DAB station you are currently listening to.
For auto-change to work, the DAB and FM stations must send a sender ID.
While the station is being received via the FM frequency band, (FM) will appear
next to the station name . When the corresponding DAB station is in range again,
the (FM) display disappears.
If a DAB station is also not available in the FM frequency band due to poor recep- tion, the device will be switched to mute.
If you do not want automatic station change (e.g. when driving through tunnels, when reception may be lost temporarily), you can deactivate this func-tion » page 8 , Settings in RADIO mode .
Traffic Program TP
The display “ TP” in combination with a station name (e.g. in the station or preset
list), indicates a traffic programme station.
Irrespective of which radio station you are listening to, an additional receiver part
in the unit ensures that a traffic programme station can always be received as
long as the traffic programme function is switched on. During media mode, the
unit always searches for an available traffic program station in the background.
The availability of traffic programme monitoring is identified by the letters “ TP” at
the top right of the screen.
If no traffic programme station can be received because, for example, radio recep- tion is interrupted in general, “ No TP” will be displayed instead of “ TP”.
9RADIO mode
Page 12 of 30
MEDIA mode
Main menu MEDIA
Press the button MEDIA
.
Selectable audio sources in the menu MEDIA
CD - Changes to an inserted CD
CD 1-6 - changes over to a connected external CD changer
SD card - changes over to an inserted SD memory card
AUX
, MDI or
changes over to a connected external audio source. Operating an
externally connected audio source via the device is possible with certain restric-
tions, depending primarily on the type of the connected device.
Buttons for operating current audio sources
Press
- to start current track
Briefly press twice
- to start the previous track
Press and hold
- “back to start” - fast rewind
Press
- to start next track
Press and hold
-fast forward
Setting the time or track display
Press the button
- to switch between the display of playback time or track title
or track info.
Settings in MEDIA mode
Press the button MEDIA
→ SETUP.
Function keys in the menu Settings – Media
■ Traffic program (TP)
- switches traffic programme on/off
■ Scan/mix/repeat inc. - switches the track playback function on/off in the “Scan”,
“Mix” and “Repeat” modes, including sub-directories » page 10 , Playback op-
tions
■ AUX volume1)
- Input volume for an external audio source at the multimedia sock-
et AUX
■ MDI volume
1)
- Input volume for iPod™ or iPhone™ units at the multimedia socket
MDI or an external audio source AUX at the multimedia socket MDI
■ Bluetooth settings
- Settings for the Bluetooth ®
- function » page 16, Settings in
PHONE mode
■ Activate AUX 2 input
– Activates the external audio source AUX via the input
MDI » page 12 , AUX and MDI input
■ BT volume
1)
- Input volume for an external Bluetooth audio source ®
Playback options
Open selection menu for the available audio sources
Press the button MEDIA
and select one of the available audio sources.
■ Select
- Display the title list for the audio source currently being played. The cur-
rently played track is shown as highlighted.
■ Up
- opens the higher-level folder (press again to switch up to the root direc-
tory)
■ Play
- Plays the selected track
Playback modes
Press the button MEDIA
→ Extras – additional functions will be displayed.
■ Scan
- plays all tracks of the current audio source for 10 seconds each
■ in “Scan” mode Scan - return to normal playback
■ Mix folder - all tracks in the current folder are played in random order
■ in the “Mix folder” mode Mix folder - return to normal playback
■ Mix all - all tracks in the current audio source are played in random order
■ in the “Mix all” mode Mix all - return to normal playback
■ Repeat track - repeats the track currently being played
■ In “Repeat track” mode Repeat trk. - returns to normal playback
■ Repeat folder - all tracks in the current folder are repeated
■ in “Repeat folder” mode Repeat
- returns to the normal playback
1)
Used to adjust the playback volume with the other audio sources.
10MEDIA mode
Page 13 of 30
Introductory information about the CD mode
Insert CD›
Insert a CD, with the labelled side facing up, into the CD slot
9
until it is auto-
matically drawn in. The play function will start automatically.
Removing the CD
›
Press the button – die CD is ejected.
If the ejected CD is not taken out within 10 seconds, it will be retracted again for safety reasons.
CD not legible
If a CD is inserted which cannot be read by the unit, a pop-up window is displayed with a note. Press the function key OK
, the CD is moved to the removal position.
WARNINGThe CD player is a laser product. On the manufacturing date, this device was
classified as a class 1 laser product in accordance with the national/interna-
tional standards DIN EN 60825-1: 2008-05 and DHHS Rules 21 CFR,
subchapter J The laser used in this class 1 laser product is so weak that there
is no risk of danger when operated correctly. This product is designed such
that the laser is restricted to the inside of the unit. However, the installed la-
ser could be classified in a higher class were the housing to be removed. For
this reason, never remove the housing from the unit.
CAUTION
■ Only audio-CDs (CD-A) and MP3-CDs can be played in the internal drive. Never
place DVDs into the internal drive – irreparable damage may result.■
Never insert CDs with the designation “Do not insert in drives without a drawer”
or Eco Disc into the internal drive.
■
After pressing the button there is a time delay of a few seconds before the
CD is ejected. During this time the lock in front of the CD slot is open.
■
Be sure to wait until the CD has been fully ejected before you try to insert a new
CD. Otherwise you can damage the drive inside the unit.
■
A dirty, mechanically damaged, unreadable or incorrectly inserted CD can cause
playback problems. For this reason, the disc may not be playable or may cause the
CD to jump. Check the CD and insert it properly into the unit. Should the problem
persist, try using another CD and visit a specialist garage if necessary.
■
If the inside temperature of the unit is too high, no CDs will be accepted. The
unit switches into the last active operating mode.
■ Never use liquids such as petrol, paint thinner or record cleaner to clean the sur-
face of the CD - this may cause damage.■
Never expose the CD to direct sun light!
■
Only write on the CD with appropriate writing tools.
■
Do not affix anything to the CD!
Note
■ Uneven road surfaces and strong vibrations may cause the CD to jump.■In cold weather or after rain showers, moisture (condensate) may deposit in the
unit. This can effect the CD jump or impair the play function. In that case, wait un-
til the moisture has dissipated.■
Should a CD be dirty, never clean it in a circular motion, but instead work from
the inside out. Use a soft, lint-free cloth. For heavy stains, we recommend that
you clean the CD with a commercially available CD cleaner and allow it to dry.
■
It is possible that CDs protected by copyright and home-made CD-R and CD-RW
will not be played back at all or only in certain circumstances.
■
Please also note the additional information for MP3 mode.
■
The national copyright laws that apply in your country must be observed.
■
The CD player does not contain parts that need to be serviced or repaired. In the
case of a defective CD player, please visit a specialist garage.
■
If the ejected CD is not taken out, it will be retracted again for safety reasons.
■
If a TP station was set before changing to CD mode, CD playback will be inter-
rupted during the traffic news and the device switches to radio mode. Once the
traffic news has ended, CD playback will resume.
SD memory card
Inserting an SD memory card
›
Insert the SD memory card into the memory card slot
16
with the slanted edge
to the front right until it “locks into place”. The play function will start automati-
cally.
Removing an SD memory card
›
In the “System and sound settings” menu, choose the menu point “Remove SD
card” » page 7 , System and sound settings .
›
Press on the inserted SD memory card. The SD memory card “jumps” into the
eject position.
11MEDIA mode
Page 14 of 30
SD memory card empty or data not readable
If an SD memory card is inserted and no data or no legible data has been stored
on the card, the unit will not be switched to the SD memory card mode after the
loading procedure.
External sources
AUX and MDI input
AUX input
Press the button MEDIA
→ AUX.
The input for an external audio source AUX is located on the front of the unit
14
.
External audio sources connected to the AUX input cannot be operated from the
device. Only the volume can be controlled from the device.
Use the standard 3.5 mm jack plug for the AUX input. If the external audio source
does not have this jack plug, you must use an adapter .
MDI input
Press the button MEDIA
→ MDI.
Audio files in MP3, WMA, OGG Vorbis and AAC format from external data carriers
connected to the MDI input can be played via the device » page 13, Require-
ments for media sources and audio files .
External audio sources connected to the MDI input can be controlled from the de-
vice.
A different audio source can be selected on the device at any time. As long as the
external audio source is not switched off, it remains always active in the back-
ground.
See the owner's manual of the specific manufacturer for operating the external
audio source.
To connect external audio sources via the MDI input, a special adapter is to be used.
iPod
If an iPod is connected to the MDI input, a menu opens in which you can select
the folders of the iPod (playlists, artists, albums, titles, etc.).
Connecting an external audio source via Bluetooth ®
In Bluetooth audio mode, audio files can be played from an external audio source
(e.g. a mobile phone) connected via Bluetooth ®
.
To activate this function, the external audio source must be paired with the de- vice » page 14 , Pairing mobile phone or Bluetooth ®
device with device .
Adjust the play function volume of the external audio source
The play volume of the external audio source can be adjusted via the volume con- trol on the device 1
» Fig. 1 on page 4.
Depending on the connected audio source, the output volume on the external au-
dio source can be changed.
You can also change the input sensitivity of the external audio source, in order to
adapt the play volume of the external audio source to that of the other audio
sources or to avoid distortions » page 10, Settings in MEDIA mode .
Conditions for a successful connection
› Only USB devices with the specification 2.0 can be connected.
› The version of the file allocation table FAT (File Allocation Table) of the connec-
ted device must be FAT16 (< 2 GB) or FAT32 (> 2 GB).
› In order to replay from a unit with a hard disk (HDD) which includes a large data
volume, it can lead to a time delay when reading in the overview of the music
data.
› In order to replay from a unit, which includes a complicated folder structure, it
can lead to a time delay when scanning the audio files.
› The folder structure in the connected unit must not exceed a depth of 8 levels.
One folder must not contain more than 1000°data.
› A USB extension cable or USB distributor (HUB) must not be used to connect
the unit.
WARNING■ Never place external sources on the dashboard. These could be thrown into
the passenger compartment during sudden driving manoeuvres, injuring the
occupants.■
Never place external sources close to the airbags. These could be thrown in-
to the passenger compartment when the airbags are deployed, injuring the
occupants.
12MEDIA mode
Page 15 of 30
WARNING (Continued)■Never hold external sources in your hand or on your knees while driving.
These could be thrown into the passenger compartment during sudden driv-
ing manoeuvres, injuring the occupants.■
Always route the connection cable of the external source so that it does not
restrict you when driving.
CAUTION
The AUX input must only be used for audio sources!Note■ See the owner's manual of the specific manufacturer for instructions on operat-
ing the external source.■
The external audio source, connected via AUX, can only be used if no other unit
is connected via MDI at the same time.
■
If an external audio source, which is equipped with an adapter for external pow-
er supply, is connected via AUX-IN, the audio signal may be interrupted. This de-
pends on the quality of the adapter which is used.
Requirements for media sources and audio files
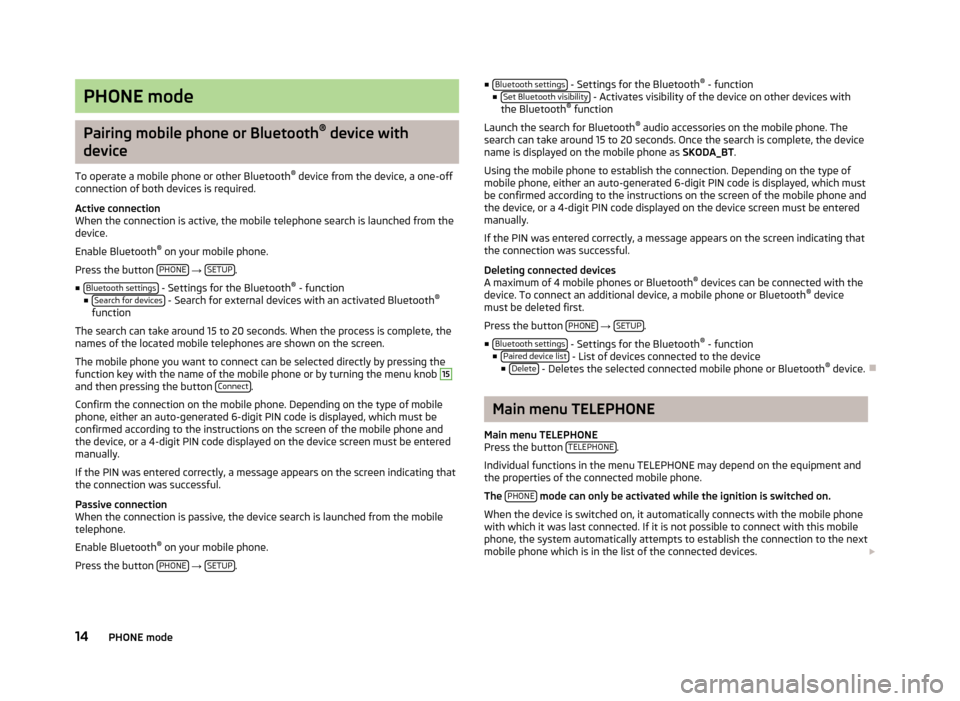
Media sourcePlayback prerequisites Audio-CDs (max. 80 min) with a diameter of 12 cm.CD digital audio specification CD-ROM, CD-R, CD-RW with a diameter of 12 cm up to a max. of 700 MB (Mega-
bytes) in the file system ISO 9660 Level 1 and 2, Joliet or UDF 1.02, 1.5, 2.01, 2.5
SD and MMC memory cards 32 mm x 24 mm x 2.1 mm or 1.4 mm with the FAT12,
FAT16 and FAT32 file system up to a max. 2 GB (Gigabytes) and SDHC memory cards
up to a max. of 32 GB.– MP3 files (.mp3) with bit rates of 48 to 320 kbps or a variable bit rate. – WMA files (.wma) up to 9.2 or to 10.0 mono/stereo without copy protection.– Audio files in the OGG-Vorbis and MPEG4 AAC formats.
– Playlists in the PLS, B4S, ASX and WPL formats. – File names and paths no longer than 256 characters.– Folder structures with a maximum of eight levels.
– Max. 256 folders and max. 512 files on audio data CDs .
– Max. 2,048 folders and max. 15,000 files, max. 6,000 files per folder, on SD mem- ory cards. Playing audio files via Bluetooth ®
a)
.– The mobile phone/external audio source must support the A2DP-Bluetooth ®
pro-
file.AUX External audio sourceAudio output via 3.5 mm jack is possible.MDI external data mediaCompatible with MEDIA-IN interfacea)
Bluetooth ®
is a registered trademark of Bluetooth SIG, Inc.
13MEDIA mode
Page 16 of 30
PHONE mode
Pairing mobile phone or Bluetooth®
device with
device
To operate a mobile phone or other Bluetooth ®
device from the device, a one-off
connection of both devices is required.
Active connection
When the connection is active, the mobile telephone search is launched from the
device.
Enable Bluetooth ®
on your mobile phone.
Press the button PHONE
→ SETUP.
■ Bluetooth settings
- Settings for the Bluetooth ®
- function
■ Search for devices - Search for external devices with an activated Bluetooth ®
function
The search can take around 15 to 20 seconds. When the process is complete, the
names of the located mobile telephones are shown on the screen.
The mobile phone you want to connect can be selected directly by pressing the
function key with the name of the mobile phone or by turning the menu knob
15
and then pressing the button Connect.
Confirm the connection on the mobile phone. Depending on the type of mobile
phone, either an auto-generated 6-digit PIN code is displayed, which must be
confirmed according to the instructions on the screen of the mobile phone and
the device, or a 4-digit PIN code displayed on the device screen must be entered
manually.
If the PIN was entered correctly, a message appears on the screen indicating that the connection was successful.
Passive connection
When the connection is passive, the device search is launched from the mobile
telephone.
Enable Bluetooth ®
on your mobile phone.
Press the button PHONE
→ SETUP.
■
Bluetooth settings - Settings for the Bluetooth ®
- function
■ Set Bluetooth visibility - Activates visibility of the device on other devices with
the Bluetooth ®
function
Launch the search for Bluetooth ®
audio accessories on the mobile phone. The
search can take around 15 to 20 seconds. Once the search is complete, the device name is displayed on the mobile phone as SKODA_BT.
Using the mobile phone to establish the connection. Depending on the type of mobile phone, either an auto-generated 6-digit PIN code is displayed, which must
be confirmed according to the instructions on the screen of the mobile phone and
the device, or a 4-digit PIN code displayed on the device screen must be entered
manually.
If the PIN was entered correctly, a message appears on the screen indicating that
the connection was successful.
Deleting connected devices
A maximum of 4 mobile phones or Bluetooth ®
devices can be connected with the
device. To connect an additional device, a mobile phone or Bluetooth ®
device
must be deleted first.
Press the button PHONE
→ SETUP.
■ Bluetooth settings
- Settings for the Bluetooth ®
- function
■ Paired device list - List of devices connected to the device
■ Delete - Deletes the selected connected mobile phone or Bluetooth ®
device.
Main menu TELEPHONE
Main menu TELEPHONE
Press the button TELEPHONE
.
Individual functions in the menu TELEPHONE may depend on the equipment and the properties of the connected mobile phone.
The PHONE
mode can only be activated while the ignition is switched on.
When the device is switched on, it automatically connects with the mobile phone with which it was last connected. If it is not possible to connect with this mobile
phone, the system automatically attempts to establish the connection to the next
mobile phone which is in the list of the connected devices.
14PHONE mode
Page 17 of 30
Function keys in the main menu TELEPHONE
■ Press the button TELEPHONE.
■ - Switches on voice operation, only with GSM II telephone preinstallation.
Further information on how to operate the voice control can be found in the
operating instructions of your vehicle.
■ SOS
- emergency setup only with the GSM III telephone preinstallation via the
rSAP profile. Further information on how to operate the GSM III telephone pre-
installation can be found in the operating instructions of your vehicle.
■
- Accept a call, dial the entered number. After pressing, the call list is dis-
played in the main menu TELEPHONE.
■
- End or reject call - only active during a call
■ - Dial number
■ Delete - Delete numbers
■ - Dial number
■ - Open phonebook
■ Find - Open the input screen for search in the phonebook
■ Details - Display information relating to a telephone book entry
■ - Open the list of missed calls
■ Edit - Edit number
■ - Dial number
■ - Open list of dialled numbers
■ Edit - Edit number
■ - Dial number
■ - Open list of received calls
■ Edit - Edit number
■ - Dial number
■ - Mobile box (the mobile box number must have been config-
ured) » page 16 , Settings in PHONE mode
WARNINGConcentrate fully at all times on your driving! As the driver you are fully re-
sponsible for road safety. Only use the system so that you are in full control of
your vehicle in every traffic situation - risk of accident!
Telephone calls and functions during a call
Calls can be received even if the device is switched off.
If you have started the process of connecting to a call number or accepted a call, the main menu TELEPHONE will change to the Phone conversation display.
Outgoing call
You can use the device to start a phone conversation directly by entering a tele-
phone number or by selecting a number from the phonebook, the list of selected
phone numbers or the list of received calls » page 15, Function keys in the main
menu TELEPHONE .
If your vehicle is fitted with the GSM II telephone preinstallation, you can also
start a phone conversation using voice operation using the function key
» page 15 , Function keys in the main menu TELEPHONE .
Incoming call ■
- accept call
■ - reject call
Additional functions during the phone conversation
■ Extras
- opens a list of additional functions
■ Mute - switches the microphone on/off during the conversation. A conversa-
tion in the vehicle is not picked up by the microphone and so cannot be heard by the other party.
■ Hands-free
- switches the hands-free system on/off The conversation is not
broadcast to the vehicle through the speakers but only via the phone speaker
(private call).
■ Hold call
- “holds” the call (the following appears: “ Holding...”). The connection
remains but the call is not transmitted. Resume call - call is resumed
■ Conference - Conference call involving all call participants » page 15, Carrying
out an additional phone conversation
■ Enter numbers
- opens the input screen for DTMF key tones
- end call
Carrying out an additional phone conversation
Press the button TELEPHONE
.
Select another phone number or a stored phone number. ■ Extras
- opens a list of additional functions
■ Swap call - switch between calls
■ Conference - Conference call involving all call participants
DTMF key tones
A particular DTMF key tone is assigned to each key of a mobile phone. DTMF key
tones are used, for example, for the input of a password via the mobile phone or
for choosing functions in a “call centre”.
15PHONE mode
Page 18 of 30
If a DTMF key tone has to be entered during a conversation, open the keypadfield by pressing the function key Extras
→ Enter numbers and follow the instruc-
tions (for example: “For a private conversation with one of our co-workers, please
press 3
”).
Settings in PHONE mode
Press the button PHONE
→ SETUP.
■ Bluetooth settings
1)
- Settings for the Bluetooth ®
- function
■ Paired device list
- opens a list of all connected devices
■ Search for devices - Search for external devices with an activated Bluetooth ®
function
■ Set Bluetooth visibility
- Activates visibility of the device on other devices with
the Bluetooth ®
function
■ Enter passkey
- Change the 4 digit code for connecting devices
■ Enter mobile box number - Enter the mobile box number for the mobile phone
■ Delete call lists2)
- Deletes all call lists from the memory of the phone unit
■ Switch off telephone2)3)
- switches off the phone unit (the mobile phone remains
paired)
■ Load telephone book
- loads the phonebook from the mobile phone to the memory
of the radio navigation system. This procedure can take a few minutes.
■ Factory settings
- resets device to factory settings- deletes user profiles
1)
This feature is not available if the mobile phone is connected by means of the GSM III telephone pre-
installation. Bluetooth ®
settings for the GSM III telephone preinstallation can be found in your vehi-
cle's Owners manual.
2)
This feature is not available if the mobile phone is connected by means of the GSM III telephone pre-
installation.
3)
This function is not active if the mobile phone is connected using the GSM III telephone preinstalla-
tion via the HFP profile.
16PHONE mode
Page 19 of 30
NAV mode (Navigation)
Introductory information
The route is recalculated each time if you ignore driving recommendations or
change the route. This process takes only a few seconds. Driving recommenda-
tions can only then be re-transmitted.
In regions that are not or only partially digitised and are therefore not included in the navigation data, the device will continue to try to provide guidance to the
destination. It should be noted that under these circumstances the guidance to
the destination may not be completely correct if, for example, one-way streets
and road categories (motorway, country road, etc.) are not or only partially inclu-
ded in the navigation data used.
When entering an address (city, street), only those letters or symbols which make up a logical entry will be presented. A list of possible names will be shown. Do not
forget to enter the blank space in names made up of more than one word, such
as High Wycombe.
The last voice output can be repeated by pressing the menu button
15
. The vol-
ume can be changed while you listen to the travel recommendation.
The GPS satellites will not be able to reach the aerial once you are in a tunnel or
underground garage. In these cases, the unit uses only the vehicle's sensors and
an internal gyroscope for navigation.
WARNING■ Please concentrate fully at all times on your driving! Driver inattention can
lead to accidents and injuries. As the driver you are fully responsible for road
safety. Only use the functions of the device in such a way that you are always
in full control of your vehicle in all traffic situations!■
The following must always have priority over the driving recommendations: ■ the road traffic legislation, even if the driving recommendations contradict
the StVO,
■ the actual acknowledgement of traffic signs, light signals or signs placed
by the police at the relevant location,
■ the facts and circumstances prevailing at the relevant location.
■
Please observe the respective traffic regulations when driving.
WARNING (Continued)■Traffic signs and traffic regulations always have priority over the driving rec-
ommendations provided by the navigation system.■
Route guidance is subject to constant changes, particularly to information
relating to one-way streets, pedestrian zones etc. stored in the navigation da-
ta. Information on traffic lights, stop and right of way signs, parking and stop-
ping restrictions as well as lane constrictions and speed restrictions is not tak-
en into account by the device.
■
Always adjust the driving speed to the road, traffic and weather conditions.
Do not let the device to tempt you to drive too fast in the fog, for example –
risk of accident!
■
The device and its various functions should only be used when traffic condi-
tions permit safe use.
■
The driving recommendations provided may vary from current situations,
e.g. due to road works or out of date navigation data. In such a case, always
observe the traffic regulations and ignore the driving recommendations.
■
Adjust the volume to ensure that acoustic signals from outside the vehicle,
e.g. sirens from vehicles to give way to, such as the police, ambulance and fire
brigade, can be heard at all times.
Note
■ It is not necessary to enter the destinations (country, city, road, point of interest
names) including all country-specific (or language-specific for points of interest)
special characters.■
Depending on the country, some functions of the device can no longer be selec-
ted on the screen at certain speeds. This is not a malfunction, but corresponds to
the legal requirements of the particular country.
Navigation data and the SD memory card
The navigation data is already available in the device memory when the device is switched on for the first time, and can be used immediately for navigation.
Update navigation data
›
Remove the mechanical copy protection from the SD memory card.
›
Insert the SD memory card » page 11, SD memory card .
The following appears automatically after you insert the SD memory card: Assign
-
assigns the SD memory card to the device. For licensing reasons, the SD memory
card is assigned to your device and cannot be used with a different device.
17NAV mode (Navigation)
Page 20 of 30
■Use SD - Using the navigation data directly from the SD memory card. If you
want to use navigation data from other regions that differs from the data stor- ed in the memory of the device, you can also use data directly from the SD
memory card for guidance. This means you have two different sets of naviga-
tion data at your disposal. It is not necessary therefore to copy the navigation data from the SD memory card to the memory of the radio navigation system.
■ Install
- Copies the navigation data from the SD memory card to the internal de-
vice memory. The “old” navigation data in the internal device memory is deleted.
Data cannot be recovered once deleted »
.
No navigation data is available during copying. The copy process takes around 2
hours.
Do not remove the SD memory card during the process of copying data from the
SD memory card to the internal memory of the radio navigation system! You can
damage the memory card!
Manual copying
If you insert the SD memory card with valid navigation data but the copy process
does not start automatically, you can start it manually.
Press the button NAV
→ SETUP.
■ Navigation data basis
- displays the options for the navigation data
■ Install/use SD data - installs/uses the navigation data from the SD memory card
CAUTION
If the navigation data in the internal device memory is overwritten by a different
version, this data cannot be restored !
Note
You can obtain an SD memory card with the latest navigation data or with data
for other countries from ŠKODA Original Accessories.
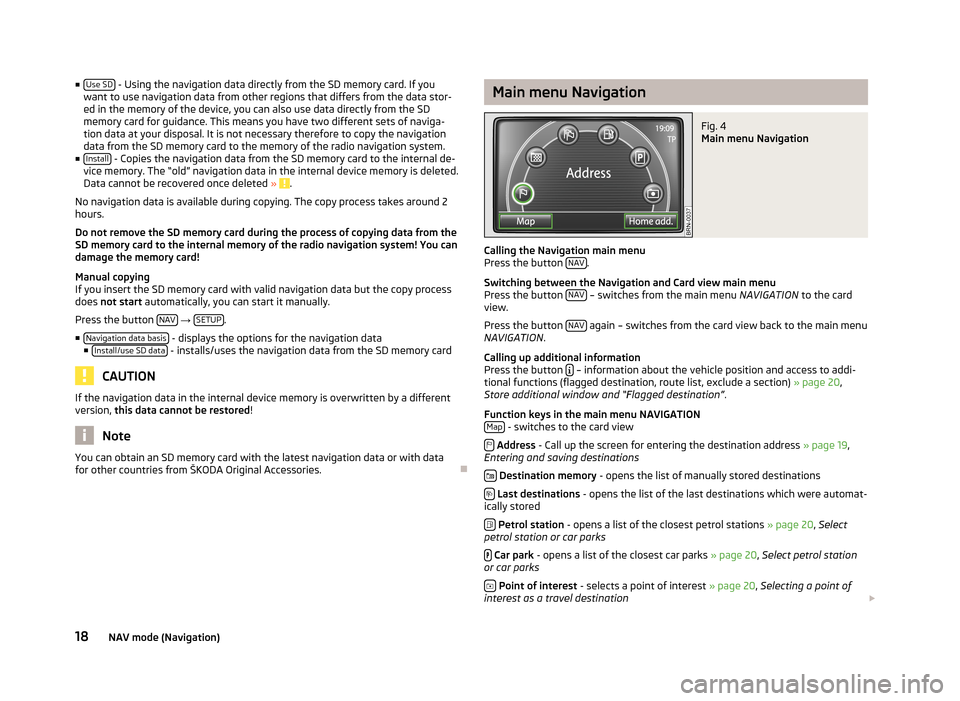
Main menu NavigationFig. 4
Main menu Navigation
Calling the Navigation main menu
Press the button NAV.
Switching between the Navigation and Card view main menu
Press the button NAV
– switches from the main menu
NAVIGATION to the card
view.
Press the button NAV
again – switches from the card view back to the main menu
NAVIGATION .
Calling up additional information
Press the button
– information about the vehicle position and access to addi-
tional functions (flagged destination, route list, exclude a section) » page 20,
Store additional window and “Flagged destination” .
Function keys in the main menu NAVIGATION Map
- switches to the card view
Address - Call up the screen for entering the destination address » page 19,
Entering and saving destinations
Destination memory - opens the list of manually stored destinations
Last destinations - opens the list of the last destinations which were automat-
ically stored
Petrol station - opens a list of the closest petrol stations » page 20, Select
petrol station or car parks
Car park - opens a list of the closest car parks » page 20, Select petrol station
or car parks
Point of interest - selects a point of interest » page 20, Selecting a point of
interest as a travel destination
18NAV mode (Navigation)