window SKODA SUPERB 2013 2.G / (B6/3T) Amundsen Navigation System Manual
[x] Cancel search | Manufacturer: SKODA, Model Year: 2013, Model line: SUPERB, Model: SKODA SUPERB 2013 2.G / (B6/3T)Pages: 30, PDF Size: 2.46 MB
Page 7 of 30

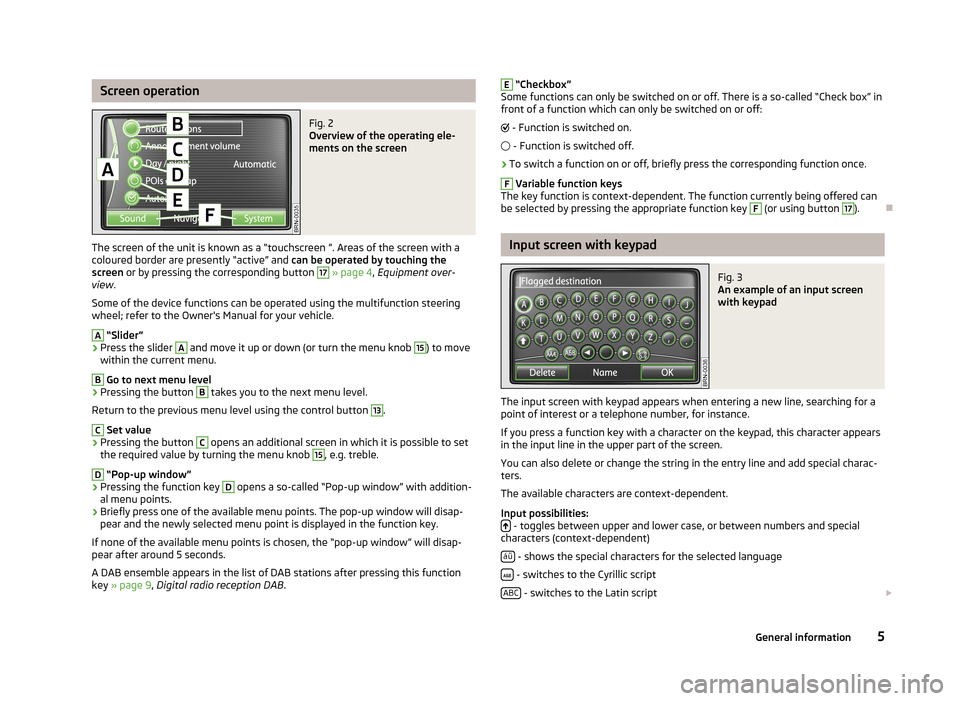
Screen operationFig. 2
Overview of the operating ele-
ments on the screen
The screen of the unit is known as a “touchscreen ”. Areas of the screen with a
coloured border are presently “active” and can be operated by touching the
screen or by pressing the corresponding button
17
» page 4 , Equipment over-
view .
Some of the device functions can be operated using the multifunction steering
wheel; refer to the Owner's Manual for your vehicle.
A
“Slider”
›
Press the slider
A
and move it up or down (or turn the menu knob
15
) to move
within the current menu.
B
Go to next menu level
›
Pressing the button
B
takes you to the next menu level.
Return to the previous menu level using the control button
13
.
C
Set value
›
Pressing the button
C
opens an additional screen in which it is possible to set
the required value by turning the menu knob
15
, e.g. treble.
D
“Pop-up window”
›
Pressing the function key
D
opens a so-called “Pop-up window” with addition-
al menu points.
›
Briefly press one of the available menu points. The pop-up window will disap-
pear and the newly selected menu point is displayed in the function key.
If none of the available menu points is chosen, the “pop-up window” will disap-
pear after around 5 seconds.
A DAB ensemble appears in the list of DAB stations after pressing this function
key » page 9 , Digital radio reception DAB .
E “Checkbox”
Some functions can only be switched on or off. There is a so-called “Check box” in front of a function which can only be switched on or off:
- Function is switched on.
- Function is switched off.›
To switch a function on or off, briefly press the corresponding function once.
F
Variable function keys
The key function is context-dependent. The function currently being offered can
be selected by pressing the appropriate function key
F
(or using button
17
).
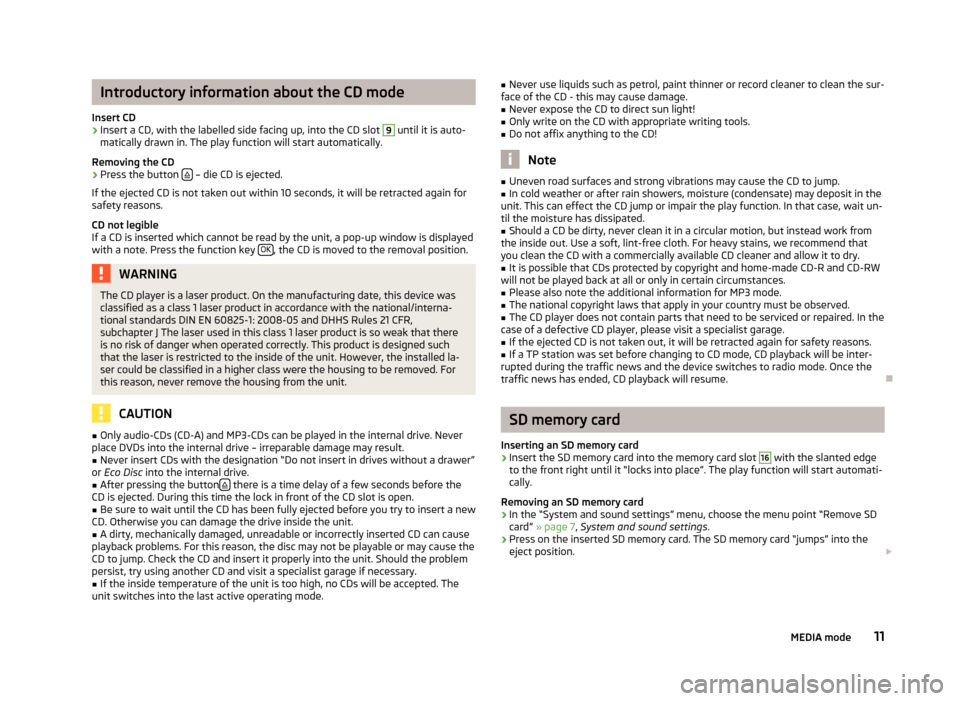
Input screen with keypad
Fig. 3
An example of an input screen
with keypad
The input screen with keypad appears when entering a new line, searching for a point of interest or a telephone number, for instance.
If you press a function key with a character on the keypad, this character appears
in the input line in the upper part of the screen.
You can also delete or change the string in the entry line and add special charac-ters.
The available characters are context-dependent.
Input possibilities:
- toggles between upper and lower case, or between numbers and special
characters (context-dependent)
áü
- shows the special characters for the selected language
- switches to the Cyrillic script
ABC
- switches to the Latin script
5General information
Page 13 of 30

Introductory information about the CD mode
Insert CD›
Insert a CD, with the labelled side facing up, into the CD slot
9
until it is auto-
matically drawn in. The play function will start automatically.
Removing the CD
›
Press the button – die CD is ejected.
If the ejected CD is not taken out within 10 seconds, it will be retracted again for safety reasons.
CD not legible
If a CD is inserted which cannot be read by the unit, a pop-up window is displayed with a note. Press the function key OK
, the CD is moved to the removal position.
WARNINGThe CD player is a laser product. On the manufacturing date, this device was
classified as a class 1 laser product in accordance with the national/interna-
tional standards DIN EN 60825-1: 2008-05 and DHHS Rules 21 CFR,
subchapter J The laser used in this class 1 laser product is so weak that there
is no risk of danger when operated correctly. This product is designed such
that the laser is restricted to the inside of the unit. However, the installed la-
ser could be classified in a higher class were the housing to be removed. For
this reason, never remove the housing from the unit.
CAUTION
■ Only audio-CDs (CD-A) and MP3-CDs can be played in the internal drive. Never
place DVDs into the internal drive – irreparable damage may result.■
Never insert CDs with the designation “Do not insert in drives without a drawer”
or Eco Disc into the internal drive.
■
After pressing the button there is a time delay of a few seconds before the
CD is ejected. During this time the lock in front of the CD slot is open.
■
Be sure to wait until the CD has been fully ejected before you try to insert a new
CD. Otherwise you can damage the drive inside the unit.
■
A dirty, mechanically damaged, unreadable or incorrectly inserted CD can cause
playback problems. For this reason, the disc may not be playable or may cause the
CD to jump. Check the CD and insert it properly into the unit. Should the problem
persist, try using another CD and visit a specialist garage if necessary.
■
If the inside temperature of the unit is too high, no CDs will be accepted. The
unit switches into the last active operating mode.
■ Never use liquids such as petrol, paint thinner or record cleaner to clean the sur-
face of the CD - this may cause damage.■
Never expose the CD to direct sun light!
■
Only write on the CD with appropriate writing tools.
■
Do not affix anything to the CD!
Note
■ Uneven road surfaces and strong vibrations may cause the CD to jump.■In cold weather or after rain showers, moisture (condensate) may deposit in the
unit. This can effect the CD jump or impair the play function. In that case, wait un-
til the moisture has dissipated.■
Should a CD be dirty, never clean it in a circular motion, but instead work from
the inside out. Use a soft, lint-free cloth. For heavy stains, we recommend that
you clean the CD with a commercially available CD cleaner and allow it to dry.
■
It is possible that CDs protected by copyright and home-made CD-R and CD-RW
will not be played back at all or only in certain circumstances.
■
Please also note the additional information for MP3 mode.
■
The national copyright laws that apply in your country must be observed.
■
The CD player does not contain parts that need to be serviced or repaired. In the
case of a defective CD player, please visit a specialist garage.
■
If the ejected CD is not taken out, it will be retracted again for safety reasons.
■
If a TP station was set before changing to CD mode, CD playback will be inter-
rupted during the traffic news and the device switches to radio mode. Once the
traffic news has ended, CD playback will resume.
SD memory card
Inserting an SD memory card
›
Insert the SD memory card into the memory card slot
16
with the slanted edge
to the front right until it “locks into place”. The play function will start automati-
cally.
Removing an SD memory card
›
In the “System and sound settings” menu, choose the menu point “Remove SD
card” » page 7 , System and sound settings .
›
Press on the inserted SD memory card. The SD memory card “jumps” into the
eject position.
11MEDIA mode
Page 20 of 30

■Use SD - Using the navigation data directly from the SD memory card. If you
want to use navigation data from other regions that differs from the data stor- ed in the memory of the device, you can also use data directly from the SD
memory card for guidance. This means you have two different sets of naviga-
tion data at your disposal. It is not necessary therefore to copy the navigation data from the SD memory card to the memory of the radio navigation system.
■ Install
- Copies the navigation data from the SD memory card to the internal de-
vice memory. The “old” navigation data in the internal device memory is deleted.
Data cannot be recovered once deleted »
.
No navigation data is available during copying. The copy process takes around 2
hours.
Do not remove the SD memory card during the process of copying data from the
SD memory card to the internal memory of the radio navigation system! You can
damage the memory card!
Manual copying
If you insert the SD memory card with valid navigation data but the copy process
does not start automatically, you can start it manually.
Press the button NAV
→ SETUP.
■ Navigation data basis
- displays the options for the navigation data
■ Install/use SD data - installs/uses the navigation data from the SD memory card
CAUTION
If the navigation data in the internal device memory is overwritten by a different
version, this data cannot be restored !
Note
You can obtain an SD memory card with the latest navigation data or with data
for other countries from ŠKODA Original Accessories.
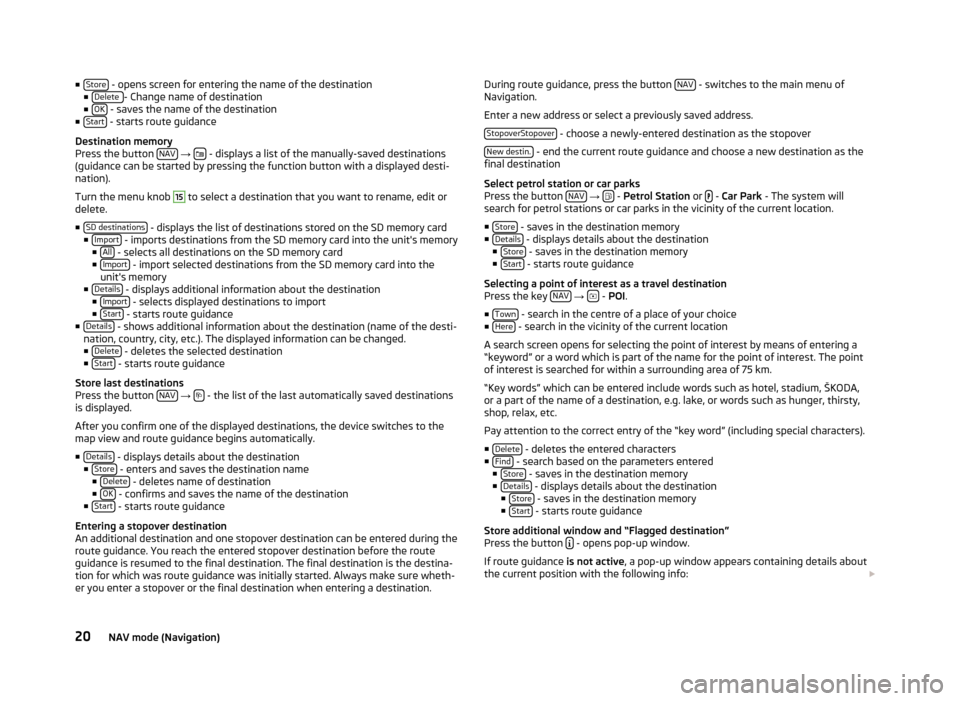
Main menu NavigationFig. 4
Main menu Navigation
Calling the Navigation main menu
Press the button NAV.
Switching between the Navigation and Card view main menu
Press the button NAV
– switches from the main menu
NAVIGATION to the card
view.
Press the button NAV
again – switches from the card view back to the main menu
NAVIGATION .
Calling up additional information
Press the button
– information about the vehicle position and access to addi-
tional functions (flagged destination, route list, exclude a section) » page 20,
Store additional window and “Flagged destination” .
Function keys in the main menu NAVIGATION Map
- switches to the card view
Address - Call up the screen for entering the destination address » page 19,
Entering and saving destinations
Destination memory - opens the list of manually stored destinations
Last destinations - opens the list of the last destinations which were automat-
ically stored
Petrol station - opens a list of the closest petrol stations » page 20, Select
petrol station or car parks
Car park - opens a list of the closest car parks » page 20, Select petrol station
or car parks
Point of interest - selects a point of interest » page 20, Selecting a point of
interest as a travel destination
18NAV mode (Navigation)
Page 22 of 30

■Store - opens screen for entering the name of the destination
■ Delete - Change name of destination
■ OK - saves the name of the destination
■ Start - starts route guidance
Destination memory
Press the button NAV
→ - displays a list of the manually-saved destinations
(guidance can be started by pressing the function button with a displayed desti-
nation).
Turn the menu knob
15
to select a destination that you want to rename, edit or
delete.
■ SD destinations
- displays the list of destinations stored on the SD memory card
■ Import - imports destinations from the SD memory card into the unit's memory
■ All - selects all destinations on the SD memory card
■ Import - import selected destinations from the SD memory card into the
unit's memory
■ Details
- displays additional information about the destination
■ Import - selects displayed destinations to import
■ Start - starts route guidance
■ Details - shows additional information about the destination (name of the desti-
nation, country, city, etc.). The displayed information can be changed. ■ Delete
- deletes the selected destination
■ Start - starts route guidance
Store last destinations
Press the button NAV
→ - the list of the last automatically saved destinations
is displayed.
After you confirm one of the displayed destinations, the device switches to the
map view and route guidance begins automatically.
■ Details
- displays details about the destination
■ Store - enters and saves the destination name
■ Delete - deletes name of destination
■ OK - confirms and saves the name of the destination
■ Start - starts route guidance
Entering a stopover destination
An additional destination and one stopover destination can be entered during the
route guidance. You reach the entered stopover destination before the route
guidance is resumed to the final destination. The final destination is the destina- tion for which was route guidance was initially started. Always make sure wheth-
er you enter a stopover or the final destination when entering a destination.
During route guidance, press the button NAV - switches to the main menu of
Navigation.
Enter a new address or select a previously saved address. StopoverStopover
- choose a newly-entered destination as the stopover
New destin.
- end the current route guidance and choose a new destination as the
final destination
Select petrol station or car parks
Press the button NAV
→ -
Petrol Station or -
Car Park - The system will
search for petrol stations or car parks in the vicinity of the current location.
■ Store
- saves in the destination memory
■ Details - displays details about the destination
■ Store - saves in the destination memory
■ Start - starts route guidance
Selecting a point of interest as a travel destination Press the key NAV
→ -
POI .
■ Town
- search in the centre of a place of your choice
■ Here - search in the vicinity of the current location
A search screen opens for selecting the point of interest by means of entering a
“keyword” or a word which is part of the name for the point of interest. The point
of interest is searched for within a surrounding area of 75 km.
“Key words” which can be entered include words such as hotel, stadium, ŠKODA,
or a part of the name of a destination, e.g. lake, or words such as hunger, thirsty,
shop, relax, etc.
Pay attention to the correct entry of the “key word” (including special characters). ■ Delete
- deletes the entered characters
■ Find - search based on the parameters entered
■ Store - saves in the destination memory
■ Details - displays details about the destination
■ Store - saves in the destination memory
■ Start - starts route guidance
Store additional window and “Flagged destination” Press the button
- opens pop-up window.
If route guidance is not active, a pop-up window appears containing details about
the current position with the following info:
20NAV mode (Navigation)