display SKODA SUPERB 2013 2.G / (B6/3T) Amundsen Navigation System Manual
[x] Cancel search | Manufacturer: SKODA, Model Year: 2013, Model line: SUPERB, Model: SKODA SUPERB 2013 2.G / (B6/3T)Pages: 30, PDF Size: 2.46 MB
Page 3 of 30
Table of Contents
General information
Operating instructions
2
Important information
2
Basic settings
System and sound settings
7
RADIO mode
Main menu RADIO
8
Settings in RADIO mode
8
Digital radio reception DAB
9
Traffic Program TP
9
MEDIA mode
Main menu MEDIA
10
Settings in MEDIA mode
10
Playback options
10
Introductory information about the CD mode
11
SD memory card
11
External sources
12
Requirements for media sources and audio files
13PHONE mode
Pairing mobile phone or Bluetooth ®
device with
device14
Main menu TELEPHONE
14
Telephone calls and functions during a call
15
Settings in PHONE mode
16
NAV mode (Navigation)
Introductory information
17
Navigation data and the SD memory card
17
Main menu Navigation
18
Settings in the (NAV) Navigation mode
19
Destinations
19
Route guidance
21
TMC mode
Displaying TMC traffic reports
23
TP traffic program and TMC traffic reports
settings
23
Display of optical park assist
Display of visual parking system (OPS)
24
Rearview camera display
24
Index
1Table of Contents
Page 5 of 30
system can be used again. The code number can only be retrieved “online” via theŠKODA system, as this guarantees even more effective anti-theft protection. Visita specialist garage 1)
if necessary.
Enter code
If a keypad appears after switching on with the command to enter the code, the unit must be unlocked by entering the correct four-digit code.›
Enter the four-digit code using the function keys 0 to 9. The digit is accepted
in the entry line.
After a four-digit order has been entered, the group of digits will turn grey (inac- tive) and no further digits can be accepted in the entry line.
›
To delete the digits in the entry line from right to left, press the function key Delete.
›
When the correct code is displayed in the entry line, press the function key OK.
Incorrect code number
If an incorrect code is confirmed after entry of the code, the procedure can be re- peated twice. The number of attempts is shown in the bottom screen line.
If the code is entered incorrectly for the third time, the unit will be blocked for ap-
prox. one hour. It is not possible to enter the safety code again until after one
hour, while the unit and the ignition were switched on.
If three invalid attempts are then made again, the radio navigation system will be
blocked again for an hour.
Note
The code is normally saved in the instrument cluster memory. This ensures that
the device is automatically decoded (convenience decoding). Manual input of the
code is normally not necessary.
Screen display
The screen of the unit displays information such as information from the Clima-
tronic, the vehicle distance to an obstacle if the “parking aid” has been activated, etc.
Personalisation
Your vehicle can be equipped with up to four keys. Individual settings of the de-
vice are always assigned to the key currently in use. Up to 4 different setting var-
iants can be stored for the device. When using the key for the first time, the fac- tory setting for the device is valid.1)
Explanation of terms » Owner's Manual , chapter Foreword .
3General information
Page 6 of 30
Equipment overviewFig. 1
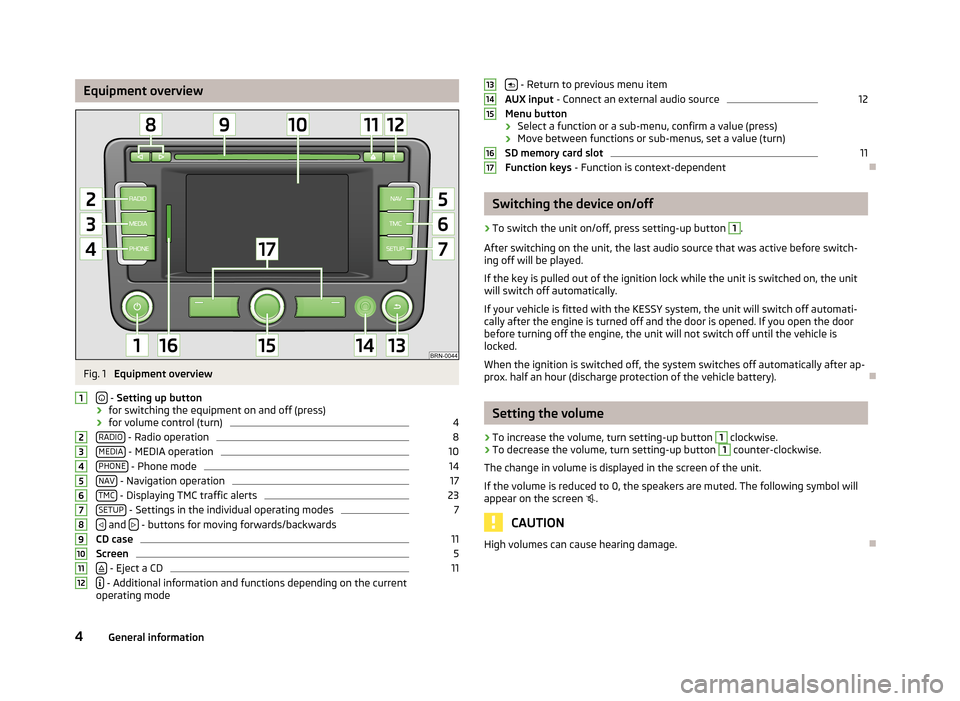
Equipment overview
- Setting up button
› for switching the equipment on and off (press)
› for volume control (turn)
4
RADIO - Radio operation
8
MEDIA - MEDIA operation
10
PHONE - Phone mode
14
NAV - Navigation operation
17
TMC - Displaying TMC traffic alerts
23
SETUP - Settings in the individual operating modes
7
and
- buttons for moving forwards/backwards
CD case
11
Screen
5
- Eject a CD
11
- Additional information and functions depending on the current
operating mode
123456789101112 - Return to previous menu item
AUX input - Connect an external audio source12
Menu button
› Select a function or a sub-menu, confirm a value (press)
› Move between functions or sub-menus, set a value (turn)
SD memory card slot
11
Function keys - Function is context-dependent
Switching the device on/off
›
To switch the unit on/off, press setting-up button
1
.
After switching on the unit, the last audio source that was active before switch-
ing off will be played.
If the key is pulled out of the ignition lock while the unit is switched on, the unit
will switch off automatically.
If your vehicle is fitted with the KESSY system, the unit will switch off automati-
cally after the engine is turned off and the door is opened. If you open the door
before turning off the engine, the unit will not switch off until the vehicle is
locked.
When the ignition is switched off, the system switches off automatically after ap-
prox. half an hour (discharge protection of the vehicle battery).
Setting the volume
›
To increase the volume, turn setting-up button
1
clockwise.
›
To decrease the volume, turn setting-up button
1
counter-clockwise.
The change in volume is displayed in the screen of the unit.
If the volume is reduced to 0, the speakers are muted. The following symbol will appear on the screen
.
CAUTION
High volumes can cause hearing damage.13141516174General information
Page 7 of 30
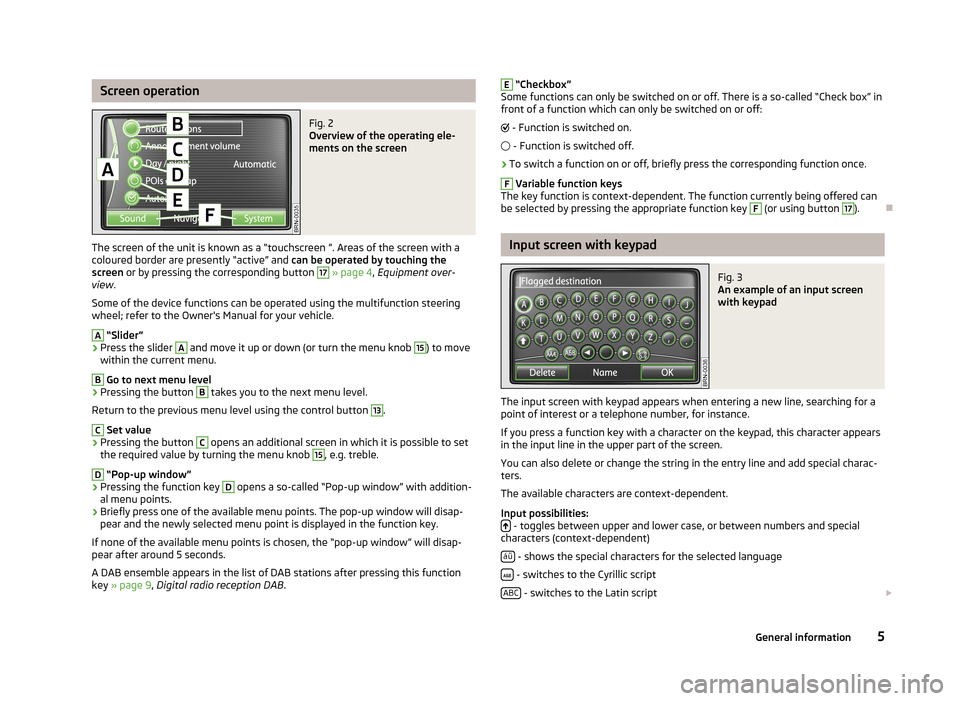
Screen operationFig. 2
Overview of the operating ele-
ments on the screen
The screen of the unit is known as a “touchscreen ”. Areas of the screen with a
coloured border are presently “active” and can be operated by touching the
screen or by pressing the corresponding button
17
» page 4 , Equipment over-
view .
Some of the device functions can be operated using the multifunction steering
wheel; refer to the Owner's Manual for your vehicle.
A
“Slider”
›
Press the slider
A
and move it up or down (or turn the menu knob
15
) to move
within the current menu.
B
Go to next menu level
›
Pressing the button
B
takes you to the next menu level.
Return to the previous menu level using the control button
13
.
C
Set value
›
Pressing the button
C
opens an additional screen in which it is possible to set
the required value by turning the menu knob
15
, e.g. treble.
D
“Pop-up window”
›
Pressing the function key
D
opens a so-called “Pop-up window” with addition-
al menu points.
›
Briefly press one of the available menu points. The pop-up window will disap-
pear and the newly selected menu point is displayed in the function key.
If none of the available menu points is chosen, the “pop-up window” will disap-
pear after around 5 seconds.
A DAB ensemble appears in the list of DAB stations after pressing this function
key » page 9 , Digital radio reception DAB .
E “Checkbox”
Some functions can only be switched on or off. There is a so-called “Check box” in front of a function which can only be switched on or off:
- Function is switched on.
- Function is switched off.›
To switch a function on or off, briefly press the corresponding function once.
F
Variable function keys
The key function is context-dependent. The function currently being offered can
be selected by pressing the appropriate function key
F
(or using button
17
).
Input screen with keypad
Fig. 3
An example of an input screen
with keypad
The input screen with keypad appears when entering a new line, searching for a point of interest or a telephone number, for instance.
If you press a function key with a character on the keypad, this character appears
in the input line in the upper part of the screen.
You can also delete or change the string in the entry line and add special charac-ters.
The available characters are context-dependent.
Input possibilities:
- toggles between upper and lower case, or between numbers and special
characters (context-dependent)
áü
- shows the special characters for the selected language
- switches to the Cyrillic script
ABC
- switches to the Latin script
5General information
Page 9 of 30
Basic settings
System and sound settings
System settings
Press the button SETUP
→ System.
■ Language
- Menu language for the displays and the language messages
■ Adaptive - auto-detection of menu language, depending on the setting in the
information display
■ or direct selection of the required language from the list
■ Keypad layout
- Keypad layout for text entry
■ ABC - keys arranged alphabetically
■ QWERTY - QWERTY keypad layout
■ Air con. displays - adjust the display duration for the Climatronic control
■ Screen - screen setting
■ Brightness - adjust the screen brightness
■ Day/night - changes between day and night design. Automatic display depends
on switching the low beam on or off.
■ Confirmation tone
- activates/deactivates confirmation tone when a function
key is pressed
■ Factory settings
- restores unit to factory settings
■ Remove SD card - removed the SD memory card safely
■ Clock display - switches time display on/off when the device is switched off
Sound settings
Press the button SETUP
→ Sound.
■ Volume
- Volume settings
■ Max. switch-on volume - setting the volume when turning on
■ Traffic program (TP) - setting the volume for the Traffic program (TP)
■ Navigation volume - Setting the volume of the navigation announcements
■ PDW vol. reductn. - Setting the reduction of the volume when the park distance
control is active
■ SDVA
- Speed-dependent volume adaptation
■ Treble - Treble setting
■ Mid-range - Mid-range setting
■ Bass - Bass setting
■ Balance - Setting of the balance between the left and right side
■ Fader - Setting the balance between the front and the rear
■ EQ settings - Setting the equalizer (linear, voice, rock, classical, dance)
■ Surround - Setting of the surround tone.
7Basic settings
Page 10 of 30
RADIO mode
Main menu RADIO
Press the button RADIO
.
Repeated pressing of the button RADIO
- change frequency band.
Function keys Extras
■
Extras - opens a list of additional functions
■ Presets - activates/deactivates the display of station presets 1 to 24■
Manual - manual station search by turning the menu knob
15
■ Scan - Auto-plays all stations in the current frequency band, each for around
five seconds.
■ TP
- switches traffic programme on/off » page 9, Traffic Program TP
Function key Band
■
Band - opens the list of frequency bands
■ DAB/List -opens the list of DAB stations » page 9, Digital radio reception
DAB
■ Update
- Update list of DAB stations
■ Store - stores the current station to the selected memory button
■ FM/List - opens the list of all FM stations currently in range
■ Store - stores the current station to the selected memory button
■ AM - switches to the AM band; a list of stations not available
Function keys 1
to 24Direct selection of the stored station.
Keep 1
to 24 pressed until a signal sounds - stores the current station to the se-
lected memory button.
Changing the station
or - depending on the setting of the “arrow keys” - changes the saved sta-
tion or all stations currently within range in this area
RDS display setting
Press the button
- switches on/off the Radio Data Service RDS.
RDS (“Radio Data System”) serves to transmit program identification and addi-
tional services therefore also enabling automatic tracking of stations.
Settings in RADIO mode
Press the button RADIO
→ SETUP.
■ Traffic program (TP)
- switches traffic program on/off
■ Arrow keys - Sets the station selection function in RADIO mode using the arrow
keys
8
■ Station list - Switches all stations currently in range for the selected frequency
band
■ Presets
- switches to the stored stations (the following symbol appears in the
display )
■ RDS Regional
- automatic station tracking with RDS on/off
■ Adaptive - auto-selects station with the best reception at the moment
■ Fixed - the selected regional station remains set for as long as possible
■ DAB settings - DAB radio settings
■ DAB announcement - switches on/off DAB announcements
■ DAB station tracking - switches on/off DAB station tracking
■ Auto. DAB-FM switching - switches on/off auto-switching from DAB to the FM fre-
quency band if the DAB signal is lost
■ Delete presets
- deletes the preset stations
■ Single - deletes a single station
■ All - deletes all stored stations
■ Alternative frequency (AF) - activates/deactivates the search for alternative fre-
quencies of the station currently being listened to
Note
■ RDS (Radio Data System) is used to transmit programme IDs and additional
services, thus enabling automatic station tracking, for example. In the event of
sufficiently satisfactory reception, the suitable RDS radio stations will display the
station name instead of the station frequency.■
TMC (Traffic Message Channel) is a digital radio data service for continuous
transmission of traffic information.
■
DAB (Digital Audio Broadcasting) is the digital transmission of radio pro-
grammes based on the DAB, DAB+ or DMB standards » page 9, Digital radio re-
ception DAB .
8RADIO mode
Page 11 of 30
Digital radio reception DAB
DAB (Digital Audio Broadcasting) is the digital transmission of radio programmes
based on the DAB, DAB+ or DMB standards. It allows multiple stations to be
transmitted in a single frequency in the form of a so-called ensemble. It also al-
lows for the transmission of additional data and information (e.g. messages,
sport, weather, warnings, etc.)
In regions without DAB coverage, the following symbol appears in DAB Radio
mode .
List of DAB stations
Press the button RADIO
→ Band
→ DAB/List.
XYZ
- an ensemble of DAB stations
XYZ
- DAB station with the name XYZ
XYZ
- DAB station with the name XYZ which is currently not in range
XYZ (FM))
- DAB station with the name XYZ which is currently only in range in the
FM frequency band
DAB programme tracking
If a DAB station is a member of several ensembles, when the signal is poor, the
same station is searched in a different ensemble.
Auto-change DAB -FM
If the DAB signal is poor, the unit will try to find a corresponding FM station for
the DAB station you are currently listening to.
For auto-change to work, the DAB and FM stations must send a sender ID.
While the station is being received via the FM frequency band, (FM) will appear
next to the station name . When the corresponding DAB station is in range again,
the (FM) display disappears.
If a DAB station is also not available in the FM frequency band due to poor recep- tion, the device will be switched to mute.
If you do not want automatic station change (e.g. when driving through tunnels, when reception may be lost temporarily), you can deactivate this func-tion » page 8 , Settings in RADIO mode .
Traffic Program TP
The display “ TP” in combination with a station name (e.g. in the station or preset
list), indicates a traffic programme station.
Irrespective of which radio station you are listening to, an additional receiver part
in the unit ensures that a traffic programme station can always be received as
long as the traffic programme function is switched on. During media mode, the
unit always searches for an available traffic program station in the background.
The availability of traffic programme monitoring is identified by the letters “ TP” at
the top right of the screen.
If no traffic programme station can be received because, for example, radio recep- tion is interrupted in general, “ No TP” will be displayed instead of “ TP”.
9RADIO mode
Page 12 of 30
MEDIA mode
Main menu MEDIA
Press the button MEDIA
.
Selectable audio sources in the menu MEDIA
CD - Changes to an inserted CD
CD 1-6 - changes over to a connected external CD changer
SD card - changes over to an inserted SD memory card
AUX
, MDI or
changes over to a connected external audio source. Operating an
externally connected audio source via the device is possible with certain restric-
tions, depending primarily on the type of the connected device.
Buttons for operating current audio sources
Press
- to start current track
Briefly press twice
- to start the previous track
Press and hold
- “back to start” - fast rewind
Press
- to start next track
Press and hold
-fast forward
Setting the time or track display
Press the button
- to switch between the display of playback time or track title
or track info.
Settings in MEDIA mode
Press the button MEDIA
→ SETUP.
Function keys in the menu Settings – Media
■ Traffic program (TP)
- switches traffic programme on/off
■ Scan/mix/repeat inc. - switches the track playback function on/off in the “Scan”,
“Mix” and “Repeat” modes, including sub-directories » page 10 , Playback op-
tions
■ AUX volume1)
- Input volume for an external audio source at the multimedia sock-
et AUX
■ MDI volume
1)
- Input volume for iPod™ or iPhone™ units at the multimedia socket
MDI or an external audio source AUX at the multimedia socket MDI
■ Bluetooth settings
- Settings for the Bluetooth ®
- function » page 16, Settings in
PHONE mode
■ Activate AUX 2 input
– Activates the external audio source AUX via the input
MDI » page 12 , AUX and MDI input
■ BT volume
1)
- Input volume for an external Bluetooth audio source ®
Playback options
Open selection menu for the available audio sources
Press the button MEDIA
and select one of the available audio sources.
■ Select
- Display the title list for the audio source currently being played. The cur-
rently played track is shown as highlighted.
■ Up
- opens the higher-level folder (press again to switch up to the root direc-
tory)
■ Play
- Plays the selected track
Playback modes
Press the button MEDIA
→ Extras – additional functions will be displayed.
■ Scan
- plays all tracks of the current audio source for 10 seconds each
■ in “Scan” mode Scan - return to normal playback
■ Mix folder - all tracks in the current folder are played in random order
■ in the “Mix folder” mode Mix folder - return to normal playback
■ Mix all - all tracks in the current audio source are played in random order
■ in the “Mix all” mode Mix all - return to normal playback
■ Repeat track - repeats the track currently being played
■ In “Repeat track” mode Repeat trk. - returns to normal playback
■ Repeat folder - all tracks in the current folder are repeated
■ in “Repeat folder” mode Repeat
- returns to the normal playback
1)
Used to adjust the playback volume with the other audio sources.
10MEDIA mode
Page 13 of 30
Introductory information about the CD mode
Insert CD›
Insert a CD, with the labelled side facing up, into the CD slot
9
until it is auto-
matically drawn in. The play function will start automatically.
Removing the CD
›
Press the button – die CD is ejected.
If the ejected CD is not taken out within 10 seconds, it will be retracted again for safety reasons.
CD not legible
If a CD is inserted which cannot be read by the unit, a pop-up window is displayed with a note. Press the function key OK
, the CD is moved to the removal position.
WARNINGThe CD player is a laser product. On the manufacturing date, this device was
classified as a class 1 laser product in accordance with the national/interna-
tional standards DIN EN 60825-1: 2008-05 and DHHS Rules 21 CFR,
subchapter J The laser used in this class 1 laser product is so weak that there
is no risk of danger when operated correctly. This product is designed such
that the laser is restricted to the inside of the unit. However, the installed la-
ser could be classified in a higher class were the housing to be removed. For
this reason, never remove the housing from the unit.
CAUTION
■ Only audio-CDs (CD-A) and MP3-CDs can be played in the internal drive. Never
place DVDs into the internal drive – irreparable damage may result.■
Never insert CDs with the designation “Do not insert in drives without a drawer”
or Eco Disc into the internal drive.
■
After pressing the button there is a time delay of a few seconds before the
CD is ejected. During this time the lock in front of the CD slot is open.
■
Be sure to wait until the CD has been fully ejected before you try to insert a new
CD. Otherwise you can damage the drive inside the unit.
■
A dirty, mechanically damaged, unreadable or incorrectly inserted CD can cause
playback problems. For this reason, the disc may not be playable or may cause the
CD to jump. Check the CD and insert it properly into the unit. Should the problem
persist, try using another CD and visit a specialist garage if necessary.
■
If the inside temperature of the unit is too high, no CDs will be accepted. The
unit switches into the last active operating mode.
■ Never use liquids such as petrol, paint thinner or record cleaner to clean the sur-
face of the CD - this may cause damage.■
Never expose the CD to direct sun light!
■
Only write on the CD with appropriate writing tools.
■
Do not affix anything to the CD!
Note
■ Uneven road surfaces and strong vibrations may cause the CD to jump.■In cold weather or after rain showers, moisture (condensate) may deposit in the
unit. This can effect the CD jump or impair the play function. In that case, wait un-
til the moisture has dissipated.■
Should a CD be dirty, never clean it in a circular motion, but instead work from
the inside out. Use a soft, lint-free cloth. For heavy stains, we recommend that
you clean the CD with a commercially available CD cleaner and allow it to dry.
■
It is possible that CDs protected by copyright and home-made CD-R and CD-RW
will not be played back at all or only in certain circumstances.
■
Please also note the additional information for MP3 mode.
■
The national copyright laws that apply in your country must be observed.
■
The CD player does not contain parts that need to be serviced or repaired. In the
case of a defective CD player, please visit a specialist garage.
■
If the ejected CD is not taken out, it will be retracted again for safety reasons.
■
If a TP station was set before changing to CD mode, CD playback will be inter-
rupted during the traffic news and the device switches to radio mode. Once the
traffic news has ended, CD playback will resume.
SD memory card
Inserting an SD memory card
›
Insert the SD memory card into the memory card slot
16
with the slanted edge
to the front right until it “locks into place”. The play function will start automati-
cally.
Removing an SD memory card
›
In the “System and sound settings” menu, choose the menu point “Remove SD
card” » page 7 , System and sound settings .
›
Press on the inserted SD memory card. The SD memory card “jumps” into the
eject position.
11MEDIA mode
Page 16 of 30
PHONE mode
Pairing mobile phone or Bluetooth®
device with
device
To operate a mobile phone or other Bluetooth ®
device from the device, a one-off
connection of both devices is required.
Active connection
When the connection is active, the mobile telephone search is launched from the
device.
Enable Bluetooth ®
on your mobile phone.
Press the button PHONE
→ SETUP.
■ Bluetooth settings
- Settings for the Bluetooth ®
- function
■ Search for devices - Search for external devices with an activated Bluetooth ®
function
The search can take around 15 to 20 seconds. When the process is complete, the
names of the located mobile telephones are shown on the screen.
The mobile phone you want to connect can be selected directly by pressing the
function key with the name of the mobile phone or by turning the menu knob
15
and then pressing the button Connect.
Confirm the connection on the mobile phone. Depending on the type of mobile
phone, either an auto-generated 6-digit PIN code is displayed, which must be
confirmed according to the instructions on the screen of the mobile phone and
the device, or a 4-digit PIN code displayed on the device screen must be entered
manually.
If the PIN was entered correctly, a message appears on the screen indicating that the connection was successful.
Passive connection
When the connection is passive, the device search is launched from the mobile
telephone.
Enable Bluetooth ®
on your mobile phone.
Press the button PHONE
→ SETUP.
■
Bluetooth settings - Settings for the Bluetooth ®
- function
■ Set Bluetooth visibility - Activates visibility of the device on other devices with
the Bluetooth ®
function
Launch the search for Bluetooth ®
audio accessories on the mobile phone. The
search can take around 15 to 20 seconds. Once the search is complete, the device name is displayed on the mobile phone as SKODA_BT.
Using the mobile phone to establish the connection. Depending on the type of mobile phone, either an auto-generated 6-digit PIN code is displayed, which must
be confirmed according to the instructions on the screen of the mobile phone and
the device, or a 4-digit PIN code displayed on the device screen must be entered
manually.
If the PIN was entered correctly, a message appears on the screen indicating that
the connection was successful.
Deleting connected devices
A maximum of 4 mobile phones or Bluetooth ®
devices can be connected with the
device. To connect an additional device, a mobile phone or Bluetooth ®
device
must be deleted first.
Press the button PHONE
→ SETUP.
■ Bluetooth settings
- Settings for the Bluetooth ®
- function
■ Paired device list - List of devices connected to the device
■ Delete - Deletes the selected connected mobile phone or Bluetooth ®
device.
Main menu TELEPHONE
Main menu TELEPHONE
Press the button TELEPHONE
.
Individual functions in the menu TELEPHONE may depend on the equipment and the properties of the connected mobile phone.
The PHONE
mode can only be activated while the ignition is switched on.
When the device is switched on, it automatically connects with the mobile phone with which it was last connected. If it is not possible to connect with this mobile
phone, the system automatically attempts to establish the connection to the next
mobile phone which is in the list of the connected devices.
14PHONE mode