heating SKODA SUPERB 2013 2.G / (B6/3T) User Guide
[x] Cancel search | Manufacturer: SKODA, Model Year: 2013, Model line: SUPERB, Model: SKODA SUPERB 2013 2.G / (B6/3T)Pages: 274, PDF Size: 17.31 MB
Page 73 of 274
›Switch on the ignition.›Turn dial for the exterior mirror control into position
» page 65 .›
Engage reverse gear.
›
Adjust the front passenger's mirror to the desired position » page 65.
›
Disengage reverse gear.
The adjusted position of the exterior mirror is stored in the remote control key
memory.
Enable automatic storage
›
Unlock the vehicle with the remote control key.
›
Press and hold any memory button
B
» Fig. 53 on page 69. After the seat has
assumed the position stored under this button, at the same time press the but-
ton
on the remote control key within 10 seconds.
The successful activation of the automatic storage function for each key is con-
firmed by an acoustic signal.
The seat and external mirror positions which are already saved in the memory
button are not saved in the memory of the key.
The seat can be adjusted to the required position if necessary » page 67.
After locking the vehicle, the current positions of the driver's seat and the exter-
nal mirrors are saved in the memory of the remote control key.
Disable the function of automatic storage
›
Unlock the vehicle with the remote control key.
›
Press and hold the SET button
A
» Fig. 53 on page 69. At the same time, press
the button on the remote control key within 10 seconds.
The successful deactivation of the automatic storage function for each key is con-
firmed by an acoustic signal.
Stopping the ongoing adjustment
›
Press any button on the driver's seat or the button on the remote control
key.
Seat features
Introduction
This chapter contains information on the following subjects:
Seat heaters
70
Ventilated front seats
71
Convenience features of passenger seat
72
Armrest, front
72
Armrest rear
73
Seat backrests
73
Rear seat folded forward (Superb Combi)
74
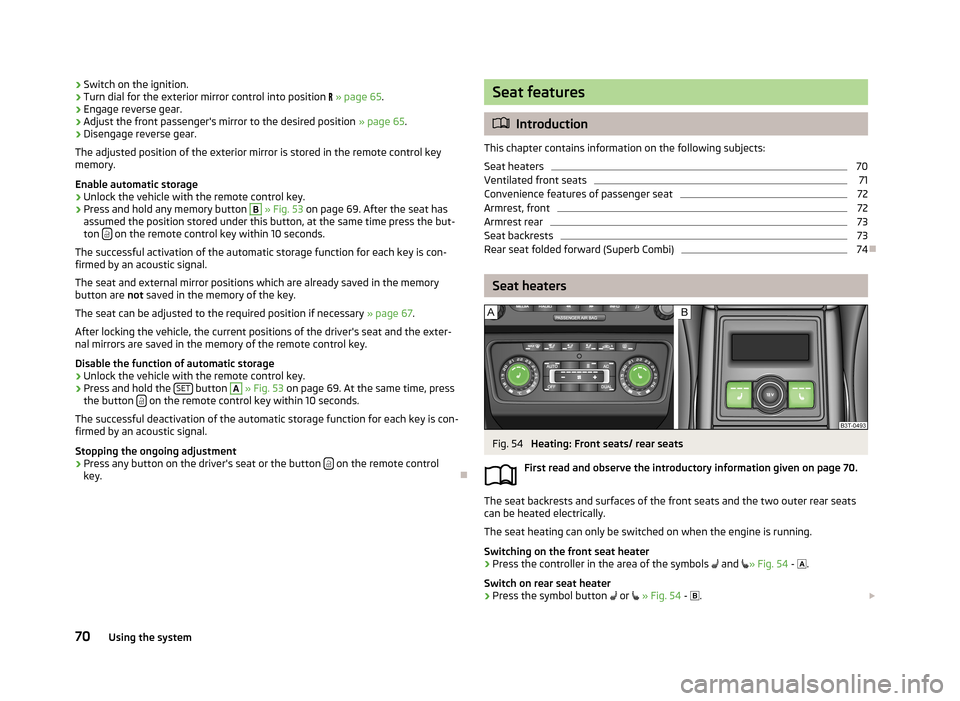
Seat heaters
Fig. 54
Heating: Front seats/ rear seats
First read and observe the introductory information given on page 70.
The seat backrests and surfaces of the front seats and the two outer rear seats
can be heated electrically.
The seat heating can only be switched on when the engine is running.
Switching on the front seat heater
›
Press the controller in the area of the symbols
and
» Fig. 54 -
.
Switch on rear seat heater
›
Press the symbol button
or
» Fig. 54 -
.
70Using the system
Page 74 of 274
By pressing the button once, the heating is switched to the highest intensity -level 3, which is indicated by all three of the indicator lights in the switch lightingup.
With repeated pressing of the switch, the heating is turned down until it goes off. The seat heating level is indicated by the number of illuminated warning lights inthe respective control.WARNINGIf you have a subdued pain and/or temperature sensitivity, e.g. through medi-
cation, paralysis or because of chronic illness (e.g. diabetes), we recommend
not to use the seat heating. This can lead to burns on the back, the posterior
and the legs which are difficult to heal. If the seat heating is used, we recom-
mend to make regular breaks in your journey when driving long distances, so
that the body can recuperate from the stress of the journey. Please consult
your doctor, who can evaluate your specific condition.
CAUTION
■ Do not kneel on the seats or otherwise apply concentrated pressure to them.■Do not turn on the seat heater if seats are not occupied.■
Do not switch on the seat heating if the seats have objects attached to or
placed on them, for example a child seat, a bag, etc. A fault of the heating ele-
ments in the seat heating can occur.
■
If additional seat covers or protective covers are attached to the seats, do not
turn on the seat heater - there is a risk of damaging the seat covers and seat
heating.
■
Do not clean the seats using moisture » page 203, Seat covers .
Note
■
If the on-board voltage drops, the seat heating is switched off automatically, in
order to provide sufficient electrical energy for the engine control » page 218.■
If the heaters for the rear seats are set to the highest intensity - level 3, they
are automatically switched over to level 2 after 10 minutes (two indicator lights
are illuminated on the switch).
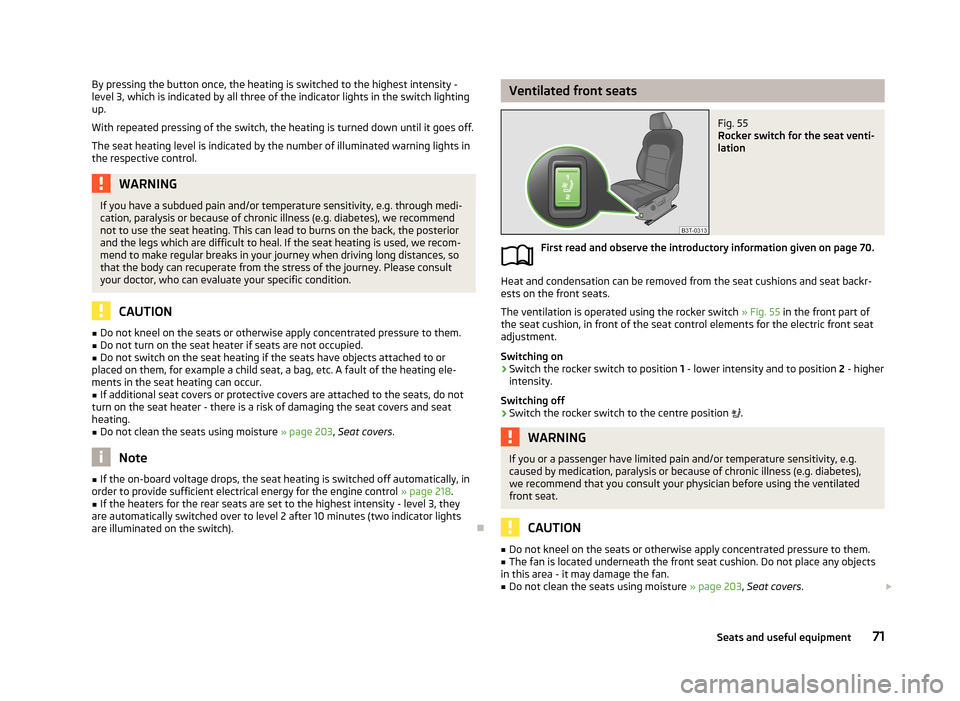
Ventilated front seatsFig. 55
Rocker switch for the seat venti-
lation
First read and observe the introductory information given on page 70.
Heat and condensation can be removed from the seat cushions and seat backr- ests on the front seats.
The ventilation is operated using the rocker switch » Fig. 55 in the front part of
the seat cushion, in front of the seat control elements for the electric front seat
adjustment.
Switching on
›
Switch the rocker switch to position 1 - lower intensity and to position 2 - higher
intensity.
Switching off
›
Switch the rocker switch to the centre position
.
WARNINGIf you or a passenger have limited pain and/or temperature sensitivity, e.g.
caused by medication, paralysis or because of chronic illness (e.g. diabetes),
we recommend that you consult your physician before using the ventilated
front seat.
CAUTION
■ Do not kneel on the seats or otherwise apply concentrated pressure to them.■The fan is located underneath the front seat cushion. Do not place any objects
in this area - it may damage the fan.■
Do not clean the seats using moisture » page 203, Seat covers .
71Seats and useful equipment
Page 75 of 274
Note■The ventilation should only be switched on when the engine is running. This
has a significant effect of saving on the battery capacity.■
We do not recommend using the front seat ventilation and heating at the same
time. Using the ventilation to cool the seat surface considerably reduces the
heating capacity, at the same time affecting the ability of the control unit to de-
tect the right seat surface temperature.
Convenience features of passenger seat
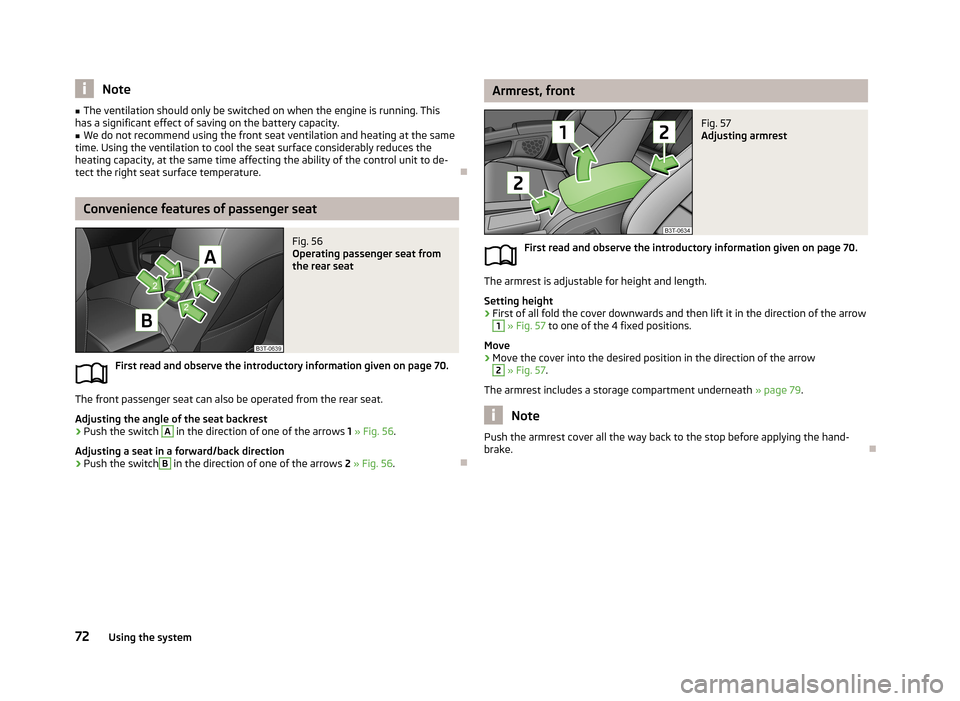
Fig. 56
Operating passenger seat from
the rear seat
First read and observe the introductory information given on page 70.
The front passenger seat can also be operated from the rear seat.
Adjusting the angle of the seat backrest
›
Push the switch
A
in the direction of one of the arrows 1 » Fig. 56 .
Adjusting a seat in a forward/back direction
›
Push the switch
B
in the direction of one of the arrows 2 » Fig. 56 .
Armrest, frontFig. 57
Adjusting armrest
First read and observe the introductory information given on page 70.
The armrest is adjustable for height and length.
Setting height
›
First of all fold the cover downwards and then lift it in the direction of the arrow
1
» Fig. 57 to one of the 4 fixed positions.
Move
›
Move the cover into the desired position in the direction of the arrow
2
» Fig. 57 .
The armrest includes a storage compartment underneath » page 79.
Note
Push the armrest cover all the way back to the stop before applying the hand-
brake.
72Using the system
Page 83 of 274

Glasses storage boxFig. 72
Opening the glasses storage box
First read and observe the introductory information and safety warn-ings on page 74.
Opening
›
Press the button
A
» Fig. 72 .
The box folds in the direction of the arrow.
Closing
›
Swivel the lid on the glasses storage box against the direction of the ar- row » Fig. 72 until it is heard to lock.
WARNING■
The compartment must only be opened when removing or inserting the
spectacles and otherwise must be kept closed!■
The box must be closed before leaving and locking the vehicle – risk of im-
pairment to the functions of the anti-theft alarm system!
CAUTION
Do not put any heat-sensitive objects in the glasses storage box - they may be
damaged.
Storage compartment on the passenger sideFig. 73
Tray open / operating air supply
First read and observe the introductory information and safety warn- ings
on page 74.
A pen holder is provided in the stowage compartment.
Opening
›
Press the button » Fig. 73 -
.
The flap folds down.
Closing
›
Lift the lid upwards until it clicks into place.
Air supply
›
Open the air supply by pulling the lever in the direction of the arrow » Fig. 73 -
.
›
The air supply is closed by pressing the lever in the opposite direction to that of
the arrow.
Opening the air supply when the air conditioning system is switched on allows
cooled air to flow into the storage compartment.
Opening the air inlet when the air conditioning system is on causes fresh or inte-rior air to flow into the storage compartment.
We recommend closing the air supply if it is operated in heating mode or the cool-ing system for the storage compartment is not being used.
80Using the system
Page 88 of 274

›Distribute loads as evenly as possible.›Place heavy objects as far forward as possible.›
Attach the items of luggage to the lashing eyes or using the nets
» page 86.
In the event of an accident, even small and light objects gain so much kinetic en-
ergy that they can cause severe injuries.
The magnitude of the kinetic energy is dependent on the speed at which the ve-
hicle is travelling and the weight of the object.
Example: In the event of a frontal collision at a speed of 50 km/h, an object with a
weight of 4.5 kg produces an energy, which corresponds to 20 times its own
weight. This means that it results in a weight of approx. 90 kg “ ”.
Luggage compartment light
The light switches on/off when the luggage compartment lid is opened or closed.
If the boot lid is open and the ignition switched off, the light will extinguish auto-
matically after around 10 minutes.
Boot light for Superb Combi vehicles » page 90.
WARNING■
Store the objects in the boot and attach them to the lashing eyes.■Loose objects can be thrown forward during a sudden manoeuvre or in case
of an accident and can injure the occupants or other road users.■
Loose objects could hit a deployed airbag and injure occupants – danger of
death!
■
Please note that transporting heavy objects alters the handling properties
of the vehicle due to the displacement of the centre of gravity – risk of acci-
dent! The speed and style of driving must be adjusted accordingly.
■
If the items of luggage or objects are attached to the lashing eyes with un-
suitable or damaged lashing straps, injuries can occur in the event of braking manoeuvres or accidents. To prevent items of luggage from moving around,
always use suitable lashing straps which must be firmly attached to the lash-
ing eyes.
■
The transported items must be stowed in such a way that no objects are
able to slip forward on sudden driving or braking manoeuvres – risk of injury!
■
When transporting objects in the luggage compartment that has been en-
larged by folding the rear seats forward, ensure the safety of the passengers transported on the other rear seats » page 171.
WARNING (Continued)■
If the rear seat next to the folded forward seat is occupied, ensure maxi-
mum safety, e.g. by placing the goods to be transported in such a way that the
seat is prevented from folding back in case of a rear collision.■
Do not drive with the luggage compartment lid fully opened or slightly ajar
otherwise exhaust gases may get into the interior of the vehicle – risk of poi-
soning!
■
Do not exceed the permissible axle loads and permissible gross weight of
the vehicle – risk of accident!
■
Do not transport people in the boot!
CAUTION
Make sure that transported objects with sharp edges do not damage the follow-
ing:■
heating elements in the rear window;
■
elements of the aerial integrated in the rear window;
■
Aerial filaments integrated in the rear side windows (Superb Combi).
Note
Tyre pressure must be adjusted to the load » page 221.
Class N1 vehicles
First read and observe the introductory information and safety warn-
ings
on page 84.
On class N1 vehicles, which are not fitted with a protective grille, a lashing set
which complies with the standard EN 12195 (1 - 4) must be used for fastening the
load.
85Seats and useful equipment
Page 91 of 274

Luggage compartment coverFig. 86
Removing/installing the luggage
compartment cover
First read and observe the introductory information and safety warn-
ings on page 84.
Removing
›
Hook the support straps
1
» Fig. 86 onto the tailgate.
›
Place the cover in the horizontal position.
›
Pull the cover out of the holders
2
horizontally towards the rear.
The removed boot cover can be stowed behind the seat backrest.
Install
›
Push the boot cover into the brackets
2
» Fig. 86 .
›
Hook the support straps
1
onto the tailgate.
WARNINGNo objects should be placed on the boot cover, the vehicle occupants could be
endangered if there is sudden braking or the vehicle collides with something.
CAUTION
Please ensure that the heating elements for the rear window heater are not dam-
aged as a result of objects placed in this area.
Note
If the retaining strips 1 are attached to the tailgate, the boot cover will raise
when you open the tailgate.
Roll-up boot cover (Superb Combi)Fig. 87
Foldable luggage compartment cover: pull out and roll up / take out
First read and observe the introductory information and safety warn-
ings
on page 84.
Pulling out
›
Pull the foldable boot cover as far as the stop into the secured position
2
» Fig. 87 .
Folding
›
Press the cover in the handle area in the direction of the arrow
3
» Fig. 87 , and
the cover automatically rolls up into position
1
.
Press in the grip area again and the cover will roll up.
Removing/inserting
The fully rolled-up boot cover can be removed (e.g. for the transport of bulky ob-
jects).
›
Push on the side of the crossbar in the direction of the arrow
4
» Fig. 87 and
remove the cover in the direction of the arrow
5
.
Insertion takes place in the reverse order.
WARNINGNo objects should be placed on the foldable boot cover.
88Using the system
Page 101 of 274
Air conditioning system
Heating, ventilation and cooling
Introduction
This chapter contains information on the following subjects:
Air outlets
99
Using the air conditioning system economically
99
Operational problems
100
The heating effect is dependent upon the coolant temperature, thus full heat
output only occurs when the engine has reached its operating temperature.
If the cooling system is switched on, the temperature and air humidity drops in
the vehicle. The cooling system prevents the windows from misting up during
winter months.
It is possible to briefly activate recirculated air mode to enhance the cooling ef-
fect.
Please refer to the information regarding recirculated air mode for the air-condi-
tioning system » page 102 or for Climatronic » page 105.
WARNINGFor your own safety and that of other road users, ensure that all the windows
are free of ice, snow and misting. Please familiarize yourself about how to cor- rectly operate the heating and ventilation systems, how to demist and defrost
the windows, as well as with the cooling mode.
CAUTION
■ The air inlet in front of the windscreen must be free (e.g. of ice, snow or leaves)
to ensure that the heating and cooling system operates properly.■
After switching on the cooling Condensation from the evaporator of the air con-
ditioning may drip down and form a puddle below the vehicle. This is not a leak!
Note■ The used air streams out through the vents in the boot.■We recommend that you do not smoke in the vehicle when the recirculating air
mode is operating since the smoke which is drawn at the evaporator from the in- terior of the vehicle forms deposits in the evaporator of the air conditioning sys-tem. This produces a permanent odour when the air conditioning system is oper-ating which can only be eliminated through considerable effort and expense (re-
placement of compressor).
98Using the system
Page 104 of 274

Set the direction of the air outlet » page 99
Switch cooling system on/off
Switching the rear window heater on/off » page 59
Aux. heating on/off » page 107
Recirculating air operation on/off » page 102
Note
The warning light in the symbol button lights after activation, even if not all of
the conditions for the function of the cooling system are met » page 100. By light-
ing up of the indicator light in the button, the operational readiness of the cooling
system is signalled.C101Air conditioning system
Page 105 of 274

adjustingFirst read and observe the introductory information and safety warnings
on page 100.
Recommended basic settings of the control elements of the air conditioning system for the respective operating modes:
SettingsControl dial settings » Fig. 107 on page 100Button » Fig. 107 on page 100Air outlet vents 2 » Fig. 105
on page 99ABC
Defrost/defog windscreen and
side windows a)Desired tempera-
ture3 or 4Automaticallyswitched onDo not switch onOpen and align with the side windowThe fastest heatingTo the right up tothe stop3Switched offBriefly switch onOpeningComfortable heatingDesired tempera- ture2 or 3Switched offDo not switch onOpeningThe fastest coolingTo the left up to
the stopbriefly 4, then 2 or 3ActivatedBriefly switch onOpeningComfortable coolingDesired tempera- ture1, 2 or 3ActivatedDo not switch onOpen and align to the roofFresh air mode - ventilationTo the left up tothe stopDesired positionSwitched offDo not switch onOpeninga)
We recommend that you do not use this setting in countries with high humidity levels. This can result in heavy cooling of the window glass and the following fogging from outside.
We recommend that you leave the air outlet vents 3 » Fig. 105 on page 99 in the
opened position.
Recirculated air mode
First read and observe the introductory information and safety warn-ings
on page 100.
Recirculated air mode prevents polluted air outside the vehicle from getting into
the vehicle, for example when driving through a tunnel or when standing in a traffic jam.
Switching on/off
›
Press the symbol button
.
The indicator light in the button lights up.
› Press the symbol button
again.
The indicator light in the button goes out.
Recirculated air mode is switched off automatically if the air distribution controlC
» Fig. 107 on page 100 is turned to position . Recirculated air mode can be
switched on again from this setting by repeatedly pressing the symbol button .
WARNINGDo not leave recirculated air mode on over a longer period of time, as “stale”
air can cause fatigue of the driver and passengers, reduce attention levels and
also cause the windows to mist up. The risk of having an accident increases.
Switch off recirculated air mode as soon as the windows start to mist up.
102Using the system
Page 106 of 274
Climatronic (automatic air conditioning system)
Introduction
This chapter contains information on the following subjects:
Control elements
103
automatic mode
104
Switching the cooling system on/off
104
Setting the temperature
104
Recirculation mode - Version 1
105
Recirculation mode - Version 2
106
Controlling blower
106
Defrosting windscreen
106
The Climatronic in automatic mode ensures the best-possible setting of the tem-
perature of the outflowing air, the blower stage and air distribution.
The system also takes sunlight into account, which eliminates the need to alterthe settings manually.
The cooling system operates only if the following conditions are met. The cooling system is switched on » page 100.
The engine is running.
The outside temperature is above approx. +2 °C.
The cooling system is switched off at a high coolant temperature in order to pro-
vide cooling at a high load of the engine.
Aeration of the vehicle when ignition is switched off
On models fitted with power sliding/tilting roof with sollar cells, the fresh air blower is automatically switched over to “solar mode” if the sun ray's are suffi-
cient after switching off the ignition. The solar cells on the sliding/tilting roof de-
liver power for the fresh air blower. This supplies the interior of the car with fresh air.
For an optimum ventilation, the air outlet vents 2 and 3 must be opened » Fig. 105
on page 99.
The ventilation functions only when the sliding/tilting roof is fully closed.
Note■ We recommend that you have Climatronic cleaned by a specialist garage once
every year.■
On vehicles equipped with a factory-fitted radio or radio navigation system, the
Climatronic information is also shown on their displays. This function can be
switched off, see » operating instructions for the radio or navigation system .
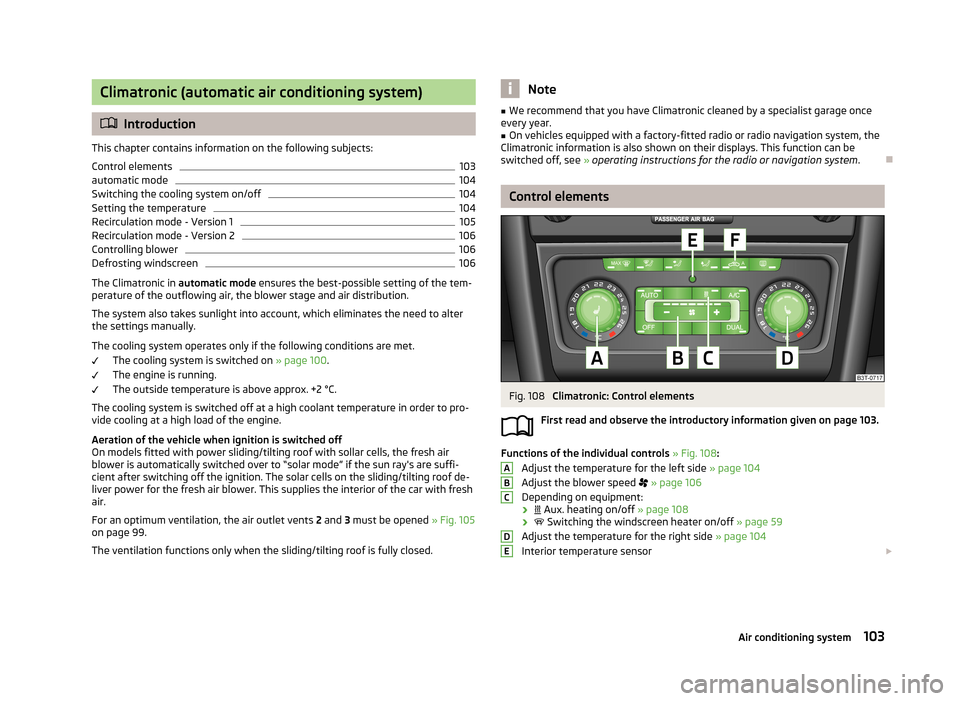
Control elements
Fig. 108
Climatronic: Control elements
First read and observe the introductory information given on page 103.
Functions of the individual controls » Fig. 108 :
Adjust the temperature for the left side » page 104
Adjust the blower speed
» page 106
Depending on equipment:
›
Aux. heating on/off » page 108
›
Switching the windscreen heater on/off » page 59
Adjust the temperature for the right side » page 104
Interior temperature sensor
ABCDE103Air conditioning system