sensor SKODA SUPERB 2013 2.G / (B6/3T) User Guide
[x] Cancel search | Manufacturer: SKODA, Model Year: 2013, Model line: SUPERB, Model: SKODA SUPERB 2013 2.G / (B6/3T)Pages: 274, PDF Size: 17.31 MB
Page 56 of 274
Turn signal and main beamFig. 31
Operating lever: Turn signal and
main beam operation
First read and observe the introductory information and safety warn-
ings on page 51.
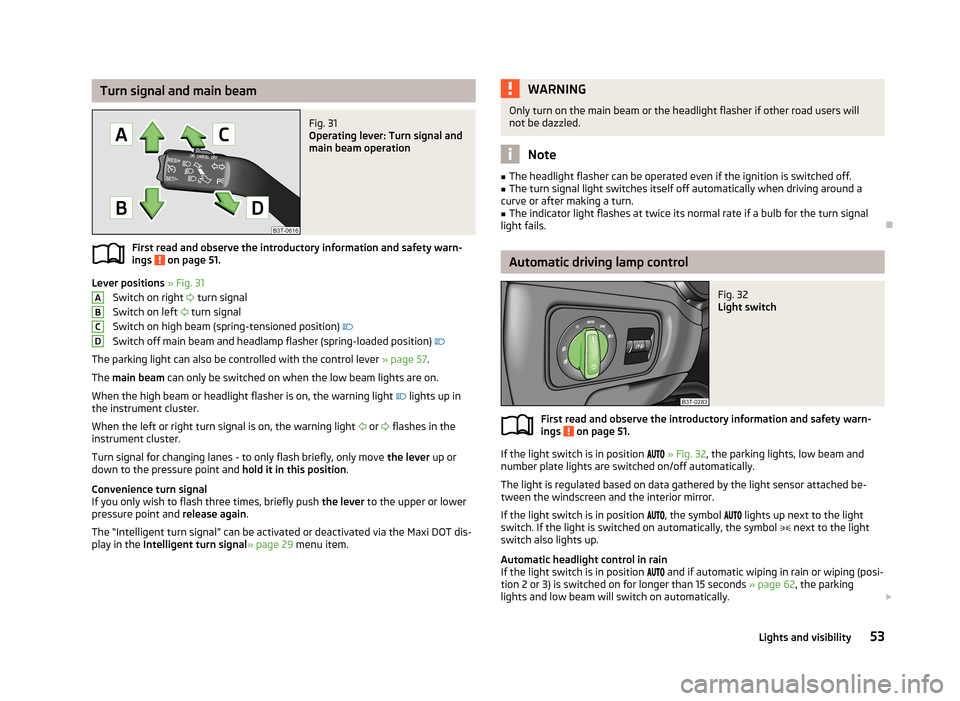
Lever positions » Fig. 31
Switch on right
turn signal
Switch on left
turn signal
Switch on high beam (spring-tensioned position)
Switch off main beam and headlamp flasher (spring-loaded position)
The parking light can also be controlled with the control lever » page 57.
The main beam can only be switched on when the low beam lights are on.
When the high beam or headlight flasher is on, the warning light
lights up in
the instrument cluster.
When the left or right turn signal is on, the warning light
or
flashes in the
instrument cluster.
Turn signal for changing lanes - to only flash briefly, only move the lever up or
down to the pressure point and hold it in this position.
Convenience turn signal
If you only wish to flash three times, briefly push the lever to the upper or lower
pressure point and release again.
The “Intelligent turn signal” can be activated or deactivated via the Maxi DOT dis-
play in the Intelligent turn signal » page 29 menu item.
ABCDWARNINGOnly turn on the main beam or the headlight flasher if other road users will
not be dazzled.
Note
■ The headlight flasher can be operated even if the ignition is switched off.■The turn signal light switches itself off automatically when driving around a
curve or after making a turn.■
The indicator light flashes at twice its normal rate if a bulb for the turn signal
light fails.
Automatic driving lamp control
Fig. 32
Light switch
First read and observe the introductory information and safety warn-
ings on page 51.
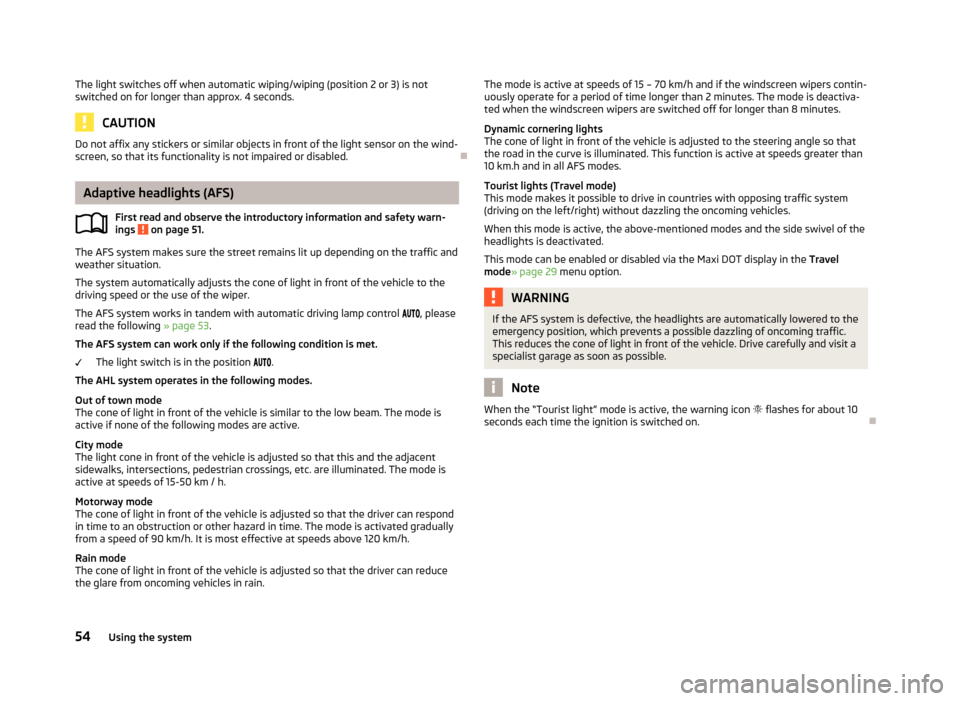
If the light switch is in position
» Fig. 32 , the parking lights, low beam and
number plate lights are switched on/off automatically.
The light is regulated based on data gathered by the light sensor attached be-
tween the windscreen and the interior mirror.
If the light switch is in position
, the symbol
lights up next to the light
switch. If the light is switched on automatically, the symbol
next to the light
switch also lights up.
Automatic headlight control in rain
If the light switch is in position
and if automatic wiping in rain or wiping (posi-
tion 2 or 3) is switched on for longer than 15 seconds » page 62, the parking
lights and low beam will switch on automatically.
53Lights and visibility
Page 57 of 274
The light switches off when automatic wiping/wiping (position 2 or 3) is not
switched on for longer than approx. 4 seconds.
CAUTION
Do not affix any stickers or similar objects in front of the light sensor on the wind-
screen, so that its functionality is not impaired or disabled.
Adaptive headlights (AFS)
First read and observe the introductory information and safety warn-ings
on page 51.
The AFS system makes sure the street remains lit up depending on the traffic and weather situation.
The system automatically adjusts the cone of light in front of the vehicle to the driving speed or the use of the wiper.
The AFS system works in tandem with automatic driving lamp control
, please
read the following » page 53.
The AFS system can work only if the following condition is met. The light switch is in the position
.
The AHL system operates in the following modes.
Out of town mode
The cone of light in front of the vehicle is similar to the low beam. The mode is
active if none of the following modes are active.
City mode
The light cone in front of the vehicle is adjusted so that this and the adjacent
sidewalks, intersections, pedestrian crossings, etc. are illuminated. The mode is
active at speeds of 15-50 km / h.
Motorway mode
The cone of light in front of the vehicle is adjusted so that the driver can respond in time to an obstruction or other hazard in time. The mode is activated gradually
from a speed of 90 km/h. It is most effective at speeds above 120 km/h.
Rain mode
The cone of light in front of the vehicle is adjusted so that the driver can reduce
the glare from oncoming vehicles in rain.
The mode is active at speeds of 15 – 70 km/h and if the windscreen wipers contin-
uously operate for a period of time longer than 2 minutes. The mode is deactiva-
ted when the windscreen wipers are switched off for longer than 8 minutes.
Dynamic cornering lights
The cone of light in front of the vehicle is adjusted to the steering angle so that the road in the curve is illuminated. This function is active at speeds greater than
10 km.h and in all AFS modes.
Tourist lights (Travel mode)
This mode makes it possible to drive in countries with opposing traffic system (driving on the left/right) without dazzling the oncoming vehicles.
When this mode is active, the above-mentioned modes and the side swivel of the
headlights is deactivated.
This mode can be enabled or disabled via the Maxi DOT display in the Travel
mode » page 29 menu option.WARNINGIf the AFS system is defective, the headlights are automatically lowered to the
emergency position, which prevents a possible dazzling of oncoming traffic.
This reduces the cone of light in front of the vehicle. Drive carefully and visit a
specialist garage as soon as possible.
Note
When the “Tourist light” mode is active, the warning icon flashes for about 10
seconds each time the ignition is switched on.
54Using the system
Page 59 of 274
The function is switched on automatically if the following conditions are met:The light switch is in position » Fig. 32 on page 53.
The visibility in the vehicle environment is reduced. The ignition is switched off.
The functions and settings of the illumination time can be activated/deactivated
via the MAXI DOT display in the menu items Coming Home or Leaving
Home » page 29 .
The light is regulated based on data gathered by the light sensor attached be- tween the windscreen and the interior mirror » page 53.
The function switches on the parking and low beam lights, the entry lighting in
the exterior mirrors and the licence plate light.
COMING HOME
The light turns on automatically when you open the driver's door on (within 60 seconds of turning off the ignition).
The light turns off 10 seconds after closing all the doors and the tailgate or after
the preset time.
If a door or the boot lid remains open, the light goes out after 60 seconds.
LEAVING HOME
The light turns on automatically after the vehicle is unlocked with the remote
control.
The light turns off after 10 seconds or after a preset time or after the vehicle is
locked.
CAUTION
Do not affix any stickers or similar objects in front of the light sensor on the wind-
screen, so that its functionality is not impaired or disabled.
Note
If this function is activated constantly, the battery will be heavily discharged par-
ticularly in short-haul traffic.Hazard warning light systemFig. 34
Button for hazard warning light
system
First read and observe the introductory information and safety warn-
ings on page 51.
Switching on/off
›
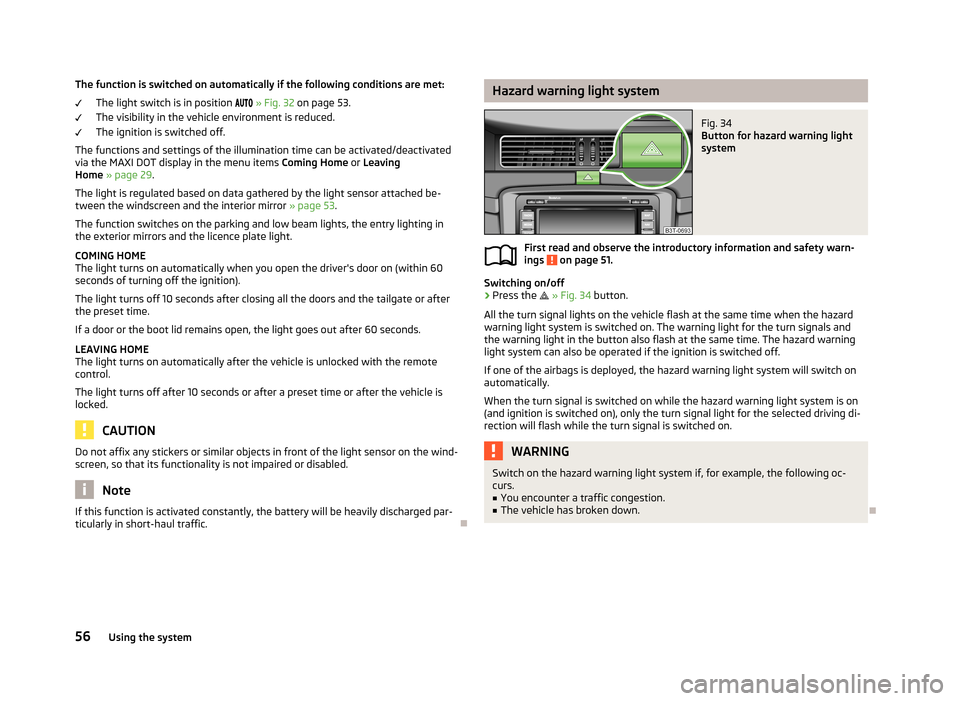
Press the
» Fig. 34 button.
All the turn signal lights on the vehicle flash at the same time when the hazard
warning light system is switched on. The warning light for the turn signals and
the warning light in the button also flash at the same time. The hazard warning
light system can also be operated if the ignition is switched off.
If one of the airbags is deployed, the hazard warning light system will switch on
automatically.
When the turn signal is switched on while the hazard warning light system is on
(and ignition is switched on), only the turn signal light for the selected driving di- rection will flash while the turn signal is switched on.
WARNINGSwitch on the hazard warning light system if, for example, the following oc-
curs.■
You encounter a traffic congestion.
■
The vehicle has broken down.
56Using the system
Page 106 of 274
Climatronic (automatic air conditioning system)
Introduction
This chapter contains information on the following subjects:
Control elements
103
automatic mode
104
Switching the cooling system on/off
104
Setting the temperature
104
Recirculation mode - Version 1
105
Recirculation mode - Version 2
106
Controlling blower
106
Defrosting windscreen
106
The Climatronic in automatic mode ensures the best-possible setting of the tem-
perature of the outflowing air, the blower stage and air distribution.
The system also takes sunlight into account, which eliminates the need to alterthe settings manually.
The cooling system operates only if the following conditions are met. The cooling system is switched on » page 100.
The engine is running.
The outside temperature is above approx. +2 °C.
The cooling system is switched off at a high coolant temperature in order to pro-
vide cooling at a high load of the engine.
Aeration of the vehicle when ignition is switched off
On models fitted with power sliding/tilting roof with sollar cells, the fresh air blower is automatically switched over to “solar mode” if the sun ray's are suffi-
cient after switching off the ignition. The solar cells on the sliding/tilting roof de-
liver power for the fresh air blower. This supplies the interior of the car with fresh air.
For an optimum ventilation, the air outlet vents 2 and 3 must be opened » Fig. 105
on page 99.
The ventilation functions only when the sliding/tilting roof is fully closed.
Note■ We recommend that you have Climatronic cleaned by a specialist garage once
every year.■
On vehicles equipped with a factory-fitted radio or radio navigation system, the
Climatronic information is also shown on their displays. This function can be
switched off, see » operating instructions for the radio or navigation system .
Control elements
Fig. 108
Climatronic: Control elements
First read and observe the introductory information given on page 103.
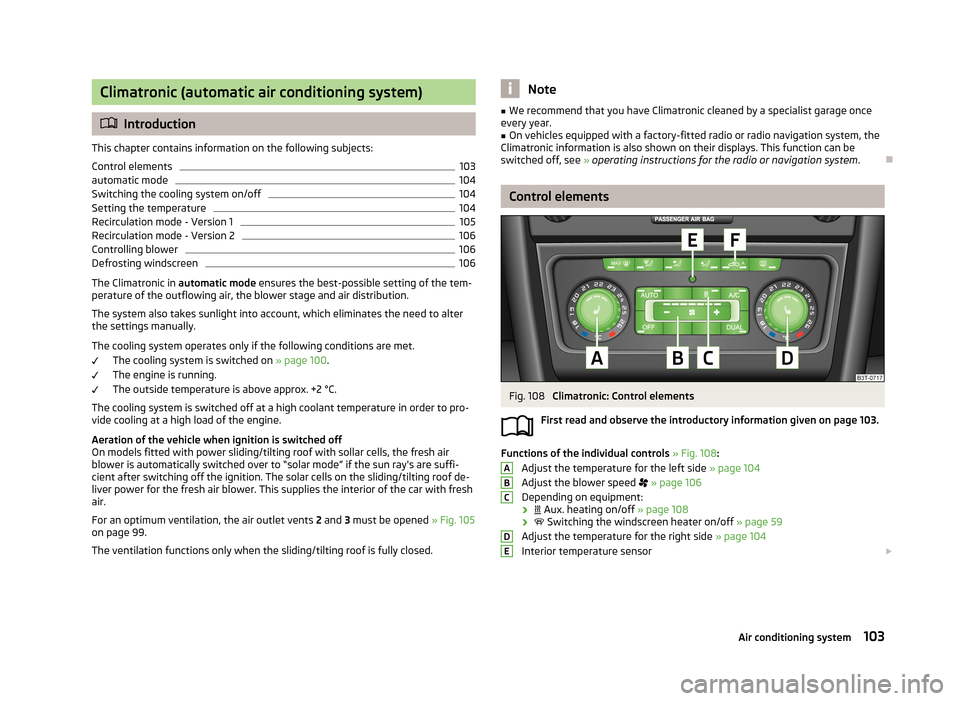
Functions of the individual controls » Fig. 108 :
Adjust the temperature for the left side » page 104
Adjust the blower speed
» page 106
Depending on equipment:
›
Aux. heating on/off » page 108
›
Switching the windscreen heater on/off » page 59
Adjust the temperature for the right side » page 104
Interior temperature sensor
ABCDE103Air conditioning system
Page 107 of 274
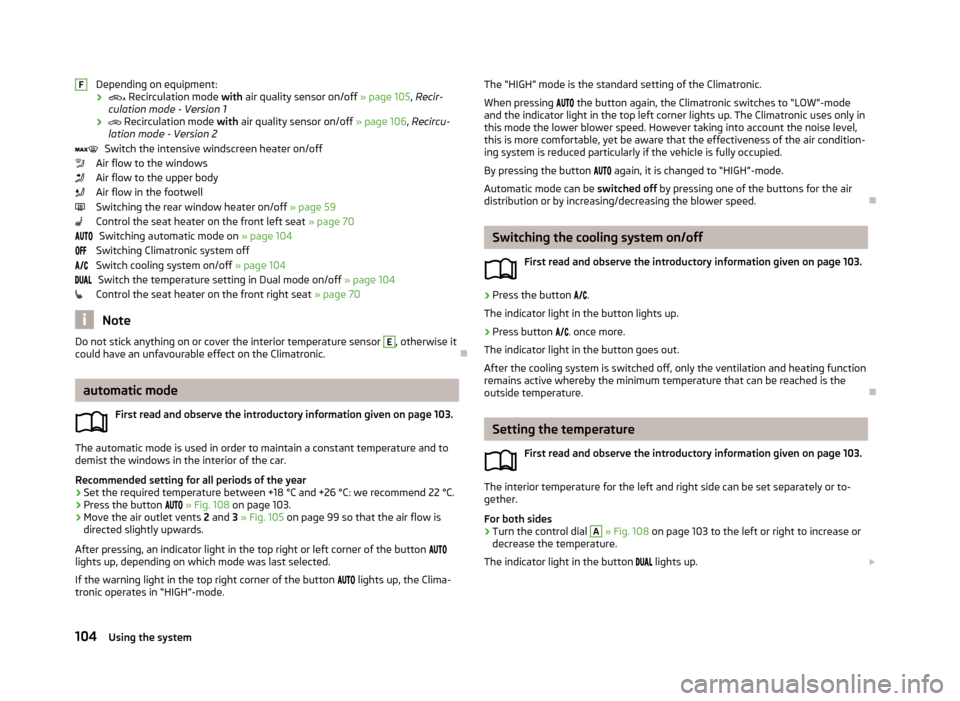
Depending on equipment:
›
Recirculation mode with air quality sensor on/off » page 105, Recir-
culation mode - Version 1
›
Recirculation mode with air quality sensor on/off » page 106, Recircu-
lation mode - Version 2
Switch the intensive windscreen heater on/off
Air flow to the windows
Air flow to the upper body
Air flow in the footwell
Switching the rear window heater on/off » page 59
Control the seat heater on the front left seat » page 70
Switching automatic mode on » page 104
Switching Climatronic system off
Switch cooling system on/off » page 104
Switch the temperature setting in Dual mode on/off » page 104
Control the seat heater on the front right seat » page 70
Note
Do not stick anything on or cover the interior temperature sensor E, otherwise it
could have an unfavourable effect on the Climatronic.
automatic mode
First read and observe the introductory information given on page 103.
The automatic mode is used in order to maintain a constant temperature and to
demist the windows in the interior of the car.
Recommended setting for all periods of the year
›
Set the required temperature between +18 °C and +26 °C: we recommend 22 °C.
›
Press the button
» Fig. 108 on page 103.
›
Move the air outlet vents 2 and 3 » Fig. 105 on page 99 so that the air flow is
directed slightly upwards.
After pressing, an indicator light in the top right or left corner of the button
lights up, depending on which mode was last selected.
If the warning light in the top right corner of the button
lights up, the Clima-
tronic operates in “HIGH”-mode.
FThe “HIGH” mode is the standard setting of the Climatronic.
When pressing the button again, the Climatronic switches to “LOW”-mode
and the indicator light in the top left corner lights up. The Climatronic uses only in
this mode the lower blower speed. However taking into account the noise level, this is more comfortable, yet be aware that the effectiveness of the air condition-ing system is reduced particularly if the vehicle is fully occupied.
By pressing the button again, it is changed to “HIGH”-mode.
Automatic mode can be switched off by pressing one of the buttons for the air
distribution or by increasing/decreasing the blower speed.
Switching the cooling system on/off
First read and observe the introductory information given on page 103.
›
Press the button
.
The indicator light in the button lights up.
›
Press button
. once more.
The indicator light in the button goes out.
After the cooling system is switched off, only the ventilation and heating function remains active whereby the minimum temperature that can be reached is the
outside temperature.
Setting the temperature
First read and observe the introductory information given on page 103.
The interior temperature for the left and right side can be set separately or to-
gether.
For both sides
›
Turn the control dial
A
» Fig. 108 on page 103 to the left or right to increase or
decrease the temperature.
The indicator light in the button
lights up.
104Using the system
Page 108 of 274
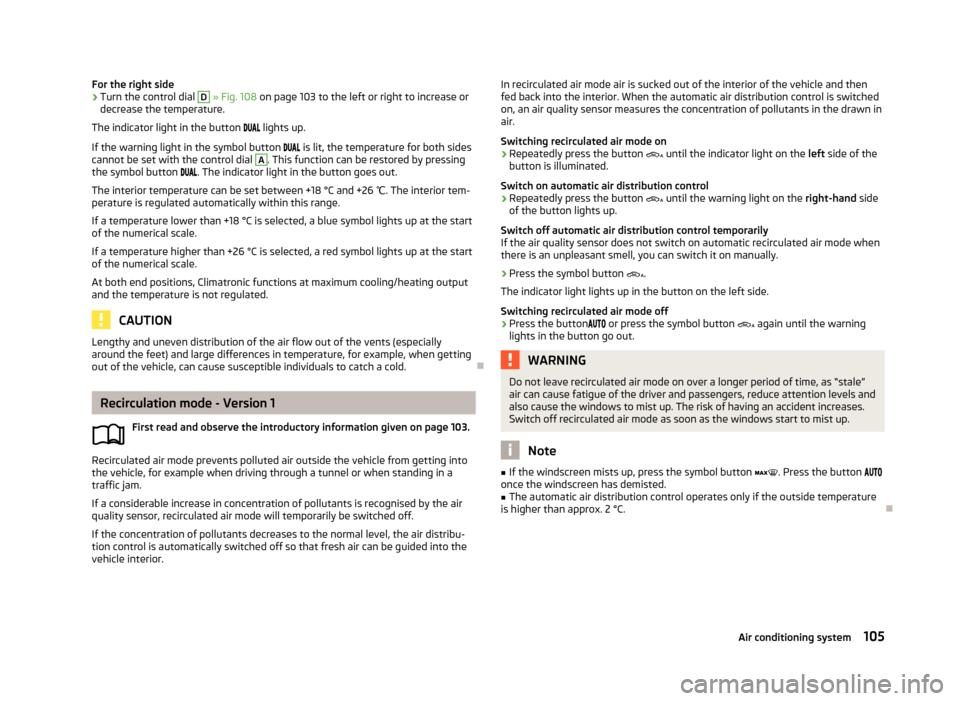
For the right side›Turn the control dial D » Fig. 108 on page 103 to the left or right to increase or
decrease the temperature.
The indicator light in the button lights up.
If the warning light in the symbol button is lit, the temperature for both sides
cannot be set with the control dial A
. This function can be restored by pressing
the symbol button . The indicator light in the button goes out.
The interior temperature can be set between +18 °C and +26 ℃. The interior tem-
perature is regulated automatically within this range.
If a temperature lower than +18 °C is selected, a blue symbol lights up at the start
of the numerical scale.
If a temperature higher than +26 °C is selected, a red symbol lights up at the start
of the numerical scale.
At both end positions, Climatronic functions at maximum cooling/heating output and the temperature is not regulated.
CAUTION
Lengthy and uneven distribution of the air flow out of the vents (especially
around the feet) and large differences in temperature, for example, when getting
out of the vehicle, can cause susceptible individuals to catch a cold.
Recirculation mode - Version 1
First read and observe the introductory information given on page 103.
Recirculated air mode prevents polluted air outside the vehicle from getting intothe vehicle, for example when driving through a tunnel or when standing in a
traffic jam.
If a considerable increase in concentration of pollutants is recognised by the air quality sensor, recirculated air mode will temporarily be switched off.
If the concentration of pollutants decreases to the normal level, the air distribu-
tion control is automatically switched off so that fresh air can be guided into the
vehicle interior.
In recirculated air mode air is sucked out of the interior of the vehicle and then
fed back into the interior. When the automatic air distribution control is switched
on, an air quality sensor measures the concentration of pollutants in the drawn in
air.
Switching recirculated air mode on›
Repeatedly press the button until the indicator light on the
left side of the
button is illuminated.
Switch on automatic air distribution control
›
Repeatedly press the button until the warning light on the
right-hand side
of the button lights up.
Switch off automatic air distribution control temporarily If the air quality sensor does not switch on automatic recirculated air mode whenthere is an unpleasant smell, you can switch it on manually.
›
Press the symbol button .
The indicator light lights up in the button on the left side.
Switching recirculated air mode off
›
Press the button
or press the symbol button again until the warning
lights in the button go out.
WARNINGDo not leave recirculated air mode on over a longer period of time, as “stale”
air can cause fatigue of the driver and passengers, reduce attention levels and
also cause the windows to mist up. The risk of having an accident increases.
Switch off recirculated air mode as soon as the windows start to mist up.
Note
■ If the windscreen mists up, press the symbol button . Press the button
once the windscreen has demisted.■
The automatic air distribution control operates only if the outside temperature
is higher than approx. 2 °C.
105Air conditioning system
Page 155 of 274
The HBA is activated by very quick operation of the brake pedal. In order to ach-
ieve the shortest possible braking distance, the brake pedal must be applied firm-
ly until the vehicle has come to a standstill.
The HBA function is automatically deactivated when the brake pedal is released.
The ABS is activated faster and more effectively with the intervention of the HBA.
Hill Hold Control (HHC)
First read and observe the introductory information and safety warn-ings
on page 150.
When driving on slopes, HHC allows you to move your foot from the brake pedal
to the accelerator pedal without having to use the handbrake.
The system holds the brake pressure produced by the activation of the brakepedal for approx. 2 seconds after the brake pedal is released.
The brake pressure drops gradually the more you operate the accelerator pedal. Ifthe vehicle does not start off within 2 seconds, it starts to roll back.
The HHC is active on slops of >5 % if the driver door is closed. HHC is only everactive on slopes when in forward or reverse start off. When driving downhill, it is
inactive.
Parking aid
Introduction
This chapter contains information on the following subjects:
Function
153
Activation/deactivation
153WARNING■ The parking aid is not a substitute for the driver paying proper attention and
it is always the driver's responsibility to take care when reversing the vehicle
or carrying out similar manoeuvres. Pay particular attention to small children
and animals as they may not be recognised by the system sensors.■
Before reversing, you should make sure that there are no small obstacles,
such as rocks, thin posts, trailer drawbars etc. in front or behind your vehicle.
Such obstacles may not be recognised by the system sensors.
■
Under certain circumstances, surfaces of certain objects and types of cloth-
ing cannot reflect the system signals. Thus, these objects or people who wear such clothing are not recognised by the System sensors.
■
External sound sources can have a detrimental effect on the system. Under
adverse conditions, this may cause objects or people to not be recognised by
the system.
CAUTION
■ If a warning signal sounds for about 3 seconds after activating the system and
there is no obstacle close to your car, this indicates a system fault. The fault is
also indicated by the symbol flashing in the » Fig. 132 on page 153 button.
Seek help from a specialist garage.■
The sensors must be kept clean (free of ice, etc.) to enable the system to oper-
ate properly.
■
Additionally installed modules such as bicycle carriers can impair the function of
the parking aid.
Note
■ The signal tones for front obstacle recognition are factory-set to be higher than
for rear obstacle recognition.■
The sound of the park-assist can be adjusted via the MAXI DOT display in the
Wizards menu option » page 29.
■
If the system is activated and the selector lever of the automatic gearbox is in
position P (the vehicle cannot move), the warning tone is interrupted and no ob-
stacles are displayed.
152Driving
Page 156 of 274
FunctionFig. 132
Range of sensors / system button
First read and observe the introductory information and safety warn- ings
on page 152.
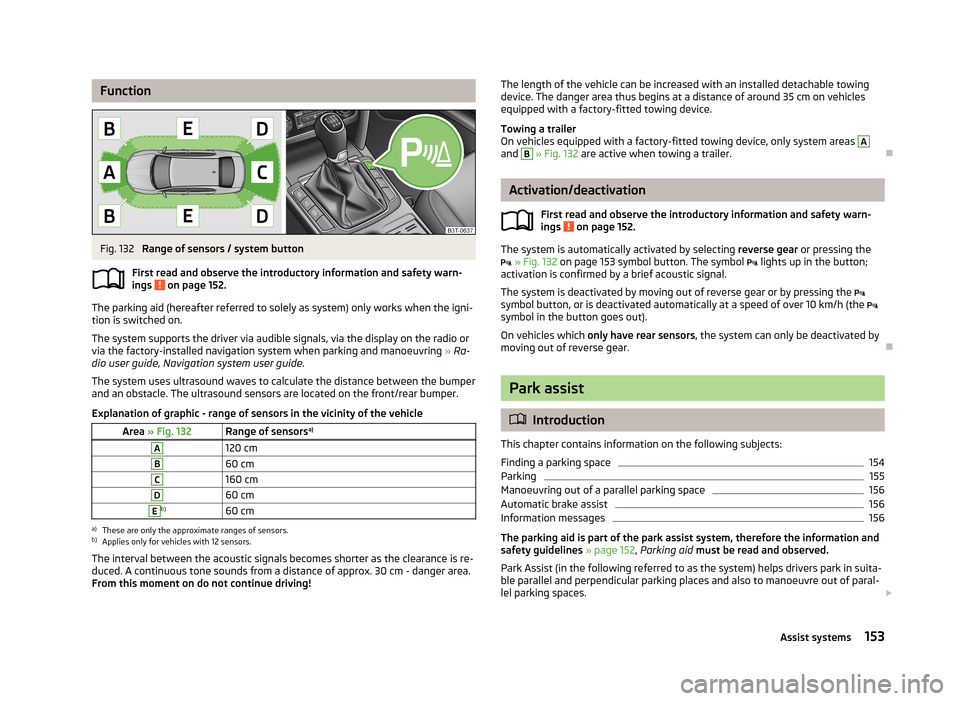
The parking aid (hereafter referred to solely as system) only works when the igni- tion is switched on.
The system supports the driver via audible signals, via the display on the radio or via the factory-installed navigation system when parking and manoeuvring » Ra-
dio user guide, Navigation system user guide.
The system uses ultrasound waves to calculate the distance between the bumper
and an obstacle. The ultrasound sensors are located on the front/rear bumper.
Explanation of graphic - range of sensors in the vicinity of the vehicle
Area » Fig. 132Range of sensors a)A120 cmB60 cmC160 cmD60 cmEb)60 cma)
These are only the approximate ranges of sensors.
b)
Applies only for vehicles with 12 sensors.
The interval between the acoustic signals becomes shorter as the clearance is re-
duced. A continuous tone sounds from a distance of approx. 30 cm - danger area.
From this moment on do not continue driving!
The length of the vehicle can be increased with an installed detachable towing device. The danger area thus begins at a distance of around 35 cm on vehicles
equipped with a factory-fitted towing device.
Towing a trailer
On vehicles equipped with a factory-fitted towing device, only system areas A
and
B
» Fig. 132 are active when towing a trailer.
Activation/deactivation
First read and observe the introductory information and safety warn-
ings
on page 152.
The system is automatically activated by selecting reverse gear or pressing the
» Fig. 132 on page 153 symbol button. The symbol
lights up in the button;
activation is confirmed by a brief acoustic signal.
The system is deactivated by moving out of reverse gear or by pressing the
symbol button, or is deactivated automatically at a speed of over 10 km/h (the
symbol in the button goes out).
On vehicles which only have rear sensors , the system can only be deactivated by
moving out of reverse gear.
Park assist
Introduction
This chapter contains information on the following subjects:
Finding a parking space
154
Parking
155
Manoeuvring out of a parallel parking space
156
Automatic brake assist
156
Information messages
156
The parking aid is part of the park assist system, therefore the information and
safety guidelines » page 152, Parking aid must be read and observed.
Park Assist (in the following referred to as the system) helps drivers park in suita- ble parallel and perpendicular parking places and also to manoeuvre out of paral-lel parking spaces.
153Assist systems
Page 185 of 274
WARNINGObserve the following instructions for the correct seated position.■Your head should never be positioned in the deployment area of the side
airbag. You might suffer severe injuries in the event of an accident. This ap-
plies in particular to children who are transported without using a suitable
child safety seat » page 187, Child safety and side airbag .■
There must not be any further persons, animals as well as objects posi-
tioned between the occupants and the deployment area of the airbag. No ac-
cessories, such as cup holders, should be attached to the doors.
■
If children adopt an incorrect seated position when travelling, they may be
exposed to an increased risk of injury in the event of an accident. This can re-
sult in serious injuries » page 186, Child seat .
WARNINGThe airbag control unit operates using pressure sensors located in the front
doors. For this reason, no adjustments may be carried out to the doors or door
panels (e.g. installation of additional loudspeakers). Resulting damage can have a negative impact on the function of the airbag system. Any work on thefront doors and door panels must be carried out by a specialist garage. The
following instructions must be observed.■
Never drive with inner door panels removed.
■
Never drive if parts of the inner door panel have been removed and the re-
sulting openings have not been properly sealed.
■
Never drive if the loudspeakers in the doors have been removed, unless the
loudspeaker openings have been properly sealed.
■
Always make sure that the openings are covered or filled if additional loud-
speakers or other equipment parts have been installed in the inner door pan-
els.
■
Always have work carried out by a ŠKODA service partner or a professional
specialist garage.
WARNING■ Only hang light items of clothing on the hooks fitted in the vehicle. Never
leave any heavy or sharp-edged objects in the pockets of the items of cloth-
ing.■
Ensure that there are no excessive forces, such as violent knocks, kicks etc.,
impact on the backrests of the seats otherwise the system may be damaged.
The side airbags would not be deployed in such a case!
■
Any seat or protective covers which you fit to the driver or front passenger
seats must only be of the type expressly authorized by ŠKODA. In view of the
fact that the airbag inflates out of the backrest of the seat, use of non-ap-
proved seat or protective covers would considerably impair the protective
function of the side airbag.
■
Any damage to the original seat covers in the area of the side airbag module
must be repaired immediately by a specialist garage.
■
The airbag modules in the front seats must not display any damage, cracks
or deep scratches. It is not permissible to use force in order to open the mod-
ules.
Head airbags
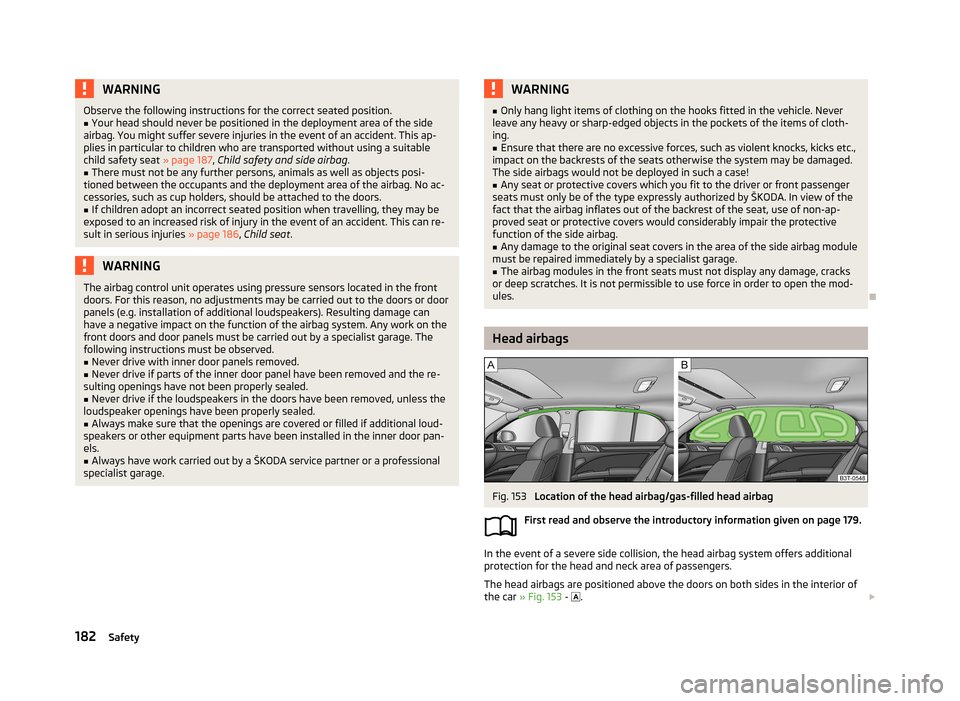
Fig. 153
Location of the head airbag/gas-filled head airbag
First read and observe the introductory information given on page 179.
In the event of a severe side collision, the head airbag system offers additional
protection for the head and neck area of passengers.
The head airbags are positioned above the doors on both sides in the interior ofthe car » Fig. 153 -
.
182Safety
Page 186 of 274
In the event of a side collision the head airbag is deployed together with the rele-
vant side airbag and the belt tensioner on the side of the car on which the acci-
dent occurs.
When deployed, the airbag covers the windows of the front and rear doors, as
well as the door pillar » Fig. 153 - .
Head impact with interior parts is reduced by the inflated head airbag. The reduc- tion in any impact to the head and the resultant minimizing of any movements of
the head additionally reduce the risk of injuries to the neck area.
The head airbag also offers additional protection in the case of an offset impact by covering the front door pillar.WARNINGGeneral■There must not be any objects in the deployment area of the head airbags
which might prevent the airbags from inflating properly.■
Only hang light items of clothing on the hooks fitted in the vehicle. Never
leave any heavy or sharp-edged objects in the pockets of the items of cloth-
ing. Additionally, clothes hangers must not be used to hang up items of cloth-
ing.
■
The installation of impermissible accessories in the vicinity of the head air-
bags can considerably impair the protection offered by the head airbag in the
event of it being deployed. When the deployed head airbag is inflated, parts of
the accessories fitted could be thrown into the interior of the car and injure
the occupants » page 193.
■
The sun visors must not be swivelled towards the side windows in the de-
ployment area of the head airbags if any objects, such as ball-point pens, etc.
are attached to them. This might result in injuries to the occupants if the head
airbag is deployed.
■
There must no other persons (e.g. children) or animals between the passen-
ger and the deployment area of the head airbag. In addition, none of the occu-
pants should lean their head out of the window when driving, or extend their
arms and hands out of the window.
WARNINGThe airbag control unit operates using pressure sensors located in the front
doors. For this reason, no adjustments may be carried out to the doors or door
panels (e.g. installation of additional loudspeakers). Resulting damage can have a negative impact on the function of the airbag system. Any work on thefront doors and door panels must be carried out by a specialist garage. The
following instructions must be observed.■
Never drive with inner door panels removed.
■
Never drive if parts of the inner door panel have been removed and the re-
sulting openings have not been properly sealed.
■
Never drive if the loudspeakers in the doors have been removed, unless the
loudspeaker openings have been properly sealed.
■
Always make sure that the openings are covered or filled if additional loud-
speakers or other equipment parts have been installed in the inner door pan-
els.
■
Always have work carried out by a ŠKODA service partner or a professional
specialist garage.
Note
In vehicles with head airbags, the word AIRBAG can be seen on the B column
cladding.
Deactivating airbags
Introduction
This chapter contains information on the following subjects:
Deactivating airbags
184
Deactivating the front passenger airbag
184
183Airbag system