display SKODA SUPERB 2013 2.G / (B6/3T) Repair Manual
[x] Cancel search | Manufacturer: SKODA, Model Year: 2013, Model line: SUPERB, Model: SKODA SUPERB 2013 2.G / (B6/3T)Pages: 274, PDF Size: 17.31 MB
Page 157 of 274
The system only operates if the ignition is switched on.The displays, messages and system instructions are displayed in the MAXI DOTdisplay (in the display only below).
During the parking procedure the system only takes over the steering move-
ments, the pedals continue to be operated by the driver.
When the system is activated, the warning light lights up
» Fig. 133 on
page 154 - .
The traction control system (TCS) must always be switched on when parking.
Basis of the system function
› The measurement and evaluation of the size of parking spaces when driving.
› The determination of the correct position of the vehicle for parking.
› The calculation of the line on which the vehicle drives backwards into the park-
ing space or forwards from the parking space.
› the automatic turning of the front wheels when parking in, or manoeuvring out
of the parking space.WARNING■ The system does not exempt the driver from his/her responsibility for park-
ing in and manoeuvring out of the parking space.■
External sound sources can have a detrimental effect on parking in and ma-
noeuvring out of the parking space. Under adverse conditions, this may cause
objects or people to not be recognised by the system.
■
When parking in, and manoeuvring out of parking spaces, the system auto-
matically executes quick steering movements. While it is doing so, do not place your hands between the steering wheel – risk of injury!
■
When parking or departing from a parking space on loose or slippery surfa-
ces (gravel, snow, ice etc.), there may be deviations due to the conditions of
the calculated road surface. We therefore recommend not using the system in
such situations.
CAUTION
■ If other vehicles are parked behind or on the kerb, the system can guide your
vehicle beyond the kerb or onto it. Ensure that the wheels or the wheel rims of
your vehicle are not damaged and if necessary intervene in time.■
Under certain circumstances, the surfaces or structures of certain objects such
as wire mesh fences or powder snow cannot be detected by the system.
■ The evaluation of the parking space and the parking procedure depend on the
circumference of the wheels. The system only works correctly if the vehicle is fit- ted with the wheel size approved by the manufacturer.■
If wheels other than those approved by the manufacturer are mounted, the re-
sulting position of the vehicle in the parking space can differ slightly. This can be
avoided by readjusting the system at a specialist garage.
■
Under certain circumstances, the system may not function correctly, for exam-
ple, if the vehicle is fitted with snow chains or a temporary spare wheel.
Finding a parking space
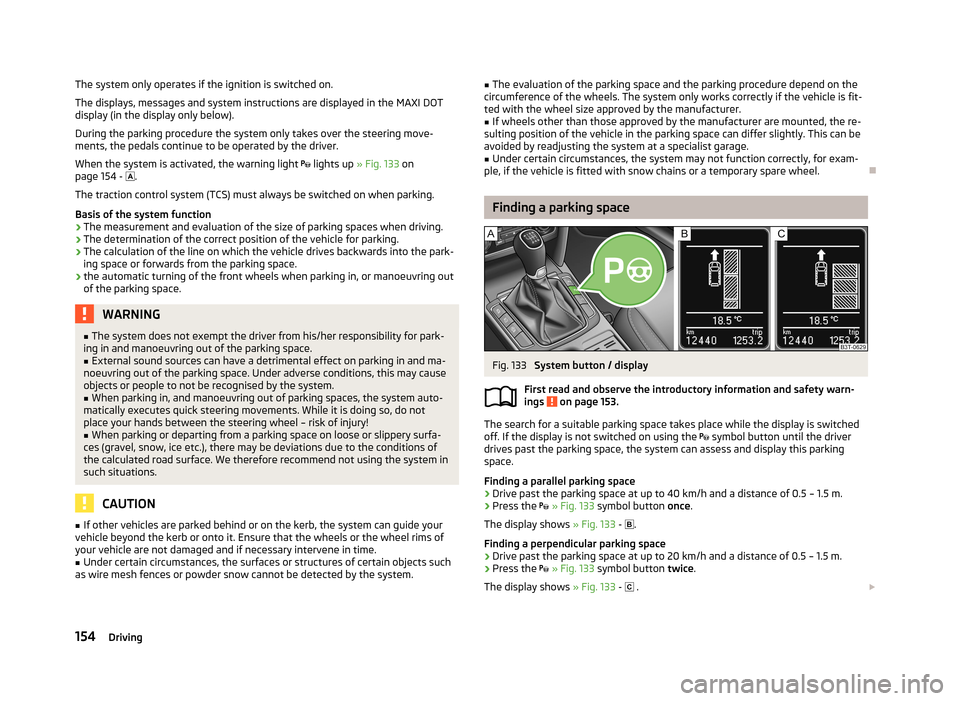
Fig. 133
System button / display
First read and observe the introductory information and safety warn- ings
on page 153.
The search for a suitable parking space takes place while the display is switchedoff. If the display is not switched on using the symbol button until the driver
drives past the parking space, the system can assess and display this parking
space.
Finding a parallel parking space
›
Drive past the parking space at up to 40 km/h and a distance of 0.5 – 1.5 m.
›
Press the
» Fig. 133 symbol button once.
The display shows » Fig. 133 -
.
Finding a perpendicular parking space
›
Drive past the parking space at up to 20 km/h and a distance of 0.5 – 1.5 m.
›
Press the
» Fig. 133 symbol button twice.
The display shows » Fig. 133 -
.
154Driving
Page 158 of 274

The search area for the parking space on the driver's side is automatically indica-
ted on the display.
Activate the turn signal on the driver's side if you wish to park on this side of the
road. In the display the search area for the parking space is indicated on the driv-
er's side.
If suitable parking space is found, its parameters are stored until another suitable
parking space has been found or until a distance of 10 m had been driven after
finding the parking space.
To change the parking mode when searching for a parking space, press the
symbol button again.
Parking
Fig. 134
Display
First read and observe the introductory information and safety warn- ings
on page 153.
The time limit for the parking procedure with the help of the system is 6 minutes.
If the system has recognised a suitable parking space, this parking space is
shown in the display » Fig. 134 -
.
›
Continue driving forwards until the display appears » Fig. 134 -
.
›
Stop and make sure that the vehicle does not move forward until the start of
the parking procedure.
›
Select reverse gear or move the selector lever into position R.
›
As soon as the following message is shown in the display:
Steering int. ac-
tive. Monitor area around veh.! , let go of the steering wheel. The steering will
be taken over by the system.
›
Observe the direct vicinity of the vehicle and reverse carefully.
In the event that the parking procedure cannot be carried out in one go, the park- ing process is completed in further stages.›
If the forward arrow in the display flashes » Fig. 134 - engage the 1st gear or
move the selector lever to position D.
›
Wait until the steering wheel automatically turns into the required position and
then carefully drive forwards.
›
If the backwards arrow is flashing in the display » Fig. 134 - , select reverse
gear again or move the selector lever into position R.
›
Wait until the steering wheel automatically turns into the required position and
then carefully reverse.
These steps can be repeated several times one after the other.
As soon as the parking procedure is completed, an audible signal sounds and the
following message appears in the display:
Steering interv. finished. Take over steering!
Explanation of graphic Parking place recognised with the information to drive on.
Parking place recognised with the information to engage the reverse gear.
Indication for selecting the forward gear.
Indication for selecting the reverse gear.
Automatic termination
The system cancels the parking procedure if one of the following cases occurs:
› Speed of 7 km/h repeatedly exceeded during the parking procedure.
› Time limit of 6 minutes exceeded for the parking procedure.
› System button pressed.
› TCS system switched off.
› Intervention of the driver in the automatic steering procedure (stops the steer-
ing wheel).
› Reverse gear disengaged or selector lever moved out of position
R when re-
versing into the parking space.
› Selector lever moved into position
P.
› There is a system fault (system temporarily not available).
› Automatic braking for damage limitation.
If any of the above events occurs, the following warning message is dis-
played. » page 156 .
ABCD155Assist systems
Page 159 of 274

Manoeuvring out of a parallel parking spaceFirst read and observe the introductory information and safety warn-
ings
on page 153.
Manoeuvring out
›
Press the
» Fig. 133 on page 154 symbol button once.
›
Activate the turn signal for side of the vehicle where the parking space is out of
which you wish to manoeuvre.
›
Select reverse gear or move the selector lever into position R.
›
As soon as the following message is shown in the display: Steering int. ac-
tive. Monitor area around veh.! , let go of the steering wheel. The steering will
be taken over by the system.
›
Observe the direct vicinity of the vehicle and reverse carefully.
›
Follow the system instructions shown in the display.
As soon as the parking procedure is completed, an audible signal sounds and the
following message appears in the information display:
Steering interv. finished. Take over steering!
Automatic termination
The system terminates the manoeuvring procedure if one of the following cases
arises.
› Speed of 7 km/h exceeded during the departing procedure.
› System button pressed.
› TCS system switched off.
› Intervention of the driver in the automatic steering procedure (stops the steer-
ing wheel).
› There is a system fault (system temporarily not available).
› Automatic braking for damage limitation.
If any of the above events occurs, the following warning message is dis- played. » page 156 .
Automatic brake assist
First read and observe the introductory information and safety warn-
ings
on page 153.
The system provides assistance to the driver with automatic brake assist. The au-
tomatic brake assist does not exempt the driver from his/her responsibility for
the accelerator, brake and clutch.
Automatic braking for preventing cancellations caused by excessive speeds
Automatic brake support can be used in order to stop the speed from exceeding
7 km/h, thereby preventing the subsequent cancellation of the parking procedure. The parking procedure can be resumed after automatic braking.
Automatic braking takes place only once per parking procedure.
Automatic braking for damage limitation
The system detects an imminent collision based on the driving speed and the dis-
tance from the obstacle, automatic brake support is initiated.
The system function is ended after this automatic brake assist for damage limita-
tion.WARNING■ Automatic brake assist only works as an element of the assist function. The
driver must always be ready to brake the vehicle him/herself.■
Automatic brake assist is ended after around 1.5 seconds. Depress the brak-
ing pedal so that the vehicle does not start moving by itself.
Information messages
First read and observe the introductory information and safety warn-
ings
on page 153.
Park Assist: Speed too high.
Reduce speed to under 40 km/h (parallel parking) or under 20 km/h (bay parking). This message is only displayed at speeds up to around 50 km/h. When the speed
exceeds 50 km/h, reactivate the system using the button.
Speed too high. Take over steering!
The parking procedure was ended because the speed was exceeded. Park with a
max. speed of 7 km/h.
Driver steering intervention: Take over steering!
The parking procedure is terminated due to a driver steering intervention.
Park Assist stopped. ASR deactivated.
The parking procedure cannot be carried out because the TCS system is deactiva- ted. Activate the TCS.
ASR deactivated. Take over steering!
156Driving
Page 162 of 274

Briefly push the rocker button B into the RES/+ position in order to resume the
stored speed after the clutch or brake pedal is released.
START-STOP
Introduction
This chapter contains information on the following subjects:
Starting/shutting down the engine
159
Operating conditions of the system
160
Manually activating/deactivating the system
160
Information messages
161
The START-STOP system helps you to save fuel while at the same time reducing
harmful exhaust emissions and CO 2 emissions.
The function is automatically activated each time the ignition is switched on. In the start-stop mode, the engine automatically switches to the vehicle's idle phase, e.g. when stopped at traffic lights. The engine restarts automatically
where necessary.
The system can work only if the following basic conditions are met. The driver's door is closed.
The driver has fastened the seat belt.
The bonnet is closed.The driving speed was higher than 4 km.h after the last stop.
No trailer is coupled.
WARNING■ The brake servo unit and power steering only operate if the engine is run-
ning.■
Never let the vehicle roll with the engine switched off.
CAUTION
Always deactivate the START-STOP system before driving through wa-
ter » page 148 .Note■
If the driver's seat belt is removed for more than approx. 30 seconds or the driv-
er's door is opened during stop mode on vehicles with manual transmission or au- tomatic transmission (when the selector lever in position P), the engine must be
started manually » page 133.■
After manually starting the engine on vehicles with manual transmission, auto-
matic engine shut down is not possible until the vehicle has travelled the re-
quired minimum distance for START-STOP mode.
■
If, on vehicles with automatic transmission, the selector lever positions D, S or N
are selected after driving in reverse, the vehicle will first need to achieve a speed
of over 10 km/h before automatic engine shut down can take place again.
■
Changes to the outdoor temperature can have an effect on the internal temper-
ature of the vehicle battery even after several hours. If the vehicle remains out-
doors for a long time in minus temperatures or in direct sunlight, it can take sev-
eral hours until the internal temperature of the vehicle battery reaches a suitable temperature for proper operation of the START STOP system.
■
If Climatronic is running in automatic mode, the engine may not switch off auto-
matically under certain conditions.
Starting/shutting down the engine
First read and observe the introductory information and safety warn-ings
on page 159.
Vehicles with manual transmission
›
Stop the vehicle (where necessary, apply the handbrake).
›
Put the gear stick into Neutral.
›
Release the clutch pedal.
Automatic engine shut down (STOP phase) takes place. The warning symbol
appears in the instrument cluster display.
›
Depress the clutch pedal.
The automatic start procedure takes place again (START phase). The warning
symbol
goes out.
Vehicles with automatic transmission
›
Bring the vehicle to a stop and depress the brake pedal.
Automatic engine shut down takes place. The warning symbol
appears in the
instrument cluster display.
›
Release the brake pedal.
159Assist systems
Page 163 of 274

The automatic start procedure takes place again. The warning symbol goes
out.
Further information on automatic transmission Engine shut down takes place when the selector lever is in positions P, D , S and N
and in Tiptronic mode.
When the selector lever is in position P, the engine remains shut down even after
you release the brake pedal. Start the engine by pressing the gas pedal or by moving the selector lever into a different mode and releasing the brake pedal.
If the selector lever is moved into position R during the STOP phase , the engine
will re-start.
No automatic engine shutdown takes place when the vehicle is moving at low speed (e.g. during a traffic jam or when tuning) and remains stationary after
pressing the brake pedal lightly. Automatic engine shutdown takes place if you
press the brake pedal down with more force.
Operating conditions of the system
First read and observe the introductory information and safety warn-ings
on page 159.
The START-STOP system is very complex. Some of the procedures are hard to check without servicing.
No engine shut down is carried out
Before each STOP phase, the system checks whether certain conditions have
been met. No engine shut down takes place in the following situations.
› The engine has not reached the minimum temperature for the START STOP
mode.
› The temperature inside the vehicle has not reached the temperature set in the
air-conditioning system.
› The external temperature is very low/high.
› The intensive windscreen heater (Climatronic) or windscreen heater/ventilation
is switched on with the maximum air temperature setting (manual air condition-
ing system).
› The parking aid/Park Assist is switched on.
› The charge state of the vehicle battery is too low.
› The stationary vehicle is on a steep slope or a steep downhill section.
› The idling speed is too high.
› The steering angle is too large (manoeuvring).
› The selector lever position
R is selected (e.g. when parking).
The warning symbol appears in the instrument cluster display.
The automatic start procedure takes place again
During the STOP phase, the engine fires up without any active driver intervention, e.g. in the following situations.
› The vehicle begins to roll, e.g. on a slope.
› The difference between the temperature setting of the air-conditioning system
and the inside temperature is too large.
› The intensive windscreen heater (Climatronic) or windscreen heater/ventilation
is switched on with the maximum air temperature setting (manual air condition-
ing system).
› The brake pedal was pressed several times (the pressure in the braking system
is too low).
› The charge state of the vehicle battery is too low.
› The current consumption is too high.
Manually activating/deactivating the system
Fig. 136
Button for the START-STOP sys-
tem
First read and observe the introductory information and safety warn-
ings on page 159.
Activation/deactivation
›
Press the symbol button
» Fig. 136 .
When start-stop mode is deactivated, the indicator light in the button lights up.
Note
If the system is deactivated during the STOP phase, the automatic start proce-
dure takes place.
160Driving
Page 164 of 274
Information messagesFirst read and observe the introductory information and safety warn-
ings
on page 159.
The messages and information are indicated in the instrument cluster display.
Start the engine manually!
START MANUALLY
The driver sees this message when the conditions for the automatic start proce-
dure are not met during the STOP phase. The engine must be started manual-
ly » page 135 .
Error: start-stop system
ERROR START-STOP
Error in the START-STOP system. Seek help from a specialist garage.
Fatigue detection (break recommendation)
Introduction
This chapter contains information on the following subjects:
Function
161
Information messages
161WARNING■ For the driving ability is always the driver's responsibility. Never drive if you
feel tired.■
The system may not detect all cases where a break is needed.
■
Therefore, take regular, sufficient breaks during long trips.
■
There will be no system warning during the so-called micro-sleep.
Note
■ In some situations, the system may evaluate the driving incorrectly and thus
mistakenly recommend a break (e.g. sporty driving, adverse weather conditions or poor road conditions).■
The fatigue detection system is designed primarily for motorway driving.
Function
First read and observe the introductory information and safety warn-ings
on page 161.
The fatigue detection system advises the driver on the basis of information about
the steering behaviour, to take a break from driving. The system recommends a
break at speeds of 65-200 km/h.
After the ignition has been switched on, the system evaluates the steering be-
haviour for 15 minutes. This baseline analysis is constantly compared with the
current steering behaviour.
If the system detects deviations from normal steering behaviour due to possible
fatigue of the driver, it recommends to take a break from driving.
The system deletes the stored baseline analysis if one of the following condi-
tions is met.
› The vehicle is stopped and the ignition switched off.
› The vehicle is stopped, the seat belt removed and the driver's door opened.
› The vehicle is stopped for more than 15 minutes.
If none of these conditions are met or if the driving style is not changed, the sys-
tem recommends a driving break again after 15 minutes.
Activation/deactivation
The system can be activated/deactivated via the MAXI DOT display in the Wizards
menu option » page 28.
Information messages
First read and observe the introductory information and safety warn-
ings
on page 161.
The symbol will appear in the MAXI DOT display for a few seconds, along with
the following message.
Fatigue detected. Take a break.
An audible signal is also emitted.
161Assist systems
Page 185 of 274
WARNINGObserve the following instructions for the correct seated position.■Your head should never be positioned in the deployment area of the side
airbag. You might suffer severe injuries in the event of an accident. This ap-
plies in particular to children who are transported without using a suitable
child safety seat » page 187, Child safety and side airbag .■
There must not be any further persons, animals as well as objects posi-
tioned between the occupants and the deployment area of the airbag. No ac-
cessories, such as cup holders, should be attached to the doors.
■
If children adopt an incorrect seated position when travelling, they may be
exposed to an increased risk of injury in the event of an accident. This can re-
sult in serious injuries » page 186, Child seat .
WARNINGThe airbag control unit operates using pressure sensors located in the front
doors. For this reason, no adjustments may be carried out to the doors or door
panels (e.g. installation of additional loudspeakers). Resulting damage can have a negative impact on the function of the airbag system. Any work on thefront doors and door panels must be carried out by a specialist garage. The
following instructions must be observed.■
Never drive with inner door panels removed.
■
Never drive if parts of the inner door panel have been removed and the re-
sulting openings have not been properly sealed.
■
Never drive if the loudspeakers in the doors have been removed, unless the
loudspeaker openings have been properly sealed.
■
Always make sure that the openings are covered or filled if additional loud-
speakers or other equipment parts have been installed in the inner door pan-
els.
■
Always have work carried out by a ŠKODA service partner or a professional
specialist garage.
WARNING■ Only hang light items of clothing on the hooks fitted in the vehicle. Never
leave any heavy or sharp-edged objects in the pockets of the items of cloth-
ing.■
Ensure that there are no excessive forces, such as violent knocks, kicks etc.,
impact on the backrests of the seats otherwise the system may be damaged.
The side airbags would not be deployed in such a case!
■
Any seat or protective covers which you fit to the driver or front passenger
seats must only be of the type expressly authorized by ŠKODA. In view of the
fact that the airbag inflates out of the backrest of the seat, use of non-ap-
proved seat or protective covers would considerably impair the protective
function of the side airbag.
■
Any damage to the original seat covers in the area of the side airbag module
must be repaired immediately by a specialist garage.
■
The airbag modules in the front seats must not display any damage, cracks
or deep scratches. It is not permissible to use force in order to open the mod-
ules.
Head airbags
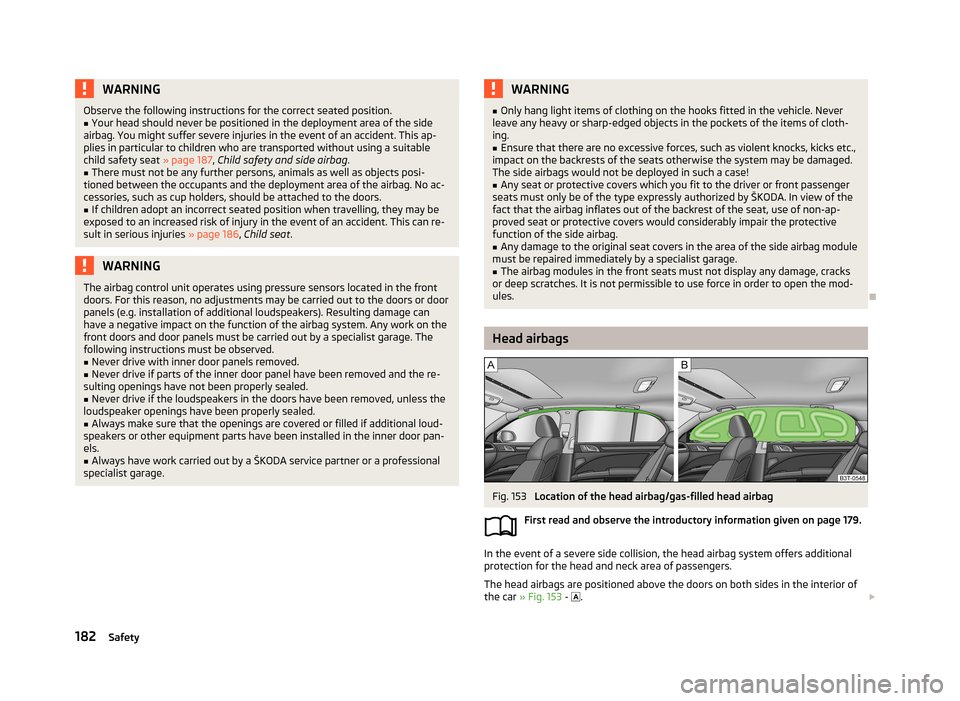
Fig. 153
Location of the head airbag/gas-filled head airbag
First read and observe the introductory information given on page 179.
In the event of a severe side collision, the head airbag system offers additional
protection for the head and neck area of passengers.
The head airbags are positioned above the doors on both sides in the interior ofthe car » Fig. 153 -
.
182Safety
Page 194 of 274
General Maintenance
Car care
Service intervals
Introduction
This chapter contains information on the following subjects:
Overview of service intervals
191
Fixed service intervals QI1 - QI4
192
Variable service interval QI6
192
Information about the ŠKODA service
192
The Service Interval Display in the instrument cluster will remind you to carry out
every service stipulated by the manufacturer at the right time, in order to avoid
forgetting any.
A timely and adequate performance of servicing works is one of the requirements
for the settlement of possible warranty claims.
The completion of services can be verified through the confirmed service certifi-
cation and the respective receipts.
The service intervals are matched to normal operating conditions. In case of difficult operating conditions, it is necessary to have some servicingwork performed before the date of the next service or between the service inter-
vals stated. This applies mainly to the cleaning or the replacement of the air filter
insert in regions with heavy dust pollution as well as checking and replacing the
toothed belt, but also vehicles with diesel particle filter which can use the engine
oil more intensely.
These severe conditions are:
› Fuel containing sulphur
› Frequent short trips
› Longer idling mode of the engine (e.g. taxi vehicles)
› Operation in areas with heavy dust pollution
› Frequent trailer operation
›
Predominantly stop-and-go traffic as tends to occur in city driving, for example
› Operation predominantly during winter.
A service consultant at the specialist garage will tell you whether the operating conditions of your vehicle make it necessary for such work to be carried out be-
tween the normal service intervals.
Different service charges may apply, depending on the scope of necessary works
as well as the model, features and condition of your vehicle.
Note
■ The customer is responsible for covering the cost of all services including
changing or replenishing the operating fluid, even during the warranty period, un-
less the ŠKODA AUTO a.s. warranty terms or other agreements state otherwise.■
You will be informed about the scope of the service with regard to a particular
service event by the specialist garage.
Overview of service intervals
Fig. 159
Vehicle data sticker: Service in-
terval
First read and observe the introductory information given on page 191.
The service interval specified by the manufacturer is indicated on the data stick-
er » Fig. 159 which is under the floor cover in the boot.
One of the following service intervals applies for your vehicle: › Fixed service interval QI1;
› Fixed service interval QI2;
› Fixed service interval QI3;
› Fixed service interval QI4;
› Variable service interval QI6.
191Car care
Page 195 of 274
In order to be able to operate a vehicle with a variable service interval, it must
only be filled and topped up with the specified engine oil.
If this engine oil is not available, the oil change is subject to a fixed service inter-val. In this case, the vehicle must be changed to the fixed service interval.
Note
■
The corresponding motor oil specifications » page 210.■A changeover from the variable service interval to the fixed service interval, or
from the fixed service interval to the variable service interval, can be carried out
by a specialist garage.
Fixed service intervals QI1 - QI4
First read and observe the introductory information given on page 191.
InspectionQI1 - QI4
First after 30,000 km or 2 years a)
, thereafter every
30,000 km or every 1 year a)
.Every 15,000 km or every 1 year a)
(Applies to Rus-
sia).
Oil change service
QI1After 5,000 km or every 1 year a)
.QI2After 7,500 km or every 1 year a)
.QI3After 10,000 km or every 1 year a)
.QI4After 15,000 km or every 1 year a)
.Brake fluid
change First change after 3 years, then every 2 years.a)
(Whichever comes first).
WARNINGThe brake fluid must always be changed after the first 3 years and then every
2 years. When the brake fluid becomes too old, vapour bubbles may form in
the brake system when the brakes are used hard. The efficiency of the brakes could be seriously affected – risk of accident!NoteFor diesel operation with a high sulphur content, the interval of engine oil change
will be every 7,500 km. Please ask your specialist garage for information on the
countries where diesel fuel has a high sulphur content.
Variable service interval QI6
First read and observe the introductory information given on page 191.
The service intervals depend on how the vehicle is driven and the local conditions
in which the vehicle is used. For example, your vehicle is subjected to different
loads when driven over short distances than long distances. The service intervals
are also variable.
InspectionFirst after 30,000 km or 2 years a)
, then every 30,000 km or
every 1 year a)
.Oil change serviceAccording to the service interval display (at the latest after
30,000 km or every 2 years a)
).Brake fluid
changeFirst change after 3 years, then every 2 years.a)
(Whichever comes first).
WARNINGThe brake fluid must always be changed after the first 3 years and then every
2 years. When the brake fluid becomes too old, vapour bubbles may form in
the brake system when the brakes are used hard. The efficiency of the brakes could be seriously affected – risk of accident!
Information about the ŠKODA service
First read and observe the introductory information given on page 191.
There is an extensive servicing network made up of ŠKODA service partners at
your disposal, for the maintenance of your vehicle.
192General Maintenance
Page 215 of 274
The oil level must be checked at regular intervals. We recommend after each time
you refuel or prior to making a long journey.
We recommend maintaining the oil level within the range A
, but not above , if
the engine has been operating at high loads, for example, during a lengthy motor-
way trip during the summer months, towing a trailer or negotiating a high moun- tain pass.
The indicator light in the instrument cluster will indicate whether the oil level is
too low » page 18 , Engine oil level . Check the oil level using the dipstick as
soon as possible. Add oil accordingly.
CAUTION
The oil level must not exceed the range A » Fig. 164 – there is a risk of damaging
the exhaust system.
Replenishing
First read and observe the introductory information and safety warn-
ings
on page 210.
›
Check the oil level » page 211.
›
Unscrew the cap of the engine oil filler opening » Fig. 162 on page 209.
›
Replenish the oil in portions of 0.5 litres in accordance with the correct specifi-
cations » page 210 .
›
Check the oil level » page 211.
›
Carefully screw on the oil filler opening cap and push the dipstick in fully.
Changing
First read and observe the introductory information and safety warn-ings
on page 210.
The engine oil must be changed according to pre-specified service inter-
vals » page 191 or according to the service interval display » page 30.
Coolant
Introduction
This chapter contains information on the following subjects:
Capacity
213
Checking the coolant level
213
Replenishing
214
The coolant consists of water with coolant additive. This mixture guarantees anti- freeze protection, protects the cooling/heater system against corrosion and pre-
vents lime formation.
Vehicles exported to countries with a mild climate are already factory-filled with
a coolant which offers antifreeze protection down to about -25 ℃. In these coun-
tries, the concentration of coolant additive should be at least 40%.
Vehicles exported to countries with a cold climate are already factory-filled with a
coolant which offers antifreeze protection down to about -35 °C. In these coun-
tries, the concentration of coolant additive should be at least 50%.
If a higher concentration of antifreeze is required for climatic reasons, the con-centration of coolant additive can be increased up to a maximum of 60% (anti-
freeze protection down to approx. -40 °C).
When refilling, only use the same antifreeze written on the antifreeze expansion tank » Fig. 165 on page 213.
WARNING■
The engine compartment of your car is a hazardous area. The following
warning instructions must be followed at all times when working in the en-
gine compartment » page 206.■
Do not continue your journey if for some reason it is not possible to fill with
coolant under the current circumstances . Switch off the engine and seek
assistance from a specialist garage.
CAUTION
■ The concentration of coolant additive in the coolant must never be under 40%.■Over 60% of coolant additive in the coolant reduces the antifreeze protection
and cooling effect. 212General Maintenance