brake light SKODA SUPERB 2014 2.G / (B6/3T) User Guide
[x] Cancel search | Manufacturer: SKODA, Model Year: 2014, Model line: SUPERB, Model: SKODA SUPERB 2014 2.G / (B6/3T)Pages: 246, PDF Size: 17.16 MB
Page 41 of 246
Switching off the hazard warning light system is switched on will cause all of
the turn signal lights as well as both warning lights to flash.
Low beam
Read and observe
on page 33 first.
The warning light
illuminates when low beam is selected.
Fog lights
Read and observe
on page 33 first.
The warning light
illuminates when the fog lights are operating.
Cruise control system
Read and observe
on page 33 first.
The warning light
illuminates when the cruise control is active.
Selector lever lock / starter (system KESSY)
Read and observe
on page 33 first.
If the warning light
illuminates , operate the brake pedal. This is necessary
to move the selector lever from position P and N » page 143 or to start the en-
gine in vehicles with the KESSY system » page 139.
Main beam
Read and observe
on page 33 first.
The warning light
illuminates when the main beam is selected or when the
headlight flasher is operated.
Information system
Driver information system
Introduction
This chapter contains information on the following subjects:
Using the information system
40
Display a low temperature
40
Gear recommendation
40
Door, boot or engine compartment warning
41
The information system provides the driver with alerts and messages about
individual vehicle systems. This information and advice is shown in the instru-
ment cluster display or indicated by the illumination of the corresponding indi-
cator light in the instrument cluster.
The information system provides the following information and instructions (depending on vehicle equipment).
› Data relating to the multi-function display (MFD)
» page 41.
› Data relating to the Maxi DOT display
» page 44.
› Service interval display
» page 46.
› Auto Check Control
» page 31.
› Selector lever positions for an automatic gearbox
» page 142.
WARNINGConcentrate fully at all times on your driving! As the driver, you are fully re-
sponsible for the operation of your vehicle.39Information system
Page 50 of 246
Unlocking and opening
Unlocking and locking
Introduction
This chapter contains information on the following subjects:
Vehicle key
49
Unlock/lock with remote control
49
Unlocking / locking - KESSY
50
Information message
51
Parking the vehicle
51
Safe securing
51
Individual settings
52
Locking/unlocking the vehicle from the inside
52
Child safety lock
53
Opening/closing a door
53
Your car is equipped with a central locking system.
The central locking system allows you to lock and unlock all doors, the fuel fill-
er flap and tailgate at the same time based on the current setting 1)
.
The safe securing system » page 51 is integrated in the central locking sys-
tem. Once the car is locked from the outside, the door locks 2)
are automatically
blocked by the safe securing system »
.
The following takes place after unlocking 1)
.
› The doors, the boot lid and the fuel filler flap are unlocked.
› The interior light, which is switched by the door contact, comes on.
› The safe securing system is switched off 2)
.
› The indicator light in the driver door stops flashing.
› The anti-theft alarm system is deactivated.
The following takes place after locking 1)
.
› The doors, the boot lid and the fuel filler flap are locked.
› The interior lights switched by the door contact come on.
› The safe securing system is switched on 2)
.
› The indicator light in the driver door begins flashing.
› The anti-theft alarm system is activated.
Displaying an error If the indicator light in the driver's door initially flashes quickly for around 2
seconds, and then lights up for 30 seconds without interruption before flash-
ing again slowly, you will need to seek the assistance of a specialist garage.WARNING■ Never leave the key in the vehicle when you exit the vehicle. Unauthor-
ized persons, such as children, for example, could lock the car, turn on the
ignition or start the engine - there is a danger of injury and accidents!■
When leaving the vehicle, never leave persons who are not completely in-
dependent, such as children, unattended in the vehicle. The children might,
for example, release the handbrake or take the vehicle out of gear. The ve-
hicle could then start to move – risk of injury and accidents! These individu-
als might also not be able to leave the vehicle on their own or to help
themselves. Can be fatal at very high or very low temperatures!
■
If the car is locked from the outside and the safelock system is switched
on, there must not be any person in the car as it is then not possible to
open either a door or a window from the inside. The locked doors make it
more difficult for rescuers to get into the vehicle in an emergency – risk to
life.
Note
■ When leaving the vehicle, always check if it is locked.■In the event of an accident in which the airbags are deployed, the locked
doors are automatically unlocked in order to enable rescuers to gain access to
the vehicle.■
Upon failure of the central locking system the key can be used only to unlock
and lock the driver's door. The other doors and the boot lid can be emergency
locked or released. ■ Emergency locking of the door » page 212.
■ Emergency unlocking of the boot lid » page 212.
1)
Depending on the individual setting » page 52 .
2)
This function is only enabled in certain countries.
48Operation
Page 58 of 246
Opening›Press the button in the handle at the lower edge of the boot lid 1 » Fig. 37
and lift the boot lid.
Closing›
Pull down and strike the lid with the handle
2
» Fig. 37 .
The small boot lid can also be opened by pressing the symbol
button on the
remote control key » page 49.
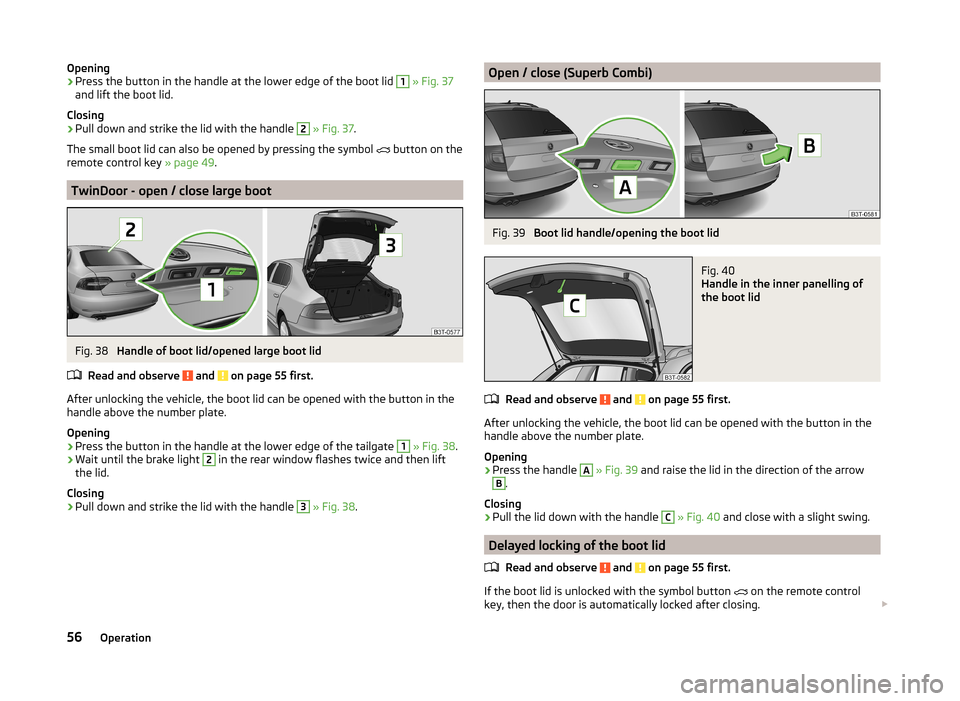
TwinDoor - open / close large boot
Fig. 38
Handle of boot lid/opened large boot lid
Read and observe
and on page 55 first.
After unlocking the vehicle, the boot lid can be opened with the button in the
handle above the number plate.
Opening
›
Press the button in the handle at the lower edge of the tailgate
1
» Fig. 38 .
›
Wait until the brake light
2
in the rear window flashes twice and then lift
the lid.
Closing
›
Pull down and strike the lid with the handle
3
» Fig. 38 .
Open / close (Superb Combi)Fig. 39
Boot lid handle/opening the boot lid
Fig. 40
Handle in the inner panelling of
the boot lid
Read and observe and on page 55 first.
After unlocking the vehicle, the boot lid can be opened with the button in the
handle above the number plate.
Opening
›
Press the handle
A
» Fig. 39 and raise the lid in the direction of the arrow
B
.
Closing
›
Pull the lid down with the handle
C
» Fig. 40 and close with a slight swing.
Delayed locking of the boot lid
Read and observe
and on page 55 first.
If the boot lid is unlocked with the symbol button on the remote control
key, then the door is automatically locked after closing.
56Operation
Page 138 of 246
Electronic immobilizerRead and observe
and on page 135 first.
An electronic chip is integrated in the head of the key. The immobiliser is deac-
tivated with the aid of this chip when the key is inserted in the ignition lock.
The electronic immobiliser is automatically activated when the ignition key is
withdrawn from the lock.
The engine will not start if a non-authorized ignition key is used.
The following message is shown in the information cluster display. Immobilizer active.
IMMOBILISER
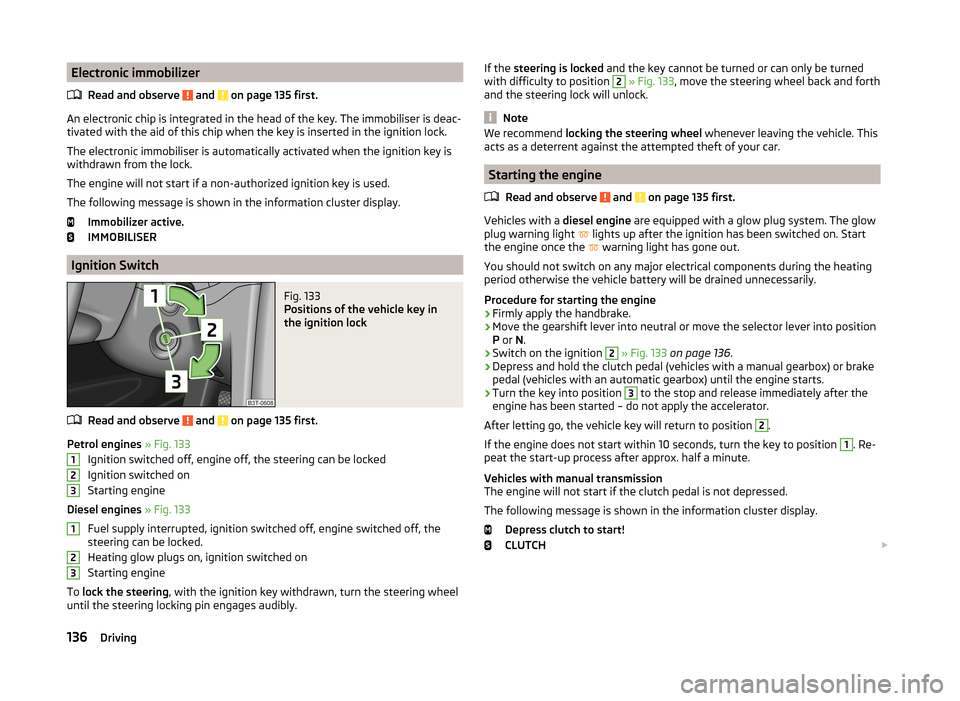
Ignition Switch
Fig. 133
Positions of the vehicle key in
the ignition lock
Read and observe and on page 135 first.
Petrol engines » Fig. 133
Ignition switched off, engine off, the steering can be locked
Ignition switched on
Starting engine
Diesel engines » Fig. 133
Fuel supply interrupted, ignition switched off, engine switched off, the
steering can be locked.
Heating glow plugs on, ignition switched on
Starting engine
To lock the steering , with the ignition key withdrawn, turn the steering wheel
until the steering locking pin engages audibly.
123123If the steering is locked and the key cannot be turned or can only be turned
with difficulty to position 2 » Fig. 133 , move the steering wheel back and forth
and the steering lock will unlock.
Note
We recommend locking the steering wheel whenever leaving the vehicle. This
acts as a deterrent against the attempted theft of your car.
Starting the engine
Read and observe
and on page 135 first.
Vehicles with a diesel engine are equipped with a glow plug system. The glow
plug warning light lights up after the ignition has been switched on. Start
the engine once the warning light has gone out.
You should not switch on any major electrical components during the heating
period otherwise the vehicle battery will be drained unnecessarily.
Procedure for starting the engine
›
Firmly apply the handbrake.
›
Move the gearshift lever into neutral or move the selector lever into position
P or N.
›
Switch on the ignition
2
» Fig. 133 on page 136 .
›
Depress and hold the clutch pedal (vehicles with a manual gearbox) or brake
pedal (vehicles with an automatic gearbox) until the engine starts.
›
Turn the key into position
3
to the stop and release immediately after the
engine has been started – do not apply the accelerator.
After letting go, the vehicle key will return to position
2
.
If the engine does not start within 10 seconds, turn the key to position
1
. Re-
peat the start-up process after approx. half a minute.
Vehicles with manual transmission
The engine will not start if the clutch pedal is not depressed.
The following message is shown in the information cluster display. Depress clutch to start!
CLUTCH
136Driving
Page 140 of 246
CAUTION■Avoid high engine revolutions, full throttle and high engine loads before the
engine has reached its operating temperature – risk of damaging the engine!■
Do not switch the engine off immediately at the end of your journey after the
engine has been operated over a prolonged period at high loads but leave it to
run at an idling speed for about 1 minute. This prevents any possible accumula-
tion of heat when the engine is switched off.
For the sake of the environment
Do not warm up the engine while the vehicle is stationary. If possible, start
your journey as soon as the engine has started. Through this the engine rea-
ches its operating temperature more rapidly and the pollutant emissions are
lower.
Note
■ The system is protected against inadvertently switching off the engine while
driving, this means that the engine can only be switched off in an emergen-
cy » page 140 .■
After switching off the ignition, the radiator fan may intermittently continue
to operate for approx. 10 minutes.
■
Under certain circumstances (e.g. after switching off the ignition and opening
the driver's door), the steering is enabled only when the ignition is switched on
or the engine is started.
Steering lock / unlock
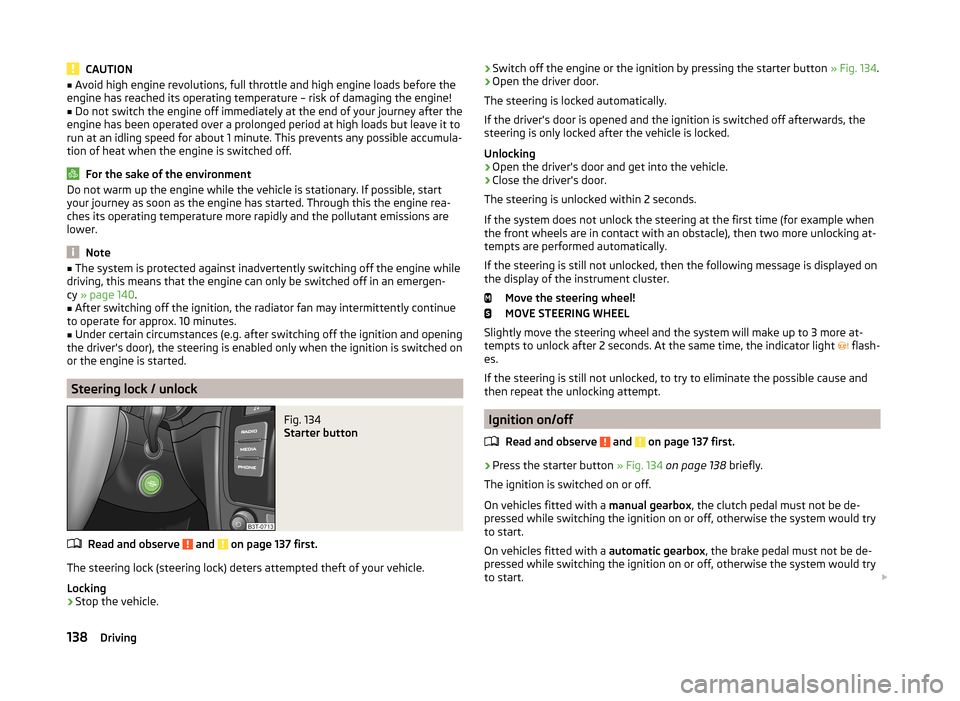
Fig. 134
Starter button
Read and observe and on page 137 first.
The steering lock (steering lock) deters attempted theft of your vehicle.
Locking
›
Stop the vehicle.
› Switch off the engine or the ignition by pressing the starter button
» Fig. 134.›Open the driver door.
The steering is locked automatically.
If the driver's door is opened and the ignition is switched off afterwards, the
steering is only locked after the vehicle is locked.
Unlocking›
Open the driver's door and get into the vehicle.
›
Close the driver's door.
The steering is unlocked within 2 seconds.
If the system does not unlock the steering at the first time (for example when
the front wheels are in contact with an obstacle), then two more unlocking at-
tempts are performed automatically.
If the steering is still not unlocked, then the following message is displayed on the display of the instrument cluster.
Move the steering wheel!
MOVE STEERING WHEEL
Slightly move the steering wheel and the system will make up to 3 more at-
tempts to unlock after 2 seconds. At the same time, the indicator light flash-
es.
If the steering is still not unlocked, to try to eliminate the possible cause and
then repeat the unlocking attempt.
Ignition on/off
Read and observe
and on page 137 first.
›
Press the starter button » Fig. 134 on page 138 briefly.
The ignition is switched on or off.
On vehicles fitted with a manual gearbox, the clutch pedal must not be de-
pressed while switching the ignition on or off, otherwise the system would try
to start.
On vehicles fitted with a automatic gearbox, the brake pedal must not be de-
pressed while switching the ignition on or off, otherwise the system would try
to start.
138Driving
Page 141 of 246
If the driver's door is opened while the igition is on, an audible signal sounds
and the following message appears in the instrument cluster display.
Ignition on!
IGNITION ON
When leaving the vehicle always switch off the ignition.
Note
The ignition is switched on when indicated by the lighting up of certain indica-
tor lamps in the instrument cluster.
Starting the engine
Read and observe
and on page 137 first.
Vehicles with a diesel engine are equipped with a glow plug system. The glow
plug warning light lights up after the ignition has been switched on. Start
the engine once the warning light has gone out.
You should not switch on any major electrical components during the heating
period otherwise the vehicle battery will be drained unnecessarily.
Procedure for starting the engine
›
Firmly apply the handbrake.
›
Move the gearshift lever into neutral or move the selector lever into position
P or N.
›
Depress and hold the clutch pedal (vehicles with a manual gearbox) or brake
pedal (vehicles with an automatic gearbox) until the engine starts.
›
Press and hold » Fig. 134 on page 138 1)
the starter button until the engine
starts.
CAUTION
■ If the engine does not start up after a second attempt, one of the following
fuses may be defective. ■ Petrol engine - fuse for the electric fuel pump.
■ Diesel engine - fuse for the control unit for glow plugs or glow plug relay
and fuel pump.■
Check the fuse and replace if necessary » page 215, or seek assistance from
a specialist garage.
Switching off the engine
Read and observe
and on page 137 first.
›
Stop the vehicle.
›
Press the starter button » Fig. 134 on page 138 briefly.
The engine and the ignition are switched off simultaneously.
The engine can be switched off up to a speed of 2 km/h.
Emergency start-up of the engine
Fig. 135
Emergency start-up of engine
Read and observe and on page 137 first.
If the authorisation check for the key fails, the following message appears in
the instrument cluster display.
Key not found.
NO KEY
The emergency start-up must be completed.
› Press the starter button directly with the key
» Fig. 135.
or
› Press the starter button and then hold the key to the starter button.
Note
During an emergency start-up of the engine, the key bit must face the starter
button » Fig. 135 .1)
On vehicles with the START-STOP system, it is sufficient to press the starter button briefly. The motor
will then automatically start.
139Starting-off and Driving
Page 142 of 246
Emergency ignition shutoff systemRead and observe
and on page 137 first.
The ignition can be turned off in an emergency even when travelling at a
speed of more than 2 km / hr.
›
Press the starter button » Fig. 134 on page 138 for longer than 1 second or
twice within 1 second.
After emergency stop of the ignition, the steering is unlocked.
Brakes
Introduction
This chapter contains information on the following subjects:
Information on braking
140
Handbrake
141WARNING■ Greater physical effort is required for braking when the engine is switch-
ed off – risk of accident!■
The clutch pedal must be actuated when braking on a vehicle with man-
ual transmission, when the vehicle is in gear and at low revs. Otherwise,
the function of the brake booster may be impaired – risk of accident!
■
When leaving the vehicle, never leave persons who might, for example,
release the handbrake or take the vehicle out of gear unattended in the ve-
hicle. The vehicle could then start to move – risk of accident!
WARNINGIn the case of damage to the standard fitted front spoiler or if retrofitting
another front spoiler, hub caps etc. » page 169, Services, modifications,
and technical alterations , make sure that the air supply to the front brakes
is not affected. The front brakes may overheat, which can have a negative
impact on the functioning of the braking system – risk of accident!
CAUTION
■ Observe the recommendations on the new brake pads » page 145.■Never let the brakes slip with light pressure on the pedal if braking is not
necessary. This causes the brakes to overheat and can also result in a longer
braking distance and excessive wear.Information on braking
Read and observe
and on page 140 first.
If the brakes are applied in full and the control unit for the braking system con-siders the situation to be dangerous for the following traffic, the brake light
flashes automatically.
After the speed was reduced below around 10 km/h or the vehicle was stop-
ped, the brake light stops flashing and the hazard warning light system
switches on. The hazard warning light system is switched off automatically af- ter accelerating or driving off again.
Before travelling a long distance with a steep gradient, reduce speed and shift
into the next lowest gear. As a result, the braking effect of the engine will be
used, reducing the load on the brakes. Any additional braking should be com-
pleted intermittently, not continuously.
Wear-and-tear
The wear of the brake pads is dependent on the operating conditions and driv-
ing style.
The brake pads wear more quickly if a lot of journeys are completed in towns
and over short distances or if a very sporty style of driving is adopted.
Under these severe conditions , the thickness of the brake pads must also be
checked by a specialist garage between service intervals.
Wet roads or road salt
The performance of the brakes can be delayed as the brake discs and brake
pads may be moist or have a coating of ice or layer of salt on them in winter.
The brakes are cleaned and dried by applying the brakes several times.
Corrosion
Corrosion on the brake discs and dirt on the bake pads occur if the vehicle has been parked for a long period and if you do not make much use of the braking
system. The brakes are cleaned and dried by applying the brakes several times.
Faults in the brake surface
If it is found that the braking distance has suddenly become longer and that
the brake pedal can be depressed further, the brake system may be faulty.
Visit a specialist garage immediately and adjust your style of driving appropri-
ately, as you will not know the exact extent of the damage.
140Driving
Page 143 of 246
Low brake fluid level
An insufficient level of brake fluid may result in problems in the brake system.
The level of the brake fluid is monitored electronically » page 33,
Brake sys-
tem .
Brake booster
The brake booster increases the pressure generated with the brake pedal. The
brake booster only operates when the engine is running.
Handbrake
Fig. 136
Handbrake
Read and observe and on page 140 first.
Apply
›
Pull the handbrake lever firmly upwards.
Releasing
›
Pull the handbrake lever up slightly and at the same time push in the locking
button » Fig. 136 .
›
Move the lever right down while pressing the lock button.
The handbrake indicator light lights up when the handbrake is applied, pro-
vided the ignition is on.
A warning signal sounds if the vehicle is inadvertently driven off with the
handbrake applied.
The following instruction is shown in the MAXI DOT display. Release parking brake!
The handbrake warning is activated if the vehicle is driven at a speed of more
than around 5 km/h for more than 3 seconds.
WARNINGPlease note that the handbrake must be fully released. A handbrake which
is only partially released can result in the rear brakes overheating. This can
have a negative effect on the operation of the brake system – risk of acci-
dent!
CAUTION
After the vehicle has come to a standstill, always tighten the handbrake first
and then put in the first gear gear (vehicles with manual gearbox) or move the
selector lever to the P position (vehicles with automatic gearbox).
Manual gear changing and pedals
Introduction
This chapter contains information on the following subjects:
Manual gear changing
141
Pedals
142
Manual gear changing
Fig. 137
Gearshift pattern of 5 gear or
6 gear manual gearbox
Always depress the clutch pedal all the way down. This prevents uneven wear on the clutch.
The gearshift indicator must be observed when changing gear » page 40.
Only engage reverse gear when the vehicle is stationary. Depress the clutch
pedal and hold it fully depressed. Wait a moment before reverse gear is engag-
ed to avoid any shift noises.
The reversing lights will come on once reverse gear is engaged, provided the
ignition is on.
141Starting-off and Driving
Page 145 of 246
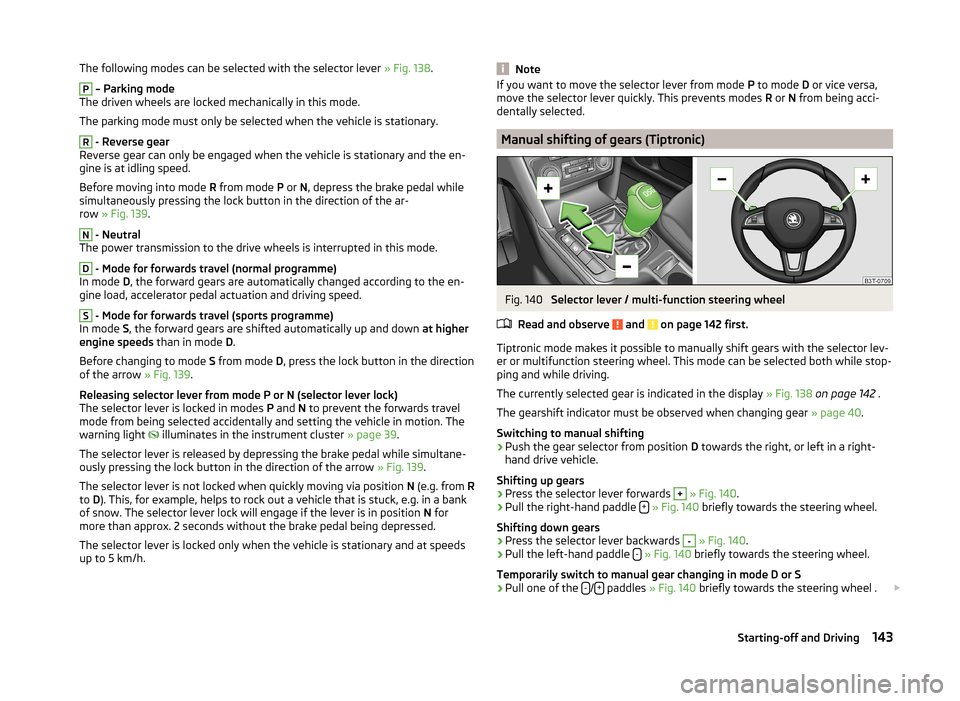
The following modes can be selected with the selector lever » Fig. 138.P
– Parking mode
The driven wheels are locked mechanically in this mode.
The parking mode must only be selected when the vehicle is stationary.
R
- Reverse gear
Reverse gear can only be engaged when the vehicle is stationary and the en-
gine is at idling speed.
Before moving into mode R from mode P or N, depress the brake pedal while
simultaneously pressing the lock button in the direction of the ar-
row » Fig. 139 .
N
- Neutral
The power transmission to the drive wheels is interrupted in this mode.
D
- Mode for forwards travel (normal programme)
In mode D, the forward gears are automatically changed according to the en-
gine load, accelerator pedal actuation and driving speed.
S
- Mode for forwards travel (sports programme)
In mode S, the forward gears are shifted automatically up and down at higher
engine speeds than in mode D.
Before changing to mode S from mode D, press the lock button in the direction
of the arrow » Fig. 139.
Releasing selector lever from mode P or N (selector lever lock)
The selector lever is locked in modes P and N to prevent the forwards travel
mode from being selected accidentally and setting the vehicle in motion. The
warning light illuminates in the instrument cluster
» page 39.
The selector lever is released by depressing the brake pedal while simultane-
ously pressing the lock button in the direction of the arrow » Fig. 139.
The selector lever is not locked when quickly moving via position N (e.g. from R
to D). This, for example, helps to rock out a vehicle that is stuck, e.g. in a bank
of snow. The selector lever lock will engage if the lever is in position N for
more than approx. 2 seconds without the brake pedal being depressed.
The selector lever is locked only when the vehicle is stationary and at speeds up to 5 km/h.
NoteIf you want to move the selector lever from mode P to mode D or vice versa,
move the selector lever quickly. This prevents modes R or N from being acci-
dentally selected.
Manual shifting of gears (Tiptronic)
Fig. 140
Selector lever / multi-function steering wheel
Read and observe
and on page 142 first.
Tiptronic mode makes it possible to manually shift gears with the selector lev-
er or multifunction steering wheel. This mode can be selected both while stop-
ping and while driving.
The currently selected gear is indicated in the display » Fig. 138 on page 142 .
The gearshift indicator must be observed when changing gear » page 40.
Switching to manual shifting
›
Push the gear selector from position D towards the right, or left in a right-
hand drive vehicle.
Shifting up gears
›
Press the selector lever forwards
+
» Fig. 140 .
›
Pull the right-hand paddle +
» Fig. 140 briefly towards the steering wheel.
Shifting down gears
›
Press the selector lever backwards
-
» Fig. 140 .
›
Pull the left-hand paddle -
» Fig. 140 briefly towards the steering wheel.
Temporarily switch to manual gear changing in mode D or S
›
Pull one of the -/+ paddles
» Fig. 140 briefly towards the steering wheel .
143Starting-off and Driving
Page 147 of 246
Indications of an activated emergency programme include the following:
› Only certain gears are selected.
› The reverse gear
R cannot be used.
› Shifting gears in Tiptronic mode is not possible.
Gearbox overheating The gearbox may, for example, become too hot due to frequent repeated
starting or stop-and-go traffic. Overheating is indicated by the warning
light » page 31 ,
Clutches of the automatic DSG gearbox are too hot .
Defective selector lever lock
If the selector lever lock is defective or its power supply is interrupted (e.g. dis-
charged vehicle battery, faulty fuse), the selector lever can no longer be moved
out of position P in the normal manner, and the vehicle can no longer be driv-
en. The selector lever must be unlocked specially » page 213.
Note
If the gearbox has switched to the emergency programme, visit a specialist ga-
rage.
Running in
Introduction
This chapter contains information on the following subjects:
New engine
145
New tyres
145
New brake pads
145
New engine
The engine has to be run in during the first 1 500 kilometres.
Up to 1 000 kilometres
›
Do not drive faster than 3/4 of the maximum speed of the gear in use, i.e. 3/4
of the maximum permissible engine speed.
›
No full throttle.
›
Avoid high engine speeds.
›
Do not tow a trailer.
From 1 000 up to 1 500 kilometres
Gradually increase the power output of the engine up to the full speed of the
gear engaged, i.e. up to the maximum permissible engine speed.
The red scale of the rev counter indicates the range in which the system be-
gins to limit the engine speed.
During the first operating hours the engine has higher internal friction than
later until all of the moving parts have harmonized. The driving style which you
adopt during the first approx.1 500 kilometres plays a decisive part in the suc-
cess of running in your car.
Never drive at unnecessarily high engine speeds even after the running-in pe-
riod.
On vehicles fitted with a manual gearbox, at the very latest shift up into the
next gear when the red area is reached. Observe the recommended
gear » page 40 , Gear recommendation . Very high engine speeds when acceler-
ating (accelerator) are automatically restricted »
.
In vehicles with manual transmission, do not drive at unnecessarily low engine
speeds. Shift down a gear when the engine is no longer running smoothly. Ob-
serve the recommended gear » page 40, Gear recommendation .
CAUTION
■
The engine is not protected from excessive engine revs caused by shifting
down at the wrong time. This can result in a sudden increase in revs beyond
the permissible maximum rpm, thereby causing engine damage.■
Never rev up a cold engine when the vehicle is stationary or when driving in
individual gears.
For the sake of the environment
Do not drive at unnecessarily high engine speeds. Shifting up sooner helps
save fuel, reduces engine noise and protects the environment.
New tyres
New tyres must firstly be “run in”, as they do not offer optimal grip at first.
Therefore, drive especially carefully for the first 500 km or so.
New brake pads
New brake pads do not initially provide optimal braking performance. They first
need to be “run in”. Therefore, drive especially carefully for the first 200 km or
so.
145Starting-off and Driving