brake pads SKODA SUPERB 2014 2.G / (B6/3T) Owner's Manual
[x] Cancel search | Manufacturer: SKODA, Model Year: 2014, Model line: SUPERB, Model: SKODA SUPERB 2014 2.G / (B6/3T)Pages: 246, PDF Size: 17.16 MB
Page 33 of 246
Display of the second speedRead and observe
on page 28 first.
The display can show the current speed in mph 1)
.
This feature is provided for driving in countries with different speed units.
Maxi DOT display
The display of the second speed can be set in the Alt. speed dis. menu
item » page 45 , Settings .
Segment display
›
Press key
3
» Fig. 20 on page 28 repeatedly, until the odometer display
flashes » page 30 .
›
Press the
7
key while the display flashes.
The second speed is displayed instead of the odometer.
The display of the second speed can be disabled in the same way.
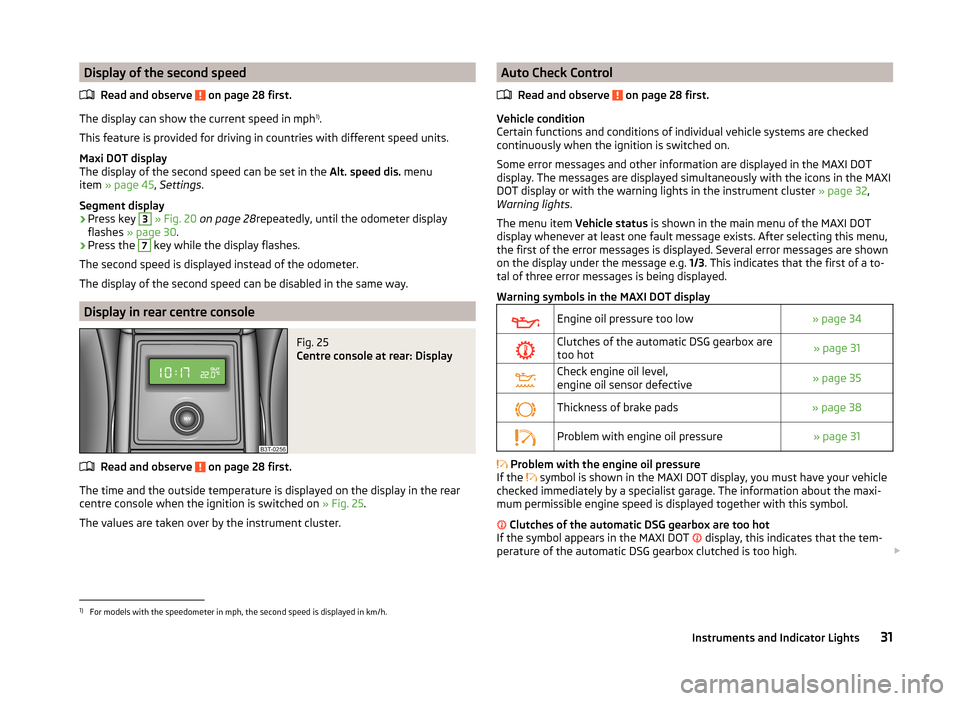
Display in rear centre console
Fig. 25
Centre console at rear: Display
Read and observe on page 28 first.
The time and the outside temperature is displayed on the display in the rear
centre console when the ignition is switched on » Fig. 25.
The values are taken over by the instrument cluster.
Auto Check Control
Read and observe
on page 28 first.
Vehicle condition
Certain functions and conditions of individual vehicle systems are checked
continuously when the ignition is switched on.
Some error messages and other information are displayed in the MAXI DOT
display. The messages are displayed simultaneously with the icons in the MAXI
DOT display or with the warning lights in the instrument cluster » page 32,
Warning lights .
The menu item Vehicle status is shown in the main menu of the MAXI DOT
display whenever at least one fault message exists. After selecting this menu,
the first of the error messages is displayed. Several error messages are shown
on the display under the message e.g. 1/3. This indicates that the first of a to-
tal of three error messages is being displayed.
Warning symbols in the MAXI DOT display
Engine oil pressure too low» page 34Clutches of the automatic DSG gearbox are
too hot» page 31Check engine oil level,
engine oil sensor defective» page 35Thickness of brake pads» page 38Problem with engine oil pressure» page 31
Problem with the engine oil pressure
If the symbol is shown in the MAXI DOT display, you must have your vehicle
checked immediately by a specialist garage. The information about the maxi-
mum permissible engine speed is displayed together with this symbol.
Clutches of the automatic DSG gearbox are too hot
If the symbol appears in the MAXI DOT display, this indicates that the tem-
perature of the automatic DSG gearbox clutched is too high.
1)
For models with the speedometer in mph, the second speed is displayed in km/h.
31Instruments and Indicator Lights
Page 34 of 246
The following message is shown in the MAXI DOT display.Gearbox overheated. Stop! Log book!
do not continue to drive! Stop the vehicle, switch off the engine, and wait
until the
icon goes out – risk of gearbox damage! You can continue your
journey as soon as the symbol disappears.WARNINGIf you have to stop for technical reasons, then park the vehicle at a safe
distance from the traffic, switch off the engine and activate the hazard
warning lights system » page 70. The warning triangle must be set up at
the prescribed distance - observe the national legal provisions when doing
so.
Note
■ If the MAXI DOT display shows warning messages, these messages must be
confirmed in order to access the main menu » page 40 .■
As long as the operational faults are not rectified, the symbols are always in-
dicated again. After they are displayed for the first time, the symbols continue
to be indicated without any extra messages for the driver.
Warning lights
Introduction
This chapter contains information on the following subjects:
Handbrake
33
Brake system
33
Seat belt warning light
33
Generator
33
Door open
34
Engine oil pressure
34
Coolant
34
Bonnet
34
Boot lid
34
Power steering / steering lock (system KESSY)
34
Engine oil level
35
Traction Control System (ASR)
35
Electronic Stability Control (ESC)
35 Antilock brake system (ABS)36 Rear fog light36
Lamp failure
36
Adaptive headlights (AFS)
36
Exhaust inspection system
36
Glow plug system (diesel engine)
36
Engine performance check (petrol engine)
37
Diesel particulate filter (diesel engine)
37
Fuel reserve
37
Airbag system
38
Tyre inflation pressure
38
Windscreen washer fluid level
38
Pads
38
Turn signal system
38
Low beam
39
Fog lights
39
Cruise control system
39
Selector lever lock / starter (system KESSY)
39
Main beam
39
The warning lights indicate certain functions or faults.
Some warning lights can be accompanied by acoustic signals and messages in
the display of the instrument cluster.
After switching on the ignition, some warning lights illuminate briefly as a
function test.
If the tested systems are OK, the corresponding warning lights go out a few
seconds after switching on the ignition or after starting the engine.
32Operation
Page 40 of 246
Airbag systemRead and observe
on page 33 first.
If the warning light
illuminates , there is a fault in the airbag system.
The following message is shown in the MAXI DOT display. Error: Airbag
The functionality of the airbag system is monitored electronically even if one
of the airbags is switched off.
If a front, side or head airbag or belt tensioner has been switched off using
the vehicle system tester:
› The warning
illuminates for approx. 4 seconds after switching on the igni-
tion and then flashes again for approx. 12 seconds.
The following message is shown in the MAXI DOT display. Airbag/belt tensioner deactivated.
If the air bag was switched off using the key-operated switch on the side of
the dash panel on the passenger side:
› The indicator light
illuminates for around 4 seconds after the ignition has
been switched on;
› The deactivated air bag is indicated by the illumination of the warning
light » page 20
in the middle of the dash panel .
WARNINGWhen a fault in the airbag system occurs, there is a risk of the system not
being triggered in the event of an accident. Therefore, this must be
checked immediately by a specialized company.
Tyre inflation pressure
Read and observe
on page 33 first.
The warning light
illuminates , if there is a substantial drop in inflation pres-
sure in one of the tyres.
An audible signal sounds as a warning signal.
›
Check and adjust the pressure in all tyres » page 194, Service life of tyres .
If the indicator light
flashes , there is a fault in the tyre pressure monitoring
system.
› Stop the car, turn the ignition off and on again.
If the warning light
flashes again after re-starting the engine, then the help
of a professional service provider must be sought immediately.
Further information » page 196, Tyre pressure monitor .
Note
The warning light illuminates after the ignition is switched on if the vehi-
cle's battery has been disconnected and reconnected. If the warning light
does not go out after moving a short distance, this means there is an error in
the system. Seek assistance from a specialist garage immediately.
Windscreen washer fluid level
Read and observe
on page 33 first.
If the windscreen washer fluid level is too low, the warning light
illumi-
nates .
The following message is shown in the MAXI DOT display. Top up wash fluid!
Top up with liquid » page 184, Windscreen washer system .
Pads
Read and observe
on page 33 first.
If the indicator light
is illuminated , the brake pads are worn.
The following message is shown in the MAXI DOT display. Check brake wear!
Seek assistance from a specialist garage immediately.
Turn signal system
Read and observe
on page 33 first.
Either the left or right
warning light
flashes depending on the position of
the turn signal lever.
If there is a fault in the turn signal system, the warning light flashes at twice
its normal rate.
38Operation
Page 142 of 246
Emergency ignition shutoff systemRead and observe
and on page 137 first.
The ignition can be turned off in an emergency even when travelling at a
speed of more than 2 km / hr.
›
Press the starter button » Fig. 134 on page 138 for longer than 1 second or
twice within 1 second.
After emergency stop of the ignition, the steering is unlocked.
Brakes
Introduction
This chapter contains information on the following subjects:
Information on braking
140
Handbrake
141WARNING■ Greater physical effort is required for braking when the engine is switch-
ed off – risk of accident!■
The clutch pedal must be actuated when braking on a vehicle with man-
ual transmission, when the vehicle is in gear and at low revs. Otherwise,
the function of the brake booster may be impaired – risk of accident!
■
When leaving the vehicle, never leave persons who might, for example,
release the handbrake or take the vehicle out of gear unattended in the ve-
hicle. The vehicle could then start to move – risk of accident!
WARNINGIn the case of damage to the standard fitted front spoiler or if retrofitting
another front spoiler, hub caps etc. » page 169, Services, modifications,
and technical alterations , make sure that the air supply to the front brakes
is not affected. The front brakes may overheat, which can have a negative
impact on the functioning of the braking system – risk of accident!
CAUTION
■ Observe the recommendations on the new brake pads » page 145.■Never let the brakes slip with light pressure on the pedal if braking is not
necessary. This causes the brakes to overheat and can also result in a longer
braking distance and excessive wear.Information on braking
Read and observe
and on page 140 first.
If the brakes are applied in full and the control unit for the braking system con-siders the situation to be dangerous for the following traffic, the brake light
flashes automatically.
After the speed was reduced below around 10 km/h or the vehicle was stop-
ped, the brake light stops flashing and the hazard warning light system
switches on. The hazard warning light system is switched off automatically af- ter accelerating or driving off again.
Before travelling a long distance with a steep gradient, reduce speed and shift
into the next lowest gear. As a result, the braking effect of the engine will be
used, reducing the load on the brakes. Any additional braking should be com-
pleted intermittently, not continuously.
Wear-and-tear
The wear of the brake pads is dependent on the operating conditions and driv-
ing style.
The brake pads wear more quickly if a lot of journeys are completed in towns
and over short distances or if a very sporty style of driving is adopted.
Under these severe conditions , the thickness of the brake pads must also be
checked by a specialist garage between service intervals.
Wet roads or road salt
The performance of the brakes can be delayed as the brake discs and brake
pads may be moist or have a coating of ice or layer of salt on them in winter.
The brakes are cleaned and dried by applying the brakes several times.
Corrosion
Corrosion on the brake discs and dirt on the bake pads occur if the vehicle has been parked for a long period and if you do not make much use of the braking
system. The brakes are cleaned and dried by applying the brakes several times.
Faults in the brake surface
If it is found that the braking distance has suddenly become longer and that
the brake pedal can be depressed further, the brake system may be faulty.
Visit a specialist garage immediately and adjust your style of driving appropri-
ately, as you will not know the exact extent of the damage.
140Driving
Page 147 of 246
Indications of an activated emergency programme include the following:
› Only certain gears are selected.
› The reverse gear
R cannot be used.
› Shifting gears in Tiptronic mode is not possible.
Gearbox overheating The gearbox may, for example, become too hot due to frequent repeated
starting or stop-and-go traffic. Overheating is indicated by the warning
light » page 31 ,
Clutches of the automatic DSG gearbox are too hot .
Defective selector lever lock
If the selector lever lock is defective or its power supply is interrupted (e.g. dis-
charged vehicle battery, faulty fuse), the selector lever can no longer be moved
out of position P in the normal manner, and the vehicle can no longer be driv-
en. The selector lever must be unlocked specially » page 213.
Note
If the gearbox has switched to the emergency programme, visit a specialist ga-
rage.
Running in
Introduction
This chapter contains information on the following subjects:
New engine
145
New tyres
145
New brake pads
145
New engine
The engine has to be run in during the first 1 500 kilometres.
Up to 1 000 kilometres
›
Do not drive faster than 3/4 of the maximum speed of the gear in use, i.e. 3/4
of the maximum permissible engine speed.
›
No full throttle.
›
Avoid high engine speeds.
›
Do not tow a trailer.
From 1 000 up to 1 500 kilometres
Gradually increase the power output of the engine up to the full speed of the
gear engaged, i.e. up to the maximum permissible engine speed.
The red scale of the rev counter indicates the range in which the system be-
gins to limit the engine speed.
During the first operating hours the engine has higher internal friction than
later until all of the moving parts have harmonized. The driving style which you
adopt during the first approx.1 500 kilometres plays a decisive part in the suc-
cess of running in your car.
Never drive at unnecessarily high engine speeds even after the running-in pe-
riod.
On vehicles fitted with a manual gearbox, at the very latest shift up into the
next gear when the red area is reached. Observe the recommended
gear » page 40 , Gear recommendation . Very high engine speeds when acceler-
ating (accelerator) are automatically restricted »
.
In vehicles with manual transmission, do not drive at unnecessarily low engine
speeds. Shift down a gear when the engine is no longer running smoothly. Ob-
serve the recommended gear » page 40, Gear recommendation .
CAUTION
■
The engine is not protected from excessive engine revs caused by shifting
down at the wrong time. This can result in a sudden increase in revs beyond
the permissible maximum rpm, thereby causing engine damage.■
Never rev up a cold engine when the vehicle is stationary or when driving in
individual gears.
For the sake of the environment
Do not drive at unnecessarily high engine speeds. Shifting up sooner helps
save fuel, reduces engine noise and protects the environment.
New tyres
New tyres must firstly be “run in”, as they do not offer optimal grip at first.
Therefore, drive especially carefully for the first 500 km or so.
New brake pads
New brake pads do not initially provide optimal braking performance. They first
need to be “run in”. Therefore, drive especially carefully for the first 200 km or
so.
145Starting-off and Driving
Page 191 of 246
Brake fluid
Introduction
This chapter contains information on the following subjects:
Checking the brake fluid level
189
Changing
189WARNING■ The engine compartment of your car is a hazardous area. The following
warning instructions must be followed at all times when working in the en-
gine compartment » page 182.■
Do not continue your journey if the fluid level has fallen below the MIN
marking » Fig. 165 on page 189 ,
- there is a risk of an accident. Seek help
from a specialist garage.
■
Do not use used brake fluid - the function of the brake system may be im-
paired – risk of accident!
CAUTION
Brake fluid damages the paintwork of the vehicle.
Note
■ The brake fluid is changed as part of a compulsory inspection service.■We recommend using brake fluids from the ŠKODA Original Accessories
range.
Checking the brake fluid level
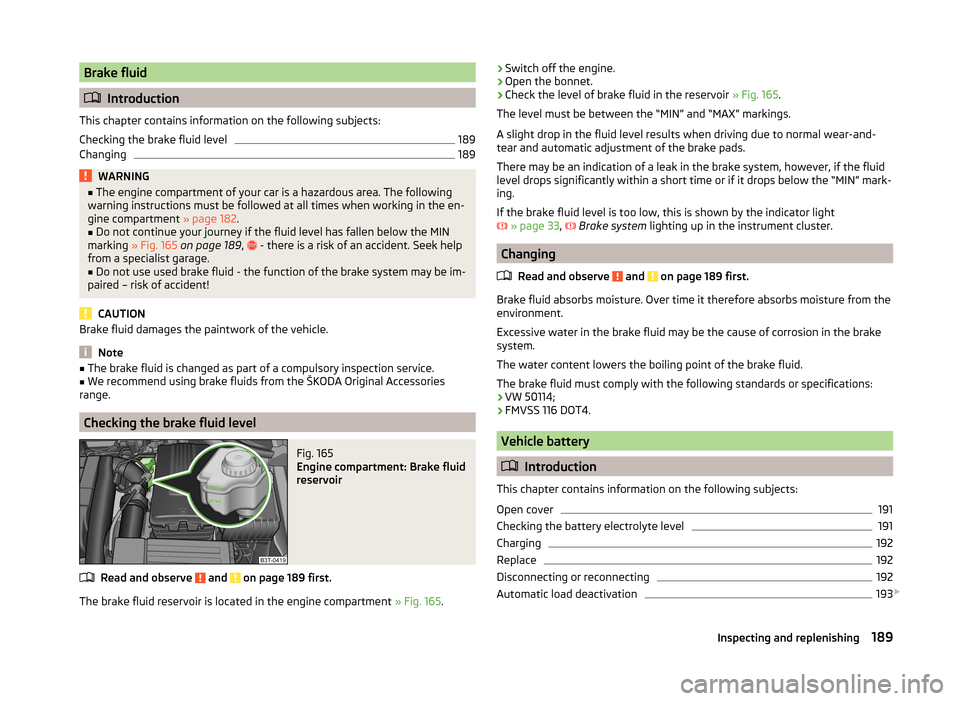
Fig. 165
Engine compartment: Brake fluid
reservoir
Read and observe and on page 189 first.
The brake fluid reservoir is located in the engine compartment » Fig. 165.
›Switch off the engine.›Open the bonnet.›
Check the level of brake fluid in the reservoir
» Fig. 165.
The level must be between the “MIN” and “MAX” markings.
A slight drop in the fluid level results when driving due to normal wear-and-
tear and automatic adjustment of the brake pads.
There may be an indication of a leak in the brake system, however, if the fluid
level drops significantly within a short time or if it drops below the “MIN” mark-
ing.
If the brake fluid level is too low, this is shown by the indicator light
» page 33 ,
Brake system
lighting up in the instrument cluster.
Changing
Read and observe
and on page 189 first.
Brake fluid absorbs moisture. Over time it therefore absorbs moisture from the
environment.
Excessive water in the brake fluid may be the cause of corrosion in the brake
system.
The water content lowers the boiling point of the brake fluid.
The brake fluid must comply with the following standards or specifications: › VW 50114;
› FMVSS 116 DOT4.
Vehicle battery
Introduction
This chapter contains information on the following subjects:
Open cover
191
Checking the battery electrolyte level
191
Charging
192
Replace
192
Disconnecting or reconnecting
192
Automatic load deactivation
193
189Inspecting and replenishing
Page 235 of 246
Folding hook97
Non-closable side pocket (Superb Combi)100
Removable Light (Superb Combi)101
Roll-up boot cover (Superb Combi)99
Side compartment with battery100
Boot cover (Superb Combi)99
Boot lid55
automatic locking56
Warning light34
(Superb Combi)56
Brake Information messages
33
Warning light33
Brake booster141
Brake fluid189
Changing189
Checking189
Information messages33
Brake pads warning light
38
Brakes Brake assist systems
151
Brake booster141
Brake fluid189
Handbrake141
Running in145
Braking Information on braking
140
Breakdown kit205
Break recommendation See Fatigue detection
162
Bulbs Replacing
219
Button in the driver's door Electric power windows
59
C
Car care
169
Car computer See multifunction display
41
Car park ticket holder87
Carrier106
Cavity protection176
CD changer133
Central locking48
Central locking button52
Changing Brake fluid
189
Engine oil187
Wheels201
Changing a wheel Follow-up work
202
Preliminary work202
Remove and attaching a wheel202
Charging a vehicle battery192
Check Fit ball head properly
165
Checking Battery electrolyte level
191
Brake fluid189
Coolant188
Engine oil186
Oil level186
Windscreen washer fluid184
Children and safety21
Child safety Side airbag
22
Child safety lock53
Child seat Classification
23
ISOFIX23
on the front passenger seat21
TOP TETHER24
Use of child seats23
Use of ISOFIX child seats24
Chrome parts refer to Taking care of your vehicle
174
Cigarette lighter89
Cleaning169
Alcantara178
Artificial leather178
cloths178
Covers of electrically heated seats178
Headlight lenses175
Natural leather177
Plastic parts174
Wheels176
Climatronic113
Air recirculation115
automatic mode114
Control elements113
Controlling blower116
Cooling system114
Defrosting windscreen116
Setting the temperature114
Clothes hook92
Cockpit 12-Volt power outlet
90
Ashtray89
Cigarette lighter89
General view27
Lighting71
Practical equipment86
Storage compartments86
Comfort control window
61
COMING HOME70
Compartments86
Computer See multifunction display
41
Convenience operation sliding / tilting roof
63
sliding / tilting roof (Superb Estate)65
convenience turn signal67
Coolant187
Checking188
Information messages34
Replenishing188
233Index
Page 240 of 246
Passive safetyBefore setting off6
Driving safety6
Safety equipment6
Passive Safety6
Payload224
Pedals142
Footmats142
Petrol refer to Fuel
180
Polishing the paintwork See Taking care of your vehicle
174
Power outlet 12 V
90
Power Steering / steering lock (KESSY system) warning light
34
Power windows Button in the front passenger door
61
Practical features86
12-Volt power outlet90
Storage compartment for umbrella93
Storage compartment in rear centre console93
Storage compartment on the passenger side92
Storage compartment under the armrest, front 90
Storage compartment under the passenger seat
92
Storage net in the front centre console91
Storage pockets on the front seats93
R
Radiator fan
184
Radio reception See windows
175
Radio remote control Auxiliary heating
118
Raise vehicle203
Rear-view mirror Exterior mirrors78
Fold in passenger mirror78
Synchronous adjustment of the rear-view mir- ror
78
Rear fog light69
Warning light36
Rear interior light72
Rear mirror77
Interior mirror77
Rear seats Seat folded forward Combi
86
Rear window - heater73
Recirculated air mode Manual air conditioning
112
Refuelling180
Fuel180
Remote control lock
49
Replacing the battery211
Synchronisation process211
unlock49
Remote control key Replacing the battery
211
Removable lights (Superb Combi) Changing rechargeable light batteries
101
Removable Light (Superb Combi) Remove light
101
Removable ski bag95
Removable variable loading floor Fit and remove
104
Repairs and technical alterations169
Replace Vehicle battery
192
Replacing Bulb for main beam
221
Bulb for main beam and daytime running lights 220
Bulb for the fog light
221
Bulb for the licence plate light222
Bulb in rear light (Superb Combi)223
Bulbs219
Fuses215
Fuses in the dash panel216
Fuses in the engine compartment217
Low beam bulb220
Wiper blades214
Replenishing Coolant
188
Engine oil187
Windscreen washer fluid184
Revolutions counter29
Roof luggage rack Attachment points
107
Roof rack system106
Roof load107
Running-in The first 1500 km
145
Running in Brake pads
145
Engine145
Tyres145
S
SAFE see Safe securing
51
SAFELOCK see Safe securing
51
Safe securing51
Safety6
Child safety21
Child safety seats21
Correct seated position7
Head restraints81
ISOFIX23
TOP TETHER24
Saving electrical energy146
Screens see Sun screen in the rear doors
74
Seals Taking care of your vehicle
174
238Index