fuel cap SKODA SUPERB 2014 2.G / (B6/3T) Owner's Manual
[x] Cancel search | Manufacturer: SKODA, Model Year: 2014, Model line: SUPERB, Model: SKODA SUPERB 2014 2.G / (B6/3T)Pages: 246, PDF Size: 17.16 MB
Page 32 of 246
Display types » Fig. 22 .
Segment display
MAXI DOT display
CAUTION
Pull out the ignition key if coming in contact with the display (e.g. when clean-
ing) to prevent any possible damage. On vehicles with the KESSY system,
switch off the ignition and open the driver's door.
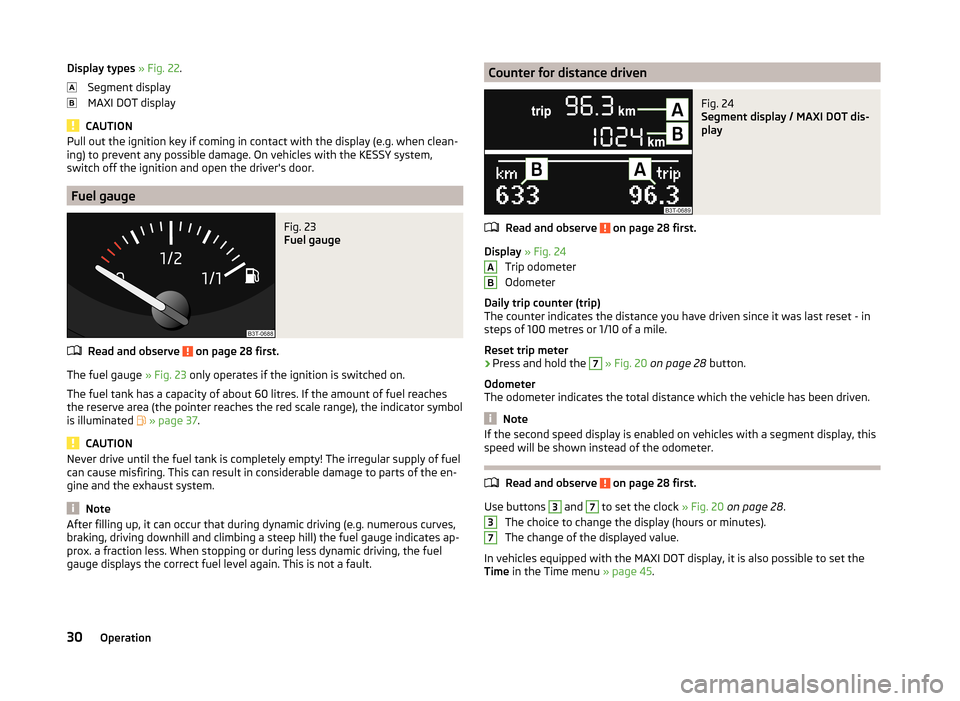
Fuel gauge
Fig. 23
Fuel gauge
Read and observe on page 28 first.
The fuel gauge » Fig. 23 only operates if the ignition is switched on.
The fuel tank has a capacity of about 60 litres. If the amount of fuel reaches
the reserve area (the pointer reaches the red scale range), the indicator symbol
is illuminated
» page 37 .
CAUTION
Never drive until the fuel tank is completely empty! The irregular supply of fuel
can cause misfiring. This can result in considerable damage to parts of the en-
gine and the exhaust system.
Note
After filling up, it can occur that during dynamic driving (e.g. numerous curves,
braking, driving downhill and climbing a steep hill) the fuel gauge indicates ap-
prox. a fraction less. When stopping or during less dynamic driving, the fuel
gauge displays the correct fuel level again. This is not a fault.Counter for distance drivenFig. 24
Segment display / MAXI DOT dis-
play
Read and observe on page 28 first.
Display » Fig. 24
Trip odometer
Odometer
Daily trip counter (trip)
The counter indicates the distance you have driven since it was last reset - in
steps of 100 metres or 1/10 of a mile.
Reset trip meter
›
Press and hold the
7
» Fig. 20 on page 28 button.
Odometer
The odometer indicates the total distance which the vehicle has been driven.
Note
If the second speed display is enabled on vehicles with a segment display, this
speed will be shown instead of the odometer.
Read and observe on page 28 first.
Use buttons
3
and
7
to set the clock » Fig. 20 on page 28 .
The choice to change the display (hours or minutes).
The change of the displayed value.
In vehicles equipped with the MAXI DOT display, it is also possible to set the
Time in the Time menu » page 45.
AB3730Operation
Page 43 of 246
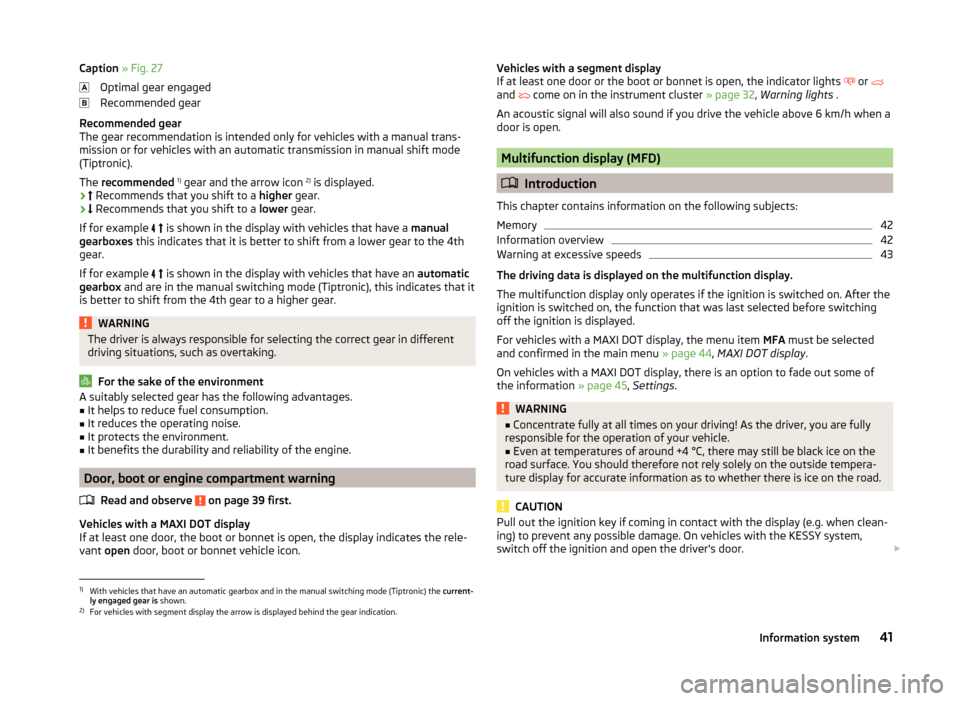
Caption » Fig. 27
Optimal gear engaged
Recommended gear
Recommended gear
The gear recommendation is intended only for vehicles with a manual trans- mission or for vehicles with an automatic transmission in manual shift mode
(Tiptronic).
The recommended 1)
gear and the arrow icon 2)
is displayed.
›
Recommends that you shift to a higher gear.
›
Recommends that you shift to a lower gear.
If for example
is shown in the display with vehicles that have a
manual
gearboxes this indicates that it is better to shift from a lower gear to the 4th
gear.
If for example
is shown in the display with vehicles that have an
automatic
gearbox and are in the manual switching mode (Tiptronic), this indicates that it
is better to shift from the 4th gear to a higher gear.WARNINGThe driver is always responsible for selecting the correct gear in different
driving situations, such as overtaking.
For the sake of the environment
A suitably selected gear has the following advantages.■It helps to reduce fuel consumption.■
It reduces the operating noise.
■
It protects the environment.
■
It benefits the durability and reliability of the engine.
Door, boot or engine compartment warning
Read and observe
on page 39 first.
Vehicles with a MAXI DOT display
If at least one door, the boot or bonnet is open, the display indicates the rele-
vant open door, boot or bonnet vehicle icon.
Vehicles with a segment display
If at least one door or the boot or bonnet is open, the indicator lights or
and
come on in the instrument cluster » page 32, Warning lights .
An acoustic signal will also sound if you drive the vehicle above 6 km/h when a door is open.
Multifunction display (MFD)
Introduction
This chapter contains information on the following subjects:
Memory
42
Information overview
42
Warning at excessive speeds
43
The driving data is displayed on the multifunction display.
The multifunction display only operates if the ignition is switched on. After the ignition is switched on, the function that was last selected before switching
off the ignition is displayed.
For vehicles with a MAXI DOT display, the menu item MFA must be selected
and confirmed in the main menu » page 44, MAXI DOT display .
On vehicles with a MAXI DOT display, there is an option to fade out some of
the information » page 45, Settings .
WARNING■
Concentrate fully at all times on your driving! As the driver, you are fully
responsible for the operation of your vehicle.■
Even at temperatures of around +4 °C, there may still be black ice on the
road surface. You should therefore not rely solely on the outside tempera-
ture display for accurate information as to whether there is ice on the road.
CAUTION
Pull out the ignition key if coming in contact with the display (e.g. when clean-
ing) to prevent any possible damage. On vehicles with the KESSY system,
switch off the ignition and open the driver's door. 1)
With vehicles that have an automatic gearbox and in the manual switching mode (Tiptronic) the
current-
ly engaged gear is shown.
2)
For vehicles with segment display the arrow is displayed behind the gear indication.
41Information system
Page 79 of 246
Headlight cleaning systemRead and observe
and on page 75 first.
After the ignition is switched on, the headlights are always cleaned at the first
and after every tenth spray of the windscreen (setting
5
» Fig. 62 on
page 76 ), when the low beam or main beam is switched on.
You should remove stubborn dirt (such as insect residues) from the headlight
lenses at regular intervals, for example when refuelling. The following guide-
lines must be observed » page 175, Headlight lenses .
To ensure the proper operation of the cleaning system during the winter, any snow should be removed from the washer nozzle fixtures and ice should be
cleared with a de-icing spray.
CAUTION
Never remove the nozzles from the headlight cleaning system by hand – risk of
damage!
Rear mirror
Introduction
This chapter contains information on the following subjects:
Interior mirror
77
Exterior mirrors
78WARNING■ Make sure that the mirror is not covered by ice, snow, mist or other ob-
jects.■
Convex (curved outward) or aspheric exterior mirrors increase the field of
vision. They do, however, make objects appear smaller in the mirror. These
mirrors are therefore only of limited use for estimating distances to the fol-
lowing vehicles.
■
Whenever possible use the interior mirror for estimating the distances to
the following vehicles.
■
The illuminated display of an external navigation unit can lead to opera-
tional faults to the automatic dimming interior mirror – risk of accident.
WARNINGThe mirrors with automatic dimming contain an electrolyte liquid which can
escape if mirror glass is broken.■
The leaking electrolytic fluid can irritate the skin, eyes and breath appara-
tus. Immediately seek out fresh air and leave the vehicle. If this is not pos-
sible, at least open the window.
■
If you swallow electrolytic fluid, seek medical assistance immediately.
■
If your eyes or skin come into contact with the electrolytic fluid, immedi-
ately wash the affected area for a few minutes long with a lot of water.
Then consult a doctor immediately.
Interior mirror
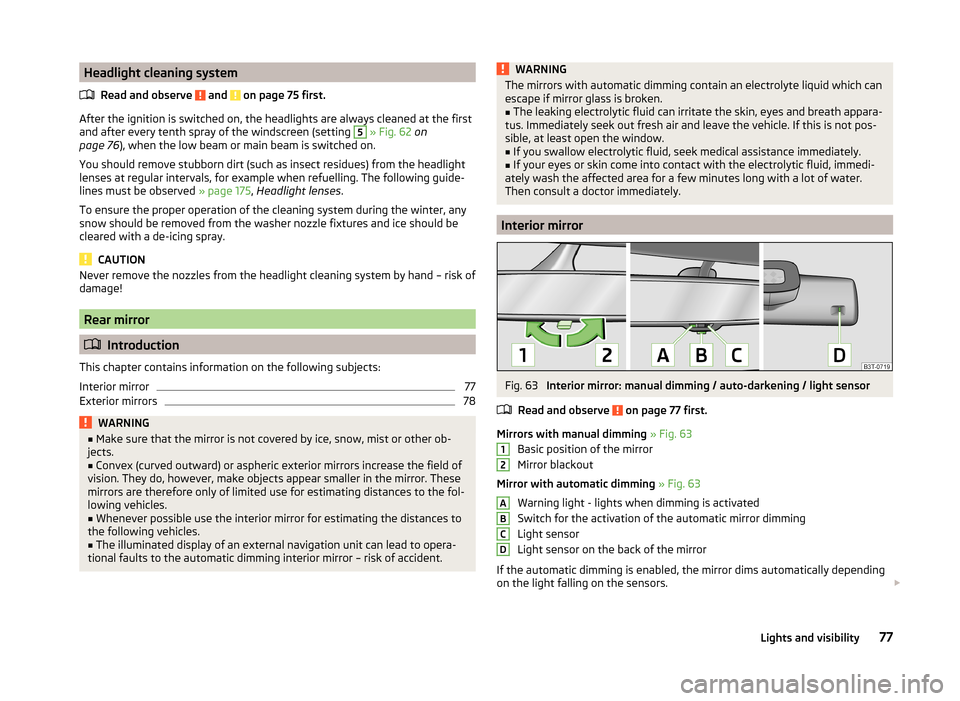
Fig. 63
Interior mirror: manual dimming / auto-darkening / light sensor
Read and observe
on page 77 first.
Mirrors with manual dimming » Fig. 63
Basic position of the mirror
Mirror blackout
Mirror with automatic dimming » Fig. 63
Warning light - lights when dimming is activated
Switch for the activation of the automatic mirror dimming
Light sensor
Light sensor on the back of the mirror
If the automatic dimming is enabled, the mirror dims automatically depending
on the light falling on the sensors.
12ABCD77Lights and visibility
Page 109 of 246
WARNING (Continued)■Distribute the load evenly over the roof rack system.■When transporting heavy objects or objects which take up a large area on
the roof rack system, the handling of the car may change as a result of the
displacement of the centre of gravity. The style of driving and speed must
therefore be adapted to the current circumstances.■
Avoid abrupt and sudden driving/braking manoeuvres.
■
Adjust the speed and driving style to the visibility, weather, road and traf-
fic conditions.
■
The permissible roof load, permissible axle loads and permissible total ve-
hicle weight must not be exceeded under any circumstances – risk of acci-
dent!
CAUTION
■ Only roof racks from the ŠKODA Original Accessories range should be used.■When dealing with roof racks, the installation instructions supplied with the
roof luggage rack system must be observed.■
On models fitted with a power sliding/tilting roof or a panoramic sliding roof,
ensure that the opened sliding/tilting roof or the panoramic sliding roof does
not strike any items of luggage transported on the roof.
■
Ensure that the boot lid does not hit the roof load when opened.
■
The height of the vehicle changes after mounting a roof luggage rack system
and the load that is secured to it. Compare the vehicle height with available
clearances, such as underpasses and garage doors.
■
Always remove the roof luggage rack system before entering an automated
car wash.
■
Ensure the roof aerial is not impaired by the secured load.
For the sake of the environment
The increased aerodynamic drag results in a higher fuel consumption.Attachment points
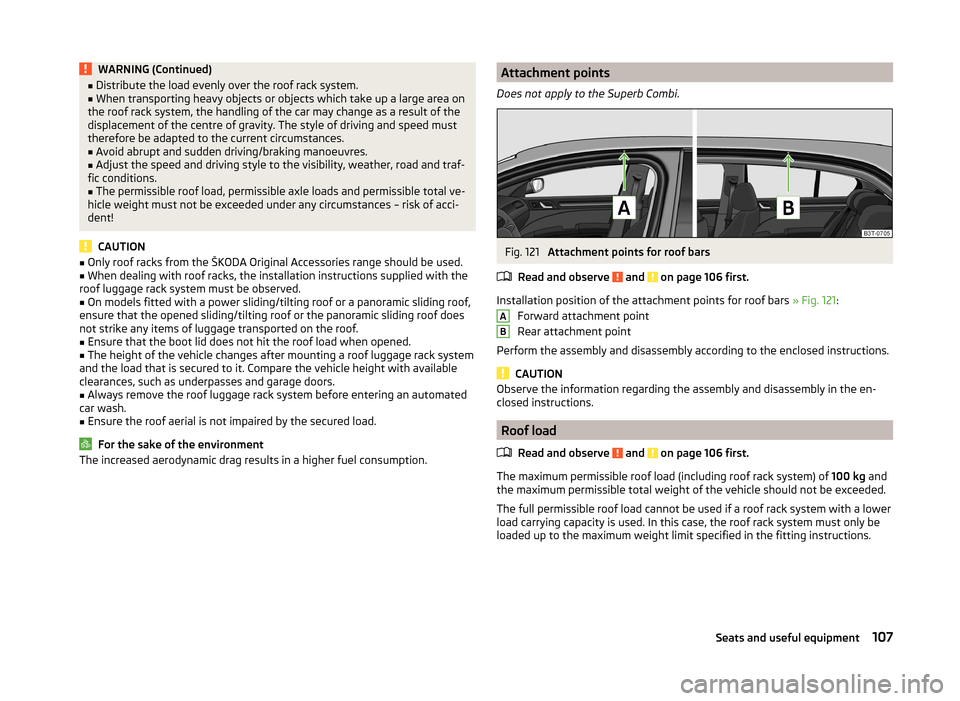
Does not apply to the Superb Combi.Fig. 121
Attachment points for roof bars
Read and observe
and on page 106 first.
Installation position of the attachment points for roof bars » Fig. 121:
Forward attachment point
Rear attachment point
Perform the assembly and disassembly according to the enclosed instructions.
CAUTION
Observe the information regarding the assembly and disassembly in the en-
closed instructions.
Roof load
Read and observe
and on page 106 first.
The maximum permissible roof load (including roof rack system) of 100 kg and
the maximum permissible total weight of the vehicle should not be exceeded.
The full permissible roof load cannot be used if a roof rack system with a lower
load carrying capacity is used. In this case, the roof rack system must only be
loaded up to the maximum weight limit specified in the fitting instructions.
AB107Seats and useful equipment
Page 111 of 246
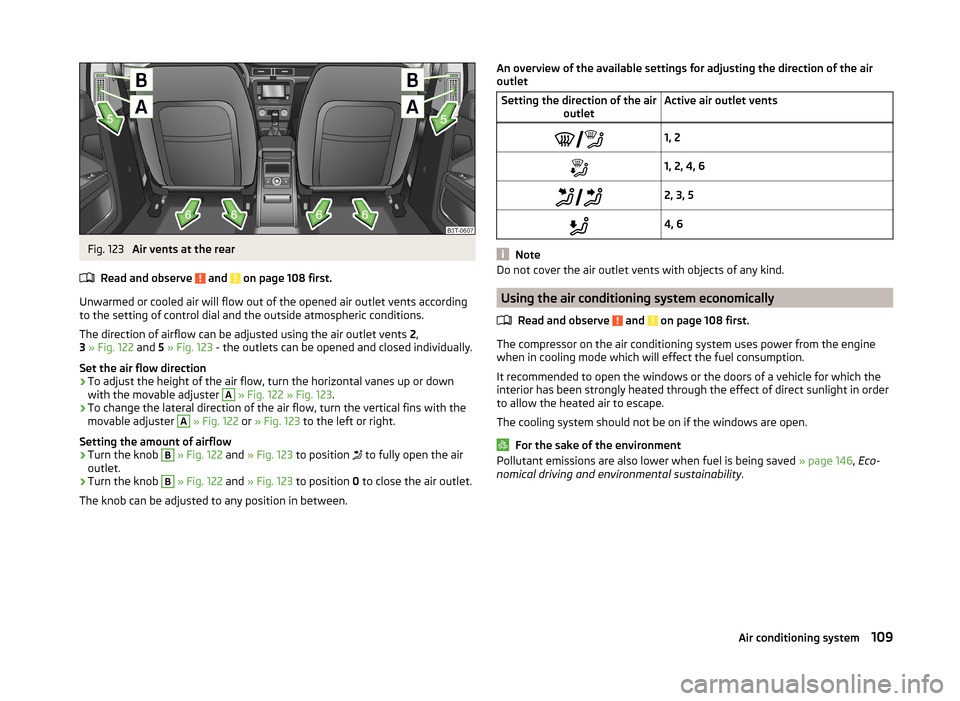
Fig. 123
Air vents at the rear
Read and observe
and on page 108 first.
Unwarmed or cooled air will flow out of the opened air outlet vents according
to the setting of control dial and the outside atmospheric conditions.
The direction of airflow can be adjusted using the air outlet vents 2,
3 » Fig. 122 and 5 » Fig. 123 - the outlets can be opened and closed individually.
Set the air flow direction
›
To adjust the height of the air flow, turn the horizontal vanes up or down
with the movable adjuster
A
» Fig. 122 » Fig. 123 .
›
To change the lateral direction of the air flow, turn the vertical fins with the
movable adjuster
A
» Fig. 122 or » Fig. 123 to the left or right.
Setting the amount of airflow
›
Turn the knob
B
» Fig. 122 and » Fig. 123 to position
to fully open the air
outlet.
›
Turn the knob
B
» Fig. 122 and » Fig. 123 to position 0 to close the air outlet.
The knob can be adjusted to any position in between.
An overview of the available settings for adjusting the direction of the air
outletSetting the direction of the air outletActive air outlet vents1, 21, 2, 4, 6 2, 3, 54, 6
Note
Do not cover the air outlet vents with objects of any kind.
Using the air conditioning system economically
Read and observe
and on page 108 first.
The compressor on the air conditioning system uses power from the engine
when in cooling mode which will effect the fuel consumption.
It recommended to open the windows or the doors of a vehicle for which the
interior has been strongly heated through the effect of direct sunlight in order
to allow the heated air to escape.
The cooling system should not be on if the windows are open.
For the sake of the environment
Pollutant emissions are also lower when fuel is being saved » page 146, Eco-
nomical driving and environmental sustainability .109Air conditioning system
Page 181 of 246
WARNING (Continued)■The seat belts must not be allowed to come into contact with corrosive
liquids (e.g. acids).■
Check the condition of all the seat belts on a regular basis. If any damage
to the belt webbing, seat belt connections, inertia reel or lock is detected,
the seat belt must be replaced by a specialist garage.
■
The seat belts must be fully dried before being rolled up.
Inspecting and replenishing
Fuel
Introduction
This chapter contains information on the following subjects:
Refuelling
180
Unleaded petrol
180
Diesel fuel
181
The correct grades of fuel for your vehicle are stated on a sticker affixed to the
inside of the fuel filler flap » Fig. 159 on page 180 -
.
WARNINGThe national legal requirements must be observed if carrying a spare canis-
ter in the vehicle. We do not recommend carrying any fuel canisters in your
vehicle for safety reasons. in the event of an accident, these canisters can
become damaged and fuel may escape – risk of fire!
CAUTION
■ Never drive until the fuel tank is completely empty! The irregular supply of
fuel can cause misfiring, which can result in considerable damage to parts of
the engine and the exhaust system.■
Immediately remove any fuel that has spilled onto the vehicle's paintwork –
risk of paint damage!
■
If the vehicle was not purchased in the country where it was intended to be
operated, you should check whether the fuel specified by the manufacturer is
offered in the country where the vehicle will be operated. You should also per-
haps check whether the manufacturer has recommended a different fuel for
operation of the vehicle in the corresponding country. Is this not the case, then
you must check whether it is permitted by the manufacturer to operate the ve-
hicle with another fuel type.
179Inspecting and replenishing
Page 182 of 246
RefuellingFig. 159
Open fuel filler flap / tank cap
Read and observe
and on page 179 first.
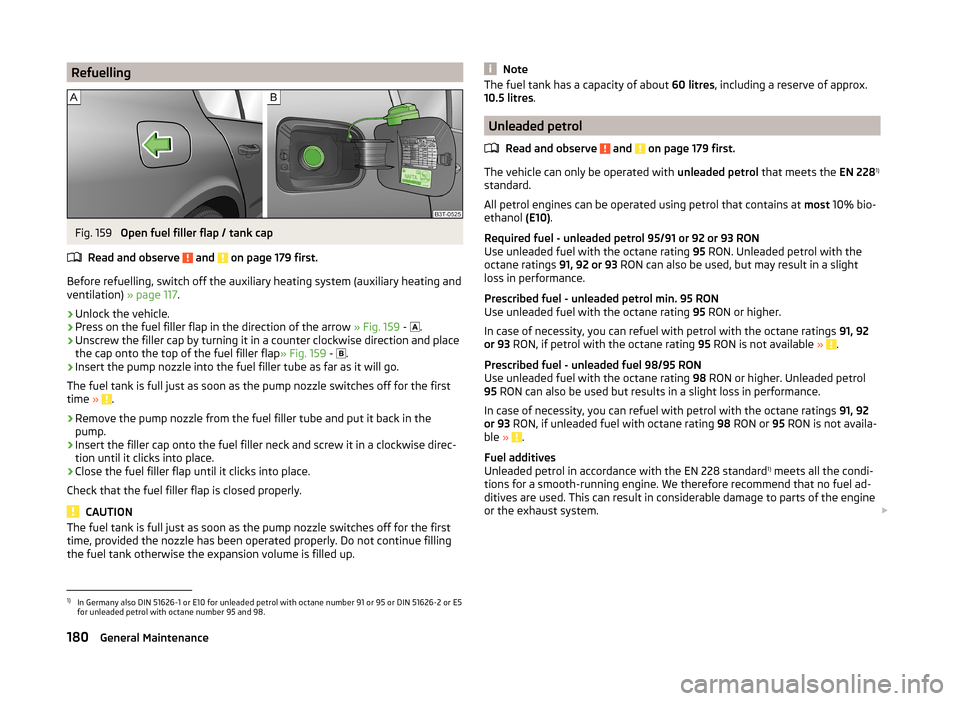
Before refuelling, switch off the auxiliary heating system (auxiliary heating and ventilation) » page 117.
›
Unlock the vehicle.
›
Press on the fuel filler flap in the direction of the arrow » Fig. 159 -
.
›
Unscrew the filler cap by turning it in a counter clockwise direction and place
the cap onto the top of the fuel filler flap » Fig. 159 -
.
›
Insert the pump nozzle into the fuel filler tube as far as it will go.
The fuel tank is full just as soon as the pump nozzle switches off for the first
time »
.
›
Remove the pump nozzle from the fuel filler tube and put it back in the
pump.
›
Insert the filler cap onto the fuel filler neck and screw it in a clockwise direc-
tion until it clicks into place.
›
Close the fuel filler flap until it clicks into place.
Check that the fuel filler flap is closed properly.
CAUTION
The fuel tank is full just as soon as the pump nozzle switches off for the first
time, provided the nozzle has been operated properly. Do not continue filling
the fuel tank otherwise the expansion volume is filled up.NoteThe fuel tank has a capacity of about 60 litres, including a reserve of approx.
10.5 litres .
Unleaded petrol
Read and observe
and on page 179 first.
The vehicle can only be operated with unleaded petrol that meets the EN 2281)
standard.
All petrol engines can be operated using petrol that contains at most 10% bio-
ethanol (E10).
Required fuel - unleaded petrol 95/91 or 92 or 93 RON
Use unleaded fuel with the octane rating 95 RON. Unleaded petrol with the
octane ratings 91, 92 or 93 RON can also be used, but may result in a slight
loss in performance.
Prescribed fuel - unleaded petrol min. 95 RON
Use unleaded fuel with the octane rating 95 RON or higher.
In case of necessity, you can refuel with petrol with the octane ratings 91, 92
or 93 RON, if petrol with the octane rating 95 RON is not available »
.
Prescribed fuel - unleaded fuel 98/95 RON
Use unleaded fuel with the octane rating 98 RON or higher. Unleaded petrol
95 RON can also be used but results in a slight loss in performance.
In case of necessity, you can refuel with petrol with the octane ratings 91, 92
or 93 RON, if unleaded fuel with octane rating 98 RON or 95 RON is not availa-
ble »
.
Fuel additives
Unleaded petrol in accordance with the EN 228 standard 1)
meets all the condi-
tions for a smooth-running engine. We therefore recommend that no fuel ad-
ditives are used. This can result in considerable damage to parts of the engine
or the exhaust system.
1)
In Germany also DIN 51626-1 or E10 for unleaded petrol with octane number 91 or 95 or DIN 51626-2 or E5
for unleaded petrol with octane number 95 and 98.
180General Maintenance
Page 184 of 246
CAUTION■Just filling the tank once with diesel fuel that does not comply with the
standard, can cause severe damage to parts of the engine, the fuel and ex-
haust system!■
If a different fuel other than diesel fuel, which complies to the above men-
tioned standards (e.g. petrol) is used by mistake do not start the engine or
switch on the ignition! Extensive damage to engine parts can occur! We rec-
ommend that you have the fuel system cleaned by a specialist garage.
■
Water which has collected in the fuel filter can cause engine faults.
CAUTION
■ The vehicle cannot be operated with bio fuel RME, therefore this fuel must
not be filled in the tank and used for driving the vehicle. The use of biofuel
RME can cause considerable damage to parts of the engine or fuel system.■
Do not mix any fuel additives, so-called “flow improvers” (petrol and similar
agents), into the diesel. This can result in considerable damage to parts of the
engine or the exhaust system!
Engine compartment
Introduction
This chapter contains information on the following subjects:
Opening and closing the bonnet
183
Engine compartment overview
184
Radiator fan
184
Windscreen washer system
184WARNINGInjuries or scolding or risks of accident or fire may occur when working in
the engine compartment. For this reason, it is essential to comply with the
warning instructions outlined below and with the general applicable safety
rules. The engine compartment of your car is a hazardous area!WARNINGInstructions before beginning work in the engine compartment■Turn off the engine and withdraw the ignition key.■
Firmly apply the handbrake.
WARNING (Continued)■ If the vehicle is fitted with a manual gearbox, move the gearshift lever in-
to Neutral, or if the vehicle is fitted with an automatic gearbox, move the
selector lever into position P.■
Allow the engine to cool.
■
Never open the bonnet if you can see steam or coolant escaping from the
engine compartment – risk of scalding! Wait until no more steam or coolant
is escaping.
WARNINGInformation for working in the engine compartment■Keep all people, especially children, away from the engine compartment.■
Never touch the radiator fan while the engine is still warm. The fan might
suddenly start running!
■
Do not touch any hot engine parts – risk of burns!
■
The coolant is harmful to health.
■
Avoid contact with the coolant.
■
Coolant vapours are harmful to health.
■
Never open the end cover of the coolant expansion reservoir while the
engine is still warm. The cooling system is pressurized!
■
When opening the end cover of the coolant expansion reservoir, cover it
with a cloth to protect your face, hands and arms from hot steam or hot
coolant.
■
If any coolant splashes into your eyes, immediately rinse out your eyes
with clear water and contact a doctor as soon as possible.
■
Always keep the coolant in the original container, safe from people who
are not completely independent, especially children - there is a danger of
poisoning!
■
If coolant is swallowed, consult a doctor immediately.
■
Never spill fluids on the hot engine. Such fluids (e.g. the antifreeze con-
tained in the coolant) may ignite!
WARNINGInformation for working in the engine compartment with the engine run-
ning■
Pay particular attention to rotating engine parts (e.g. V-ribbed belt, gen-
erator, radiator fan) and the high-voltage ignition system – risk to life!
■
Never touch the electric wiring on the ignition system.
182General Maintenance
Page 188 of 246
Specifications and capacity (in l) for vehicles with fixed service intervalsPetrol enginesSpecificationCapacity1.4 ltr./92 kW TSIVW 501 01, VW 502 003.6
1.8 l/112, 118 kW TSI
VW 502 00
4.6
applies to RussiaSAE 0W - 30
VW 502 00/505 00
2.0 ltr./147 kW TSI
VW 502 00
4.6
applies to Russia SAE 0W - 30
VW 502 00/505 003.6 l/191 kW FSIVW 502 005.5Diesel engines a)SpecificationCapacity1.6 ltr./77 kW TDI CRVW 507 004.32.0 ltr/103 kW TDI CR DPFVW 507 004.32.0 ltr/125 kW TDI CR DPFVW 507 004.3a)
Engine oil VW 505 01 can optionally be used in diesel engines
without a DPF.
CAUTION
■
If the above engine oils are not available, a different engine oil can be used in
an emergency. To prevent damage to the engine, a maximum of 0.5 litres only
of the following engine oils may be used until the next oil change: ■ For petrol engine models: ACEA A3/ACEA B4 or API SN/API SM;
■ For diesel engine models: ACEA C3 or API CJ-4.
Checking the oil level
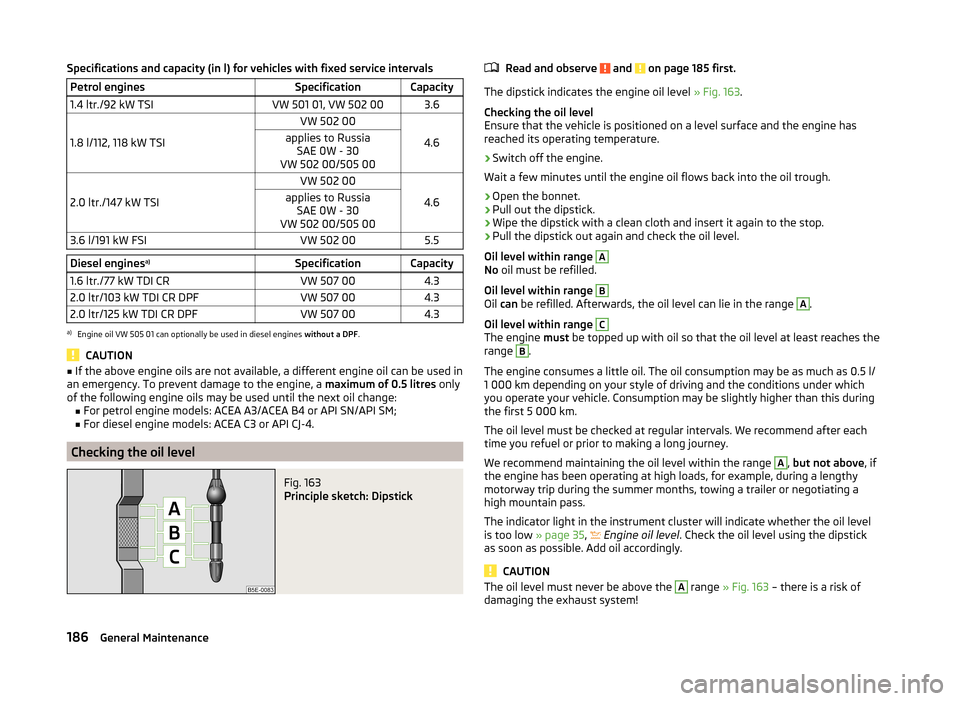
Fig. 163
Principle sketch: Dipstick
Read and observe and on page 185 first.
The dipstick indicates the engine oil level » Fig. 163.
Checking the oil level
Ensure that the vehicle is positioned on a level surface and the engine has
reached its operating temperature.
›
Switch off the engine.
Wait a few minutes until the engine oil flows back into the oil trough.
›
Open the bonnet.
›
Pull out the dipstick.
›
Wipe the dipstick with a clean cloth and insert it again to the stop.
›
Pull the dipstick out again and check the oil level.
Oil level within range
A
No oil must be refilled.
Oil level within range
B
Oil can be refilled. Afterwards, the oil level can lie in the range
A
.
Oil level within range
C
The engine must be topped up with oil so that the oil level at least reaches the
range
B
.
The engine consumes a little oil. The oil consumption may be as much as 0.5 l/
1 000 km depending on your style of driving and the conditions under which
you operate your vehicle. Consumption may be slightly higher than this during
the first 5 000 km.
The oil level must be checked at regular intervals. We recommend after each
time you refuel or prior to making a long journey.
We recommend maintaining the oil level within the range
A
, but not above , if
the engine has been operating at high loads, for example, during a lengthy
motorway trip during the summer months, towing a trailer or negotiating a
high mountain pass.
The indicator light in the instrument cluster will indicate whether the oil level
is too low » page 35,
Engine oil level
. Check the oil level using the dipstick
as soon as possible. Add oil accordingly.
CAUTION
The oil level must never be above the A range » Fig. 163 – there is a risk of
damaging the exhaust system!186General Maintenance
Page 196 of 246
WARNINGInformation regarding tyre damage or wear■Never use tyres if you do not know anything about the condition and age.■
Never drive with damaged tyres – risk of accident!
■
Immediately replace damaged wheel rims or tyres.
■
You must have your tyres replaced with new ones at the latest when the
wear indicators have been worn down.
■
Worn tyres impair necessary adhesion to the road surface, particularly at
high speeds on wet roads. This could lead to “aquaplaning” (uncontrolled
vehicle movement – “swimming” on a wet road surface).
WARNINGInformation on tyre pressure■The tyre control display does not absolve the driver of the responsibility
to ensure the correct tyre inflation pressure. Check the tyre inflation pres-
sure at regular intervals.■
Insufficient or excessive inflation pressure impairs handling – risk of acci-
dent!
■
If the inflation pressure is too low, the tyre will have to overcome a higher
rolling resistance. This will cause a significant increase in the temperature
of the tyre, especially at higher speeds. This can result in tread separation
and a tyre blowout.
WARNINGInformation on the wheel bolts■The wheel bolts must be clean and must turn easily. Never treat them
with grease or oil.■
The prescribed tightening torque of the wheel bolts for steel and light al-
loy wheels is 120 Nm.
■
If the wheel bolts are tightened to a too low tightening torque, the rims
could come loose when the car is moving – risk of accident! A tightening
torque which is too high can damage the bolts and threads and this can re-
sult in permanent deformation of the contact surfaces on the rims.
■
In case of incorrect treatment of the wheel bolts, the wheel can loosen
when the car is moving – risk of accident!
WARNINGInformation on the temporary spare wheel■Only use the temporary spare wheel when absolutely necessary.■
Never drive with more than one temporary spare wheel mounted.
■
The snow chains cannot be used on the temporary spare wheel.
CAUTION
■ If a spare wheel is used that is not identical to the fitted tyres, the following
must be observed » page 197, Spare and temporary spare wheel .■
Protect the tyres from contact with oil, grease and fuel.
■
Replace lost valve caps.
■
If, in the event of a puncture, it is necessary to fit a spare wheel with a tyre
without a dedicated running direction or with the opposite direction of rota-
tion, drive carefully as the optimal characteristics of the tyre are no longer ap-
plicable in this situation.
For the sake of the environment
Tyres that are insufficiently inflated increase your fuel consumption.
Note
■ We recommend that any work on the wheels or tyres be carried out by a spe-
cialist garage.■
We recommend that you use wheel rims, tyres, full wheel trims and snow
chains from ŠKODA Original Accessories.
Service life of tyres
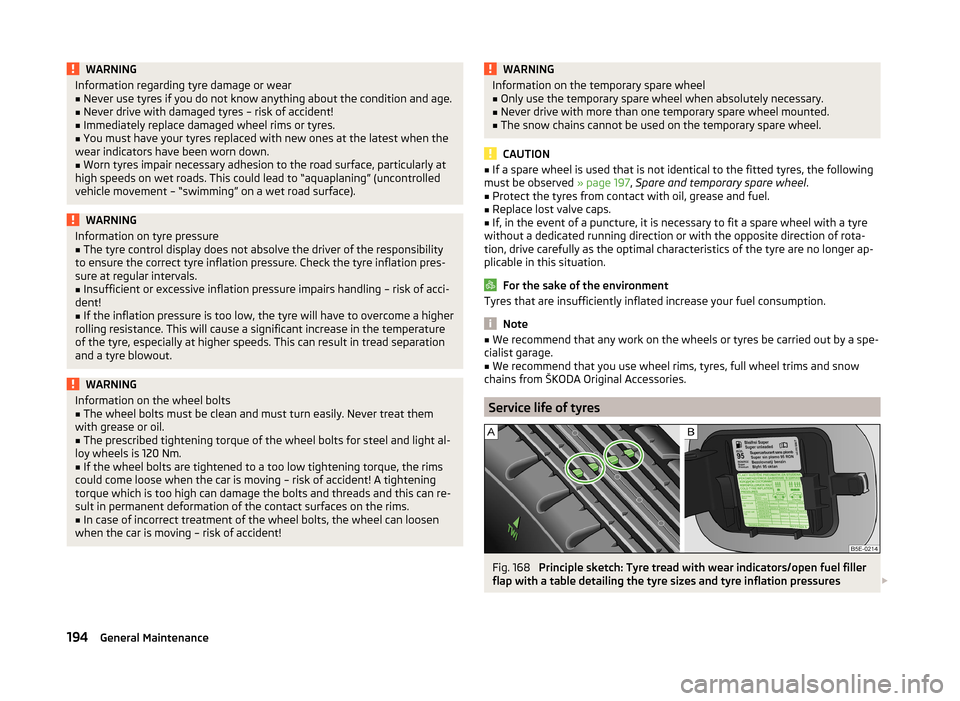
Fig. 168
Principle sketch: Tyre tread with wear indicators/open fuel filler
flap with a table detailing the tyre sizes and tyre inflation pressures
194General Maintenance