navigation SKODA SUPERB 2014 2.G / (B6/3T) Owner's Manual
[x] Cancel search | Manufacturer: SKODA, Model Year: 2014, Model line: SUPERB, Model: SKODA SUPERB 2014 2.G / (B6/3T)Pages: 246, PDF Size: 17.16 MB
Page 29 of 246
Operation
Cockpit
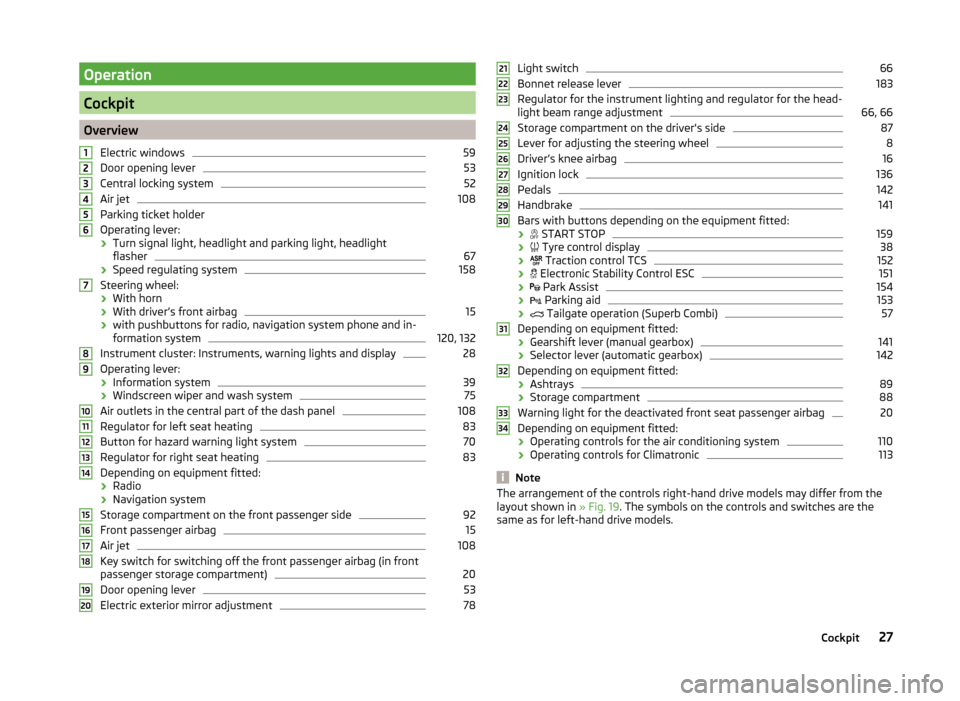
OverviewElectric windows
59
Door opening lever
53
Central locking system
52
Air jet
108
Parking ticket holder
Operating lever: › Turn signal light, headlight and parking light, headlight
flasher
67
› Speed regulating system
158
Steering wheel:
› With horn
› With driver’s front airbag
15
›with pushbuttons for radio, navigation system phone and in-
formation system
120, 132
Instrument cluster: Instruments, warning lights and display
28
Operating lever:
› Information system
39
›Windscreen wiper and wash system
75
Air outlets in the central part of the dash panel
108
Regulator for left seat heating
83
Button for hazard warning light system
70
Regulator for right seat heating
83
Depending on equipment fitted:
› Radio
› Navigation system
Storage compartment on the front passenger side
92
Front passenger airbag
15
Air jet
108
Key switch for switching off the front passenger airbag (in front
passenger storage compartment)
20
Door opening lever
53
Electric exterior mirror adjustment
781234567891011121314151617181920Light switch66
Bonnet release lever
183
Regulator for the instrument lighting and regulator for the head-
light beam range adjustment
66, 66
Storage compartment on the driver's side
87
Lever for adjusting the steering wheel
8
Driver’s knee airbag
16
Ignition lock
136
Pedals
142
Handbrake
141
Bars with buttons depending on the equipment fitted:
›
START STOP
159
›
Tyre control display
38
›
Traction control TCS
152
›
Electronic Stability Control ESC
151
›
Park Assist
154
›
Parking aid
153
›
Tailgate operation (Superb Combi)
57
Depending on equipment fitted:
› Gearshift lever (manual gearbox)
141
›Selector lever (automatic gearbox)
142
Depending on equipment fitted:
› Ashtrays
89
›Storage compartment
88
Warning light for the deactivated front seat passenger airbag
20
Depending on equipment fitted:
› Operating controls for the air conditioning system
110
›
Operating controls for Climatronic
113
Note
The arrangement of the controls right-hand drive models may differ from the
layout shown in » Fig. 19. The symbols on the controls and switches are the
same as for left-hand drive models.212223242526272829303132333427Cockpit
Page 37 of 246
If the warning light or illuminates again, then immediately obtain help
from an authorised dealer.
Steering lock (KESSY system)
As long as the warning light
is flashing , the steering lock cannot be re-
leased.
If the warning light
flashes , a signal tone sounds, and the following mes-
sage appears in the MAXI DOT- display steering column lock. If Workshop! ap-
pears the electrical steering lock is faulty. Seek assistance from a specialist ga-
rage immediately.
If the warning light
flashes , a beep sounds and in the MAXI DOT display the
message Steering lock defective appears, then the electric steering lock is
broken. Park the car,
do not continue the journey . After switching off the
ignition, it is then no longer possible to lock the steering, to activate the elec-
trical components (e.g. radio, navigation system), to switch on the ignition
again and to start the engine. Seek help from a specialist garage.
Note
The warning light illuminates after the ignition is switched on if the vehi-
cle's battery has been disconnected and reconnected. If the warning light
does not go out after moving a short distance, this means there is an error in
the system. Seek assistance from a specialist garage immediately.
Engine oil level
Read and observe
on page 33 first.
The indicator light lights up (oil quantity too low)
The following message is shown in the MAXI DOT display.
Check oil level!
› Stop the vehicle, switch off the engine, and check the engine oil lev-
el » page 186 .
The warning light will go out if the bonnet is left open for more than 30 sec-
onds. If no engine oil has been replenished, the warning light will come on
again after driving about 100 km.
The indicator light flashes (engine oil level sensor faulty)
The following message is shown in the MAXI DOT display.
Oil sensor: Workshop!
If the engine oil level sensor is faulty, the warning light flashes several
times and an audible signal sounds when the ignition is turned on.
Seek assistance from a specialist garage immediately.
Traction Control System (ASR)
Read and observe
on page 33 first.
The warning light
flashes to show that the ASR is currently operating.
If the warning light
illuminates , there is a fault in the ASR.
The following message is shown in the MAXI DOT display. Error: Traction control (ASR)
Seek assistance from a specialist garage immediately.
If the warning light
illuminates immediately after you start the engine, the
ASR might be switched off due to technical reasons.
›
Switch the ignition off and on again.
The ASR is fully functional again if the warning light
no longer illuminates
after you switch the engine back on.
Further information » page 152.
Note
The warning light illuminates after the ignition is switched on if the vehi-
cle's battery has been disconnected and reconnected. If the warning light
does not go out after moving a short distance, this means there is an error in
the system. Seek assistance from a specialist garage immediately.
Electronic Stability Control (ESC)
Read and observe
on page 33 first.
The warning light
flashes to show that the ESC is currently operating.
If the warning light
illuminates , there is a fault in the ESC.
The following message is shown in the MAXI DOT display. Error: Electronic Stability Control (ESC)
Seek assistance from a specialist garage immediately.
35Instruments and Indicator Lights
Page 46 of 246
The speed limit can be adjusted from 30 km/h to 250 km/h in 5 km/h incre-
ments.
Adjusting the speed limit while the vehicle is moving›
Select the menu item Speed warning (MAXI DOT display) or
(segment dis-
play).
›
Drive at the desired speed, e.g. 50 km/h.
›
Confirm the current speed as the speed limit.
If you wish to adjust the set speed limit, you can do so in 5 km/h intervals (e.g.
the accepted speed of 47 km/h increases to 50 km/h or decreases to 45 km/h).
›
Store the speed limit, or wait several seconds; your settings will be saved au-
tomatically.
Change or disable speed limit
›
Select the menu item Speed warning (MAXI DOT display) or
(segment dis-
play).
›
By confirming the stored value, the speed limit is disabled.
›
By reconfirming, the option to change the speed limit is activated.
If the set speed limit is exceeded, an audible signal will sound as a warning.
The menu item Speed warning (MAXI DOT display) or
(Segment display) ap-
pears in the display at the same time as the set threshold.
The set driving mode is stored even after switching the ignition on and off.
MAXI DOT display
Introduction
This chapter contains information on the following subjects:
Main menu
44
Settings
45
Compass point display
46
The MAXI DOT display provides you with information about the current operat-
ing state of your vehicle. Depending on the vehicle equipment, it also provides
you with data relating to the radio, multifunction display (MFD), mobile phone,
navigation system, automatic gearbox and devices connected via the MDI in-
put. Furthermore, it allows the adjustment of some other features of your ve-
hicle.
WARNINGConcentrate fully at all times on your driving! As the driver, you are fully re-
sponsible for the operation of your vehicle.
CAUTION
Pull out the ignition key if coming in contact with the display (e.g. when clean-
ing) to prevent any possible damage. On vehicles with the KESSY system,
switch off the ignition and open the driver's door.
Main menu
Read and observe
and on page 44 first.
In order to activate the primary menu MAIN MENU, press and hold down But-
ton
A
or
C
» Fig. 26 on page 40 . By briefly pressing the
C
button you will
reach one level higher.
Main menu items (depending on vehicle equipment) ■ MFD (Multifunction display) » page 41
■ Audio » Operating instructions for the radio
■ Navigation » Operating instructions for the navigation system
■ Phone » page 119 ;
■ Aux. heating » page 116
■ Assist systems » page 162
■ Vehicle status » page 31
■ Settings » page 45
The Audio and Navigation menu items are only displayed when the factory-fit-
ted radio or navigation system is switched on.
Note
■ If warning messages are displayed, these messages must be verified to ac-
cess the main menu » page 40, Using the information system .■
If the display is not activated at that moment, the menu always shifts to one
of the higher levels after approx. 10 seconds.
■
Using the factory-fitted radio or navigation system » Radio operating in-
structions or» navigation system operating instructions .
44Operation
Page 48 of 246
As soon as the parking procedure is completed, an audible signal sounds and
the following message appears in the information display.
Winter tyres: maximum ... km/h.
Units of measurement
The units for the temperature, consumption and distance driven can be set
here.
Assistants
The tones of the audible signals for the parking aid can be adjusted here.
Alt. speed dis.
Here, the display of the second speed in mph 1)
can be activated.
Further information » page 31, Display of the second speed .
Service
The days and kilometres remaining until the next service can be displayed
here.
Further information » page 46, Service interval display .
Factory setting
The factory setting of the functions of the MAXI DOT display can be restored
here.
Compass point display
Read and observe
and on page 44 first.
For vehicles with a factory fitted navigation system, an abbreviation for eachpoint of the compass (depending on the current direction of travel) is shown
on the top left-hand corner of the display.
The compass point display only operates when the ignition is switched on.
Service interval display
Introduction
This chapter contains information on the following subjects:
Prompt in the MAXI DOT display
46
Prompt in the segment display
47
Resetting the service interval display
47
The service interval display shows the time and mileage to the next service
event.
The service due date is automatically displayed on the display and this infor-
mation can be displayed manually if necessary.
The kilometre indicator or the days indicator reduces in steps of 100 km or,
where applicable, days until the service due date is reached.
The information regarding the service intervals can be found in the service
schedule.
Note
Information is retained in the Service Interval Display even after the vehicle
battery is disconnected.
Prompt in the MAXI DOT display
Oil change service
If an oil change service is due, the following message appears: Oil change in …
km or … days.
As soon as the service interval date has been reached, the message Oil
change now! appears once the ignition has been switched on!
Inspection
If an inspection is due, the following message appears: Inspection in ... km
or ... days.
As soon as the service interval date has been reached, the message Inspec-
tion now! appears once the ignition has been switched on!
1)
For models with the speedometer in mph, the second speed is displayed in km/h.
46Operation
Page 79 of 246
Headlight cleaning systemRead and observe
and on page 75 first.
After the ignition is switched on, the headlights are always cleaned at the first
and after every tenth spray of the windscreen (setting
5
» Fig. 62 on
page 76 ), when the low beam or main beam is switched on.
You should remove stubborn dirt (such as insect residues) from the headlight
lenses at regular intervals, for example when refuelling. The following guide-
lines must be observed » page 175, Headlight lenses .
To ensure the proper operation of the cleaning system during the winter, any snow should be removed from the washer nozzle fixtures and ice should be
cleared with a de-icing spray.
CAUTION
Never remove the nozzles from the headlight cleaning system by hand – risk of
damage!
Rear mirror
Introduction
This chapter contains information on the following subjects:
Interior mirror
77
Exterior mirrors
78WARNING■ Make sure that the mirror is not covered by ice, snow, mist or other ob-
jects.■
Convex (curved outward) or aspheric exterior mirrors increase the field of
vision. They do, however, make objects appear smaller in the mirror. These
mirrors are therefore only of limited use for estimating distances to the fol-
lowing vehicles.
■
Whenever possible use the interior mirror for estimating the distances to
the following vehicles.
■
The illuminated display of an external navigation unit can lead to opera-
tional faults to the automatic dimming interior mirror – risk of accident.
WARNINGThe mirrors with automatic dimming contain an electrolyte liquid which can
escape if mirror glass is broken.■
The leaking electrolytic fluid can irritate the skin, eyes and breath appara-
tus. Immediately seek out fresh air and leave the vehicle. If this is not pos-
sible, at least open the window.
■
If you swallow electrolytic fluid, seek medical assistance immediately.
■
If your eyes or skin come into contact with the electrolytic fluid, immedi-
ately wash the affected area for a few minutes long with a lot of water.
Then consult a doctor immediately.
Interior mirror
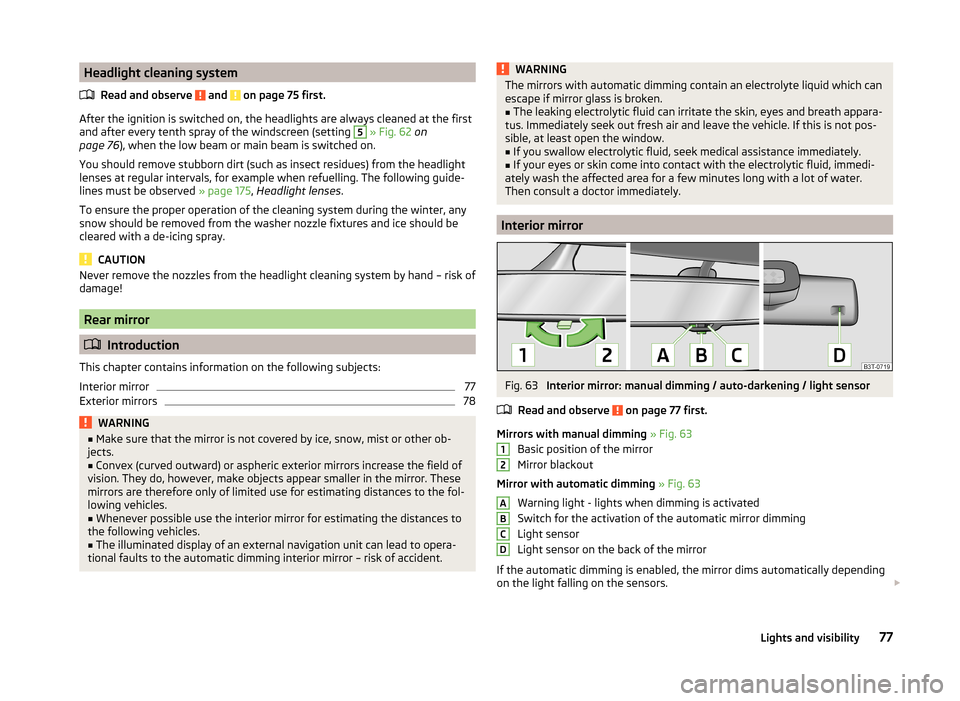
Fig. 63
Interior mirror: manual dimming / auto-darkening / light sensor
Read and observe
on page 77 first.
Mirrors with manual dimming » Fig. 63
Basic position of the mirror
Mirror blackout
Mirror with automatic dimming » Fig. 63
Warning light - lights when dimming is activated
Switch for the activation of the automatic mirror dimming
Light sensor
Light sensor on the back of the mirror
If the automatic dimming is enabled, the mirror dims automatically depending
on the light falling on the sensors.
12ABCD77Lights and visibility
Page 80 of 246
When the interior lights are switched on or the reverse gear is engaged, the
mirror always moves back into the basic position (not dimmed).
Do not attach external navigation devices on to the windscreen or in the vicini-
ty of the automatic dimming mirror » page 77,
in section Introduction .
Note
■
The automatic dimming mirror only functions smoothly if the light falling on
the sensors is not compromised (e.g. by the sun screen back).■
If the automatic interior mirror dimming is switched off, the exterior mirror
dimming is also switched off.
Exterior mirrors
Fig. 64
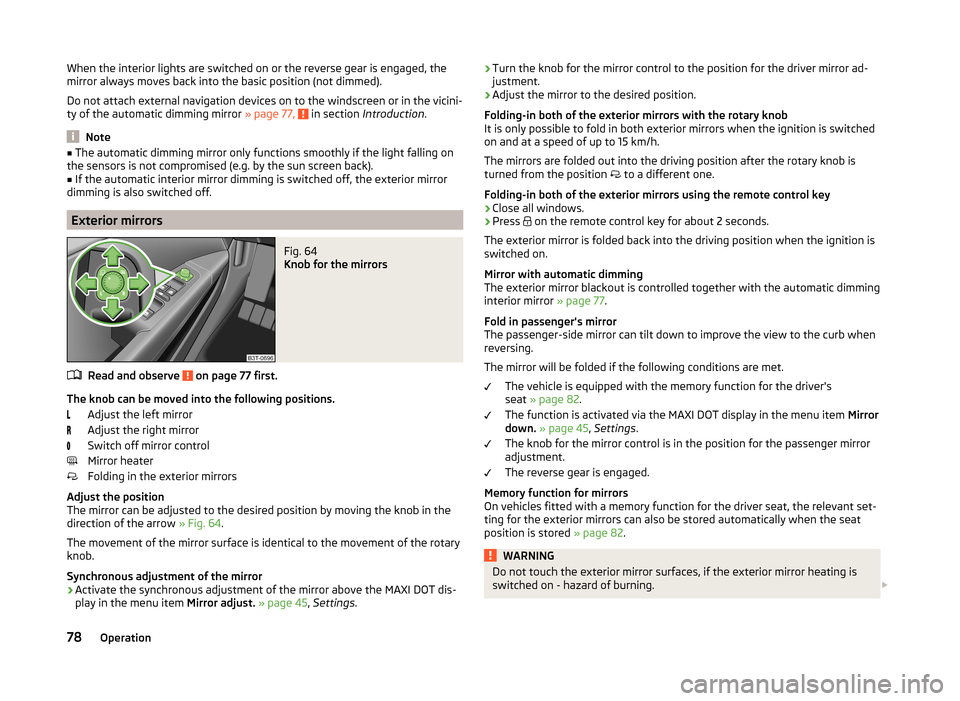
Knob for the mirrors
Read and observe on page 77 first.
The knob can be moved into the following positions.
Adjust the left mirror
Adjust the right mirror
Switch off mirror control
Mirror heater
Folding in the exterior mirrors
Adjust the position
The mirror can be adjusted to the desired position by moving the knob in the
direction of the arrow » Fig. 64.
The movement of the mirror surface is identical to the movement of the rotary
knob.
Synchronous adjustment of the mirror
›
Activate the synchronous adjustment of the mirror above the MAXI DOT dis- play in the menu item Mirror adjust. » page 45 , Settings .
›Turn the knob for the mirror control to the position for the driver mirror ad-
justment.›
Adjust the mirror to the desired position.
Folding-in both of the exterior mirrors with the rotary knob
It is only possible to fold in both exterior mirrors when the ignition is switched
on and at a speed of up to 15 km/h.
The mirrors are folded out into the driving position after the rotary knob is
turned from the position
to a different one.
Folding-in both of the exterior mirrors using the remote control key
›
Close all windows.
›
Press on the remote control key for about 2 seconds.
The exterior mirror is folded back into the driving position when the ignition is
switched on.
Mirror with automatic dimming
The exterior mirror blackout is controlled together with the automatic dimming
interior mirror » page 77.
Fold in passenger's mirror
The passenger-side mirror can tilt down to improve the view to the curb when
reversing.
The mirror will be folded if the following conditions are met. The vehicle is equipped with the memory function for the driver's
seat » page 82 .
The function is activated via the MAXI DOT display in the menu item Mirror
down. » page 45 , Settings .
The knob for the mirror control is in the position for the passenger mirror
adjustment.
The reverse gear is engaged.
Memory function for mirrors
On vehicles fitted with a memory function for the driver seat, the relevant set-
ting for the exterior mirrors can also be stored automatically when the seat
position is stored » page 82.
WARNINGDo not touch the exterior mirror surfaces, if the exterior mirror heating is
switched on - hazard of burning. 78Operation
Page 115 of 246
Climatronic (automatic air conditioning system)
Introduction
This chapter contains information on the following subjects:
Control elements
113
automatic mode
114
Switching the cooling system on/off
114
Setting the temperature
114
Recirculation mode - Version 1
115
Recirculation mode - Version 2
115
Controlling blower
116
Defrosting windscreen
116
The Climatronic in automatic mode ensures the best-possible setting of the
temperature of the outflowing air, the blower stage and air distribution.
The system also takes sunlight into account, which eliminates the need to al-
ter the settings manually.
The cooling system operates only if the following conditions are met. The cooling system is switched on » page 110.
The engine is running.
The outside temperature is above approx. +2 °C.
The cooling system is switched off at a high coolant temperature in order to
provide cooling at a high load of the engine.
Aeration of the vehicle when ignition is switched off
On models fitted with power sliding/tilting roof with sollar cells, the fresh air
blower is automatically switched over to “solar mode” if the sun ray's are suffi- cient after switching off the ignition. The solar cells on the sliding/tilting roof
deliver power for the fresh air blower. This supplies the interior of the car with
fresh air.
For an optimum ventilation, the air outlet vents 2 and 3 must be
opened » Fig. 122 on page 108 .
The ventilation functions only when the sliding/tilting roof is fully closed.
Note■ We recommend that you have Climatronic cleaned by a specialist garage
once every year.■
During operation of the Climatronic, an increase in engine idle speed can oc-
cur under certain circumstances in order to ensure adequate heating comfort.
■
On vehicles equipped with a factory-fitted radio or radio navigation system,
the Climatronic information is also shown on their displays. This function can
be switched off, see » operating instructions for the radio or navigation sys-
tem .
Control elements
Fig. 125
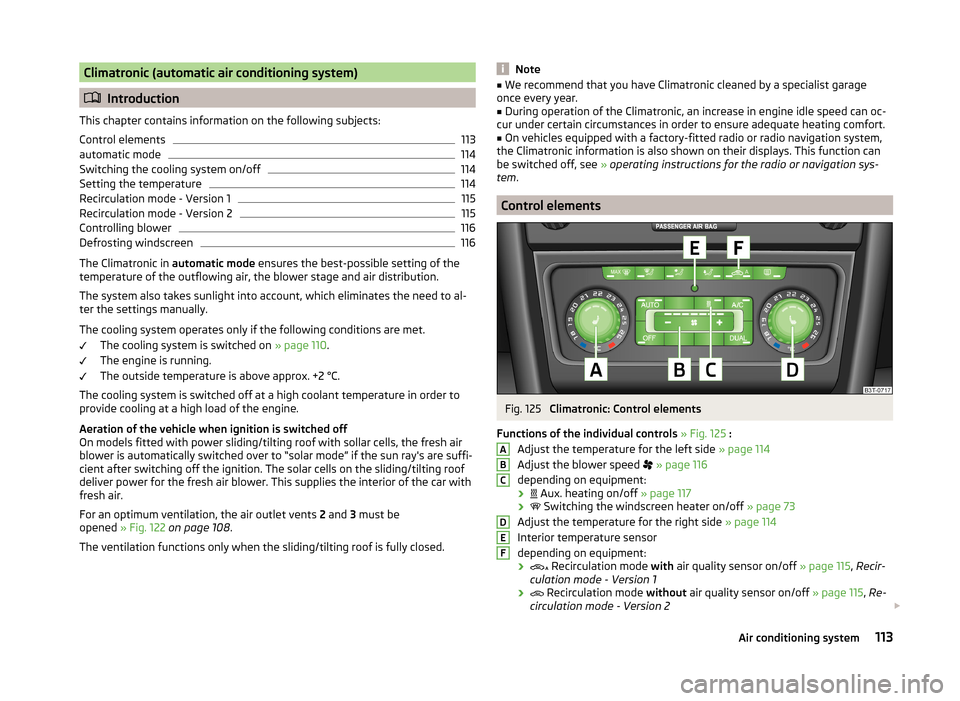
Climatronic: Control elements
Functions of the individual controls » Fig. 125 :
Adjust the temperature for the left side » page 114
Adjust the blower speed
» page 116
depending on equipment:
›
Aux. heating on/off
» page 117
›
Switching the windscreen heater on/off
» page 73
Adjust the temperature for the right side » page 114
Interior temperature sensor
depending on equipment:
›
Recirculation mode
with air quality sensor on/off » page 115, Recir-
culation mode - Version 1
›
Recirculation mode
without air quality sensor on/off » page 115, Re-
circulation mode - Version 2
ABCDEF113Air conditioning system
Page 122 of 246
WARNING (Continued)■Never leave a mobile phone on a seat, on the dash panel or in any area
from where it becomes a projectile during a sudden braking manoeuvre, an
accident or a collision — risk of injury.■
Before transport of the vehicle by air, the Bluetooth ®
function must be
switched off by a specialist company.
Universal telephone preinstallation (hands free)
The universal telephone preinstallation (“hands-free system”) includes a con- venience mode for the mobile phone via voice control, the multifunction steer-
ing wheel, the radio or navigation system.
WARNING■ Concentrate fully at all times on your driving! As the driver, you are fully
responsible for the operation of your vehicle.■
Only use the device in such a way that you are in full control of your vehi-
cle in every traffic situation – there is the risk of accidents!
■
The national regulations for using a mobile phone in a vehicle must be
observed.
Note■ We recommend that the installation of mobile phones and two-way radio
systems in a vehicle be carried out by a specialist firm.■
Not all mobile phones that enable Bluetooth ®
communication are compatible
with the universal telephone preinstallation GSM II or GSM III. Ask a ŠKODA Partner whether your phone is compatible with the universal telephone prepa-
ration GSM II or GSM III.
■
The range of the Bluetooth ®
connection to the hands-free system is restric-
ted to the vehicle interior. The range is dependent on local factors, e.g. obsta-
cles between the devices and mutual interferences with other devices. If your
mobile phone is in a jacket pocket, for example, this can lead to difficulties
when establishing a connection with the hands-free-system or transferring
data.
Operating the phone on the multifunction steering wheel
Fig. 128
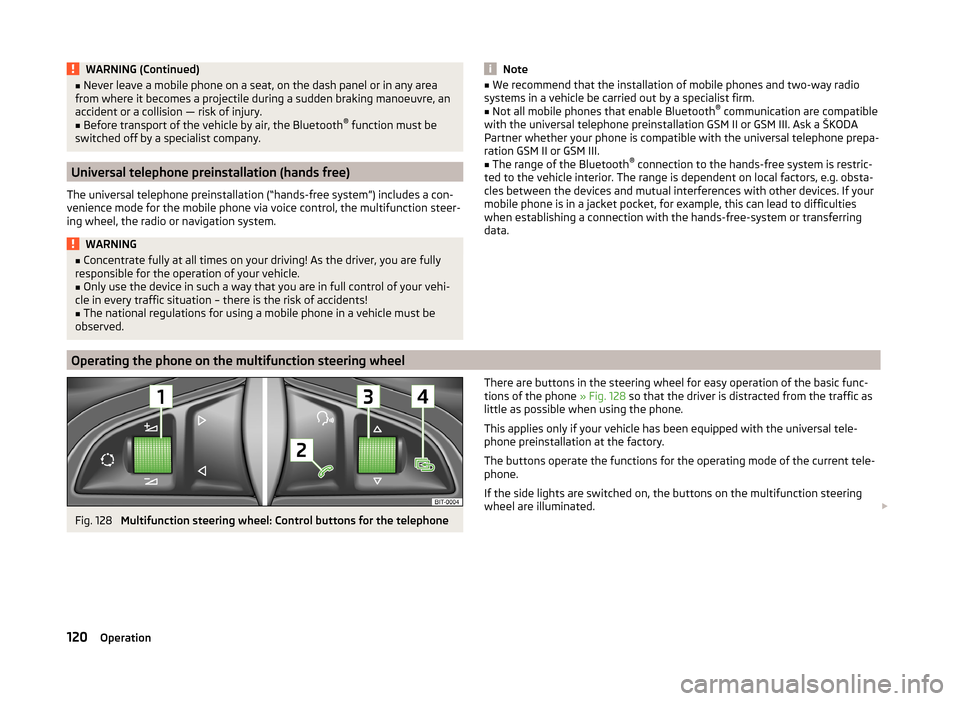
Multifunction steering wheel: Control buttons for the telephone
There are buttons in the steering wheel for easy operation of the basic func-
tions of the phone » Fig. 128 so that the driver is distracted from the traffic as
little as possible when using the phone.
This applies only if your vehicle has been equipped with the universal tele-
phone preinstallation at the factory.
The buttons operate the functions for the operating mode of the current tele-
phone.
If the side lights are switched on, the buttons on the multifunction steering
wheel are illuminated. 120Operation
Page 124 of 246
Each time the telephone has established a new connection with the hands-
free system, an update of the relevant phone book is performed. The updating
can take a few minutes. During this period, the available phone book is the one
stored at the previous update. Newly stored telephone numbers are only
shown after the updating has ended.
The update is interrupted if a telephone event (e.g. incoming or outgoing call, voice control dialogue) occurs during the updating procedure. After the tele-
phone event has ended, the updating starts anew.
GSM II
The internal phonebook provides 2 500 free memory locations. Each contact
can contain up to 4 numbers.
On vehicles fitted with the Columbus navigation system, a maximum of 1 200
telephone contacts are shown on the display of this appliance.
If the number of contacts loaded exceeds 2 500, the phone book is not com-
plete.
GSM III
The internal phonebook provides 2 000 free memory locations. Each contact
can contain up to 5 numbers.
On vehicles fitted with the Columbus navigation system, a maximum of 1 000
telephone contacts are shown on the display of this appliance.
If the mobile phone's telephone book has more than 2,000 contacts, the fol- lowing message will appear in the MAXI DOTdisplay:
Phone book not fully loaded
Universal telephone preinstallation GSM II
Introduction
This chapter contains information on the following subjects:
Connecting the mobile phone to the hands-free system
122
Telephone operation in the MAXI DOT display
123The universal telephone preinstallation GSM II comprises the following func-
tions.
› Phone Phonebook
» page 121.
› Convenience operation of the telephone via the multifunction steering
wheel » page 120 .
› Telephone operation in the MAXI DOT display
» page 120.
› Voice control of the telephone
» page 129.
› Music playback from the telephone or other multimedia units
» page 131.
All communication between a mobile phone and your vehicle's hands-free sys-
tem is established with the help of Bluetooth ®
technology.
Note
The following guidelines must be observed » page 119, Mobile phones and
two-way radio systems .
Connecting the mobile phone to the hands-free system
To connect a mobile phone with the hands-free system, the two devices must
be paired. Detailed information on this is provided in the operating instructions
for your mobile phone.
The following steps must be carried out for the connection.
›
Activate Bluetooth ®
and the visibility of your mobile phone on your tele-
phone.
›
Switch on the ignition.
›
Select the Phone - New user menu in the MAXI DOT display and wait until
the hands-free system has completed the search.
›
Select the phone you wish to connect from the list of units found.
›
Confirm the PIN 1)
.
›
If the hands-free system announces (as standard SKODA_BT) on the display
of the mobile phone, enter the PIN 1 )
within 30 seconds and wait, until the
connection is established 2)
.
›
To finish pairing in the MAXI DOT display, confirm the creation of the new
user profile.
1)
Depending on the Bluetooth®
version on the mobile phone, an automatically generated 6-digit PIN (SSP)
is either displayed, or the PIN 1234 has to be entered manually.
2)
Some mobile phones have a menu, in which the authorisation for establishing a Bluetooth ®
connection
is completed by inputting a code. If the authorisation input is required, it must always be performed
when re-establishing the Bluetooth connection.
122Operation
Page 125 of 246
If there is no free space available to create a new user profile, delete an exist-
ing user profile.
During the connecting procedure, no other mobile phone may be connected
with the hands-free system.
Up to four mobile phones can be paired with the hands-free system, whereby
only one mobile phone can communicate with the hands-free system.
The visibility of the hands-free system is automatically switched off 3 minutes
after the ignition is switched on and is also deactivated when the mobile
phone has connected to the hands-free system.
Restoring the visibility of the hands-free system
If you have not managed to connect your mobile phone with the hands-free
system within 3 minutes of switching on the ignition, the visibility of the
hands-free system can be reestablished for 3 minutes in the following ways.
› By turning the ignition off and on.
› By turning voice control off and on.
› In the MAXI DOT display under menu item
Bluetooth - Visibility .
Creating a connection with an already paired mobile phone
After switching on the ignition, the connection is automatically established for
the already paired mobile phone 1)
. Check on your mobile phone if the automatic
connection has been established.
Disconnecting the connection
› By withdrawing the ignition key.
› By disconnecting the hands-free system in the mobile phone.
› By disconnecting from the user in the MAXI DOT display under the menu item
Bluetooth - User .
Solving connection problems
If the hands-free system reports No paired phone found, check the operating
status of the mobile phone.
› Is the mobile phone switched on?
› Is the PIN code entered?
› Is Bluetooth ®
active?› Is the visibility of the mobile phone active?
› Has the mobile phone already been paired with the hands-free system?
Telephone operation in the MAXI DOT display
The following menu items can be selected from the Phone menu.
■ Phone book
■ Dial number 2)
■ Call list
■ Voice mailbox
■ Bluetooth 2)
■ Settings 3)
■ Back
Phone book
The Phone book menu item lists the contacts downloaded from the telephone
memory and the mobile phone SIM card.
Dial number
Any telephone number can be entered in the Dial number menu item. The re-
quired digits must be selected one after the other using the adjustment wheel,
and then confirmed by pressing the adjustment wheel. You can select digits
0-9 , symbols
,
, #
and the Cancel, Call and Delete functions.
Call list
The following menu items can be selected in the Call list menu item.
■ Missed calls - List of missed calls
■ Dialled Nos. - List of dialled numbers
■ Received calls - list of received calls
Voice mailbox
In the Voice mailbox menu item, you can set the number of the voice mailbox 2)
and then dial the number.
1)
Some mobile phones have a menu, in which the authorisation for establishing a Bluetooth®
connection
is completed by inputting a code. If the authorisation input is required, it must always be performed
when re-establishing the Bluetooth connection.
2)
On vehicles fitted with the Amundsen+ navigation system, this function can be accessed via the naviga-
tion system menu; refer to the » operating instructions for the Amundsen+ navigation system .
3)
This function is not available in vehicles fitted with the Amundsen+ navigation system.
123Communication and multimedia