stop start SKODA SUPERB 2014 2.G / (B6/3T) Owner's Manual
[x] Cancel search | Manufacturer: SKODA, Model Year: 2014, Model line: SUPERB, Model: SKODA SUPERB 2014 2.G / (B6/3T)Pages: 246, PDF Size: 17.16 MB
Page 5 of 246
Table of Contents
Abbreviations
Safety
Passive Safety
6
General information
6
Correct and safe seated position
7
Seat belts
10
Using seat belts
10
Inertia reels and belt tensioners
13
Airbag system
14
Description of the airbag system
14
Airbag overview
15
Deactivating airbags
19
Transporting children safely
21
Child seat
21
Fastening systems
23
Operation
Cockpit
27
Overview
26
Instruments and Indicator Lights
28
Instrument cluster
28
Warning lights
32
Information system
39
Driver information system
39
Multifunction display (MFD)
41
MAXI DOT display
44
Service interval display
46
Unlocking and opening
48
Unlocking and locking
48
Anti-theft alarm system
54
Luggage compartment lid
55Electric boot lid (Superb Combi)57Electric power windows59
Electric sliding/tilting roof
62
Panoramic sliding/tilting roof (Superb Estate)
63
Lights and visibility
65
Lights
65
Interior lights
71
Visibility
73
Windscreen wipers and washers
75
Rear mirror
77
Seats and useful equipment
79
Adjusting the seats
79
Seat features
83
Practical equipment
86
Luggage compartment
95
Removable light (Superb Combi)
101
Variable loading floor in the luggage
compartment (Estate)
102
Extending variable loading floor with
integrated aluminium rails and faseting
elements (Superb Combi)
103
Net partition (Superb Combi)
105
Roof rack system
106
Air conditioning system
108
Heating, ventilation, cooling
108
Air conditioning system (manual air
conditioning system)
110
Climatronic (automatic air conditioning
system)
113
Auxiliary heating (auxiliary heating and
ventilation)
116
Communication and multimedia
119
General information
119
Universal telephone preinstallation GSM II
122
Universal telephone preinstallation GSM IIl
124
WLAN
127Voice control129Multimedia131
Driving
Starting-off and Driving
135
Starting and stopping the engine using the key
135
Starting and stopping the engine - KESSY
137
Brakes
140
Manual gear changing and pedals
141
Automatic gearbox
142
Running in
145
Economical driving and environmental
sustainability
146
Avoiding damage to your vehicle
149
Driving abroad
150
Assist systems
151
Brake assist systems
151
Parking aid
153
Park assist
154
Cruise Control System
158
START-STOP
159
Fatigue detection (break recommendation)
162
Towing a trailer
163
Towing device
163
Trailer
166
General Maintenance
Car care
169
Services, modifications, and technical
alterations
169
Washing your car
172
Taking care of your vehicle exterior
173
Taking care of the interior
1763Table of Contents
Page 29 of 246
Operation
Cockpit
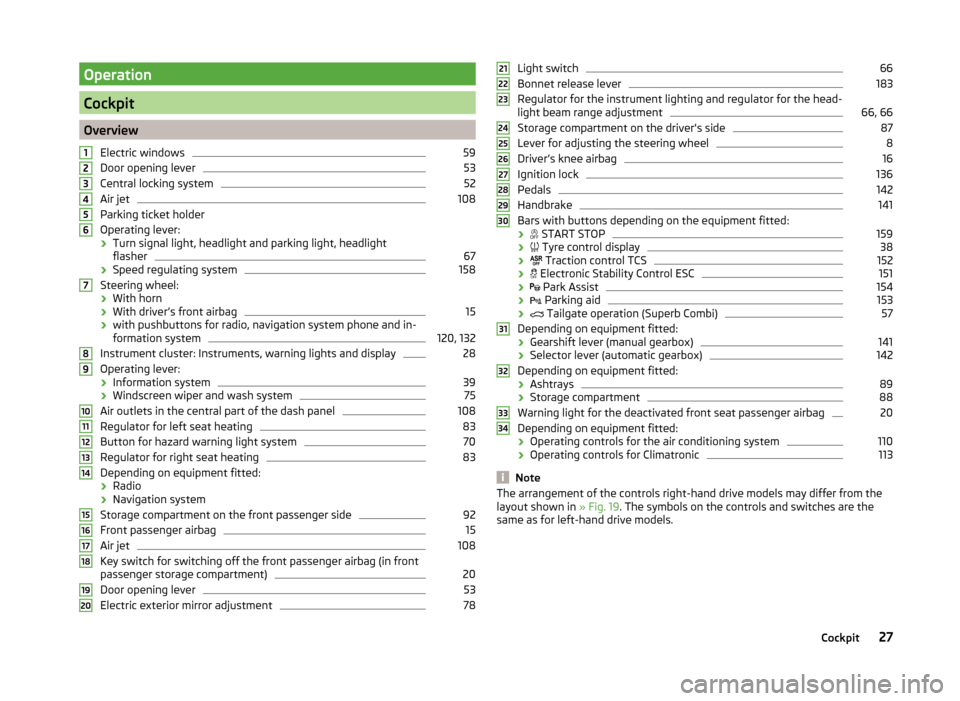
OverviewElectric windows
59
Door opening lever
53
Central locking system
52
Air jet
108
Parking ticket holder
Operating lever: › Turn signal light, headlight and parking light, headlight
flasher
67
› Speed regulating system
158
Steering wheel:
› With horn
› With driver’s front airbag
15
›with pushbuttons for radio, navigation system phone and in-
formation system
120, 132
Instrument cluster: Instruments, warning lights and display
28
Operating lever:
› Information system
39
›Windscreen wiper and wash system
75
Air outlets in the central part of the dash panel
108
Regulator for left seat heating
83
Button for hazard warning light system
70
Regulator for right seat heating
83
Depending on equipment fitted:
› Radio
› Navigation system
Storage compartment on the front passenger side
92
Front passenger airbag
15
Air jet
108
Key switch for switching off the front passenger airbag (in front
passenger storage compartment)
20
Door opening lever
53
Electric exterior mirror adjustment
781234567891011121314151617181920Light switch66
Bonnet release lever
183
Regulator for the instrument lighting and regulator for the head-
light beam range adjustment
66, 66
Storage compartment on the driver's side
87
Lever for adjusting the steering wheel
8
Driver’s knee airbag
16
Ignition lock
136
Pedals
142
Handbrake
141
Bars with buttons depending on the equipment fitted:
›
START STOP
159
›
Tyre control display
38
›
Traction control TCS
152
›
Electronic Stability Control ESC
151
›
Park Assist
154
›
Parking aid
153
›
Tailgate operation (Superb Combi)
57
Depending on equipment fitted:
› Gearshift lever (manual gearbox)
141
›Selector lever (automatic gearbox)
142
Depending on equipment fitted:
› Ashtrays
89
›Storage compartment
88
Warning light for the deactivated front seat passenger airbag
20
Depending on equipment fitted:
› Operating controls for the air conditioning system
110
›
Operating controls for Climatronic
113
Note
The arrangement of the controls right-hand drive models may differ from the
layout shown in » Fig. 19. The symbols on the controls and switches are the
same as for left-hand drive models.212223242526272829303132333427Cockpit
Page 34 of 246
The following message is shown in the MAXI DOT display.Gearbox overheated. Stop! Log book!
do not continue to drive! Stop the vehicle, switch off the engine, and wait
until the
icon goes out – risk of gearbox damage! You can continue your
journey as soon as the symbol disappears.WARNINGIf you have to stop for technical reasons, then park the vehicle at a safe
distance from the traffic, switch off the engine and activate the hazard
warning lights system » page 70. The warning triangle must be set up at
the prescribed distance - observe the national legal provisions when doing
so.
Note
■ If the MAXI DOT display shows warning messages, these messages must be
confirmed in order to access the main menu » page 40 .■
As long as the operational faults are not rectified, the symbols are always in-
dicated again. After they are displayed for the first time, the symbols continue
to be indicated without any extra messages for the driver.
Warning lights
Introduction
This chapter contains information on the following subjects:
Handbrake
33
Brake system
33
Seat belt warning light
33
Generator
33
Door open
34
Engine oil pressure
34
Coolant
34
Bonnet
34
Boot lid
34
Power steering / steering lock (system KESSY)
34
Engine oil level
35
Traction Control System (ASR)
35
Electronic Stability Control (ESC)
35 Antilock brake system (ABS)36 Rear fog light36
Lamp failure
36
Adaptive headlights (AFS)
36
Exhaust inspection system
36
Glow plug system (diesel engine)
36
Engine performance check (petrol engine)
37
Diesel particulate filter (diesel engine)
37
Fuel reserve
37
Airbag system
38
Tyre inflation pressure
38
Windscreen washer fluid level
38
Pads
38
Turn signal system
38
Low beam
39
Fog lights
39
Cruise control system
39
Selector lever lock / starter (system KESSY)
39
Main beam
39
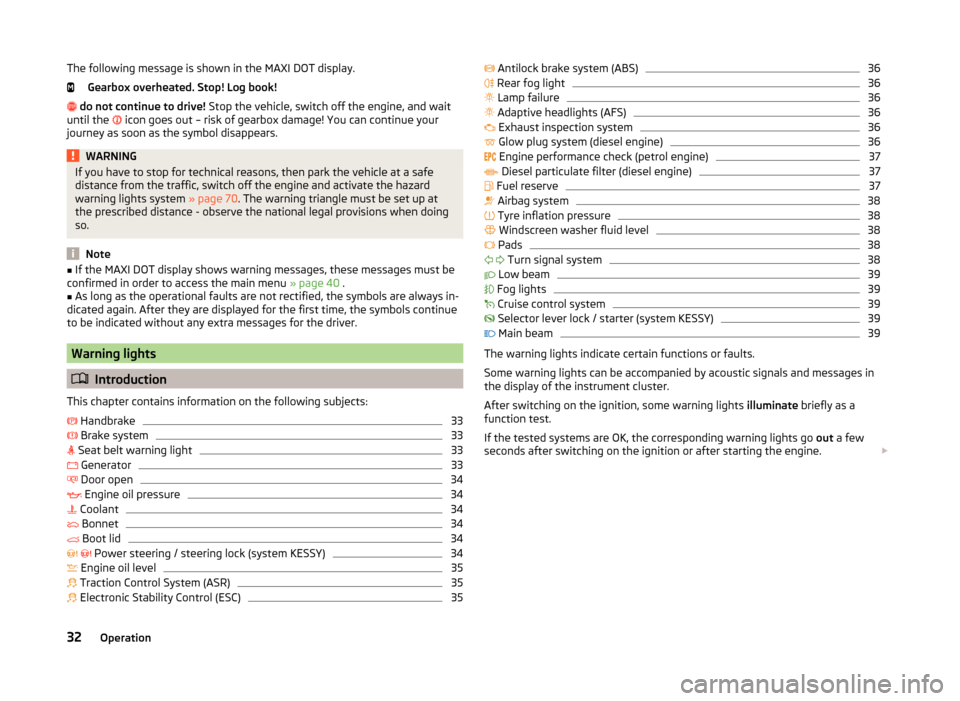
The warning lights indicate certain functions or faults.
Some warning lights can be accompanied by acoustic signals and messages in
the display of the instrument cluster.
After switching on the ignition, some warning lights illuminate briefly as a
function test.
If the tested systems are OK, the corresponding warning lights go out a few
seconds after switching on the ignition or after starting the engine.
32Operation
Page 37 of 246
If the warning light or illuminates again, then immediately obtain help
from an authorised dealer.
Steering lock (KESSY system)
As long as the warning light
is flashing , the steering lock cannot be re-
leased.
If the warning light
flashes , a signal tone sounds, and the following mes-
sage appears in the MAXI DOT- display steering column lock. If Workshop! ap-
pears the electrical steering lock is faulty. Seek assistance from a specialist ga-
rage immediately.
If the warning light
flashes , a beep sounds and in the MAXI DOT display the
message Steering lock defective appears, then the electric steering lock is
broken. Park the car,
do not continue the journey . After switching off the
ignition, it is then no longer possible to lock the steering, to activate the elec-
trical components (e.g. radio, navigation system), to switch on the ignition
again and to start the engine. Seek help from a specialist garage.
Note
The warning light illuminates after the ignition is switched on if the vehi-
cle's battery has been disconnected and reconnected. If the warning light
does not go out after moving a short distance, this means there is an error in
the system. Seek assistance from a specialist garage immediately.
Engine oil level
Read and observe
on page 33 first.
The indicator light lights up (oil quantity too low)
The following message is shown in the MAXI DOT display.
Check oil level!
› Stop the vehicle, switch off the engine, and check the engine oil lev-
el » page 186 .
The warning light will go out if the bonnet is left open for more than 30 sec-
onds. If no engine oil has been replenished, the warning light will come on
again after driving about 100 km.
The indicator light flashes (engine oil level sensor faulty)
The following message is shown in the MAXI DOT display.
Oil sensor: Workshop!
If the engine oil level sensor is faulty, the warning light flashes several
times and an audible signal sounds when the ignition is turned on.
Seek assistance from a specialist garage immediately.
Traction Control System (ASR)
Read and observe
on page 33 first.
The warning light
flashes to show that the ASR is currently operating.
If the warning light
illuminates , there is a fault in the ASR.
The following message is shown in the MAXI DOT display. Error: Traction control (ASR)
Seek assistance from a specialist garage immediately.
If the warning light
illuminates immediately after you start the engine, the
ASR might be switched off due to technical reasons.
›
Switch the ignition off and on again.
The ASR is fully functional again if the warning light
no longer illuminates
after you switch the engine back on.
Further information » page 152.
Note
The warning light illuminates after the ignition is switched on if the vehi-
cle's battery has been disconnected and reconnected. If the warning light
does not go out after moving a short distance, this means there is an error in
the system. Seek assistance from a specialist garage immediately.
Electronic Stability Control (ESC)
Read and observe
on page 33 first.
The warning light
flashes to show that the ESC is currently operating.
If the warning light
illuminates , there is a fault in the ESC.
The following message is shown in the MAXI DOT display. Error: Electronic Stability Control (ESC)
Seek assistance from a specialist garage immediately.
35Instruments and Indicator Lights
Page 40 of 246
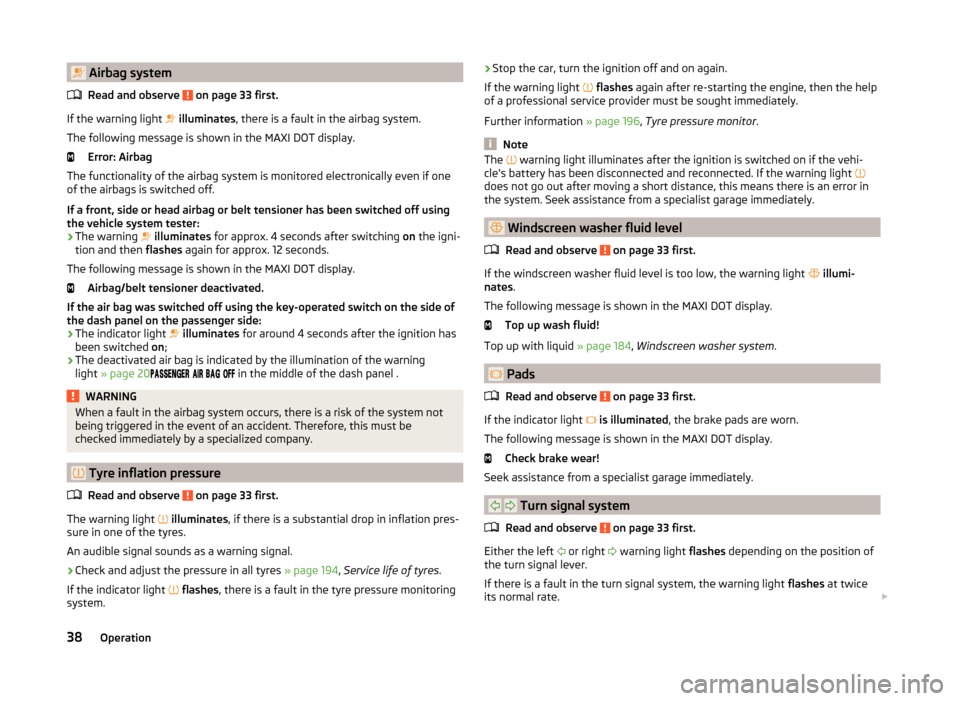
Airbag systemRead and observe
on page 33 first.
If the warning light
illuminates , there is a fault in the airbag system.
The following message is shown in the MAXI DOT display. Error: Airbag
The functionality of the airbag system is monitored electronically even if one
of the airbags is switched off.
If a front, side or head airbag or belt tensioner has been switched off using
the vehicle system tester:
› The warning
illuminates for approx. 4 seconds after switching on the igni-
tion and then flashes again for approx. 12 seconds.
The following message is shown in the MAXI DOT display. Airbag/belt tensioner deactivated.
If the air bag was switched off using the key-operated switch on the side of
the dash panel on the passenger side:
› The indicator light
illuminates for around 4 seconds after the ignition has
been switched on;
› The deactivated air bag is indicated by the illumination of the warning
light » page 20
in the middle of the dash panel .
WARNINGWhen a fault in the airbag system occurs, there is a risk of the system not
being triggered in the event of an accident. Therefore, this must be
checked immediately by a specialized company.
Tyre inflation pressure
Read and observe
on page 33 first.
The warning light
illuminates , if there is a substantial drop in inflation pres-
sure in one of the tyres.
An audible signal sounds as a warning signal.
›
Check and adjust the pressure in all tyres » page 194, Service life of tyres .
If the indicator light
flashes , there is a fault in the tyre pressure monitoring
system.
› Stop the car, turn the ignition off and on again.
If the warning light
flashes again after re-starting the engine, then the help
of a professional service provider must be sought immediately.
Further information » page 196, Tyre pressure monitor .
Note
The warning light illuminates after the ignition is switched on if the vehi-
cle's battery has been disconnected and reconnected. If the warning light
does not go out after moving a short distance, this means there is an error in
the system. Seek assistance from a specialist garage immediately.
Windscreen washer fluid level
Read and observe
on page 33 first.
If the windscreen washer fluid level is too low, the warning light
illumi-
nates .
The following message is shown in the MAXI DOT display. Top up wash fluid!
Top up with liquid » page 184, Windscreen washer system .
Pads
Read and observe
on page 33 first.
If the indicator light
is illuminated , the brake pads are worn.
The following message is shown in the MAXI DOT display. Check brake wear!
Seek assistance from a specialist garage immediately.
Turn signal system
Read and observe
on page 33 first.
Either the left or right
warning light
flashes depending on the position of
the turn signal lever.
If there is a fault in the turn signal system, the warning light flashes at twice
its normal rate.
38Operation
Page 50 of 246
Unlocking and opening
Unlocking and locking
Introduction
This chapter contains information on the following subjects:
Vehicle key
49
Unlock/lock with remote control
49
Unlocking / locking - KESSY
50
Information message
51
Parking the vehicle
51
Safe securing
51
Individual settings
52
Locking/unlocking the vehicle from the inside
52
Child safety lock
53
Opening/closing a door
53
Your car is equipped with a central locking system.
The central locking system allows you to lock and unlock all doors, the fuel fill-
er flap and tailgate at the same time based on the current setting 1)
.
The safe securing system » page 51 is integrated in the central locking sys-
tem. Once the car is locked from the outside, the door locks 2)
are automatically
blocked by the safe securing system »
.
The following takes place after unlocking 1)
.
› The doors, the boot lid and the fuel filler flap are unlocked.
› The interior light, which is switched by the door contact, comes on.
› The safe securing system is switched off 2)
.
› The indicator light in the driver door stops flashing.
› The anti-theft alarm system is deactivated.
The following takes place after locking 1)
.
› The doors, the boot lid and the fuel filler flap are locked.
› The interior lights switched by the door contact come on.
› The safe securing system is switched on 2)
.
› The indicator light in the driver door begins flashing.
› The anti-theft alarm system is activated.
Displaying an error If the indicator light in the driver's door initially flashes quickly for around 2
seconds, and then lights up for 30 seconds without interruption before flash-
ing again slowly, you will need to seek the assistance of a specialist garage.WARNING■ Never leave the key in the vehicle when you exit the vehicle. Unauthor-
ized persons, such as children, for example, could lock the car, turn on the
ignition or start the engine - there is a danger of injury and accidents!■
When leaving the vehicle, never leave persons who are not completely in-
dependent, such as children, unattended in the vehicle. The children might,
for example, release the handbrake or take the vehicle out of gear. The ve-
hicle could then start to move – risk of injury and accidents! These individu-
als might also not be able to leave the vehicle on their own or to help
themselves. Can be fatal at very high or very low temperatures!
■
If the car is locked from the outside and the safelock system is switched
on, there must not be any person in the car as it is then not possible to
open either a door or a window from the inside. The locked doors make it
more difficult for rescuers to get into the vehicle in an emergency – risk to
life.
Note
■ When leaving the vehicle, always check if it is locked.■In the event of an accident in which the airbags are deployed, the locked
doors are automatically unlocked in order to enable rescuers to gain access to
the vehicle.■
Upon failure of the central locking system the key can be used only to unlock
and lock the driver's door. The other doors and the boot lid can be emergency
locked or released. ■ Emergency locking of the door » page 212.
■ Emergency unlocking of the boot lid » page 212.
1)
Depending on the individual setting » page 52 .
2)
This function is only enabled in certain countries.
48Operation
Page 57 of 246
The tow-away protection triggers the alarm if a vehicle is registered as being
on an inclination.
Activating
The interior monitor and the towing protection are activated automatically af-
ter the vehicle is locked.
Deactivating›
Switch off the ignition.
›
Open the driver door.
›
Press
» Fig. 36 on the B-column on the driver's side. The symbol lighting in
the button changes
from red to orange.
›
Lock the vehicle within 30 seconds.
Deactivate the interior monitor and the towing protection if there is a possibili-
ty of the alarm being triggered by movements (e.g. by children or animals)
within the vehicle interior or if the vehicle has to be transported (e.g. by train
or ship) or towed.
CAUTION
■ The opened glasses storage compartment reduces the effectiveness of the
interior monitor. To ensure the full functionality of the interior monitor, the
glasses storage compartment must always be closed before locking the vehi-
cle.■
The anti-theft alarm system is activated when the vehicle is locked even if
the safe securing system is deactivated. The interior monitor is however not
activated.
Luggage compartment lid
Introduction
This chapter contains information on the following subjects:
Twindoor - open/close small boot lid
55
TwinDoor - open / close large boot
56
Open / close (Superb Combi)
56
Delayed locking of the boot lid
56WARNING■ Ensure that the lock is properly engaged after closing the boot lid. Other-
wise, the lid might open suddenly while the vehicle is moving, even if the
lid was locked – risk of accident!■
Never drive with the boot lid open or ajar, as otherwise exhaust gases
may get into the interior of the vehicle – risk of poisoning!
■
Do not press on the rear window when closing the luggage compartment
lid, as otherwise this could crack – risk of injury!
CAUTION
If the vehicle was locked before the boot lid was closed, the lid is immediately
locked automatically when closed » page 56.
Note
■
The function of the button in the grip above the licence plate is deactivated
when starting off or at a speed of 5 km/hour or more for vehicles with central
locking. The function is restored after the vehicle stops and the door is
opened.■
Repeated opening and closing of the boot lid can lead to a temporary failure
of the function due to the overheating protection of the motors of the Twin-
door system.
Twindoor - open/close small boot lid
Fig. 37
Handle of boot lid/opened small boot lid
Read and observe
and on page 55 first.
After unlocking the vehicle, the boot lid can be opened with the button in the
handle above the number plate.
55Unlocking and opening
Page 114 of 246
adjustingRead and observe
on page 110 first.
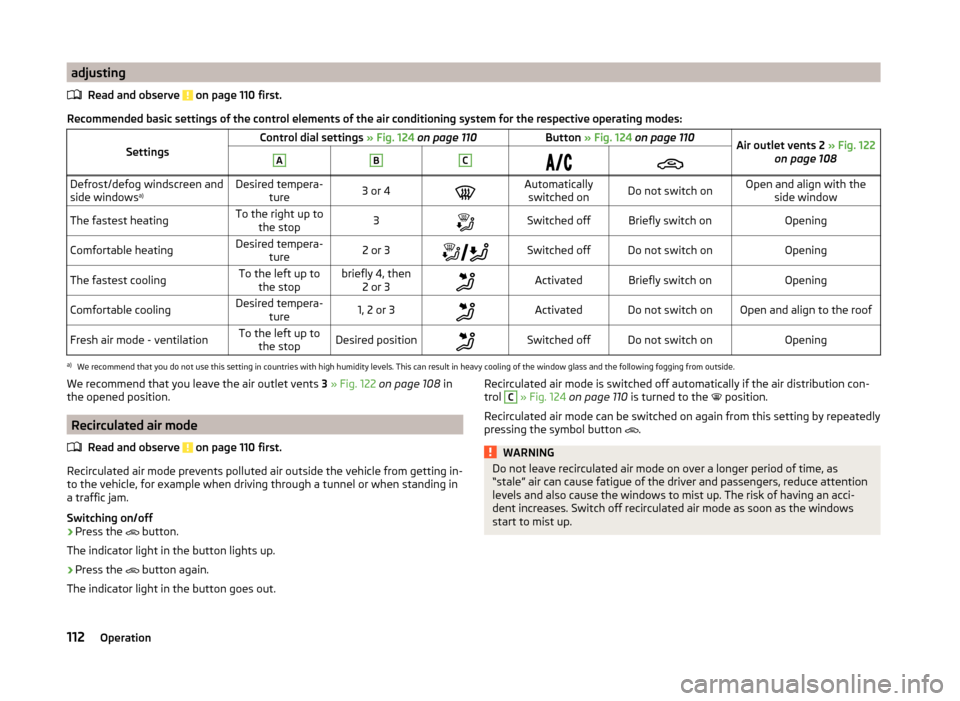
Recommended basic settings of the control elements of the air conditioning system for the respective operating modes:
SettingsControl dial settings » Fig. 124 on page 110Button » Fig. 124 on page 110Air outlet vents 2 » Fig. 122
on page 108ABCDefrost/defog windscreen and
side windows a)Desired tempera-
ture3 or 4Automaticallyswitched onDo not switch onOpen and align with the side windowThe fastest heatingTo the right up tothe stop3Switched offBriefly switch onOpeningComfortable heatingDesired tempera- ture2 or 3Switched offDo not switch onOpeningThe fastest coolingTo the left up to
the stopbriefly 4, then 2 or 3ActivatedBriefly switch onOpeningComfortable coolingDesired tempera- ture1, 2 or 3ActivatedDo not switch onOpen and align to the roofFresh air mode - ventilationTo the left up tothe stopDesired positionSwitched offDo not switch onOpeninga)
We recommend that you do not use this setting in countries with high humidity levels. This can result in heavy cooling of the window glass and the following fogging from outside.
We recommend that you leave the air outlet vents 3 » Fig. 122 on page 108 in
the opened position.
Recirculated air mode
Read and observe
on page 110 first.
Recirculated air mode prevents polluted air outside the vehicle from getting in-to the vehicle, for example when driving through a tunnel or when standing in
a traffic jam.
Switching on/off
›
Press the button.
The indicator light in the button lights up.
›
Press the button again.
The indicator light in the button goes out.
Recirculated air mode is switched off automatically if the air distribution con-
trol C » Fig. 124 on page 110 is turned to the position.
Recirculated air mode can be switched on again from this setting by repeatedly pressing the symbol button
.WARNINGDo not leave recirculated air mode on over a longer period of time, as
“stale” air can cause fatigue of the driver and passengers, reduce attention
levels and also cause the windows to mist up. The risk of having an acci-
dent increases. Switch off recirculated air mode as soon as the windows
start to mist up.112Operation
Page 134 of 246
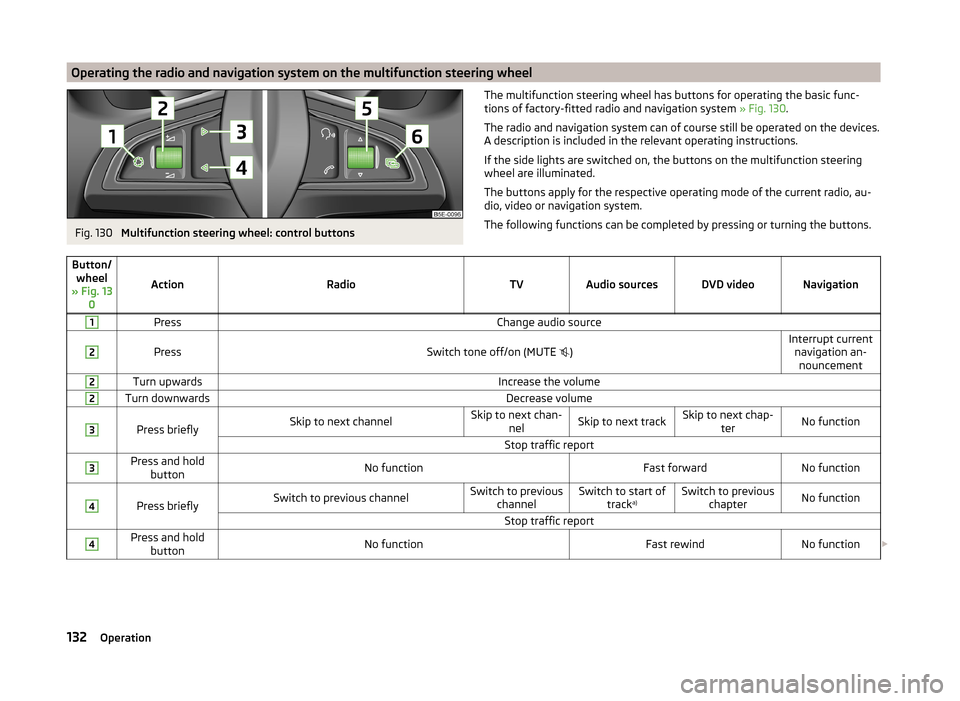
Operating the radio and navigation system on the multifunction steering wheelFig. 130
Multifunction steering wheel: control buttons
The multifunction steering wheel has buttons for operating the basic func-
tions of factory-fitted radio and navigation system » Fig. 130.
The radio and navigation system can of course still be operated on the devices.
A description is included in the relevant operating instructions.
If the side lights are switched on, the buttons on the multifunction steering wheel are illuminated.
The buttons apply for the respective operating mode of the current radio, au-
dio, video or navigation system.
The following functions can be completed by pressing or turning the buttons.Button/ wheel
» Fig. 13 0
ActionRadioTVAudio sourcesDVD videoNavigation
1PressChange audio source2
PressSwitch tone off/on (MUTE
)Interrupt current
navigation an-nouncement2Turn upwardsIncrease the volume2Turn downwardsDecrease volume3
Press brieflySkip to next channelSkip to next chan- nelSkip to next trackSkip to next chap- terNo functionStop traffic report3Press and holdbuttonNo functionFast forwardNo function4
Press brieflySwitch to previous channelSwitch to previous channelSwitch to start of tracka)Switch to previous
chapterNo functionStop traffic report4Press and holdbuttonNo functionFast rewindNo function 132Operation
Page 135 of 246
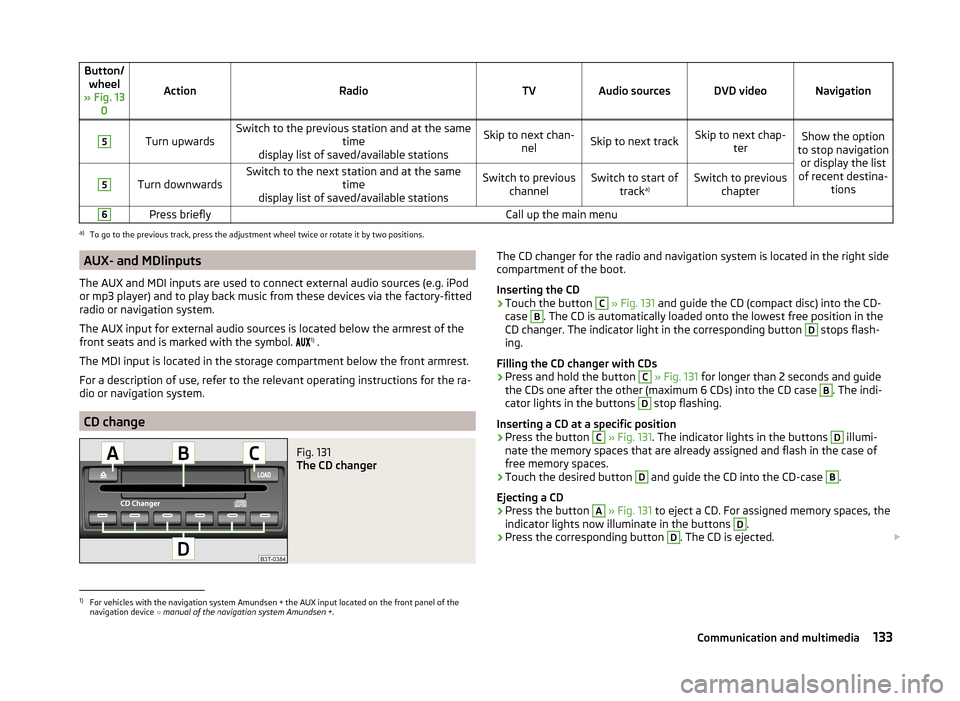
Button/wheel
» Fig. 13 0
ActionRadioTVAudio sourcesDVD videoNavigation
5
Turn upwardsSwitch to the previous station and at the same time
display list of saved/available stationsSkip to next chan- nelSkip to next trackSkip to next chap- terShow the option
to stop navigation or display the list
of recent destina- tions5
Turn downwardsSwitch to the next station and at the same time
display list of saved/available stationsSwitch to previous channelSwitch to start of tracka)Switch to previous
chapter6Press brieflyCall up the main menua)
To go to the previous track, press the adjustment wheel twice or rotate it by two positions.
AUX- and MDIinputs
The AUX and MDI inputs are used to connect external audio sources (e.g. iPod
or mp3 player) and to play back music from these devices via the factory-fitted
radio or navigation system.
The AUX input for external audio sources is located below the armrest of the
front seats and is marked with the symbol. 1)
.
The MDI input is located in the storage compartment below the front armrest.
For a description of use, refer to the relevant operating instructions for the ra-
dio or navigation system.
CD change
Fig. 131
The CD changer
The CD changer for the radio and navigation system is located in the right side
compartment of the boot.
Inserting the CD›
Touch the button
C
» Fig. 131 and guide the CD (compact disc) into the CD-
case
B
. The CD is automatically loaded onto the lowest free position in the
CD changer. The indicator light in the corresponding button
D
stops flash-
ing.
Filling the CD changer with CDs
›
Press and hold the button
C
» Fig. 131 for longer than 2 seconds and guide
the CDs one after the other (maximum 6 CDs) into the CD case
B
. The indi-
cator lights in the buttons
D
stop flashing.
Inserting a CD at a specific position
›
Press the button
C
» Fig. 131 . The indicator lights in the buttons
D
illumi-
nate the memory spaces that are already assigned and flash in the case of
free memory spaces.
›
Touch the desired button
D
and guide the CD into the CD-case
B
.
Ejecting a CD
›
Press the button
A
» Fig. 131 to eject a CD. For assigned memory spaces, the
indicator lights now illuminate in the buttons
D
.
›
Press the corresponding button
D
. The CD is ejected.
1)
For vehicles with the navigation system Amundsen + the AUX input located on the front panel of the
navigation device » manual of the navigation system Amundsen + .
133Communication and multimedia