child restraint SKODA SUPERB 2015 3.G / (B8/3V) Owner's Manual
[x] Cancel search | Manufacturer: SKODA, Model Year: 2015, Model line: SUPERB, Model: SKODA SUPERB 2015 3.G / (B8/3V)Pages: 276, PDF Size: 42.14 MB
Page 4 of 276
Table of Contents
On-board literature4
Notes
5
Structure and more information about the
Owner's Manual
6
Abbreviations
Safety
Passive Safety
8
General information
8
Correct and safe seated position
8
Seat belts
11
Using seat belts
11
Belt retractors and belt tensioners, reversible
seat belts
13
Airbag system
14
Description of the airbag system
14
Airbag overview
15
Deactivating airbags
19
Transporting children safely
20
Child seat
20
Fastening systems
23
Using the system
Cockpit
27
Overview
26
Instruments and warning lights
28
Instrument cluster
28
Warning lights
31
Information system
41
Driver information system
41
Driving data (Multifunction display)
42MAXI DOT display45Service interval display49
SmartGate
50
Unlocking and opening
52
Unlocking and locking
52
Anti-theft alarm system
57
Luggage compartment lid
58
Electric boot lid
59
Window operation
61
Panorama sliding/tilting roof
64
Lights and visibility
67
Lights
67
Headlamp Assistant (Light Assist / Dynamic
Light Assist)
72
Interior lights
74
Visibility
75
Windscreen wipers and washers
77
Rear mirror
79
Seats and head restraints
81
Front seats
81
Rear seats
85
Head restraints
87
Seat heating and ventilation
88
Transporting and practical equipment
90
Useful equipment
90
Electrical sockets and cigarette lighter
99
Ashtrays
103
Tablet holder
104
Luggage compartment and transport of
cargo
105
Variable loading floor in the luggage
compartment (Estate)
115Net partition116Roof rack117
Heating and ventilation
118
Heating, manual air conditioning system,
Climatronic
118
Auxiliary heating (auxiliary heating and
ventilation)
123
Driving
Starting-off and Driving
126
Starting and stopping the engine using the
key
126
Starting and stopping the engine at the push
of the button
128
START-STOPsystem
130
Brakes and parking
132
Manual gear changing and pedals
135
Automatic transmission
135
Running-in and economical driving
138
Avoiding damage to your vehicle
141
Assist systems
142
General information
142
Braking and stabilisation systems
143
Parking aid (ParkPilot)
147
Rear Traffic Alert
149
Rear View Camera
151
Park Assist
155
Cruise Control System
160
Speed Limiter
162
Adaptive Cruise Control (ACC)
163
Front Assist
168
Selection of the driving mode(Driving Mode
Selection)
171
Proactive passenger protection (Crew Protect
Assist)
173
Lane Departure Warning (Lane Assist)
174
Assistant for “blind spot monitoring”
1772Table of Contents
Page 11 of 276
WARNING■The front seats and all head restraints must be adjusted to match the
body size at all times and the seat belt must always be fastened properly to
provide the most effective levels of protection to the passengers.■
Each occupant must correctly fasten the seat belt belonging to the seat.
Children must be fastened » page 20, Transporting children safely with a
suitable restraint system.
■
By sitting incorrectly, the occupant is risking life-threatening injuries.
■
The seat backrests must not be tilted too far back when driving, as this
will impair the function of the seat belts and of the airbag system – risk of
injury!
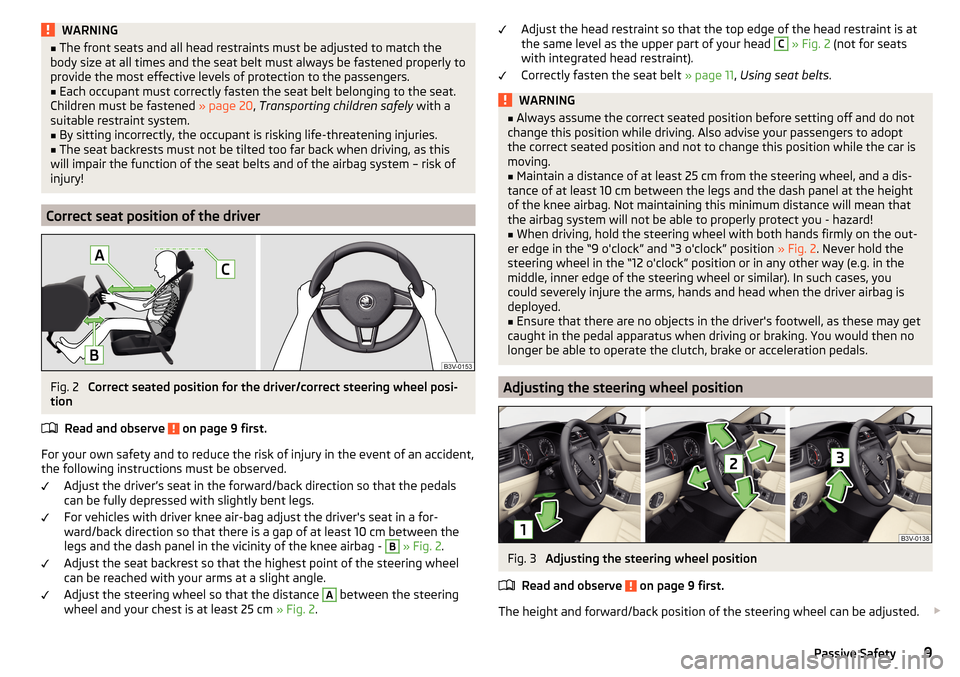
Correct seat position of the driver
Fig. 2
Correct seated position for the driver/correct steering wheel posi-
tion
Read and observe
on page 9 first.
For your own safety and to reduce the risk of injury in the event of an accident,
the following instructions must be observed.
Adjust the driver’s seat in the forward/back direction so that the pedals
can be fully depressed with slightly bent legs.
For vehicles with driver knee air-bag adjust the driver's seat in a for-
ward/back direction so that there is a gap of at least 10 cm between the
legs and the dash panel in the vicinity of the knee airbag -
B
» Fig. 2 .
Adjust the seat backrest so that the highest point of the steering wheel
can be reached with your arms at a slight angle.
Adjust the steering wheel so that the distance
A
between the steering
wheel and your chest is at least 25 cm » Fig. 2.
Adjust the head restraint so that the top edge of the head restraint is at
the same level as the upper part of your head C » Fig. 2 (not for seats
with integrated head restraint).
Correctly fasten the seat belt » page 11, Using seat belts .WARNING■
Always assume the correct seated position before setting off and do not
change this position while driving. Also advise your passengers to adopt
the correct seated position and not to change this position while the car is
moving.■
Maintain a distance of at least 25 cm from the steering wheel, and a dis-
tance of at least 10 cm between the legs and the dash panel at the height
of the knee airbag. Not maintaining this minimum distance will mean that
the airbag system will not be able to properly protect you - hazard!
■
When driving, hold the steering wheel with both hands firmly on the out-
er edge in the “9 o'clock” and “3 o'clock” position » Fig. 2. Never hold the
steering wheel in the “12 o'clock” position or in any other way (e.g. in the
middle, inner edge of the steering wheel or similar). In such cases, you
could severely injure the arms, hands and head when the driver airbag is
deployed.
■
Ensure that there are no objects in the driver's footwell, as these may get
caught in the pedal apparatus when driving or braking. You would then no
longer be able to operate the clutch, brake or acceleration pedals.
Adjusting the steering wheel position
Fig. 3
Adjusting the steering wheel position
Read and observe
on page 9 first.
The height and forward/back position of the steering wheel can be adjusted.
9Passive Safety
Page 12 of 276
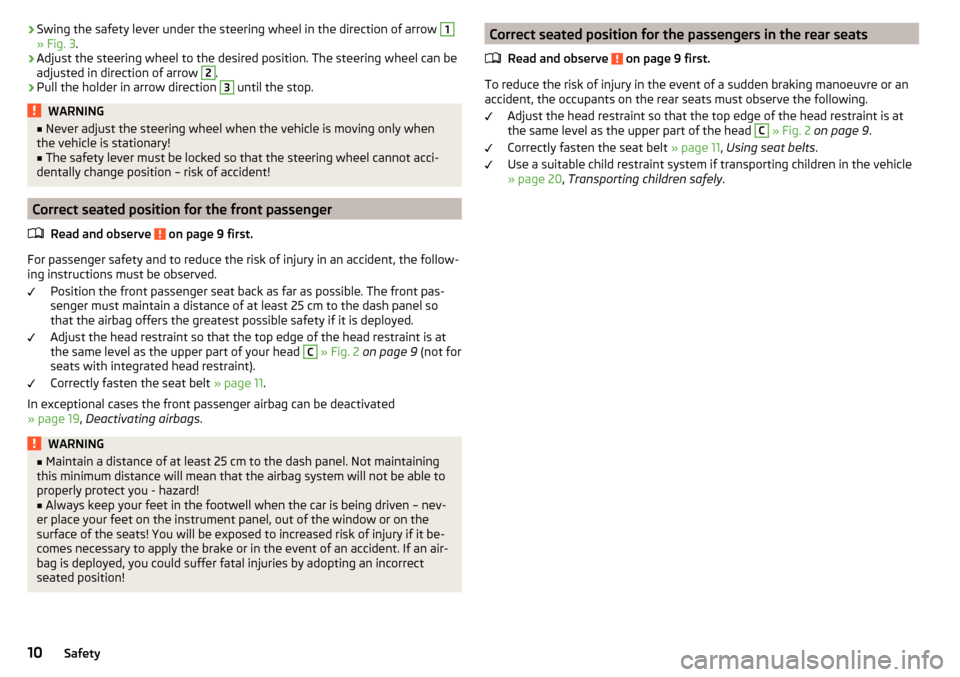
›Swing the safety lever under the steering wheel in the direction of arrow 1» Fig. 3
.›
Adjust the steering wheel to the desired position. The steering wheel can be
adjusted in direction of arrow
2
.
›
Pull the holder in arrow direction
3
until the stop.
WARNING■ Never adjust the steering wheel when the vehicle is moving only when
the vehicle is stationary!■
The safety lever must be locked so that the steering wheel cannot acci-
dentally change position – risk of accident!
Correct seated position for the front passenger
Read and observe
on page 9 first.
For passenger safety and to reduce the risk of injury in an accident, the follow-
ing instructions must be observed.
Position the front passenger seat back as far as possible. The front pas-
senger must maintain a distance of at least 25 cm to the dash panel so
that the airbag offers the greatest possible safety if it is deployed.
Adjust the head restraint so that the top edge of the head restraint is at
the same level as the upper part of your head
C
» Fig. 2 on page 9 (not for
seats with integrated head restraint).
Correctly fasten the seat belt » page 11.
In exceptional cases the front passenger airbag can be deactivated
» page 19 , Deactivating airbags .
WARNING■
Maintain a distance of at least 25 cm to the dash panel. Not maintaining
this minimum distance will mean that the airbag system will not be able to
properly protect you - hazard!■
Always keep your feet in the footwell when the car is being driven – nev-
er place your feet on the instrument panel, out of the window or on the
surface of the seats! You will be exposed to increased risk of injury if it be-
comes necessary to apply the brake or in the event of an accident. If an air-
bag is deployed, you could suffer fatal injuries by adopting an incorrect
seated position!
Correct seated position for the passengers in the rear seats
Read and observe
on page 9 first.
To reduce the risk of injury in the event of a sudden braking manoeuvre or an
accident, the occupants on the rear seats must observe the following.
Adjust the head restraint so that the top edge of the head restraint is at
the same level as the upper part of the head
C
» Fig. 2 on page 9 .
Correctly fasten the seat belt » page 11, Using seat belts .
Use a suitable child restraint system if transporting children in the vehicle
» page 20 , Transporting children safely .
10Safety
Page 15 of 276
The shoulder part of the seat belt must never run across the neck but must
roughly run over the middle of the shoulder and fit snugly against the chest.
The lap part of the belt must run across the pelvis, must not be positioned
across the stomach and must always fit snugly » Fig. 5 -
.
seat belt height adjusters for front seats
The seat belt height adjuster makes it possible to adjust the routing of the
front seat belts in the area of the shoulder to the body size.›
Press the height adjuster and move to the desired position » Fig. 6.
›
Then pull firmly on the belt to ensure that the seat belt height adjuster has
correctly locked in place.
Seat belts with pregnant women
Expectant women must also always wear a seat belt. This is the only way of ensuring optimal protection for the unborn child.
With pregnant women, the lap part of the belt must be positioned as low as
possible on the pelvis to avoid exerting any pressure on the lower abdomen
» Fig. 5 -
.
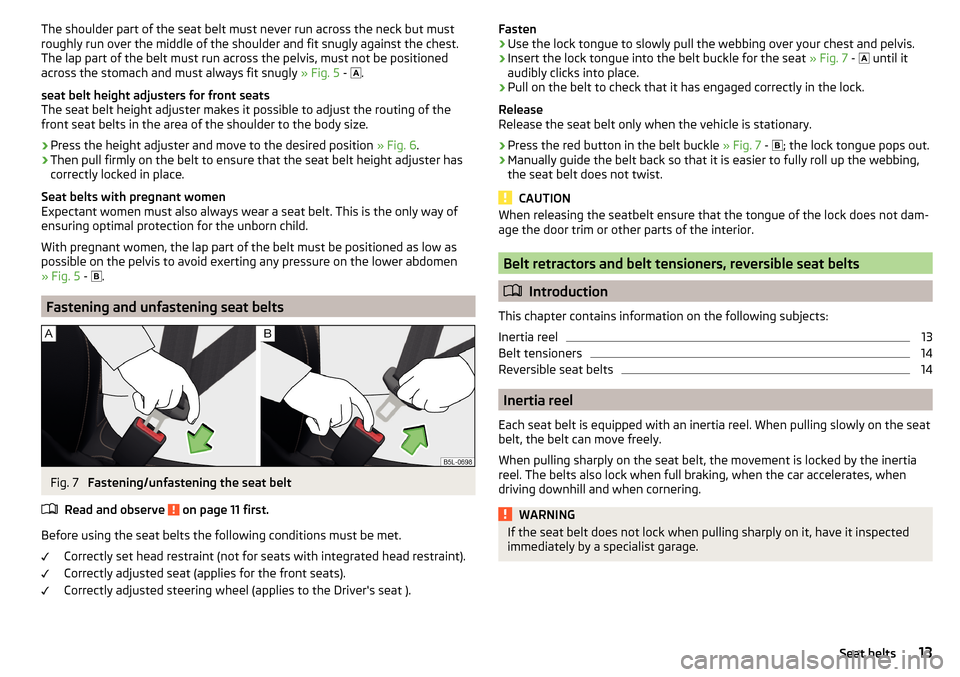
Fastening and unfastening seat belts
Fig. 7
Fastening/unfastening the seat belt
Read and observe
on page 11 first.
Before using the seat belts the following conditions must be met. Correctly set head restraint (not for seats with integrated head restraint).
Correctly adjusted seat (applies for the front seats).
Correctly adjusted steering wheel (applies to the Driver's seat ).
Fasten›Use the lock tongue to slowly pull the webbing over your chest and pelvis.›
Insert the lock tongue into the belt buckle for the seat » Fig. 7 -
until it
audibly clicks into place.
›
Pull on the belt to check that it has engaged correctly in the lock.
Release
Release the seat belt only when the vehicle is stationary.
›
Press the red button in the belt buckle » Fig. 7 -
; the lock tongue pops out.
›
Manually guide the belt back so that it is easier to fully roll up the webbing,
the seat belt does not twist.
CAUTION
When releasing the seatbelt ensure that the tongue of the lock does not dam-
age the door trim or other parts of the interior.
Belt retractors and belt tensioners, reversible seat belts
Introduction
This chapter contains information on the following subjects:
Inertia reel
13
Belt tensioners
14
Reversible seat belts
14
Inertia reel
Each seat belt is equipped with an inertia reel. When pulling slowly on the seat
belt, the belt can move freely.
When pulling sharply on the seat belt, the movement is locked by the inertia
reel. The belts also lock when full braking, when the car accelerates, when
driving downhill and when cornering.
WARNINGIf the seat belt does not lock when pulling sharply on it, have it inspected
immediately by a specialist garage.13Seat belts
Page 18 of 276
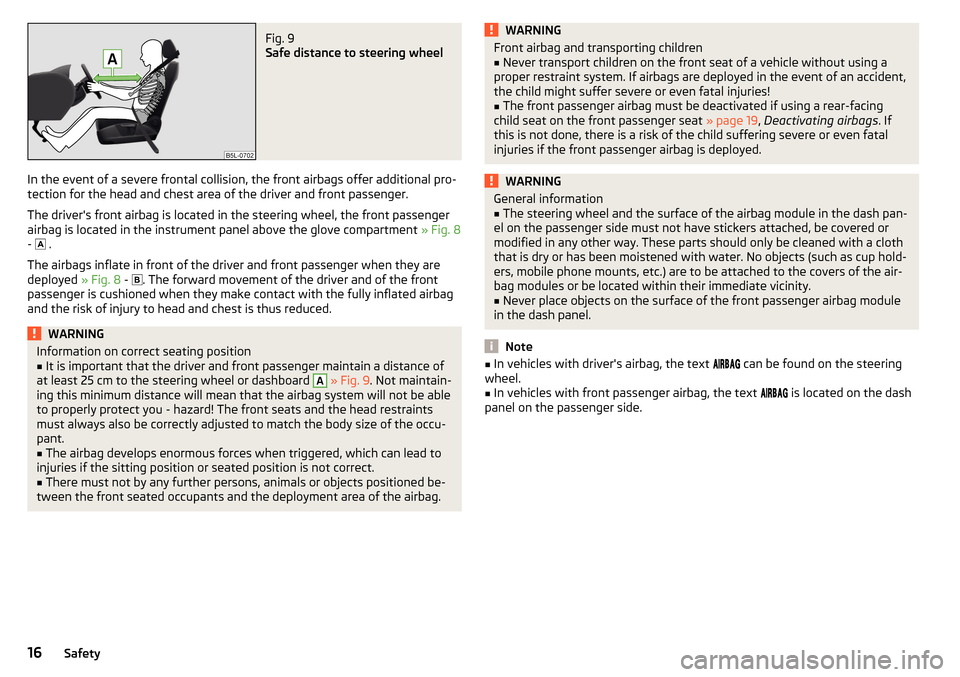
Fig. 9
Safe distance to steering wheel
In the event of a severe frontal collision, the front airbags offer additional pro-
tection for the head and chest area of the driver and front passenger.
The driver's front airbag is located in the steering wheel, the front passenger airbag is located in the instrument panel above the glove compartment » Fig. 8
- .
The airbags inflate in front of the driver and front passenger when they are
deployed » Fig. 8 -
. The forward movement of the driver and of the front
passenger is cushioned when they make contact with the fully inflated airbag
and the risk of injury to head and chest is thus reduced.
WARNINGInformation on correct seating position■It is important that the driver and front passenger maintain a distance of
at least 25 cm to the steering wheel or dashboard A
» Fig. 9 . Not maintain-
ing this minimum distance will mean that the airbag system will not be able
to properly protect you - hazard! The front seats and the head restraints
must always also be correctly adjusted to match the body size of the occu-
pant.
■
The airbag develops enormous forces when triggered, which can lead to
injuries if the sitting position or seated position is not correct.
■
There must not by any further persons, animals or objects positioned be-
tween the front seated occupants and the deployment area of the airbag.
WARNINGFront airbag and transporting children■Never transport children on the front seat of a vehicle without using a
proper restraint system. If airbags are deployed in the event of an accident,
the child might suffer severe or even fatal injuries!■
The front passenger airbag must be deactivated if using a rear-facing
child seat on the front passenger seat » page 19, Deactivating airbags . If
this is not done, there is a risk of the child suffering severe or even fatal
injuries if the front passenger airbag is deployed.
WARNINGGeneral information■The steering wheel and the surface of the airbag module in the dash pan-
el on the passenger side must not have stickers attached, be covered or
modified in any other way. These parts should only be cleaned with a cloth
that is dry or has been moistened with water. No objects (such as cup hold-
ers, mobile phone mounts, etc.) are to be attached to the covers of the air-
bag modules or be located within their immediate vicinity.■
Never place objects on the surface of the front passenger airbag module
in the dash panel.
Note
■ In vehicles with driver's airbag, the text can be found on the steering
wheel.■
In vehicles with front passenger airbag, the text
is located on the dash
panel on the passenger side.
16Safety
Page 23 of 276
WARNING (Continued)■Children are exposed to an increased risk of injury in the event of an acci-
dent if they lean forward or adopt an incorrect seated position when the
vehicle is moving. This particularly applies to children who are transported
on the front passenger seat as they can suffer severe, or even fatal injuries
if the airbag system is deployed!■
Pay particular attention to the information provided by the manufacturer
of the child safety seat regarding the correct routing of the belt. Seat belts
which are not correctly adjusted can themselves cause injuries even in mi-
nor accidents.
■
Safety belts must be checked to ensure that they are running properly.
One should also ensure that the belt is not damaged by sharp-edged fit-
tings.
■
The front passenger airbag must be deactivated if using a rear-facing
child seat on the front passenger seat. Further information » page 21, Use
of a child seat on the front passenger seat .
■
When installing the child seat on the back seat, the corresponding front
seat must be adjusted so that there is no contact between the front seat
and the child seat or the child being transported in a child seat.
■
Before installing a forward-facing child seat with backrest, remove the
headrest » page 87 . After removing the child seat, refit the head re-
straints.
Note
We recommend that you use child seats from ŠKODA Original Accessories.
These child seats were developed and also tested for use in ŠKODA vehicles.
They meet the ECE-R 44 standard.
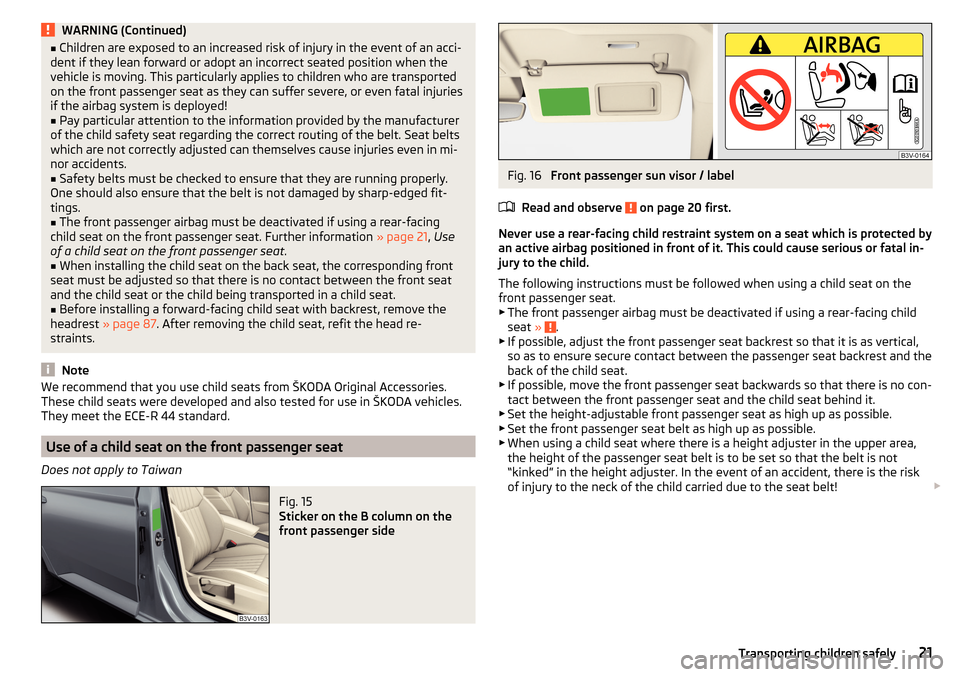
Use of a child seat on the front passenger seat
Does not apply to Taiwan
Fig. 15
Sticker on the B column on the
front passenger side
Fig. 16
Front passenger sun visor / label
Read and observe
on page 20 first.
Never use a rear-facing child restraint system on a seat which is protected by
an active airbag positioned in front of it. This could cause serious or fatal in-
jury to the child.
The following instructions must be followed when using a child seat on the
front passenger seat.
▶ The front passenger airbag must be deactivated if using a rear-facing child
seat »
.
▶ If possible, adjust the front passenger seat backrest so that it is as vertical,
so as to ensure secure contact between the passenger seat backrest and the
back of the child seat.
▶ If possible, move the front passenger seat backwards so that there is no con-
tact between the front passenger seat and the child seat behind it.
▶ Set the height-adjustable front passenger seat as high up as possible.
▶ Set the front passenger seat belt as high up as possible.
▶ When using a child seat where there is a height adjuster in the upper area,
the height of the passenger seat belt is to be set so that the belt is not
“kinked” in the height adjuster. In the event of an accident, there is the risk
of injury to the neck of the child carried due to the seat belt!
21Transporting children safely
Page 83 of 276

CAUTION■Never adjust retractable exterior mirrors by hand - risk of damaging the
electric mirror actuator!■
When the mirror is swung by external influences (due to impact during ma-
noeuvring, for example), then first fold-in the mirror by turning the knob and
wait for a loud clapping noise.
Seats and head restraints
Front seats
Introduction
This chapter contains information on the following subjects:
Manually adjusting seats
82
Electrical adjustment
82
Convenience features of passenger seat
82
Memory Function of the electrically adjustable seat
83
Memory function of the remote control key
83
Folding front passenger seat
84
Armrest setting
85WARNING■ Only adjust the driver's seat when the vehicle is stationary – risk of acci-
dent!■
Caution when adjusting the seat! You may suffer injuries or bruises as a
result of adjusting the seat without paying proper attention.
■
The electric front seat adjustment is functional even with the ignition off.
Therefore, when leaving the vehicle, never leave people who are not com-
pletely independent, such as children, unattended in the vehicle - there is a
danger of injury!
■
Do not carry any objects on the front passenger seat except objects de-
signed for this purpose (e.g. child seats) – risk of accident!
Note
■ After a certain time, play can develop within the adjustment mechanism of
the backrest angle.■
For safety reasons, it is not possible to store the seat position in the electric
seat memory and remote control key memory if the inclination angle of the
seat backrest is more than 102° in relation to the seat cushion.
■
Each time you store the position of the electrically adjustable driver's seat
and exterior mirrors, the existing setting is deleted.
81Seats and head restraints
Page 91 of 276

When the ignition is switched off, the seat heating and seat ventilation is also
switched off. If the engine is started again within 10 minutes, the driver's seat
heating and seat ventilation is automatically turned on again at the last set-
ting.WARNINGIf you have a subdued pain and/or temperature sensitivity, e.g. through
medication, paralysis or because of chronic illness (e.g. diabetes), we rec-
ommend not to use the seat heating. There may be difficult to heal burns. If
the seat heating is used, we recommend to make regular breaks in your
journey when driving long distances, so that the body can recuperate from
the stress of the journey. Please consult your doctor, who can evaluate
your specific condition.
CAUTION
The following instructions must be observed to avoid damage to the seats.■Do not kneel on the seats or otherwise apply concentrated pressure to them.■
Do not turn on any of the seat heaters if seats are not occupied.
■
Do not switch on the relevant seat heating if the seats have objects attached
to or placed on them, for example a child seat, a bag, etc.
■
When there are additional protective covers or protective covers mounted on
each of the seats, do not turn the seat heating on.
Note
If the on-board voltage decreases, the seat heating and ventilation switches
off automatically » page 216, Automatic load deactivation .
Front seats with heating
Read and observe
and on page 89 first.
The level of the seat heating is indicated by the number of illuminated warning
lights below the switch.
Seat heating operation
›
Press button or
.
The seat heating is switched on at maximum heat » Fig. 86 on page 88 -
.
With repeated pressing of the switch, the level is down-regulated up to the
switch-off.
Front seats with heating and ventilationFig. 87
Infotainment display: Front seat
heating and ventilation with
maximum heating / ventilation
level switched on
Read and observe and on page 89 first.
The heating / ventilation level is indicated by the number of illuminated func-
tion keys in Infotainment, if necessary, by the number of illuminated warning
lights below the button.
The heating / ventilation setting can also be adjusted in the Infotainment us-
ing function keys
A
and
B
» Fig. 87 and with the respective function key
turned off.
Seat heating operation only
›
Press button or
.
The seat heating is switched on at maximum heat » Fig. 86 on page 88 -
.
With repeated pressing of the switch, the level is down-regulated up to the
switch-off.
The heat output can be set in the Infotainment.
Only use seat ventilation
›
Press button or
.
›
Turn off the seat heating.
›
Set the ventilation level in the Infotainment with the function keys
A
» Fig. 87
.
Another setting of the ventilation level up to turn off can also take place by
pressing the buttons and
again.
Operating the seat heating and ventilation simultaneously
›
Press button or
.
›
Adjust the heating / ventilation level in the Infotainment.
Below the button the control lamps » Fig. 86 on page 88 -
illuminate.
89Seats and head restraints
Page 266 of 276

Reversing cameraLens care197
Revolutions counter29
Roller blind Luggage compartment cover
109
Roof Load
118
Roof rack117
mounting points118
Roof load118
Rubber seals196
Running-in Brake linings
139
Engine139
Tyres139
S
SAFE See Safe securing system
55
SAFELOCK See Safe securing system
55
Safe securing system55
Safety8
Child safety20
Child safety seats20
Correct seated position8
Headrests87
i-Size25
ISOFIX23
TOP TETHER25
Save electrical energy139
Save fuel139
Screens see Sun screen in the rear doors
77
Seals Vehicle care
196
Seat belt height adjustment
12
Warning light33, 37
Seat belts11
Belt tensioners14
fastening and unfastening13
Seatbelts Inertia reels
13
Seat belts reversible
14
The physical principle of a head-on collision12
Seat electrical adjustment82
Seats Convenience features of passenger seat
82
Electrical adjustment82
Folding front passenger seat84
Front armrest85
Front seat adjustment81
Headrests87
Heated front seats89
Manual adjustment82
Memory Function of the electrically adjustable seat
83
Rear armrest86
Rear heated seats90
Rear seat backrests85
Storing in memory of remote control key83
Seats and head restraint81
see Automatic gearbox Manual gear shifting on the multifunctionsteering wheel
137
see Instrument cluster see Instrument cluster
28
Select drive mode Individual mode settings
173
Mode selection and Infotainment display173
Select driving mode Eco mode
172
Individual mode172
Mode comfort171
Sport mode172
Selector lever Refer to Selector lever
136
Selector lever lockWarning light37
Service191
Service interval display49
Warning light41
Setting Positions of the variable loading floor
115
Seat belt height12
Settings Interior mirror
79
Setting the Clock
31
Side airbag17
Side compartments in the luggage compart- ment
112
sliding/tilting roof Sunblind
66
Sliding/tilting roof Closing
64
Sliding / tilting roof Malfunction
65
Malfunction of the sun blind66
Sliding/tilting roof Opening and tilting
64
Operation64
SmartGate Connect by searching for a Wi-Fi network
50
introductory information50
Password/PIN code change51
Setting51
Wi-Fi Direct51
SmartLink see Infotainment
4
Snow chains221
Sockets 12 volt socket in luggage compartment
101
12 volt socket inside100
230 V101
264Index