Emergency SKODA SUPERB 2016 3.G / (B8/3V) Owner's Guide
[x] Cancel search | Manufacturer: SKODA, Model Year: 2016, Model line: SUPERB, Model: SKODA SUPERB 2016 3.G / (B8/3V)Pages: 336, PDF Size: 53.89 MB
Page 170 of 336
Telephone functions
Enter telephone number and select
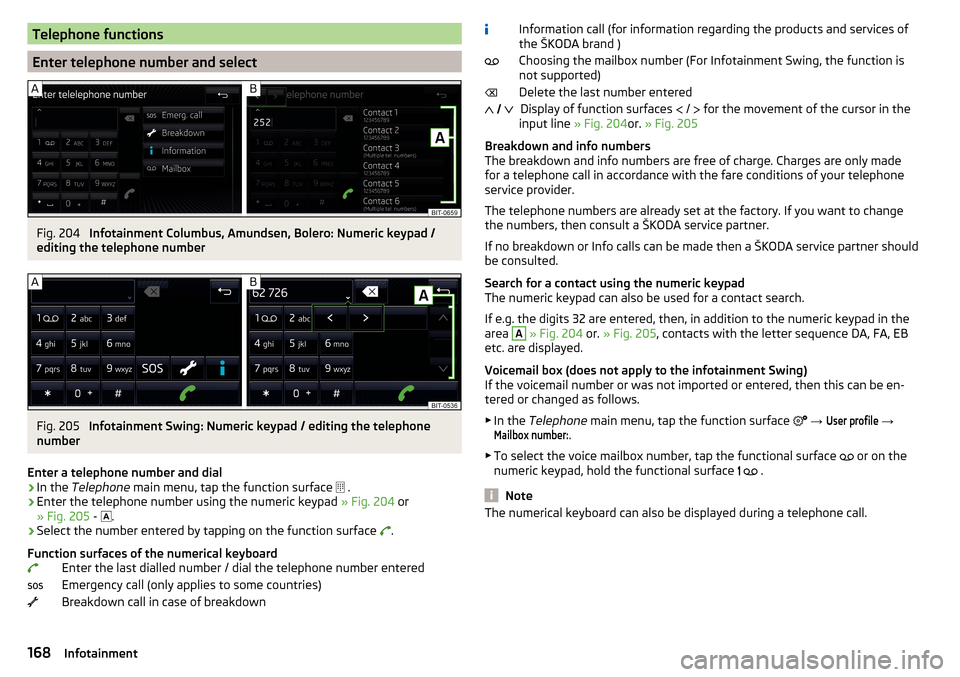
Fig. 204
Infotainment Columbus, Amundsen, Bolero: Numeric keypad /
editing the telephone number
Fig. 205
Infotainment Swing: Numeric keypad / editing the telephone
number
Enter a telephone number and dial
›
In the Telephone main menu, tap the function surface
.
›
Enter the telephone number using the numeric keypad » Fig. 204 or
» Fig. 205 -
.
›
Select the number entered by tapping on the function surface
.
Function surfaces of the numerical keyboard Enter the last dialled number / dial the telephone number entered
Emergency call (only applies to some countries)
Breakdown call in case of breakdown
Information call (for information regarding the products and services of
the ŠKODA brand )
Choosing the mailbox number (For Infotainment Swing, the function is
not supported)
Delete the last number entered Display of function surfaces
/
for the movement of the cursor in the
input line » Fig. 204or. » Fig. 205
Breakdown and info numbers
The breakdown and info numbers are free of charge. Charges are only made
for a telephone call in accordance with the fare conditions of your telephone
service provider.
The telephone numbers are already set at the factory. If you want to change
the numbers, then consult a ŠKODA service partner.
If no breakdown or Info calls can be made then a ŠKODA service partner should
be consulted.
Search for a contact using the numeric keypad
The numeric keypad can also be used for a contact search.
If e.g. the digits 32 are entered, then, in addition to the numeric keypad in the
area A
» Fig. 204 or. » Fig. 205 , contacts with the letter sequence DA, FA, EB
etc. are displayed.
Voicemail box (does not apply to the infotainment Swing)
If the voicemail number or was not imported or entered, then this can be en- tered or changed as follows.
▶ In the Telephone main menu, tap the function surface
→
User profile
→
Mailbox number:
.
▶ To select the voice mailbox number, tap the functional surface or on the
numeric keypad, hold the functional surface
.
Note
The numerical keyboard can also be displayed during a telephone call.
168Infotainment
Page 202 of 336
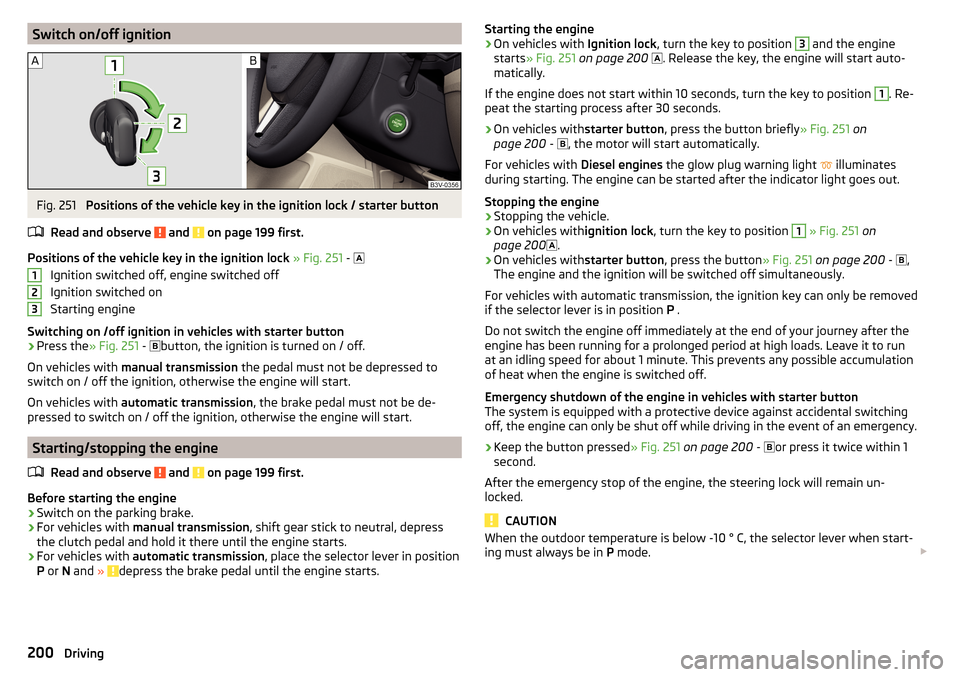
Switch on/off ignitionFig. 251
Positions of the vehicle key in the ignition lock / starter button
Read and observe
and on page 199 first.
Positions of the vehicle key in the ignition lock » Fig. 251 -
Ignition switched off, engine switched off
Ignition switched on
Starting engine
Switching on /off ignition in vehicles with starter button
›
Press the » Fig. 251 -
button, the ignition is turned on / off.
On vehicles with manual transmission the pedal must not be depressed to
switch on / off the ignition, otherwise the engine will start.
On vehicles with automatic transmission , the brake pedal must not be de-
pressed to switch on / off the ignition, otherwise the engine will start.
Starting/stopping the engine
Read and observe
and on page 199 first.
Before starting the engine
›
Switch on the parking brake.
›
For vehicles with manual transmission , shift gear stick to neutral, depress
the clutch pedal and hold it there until the engine starts.
›
For vehicles with automatic transmission , place the selector lever in position
P or N and » depress the brake pedal until the engine starts.
123Starting the engine›On vehicles with Ignition lock, turn the key to position 3 and the engine
starts » Fig. 251 on page 200
. Release the key, the engine will start auto-
matically.
If the engine does not start within 10 seconds, turn the key to position 1
. Re-
peat the starting process after 30 seconds.
›
On vehicles with starter button, press the button briefly » Fig. 251 on
page 200 -
, the motor will start automatically.
For vehicles with Diesel engines the glow plug warning light
illuminates
during starting. The engine can be started after the indicator light goes out.
Stopping the engine
›
Stopping the vehicle.
›
On vehicles with ignition lock, turn the key to position
1
» Fig. 251 on
page 200 .
›
On vehicles with
starter button, press the button » Fig. 251 on page 200 -
,
The engine and the ignition will be switched off simultaneously.
For vehicles with automatic transmission, the ignition key can only be removed
if the selector lever is in position P .
Do not switch the engine off immediately at the end of your journey after the
engine has been running for a prolonged period at high loads. Leave it to run
at an idling speed for about 1 minute. This prevents any possible accumulation
of heat when the engine is switched off.
Emergency shutdown of the engine in vehicles with starter button
The system is equipped with a protective device against accidental switching
off, the engine can only be shut off while driving in the event of an emergency.
›
Keep the button pressed » Fig. 251 on page 200 -
or press it twice within 1
second.
After the emergency stop of the engine, the steering lock will remain un-
locked.
CAUTION
When the outdoor temperature is below -10 ° C, the selector lever when start-
ing must always be in P mode. 200Driving
Page 205 of 336
Brakes and Parking
Introduction
This chapter contains information on the following subjects:
Electric parking brake
203
Auto Hold function
204
Parking
205
The wear of the brake pads is dependent on the operating conditions and driv-
ing style. Under difficult conditions (e.g. urban, sporty driving style) the condi-
tion of the brakes should also be checked by a specialist garage between the
service intervals.
The performance of the brakes can be delayed if the brakes are damp, iced up
in winter or if covered in a layer of salt . The brakes are cleaned and dried by
applying the brakes several times »
.
Corrosion on the brake discs and dirt on the brake pads occur if the vehicle has
been parked for a long period and if you do not make much use of the braking
system. The brakes are cleaned by applying the brakes several times »
.
Before travelling a long distance with a steep gradient , reduce speed and
shift into the next lowest gear. As a result, the braking effect of the engine will
be used, reducing the load on the brakes. If you do have to brake, this should
be carried out at intervals.
Emergency braking display - when an emergency braking is performed, the
automatic flashing of the brake lights are used to alert the traffic behind.
New brake pads must first be “worn in” because these do not initially have the
best possible braking effect. Drive especially carefully for the first 200 km or
so.
A too low brake fluid level can cause faults in the braking system , the warn-
ing light illuminates in the instrument cluster
» page 35,
Brake system
. If
the warning light does not illuminate and an extended stopping distance is re-
quired, then driving should be adapted according to the unknown cause of
fault and restricted braking effect - seek the assistance of a specialist garage
immediately.
The brake booster increases the pressure generated with the brake pedal. The
brake booster only operates when the engine is running.
WARNING■ Greater physical effort is required for braking when the engine is switch-
ed off – risk of accident!■
During the braking procedure on a vehicle with manual transmission,
when the vehicle is in gear and at low revs, press the clutch pedal. Other-
wise, the functionality of the brake system may be impaired – risk of acci-
dent!
■
Do not press the brake pedal if braking is now required. This causes the
brakes to overheat and can also result in a longer braking distance and ex-
cessive wear - risk of accident!
■
Braking for the purpose of drying and cleaning the brake discs should be
carried out only if the traffic conditions permit. Do not place any other road
users in jeopardy.
■
Recommendations for new brake pads have to be observed.
■
When stopping and parking, the parking brake should always be on, oth-
erwise the vehicle could move off - there is the risk of an accident!
■
If a front spoiler, full wheel trim, etc. is mounted retrospectively, it must
be ensured that the air supply to the front wheel brakes is not reduced.
Otherwise, the functionality of the brake system may be impaired – risk of
accident!
Electric parking brake
Fig. 255
Parking brake button
203Starting-off and Driving
Page 206 of 336
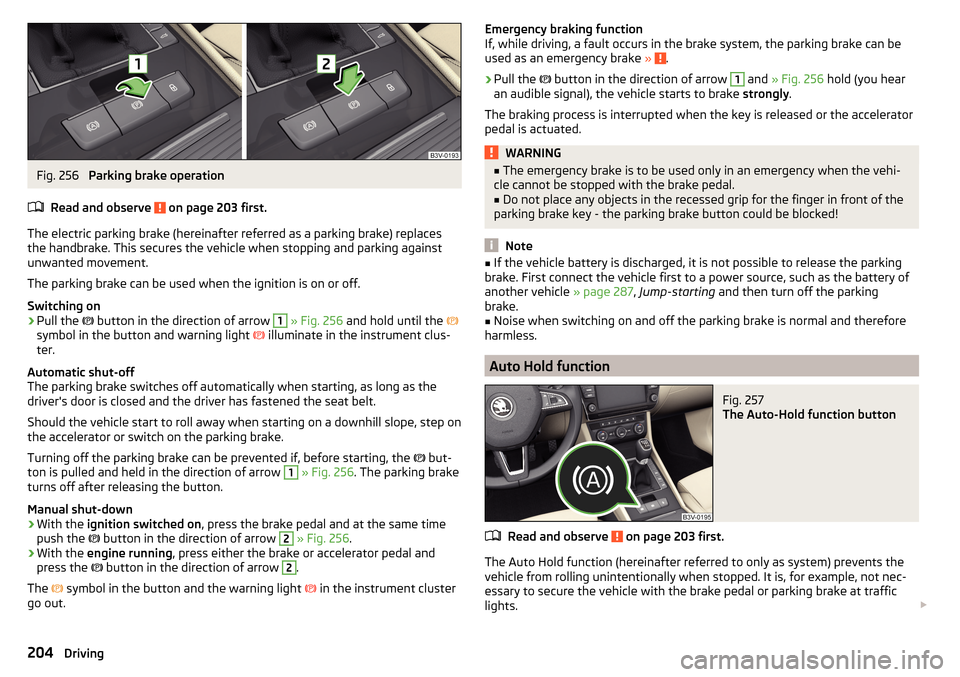
Fig. 256
Parking brake operation
Read and observe
on page 203 first.
The electric parking brake (hereinafter referred as a parking brake) replaces the handbrake. This secures the vehicle when stopping and parking against
unwanted movement.
The parking brake can be used when the ignition is on or off.
Switching on
›
Pull the button in the direction of arrow
1
» Fig. 256 and hold until the
symbol in the button and warning light illuminate in the instrument clus-
ter.
Automatic shut-off
The parking brake switches off automatically when starting, as long as the
driver's door is closed and the driver has fastened the seat belt.
Should the vehicle start to roll away when starting on a downhill slope, step on
the accelerator or switch on the parking brake.
Turning off the parking brake can be prevented if, before starting, the but-
ton is pulled and held in the direction of arrow
1
» Fig. 256 . The parking brake
turns off after releasing the button.
Manual shut-down
›
With the ignition switched on , press the brake pedal and at the same time
push the button in the direction of arrow
2
» Fig. 256 .
›
With the engine running , press either the brake or accelerator pedal and
press the button in the direction of arrow
2
.
The symbol in the button and the warning light
in the instrument cluster
go out.
Emergency braking function
If, while driving, a fault occurs in the brake system, the parking brake can be
used as an emergency brake »
.
›
Pull the
button in the direction of arrow
1
and » Fig. 256 hold (you hear
an audible signal), the vehicle starts to brake strongly.
The braking process is interrupted when the key is released or the accelerator
pedal is actuated.
WARNING■ The emergency brake is to be used only in an emergency when the vehi-
cle cannot be stopped with the brake pedal.■
Do not place any objects in the recessed grip for the finger in front of the
parking brake key - the parking brake button could be blocked!
Note
■ If the vehicle battery is discharged, it is not possible to release the parking
brake. First connect the vehicle first to a power source, such as the battery of
another vehicle » page 287, Jump-starting and then turn off the parking
brake.■
Noise when switching on and off the parking brake is normal and therefore
harmless.
Auto Hold function
Fig. 257
The Auto-Hold function button
Read and observe on page 203 first.
The Auto Hold function (hereinafter referred to only as system) prevents the
vehicle from rolling unintentionally when stopped. It is, for example, not nec-
essary to secure the vehicle with the brake pedal or parking brake at traffic
lights.
204Driving
Page 210 of 336
The selector lever is not locked when quickly moving across the position N
(e.g. from R to D/S ). This, for example, helps to rock out a vehicle that is stuck,
e.g. in a bank of snow. The selector lever lock will engage if the lever is in posi-
tion N for more than approx. 2 seconds without the brake pedal being de-
pressed.
If it is not possible to release the gear selector from mode P in the usual man-
ner, then this can be emergency unlocked » page 293.
Note
If you want to switch the selector lever from mode P to mode D/S or vice ver-
sa, move the selector lever quickly. This prevents that you accidentally select
mode R or N.
Manual shifting of gears (Tiptronic)
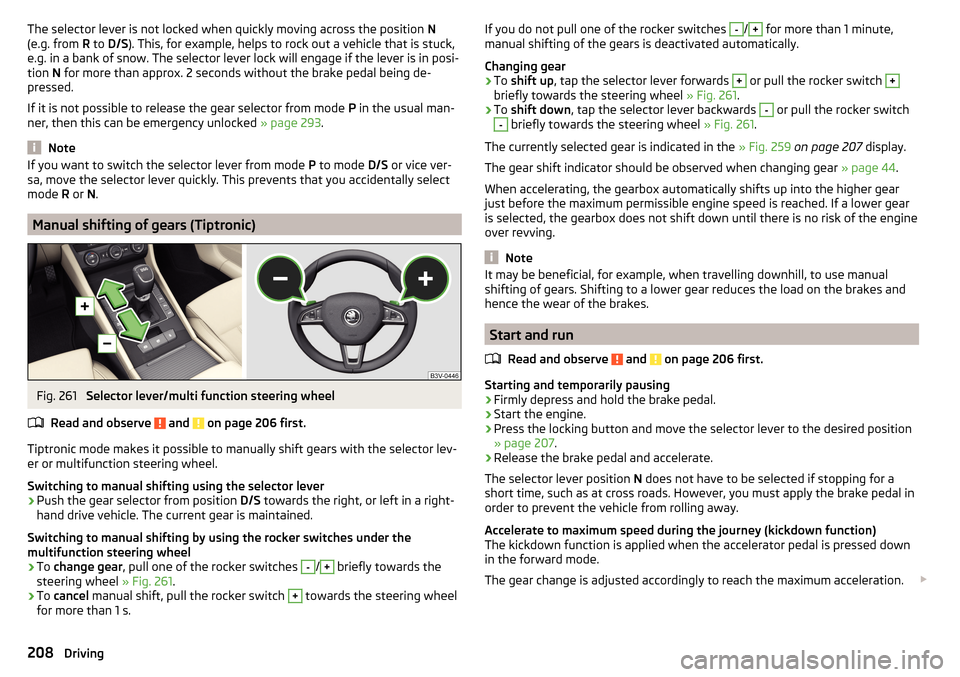
Fig. 261
Selector lever/multi function steering wheel
Read and observe
and on page 206 first.
Tiptronic mode makes it possible to manually shift gears with the selector lev-
er or multifunction steering wheel.
Switching to manual shifting using the selector lever
›
Push the gear selector from position D/S towards the right, or left in a right-
hand drive vehicle. The current gear is maintained.
Switching to manual shifting by using the rocker switches under the
multifunction steering wheel
›
To change gear , pull one of the rocker switches
-
/
+
briefly towards the
steering wheel » Fig. 261.
›
To cancel manual shift, pull the rocker switch
+
towards the steering wheel
for more than 1 s.
If you do not pull one of the rocker switches -/+ for more than 1 minute,
manual shifting of the gears is deactivated automatically.
Changing gear›
To shift up , tap the selector lever forwards
+
or pull the rocker switch
+
briefly towards the steering wheel » Fig. 261.
›
To shift down , tap the selector lever backwards
-
or pull the rocker switch
-
briefly towards the steering wheel » Fig. 261.
The currently selected gear is indicated in the » Fig. 259 on page 207 display.
The gear shift indicator should be observed when changing gear » page 44.
When accelerating, the gearbox automatically shifts up into the higher gear
just before the maximum permissible engine speed is reached. If a lower gear
is selected, the gearbox does not shift down until there is no risk of the engine
over revving.
Note
It may be beneficial, for example, when travelling downhill, to use manual
shifting of gears. Shifting to a lower gear reduces the load on the brakes and
hence the wear of the brakes.
Start and run
Read and observe
and on page 206 first.
Starting and temporarily pausing
›
Firmly depress and hold the brake pedal.
›
Start the engine.
›
Press the locking button and move the selector lever to the desired position
» page 207 .
›
Release the brake pedal and accelerate.
The selector lever position N does not have to be selected if stopping for a
short time, such as at cross roads. However, you must apply the brake pedal in
order to prevent the vehicle from rolling away.
Accelerate to maximum speed during the journey (kickdown function)
The kickdown function is applied when the accelerator pedal is pressed down
in the forward mode.
The gear change is adjusted accordingly to reach the maximum acceleration.
208Driving
Page 218 of 336
Settings in InfotainmentRead and observe
and on page 215 first.
›
Press the button, then tap on the function surface
→
Parking and ma-noeuvring
.
■ ParkPilot - Settings for the parking aid
■
Activate automatically
- Activate/deactivate the compact parking aid display
(when driving forward)
■
Front volume
- Adjust the volume of the beeps for obstacle detection in front
■
Front tone setting
- Setting the pitch of the beeps for obstacle detection in
front
■
Rear volume
- Set the volume level of the beeps for the rear obstacle detec-
tion
■
Rear tone setting
- Setting the pitch of the beeps for the rear obstacle detec-
tion
■
Entertainment fading
/
Entert. Fading
- Lowers the audio volume (e.g. radio vol-
ume) with activated parking aid
■
Manoeuvre braking
- Activation / deactivation of the automatic emergency
braking
Operation
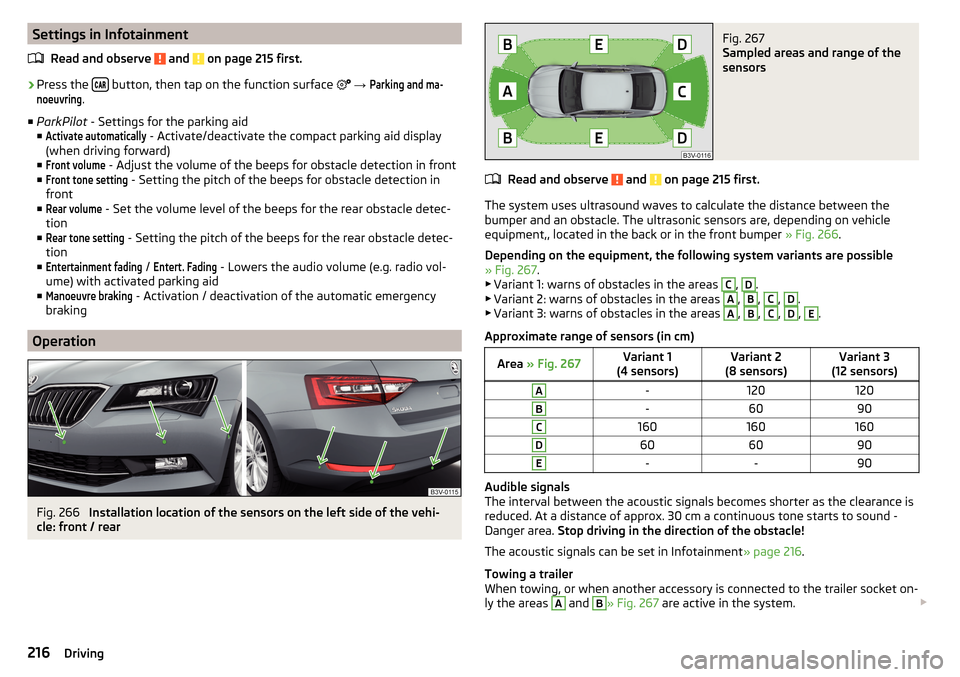
Fig. 266
Installation location of the sensors on the left side of the vehi-
cle: front / rear
Fig. 267
Sampled areas and range of the
sensors
Read and observe and on page 215 first.
The system uses ultrasound waves to calculate the distance between the
bumper and an obstacle. The ultrasonic sensors are, depending on vehicle
equipment,, located in the back or in the front bumper » Fig. 266.
Depending on the equipment, the following system variants are possible
» Fig. 267 .
▶ Variant 1: warns of obstacles in the areas
C
,
D
.
▶ Variant 2: warns of obstacles in the areas
A
,
B
,
C
,
D
.
▶ Variant 3: warns of obstacles in the areas
A
,
B
,
C
,
D
,
E
.
Approximate range of sensors (in cm)
Area » Fig. 267Variant 1
(4 sensors)Variant 2
(8 sensors)Variant 3
(12 sensors)A-120120B-6090C160160160D606090E--90
Audible signals
The interval between the acoustic signals becomes shorter as the clearance is
reduced. At a distance of approx. 30 cm a continuous tone starts to sound -
Danger area. Stop driving in the direction of the obstacle!
The acoustic signals can be set in Infotainment » page 216.
Towing a trailer
When towing, or when another accessory is connected to the trailer socket on-
ly the areas
A
and
B
» Fig. 267 are active in the system.
216Driving
Page 221 of 336
WARNINGThe general information relating to the use of assistance systems must be
observed » page 212, in section Introduction .WARNING■
In the case of a collision or damage to the rear of the vehicle, the function
of the systems may be affected - risk of accident! Have the vehicle checked
by a specialist garage.■
Do not cover the sensor area - the function of the systems could be limi-
ted. ■ Remove snow, ice and such obstacles from the sensor environment im-
mediately.
WARNINGThe wizard for “blind spot”monitoring is limited by physical and system-re-
lated limits. Therefore, in the following situations the system can be de-
layed in drawing attention (or not at all) to a vehicle in the next land.■
When a vehicle is approaching at a very high speed.
■
When passing through a very sharp curve or a roundabout.
CAUTION
■ If a trailer or other accessory is to be connected to the trailer socket, then
the two systems are not available.■
In adverse weather conditions (heavy rain, water vapour, very low or high
temperatures, etc.), the system function may be limited - “failure to recognise
a vehicle”.
■
Accessories additionally installed on the vehicle rear, such as bicycle carriers,
can impair the system function.
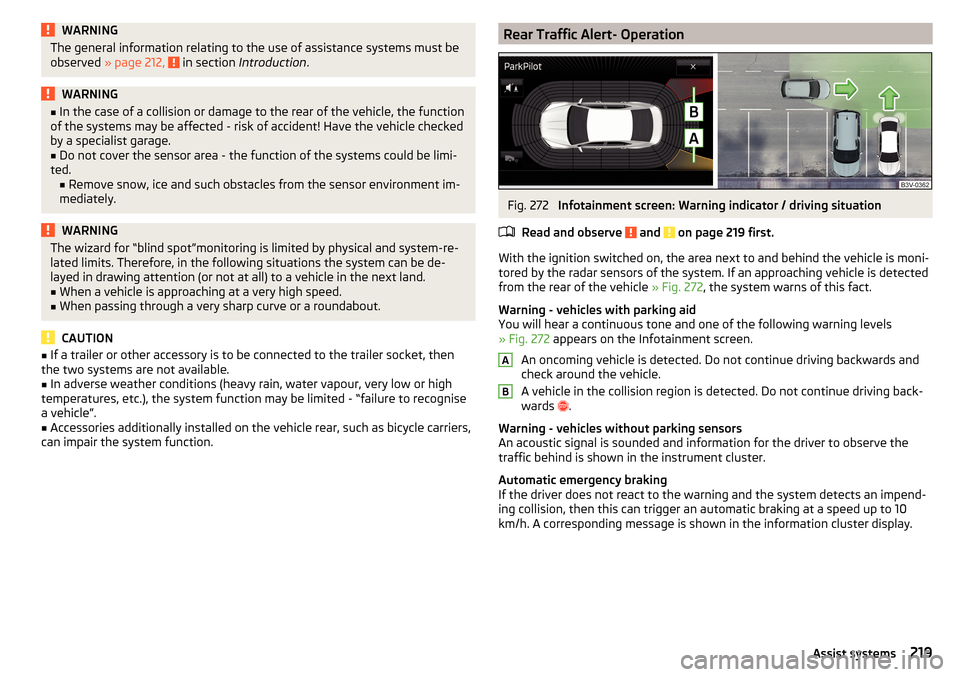
Rear Traffic Alert- OperationFig. 272
Infotainment screen: Warning indicator / driving situation
Read and observe
and on page 219 first.
With the ignition switched on, the area next to and behind the vehicle is moni-
tored by the radar sensors of the system. If an approaching vehicle is detected
from the rear of the vehicle » Fig. 272, the system warns of this fact.
Warning - vehicles with parking aid
You will hear a continuous tone and one of the following warning levels
» Fig. 272 appears on the Infotainment screen.
An oncoming vehicle is detected. Do not continue driving backwards and
check around the vehicle.
A vehicle in the collision region is detected. Do not continue driving back-
wards .
Warning - vehicles without parking sensors
An acoustic signal is sounded and information for the driver to observe the
traffic behind is shown in the instrument cluster.
Automatic emergency braking
If the driver does not react to the warning and the system detects an impend-
ing collision, then this can trigger an automatic braking at a speed up to 10
km/h. A corresponding message is shown in the information cluster display.
AB219Assist systems
Page 231 of 336
Departing from a parallel parking spaceRead and observe
and on page 226 first.
The system supports the driver when leaving a parking space of a parallel
parking space.
Leaving a parking space process
›
Press the
» Fig. 282 on page 226 button.
The following message is displayed:
Park Assist: Set indicators and engage reverse gear!›
Activate the turn signal for side of the vehicle where the parking space is out
of which you wish to manoeuvre.
›
Select reverse gear or move the selector lever into position R.
The further procedure is analogous to that for reverse parking.
›
Follow the system instructions shown in the display.
As soon as the parking procedure is complete, an audible signal sounds and
the following message appears in the display.
If the parking space is too small, it is not possible to use the system to leave
the parking space. A corresponding message is shown in the information clus-
ter display.
Automatic brake assist
Read and observe
and on page 226 first.
Automatic brake assist when speeding
If a velocity of 7 km / h is exceeded during the parking manoeuvre for the first
time, the speed will be automatically reduced by the system to less than 7 km /
h. This prevents the parking manoeuvre from aborting.
Automatic emergency braking
If the system detects a risk of collision during parking, automatic emergency
braking takes place to prevent a collision.
The parking is terminated by the emergency braking.
CAUTION
The automatic emergency braking is not triggered by the system when the
parking process stops due to the speed of 7 km / hr being exceeded!Malfunctions
Read and observe
and on page 226 first.
If, for some unknown reason, the system is not available, an appropriate mes-
sage appears in the display of the instrument cluster.
System unavailable
If the system is not available because the vehicle has a fault, a message ap-
pears concerning the unavailability. Seek help from a specialist garage.
System fault
In the case of a system fault, an error message appears. Seek help from a spe-
cialist garage.
Cruise Control System
Introduction
This chapter contains information on the following subjects:
Operation
230
Operation description
230
The Cruise Control System (CCS) maintains a set speed without you having to
actuate the accelerator pedal. The state where the CCS maintains the speed is
referred to hereinafter as the control.
WARNING■
The general information relating to the use of assistance systems must
be observed » page 212, in section Introduction .■
After pressing the clutch pedal, no interrupted control occurs! For exam-
ple, if a different gear is engaged and the clutch pedal is released, control is
continued.
229Assist systems
Page 240 of 336
WARNING■Please take note of the general points relating to the use of assistance
systems » page 212, in section Introduction .■
The system does not respond to crossing or oncoming objects.
CAUTION
In case of failure of more than one brake light on the vehicle or on the electri-
cally connected trailer, the system becomes unavailable.
Settings in Infotainment
Read and observe
and on page 238 first.
›
Press the button, then tap on the function surface
→
Driver assistance
.
■ Front Assist (ambient traffic monitor. sys.) - Set the assistant for distance
monitoring to the vehicles ahead ■
Active
- Activate/deactivate the assistant
■
Advance warning
(Version 1) - Activate/deactivate advance warning
■
Advance warning
(Version 2) - Activating/deactivating and setting the distance
level at which a warning occurs
■
Display distance warning
- Activate/deactivate distance warnings
Operation
Read and observe
and on page 238 first.
The system support is provided in the following manner.▶ Alerts you about a dangerous proximity to the vehicle ahead.
▶ Warns you of an impending collision.
▶ Assists with a brake action triggered by the driver.
▶ If the driver fails to respond to a detected danger, an automatic braking ac-
tion is performed.
The system can work only if the following basic conditions are met. The system is activated.
TCS is activated » page 214.
The vehicle is travelling forwards at a speed of more than approx. 5 km/h.
Note
The system can be impaired or may not be available, for example when driving
in “sharp ”curves or with an ESC engagement » page 213.Distance warningFig. 299
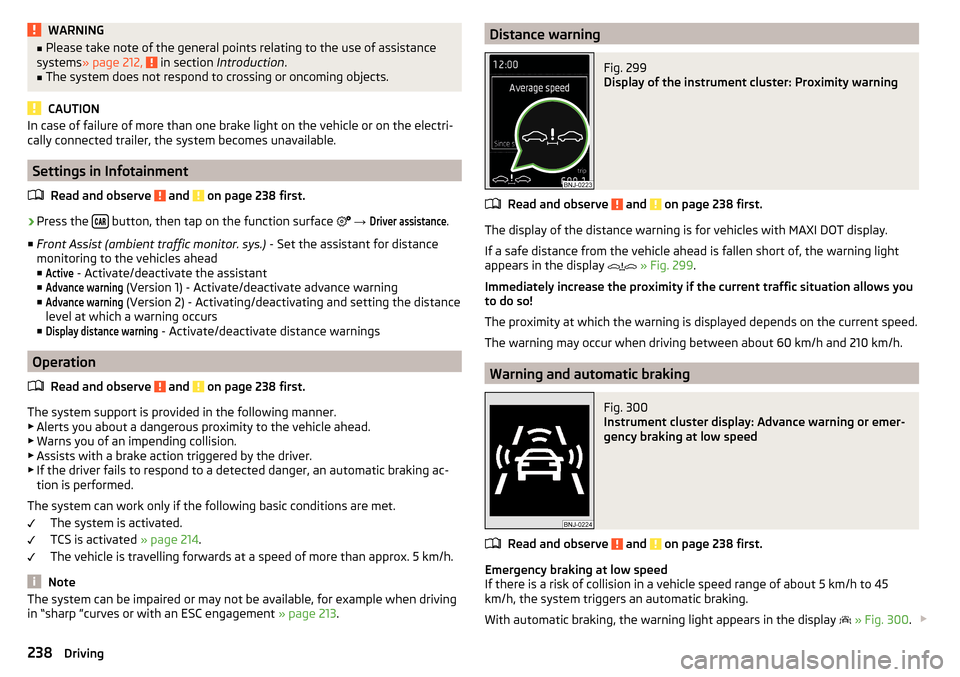
Display of the instrument cluster: Proximity warning
Read and observe and on page 238 first.
The display of the distance warning is for vehicles with MAXI DOT display.
If a safe distance from the vehicle ahead is fallen short of, the warning light
appears in the display
» Fig. 299 .
Immediately increase the proximity if the current traffic situation allows you
to do so!
The proximity at which the warning is displayed depends on the current speed.
The warning may occur when driving between about 60 km/h and 210 km/h.
Warning and automatic braking
Fig. 300
Instrument cluster display: Advance warning or emer-
gency braking at low speed
Read and observe and on page 238 first.
Emergency braking at low speed
If there is a risk of collision in a vehicle speed range of about 5 km/h to 45
km/h, the system triggers an automatic braking.
With automatic braking, the warning light appears in the display
» Fig. 300 .
238Driving
Page 244 of 336
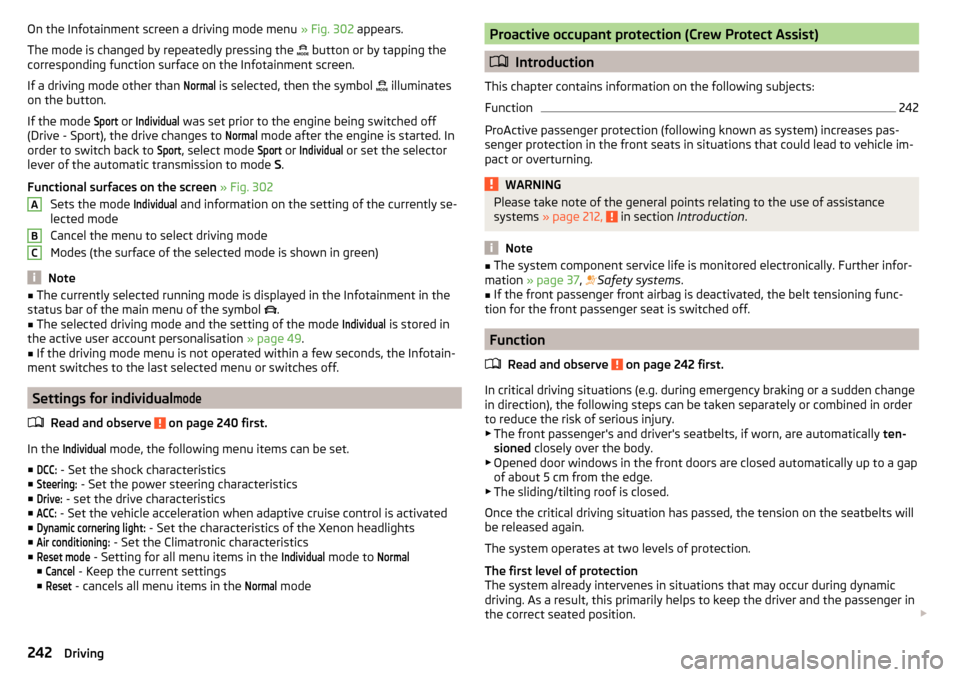
On the Infotainment screen a driving mode menu » Fig. 302 appears.
The mode is changed by repeatedly pressing the
button or by tapping the
corresponding function surface on the Infotainment screen.
If a driving mode other than Normal
is selected, then the symbol
illuminates
on the button.
If the mode
Sport
or
Individual
was set prior to the engine being switched off
(Drive - Sport), the drive changes to
Normal
mode after the engine is started. In
order to switch back to
Sport
, select mode
Sport
or
Individual
or set the selector
lever of the automatic transmission to mode S.
Functional surfaces on the screen » Fig. 302
Sets the mode
Individual
and information on the setting of the currently se-
lected mode
Cancel the menu to select driving mode
Modes (the surface of the selected mode is shown in green)
Note
■ The currently selected running mode is displayed in the Infotainment in the
status bar of the main menu of the symbol .■
The selected driving mode and the setting of the mode
Individual
is stored in
the active user account personalisation » page 49.
■
If the driving mode menu is not operated within a few seconds, the Infotain-
ment switches to the last selected menu or switches off.
Settings for individual
mode
Read and observe on page 240 first.
In the
Individual
mode, the following menu items can be set.
■
DCC:
- Set the shock characteristics
■
Steering:
- Set the power steering characteristics
■
Drive:
- set the drive characteristics
■
ACC:
- Set the vehicle acceleration when adaptive cruise control is activated
■
Dynamic cornering light:
- Set the characteristics of the Xenon headlights
■
Air conditioning:
- Set the Climatronic characteristics
■
Reset mode
- Setting for all menu items in the
Individual
mode to
Normal
■
Cancel
- Keep the current settings
■
Reset
- cancels all menu items in the
Normal
mode
ABCProactive occupant protection (Crew Protect Assist)
Introduction
This chapter contains information on the following subjects:
Function
242
ProActive passenger protection (following known as system) increases pas-
senger protection in the front seats in situations that could lead to vehicle im-
pact or overturning.
WARNINGPlease take note of the general points relating to the use of assistance
systems » page 212, in section Introduction .
Note
■
The system component service life is monitored electronically. Further infor-
mation » page 37 , Safety systems .■
If the front passenger front airbag is deactivated, the belt tensioning func-
tion for the front passenger seat is switched off.
Function
Read and observe
on page 242 first.
In critical driving situations (e.g. during emergency braking or a sudden changein direction), the following steps can be taken separately or combined in order
to reduce the risk of serious injury.
▶ The front passenger's and driver's seatbelts, if worn, are automatically ten-
sioned closely over the body.
▶ Opened door windows in the front doors are closed automatically up to a gap
of about 5 cm from the edge.
▶ The sliding/tilting roof is closed.
Once the critical driving situation has passed, the tension on the seatbelts will
be released again.
The system operates at two levels of protection.
The first level of protection
The system already intervenes in situations that may occur during dynamic
driving. As a result, this primarily helps to keep the driver and the passenger in
the correct seated position.
242Driving