infotainment SKODA SUPERB 2016 3.G / (B8/3V) Owner's Guide
[x] Cancel search | Manufacturer: SKODA, Model Year: 2016, Model line: SUPERB, Model: SKODA SUPERB 2016 3.G / (B8/3V)Pages: 336, PDF Size: 53.89 MB
Page 74 of 336
WARNINGThe system is used only for support, thus the driver is not released from his
obligation to manually adjust the main or low beam according to the given
ambient conditions (e.g. in unfavourable lighting and weather conditions,
as when passing poorly lit road users, if necessary, when the visual range
of the sensor is limited by an obstacle).
CAUTION
Do not attach any stickers or similar objects in front of the sensor on the wind-
screen to avoid impairing the function of the system.
Note
The adjustment of the headlight assistant in Infotainment is stored (depend-
ing on the Infotainment type) in the active user account personalisation
» page 49 .
Operating conditions
Read and observe
and on page 72 first.
The system works under the following conditions. The system is activated in the Infotainment menu
→
→
light
.
The light switch is in the position .
The system is activated » page 72, Switching on and off .
The vehicle speed is over 60 km/h or for some countries more than 40
km/h.
The windscreen is clean in the sensor area.
Switching on and off
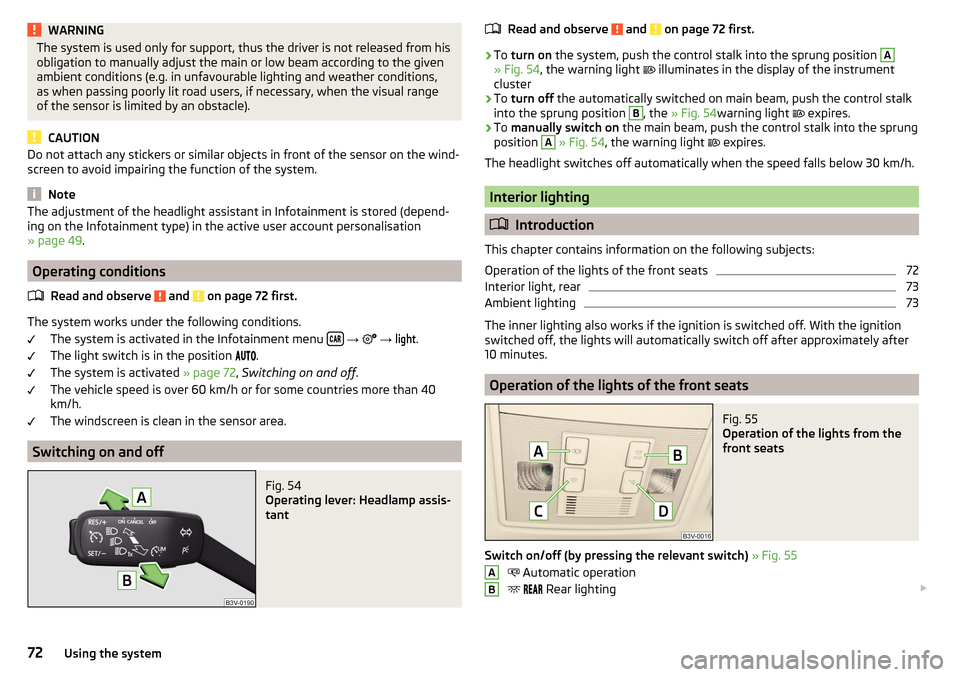
Fig. 54
Operating lever: Headlamp assis-
tant
Read and observe and on page 72 first.›
To turn on the system, push the control stalk into the sprung position
A
» Fig. 54 , the warning light
illuminates in the display of the instrument
cluster
›
To turn off the automatically switched on main beam, push the control stalk
into the sprung position
B
, the » Fig. 54 warning light
expires.
›
To manually switch on the main beam, push the control stalk into the sprung
position
A
» Fig. 54 , the warning light
expires.
The headlight switches off automatically when the speed falls below 30 km/h.
Interior lighting
Introduction
This chapter contains information on the following subjects:
Operation of the lights of the front seats
72
Interior light, rear
73
Ambient lighting
73
The inner lighting also works if the ignition is switched off. With the ignition
switched off, the lights will automatically switch off after approximately after
10 minutes.
Operation of the lights of the front seats
Fig. 55
Operation of the lights from the
front seats
Switch on/off (by pressing the relevant switch) » Fig. 55
Automatic operation
Rear lighting
AB72Using the system
Page 75 of 336

Front and rear lighting
Passenger light
Automatic operation - switch
The system is turned on when any of the following is present.
▶ The vehicle is unlocked.
▶ One of the doors is opened.
▶ The ignition key is removed.
The system is turned off when any of the following is present.
▶ The vehicle is locked.
▶ The ignition is switched on.
▶ About 30 seconds after all the doors have been closed.
Interior light, rear
Fig. 56
Interior light, rear: Variant 1
Fig. 57
Interior light, rear: Variant 2 / Variant 3
CDOption 1 - switch on/off (by pressing relevant switch) » Fig. 56
Reading lamp left
Reading lamp right
Variant 2 - operation (by moving the light lens C
) » Fig. 57
Switching on
Switching off
Automatic operation 1)
Option 3 - switch on/off (by pressing relevant switch) » Fig. 57
Reading lamp left
Reading lamp right
The rear lighting (variants 1 and 3) is controlled together with the automatic
operation of the lighting from the front seats. ▶ When the front interior lighting is switched on, the rear interior lighting also
turns on automatically.
▶ When the front interior lighting is switched off, the rear interior lighting can
be turned on/off as required.
Ambient lighting
Fig. 58
Infotainment Columbus, Amund-
sen, Bolero: Setting ambient
lighting
The ambient lighting illuminates the panel in colour, side door panels and the
footwell white.
The switching on of the lighting takes place automatically after opening the
door, switching off occurs automatically after the locking of the vehicle or 30
seconds after the closing of the door with the ignition switched off.
ABD1)
In this position, for the rear lighting, the same conditions apply as for the automatic operation of the
lighting from the front seats » page 72.
73Lights and visibility
Page 76 of 336

The ambient lighting can be adjusted in the Infotainment menu
→ →Ambient lighting
.
Infotainment Columbus, Amundsen, Bolero: Description of function surfaces
» Fig. 58
Enable / disable the background lighting
Activating of the brightness setting for all areas at the same time
Activating of the brightness setting for the dashboard area
Activating the brightness controls for the door area
Activating of the brightness setting for the footwell area only in white
Choice of colour options / brightness adjustment
Function surfaces for selecting lighting colour / brightness adjustment
To display B
.
C
.
D
and
E
tap on the function surface .
Note
The adjustment of the ambient lighting is stored (depending on the Infotain-
ment type) in the active user account personalisation » page 49.
Visibility
Introduction
This chapter contains information on the following subjects:
Windscreen and rear window heater
74
Sun visors
75
Sunshade
75
Sunshade in the rear doors
75WARNINGNo objects should be attached to the sun visors, which could limit the view
or endanger the vehicle occupants during sudden braking or should the ve-
hicle collide.ABCDEFGWindscreen and rear window heaterFig. 59
Buttons for the front and rear window heater: Climatronic / man-
ual air conditioning
Read and observe
on page 74 first.
The heating for quick defrosting and ventilation of the front /and rear window.
The heating only works when the engine is running.
Buttons for the heating (depending on vehicle equipment) » Fig. 59
Switch on/off the rear window heating
Switching the windscreen heater on/off
When the heating is switched on, a light illuminates inside or below the but-
ton.
The heating automatically switches off after ten minutes.
If the engine is switched off when the heating is on and turned back on again
within 10 minutes, the heating is continued.
Note
■ If the on-board voltage decreases, the heating switches off automatically
» page 273 , Automatic consumer shutdown - discharge protection of the vehi-
cle battery .■
If the lighting inside or below the button flashes, the heater will not work be-
cause of the low charge of the battery.
■
If the Climatronic recognises that the windshield could fog up, the windshield
heating is automatically switched on. This function can be activated / deactiva-
ted on the Climatronic control panel menu
→
.
74Using the system
Page 79 of 336

Automatic windscreen wiping during rain can be in the Infotainment menu
→ →
Mirrors and wipers
enabled / disabled .WARNINGAutomatic wiping during rain is only a support. The driver is not released
from the responsibility to set the function of the windscreen wipers man-
ually depending on the visibility conditions.
Note
■ If the wiping is carried out without interruption, the wiping speed varies de-
pending on the vehicle speed.■
The setting (activation/deactivation) of the automatic windscreen wiping in
the rain is stored (depending on the Infotainment type) in the active user ac-
count personalisation » page 49.
Rear window wipers and washers / reversing camera cleaning
system
Fig. 64
Operating the windscreen wipers
and washing system
Read and observe and on page 76 first.
The lever can be moved to the following positions » Fig. 64
Spraying and wiping the windscreen (sprung position) - after releasing the
control stalk, the wipers perform another 2 to 3 wiper strokes
Spraying the rear view camera (sprung position)
Windscreen wiping
Wipers and washers off
Automatic rear wiper
If the windscreen wiping is performed without interruption, then the automat-
ic regular intermittent wiping of the rear window takes place.
This function can be activated / deactivated in the Infotainment menu
→
→ Mirrors and wipers
.
Note
■
The rear window is wiped automatically if the windscreen wipers are on
when reverse gear is selected.■
The setting (activation/deactivation) of the automatic rear window wiping in
the rain is stored (depending on the Infotainment type) in the active user ac-
count personalisation » page 49.
Headlight cleaning system
Read and observe
and on page 76 first.
The headlights are cleaned with every first and after every tenth spraying of
the windscreen under the following conditions.
The ignition is switched on.
The low beam is switched on.
The outside temperature is about -12° C to +39° C.
To ensure the correct functioning of the system, even in winter, this needs to
be regularly cleared of snow and ice (e.g. using the de-icing spray).
Rear view mirror
Introduction
This chapter contains information on the following subjects:
Interior mirror dimming
78
Exterior mirrors
78WARNINGExterior mirrors increase the field of view, however, make objects appear
smaller and further away. Therefore, use the rear-view mirror to determine
the distances to the following vehicles. 77Lights and visibility
Page 81 of 336
If the mirror setting fails at any time, the mirrors can be adjusted manually by
pressing on the edge of the mirror area.
Setting the mirror surfaces synchronously
This function allows the simultaneous adjustment of the two mirror areas. The
function can be activated / deactivated in the Infotainment menu
→
→
Mirrors and wipers
.
›
Turn the knob for the mirror control to the position for the driver mirror ad-
justment.
›
Adjust the mirror areas to the desired position.
Manual folding mirrors
The mirror can be manually folded towards the side windows. To put it back to
its original position, it should be folded back from the side window until it au-
dibly clicks into place.
Automatic folding in/back of both mirrors
The exterior mirrors are automatically collapsed after locking the vehicle in the park position. After unlocking the vehicle, the mirrors are folded back to the
driving position »
.
This function can be activated / deactivated in the Infotainment menu
→
→
Mirrors and wipers
.
Mirror with automatic dimming
The exterior mirror dimming is controlled together with the automatic rear-
view mirror dimming » page 78.
Memory function for mirror (vehicles with electrically adjustable driver's
seat)
It is possible to save the current setting of the exterior mirror when saving the
driver's seat position with » page 81, Memory Function of the electrically ad-
justable seat or » page 81 , Memory function of the remote control key .
Tilting the mirror area of the front passenger mirror (vehicles with
electrically adjustable driver's seat)
The front passenger mirror area can be tilted to the stored position to improve the view to the curb when reversing.
Operating conditions.
The function is activated in the Infotainment menu
→
→
Mirrors andwipers
.
The setting of the mirror area has been previously stored » page 81,
Memory Function of the electrically adjustable seat or. » page 81 , Memo-
ry function of the remote control key .
The reverse gear is engaged.
The knob for the mirror control is in the position for the passenger mirror
adjustment.
The mirror area returns to its initial position after the rotary knob is set to an-
other position or if the speed is greater than 15 km/h.
WARNINGDo not touch the exterior mirror surfaces, if the exterior mirror heating is
switched on - hazard of burning.
CAUTION
■ Never manually fold in/out the electrically folding exterior mirrors - there is a
risk of damage to the mirror!■
When the mirror is swung by external influences (due to impact during ma-
noeuvring, for example), then first fold-in the mirror by turning the knob and
wait for a loud clapping noise.
Note
The setting of the mirror functions is stored in Infotainment (depending on the
Infotainment type) in the active user account personalisation » page 49.79Lights and visibility
Page 83 of 336
Note■If the inclination angle of the seat backrest relative to the seat surface is
greater than approx. 110°, then it is not possible for safety reasons to save this
setting in the memory of the electrically adjustable seats or the remote control
key.■
On vehicles with personalisation, the driver's seat setting is stored in the ac-
tive user account personalisation » page 49.
Convenience operation of the front passenger seat
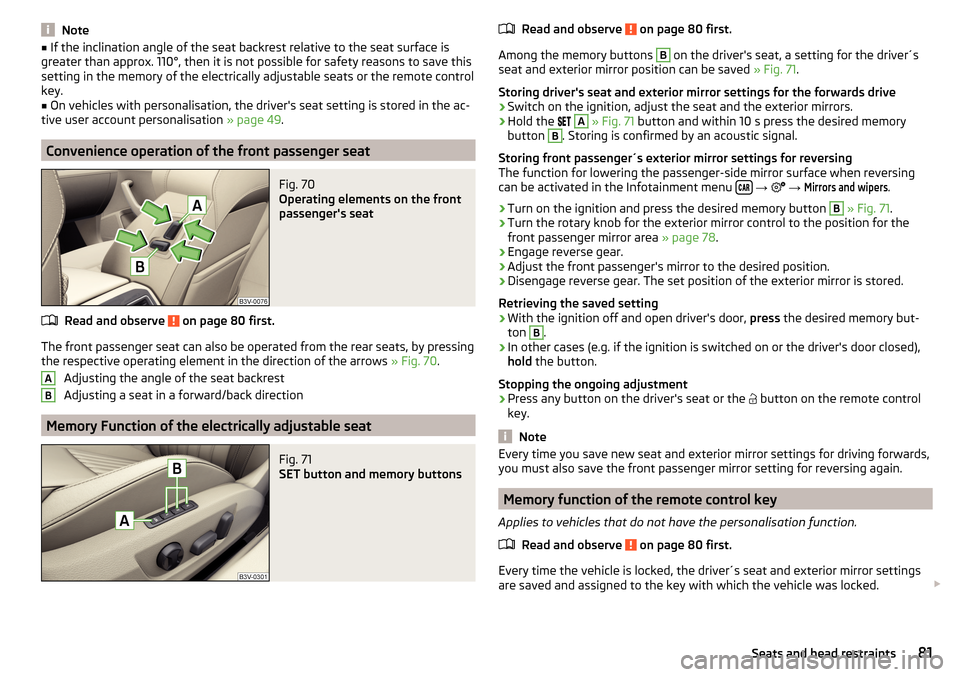
Fig. 70
Operating elements on the front
passenger's seat
Read and observe on page 80 first.
The front passenger seat can also be operated from the rear seats, by pressing
the respective operating element in the direction of the arrows » Fig. 70.
Adjusting the angle of the seat backrest
Adjusting a seat in a forward/back direction
Memory Function of the electrically adjustable seat
Fig. 71
SET button and memory buttons
ABRead and observe on page 80 first.
Among the memory buttons
B
on the driver's seat, a setting for the driver´s
seat and exterior mirror position can be saved » Fig. 71.
Storing driver's seat and exterior mirror settings for the forwards drive
›
Switch on the ignition, adjust the seat and the exterior mirrors.
›
Hold the
A
» Fig. 71 button and within 10 s press the desired memory
button
B
. Storing is confirmed by an acoustic signal.
Storing front passenger´s exterior mirror settings for reversing
The function for lowering the passenger-side mirror surface when reversing can be activated in the Infotainment menu
→
→
Mirrors and wipers
.
›
Turn on the ignition and press the desired memory button
B
» Fig. 71 .
›
Turn the rotary knob for the exterior mirror control to the position for the
front passenger mirror area » page 78.
›
Engage reverse gear.
›
Adjust the front passenger's mirror to the desired position.
›
Disengage reverse gear. The set position of the exterior mirror is stored.
Retrieving the saved setting
›
With the ignition off and open driver's door, press the desired memory but-
ton
B
.
›
In other cases (e.g. if the ignition is switched on or the driver's door closed),
hold the button.
Stopping the ongoing adjustment
›
Press any button on the driver's seat or the button on the remote control
key.
Note
Every time you save new seat and exterior mirror settings for driving forwards,
you must also save the front passenger mirror setting for reversing again.
Memory function of the remote control key
Applies to vehicles that do not have the personalisation function.
Read and observe
on page 80 first.
Every time the vehicle is locked, the driver´s seat and exterior mirror settingsare saved and assigned to the key with which the vehicle was locked.
81Seats and head restraints
Page 84 of 336
After the following unlocking of the vehicle with the same key and opening
the driver’s door, the driver´s seat and exterior mirrors that are saved to this
key will be adopted.
This function can be in the Infotainment menu
→
→
Mirrors and wipers
activated / deactivated .
Storing front passenger´s exterior mirror settings for reversing
The function for lowering the passenger-side mirror surface when reversing
can be activated in the Infotainment menu
→
→
Mirrors and wipers
.
›
Unlock the vehicle with the remote control key and switch on the ignition.
›
Turn the rotary knob for the exterior mirror control to the position for the
front passenger mirror area » page 78.
›
Engage reverse gear.
›
Adjust the front passenger's mirror to the desired position.
›
Disengage reverse gear. The adjusted position of the exterior mirror is stored
in the remote control key memory.
Stopping the ongoing adjustment
›
Press any button on the driver's seat or the button on the remote control
key.
Folding front passenger seat
Fig. 72
Folding the front passenger seat
forward
Read and observe on page 80 first.
The front passenger seat can, (depending on equipment fitted), be folded for- ward into a horizontal position.
›
To fold the seat down, pull the lever in the direction of arrow
1
and fold
down the seat back in the direction of arrow
2
» Fig. 72 . The locking mecha-
nism must audibly snap into place.
› To
fold up , pull the lever in direction of arrow 1, fold back the seat backrest
against the direction of arrow 2. The locking mechanism must audibly snap
into place.›
Check this by pulling on the seat and on the backrest.
WARNING■ If the seat backrest is folded down, only the seat behind the driver´s seat
can be used to transport passengers.■
The front passenger airbag should be switched off when transporting ob-
jects on the seat which was folded forwards » page 21.
■
Do not adjust the seat backrest while driving - it can cause injury and ac-
cidents!
■
When moving the seat backrest, keep limbs out of the area between the
seat and seat backrest – risk of injury!
■
Never transport the following items on the seat backrest when folded
forwards. ■ Objects that could restrict the driver's view.
■ Objects which make it impossible for the driver to control the vehicle,
e.g. if they roll under the pedals, or could protrude into the driver's zone. ■ Objects which could lead to injury to passengers due to a change of di-
rection or braking manoeuvre when accelerating sharply.
Armrest setting
Fig. 73
Adjust armrest
Read and observe on page 80 first.
›
To adjust the height , lift the armrest in the direction of the arrow
A
into one
of the six locking positions » Fig. 73.
›
To close , lift the armrest in the direction of arrow
A
until the stop and then
fold down again.
82Using the system
Page 88 of 336

With repeated pressing of the button, the level is down-regulated until it
switches off . The level of the seat heating is indicated by the number of illu-
minated warning lights underneath / in the button.
Increasing in heating power of the rear seats can be locked / unlocked , to do
this, press button
on the Climatronic → Tap the function surfaces
/
on
the Infotainment screen. In the locked heating power increase, the heating
power can only be adjusted down to turn off.
Front seats with heating and ventilation
Fig. 82
Heating switched on / cooling switched on / heating and cooling
are switched on simultaneously
Fig. 83
Infotainment screen: Front seat heating and ventilation with
maximum heating / ventilation level switched on
Read and observe
and on page 85 first.
›
Press the button
or
on the control panel of the air conditioner, a menu
for operating the front seat heating and ventilation is displayed on the Info-
tainment screen » Fig. 83,
Function surfaces for setting the ventilation level
Function surfaces for setting the heating power
Functional surfaces for switching off the ventilation (in addition to the
function surfaces A
) or for switching off the heating (in addition to the
function surfaces
B
)
If the seat heating was switched on before the ignition was switched off, then,
by pressing the buttons
and
, the seat heating will » Fig. 82 - switch on
with maximum output
.
If the seat cooling was switched on before the ignition was switched off, then,
by pressing the buttons
and
, the seat cooling will » Fig. 82 - switch on with
maximum output .
By repeatedly pressing the button or.
, the heating or cooling output is con-
trolled down to off. The power of the seat heating is indicated by the number
of illuminated warning lights underneath the switch.
Only the heating or ventilation can be operated using the buttons or.
.
If ventilation and heating are switched on simultaneously on the infotainment
screen, under each button or.
the blue and red light warning illuminates
» Fig. 82 -
, the button
or.
is not functioning (as long as the ventilation
and the heating is switched on simultaneously).
Heated steering wheel
Fig. 84
Button for steering wheel heat-
ing
Switching steering wheel heating on/off using Infotainment
›
To switch on / off press the button
on the Climatronic
→ Tap on the
function area on the Infotainment screen. When the heating is switched
on, the symbol in the function surface
A
is green » Fig. 84 .
AB86Using the system
Page 89 of 336

Heated steering wheel, along with the driver's seat heating›To activate / deactivate the heated steering wheel with the driver's seat
heating, press the button
on the Climatronic, then tap on the function
surface
→
Link seats and steering wheel heating
in the Infotainment screen.
›
To switch on / off the heated steering wheel, press the button for the driver
seat heating.
Setting the heat output of the steering wheel heater
›
Press the button
on the Climatronic, then tap the function surface
→
intensity
on the Infotainment screen.
›
Select one of the three heating levels (this remains stored even after switch-
ing off the engine).
The selected heat output of the heated steering wheel is shown on the Info- tainment screen
B
» Fig. 84 ,
Note
■
The heated steering wheel only works when the engine is running.■If the on-board voltage decreases, the heated steering wheel switches off
automatically.Practical features
Interior equipment
Introduction
This chapter contains information on the following subjects:
Parking ticket holder
88
Storage compartment on the driver's side
88
stowage compartments in the doors
88
Storage compartment in the front centre console
89
Phonebox
89
USB and AUX inputs
90
Cup holders
90
Waste container
91
Storage compartment under the front arm rest
91
Glasses compartment
92
Storage compartment on the front passenger side
92
Storage compartment under the front passenger seat
93
Storage compartments for umbrella
93
Clothes hook
93
Storage pockets on the backs of the front seats
94
Storage pockets at the inner sides of the front seats
94
Storage compartment in the rear centre console
94
Storage compartment in the rear armrest
94
Long cargo channel
95
Removable through-loading bag
95WARNING■ Do not place anything on the dashboard. These objects might slide or fall
down when driving and may distract you from concentrating on the traffic –
risk of accident!■
Make sure that while driving no objects can enter the driver's footwell -
cause an accident!
■
Do not carry any objects on the front passenger seat except objects de-
signed for this purpose (e.g. child seats) – risk of accident!
87Practical features
Page 91 of 336
WARNINGThe storage compartmentA » Fig. 87 is to be used exclusively for storing
objects which do not stick out - danger of restricting the effectiveness of
the side airbags.
Storage compartment in the front centre console
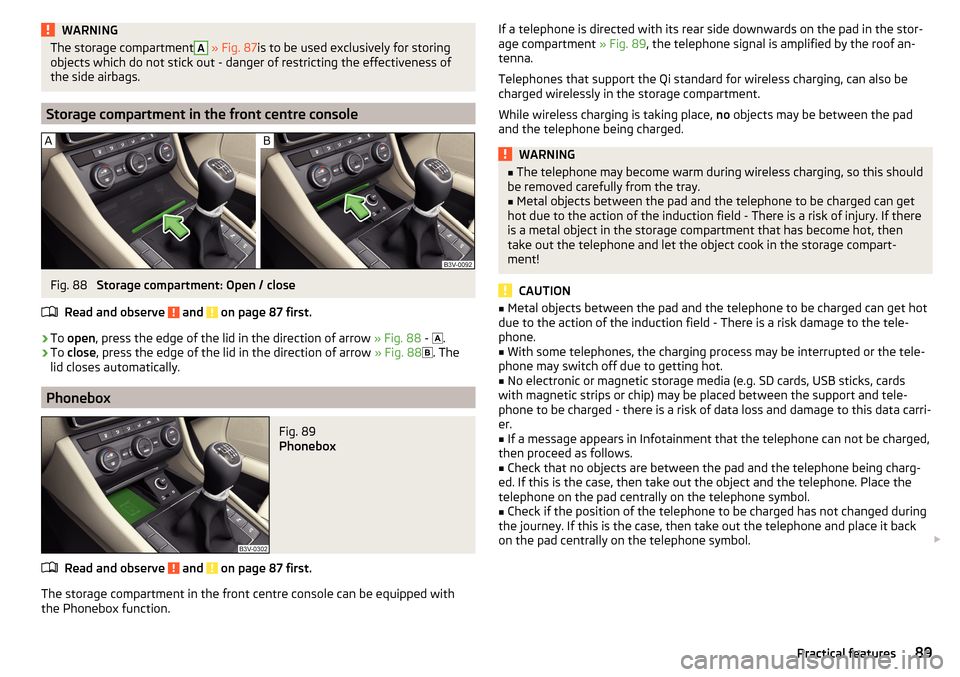
Fig. 88
Storage compartment: Open / close
Read and observe
and on page 87 first.
›
To open , press the edge of the lid in the direction of arrow » Fig. 88 -
.
›
To close , press the edge of the lid in the direction of arrow » Fig. 88
. The
lid closes automatically.
Phonebox
Fig. 89
Phonebox
Read and observe and on page 87 first.
The storage compartment in the front centre console can be equipped with
the Phonebox function.
If a telephone is directed with its rear side downwards on the pad in the stor-
age compartment » Fig. 89, the telephone signal is amplified by the roof an-
tenna.
Telephones that support the Qi standard for wireless charging, can also be
charged wirelessly in the storage compartment.
While wireless charging is taking place, no objects may be between the pad
and the telephone being charged.WARNING■ The telephone may become warm during wireless charging, so this should
be removed carefully from the tray.■
Metal objects between the pad and the telephone to be charged can get
hot due to the action of the induction field - There is a risk of injury. If there
is a metal object in the storage compartment that has become hot, then
take out the telephone and let the object cook in the storage compart-
ment!
CAUTION
■ Metal objects between the pad and the telephone to be charged can get hot
due to the action of the induction field - There is a risk damage to the tele-
phone.■
With some telephones, the charging process may be interrupted or the tele-
phone may switch off due to getting hot.
■
No electronic or magnetic storage media (e.g. SD cards, USB sticks, cards
with magnetic strips or chip) may be placed between the support and tele-
phone to be charged - there is a risk of data loss and damage to this data carri-
er.
■
If a message appears in Infotainment that the telephone can not be charged,
then proceed as follows.
■
Check that no objects are between the pad and the telephone being charg-
ed. If this is the case, then take out the object and the telephone. Place the
telephone on the pad centrally on the telephone symbol.
■
Check if the position of the telephone to be charged has not changed during
the journey. If this is the case, then take out the telephone and place it back
on the pad centrally on the telephone symbol.
89Practical features