light SKODA SUPERB 2016 3.G / (B8/3V) Repair Manual
[x] Cancel search | Manufacturer: SKODA, Model Year: 2016, Model line: SUPERB, Model: SKODA SUPERB 2016 3.G / (B8/3V)Pages: 336, PDF Size: 53.89 MB
Page 117 of 336
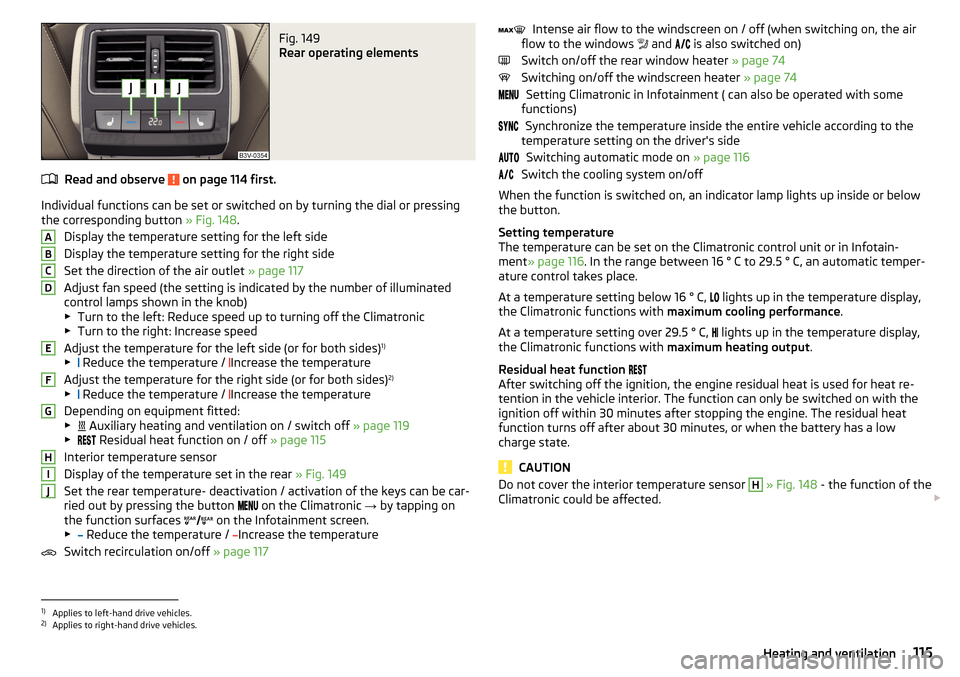
Fig. 149
Rear operating elements
Read and observe on page 114 first.
Individual functions can be set or switched on by turning the dial or pressingthe corresponding button » Fig. 148.
Display the temperature setting for the left side
Display the temperature setting for the right side
Set the direction of the air outlet » page 117
Adjust fan speed (the setting is indicated by the number of illuminated
control lamps shown in the knob)
▶ Turn to the left: Reduce speed up to turning off the Climatronic
▶ Turn to the right: Increase speed
Adjust the temperature for the left side (or for both sides) 1)
▶ Reduce the temperature /
Increase the temperature
Adjust the temperature for the right side (or for both sides) 2)
▶ Reduce the temperature /
Increase the temperature
Depending on equipment fitted:
▶ Auxiliary heating and ventilation on / switch off
» page 119
▶ Residual heat function on / off
» page 115
Interior temperature sensor
Display of the temperature set in the rear » Fig. 149
Set the rear temperature- deactivation / activation of the keys can be car-
ried out by pressing the button on the Climatronic
→ by tapping on
the function surfaces on the Infotainment screen.
▶ Reduce the temperature /
Increase the temperature
Switch recirculation on/off » page 117
ABCDEFGHIJIntense air flow to the windscreen on / off (when switching on, the air
flow to the windows and is also switched on)
Switch on/off the rear window heater » page 74
Switching on/off the windscreen heater » page 74
Setting Climatronic in Infotainment ( can also be operated with some
functions)
Synchronize the temperature inside the entire vehicle according to the
temperature setting on the driver's side
Switching automatic mode on » page 116
Switch the cooling system on/off
When the function is switched on, an indicator lamp lights up inside or below
the button.
Setting temperature
The temperature can be set on the Climatronic control unit or in Infotain-
ment » page 116 . In the range between 16 ° C to 29.5 ° C, an automatic temper-
ature control takes place.
At a temperature setting below 16 ° C, lights up in the temperature display,
the Climatronic functions with maximum cooling performance .
At a temperature setting over 29.5 ° C, lights up in the temperature display,
the Climatronic functions with maximum heating output.
Residual heat function
After switching off the ignition, the engine residual heat is used for heat re-
tention in the vehicle interior. The function can only be switched on with the
ignition off within 30 minutes after stopping the engine. The residual heat
function turns off after about 30 minutes, or when the battery has a low
charge state.
CAUTION
Do not cover the interior temperature sensor H » Fig. 148 - the function of the
Climatronic could be affected. 1)
Applies to left-hand drive vehicles.
2)
Applies to right-hand drive vehicles.
115Heating and ventilation
Page 119 of 336

Operating modes
Automatic mode works in three modes - moderate, medium, and intensive.
Setting of the different modes takes place via the functional surface D
» Fig. 150 on page 116 or » Fig. 151 on page 116 .
After the automatic mode is switched on, Climatronic works in the last selec-
ted mode. The currently selected mode is displayed in the Infotainment dis-
play.
Air distribution control
Read and observe
on page 114 first.
The recirculation mode prevents contaminated outside air getting into the In-terior of the vehicle. In recirculated air mode air is sucked out of the interior of
the vehicle and then fed back into the interior.
›
To switch on , press the
button. The warning light below the button lights
up.
›
To switch off , press the
button again. The warning light below the button
goes out.
Heating and manual air conditioning system
If the air distribution control is set to position when the recirculation modes
is switched on, the recirculated-air mode is switched off. By pressing the
button, the air recirculation also in this position can be switched on again.
When the cooling system ( button) is switched on and the temperature reg-
ulator is “turned” to the left, the recirculated-air mode is switched on.
Climatronic
The Climatronic can have a sensor that measures the air recirculation mode
and automatically turns on if there is an increased concentration of pollutants
in the incoming air.
When the pollutant concentration decreases to the normal level, the recircula-
ted air mode is automatically switched off.
Automatically switching the air recirculation function on/off can be adjusted by pressing the button on the Climatronic and by subsequently pressing the
function surfaces
→
automatic air recirculation
in the Infotainment screen. Au-
tomatic switching on / off works at a temperature above 2 ° C.
A shut-off of the air recirculation function takes place automatically by press-
ing the button, possibly depending on the moisture conditions in the vehi-
cle interior.
WARNINGThe air recirculation cannot be switched on for a longer period of time be-
cause there is no supply of fresh air from the outside. “Stale air” may result
in fatigue in the driver and occupants, reduce attention levels and also
cause the windows to mist up. As soon as the windows mist up, turn the air
recirculation mode off immediately - there is a risk of accident!
CAUTION
We recommend not smoking in the vehicle when the recirculating air operation
is switched on. The smoke sucked from inside the vehicle is deposited on the
evaporator of the air conditioner. This produces a permanent odour when the
air conditioning system is operating which can only be eliminated through con-
siderable effort and expense (replacement of compressor).
Air outlet vents
Fig. 152
Air vents at the front
117Heating and ventilation
Page 121 of 336
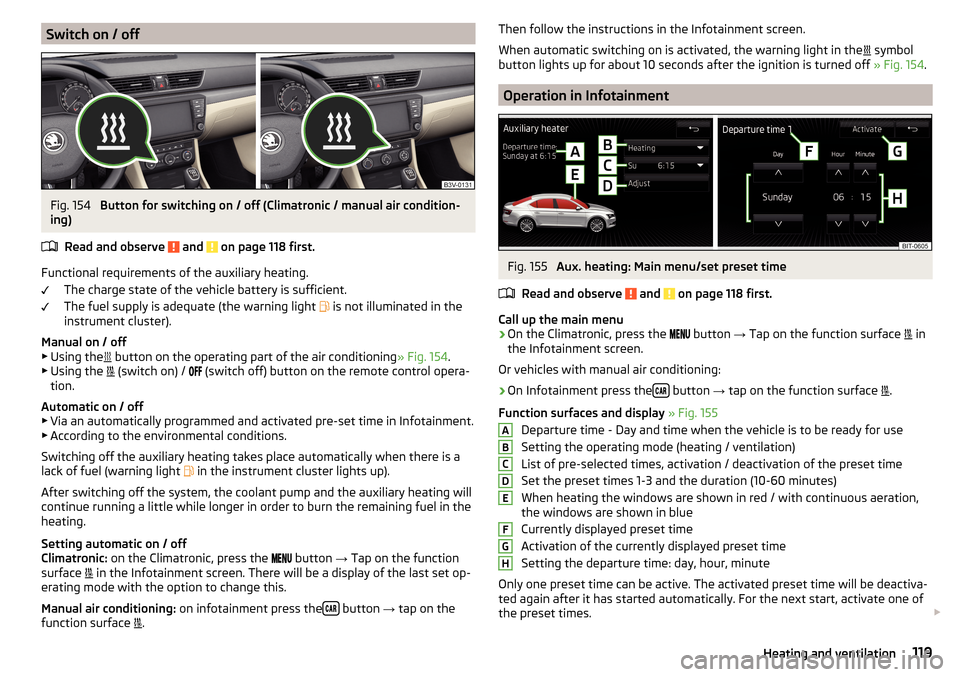
Switch on / offFig. 154
Button for switching on / off (Climatronic / manual air condition-
ing)
Read and observe
and on page 118 first.
Functional requirements of the auxiliary heating. The charge state of the vehicle battery is sufficient.
The fuel supply is adequate (the warning light is not illuminated in the
instrument cluster).
Manual on / off ▶ Using the button on the operating part of the air conditioning
» Fig. 154.
▶ Using the (switch on) /
(switch off) button on the remote control opera-
tion.
Automatic on / off ▶ Via an automatically programmed and activated pre-set time in Infotainment.
▶ According to the environmental conditions.
Switching off the auxiliary heating takes place automatically when there is a
lack of fuel (warning light in the instrument cluster lights up).
After switching off the system, the coolant pump and the auxiliary heating will
continue running a little while longer in order to burn the remaining fuel in the
heating.
Setting automatic on / off
Climatronic: on the Climatronic, press the
button
→ Tap on the function
surface in the Infotainment screen. There will be a display of the last set op-
erating mode with the option to change this.
Manual air conditioning: on infotainment press the
button
→ tap on the
function surface .
Then follow the instructions in the Infotainment screen.
When automatic switching on is activated, the warning light in the
symbol
button lights up for about 10 seconds after the ignition is turned off » Fig. 154.
Operation in Infotainment
Fig. 155
Aux. heating: Main menu/set preset time
Read and observe
and on page 118 first.
Call up the main menu
›
On the Climatronic, press the button
→ Tap on the function surface
in
the Infotainment screen.
Or vehicles with manual air conditioning:
›
On Infotainment press the button
→ tap on the function surface
.
Function surfaces and display » Fig. 155
Departure time - Day and time when the vehicle is to be ready for use
Setting the operating mode (heating / ventilation)
List of pre-selected times, activation / deactivation of the preset time
Set the preset times 1-3 and the duration (10-60 minutes)
When heating the windows are shown in red / with continuous aeration,
the windows are shown in blue
Currently displayed preset time
Activation of the currently displayed preset time
Setting the departure time: day, hour, minute
Only one preset time can be active. The activated preset time will be deactiva-
ted again after it has started automatically. For the next start, activate one of
the preset times.
ABCDEFGH119Heating and ventilation
Page 122 of 336
Note■When selecting the day in the preset time, there is an option between Sun-
day and Monday without the specified day. If this setting is selected, the vehi-
cle will be ready for use at the selected time, regardless of the current day.■
If a different time is set, the activated preset time is automatically deactiva-
ted. The preset time must be reactivated.
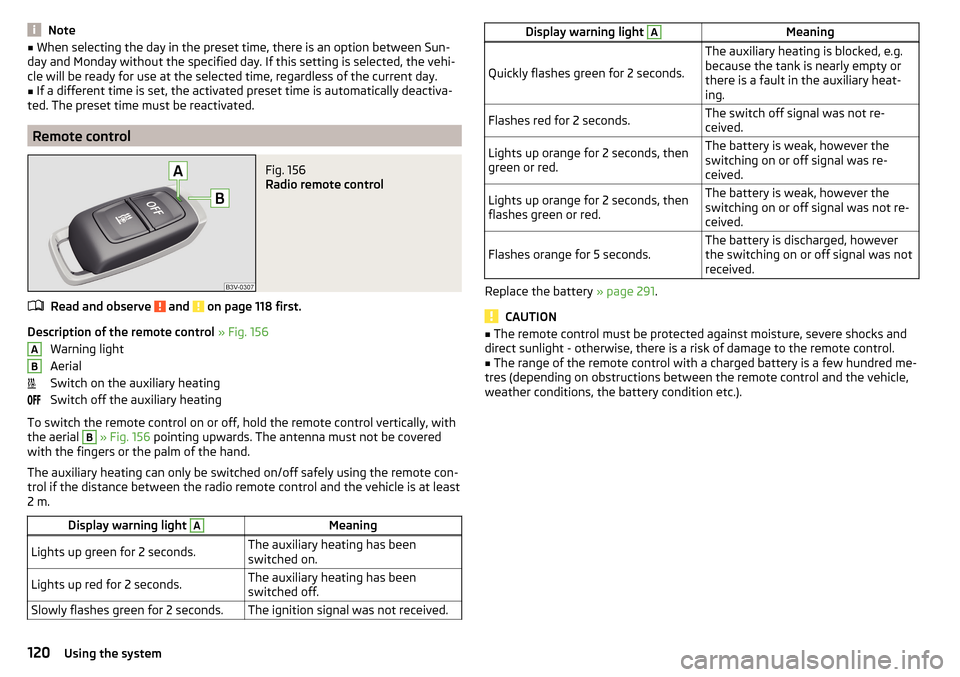
Remote control
Fig. 156
Radio remote control
Read and observe and on page 118 first.
Description of the remote control » Fig. 156
Warning light
Aerial
Switch on the auxiliary heating
Switch off the auxiliary heating
To switch the remote control on or off, hold the remote control vertically, with
the aerial
B
» Fig. 156 pointing upwards. The antenna must not be covered
with the fingers or the palm of the hand.
The auxiliary heating can only be switched on/off safely using the remote con-
trol if the distance between the radio remote control and the vehicle is at least
2 m.
Display warning light AMeaningLights up green for 2 seconds.The auxiliary heating has been
switched on.Lights up red for 2 seconds.The auxiliary heating has been
switched off.Slowly flashes green for 2 seconds.The ignition signal was not received.ABDisplay warning light AMeaning
Quickly flashes green for 2 seconds.
The auxiliary heating is blocked, e.g.
because the tank is nearly empty or
there is a fault in the auxiliary heat-
ing.Flashes red for 2 seconds.The switch off signal was not re-
ceived.Lights up orange for 2 seconds, then
green or red.The battery is weak, however the
switching on or off signal was re-
ceived.Lights up orange for 2 seconds, then
flashes green or red.The battery is weak, however the
switching on or off signal was not re-
ceived.Flashes orange for 5 seconds.The battery is discharged, however
the switching on or off signal was not
received.
Replace the battery » page 291.
CAUTION
■
The remote control must be protected against moisture, severe shocks and
direct sunlight - otherwise, there is a risk of damage to the remote control.■
The range of the remote control with a charged battery is a few hundred me-
tres (depending on obstructions between the remote control and the vehicle,
weather conditions, the battery condition etc.).
120Using the system
Page 126 of 336
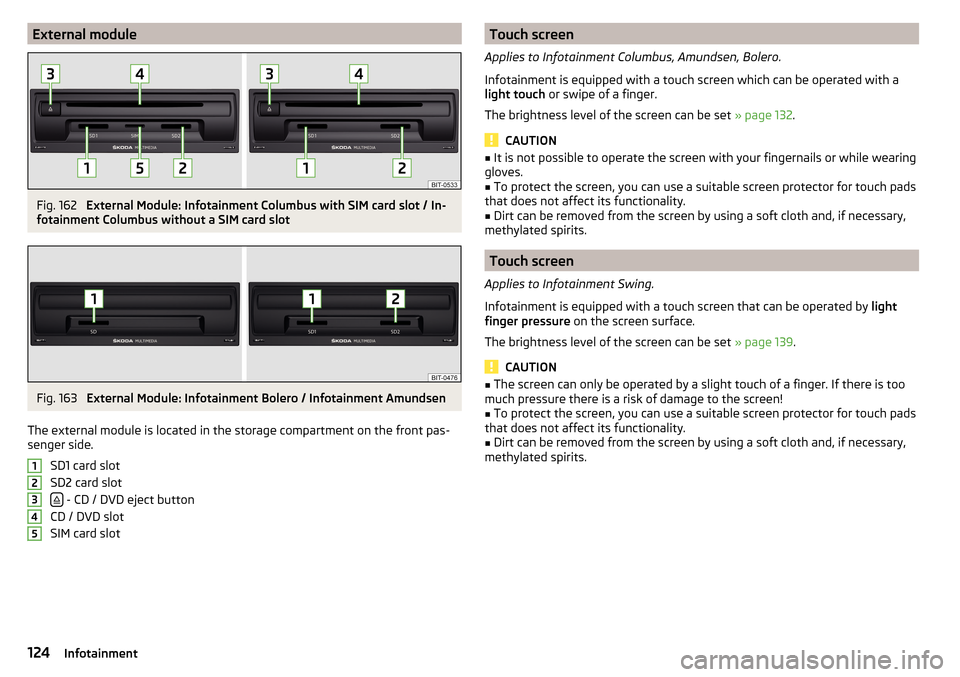
External moduleFig. 162
External Module: Infotainment Columbus with SIM card slot / In-
fotainment Columbus without a SIM card slot
Fig. 163
External Module: Infotainment Bolero / Infotainment Amundsen
The external module is located in the storage compartment on the front pas-
senger side.
SD1 card slot
SD2 card slot
- CD / DVD eject button
CD / DVD slot
SIM card slot
12345Touch screen
Applies to Infotainment Columbus, Amundsen, Bolero.
Infotainment is equipped with a touch screen which can be operated with a
light touch or swipe of a finger.
The brightness level of the screen can be set » page 132.
CAUTION
■
It is not possible to operate the screen with your fingernails or while wearing
gloves.■
To protect the screen, you can use a suitable screen protector for touch pads
that does not affect its functionality.
■
Dirt can be removed from the screen by using a soft cloth and, if necessary,
methylated spirits.
Touch screen
Applies to Infotainment Swing.
Infotainment is equipped with a touch screen that can be operated by light
finger pressure on the screen surface.
The brightness level of the screen can be set » page 139.
CAUTION
■
The screen can only be operated by a slight touch of a finger. If there is too
much pressure there is a risk of damage to the screen!■
To protect the screen, you can use a suitable screen protector for touch pads
that does not affect its functionality.
■
Dirt can be removed from the screen by using a soft cloth and, if necessary,
methylated spirits.
124Infotainment
Page 134 of 336
■Touchscreen tone - Switch on/off audible tone when touching the screen
■No navigation sound during call
- Switching on / off the nav. announcements dur-
ing a telephone conversation (does not apply to Infotainment Bolero)
Screen settings
›
Press the button, then tap on the function surface
Tap →
screen
.
■
Screen off (in 10 seconds)
- Enable / disable the automatic power off function
■
Brightness:
- Adjusts the brightness of the screen
■
Touchscreen tone
- Switch on/off audible tone when touching the screen
■
Animation when finger near screen
- Turn the proximity sensors on/off (When the
function is on, e.g. Navigation will be shown in the main menu when moving a
finger towards the bottom bar with the functional surfaces on the screen)
■
Show clock in standby mode
- Time and date displayed on the screen when the
ignition is switched on and Infotainment is switched off
Time and date settings
›
Press the button, then tap on the function surface
→
time and date
.
■
Time source:
- Time source settings: manual / GPS (applies to Infotainment Co-
lumbus, Amundsen)
■
Time:
- time settings
■
Summer (DST)
- Switches the summer time setting on/off (applies to Infotain-
ment Columbus, Amundsen)
■
Automatic summertime
- Turn on / off the automatic switch to daylight saving
time
■
Time zone:
- Choice of time zone
■
Time format:
- Specify the time format
■
Date:
- Date settings
■
Date format:
- Setting the date format
Setting the Infotainment language
›
Press the button, then tap on the function surface
→
Language
.
›
Select the Infotainment language.
In some languages, after selecting the function surface
Female
and
Male
are dis-
played for the choice of voice prompts for Infotainment.
Note■ When a language is selected which does not support voice control, Infotain-
ment will indicate with a message on the screen.■
The messages are generated by Infotainment. Flawless clarity (e.g. road or
city name) cannot always be guaranteed.
Additional keypad language settings
›
Press the button, then tap on the function surface
→
Additional keypadlanguages
.
In this menu, a keyboard language set can be added to allow the entering of
characters other than those in the currently selected language (function sur-
face ).
Unit settings
›
Press the button, then tap on the function surface
→
Units
.
■
Distance:
- Distance units
■
Speed:
- Speed units
■
Temperature:
- Temperature units
■
Volume:
- Volume units
■
Consumption:
- Consumption units
■
Pressure:
- Pressure units for tire pressure
Setting data transfer
An active data transfer allows data transfer between Infotainment and the ex-
ternal device (e.g. MirrorLink ®
application) or the operation of some Infotain-
ment functions using the application of the external device (e.g. ŠKODA Media
Command).
›
Press the button, then tap on the function surface
→
Mobile device datatransfer
.
■
Activate data transfer for ŠKODA apps
- Turning data transfer on and off
■
Use apps to operate::
- Setting Infotainment operation via the external device
applications (applies to Infotainment Columbus) ■
Deactivate
- Deactivate Infotainment operation via an external device
■
Confirm
- Infotainment operation with required confirmation
■
Allow
- Infotainment operation without required confirmation
132Infotainment
Page 142 of 336
■Automatic summer time - switch on/off the automatic daylight savings time
change
■Date:
- Date settings
■
Date format:
- Setting the date format
Setting the Infotainment language
›
Press the button, then tap the function surface
Language
.
›
Select the Infotainment language.
Additional keypad language settings
›
Press the
button, then tap the function surface
Additional keypad languages
.
In this menu, a keyboard language set can be added to allow the entering of
characters other than those in the currently selected language.
Unit settings
›
Press the button, then tap the function surface
Units
.
■
Distance:
- Distance units
■
Speed:
- Speed units
■
Temperature:
- Temperature units
■
Volume:
- Volume units
■
Consumption:
- Fuel consumption units
■
CNG consump.:
- CNG consumption units
■
Pressure:
- Pressure units for tire pressure
Safe removal of the data source
›
Press the button, then tap the function surface
Remove SD card safely
/
Re-move USB Safely
.
The appropriate message concerning the safe removal of the source is dis-
played in the screen.
Now the external source can be removed or separated.
Restore factory settings
›
Press the button, then tap the function surface
Factory settings
.
In this menu individual settings or all settings can be restored at the same
time.
Bluetooth ®
settings›
Press the button, then tap the function surface
Bluetooth
.
■
Bluetooth
- Switch on/off Bluetooth ®
function
■
Visibility:
- Switch on/off the visibility of the Bluetooth ®
device for other Blue-
tooth ®
devices
■
1st name
- Changing the name of the Bluetooth ®
unit
■
Paired devices
- Display the list of coupled Bluetooth ®
Devices
■
Find devices
- Searches for available Bluetooth ®
devices
■
BT audio (A2DP/AVRCP)
- Turn on/off the ability to connect a Bluetooth ®
audio
device (e.g. MP3 player, tablet etc...)
System information
›
Press the button, then tap the function surface
System information
.
■
Update software
- Update software (e.g. Bluetooth ®
)
■ Bluetooth: ... - version number of the Bluetooth ®
software
■ Device part number: ... - Infotainment part number
■ Hardware: ... - Hardware version
■ Software: ... - Software version
The information on available software updates is obtained from a ŠKODA Part-
ner or from the following ŠKODA Internet pages.
http://go.skoda.eu/infotainment
Radio menu settings
Settings for all broadcasting areas
›
Tap the Radio main menu function
surface.
■
Scan
- Automatically play short portions of all available stations of the current
frequency range
■
Arrow buttons:
- Setting the function of the function surfaces
■
Presets
- Change between stations stored under the preset buttons
■
Stations
- Change between all available stations of the selected broadcast-
ing range
■
Traffic program (TP)
- Switches traffic programme on/off
■
Radio text
- Switching the text display radio (FM and DAB) on and off
140Infotainment
Page 189 of 336
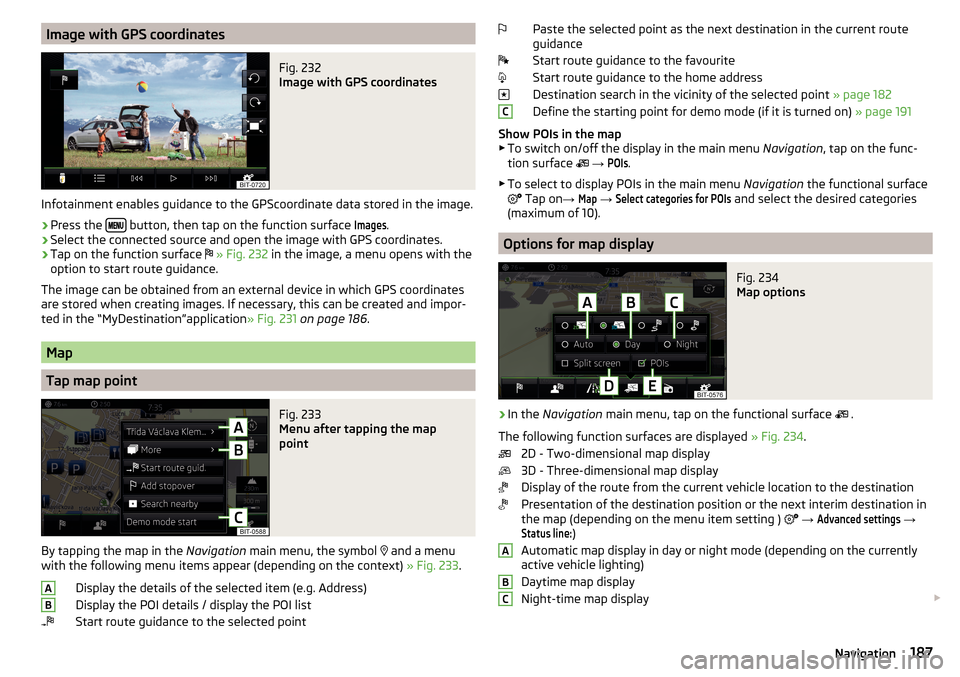
Image with GPS coordinatesFig. 232
Image with GPS coordinates
Infotainment enables guidance to the GPScoordinate data stored in the image.
›
Press the button, then tap on the function surface
Images
.
›
Select the connected source and open the image with GPS coordinates.
›
Tap on the function surface
» Fig. 232 in the image, a menu opens with the
option to start route guidance.
The image can be obtained from an external device in which GPS coordinates
are stored when creating images. If necessary, this can be created and impor-
ted in the “MyDestination”application » Fig. 231 on page 186 .
Map
Tap map point
Fig. 233
Menu after tapping the map
point
By tapping the map in the Navigation main menu, the symbol
and a menu
with the following menu items appear (depending on the context) » Fig. 233.
Display the details of the selected item (e.g. Address)
Display the POI details / display the POI list
Start route guidance to the selected point
ABPaste the selected point as the next destination in the current route
guidance
Start route guidance to the favourite
Start route guidance to the home address
Destination search in the vicinity of the selected point » page 182
Define the starting point for demo mode (if it is turned on) » page 191
Show POIs in the map ▶ To switch on/off the display in the main menu Navigation, tap on the func-
tion surface
→ POIs
.
▶ To select to display POIs in the main menu Navigation the functional surface
Tap on
→
Map
→
Select categories for POIs
and select the desired categories
(maximum of 10).
Options for map display
Fig. 234
Map options
›
In the Navigation main menu, tap on the functional surface
.
The following function surfaces are displayed » Fig. 234.
2D - Two-dimensional map display
3D - Three-dimensional map display
Display of the route from the current vehicle location to the destination
Presentation of the destination position or the next interim destination in
the map (depending on the menu item setting )
→
Advanced settings
→
Status line:
)
Automatic map display in day or night mode (depending on the currently
active vehicle lighting)
Daytime map display
Night-time map display
CABC187Navigation
Page 190 of 336
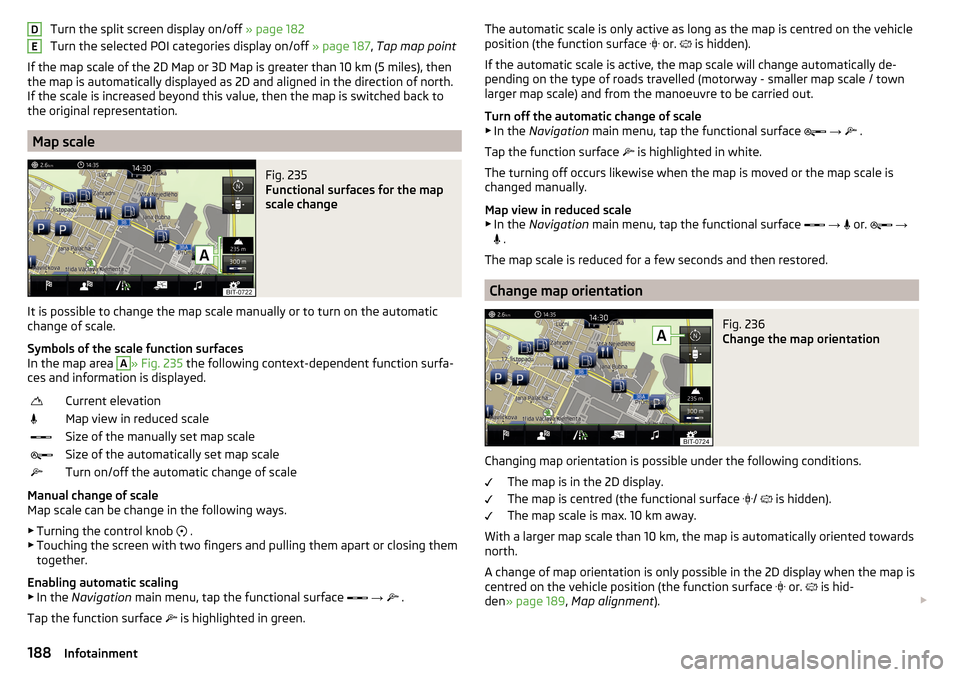
Turn the split screen display on/off » page 182
Turn the selected POI categories display on/off » page 187, Tap map point
If the map scale of the 2D Map or 3D Map is greater than 10 km (5 miles), then
the map is automatically displayed as 2D and aligned in the direction of north.
If the scale is increased beyond this value, then the map is switched back to
the original representation.
Map scale
Fig. 235
Functional surfaces for the map
scale change
It is possible to change the map scale manually or to turn on the automatic
change of scale.
Symbols of the scale function surfaces
In the map area
A
» Fig. 235 the following context-dependent function surfa-
ces and information is displayed.
Current elevationMap view in reduced scaleSize of the manually set map scaleSize of the automatically set map scaleTurn on/off the automatic change of scale
Manual change of scale
Map scale can be change in the following ways.
▶ Turning the control knob .
▶ Touching the screen with two fingers and pulling them apart or closing them
together.
Enabling automatic scaling ▶ In the Navigation main menu, tap the functional surface
→
.
Tap the function surface is highlighted in green.
DEThe automatic scale is only active as long as the map is centred on the vehicle
position (the function surface or. is hidden).
If the automatic scale is active, the map scale will change automatically de-
pending on the type of roads travelled (motorway - smaller map scale / town larger map scale) and from the manoeuvre to be carried out.
Turn off the automatic change of scale
▶ In the Navigation main menu, tap the functional surface
→
.
Tap the function surface
is highlighted in white.
The turning off occurs likewise when the map is moved or the map scale is
changed manually.
Map view in reduced scale ▶ In the Navigation main menu, tap the functional surface
→
or.
→
.
The map scale is reduced for a few seconds and then restored.
Change map orientation
Fig. 236
Change the map orientation
Changing map orientation is possible under the following conditions. The map is in the 2D display.
The map is centred (the functional surface /
is hidden).
The map scale is max. 10 km away.
With a larger map scale than 10 km, the map is automatically oriented towards
north.
A change of map orientation is only possible in the 2D display when the map is
centred on the vehicle position (the function surface or.
is hid-
den » page 189 , Map alignment ).
188Infotainment
Page 193 of 336
Alternative routes
With selection of alternative routes turned on, the following menu is displayed
after the calculation of a new route » Fig. 240.
Calculate the most economical route with shortest travelling time and
distance travelled – the route is highlighted green
Calculate the fastest route to the destination, even if a detour is nec-
essary - the route is highlighted in red
Calculate the shortest route to the destination, even if a longer travel-
ling time is required - the route is highlighted in orange
In the functional surfaces of the alternative routes, information on the route length estimated travel time and the following symbols are displayed (applies
to the Infotainment Columbus).
Use of a toll motorway
Use of a train / ferry
Using a toll tunnel
Use of a toll road
Using a vignette duty road
It is possible to select an already calculated alternative route before the calcu-
lation of the remaining routes is completed.
Selecting the type of route will start the route guidance.
If no route selection is made within 30 s after the calculation of all routes, the
route guidance is automatically started according to the preferred route type.
Route calculation for the trailer
When driving with a trailer or any other accessory connected to the trailer
socket, we recommend that you switch on the trailer recognition, if necessary
to set the maximum speed for towing a trailer.
›
For calculating the route for towing a trailer, tap the functional surface in the
main navigation menu
→
Route options
→
.
›
To set the top speed of the trailer, press the button, then tap on the
functional surface
→
Driver assistance
→ Trailer recognition →
Maximum speedfor trailer
.
Demo mode
The Demo mode provides a travel simulation to the entered destination. The
function offers the chance to travel through the calculated route “virtually”.
ABCWhen the Demo mode is turned on, a menu for route guidance in the Demo
mode or in normal operation is displayed before the start of route guidance.›
To switch on/off in the main menu Navigation, tap the function surface
Tap →
Advanced settings
→
Demo mode
.
When the demoMode is switched on, the route starting point can be defined.
›
In the Navigation main menu, tap the functional surface
Tap →
Advancedsettings
→
Define demo mode starting point
.
›
Define the starting point by entering the address or the current vehicle posi-
tion.
›
The demo mode starting pointcan also be set as long as the demo mode is
turned on by tap the desired map location and the menu item
Demo modestart
is selected » page 187 , Tap map point .
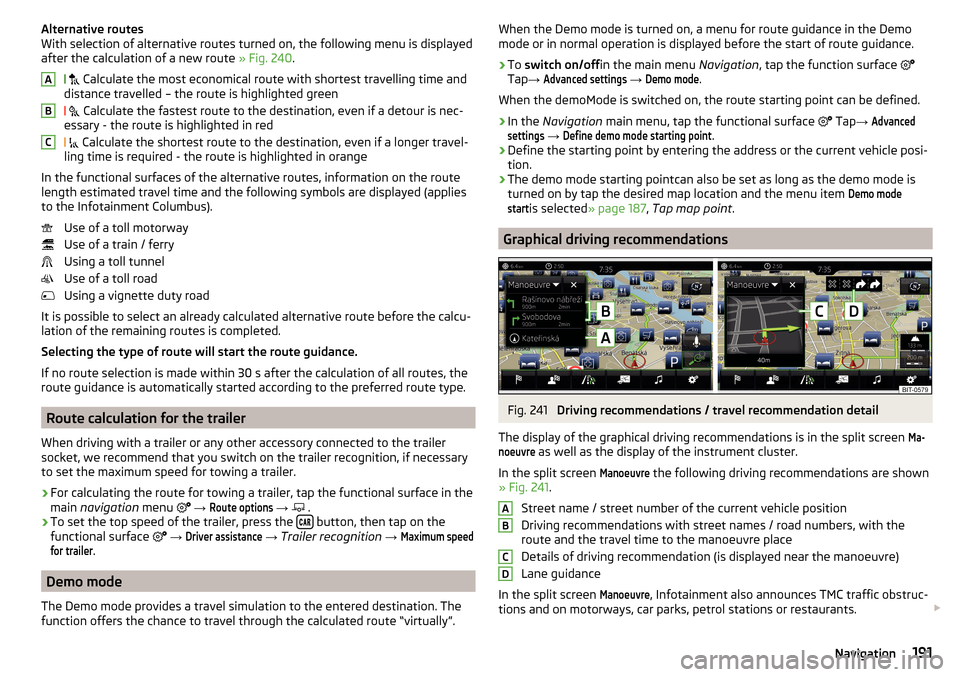
Graphical driving recommendations
Fig. 241
Driving recommendations / travel recommendation detail
The display of the graphical driving recommendations is in the split screen
Ma-noeuvre
as well as the display of the instrument cluster.
In the split screen
Manoeuvre
the following driving recommendations are shown
» Fig. 241 .
Street name / street number of the current vehicle position
Driving recommendations with street names / road numbers, with the
route and the travel time to the manoeuvre place
Details of driving recommendation (is displayed near the manoeuvre)
Lane guidance
In the split screen
Manoeuvre
, Infotainment also announces TMC traffic obstruc-
tions and on motorways, car parks, petrol stations or restaurants.
ABCD191Navigation