remote control SKODA SUPERB 2016 3.G / (B8/3V) Owner's Manual
[x] Cancel search | Manufacturer: SKODA, Model Year: 2016, Model line: SUPERB, Model: SKODA SUPERB 2016 3.G / (B8/3V)Pages: 336, PDF Size: 53.89 MB
Page 5 of 336
Radio142Operation142
Media
146
Operation
146
Audio sources
149
Images
153
Image viewer
153
Video DVD
155
Video player
155
TV tuner
156
TV function
156
Media Command
158
Operation
158
Telephone
160
Introductory information
160
Pair and connect
163
Use the SIM card in the external module
166
rSAP
167
Telephone functions
168
Text messages (SMS)
172
Hotspot (WLAN) and data connection
174
Hotspot (WLAN)
174
Data connection
175
SmartLink
176
Introductory information
176
Android Auto
177
Apple CarPlay
178
MirrorLink®
178
Navigation
180
Introductory information
180
Search for destination and enter
182
Import my destinations
186
Map
187
Route guidance
190Route192Waypoint mode194
Traffic reports
196
vehicle systems
198
CAR - Vehicle settings
198
Driving
Starting-off and Driving
199
Starting and stopping the engine
199
START-STOPsystem
201
Brakes and Parking
203
Manual gear changing and pedals
205
Automatic transmission
206
Running in the engine and economical
driving
209
Avoiding damage to your vehicle
211
Assist systems
212
General information
212
Braking and stabilisation systems
212
Parking aid (ParkPilot)
215
Rear traffic alert and wizard for “Blind
spot”Monitoring
218
Reversing camera
221
Park Assist
225
Cruise Control System
229
Speed limiter
231
Adaptive Cruise Control (ACC)
233
Front Assist
237
Select the driving mode (Driving Mode
Selection)
240
Proactive occupant protection (Crew Protect
Assist)
242
Lane Departure Warning (Lane Assist)
243
Traffic jam assistant
245
Assistant for emergencies
246
Traffic sign recognition
246Fatigue detection248Tyre pressure monitoring249
Towing device and trailer
250
Hitch
250
Using hitch
252
General Maintenance
Care and maintenance
256
Service work, adjustments and technical
alterations
256
Service intervals
258
Cleaning and care
260
Inspecting and replenishing
264
Fuel
264
AdBlue ®
and its refilling
267
Engine compartment
268
Engine oil
270
Coolant
271
Brake fluid
273
Vehicle battery
273
Wheels
276
Wheels and tyres
276
Operating in winter conditions
278
Do-it-yourself
Emergency equipment and self-help
280
Emergency equipment
280
Changing a wheel
282
Puncture repair kit
285
Jump-starting
287
Towing the vehicle
288
Remote control and removable light -
replacing the battery/batteries
2903Table of Contents
Page 55 of 336
›Restart SmartGate by tapping on the “Reboot” 1)
button.
Changing the PIN code for the Wi-Fi Direct connection›
Open the SmartGate web interface » page 52.
›
In the menu item “WiFi Direct PIN:”, enter the new PIN code (6 digits).
›
Confirm the PIN code change by tapping on the “Save” button.
›
Restart SmartGate by tapping on the “Reboot” 1 )
button.
Note
If you have forgotten your password/PIN code for connecting to SmartGate,
SmartGate must be reset to the factory settings in a specialist workshop.Unlocking and opening
Unlocking and locking
Introduction
This chapter contains information on the following subjects:
Unlocking/locking with the remote control key
54
Remove KESSY emergency key
54
Locking / unlocking - KESSY
55
Locking/unlocking the vehicle with the central locking button
55
SafeLock
56
Individual settings
56
Open / close door
57
Child safety lock
57
Malfunctions
57
The vehicle is equipped with a central locking system which makes it possible
to unlock / lock all the doors, the fuel filler flap and boot lid simultaneously.
The door unlocking can be adjusted individually » page 56.
The unlocking of the vehicle is displayed by the turn signal lights flashing
twice.
If you unlock the vehicle and do not open a door or the boot lid within the next
45 seconds, the vehicle will lock again automatically.
The locking of the vehicle is displayed by the turn signal lights flashing once.
If the driver's door has been opened, the vehicle cannot be locked.
If the doors or the boot lid remain open after the vehicle has been locked, the turn signal lights do not flash until they have been closed.
1)
If the “Reboot” button is not displayed, you must manually restore the web browser display.
53Unlocking and opening
Page 56 of 336
WARNING■Never leave the key in the vehicle when you exit the vehicle. Unauthor-
ized persons (e.g. children) could lock the car, turn on the ignition or start
the engine - there is a danger of injury and accidents!■
When leaving the vehicle, never leave people who are not completely in-
dependent, such as children, unattended in the vehicle. These individuals
might not be able to leave the vehicle on their own or to help themselves.
Can be fatal at very high or very low temperatures!
CAUTION
■ Each key contains electronic components; therefore it must be protected
against moisture and severe shocks.■
Keep the keyway clean. Impurities (textile fibres, dust etc.) have a negative
effect on the functionality of the locking cylinder and ignition lock.
Unlocking/locking with the remote control key
Fig. 33
Key with fold/out key bit/KESSY key
Read and observe
and on page 54 first.
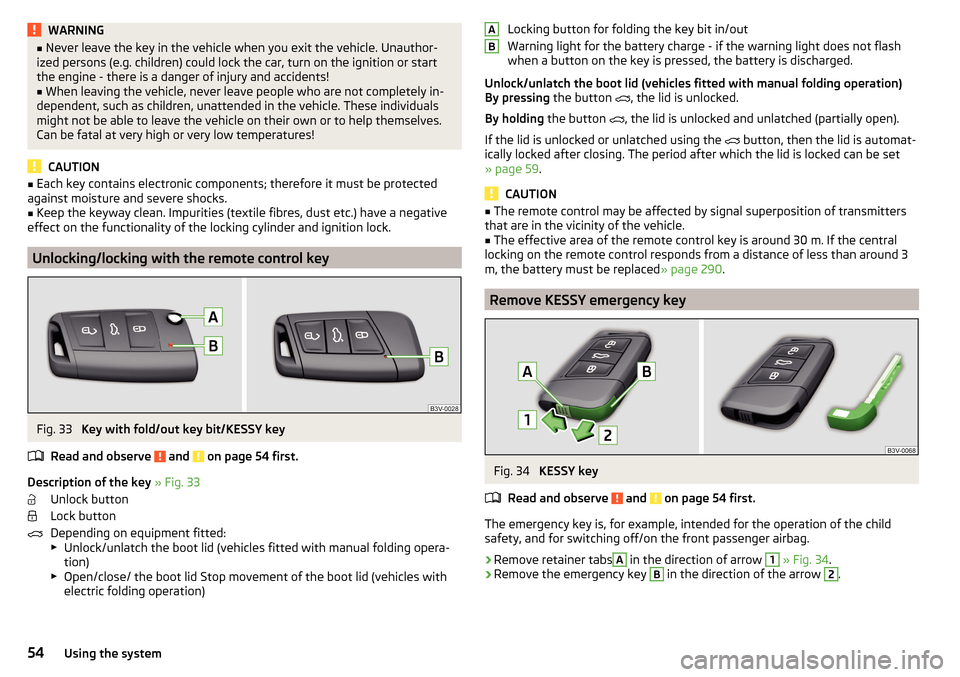
Description of the key » Fig. 33
Unlock button
Lock button
Depending on equipment fitted:
▶ Unlock/unlatch the boot lid (vehicles fitted with manual folding opera-
tion)
▶ Open/close/ the boot lid Stop movement of the boot lid (vehicles with
electric folding operation)
Locking button for folding the key bit in/out
Warning light for the battery charge - if the warning light does not flash
when a button on the key is pressed, the battery is discharged.
Unlock/unlatch the boot lid (vehicles fitted with manual folding operation)
By pressing the button
, the lid is unlocked.
By holding the button
, the lid is unlocked and unlatched (partially open).
If the lid is unlocked or unlatched using the
button, then the lid is automat-
ically locked after closing. The period after which the lid is locked can be set
» page 59 .
CAUTION
■
The remote control may be affected by signal superposition of transmitters
that are in the vicinity of the vehicle.■
The effective area of the remote control key is around 30 m. If the central
locking on the remote control responds from a distance of less than around 3
m, the battery must be replaced » page 290.
Remove KESSY emergency key
Fig. 34
KESSY key
Read and observe
and on page 54 first.
The emergency key is, for example, intended for the operation of the child
safety, and for switching off/on the front passenger airbag.
›
Remove retainer tabs
A
in the direction of arrow
1
» Fig. 34 .
›
Remove the emergency key
B
in the direction of the arrow
2
.
AB54Using the system
Page 57 of 336
Locking / unlocking - KESSYFig. 35
Vehicle unlocking / vehicle locking
Read and observe
and on page 54 first.
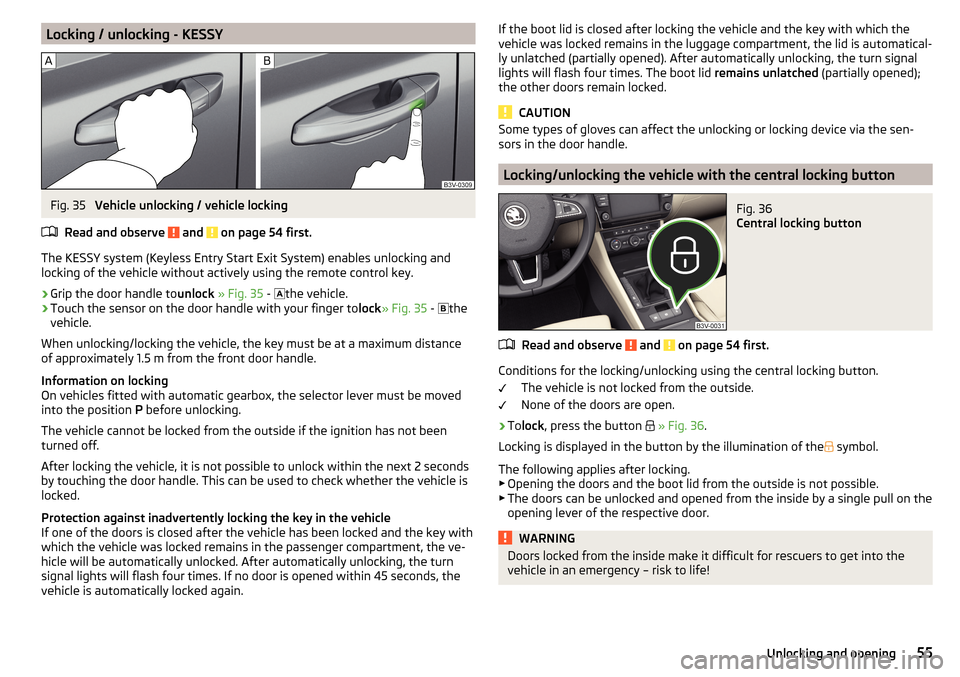
The KESSY system (Keyless Entry Start Exit System) enables unlocking and
locking of the vehicle without actively using the remote control key.
›
Grip the door handle to unlock » Fig. 35 -
the vehicle.
›
Touch the sensor on the door handle with your finger to
lock» Fig. 35 -
the
vehicle.
When unlocking/locking the vehicle, the key must be at a maximum distance
of approximately 1.5 m from the front door handle.
Information on locking
On vehicles fitted with automatic gearbox, the selector lever must be moved
into the position P before unlocking.
The vehicle cannot be locked from the outside if the ignition has not been
turned off.
After locking the vehicle, it is not possible to unlock within the next 2 seconds
by touching the door handle. This can be used to check whether the vehicle is
locked.
Protection against inadvertently locking the key in the vehicle
If one of the doors is closed after the vehicle has been locked and the key with
which the vehicle was locked remains in the passenger compartment, the ve-
hicle will be automatically unlocked. After automatically unlocking, the turn
signal lights will flash four times. If no door is opened within 45 seconds, the
vehicle is automatically locked again.
If the boot lid is closed after locking the vehicle and the key with which the
vehicle was locked remains in the luggage compartment, the lid is automatical-
ly unlatched (partially opened). After automatically unlocking, the turn signal
lights will flash four times. The boot lid remains unlatched (partially opened);
the other doors remain locked.
CAUTION
Some types of gloves can affect the unlocking or locking device via the sen-
sors in the door handle.
Locking/unlocking the vehicle with the central locking button
Fig. 36
Central locking button
Read and observe and on page 54 first.
Conditions for the locking/unlocking using the central locking button.
The vehicle is not locked from the outside.
None of the doors are open.
›
To lock , press the button
» Fig. 36 .
Locking is displayed in the button by the illumination of the
symbol.
The following applies after locking. ▶ Opening the doors and the boot lid from the outside is not possible.
▶ The doors can be unlocked and opened from the inside by a single pull on the
opening lever of the respective door.
WARNINGDoors locked from the inside make it difficult for rescuers to get into the
vehicle in an emergency – risk to life!55Unlocking and opening
Page 58 of 336
SafeLockRead and observe
and on page 54 first.
SafeLock prevents the doors from behind opened from inside as well as win-
dow operation. This makes it more difficult for anyone to break into the vehi-
cle.
Switching on
SafeLock switches on when the vehicle is locked.
This function is pointed out by the following message on the display of the in-
strument cluster after the ignition is switched off.
Observe SAFE interlock! Log book!CHECK SAFELOCK
Switch-on display
With the activated SafeLock, the warning light in the driver´s door flashes for 2
seconds in rapid succession, this then starts to flash at longer intervals.
Switching off ▶ By locking twice within 2 seconds.
▶ or: by deactivating the interior monitor and the towing protection
» page 58 .
The warning light in the driver´s door flashes fast for about 2 seconds, goes
out and starts to flash at longer intervals after about 30 seconds.
If the vehicle is locked and the safe securing system is switched off, the door
can be opened separately from the inside by a single pull on opening lever.
The safelock switches on the next time the vehicle is locked.
WARNINGIf the car is locked and the safe securing system activated, no people must
remain in the car as it will then not be possible to either unlock a door or
open a window from the inside. The locked doors make it more difficult for
rescuers to get into the vehicle in an emergency – risk to life!
Individual settings
Read and observe
and on page 54 first.
The following functions of the central locking can be individually adjusted in
infotainment in the
→
→
Opening and closing
menu.
All doors
The function allows you to unlock all doors, the boot lid and the fuel filler flap.
Single door
The function allows you to unlock only the driver's door and the fuel filler flap
with the radio remote control. KESSY allows the unlocking of a single door
which is in the vicinity of the key, as well as the fuel filler flap. The other doors
and the boot lid are only unlocked once the door handle is unlocked or
touched.
Doors on a vehicle side
This function enables you to unlock both doors on the driver's side and the
fuel filler flap with the radio remote control unit. KESSY allows the unlocking of
both doors which are in the vicinity of the key, as well as the fuel filler flap. The
other doors and the boot lid are only unlocked once the door handle is un-
locked or touched.
Automatic locking/unlocking
This function enables the locking of all doors and the boot lid from a speed of
15 km/h. Opening the doors and the boot lid from the outside is not possible.
The renewed unlocking of the doors and the boot lid is carried out when the
ignition key is removed or when the door is opened from inside (depending on
the individual setting for the central locking system).
Note
The individual adjustment of the central locking system is stored (depending
on the Infotainment type) in the active user account personalisation
» page 49 .56Using the system
Page 59 of 336
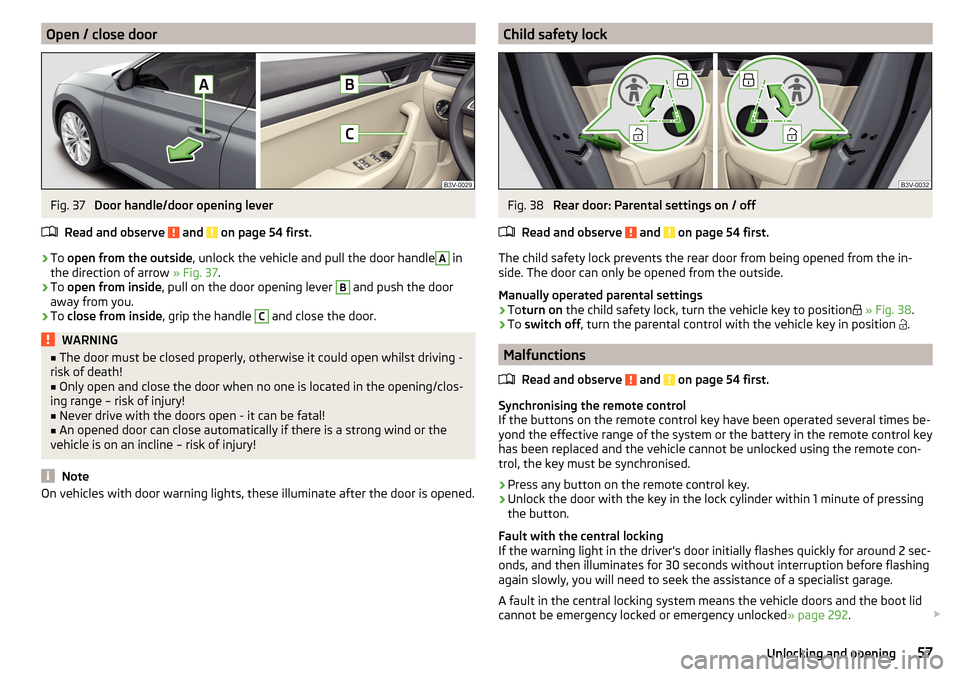
Open / close doorFig. 37
Door handle/door opening lever
Read and observe
and on page 54 first.
›
To open from the outside , unlock the vehicle and pull the door handle
A
in
the direction of arrow » Fig. 37.
›
To open from inside , pull on the door opening lever
B
and push the door
away from you.
›
To close from inside , grip the handle
C
and close the door.
WARNING■
The door must be closed properly, otherwise it could open whilst driving -
risk of death!■
Only open and close the door when no one is located in the opening/clos-
ing range – risk of injury!
■
Never drive with the doors open - it can be fatal!
■
An opened door can close automatically if there is a strong wind or the
vehicle is on an incline – risk of injury!
Note
On vehicles with door warning lights, these illuminate after the door is opened.Child safety lockFig. 38
Rear door: Parental settings on / off
Read and observe
and on page 54 first.
The child safety lock prevents the rear door from being opened from the in-
side. The door can only be opened from the outside.
Manually operated parental settings
›
To turn on the child safety lock, turn the vehicle key to position
» Fig. 38 .
›
To switch off , turn the parental control with the vehicle key in position
.
Malfunctions
Read and observe
and on page 54 first.
Synchronising the remote control
If the buttons on the remote control key have been operated several times be-
yond the effective range of the system or the battery in the remote control key
has been replaced and the vehicle cannot be unlocked using the remote con-
trol, the key must be synchronised.
›
Press any button on the remote control key.
›
Unlock the door with the key in the lock cylinder within 1 minute of pressing the button.
Fault with the central locking
If the warning light in the driver's door initially flashes quickly for around 2 sec-
onds, and then illuminates for 30 seconds without interruption before flashing
again slowly, you will need to seek the assistance of a specialist garage.
A fault in the central locking system means the vehicle doors and the boot lid
cannot be emergency locked or emergency unlocked » page 292.
57Unlocking and opening
Page 72 of 336
Fog lights with CORNER functionRead and observe
on page 66 first.
The CORNER function automatically switches on the fog lights on the respec-tive side of the vehicle (e.g. when cornering), if the following conditions are ful-
filled.
The turn signal is switched on or the front wheels are turned sharply 1)
.
The vehicle speed is below 40 km/h.
The low beam is switched on.
The fog lights are not switched on.
The two fog lights are switched on when you shift into the reverse gear.
COMING HOME / LEAVING HOME
Read and observe
on page 66 first.
The function COMING HOME ensures that the vehicle's environment is illumi-
nated after switching off the ignition and opening the driver's door.
The function LEAVING HOME ensures that the vehicle's environment is illumi-
nated after unlocking the vehicle with the radio remote control unit.
The function switches the light on only if there is poorer visibility and the light
switch is in the position .
The two functions can be activated/deactivated and set in the Infotainment
menu
→
→
Light
.
CAUTION
■
Poorer visibility is evaluated by a sensor mounted below the windscreen in
the holder of the rear-view mirror. Do not cover the sensor - the system can be
affected.■
If this option is always enabled, then the battery is heavily loaded.
Note
The setting of the two functions is stored (depending on the Infotainment
type) in the active user account personalisation » page 49.Hazard warning light systemFig. 52
Button for hazard warning light
system
Read and observe on page 66 first.
›
To switch on/off , press the
button
» Fig. 52 .
When switching on, all the turn signal lights as well as the warning light in
the button flash simultaneously with the control lights
in the instrument
cluster.
The hazard warning light system can also be operated if the ignition is switch-
ed off.
If one of the airbags is deployed, the hazard warning light system will switch
on automatically.
The automatic activation of hazard warning lights can take place during a
heavy braking. After starting or accelerating the hazard warning system is au-
tomatically switched off.
When the hazard warning system is on and the indicator light is switched on
(e.g. when turning), the hazard warning lights are switched off temporarily and
only the turn signal flashes on the relevant side of the vehicle.
Parking light
Read and observe
on page 66 first.
The side light is provided for lighting of the parked vehicle.
Switching on the side light on one side
›
Switch off the ignition.
1)
If the two switch-on variants are conflicting (e.g. if the front wheels are turned to the left and the right
turn signal light is switched on), the turn signal light has the higher priority.
70Using the system
Page 81 of 336
If the mirror setting fails at any time, the mirrors can be adjusted manually by
pressing on the edge of the mirror area.
Setting the mirror surfaces synchronously
This function allows the simultaneous adjustment of the two mirror areas. The
function can be activated / deactivated in the Infotainment menu
→
→
Mirrors and wipers
.
›
Turn the knob for the mirror control to the position for the driver mirror ad-
justment.
›
Adjust the mirror areas to the desired position.
Manual folding mirrors
The mirror can be manually folded towards the side windows. To put it back to
its original position, it should be folded back from the side window until it au-
dibly clicks into place.
Automatic folding in/back of both mirrors
The exterior mirrors are automatically collapsed after locking the vehicle in the park position. After unlocking the vehicle, the mirrors are folded back to the
driving position »
.
This function can be activated / deactivated in the Infotainment menu
→
→
Mirrors and wipers
.
Mirror with automatic dimming
The exterior mirror dimming is controlled together with the automatic rear-
view mirror dimming » page 78.
Memory function for mirror (vehicles with electrically adjustable driver's
seat)
It is possible to save the current setting of the exterior mirror when saving the
driver's seat position with » page 81, Memory Function of the electrically ad-
justable seat or » page 81 , Memory function of the remote control key .
Tilting the mirror area of the front passenger mirror (vehicles with
electrically adjustable driver's seat)
The front passenger mirror area can be tilted to the stored position to improve the view to the curb when reversing.
Operating conditions.
The function is activated in the Infotainment menu
→
→
Mirrors andwipers
.
The setting of the mirror area has been previously stored » page 81,
Memory Function of the electrically adjustable seat or. » page 81 , Memo-
ry function of the remote control key .
The reverse gear is engaged.
The knob for the mirror control is in the position for the passenger mirror
adjustment.
The mirror area returns to its initial position after the rotary knob is set to an-
other position or if the speed is greater than 15 km/h.
WARNINGDo not touch the exterior mirror surfaces, if the exterior mirror heating is
switched on - hazard of burning.
CAUTION
■ Never manually fold in/out the electrically folding exterior mirrors - there is a
risk of damage to the mirror!■
When the mirror is swung by external influences (due to impact during ma-
noeuvring, for example), then first fold-in the mirror by turning the knob and
wait for a loud clapping noise.
Note
The setting of the mirror functions is stored in Infotainment (depending on the
Infotainment type) in the active user account personalisation » page 49.79Lights and visibility
Page 82 of 336
Seats and head restraints
Front seats
Introduction
This chapter contains information on the following subjects:
Manual adjustment
80
Electrical adjustment
80
Convenience operation of the front passenger seat
81
Memory Function of the electrically adjustable seat
81
Memory function of the remote control key
81
Folding front passenger seat
82
Armrest setting
82WARNING■ Only adjust the driver's seat when the vehicle is stationary – risk of acci-
dent!■
Caution when adjusting the seat! You may suffer injuries or bruises as a
result of adjusting the seat without paying proper attention.
Manual adjustment
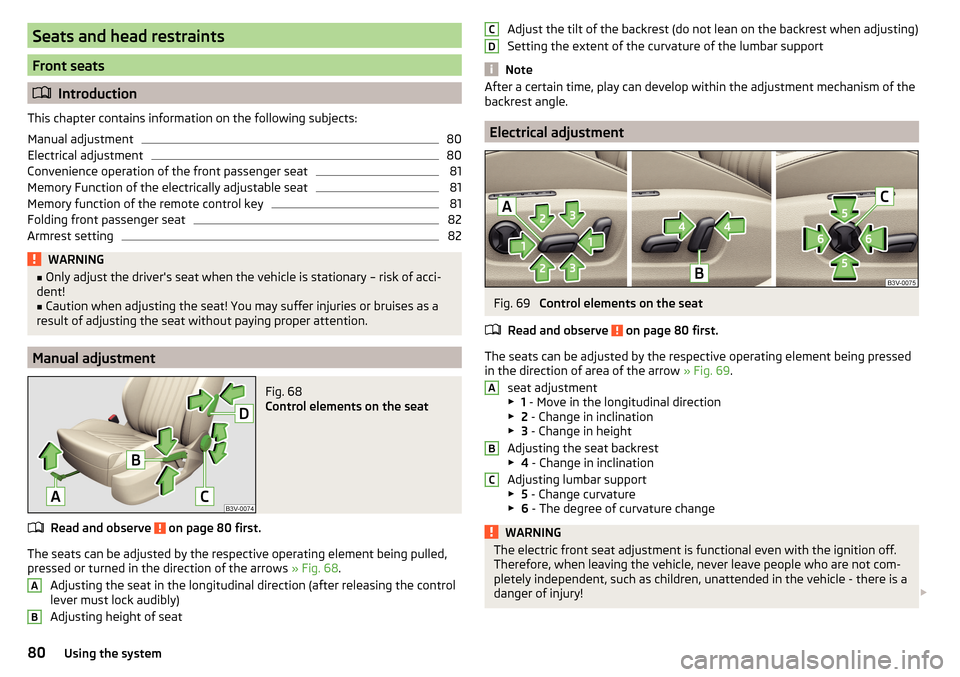
Fig. 68
Control elements on the seat
Read and observe on page 80 first.
The seats can be adjusted by the respective operating element being pulled,
pressed or turned in the direction of the arrows » Fig. 68.
Adjusting the seat in the longitudinal direction (after releasing the control
lever must lock audibly)
Adjusting height of seat
ABAdjust the tilt of the backrest (do not lean on the backrest when adjusting)
Setting the extent of the curvature of the lumbar support
Note
After a certain time, play can develop within the adjustment mechanism of the
backrest angle.
Electrical adjustment
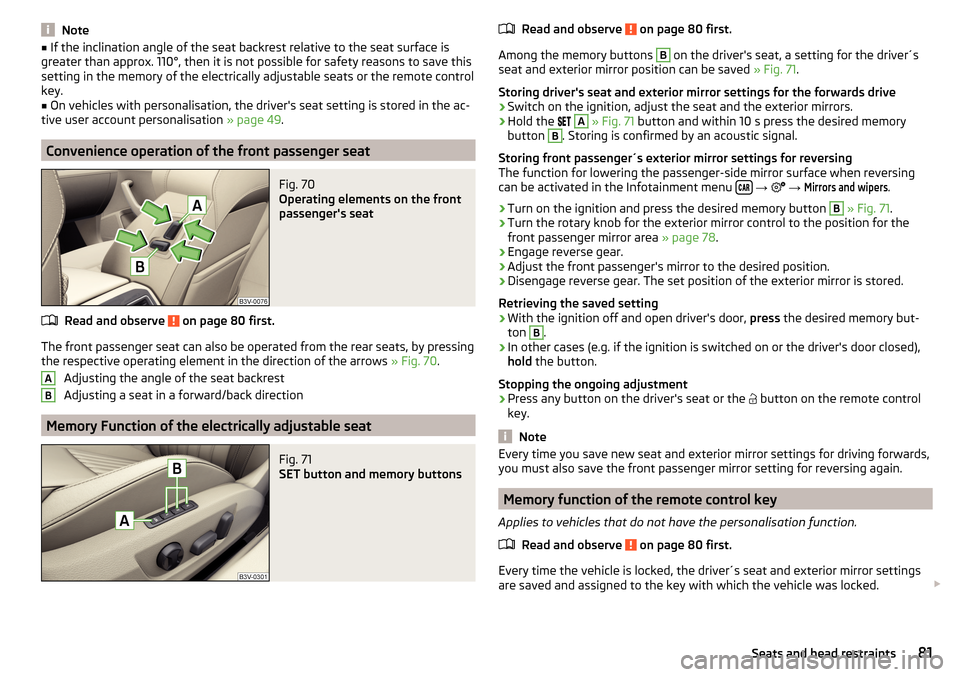
Fig. 69
Control elements on the seat
Read and observe
on page 80 first.
The seats can be adjusted by the respective operating element being pressed in the direction of area of the arrow » Fig. 69.
seat adjustment
▶ 1 - Move in the longitudinal direction
▶ 2 - Change in inclination
▶ 3 - Change in height
Adjusting the seat backrest
▶ 4 - Change in inclination
Adjusting lumbar support
▶ 5 - Change curvature
▶ 6 - The degree of curvature change
WARNINGThe electric front seat adjustment is functional even with the ignition off.
Therefore, when leaving the vehicle, never leave people who are not com-
pletely independent, such as children, unattended in the vehicle - there is a
danger of injury! CDABC80Using the system
Page 83 of 336
Note■If the inclination angle of the seat backrest relative to the seat surface is
greater than approx. 110°, then it is not possible for safety reasons to save this
setting in the memory of the electrically adjustable seats or the remote control
key.■
On vehicles with personalisation, the driver's seat setting is stored in the ac-
tive user account personalisation » page 49.
Convenience operation of the front passenger seat
Fig. 70
Operating elements on the front
passenger's seat
Read and observe on page 80 first.
The front passenger seat can also be operated from the rear seats, by pressing
the respective operating element in the direction of the arrows » Fig. 70.
Adjusting the angle of the seat backrest
Adjusting a seat in a forward/back direction
Memory Function of the electrically adjustable seat
Fig. 71
SET button and memory buttons
ABRead and observe on page 80 first.
Among the memory buttons
B
on the driver's seat, a setting for the driver´s
seat and exterior mirror position can be saved » Fig. 71.
Storing driver's seat and exterior mirror settings for the forwards drive
›
Switch on the ignition, adjust the seat and the exterior mirrors.
›
Hold the
A
» Fig. 71 button and within 10 s press the desired memory
button
B
. Storing is confirmed by an acoustic signal.
Storing front passenger´s exterior mirror settings for reversing
The function for lowering the passenger-side mirror surface when reversing can be activated in the Infotainment menu
→
→
Mirrors and wipers
.
›
Turn on the ignition and press the desired memory button
B
» Fig. 71 .
›
Turn the rotary knob for the exterior mirror control to the position for the
front passenger mirror area » page 78.
›
Engage reverse gear.
›
Adjust the front passenger's mirror to the desired position.
›
Disengage reverse gear. The set position of the exterior mirror is stored.
Retrieving the saved setting
›
With the ignition off and open driver's door, press the desired memory but-
ton
B
.
›
In other cases (e.g. if the ignition is switched on or the driver's door closed),
hold the button.
Stopping the ongoing adjustment
›
Press any button on the driver's seat or the button on the remote control
key.
Note
Every time you save new seat and exterior mirror settings for driving forwards,
you must also save the front passenger mirror setting for reversing again.
Memory function of the remote control key
Applies to vehicles that do not have the personalisation function.
Read and observe
on page 80 first.
Every time the vehicle is locked, the driver´s seat and exterior mirror settingsare saved and assigned to the key with which the vehicle was locked.
81Seats and head restraints