Cooling SKODA SUPERB 2016 3.G / (B8/3V) Owner's Manual
[x] Cancel search | Manufacturer: SKODA, Model Year: 2016, Model line: SUPERB, Model: SKODA SUPERB 2016 3.G / (B8/3V)Pages: 336, PDF Size: 53.89 MB
Page 41 of 336
Auto Hold functionRead and observe
on page 34 first.
illuminates - the Auto Hold function is activated.
For more information about the Auto-Hold Function » page 204.
Main beam
Read and observe
on page 34 first.
lights up – the main beam or the headlight flasher is switched on.
Automatic gearbox
Read and observe
on page 34 first.
Gearbox overheated
The warning light is only shown in the MAXI DOTdisplay.
Illumi-
nates
Gearbox overheated. You can drive on.GEARBOX OVERHEATED
Transmission overheated. You can drive on, exercising appropriate caution.
Illumi-
nates
Gearbox overheated. Stop! Log book!STOP VEHICLE GEARBOX OVERHEAT
▶
Do not drive the vehicle! Stop the vehicle and turn off the engine.
You can continue your journey as soon as the warning light disappears.
▶ If the warning light does not go off,
stop driving! Seek help from a special-
ist garage.
Transmission problem
The warning light is only shown in the MAXI DOTdisplay.
Illumi-
nates
Gearbox faulty. Stop the vehicle safely!GEARBOX FAULTY WORKSHOP Illumi-
nates
Gearbox in emergency mode. No reverse gear.GEARBOX ERROR REV_ GEAR NOT AVAIL Illumi-
nates
Error: gearbox. Speed is limited.GEARBOX ERROR▶ You can drive on, exercising appropriate caution. Seek assistance from a spe-
cialist garage immediately.
Rear seat belt warning light
Read and observe
on page 34 first.
lights up – a rear seat belt is not fastened.
lights up – a rear seat belt is fastened.
When the seat belt is fastened/unfastened, the particular light lights up briefly
and indicates the current belt status!
Generator
Read and observe
on page 34 first.
lights up – the battery is not being charged whilst the engine is running.
CAUTION
If in addition to the light
the light lights up while driving, stop driving -
There is a risk of engine damage! Switch off the engine and seek assistance
from a specialist garage.
Coolant
Read and observe
on page 34 first.
Coolant level too low
Illumi-
nates
ENGINE COOLANT PLEASE CHECK Log book!ENGINE COOLANT PLEASE CHECK
▶ Stop the vehicle, switch off the engine and let it cool.
▶ Check the coolant level » page 272.
If the coolant level is within the specified range and the warning light lights
up again, then there may be a malfunction of the cooling fan.
▶ Switch off the ignition.
▶ Check the fuse for the radiator fan, replace if necessary.
If the coolant level and fan fuse are both OK but the warning light lights up
again,
stop driving!
▶ Seek help from a specialist garage.
39Instruments and warning lights
Page 88 of 336

With repeated pressing of the button, the level is down-regulated until it
switches off . The level of the seat heating is indicated by the number of illu-
minated warning lights underneath / in the button.
Increasing in heating power of the rear seats can be locked / unlocked , to do
this, press button
on the Climatronic → Tap the function surfaces
/
on
the Infotainment screen. In the locked heating power increase, the heating
power can only be adjusted down to turn off.
Front seats with heating and ventilation
Fig. 82
Heating switched on / cooling switched on / heating and cooling
are switched on simultaneously
Fig. 83
Infotainment screen: Front seat heating and ventilation with
maximum heating / ventilation level switched on
Read and observe
and on page 85 first.
›
Press the button
or
on the control panel of the air conditioner, a menu
for operating the front seat heating and ventilation is displayed on the Info-
tainment screen » Fig. 83,
Function surfaces for setting the ventilation level
Function surfaces for setting the heating power
Functional surfaces for switching off the ventilation (in addition to the
function surfaces A
) or for switching off the heating (in addition to the
function surfaces
B
)
If the seat heating was switched on before the ignition was switched off, then,
by pressing the buttons
and
, the seat heating will » Fig. 82 - switch on
with maximum output
.
If the seat cooling was switched on before the ignition was switched off, then,
by pressing the buttons
and
, the seat cooling will » Fig. 82 - switch on with
maximum output .
By repeatedly pressing the button or.
, the heating or cooling output is con-
trolled down to off. The power of the seat heating is indicated by the number
of illuminated warning lights underneath the switch.
Only the heating or ventilation can be operated using the buttons or.
.
If ventilation and heating are switched on simultaneously on the infotainment
screen, under each button or.
the blue and red light warning illuminates
» Fig. 82 -
, the button
or.
is not functioning (as long as the ventilation
and the heating is switched on simultaneously).
Heated steering wheel
Fig. 84
Button for steering wheel heat-
ing
Switching steering wheel heating on/off using Infotainment
›
To switch on / off press the button
on the Climatronic
→ Tap on the
function area on the Infotainment screen. When the heating is switched
on, the symbol in the function surface
A
is green » Fig. 84 .
AB86Using the system
Page 115 of 336
NoteWe recommend that you use a roof rack from ŠKODA Original Accessories.Heating and ventilation
Heating, manual air conditioning system, Climatronic
Introduction
This chapter contains information on the following subjects:
Heating and manual air conditioning
114
Climatronic (automatic air conditioning)
114
Operate Climatronic in Infotainment
116
Climatronic - automatic operation
116
Air distribution control
117
Air outlet vents
117
The heating heats and ventilates the vehicle interior. The air conditioning sys-
tem also cools and dehumidifies the vehicle interior.
The heating effect is dependent upon the coolant temperature, thus full heat
output only occurs when the engine has reached its operating temperature.
The cooling system works under the following conditions. The cooling system is switched on.
The engine is running.
The outside temperature is below 2 ° C.
The blower is switched on.
Fogging is prevented when the cooling system is switched on.
It is possible to boost the effectiveness of the cooling system by briefly acti-
vating the air recirculation system » page 117.
Health protection
To reduce health risks (e.g. common colds), the following instructions for the
use of the cooling system are to be observed. ▶ The difference between the indoor temperature and the outdoor air temper-
ature should not be greater than about 5 ° C.
▶ The cooling system should be turned off about 10 minutes before the end of
the journey.
▶ Once a year, the air conditioning should be disinfected by a specialist garage.
113Heating and ventilation
Page 116 of 336
WARNING■The blower should always be on to prevent the windows from misting.
Otherwise there could be an accident.■
Under certain circumstances, air at a temperature of about 5 °C can flow
out of the vents when the cooling system is switched on.
Note
■ The air inlet in front of the windscreen must be free of e.g. ice, snow or
leaves to ensure that the heating and cooling system operates properly.■
After switching on the cooling Condensation from the evaporator of the air
conditioning may drip down and form a puddle below the vehicle. This is not a
leak!
■
If the coolant temperature is too high, the cooling system is switched off to
ensure that the engine cools down.
Heating and manual air conditioning
Fig. 147
Controls of the heating / air conditioning
Read and observe
on page 114 first.
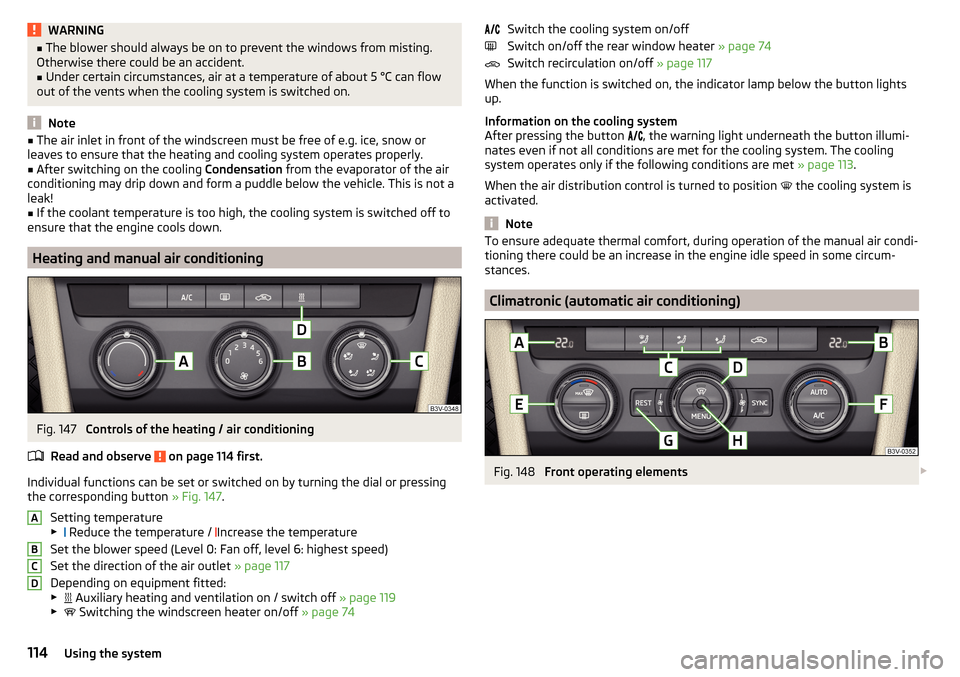
Individual functions can be set or switched on by turning the dial or pressing the corresponding button » Fig. 147.
Setting temperature
▶ Reduce the temperature /
Increase the temperature
Set the blower speed (Level 0: Fan off, level 6: highest speed)
Set the direction of the air outlet » page 117
Depending on equipment fitted:
▶ Auxiliary heating and ventilation on / switch off
» page 119
▶ Switching the windscreen heater on/off
» page 74
ABCDSwitch the cooling system on/off
Switch on/off the rear window heater » page 74
Switch recirculation on/off » page 117
When the function is switched on, the indicator lamp below the button lights up.
Information on the cooling system
After pressing the button
, the warning light underneath the button illumi-
nates even if not all conditions are met for the cooling system. The cooling
system operates only if the following conditions are met » page 113.
When the air distribution control is turned to position
the cooling system is
activated.
Note
To ensure adequate thermal comfort, during operation of the manual air condi-
tioning there could be an increase in the engine idle speed in some circum-
stances.
Climatronic (automatic air conditioning)
Fig. 148
Front operating elements
114Using the system
Page 117 of 336
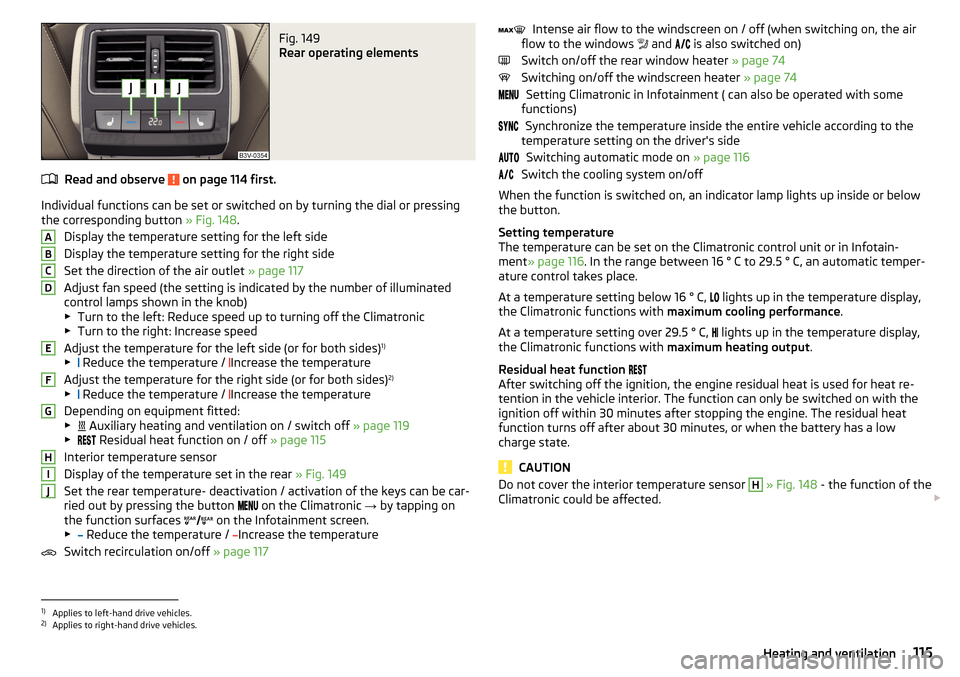
Fig. 149
Rear operating elements
Read and observe on page 114 first.
Individual functions can be set or switched on by turning the dial or pressingthe corresponding button » Fig. 148.
Display the temperature setting for the left side
Display the temperature setting for the right side
Set the direction of the air outlet » page 117
Adjust fan speed (the setting is indicated by the number of illuminated
control lamps shown in the knob)
▶ Turn to the left: Reduce speed up to turning off the Climatronic
▶ Turn to the right: Increase speed
Adjust the temperature for the left side (or for both sides) 1)
▶ Reduce the temperature /
Increase the temperature
Adjust the temperature for the right side (or for both sides) 2)
▶ Reduce the temperature /
Increase the temperature
Depending on equipment fitted:
▶ Auxiliary heating and ventilation on / switch off
» page 119
▶ Residual heat function on / off
» page 115
Interior temperature sensor
Display of the temperature set in the rear » Fig. 149
Set the rear temperature- deactivation / activation of the keys can be car-
ried out by pressing the button on the Climatronic
→ by tapping on
the function surfaces on the Infotainment screen.
▶ Reduce the temperature /
Increase the temperature
Switch recirculation on/off » page 117
ABCDEFGHIJIntense air flow to the windscreen on / off (when switching on, the air
flow to the windows and is also switched on)
Switch on/off the rear window heater » page 74
Switching on/off the windscreen heater » page 74
Setting Climatronic in Infotainment ( can also be operated with some
functions)
Synchronize the temperature inside the entire vehicle according to the
temperature setting on the driver's side
Switching automatic mode on » page 116
Switch the cooling system on/off
When the function is switched on, an indicator lamp lights up inside or below
the button.
Setting temperature
The temperature can be set on the Climatronic control unit or in Infotain-
ment » page 116 . In the range between 16 ° C to 29.5 ° C, an automatic temper-
ature control takes place.
At a temperature setting below 16 ° C, lights up in the temperature display,
the Climatronic functions with maximum cooling performance .
At a temperature setting over 29.5 ° C, lights up in the temperature display,
the Climatronic functions with maximum heating output.
Residual heat function
After switching off the ignition, the engine residual heat is used for heat re-
tention in the vehicle interior. The function can only be switched on with the
ignition off within 30 minutes after stopping the engine. The residual heat
function turns off after about 30 minutes, or when the battery has a low
charge state.
CAUTION
Do not cover the interior temperature sensor H » Fig. 148 - the function of the
Climatronic could be affected. 1)
Applies to left-hand drive vehicles.
2)
Applies to right-hand drive vehicles.
115Heating and ventilation
Page 118 of 336

Note■In order to ensure adequate thermal comfort, there may be an increase in en-
gine idle speed during operation of the Climatronic in some circumstances.■
The setting of the Climatronic is stored in the active user account personali-
sation » page 49 .
Operate Climatronic in Infotainment
Fig. 150
Infotainment Columbus, Amund-
sen, Bolero: Climatronic main
menu
Fig. 151
Infotainment Swing: Climatronic
main menu
Read and observe on page 114 first.
›
To display the main menu press the button
on the Climatronic control
unit.
Function surfaces and display » Fig. 150 and. » Fig. 151ADisplays the current operation mode (or set the operation mode) of
the ClimatronicBSet the desired temperature (front - left side)CSet the desired temperature (front - right side)DSetting the power in operationESwitching on/off and adjusting the fan speed, cooling system, air dis-
tribution and the air recirculation a)FSet the desired temperature (rear)
Colour representation of the air flow from the air vents at the front
(Blue colour - temperature reduction / red colour - temperature in-
crease)Switching on/off the ClimatronicSwitch on / off the temperature synchronisation throughout the inte-
rior of the vehicle according to the temperature setting on the driv-
er's side a)
Locking / unlocking of the temperature setting and heating of the
rear seats using the rear buttons a)Set the auxiliary heater and ventilationSwitch on/off the windscreen heating
a)Other Climatronic settingsa)
When switched on, the symbol in the function surface is green.
Other Climatronic settings
Press the button on the Climatronic control panel
→ Tap the function sur-
face In the Infotainment screen.
■
Air con. profile
- Setting the operating performance during operation (ap-
plies to Infotainment Swing)
■
Automatic air recirculation
- Automatic re-circulated air mode on/off
■
Automatic auxiliary heater
- Quick interior heating on/off
■
Automatic windscreen heating
- Activates/deactivates the automatic windscreen
heating
Climatronic - automatic operation
Read and observe
on page 114 first.
The automatic mode is used in order to maintain a constant temperature andto demist the windows in the interior of the car.
›
To turn on , press
» Fig. 148 on page 114 the function surface.
›
To turn off , press any button for the air distribution or change the blower
speed. The temperature regulation is continued.
Holding the button will turn on
automatically.
116Using the system
Page 119 of 336

Operating modes
Automatic mode works in three modes - moderate, medium, and intensive.
Setting of the different modes takes place via the functional surface D
» Fig. 150 on page 116 or » Fig. 151 on page 116 .
After the automatic mode is switched on, Climatronic works in the last selec-
ted mode. The currently selected mode is displayed in the Infotainment dis-
play.
Air distribution control
Read and observe
on page 114 first.
The recirculation mode prevents contaminated outside air getting into the In-terior of the vehicle. In recirculated air mode air is sucked out of the interior of
the vehicle and then fed back into the interior.
›
To switch on , press the
button. The warning light below the button lights
up.
›
To switch off , press the
button again. The warning light below the button
goes out.
Heating and manual air conditioning system
If the air distribution control is set to position when the recirculation modes
is switched on, the recirculated-air mode is switched off. By pressing the
button, the air recirculation also in this position can be switched on again.
When the cooling system ( button) is switched on and the temperature reg-
ulator is “turned” to the left, the recirculated-air mode is switched on.
Climatronic
The Climatronic can have a sensor that measures the air recirculation mode
and automatically turns on if there is an increased concentration of pollutants
in the incoming air.
When the pollutant concentration decreases to the normal level, the recircula-
ted air mode is automatically switched off.
Automatically switching the air recirculation function on/off can be adjusted by pressing the button on the Climatronic and by subsequently pressing the
function surfaces
→
automatic air recirculation
in the Infotainment screen. Au-
tomatic switching on / off works at a temperature above 2 ° C.
A shut-off of the air recirculation function takes place automatically by press-
ing the button, possibly depending on the moisture conditions in the vehi-
cle interior.
WARNINGThe air recirculation cannot be switched on for a longer period of time be-
cause there is no supply of fresh air from the outside. “Stale air” may result
in fatigue in the driver and occupants, reduce attention levels and also
cause the windows to mist up. As soon as the windows mist up, turn the air
recirculation mode off immediately - there is a risk of accident!
CAUTION
We recommend not smoking in the vehicle when the recirculating air operation
is switched on. The smoke sucked from inside the vehicle is deposited on the
evaporator of the air conditioner. This produces a permanent odour when the
air conditioning system is operating which can only be eliminated through con-
siderable effort and expense (replacement of compressor).
Air outlet vents
Fig. 152
Air vents at the front
117Heating and ventilation
Page 211 of 336
When approaching maximum speed (launch control function)1)
The launch control function is available in mode S or Tiptronic.›
Disable the TCS » page 212, Braking and stabilisation systems .
›
START STOP deactivate » page 202, Manually disable / enable system .
›
Fully depress and hold the brake pedal with your left foot.
›
Fully depress the accelerator pedal with your right foot.
›
Release the brake pedal - the vehicle is running at maximum acceleration.
Driving in neutral (“coasting”)
When releasing the accelerator pedal, the vehicle moves without the braking
effect of the engine.
Operating conditions
▶ The selector lever is in the D/S position.
▶ Driving mode Eco or Individual (Drive - Eco) is selected » page 240, Select the
driving mode (Driving Mode Selection) .
▶ The vehicle is travelling at more than 20 km/h.
▶ No trailer or other accessory is connected to the trailer socket.
The gear is selected again automatically, when you depress the accelerator or
brake pedal or pull the left rocker switch
-
towards the steering wheel
» page 208 , Manual shifting of gears (Tiptronic) .
WARNINGRapid acceleration, particularly on slippery roads, can lead to loss of control
of the vehicle – risk of accident!
Running in the engine and economical driving
Introduction
This chapter contains information on the following subjects:
Running in the engine
209
Tips for economical driving
209
DriveGreen function
210
Radiator shutters
210Running in the engine
During the first 1,500 km, the driving manner determines the quality of the
running in process on a new engine.
During the first 1,000 km , the engine should not be charged with more than
3/4 of the maximum permitted engine revs and without the trailer.
In the area of 1,000 to 1,500 kilometres , the engine load can be increased up
to the maximum permitted engine speed.
Tips for economical driving
The fuel consumption depends on the driving style, road condition, weather
conditions and the like.
For an economical driving style, the following instructions must be observed. ▶ Avoid unnecessary acceleration and braking.
▶ Observe the recommended gear » page 44.
▶ Avoid full throttle and high speeds.
▶ Reduce idling.
▶ Avoid short distances.
▶ Ensure the correct tyre inflation pressure is maintained » page 277.
▶ Avoid unnecessary ballast.
▶ Remove the roof rack when it is not needed.
▶ Only switch on electrical consumers (e.g. seat heating) for as long as they are
needed. In the Infotainment menu
→
→
conv. Consumers,
, up to three
consumers who currently have the largest share of fuel consumption, can be
displayed.
▶ Before switching on, ventilate the cooling system briefly and do not use the
cooling system with open windows.
▶ Do not leave windows open at high speed.
1)
This function is only valid for some engines.
209Starting-off and Driving
Page 273 of 336

Diesel enginesSpecification1.6 ltr. / 88 kW TDI CRVW 507 002.0 l/110, 130, 140 kW TDI CR
Vehicles with fixed service intervals
Petrol enginesSpecification1.4 l/92, 110 kW TSI
VW 502 00
1.8 ltr./132 kW TSI2.0 l/162, 206 kW TSIDiesel enginesSpecification1.6 ltr. / 88 kW TDI CRVW 507 002.0 l/110, 130, 140 kW TDI CR
Engine oil VW 505 01 can optionally be used in diesel engines without a DPF.
CAUTION
■
If no prescribed engine oil is available, then max. 0.5 l oil of the following
specifications can be refilled. ■Petrol engines: ACEA A3/ACEA B4 or API SN, (API SM);
■ Diesel engines: ACEA C3 or API CJ-4.
Check and refill
Fig. 321
Dipstick variants
Read and observe and on page 270 first.
Check the oil under the following conditions and refill.
The vehicle is standing on a horizontal surface.
The engine operating temperature is reached.
The engine is turned off.
Checking the level
›
Wait a few minutes until the engine oil flows back into the oil trough.
›
Remove the dipstick and wipe with a clean cloth.
›
Push the dipstick to the stop and pull out again.
›
Read the oil level and push in the dipstick.
The oil level must be in range
A
» Fig. 321 . If the oil level is below the range
A
, refill the oil.
Refilling
›
Unscrew the cap of the engine oil filler opening
C
» Fig. 319 on page 269 .
›
Add oil of the correct specification in portions of 0.5 litres » page 270.
›
Check the oil level .
›
Screw the lid of the engine oil filler closed carefully.
CAUTION
■
The oil level must never be below the range A » Fig. 321 – risk of damage to
the motor as well as the exhaust system.■
If a top up with oil is not possible or the oil level is above range
A
,
stop
driving! Switch off the engine and seek assistance from a specialist garage.
Note
Too low engine oil level is shown in the instrument cluster by the warning
light illuminating and also indicated by the message » page 40. Nevertheless,
we recommend to check the oil level on a regular basis with the dipstick.
Coolant
Introduction
This chapter contains information on the following subjects:
Checking and refilling
272
The coolant cools the engine and consists of water and coolant additive (with
additives that protect the cooling system against corrosion and prevents fur-
ring).
271Inspecting and replenishing
Page 274 of 336
The coolant additive proportion in the coolant must be between 40 and 60 %.
The correct mixing ratio of water and coolant additive should be checked if
necessary by a specialist garage or corrected if necessary.WARNING■ The following warning instructions must be followed at all times when
working in the engine compartment » page 268.■
Never open the end cover of the coolant expansion reservoir while the
engine is still warm. The cooling system is pressurized - risk of scalding or
injury from being splashed with coolant!
■
To protect against coolant splashes, cover the cap with a cloth when
opening.
■
Coolant and coolant fumes are harmful - avoid contact with the coolant. If
your eyes or skin come into contact with the coolant, immediately wash the
affected area for a few minutes long with a lot of water and seek medical
advice if required.
CAUTION
Do not cover the radiator or fit any parts (e.g. auxiliary lights) in front of the air
intakes - there is a risk of the engine overheating.
Checking and refilling
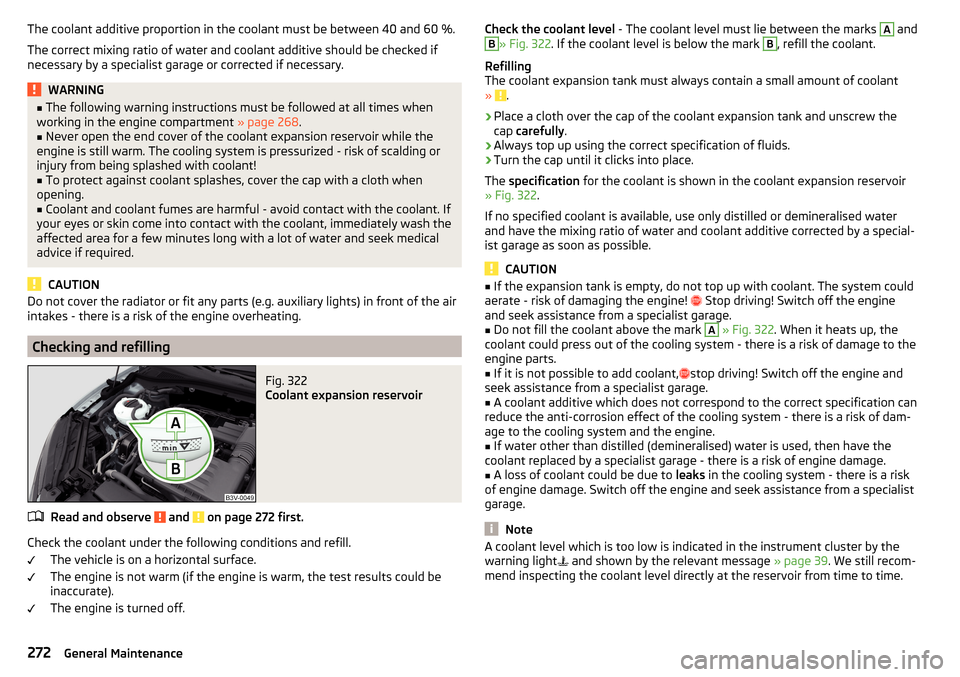
Fig. 322
Coolant expansion reservoir
Read and observe and on page 272 first.
Check the coolant under the following conditions and refill.
The vehicle is on a horizontal surface.
The engine is not warm (if the engine is warm, the test results could be
inaccurate).
The engine is turned off.
Check the coolant level - The coolant level must lie between the marks A andB» Fig. 322. If the coolant level is below the mark B, refill the coolant.
Refilling
The coolant expansion tank must always contain a small amount of coolant
»
.
›
Place a cloth over the cap of the coolant expansion tank and unscrew the
cap carefully .
›
Always top up using the correct specification of fluids.
›
Turn the cap until it clicks into place.
The specification for the coolant is shown in the coolant expansion reservoir
» Fig. 322 .
If no specified coolant is available, use only distilled or demineralised water
and have the mixing ratio of water and coolant additive corrected by a special-
ist garage as soon as possible.
CAUTION
■ If the expansion tank is empty, do not top up with coolant. The system could
aerate - risk of damaging the engine! Stop driving! Switch off the engine
and seek assistance from a specialist garage.■
Do not fill the coolant above the mark
A
» Fig. 322 . When it heats up, the
coolant could press out of the cooling system - there is a risk of damage to the
engine parts.
■
If it is not possible to add coolant,
stop driving! Switch off the engine and
seek assistance from a specialist garage.
■
A coolant additive which does not correspond to the correct specification can
reduce the anti-corrosion effect of the cooling system - there is a risk of dam-
age to the cooling system and the engine.
■
If water other than distilled (demineralised) water is used, then have the
coolant replaced by a specialist garage - there is a risk of engine damage.
■
A loss of coolant could be due to leaks in the cooling system - there is a risk
of engine damage. Switch off the engine and seek assistance from a specialist
garage.
Note
A coolant level which is too low is indicated in the instrument cluster by the
warning light and shown by the relevant message » page 39. We still recom-
mend inspecting the coolant level directly at the reservoir from time to time.272General Maintenance