front camera SKODA SUPERB 2016 3.G / (B8/3V) Owner's Manual
[x] Cancel search | Manufacturer: SKODA, Model Year: 2016, Model line: SUPERB, Model: SKODA SUPERB 2016 3.G / (B8/3V)Pages: 336, PDF Size: 53.89 MB
Page 5 of 336
Radio142Operation142
Media
146
Operation
146
Audio sources
149
Images
153
Image viewer
153
Video DVD
155
Video player
155
TV tuner
156
TV function
156
Media Command
158
Operation
158
Telephone
160
Introductory information
160
Pair and connect
163
Use the SIM card in the external module
166
rSAP
167
Telephone functions
168
Text messages (SMS)
172
Hotspot (WLAN) and data connection
174
Hotspot (WLAN)
174
Data connection
175
SmartLink
176
Introductory information
176
Android Auto
177
Apple CarPlay
178
MirrorLink®
178
Navigation
180
Introductory information
180
Search for destination and enter
182
Import my destinations
186
Map
187
Route guidance
190Route192Waypoint mode194
Traffic reports
196
vehicle systems
198
CAR - Vehicle settings
198
Driving
Starting-off and Driving
199
Starting and stopping the engine
199
START-STOPsystem
201
Brakes and Parking
203
Manual gear changing and pedals
205
Automatic transmission
206
Running in the engine and economical
driving
209
Avoiding damage to your vehicle
211
Assist systems
212
General information
212
Braking and stabilisation systems
212
Parking aid (ParkPilot)
215
Rear traffic alert and wizard for “Blind
spot”Monitoring
218
Reversing camera
221
Park Assist
225
Cruise Control System
229
Speed limiter
231
Adaptive Cruise Control (ACC)
233
Front Assist
237
Select the driving mode (Driving Mode
Selection)
240
Proactive occupant protection (Crew Protect
Assist)
242
Lane Departure Warning (Lane Assist)
243
Traffic jam assistant
245
Assistant for emergencies
246
Traffic sign recognition
246Fatigue detection248Tyre pressure monitoring249
Towing device and trailer
250
Hitch
250
Using hitch
252
General Maintenance
Care and maintenance
256
Service work, adjustments and technical
alterations
256
Service intervals
258
Cleaning and care
260
Inspecting and replenishing
264
Fuel
264
AdBlue ®
and its refilling
267
Engine compartment
268
Engine oil
270
Coolant
271
Brake fluid
273
Vehicle battery
273
Wheels
276
Wheels and tyres
276
Operating in winter conditions
278
Do-it-yourself
Emergency equipment and self-help
280
Emergency equipment
280
Changing a wheel
282
Puncture repair kit
285
Jump-starting
287
Towing the vehicle
288
Remote control and removable light -
replacing the battery/batteries
2903Table of Contents
Page 78 of 336
Windscreen wipers and washers
Introduction
This chapter contains information on the following subjects:
Front wipers and washers
76
Rear window wipers and washers / reversing camera cleaning system
77
Headlight cleaning system
77
The windscreen wipers and the wash system only operate if the ignition is
switched on and the bonnet and boot are closed.
WARNINGDo not use the windscreen washer system at low temperatures, without
heating the windscreen beforehand. The window washer fluid could other-
wise freeze on the windscreen and restrict the view to the front.
CAUTION
■ If the windscreen wipers are in rest position, they cannot be folded out from
the windscreen. The wipers must be set to the service position to raise them
off the windscreen » page 294.■
In cold temperatures and during the winter, check before switching on the
ignition that the wiper blades are not frozen to the windscreen. If the wind-
screen wipers are switched on when the blades are frozen to the windscreen,
this may damage both the blades and windscreen wiper motor.
■
Carefully release the frozen-on windscreen wiper blades from the wind-
screen and remove snow and ice.
■
Handle the windscreen wipers with care - there is the risk of damaging the
windscreen with the windscreen wiper arms.
■
Do not switch on the ignition when the front windscreen wiper arms are fol-
ded down - there is the danger of damaging the bonnet by the windscreen
wiper arms.
■
If there is an obstacle on the windscreen, the wipers will try to push away
the obstacle five times. Thereafter, the wipers will stop to prevent them be-
coming damaged. Turn on the wipers again only after the obstacle has been
removed.
Note■ Each time the ignition switches off for the third time, the position of the
windscreen wipers changes. This counteracts an early fatigue of the wiper
blades.■
The windscreen washer nozzles for the windscreen are heated when the en-
gine is running and the outside temperature is less than +10 °C.
Front wipers and washers
Fig. 63
Operating the windscreen wipers
and washing system at the front
Read and observe and on page 76 first.
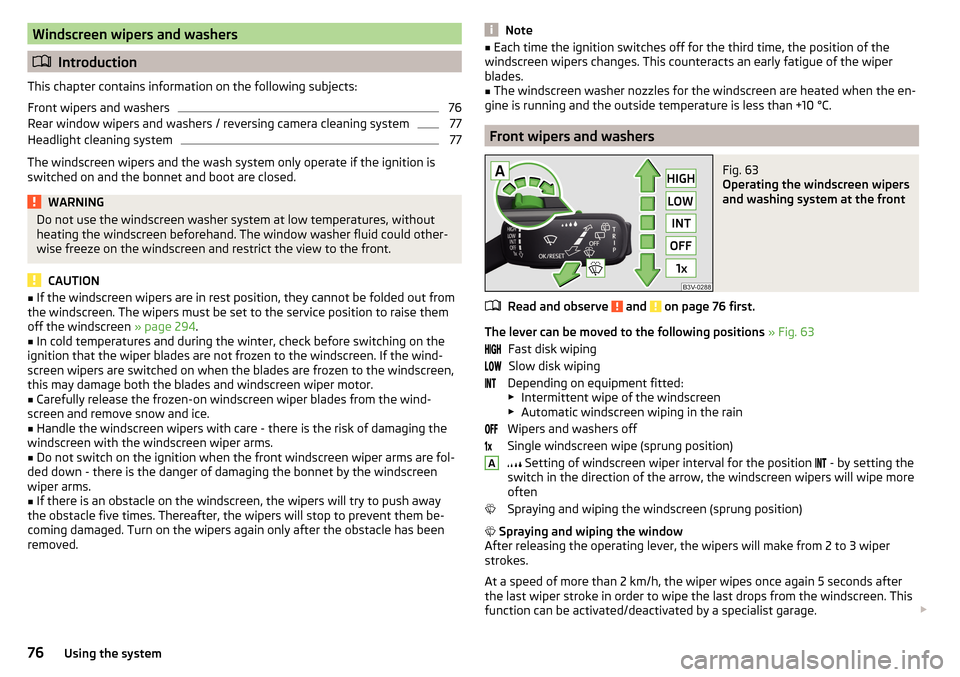
The lever can be moved to the following positions » Fig. 63
Fast disk wiping Slow disk wiping
Depending on equipment fitted:
▶ Intermittent wipe of the windscreen
▶ Automatic windscreen wiping in the rain
Wipers and washers off
Single windscreen wipe (sprung position)
Setting of windscreen wiper interval for the position
- by setting the
switch in the direction of the arrow, the windscreen wipers will wipe more
often
Spraying and wiping the windscreen (sprung position)
Spraying and wiping the window
After releasing the operating lever, the wipers will make from 2 to 3 wiper
strokes.
At a speed of more than 2 km/h, the wiper wipes once again 5 seconds after
the last wiper stroke in order to wipe the last drops from the windscreen. This
function can be activated/deactivated by a specialist garage.
A76Using the system
Page 191 of 336
With a larger map scale than 10 km, the map is automatically oriented towards
north.›
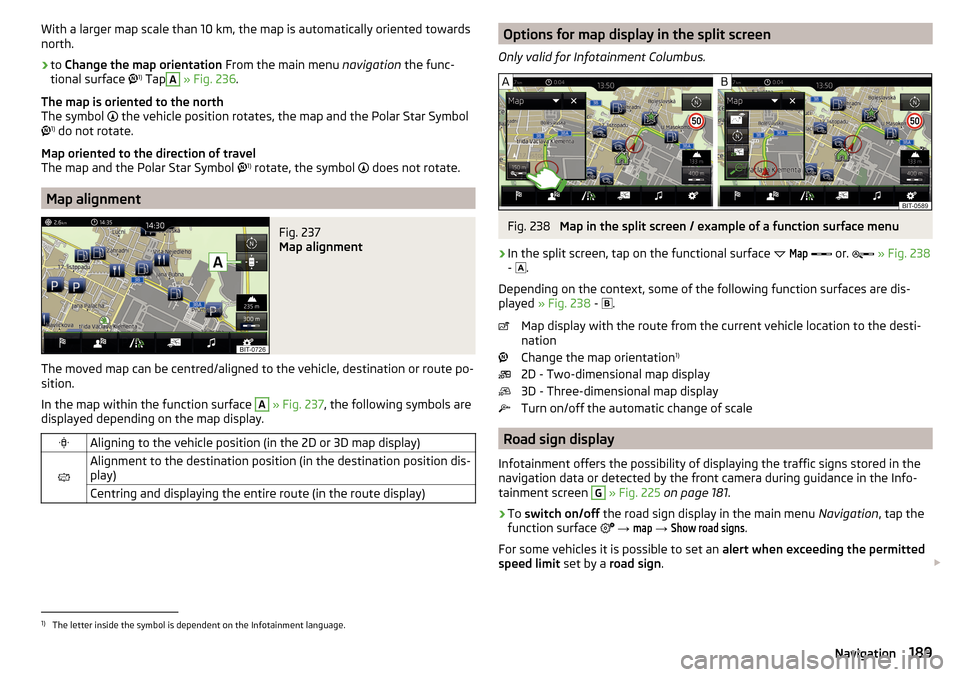
to Change the map orientation From the main menu navigation the func-
tional surface 1)
Tap
A
» Fig. 236 .
The map is oriented to the north
The symbol
the vehicle position rotates, the map and the Polar Star Symbol
1)
do not rotate.
Map oriented to the direction of travel
The map and the Polar Star Symbol 1)
rotate, the symbol
does not rotate.
Map alignment
Fig. 237
Map alignment
The moved map can be centred/aligned to the vehicle, destination or route po-
sition.
In the map within the function surface
A
» Fig. 237 , the following symbols are
displayed depending on the map display.
Aligning to the vehicle position (in the 2D or 3D map display)
Alignment to the destination position (in the destination position dis-
play)Centring and displaying the entire route (in the route display)Options for map display in the split screen
Only valid for Infotainment Columbus.Fig. 238
Map in the split screen / example of a function surface menu
›
In the split screen, tap on the functional surface
Map
or.
» Fig. 238
- .
Depending on the context, some of the following function surfaces are dis-
played » Fig. 238 -
.
Map display with the route from the current vehicle location to the desti-
nation
Change the map orientation 1)
2D - Two-dimensional map display
3D - Three-dimensional map display
Turn on/off the automatic change of scale
Road sign display
Infotainment offers the possibility of displaying the traffic signs stored in the
navigation data or detected by the front camera during guidance in the Info-
tainment screen
G
» Fig. 225 on page 181 .
›
To switch on/off the road sign display in the main menu Navigation, tap the
function surface
→
map
→
Show road signs
.
For some vehicles it is possible to set an alert when exceeding the permitted
speed limit set by a road sign .
1)
The letter inside the symbol is dependent on the Infotainment language.
189Navigation
Page 219 of 336
Note■If with Version 3 vehicles not all fields around the vehicle silhouette are ac-
tive after activation the vehicle should be moved forwards or backwards.■
The signal tones for front obstacle recognition are factory-set to be higher
than for rear obstacle recognition.
■
The setting of the acoustic signals is stored (depending on the Infotainment
type) in the active user account personalisation » page 49.
Display in Infotainment screen
Fig. 268
Screen display
Read and observe and on page 215 first.
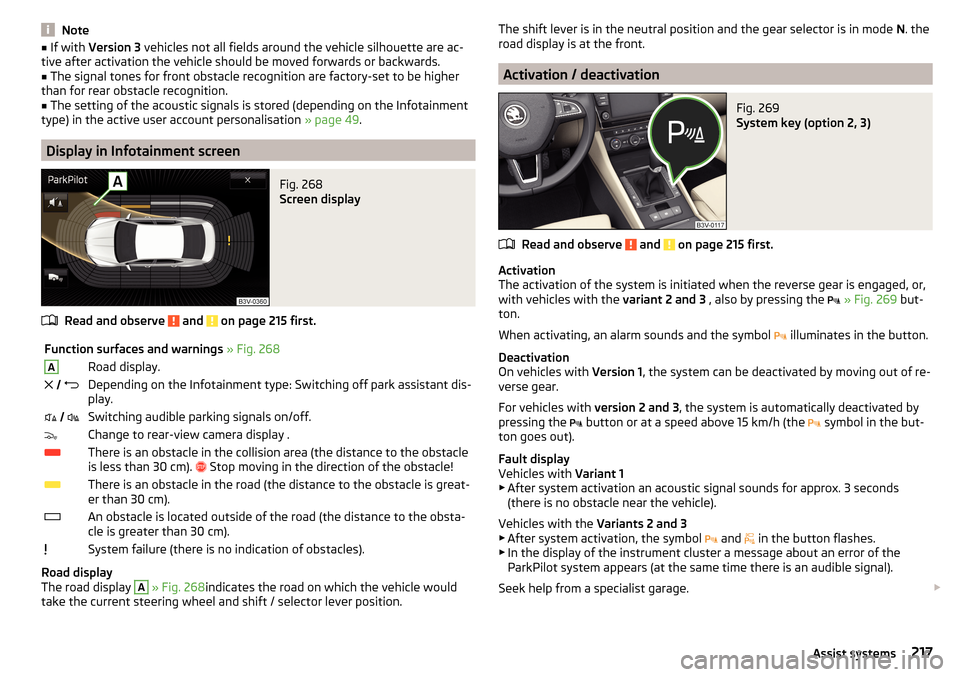
Function surfaces and warnings » Fig. 268ARoad display. Depending on the Infotainment type: Switching off park assistant dis-
play. Switching audible parking signals on/off.Change to rear-view camera display .There is an obstacle in the collision area (the distance to the obstacle
is less than 30 cm).
Stop moving in the direction of the obstacle!There is an obstacle in the road (the distance to the obstacle is great-
er than 30 cm).An obstacle is located outside of the road (the distance to the obsta-
cle is greater than 30 cm).System failure (there is no indication of obstacles).
Road display
The road display
A
» Fig. 268 indicates the road on which the vehicle would
take the current steering wheel and shift / selector lever position.
The shift lever is in the neutral position and the gear selector is in mode N. the
road display is at the front.
Activation / deactivation
Fig. 269
System key (option 2, 3)
Read and observe and on page 215 first.
Activation
The activation of the system is initiated when the reverse gear is engaged, or,
with vehicles with the variant 2 and 3 , also by pressing the
» Fig. 269 but-
ton.
When activating, an alarm sounds and the symbol illuminates in the button.
Deactivation
On vehicles with Version 1, the system can be deactivated by moving out of re-
verse gear.
For vehicles with version 2 and 3, the system is automatically deactivated by
pressing the button or at a speed above 15 km/h (the
symbol in the but-
ton goes out).
Fault display
Vehicles with Variant 1
▶ After system activation an acoustic signal sounds for approx. 3 seconds
(there is no obstacle near the vehicle).
Vehicles with the Variants 2 and 3
▶ After system activation, the symbol and
in the button flashes.
▶ In the display of the instrument cluster a message about an error of the
ParkPilot system appears (at the same time there is an audible signal).
Seek help from a specialist garage.
217Assist systems
Page 299 of 336
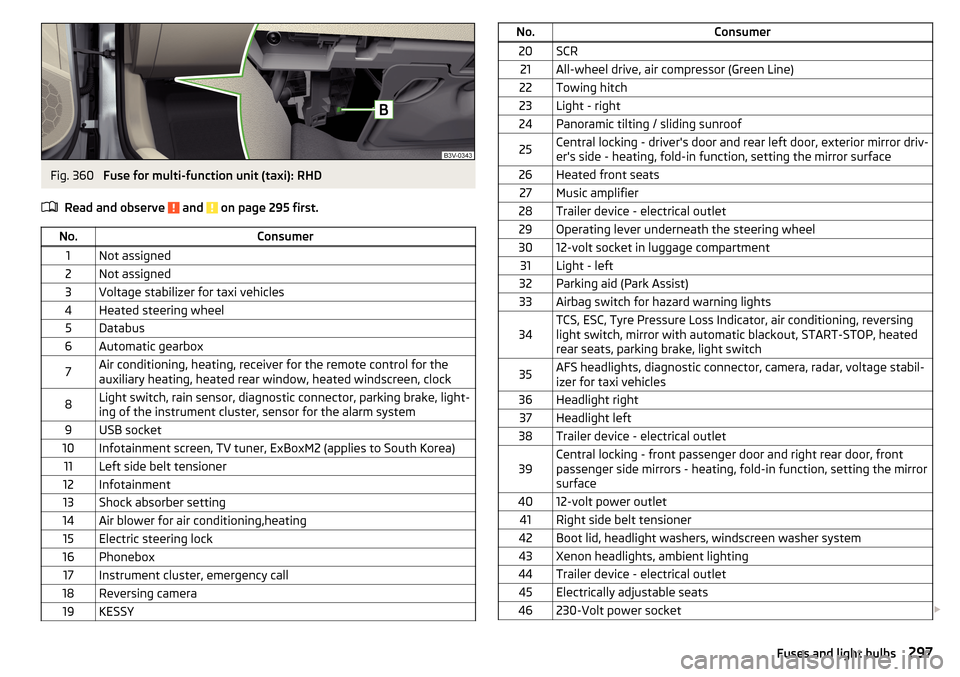
Fig. 360
Fuse for multi-function unit (taxi): RHD
Read and observe
and on page 295 first.
No.Consumer1Not assigned2Not assigned3Voltage stabilizer for taxi vehicles4Heated steering wheel5Databus6Automatic gearbox7Air conditioning, heating, receiver for the remote control for the
auxiliary heating, heated rear window, heated windscreen, clock8Light switch, rain sensor, diagnostic connector, parking brake, light-
ing of the instrument cluster, sensor for the alarm system9USB socket10Infotainment screen, TV tuner, ExBoxM2 (applies to South Korea)11Left side belt tensioner12Infotainment13Shock absorber setting14Air blower for air conditioning,heating15Electric steering lock16Phonebox17Instrument cluster, emergency call18Reversing camera19KESSYNo.Consumer20SCR21All-wheel drive, air compressor (Green Line)22Towing hitch23Light - right24Panoramic tilting / sliding sunroof25Central locking - driver's door and rear left door, exterior mirror driv-
er's side - heating, fold-in function, setting the mirror surface26Heated front seats27Music amplifier28Trailer device - electrical outlet29Operating lever underneath the steering wheel3012-volt socket in luggage compartment31Light - left32Parking aid (Park Assist)33Airbag switch for hazard warning lights34TCS, ESC, Tyre Pressure Loss Indicator, air conditioning, reversing
light switch, mirror with automatic blackout, START-STOP, heated
rear seats, parking brake, light switch35AFS headlights, diagnostic connector, camera, radar, voltage stabil-
izer for taxi vehicles36Headlight right37Headlight left38Trailer device - electrical outlet39Central locking - front passenger door and right rear door, front
passenger side mirrors - heating, fold-in function, setting the mirror
surface4012-volt power outlet41Right side belt tensioner42Boot lid, headlight washers, windscreen washer system43Xenon headlights, ambient lighting44Trailer device - electrical outlet45Electrically adjustable seats46230-Volt power socket 297Fuses and light bulbs
Page 324 of 336
Pop-up windowMap189
Power steering35
Practical equipment 230-volt socket
97
Practical features 12-volt socket in the interior
96
12 volt socket in luggage compartment97
Ashtray98
Cigarette lighter99
Parking ticket holder88
Pockets94
Reflective vest280
Seat backrest with long cargo channel95
Storage compartment87
Storage compartment for umbrella93
Storage compartment under the front passen- ger seat
93
Waste container91
Preferred contacts170
Preheating unit36
Preset list TV tuner
157
Principles of Infotainment125
Proactive occupant protection242
Proactive passenger protection Warning light
37
Puncture repair kit285
R
Radiator shutters
210
radio Select station
143
Radio Broadcasting
143
DAB - settings141
DAB settings134
FM - settings134, 141
L-band135
List of available stations143
Main menu142
Operation142
Preface142
Radio station logo145
Save station144
Scan143
Search stations143
Set140
set to134
Station buttons144
Traffic program (TP)145
Voice control128
Radio station logo145
Radio station logos Update
134
Radio stations Choose
143
Logo145
Save station144
Search stations143
Select station143
Station buttons144
Raising the vehicle284
Rear fog light69
Warning light36
Rear seats83
Rear traffic alert218
Rear Traffic Alert Activation / deactivation
221
Malfunctions221
Operation219
Rear view mirror77
Rear window - heating74
Record waypoints195
Refill Windscreen washer fluid
270
refilling AdBlue
267
RefillingCoolant272
Engine oil271
Reflective vest280
Refuelling265
Fuel265
Regulation Headlight beam
67
Remote control Auxiliary heating (auxiliary heating and ventila- tion)
120
Changing battery290
Synchronisation process57
Unlocking/locking54
Remote transmission of SIM data167
Removable light109
Changing batteries292
Removable through-loading bag95
Repairs and technical alterations256
Replace Battery
291
Replacing Bulbs
299
Fuses295
Windscreen wiper blades294
Reproduction Media
147
Video DVD155
Restart Infotainment126
Restaurant184
Reversible seat belts17
Reversing camera221
Activation / deactivation222
Function surfaces223
Mode- Driving up to a trailer / Distance moni- toring
225
Mode- Monitoring the area behind the vehicle 225
Mode - Parallel parking
224
Operation222
Orientation lines and roadway223
322Index