warning SKODA YETI 2010 1.G / 5L Owners Manual
[x] Cancel search | Manufacturer: SKODA, Model Year: 2010, Model line: YETI, Model: SKODA YETI 2010 1.G / 5LPages: 271, PDF Size: 14.71 MB
Page 116 of 271
Starting-off and Driving115
Using the system
Safety
Driving Tips
General Maintenance
Breakdown assistance
Technical Data
The external sound source of the park assist and the parking aid can be
disruptively influenced and under unfavourable conditions, objects or people
cannot be recognised by the sensors of the parking aid.Caution
If other vehicles are parked behind or on the kurb, the park assist guides your
ve hicle be yond the kurb or onto it. Make s ure that the whee ls or the whe el rims of yo ur
vehicle are not damaged and if necessary intervene in time.
You should satisfy yourself before parking that there is no small obstacle, such as a
rock, thin post, trailer drawbar etc., in front or behind your vehicle. Such an obstacle
might not be within the range detected by the sensors.
Under certain circumstances, surfaces or st ructures of certain objects such as wire
mesh fences, powder snow etc..., ca nnot be recognised by the system.
The evaluation of the parking space and the parking procedure depends on the
circumference of the wheels. The system does not function correctly if your vehicle is
mounted with wheels of non-permissible size, snow chains or a temporary spare
wheel (in order to reach the nearest workshop). If the tyres other than those excepted
by the manufacturer are mounted, the resulting position of the vehicle in the parking
space can differ slightly. The parking assistant system automatically performs the
correction of the wheel circumference when driving.
The accuracy of the evaluation for the parking space can be influenced by the
incorrectly determined outside temperature if the later is influenced by the thermal
radiation of the engine i.e for stop and go in a traffic jam.
In order to avoid damaging th e sensors while cleaning with high-pressure cleaners
or steam jets, the sensors must only be directly sprayed for short periods while a
minimum distance of 10 cm must be observed.Note
A component of the park assist is the front and rear parking aid*.
The electronic stability programme (ESP*) must always be switched on for the
parking procedure.
Only the front parking aid operates if you are towing a trailer (applies only to
models which feature a factory-fitted towing device*). This is why it is not possible to
park backwards with the help of the park assist when towing a trailer.
The sensors must be kept clean and free of ice to enable the parking aid to operate
properly.
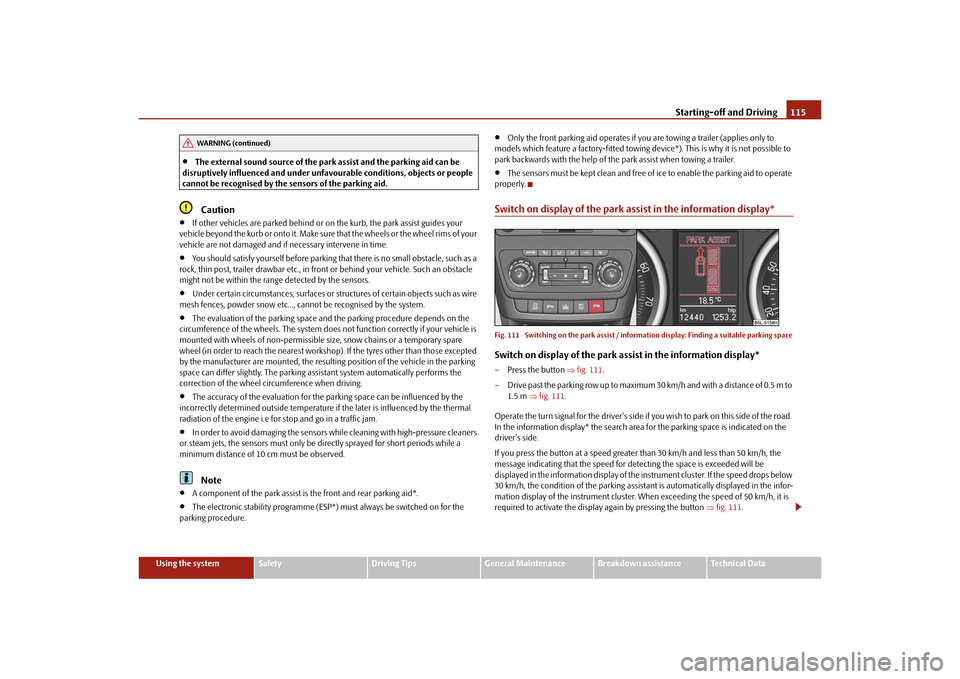
Switch on display of the park a ssist in the information display*Fig. 111 Switching on the park assist / inform ation display: Finding a suitable parking spaceSwitch on display of the park assist in the information display*– Press the button fig. 111 .
– Drive past the parking row up to maximum 30 km/h and with a distance of 0.5 m to 1.5 m fig. 111 .
Operate the turn signal for the driver's side if you wish to park on this side of the road.
In the information display* the search area for the parking space is indicated on the
driver's side.
If you press the button at a speed greate r than 30 km/h and less than 50 km/h, the
message indicating that the speed for detecting the space is exceeded will be
displayed in the information display of the in strument cluster. If the speed drops below
30 km/h, the condition of the parking assistant is automatically displayed in the infor-
mation display of the instrument cluster. When exceeding the speed of 50 km/h, it is
required to activate the displa y again by pressing the button fig. 111 .
WARNING (continued)
s2ug.6.book Page 115 Friday, April 9, 2010 2:24 PM
Page 117 of 271
Starting-off and Driving
116Note
If the park assist is switched on, a yellow warning light lights up in the button.
The search for suitable parking spaces is automatic after switching on the ignition
at speeds of more than 30 km/h. Searching for a parking space is performed at the
same time on the driver and front passenger side.
If the sensors find a suitable parking space, they store its parameters until another
suitable parking space has been found or until a distance of 10 m had been driven after
finding the parking space. This is why it is possible to switch on the park assist after
driving past the parking space, the information on whether this parking space is suit-
able for parking appears in the information display*.
Parking with the help of the park assist and concluding the parking procedureFig. 112 Information display: the determined pa rking space with the information to drive on
and for engaging the reverse gear Fig. 113 Information display: Information fo
r engaging the forward gear or the reverse
gear
The time limit for the parking procedure with the help of the park assist lasts 180
seconds.
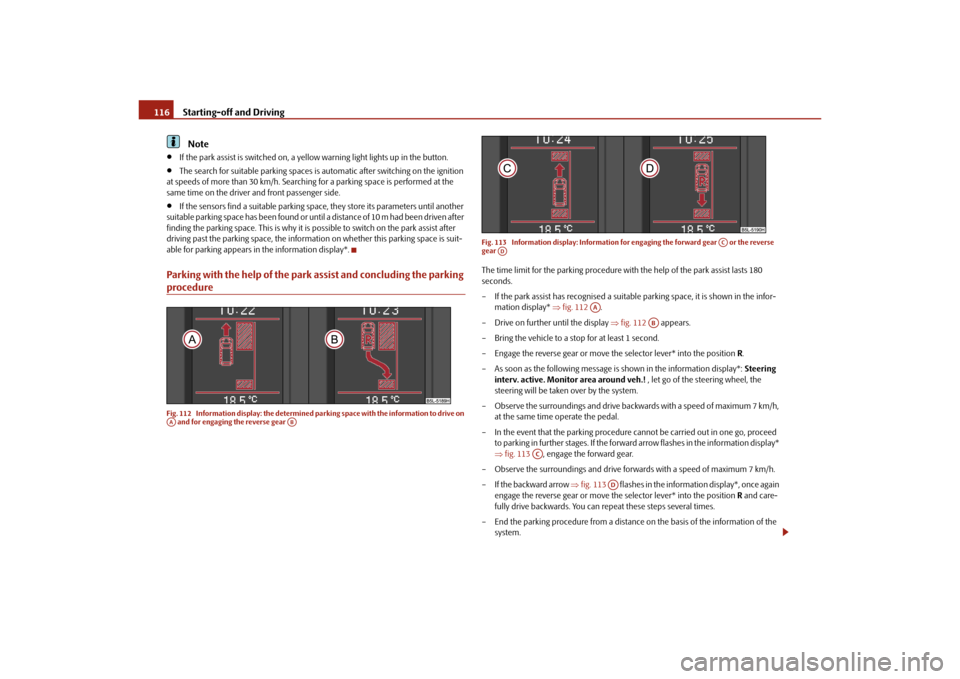
– If the park assist has recognised a suitable parking space, it is shown in the infor-
mation display* fig. 112 .
– Drive on further until the display fig. 112 appears.
– Bring the vehicle to a stop for at least 1 second.
– Engage the reverse gear or move the selector lever* into the position R.
– As soon as the following message is shown in the information display*: Steering
interv. active. Monitor area around veh.! , let go of the steering wheel, the
steering will be taken over by the system.
– Observe the surroundings and drive back wards with a speed of maximum 7 km/h,
at the same time operate the pedal.
– In the event that the parking procedure cannot be carried out in one go, proceed to parking in further stages. If the forward arrow flashes in the information display*
fig. 113 , engage the forward gear.
– Observe the surroundings and drive forw ards with a speed of maximum 7 km/h.
– If the backward arrow fig. 113 flashes in the information display*, once again
engage the reverse gear or move the selector lever* into the position R and care-
fully drive backwards. You can repeat these steps several times.
– End the parking procedure from a distance on the basis of the information of the
system.
AA
AB
AC
AD
AA
AB
AC
AD
s2ug.6.book Page 116 Friday, April 9, 2010 2:24 PM
Page 118 of 271
Starting-off and Driving117
Using the system
Safety
Driving Tips
General Maintenance
Breakdown assistance
Technical Data
As soon as the parking procedure is comple
ted, an audible signal sounds and in the
information display* the following message appears: Steering interv. finished.
Please take over steering! .
Switch off park assist
The park assist switches off during one of the following occurences:
a speed of 30 km/h is exceeded,
a speed of 7 km/h is exceeded during the parking procedure,
a time limit of 180 seconds is exceeded for the parking procedure,
the button for the park assist is pressed,
parking aid is activated,
Switch off TCS system
intervention of the driver in the automa tic steering procedure (stop the steering
wheel),
Disengage reverse gear or take selector lever* out of the position R when driving
backwards into the parking space.
Further warning and information texts of the park assist in the information
display*:
Park Assist finished.
The parking procedure has ended or after switching on the ignition, the vehicle has not
been driven above 10 km/h.
Park Assist: Speed too high!
Reduce the speed below 30 km/h.
Driver steering intervention: Please take over steering!
The parking procedure is ended through driver intervention.
Park Assist finished. TCS deactivated.
The parking procedure cannot be carried ou t because the TCS system is switched off.
TCS deactivated. Please take over steering!
The parking procedure was ended because the TCS system was switched off during the
parking procedure. Trailer: Park Assist finished.
The parking procedure is not possible beca
use the trailer is hitched and a plug is
inserted in the socket of the towing device.
Time limit exceeded. Please take over steering!
The parking procedure was ended because a time limit of 180 seconds for parking was
exceeded.
Fault: Park Assist stopped.
The parking procedure is not possible becaus e a fault exists on the vehicle. Have the
fault rectified by a specialist workshop.
Park Assist defective. Workshop!
The parking procedure is not possible because a fault exists on the park assist. Have the
fault rectified by a specialist workshop.
Steering interv. active. Mo nitor area around veh.!
The park assist is active and takes over the steering movements. Observe the
surroundings and carefully drive backward s, at the same time operate the pedal.
Please take over steering! Finish parking proc. manually!
Take over the steering. End the parking procedure without using the park assist.
Speed too high! Please take over steering!
The parking procedure was ended while the speed was exceeded.
Park Assist: TCS Intervention.
Intervention of the TCS while searching for a suitable parking place.
TCS intervention! Please take over steering!
Parking procedure is ended through the intervention of the TCS.
Park Assist: Stationary time not sufficient.
The stationary time of the vehicle was less than 1 second.
Park Assist: Speed too low.
After the ignition is switched on, the vehicle must exceed the speed of 10 km/h at least
once.
s2ug.6.book Page 117 Friday, April 9, 2010 2:24 PM
Page 119 of 271
Starting-off and Driving
118
Cruise control system (CCS)*IntroductionThe cruise control system (CCS) maintains a constant speed, more than 30 km/h (20
mph), once it has been set, without you havi ng to depress the accelerator pedal. This
is only possible within the range which is permitted by the power output and braking
power of the engine. The cruise control system makes it possible - particularly on long
journeys - for you to rest your “accelerator foot”.
WARNING
For safety reasons, the cruise control system must not be used in dense
traffic or on unfavourable road surfaces (such as icy roads, slippery roads, loose
gravel) - risk of accident!
In order to prevent unintentional use of the cruise control system, always
switch off the system after use.Note
Models fitted with a manual gearbox: Always depress the clutch pedal if you switch
on the cruise control system when the gearbo x is in Neutral! Otherwise the engine can
rev up unintentionally.
The cruise control system is not able to maintain a constant speed when driving on
steep downhill sections. The weight of the vehicle increases the speed at which it
travels. One should shift down in good time to a lower gear or slow the vehicle down
by applying the foot brake.
It is not possible on vehicles fitted with an automatic gearbox to switch on the
cruise control system if the sele ctor lever is in the position P, N or R.
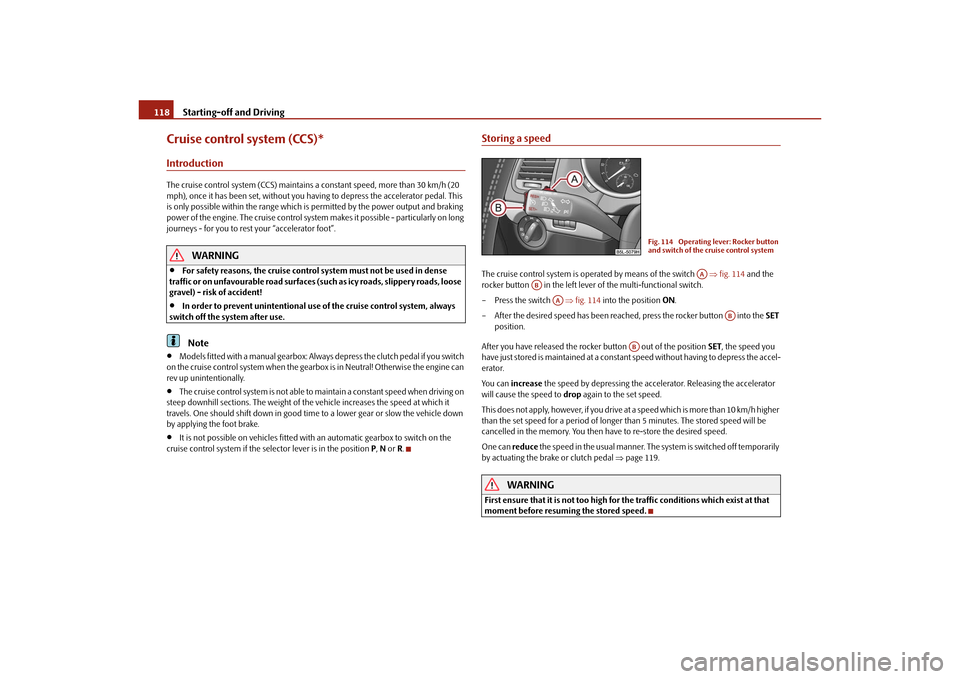
Storing a speedThe cruise control system is oper ated by means of the switch fig. 114 and the
rocker button in the left lever of the multi-functional switch.
– Press the switch fig. 114 into the position ON.
– After the desired speed has been reached, press the rocker button into the SET
position.
After you have released the rocker button out of the position SET, the speed you
have just stored is maintained at a consta nt speed without having to depress the accel-
erator.
You can increase the speed by depressing the acce lerator. Releasing the accelerator
will cause the speed to drop again to the set speed.
This does not apply, however, if you drive at a speed which is more than 10 km/h higher
than the set speed for a period of longer than 5 minutes. The stored speed will be
cancelled in the memory. You then have to re-store the desired speed.
One can reduce the speed in the usual manner. The system is switched off temporarily
by actuating the brake or clutch pedal page 119.
WARNING
First ensure that it is not too high for the traffic conditions which exist at that
moment before resuming the stored speed.
Fig. 114 Operating lever: Rocker button
and switch of the cruise control system
AA
AB
AA
AB
AB
s2ug.6.book Page 118 Friday, April 9, 2010 2:24 PM
Page 120 of 271
Starting-off and Driving119
Using the system
Safety
Driving Tips
General Maintenance
Breakdown assistance
Technical Data
Changing a stored speed
You can also change the speed of the vehicle without depressing the
accelerator.Fas t e r–You can increase the stored speed without depressing the accelerator, by pressing
the rocker button fig. 114 in the RES position.
– The speed of the vehicle will increase co ntinuously if you hold the rocker button
pressed in the RES position. Once the vehicle has reached the desired speed,
release the rocker button. The set speed is then stored in the memory.Slower–You can decrease the stored speed by pressing the rocker button in the SET
position.
– Holding down the rocker button pressed in the SET position will cause the speed
of the vehicle to reduce continuously. Once the vehicle has reached the desired
speed, release the rocker button. The set speed is then stored in the memory.
– If you release the rocker button when the vehicle is travelling at a speed of less than 30 km/h, the speed is not stored, the memory is erased. It is then necessary to again
store the speed with the rocker button in the position SET after an increase in
speed of the vehicle to more than 30 km/hour.Switching off the cruise control system temporarily–You can switch off the cruise control system temporarily by depressing the brake
pedal or clutch pedal, on vehicles fitted with an automatic gearbox only with the
brake pedal.
– You can switch off temporarily the cruise control system, if you press the switch in the middle position.
The set speed remains stored in the memory.
The Resumption of the stored speed is achieved by releasing the brake or clutch
pedal, on vehicles fitted wi th automatic gearbox only after releasing the brake pedal and after shortly pressing the rocker button
page 118, fig. 114 into the position
RES .
WARNING
First ensure that it is not too high for the traffic conditions which exist at that
moment before resuming the stored speed.Switching off the cruise control system completely– Press the switch page 118, fig. 114 to the right into position OFF.
AB
AB
AB
AA
AB
AA
s2ug.6.book Page 119 Friday, April 9, 2010 2:24 PM
Page 121 of 271
Automatic gearbox DSG*
120
Automatic gearbox DSG*Automatic gearbox DSG*IntroductionYour car is equipped with an automatic gearbox DSG. The abbreviation DSG means
Direct shift gearbox (Direct shift gearbox).
Two independent clutches are needed for the power transmission between the engine
and the gearbox. These replace the torque converter of the conventional automatic
gearbox. Their shifting is matched in such a way that there are no jerks when shifting
the gear and the power transmission of the engine to the front wheels is not
interrupted.Information for driving with the automatic gearbox DSG
Shifting up and down through the gears is performed automatically.You can also, however, switch the gearbox over into the Tiptronic mode. This mode
makes it possible for you to also shift gears manually page 123.Starting-off and Driving– Depress the brake pedal fully and keep it depressed.
– Press the Shiftlock button (button in ha ndle of the selector lever), move the
selector lever into the desired position, e.g. D page 121, and then release the
Shiftlock button.
– Release the brake pedal and depress the accelerator .Stop– The selector lever position N does not have to be selected when stopping just for
a short time, such as at a cross roads. It is sufficient to hold the vehicle stationary
using the foot brake. The engine can, however, be allowed just to idle.Parking– Depress the brake pedal and hold it depressed. – Apply the handbrake firmly.
– Press and Shiftlock button in the selector lever, move the selector lever to
P and
then release the Shiftlock button.
The engine can only be started when the selector lever is in position P or N
page 109. At temperatures below -10 °C the engine can only be started in the
selector lever position P.
It is sufficient to engage selector lever position P when parking on a flat surface. When
parking on a slope you should first apply the handbrake firmly and then move the
selector lever into position P. This is to ensure that there is no excessive pressure acting
on the lock mechanism and that it is easier to subsequently move the selector lever out
of position P.
If the selector lever position N is selected by accident while driving it is first necessary
to release pressure on the accelerator pedal and wait for idling speed of the engine to
be reached before engaging a drive position in the selector lever.
WARNING
Do not depress the accelerator when changing the position of the selector
lever if the car is stationary and the engine is running - risk of accident!
Never move the selector lever into position R or P when driving - risk of an
accident!
If you are stopping at a hill (downhill section), never try to hold the car
stationary with the gear engaged by mean s of the “accelerator”, this means by
letting the clutch slip. This can lead to ov erheating of the clutch. If there is a risk
of overheating of the clutch due to overlo ad, the clutch is opened automatically
and the vehicle rolls backward - risk of accident!
If yo u m us t s to p a t a sl ope , d e pre s s a nd ho ld t he b ra ke pe d a l , s o t ha t y ou c a n
prevent the vehicle from rolling back.
s2ug.6.book Page 120 Friday, April 9, 2010 2:24 PM
Page 122 of 271
Automatic gearbox DSG*121
Using the system
Safety
Driving Tips
General Maintenance
Breakdown assistance
Technical Data
Caution
The double clutch on the automatic gear box DSG is equipped with an overload
protection. If you make use of the uphill function on a vehicle which is stationary or
driving slowly uphill, it will result in an increase of thermal stress of the clutches.
In the event that they overheat, the warning light
and a warning text page 37
appear in the information display*. In such a case bring the vehicle to a stop, switch off
the engine and wait until the warning light and the warning go out - risk of gearbox
damage! You can continue the trip as soon as the warning light and the warning go
out.
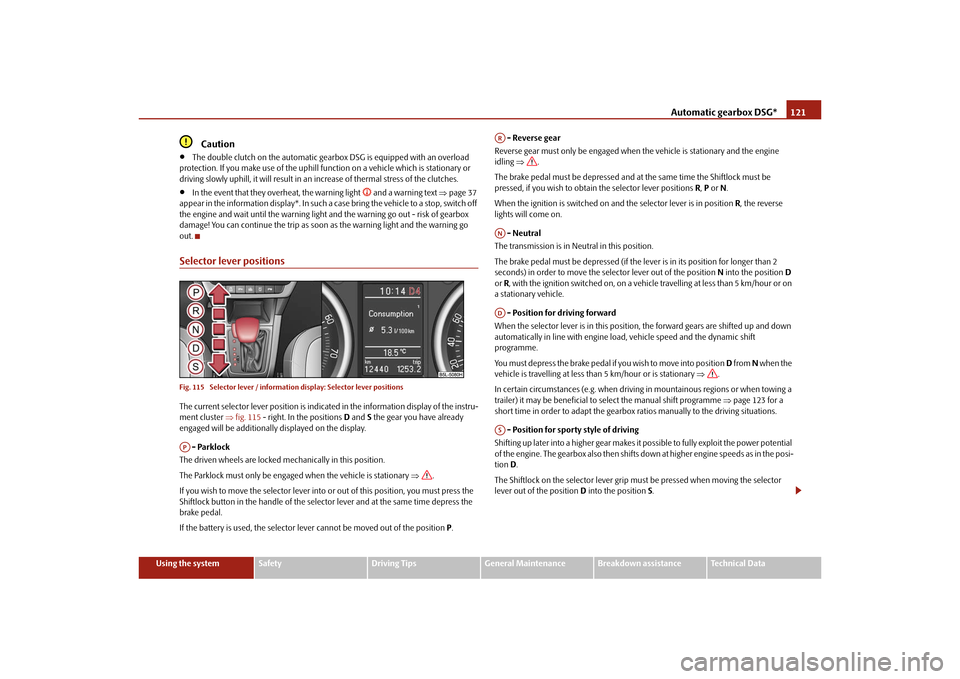
Selector lever positionsFig. 115 Selector lever / informatio n display: Selector lever positionsThe current selector lever position is indica ted in the information display of the instru-
ment cluster fig. 115 - right. In the positions D and S the gear you have already
engaged will be additionally displayed on the display.
- Parklock
The driven wheels are locked me chanically in this position.
The Parklock must only be engaged when the vehicle is stationary .
If you wish to move the selector lever into or out of this position, you must press the
Shiftlock button in the handle of the selector lever and at the same time depress the
brake pedal.
If the battery is used, the selector lever cannot be moved out of the position P. - Reverse gear
Reverse gear must only be engaged when the vehicle is stationary and the engine
idling .
The brake pedal must be depressed and at the same time the Shiftlock must be
pressed, if you wish to obtain the selector lever positions R, P or N.
When the ignition is switched on an d the selector lever is in position R, the reverse
lights will come on.
- Neutral
The transmission is in Neutral in this position.
The brake pedal must be depressed (if the le ver is in its position for longer than 2
seconds) in order to move the se lector lever out of the position N into the position D
or R, with the ignition switched on, on a vehicle travelling at less than 5 km/hour or on
a stationary vehicle.
- Position for driving forward
When the selector lever is in this position, the forward gears are shifted up and down
automatically in line with engine load, vehicle speed and the dynamic shift
programme.
You must depress the brake pedal if you wish to move into position D from N when the
vehicle is travelling at less th an 5 km/hour or is stationary .
In certain circumstances (e.g. when driving in mountainous regions or when towing a
trailer) it may be beneficial to select the manual shift programme page 123 for a
short time in order to adapt the gearbox ratios manually to the driving situations.
- Position for sporty style of driving
Shifting up later into a higher gear makes it possible to fully exploit the power potential
of the engine. The gearbox also then shifts down at higher engine speeds as in the posi-
tion D.
The Shiftlock on the selector lever grip must be pressed when moving the selector
lever out of the position D into the position S.AP
ARANADAS
s2ug.6.book Page 121 Friday, April 9, 2010 2:24 PM
Page 123 of 271
Automatic gearbox DSG*
122WARNING
Never move the selector lever into position R or P when driving - risk of an
accident!
When the engine is running and the vehicle is stationary, it is necessary to
hold the car with the brake pedal in all the positions of the selector lever (except
P and N) since the power transmission is never completely interrupted, also not
when the engine is idling - the vehicle creeps.
You must on no account unintentionally operate the throttle (e.g. by hand
from the engine compartment) if a driv e position is engaged when the car is
stationary. The vehicle would otherwise immediately start off - also when the
handbrake is firmly applied - risk of an accident!
You must move the selector lever into position P and firmly apply the hand-
brake first before you or any other person opens the bonnet and starts working
on the engine when it is running - risk of accident! It is also essential to observe
all warnings page 204, “Working in the engine compartment”.
Selector lever lockAutomatic selector lever lock
With the ignition on, the selector lever is locked when it is in the positions P and N . You
must first of all depress the brake pedal in or der to move the selector lever out of this
position. The warning light
page 34 lights up in the instrument cluster as a
reminder for the driver when the selector lever is in the positions P and N.
A time delay element ensures that the selector lever is not blocked when rapidly
switching over the position N (e.g. from R to D). This does, for example, allow one to
seesaw out a stuck vehicle. The selector lever lo ck will click into place if the lever is in
the N position for more than 2 seconds without the brake pedal being pressed.
The selector lever lock is only active if the vehicle is stationary or moving at speed of
less than 5 km/hour. The lock is swit ched off automatically into position N when the
car is travelling at a higher speed.
Shiftlock button
The Shiftlock button in the hand le of selector lever prevents certain selector lever posi-
tions being engaged inadvertently. The select or lever lock is cancelled when you press
the Shiftlock button. Keylock - Ignition key withdrawal lock
You can only withdraw the ignition key after
switching off the ignition if the selector
lever is in position P. If the ignition key is withdrawn, the selector lever is blocked in
position P.
Kickdown function
The kickdown function provides you with maximum acceleration
power.Fully depressing the accelerato r pedal allows the kickdown function to be activated in
the desired driving program. This function has precedence over the driving
programme and serves for maximum accelerati on of the vehicle when exploiting the
maximum power potential of the engine wi thout taking into account the current
selector lever position ( D, S or Tiptronic). The gearbox shifts down to one or several
gears in line with the driving state and the vehicle accelerates. The gearbox does not
shift up into the highest gear until the en gine has reached its maximum revolutions for
this gear range.
WARNING
Please note that using the kickdown function can result in the driven wheels
spinning on a smooth or slippery road surface - risk of skidding!Dynamic shift programmeThe automatic gearbox of your vehicle is controlled electronically. Shifting up and
down through the gears is performed automati cally on the basis of pre-defined driving
programmes.
Adopting a moderate style of driving will cause the gearbox to select the most
economical driving programme. Shifting up into a higher gear as soon as possible and
shifting down as late as po ssible will have a favourable effect on your fuel consump-
tion.
Adopting a sporty style of driving with rapid movements of the accelerator pedal
combined with sharp acceleration and frequent changes in speed, exploiting the top
speed of the car or depressing the accelerator pedal (kickdown function), will cause
s2ug.6.book Page 122 Friday, April 9, 2010 2:24 PM
Page 129 of 271
Communication
128Note
The loudspeakers in the vehicle are matched to a power output of the radio and
navigation system of 4x 20°W.
For the equipment sound system*, the loudspeakers are matched to a power
output of the amplifier of 4x40°W + 6x20 W.
Mobile phones and tw o-way radio systemsThe installation of a mobile phone and two-way radio system in a vehicle should be
carried out by a specialist garage.
Škoda Auto permits the operation of mobile phones and two-way radio systems with
a professionally installed external aerial and a maximum transmission power of up to
10 watts.
It is essential that you inform yourself at specialist garages about the possibilites to
install and operate mobile phones which have a transmission power of more than 10
W. They will inform you which technical po ssibilities exist for retrofitting mobile
phones.
When using a mobille phone inside the vehicl e, which is not inserted into the phone
adapter, and thus has no connection to the external aerial, the electromagnetic radia-
tion can exceed the current limit value. We therefore recommend to operate a mobile
phone in the vehicle only when it is conne cted to an external aerial via the phone
adapter. This improves the quality of the connection.
Operation of mobile phones or two-way ra dio systems may interfere with functioning
of the electronic systems of your vehicle. The reasons for this may be:
no external aerial,
external aerial incorrectly installed,
transmission power greater than 10 watts.
WARNING
If a mobile phone or a two-way radio system is operated in the vehicle
without using a special external aerial or an external aerial which has been
incorrectly installed, this can increase the strength of the electromagnetic field
in the interior of the vehicle.
Please concentrate fully at all times on your driving!
You must not install two-way radio systems, mobile phones or mounts on
the covers of the airbags or within the immediate deployment range of airbags.
This might result in injuries to the occupants in the event of an accident.
Never leave a mobile phone on a seat, on the dash panel or in another area,
from which it can be thrown during a sudden braking manoeuver, an accident
or a collision. In this case, the occupants of the vehicle might be injured.Note
Observe the country-specific regulations for the use of mobile phones in vehicles.Universal telephone preinstallation GSM II*IntroductionThe universal telephone preinstallation GSM II is a built-in “hands-free system”, it
provides a voice operated convenience mode via the multifunction steering wheel* or
the navigation system*.
All communication between a telephone and the hands-free system of your vehicle
can only be established with the help of the Bluetooth
® technology. The adapter*
serves only for charging the telephone and fo r transmitting the signal to the external
aerial of the vehicle.
To ensure an optimum signal transmission, always leave the telephone with the
adapter* in the telephone mount.
a)Only valid for the navigation system Columbus.s2ug.6.book Page 128 Friday, April 9, 2010 2:24 PM
Page 130 of 271
Communication129
Using the system
Safety
Driving Tips
General Maintenance
Breakdown assistance
Technical Data
Furthermore the volume can be changed individually during the call at any time with
the button for setting the radio* or navigation system* or with the buttons on the
multifunction steering wheel*.
WARNING
Pay attention primarily to the traffic situation! As the driver you are fully
responsible for road safety. Use the telephone system only to such an extent, so
that you are in full control of your vehicle at any time.
Note
Please refer to the following guidelines
page 128.
Should you have any questions, please contact an authorised Škoda Service
Par tner.
Phone PhonebookA phone phonebook is part of the mobile ph one preinstallation with voice control. In
the phone phonebook there are 2500 free memory locations available. This phone
phonebook can be used in line with the mobile telephone.
After the first connection of the telephone, the system begins to load the phone book
from the phone and the SIM card into the memory of the control unit.
Each time the telephone has establishe d a new connection with the hands-free
system, an update of the relevant phone b ook is performed. The updating can take a
few minutes. During this time the phone book, which was stored after the last update
was completed, is available. Newly stored telephone numbers are only shown after the
updating has ended.
If the number of contacts loaded exceeds 2 500, the phone book is not complete.
If a telephone event (e.g. incoming or outgoing call, dialogue of the voice control)
occurs during the updating procedure, the updating is interrupted. After the telephone
event has ended, the updating starts anew.
Connection of the mobile phone with the hands-free systemIn order to connect a mobile phone with th e hands-free system, it is necessary to
connect the telephone to the hands-free sy stem. Detailed information on this is
provided in the operating instructions of your mobile phone. The following steps must
be carried out for the connection:
– Activate the Bluetooth
® in your telephone and the visibility of the mobile phone.
– Switch on the ignition.
– Select the menu Phone - Phone search in the information display and wait until
the control unit has ended the search.
– Select your mobile phone in the menu of the units found.
–Confirm the PIN (as standard 1234).
– If the hands-free system announces (as standard Skoda_BT) on the display of the
mobile phone, enter the PIN (as standard 1234) within 30 seconds and wait until
the connection is established.
10)
– After ending the connection, confirm in the information display that a new user
profile was created.
If no more free space is available for creating a new user profile, delete an existing user
profile.
If you have not managed to connect your mobile phone with the hands-free system
within 3 minutes after switching on the igniti on, switch the ignition off and then again
on. The visibility of the hands-free system is established again for 3 minutes. The visi-
bility of the Bluetooth
® device is automatically switched off if the vehicle starts off or
if the mobile phone connects to the device.
During the connecting procedure, no other mobile phone may be connected with the
hands-free system.
Up to four mobile phones ca n be paired to the hands-free system, whereby only one
mobile phone can communicate with the hands-free system.
10)Some mobile phones have a menu, in which th e authorization for establishing a Bluetooth
®
connection is performed via the input of a code. If the input for the authorization is necessary, it
must always be performed when re-establishing the Bluetooth connection.
s2ug.6.book Page 129 Friday, April 9, 2010 2:24 PM