SKODA YETI 2010 1.G / 5L Owner's Manual
Manufacturer: SKODA, Model Year: 2010, Model line: YETI, Model: SKODA YETI 2010 1.G / 5LPages: 271, PDF Size: 14.71 MB
Page 131 of 271
Communication
130
Connection with an already paired mobile phone
After switching on the ignition, the connec tion is automatically established for the
already paired mobile phone
10). Check on the mobile unit if the automatic connection
was established.
Disconnecting the connection
By withdrawing the ignition key.
By disconnecting the device in the information display.
By disconnecting the device in the mobile phone.
Solving connection problems
If the system announces No paired phone found , check the operating state of the
telephone:
Is the telephone switched on?
Is the PIN code entered?
Is Bluetooth
® active?
Is the visibility of the mobile phone active?
Was the telephone already paired with the hands-free system?
WARNING
In the event of air transport, the Bluetooth
® function of the hands-free system
must be switched off by a specialist garage!
Note
Not valid for all mobile phones which enable a communication via Bluetooth
®.
You can ask at an authorised Škoda Service Partner if your telephone is compatible
with the universal telephone preinstallation GSM II.
If a suitable adapter is available for yo ur mobile phone, use your mobile phone
exclusively in the adapter so that the radiation in the vehicle drops to a minimum.
Inserting the mobile phone into the ad apter ensures an optimal sending and
receiving power and offers at the same ti me the advantage of the battery charging.
The range of the Bluetooth
® connection to the hands-free system is restricted to
the vehicle interior. The range is dependent on local factors, e.g. obstacles between the devices and mutual interferences with other de
vices. If your mobile phone is e.g. in a
jacket pocket, this can lead to diffic ulties when establishing the Bluetooth
® connection
with the hands-free system or the data transfer.
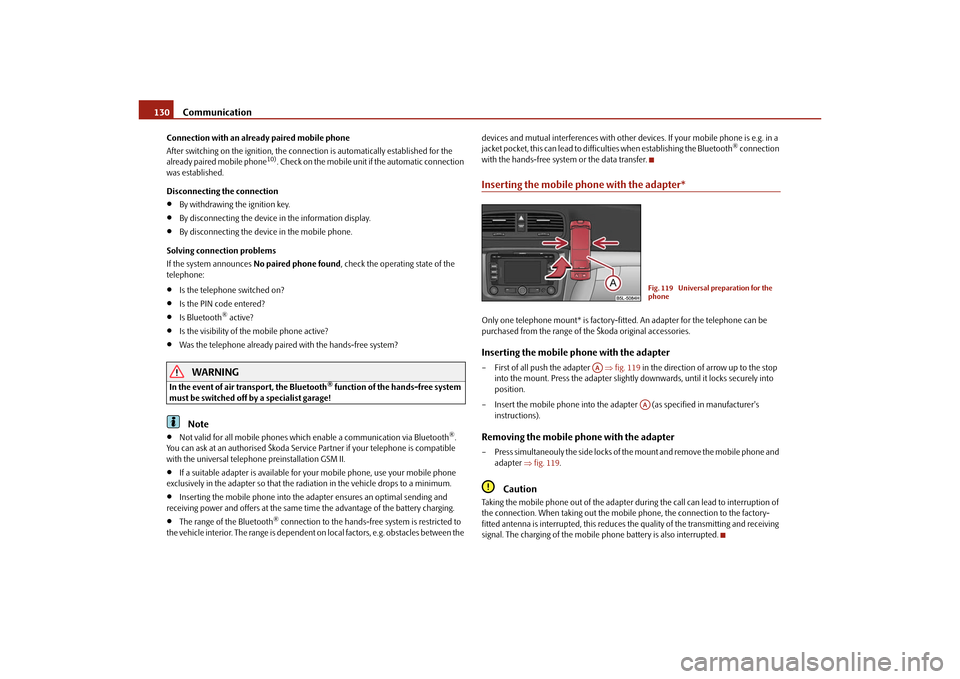
Inserting the mobile phone with the adapter*Only one telephone mount* is factory-fitted. An adapter for the telephone can be
purchased from the range of the Škoda original accessories.Inserting the mobile phone with the adapter– First of all push the adapter fig. 119 in the direction of arrow up to the stop
into the mount. Press the adapter slightly downwards, until it locks securely into
position.
– Insert the mobile phone into the adapter (as specified in manufacturer's instructions).Removing the mobile phone with the adapter– Press simultaneouly the side locks of th e mount and remove the mobile phone and
adapter fig. 119 .
Caution
Taking the mobile phone out of the adapter du ring the call can lead to interruption of
the connection. When taking out the mobile phone, the connection to the factory-
fitted antenna is interrupted, this reduces the quality of the transmitting and receiving
signal. The charging of the mobile phone battery is also interrupted.
Fig. 119 Universal preparation for the
phone
AA
AA
s2ug.6.book Page 130 Friday, April 9, 2010 2:24 PM
Page 132 of 271

Communication131
Using the system
Safety
Driving Tips
General Maintenance
Breakdown assistance
Technical Data
Operating telephone calls with the aid of the adapter*.Fig. 120 Illustration image: Single -button adapter / two-button adapter
The voice control of the telephone is acti vated by briefly pressing the PTT button
(button push to talk) on the adapter* fig. 120 .
Aside from the PTT button, the SOS button can be found on certain adapters* on the
right fig. 120 . After pressing the button for 2 seconds, the number 112 (Emergency
call) is dialed (only valid for some countries).
Note
The adapters illustrated are only prime examples.
Operation of the telephone on the multifunction steering wheel*The driver can set the basic functions of the telephone by simply operating the buttons
located on the steering whee l so that he can concentrate on the traffic situation
without being distracted as little as possible by operating the telephone fig. 121 .
This applies only if your vehicle has been equipped with the telephone preinstallation
at the factory.
If the side lights are switched on, the butt ons on the multifunction steering wheel are
also illuminated except the symbols
and
.
Overview of the different functions in contrast to the multifunction steering wheel
without mobile phone operation page 125.Fig. 121 Multifunction steering wheel:
Mobile phone operation
s2ug.6.book Page 131 Friday, April 9, 2010 2:24 PM
Page 133 of 271
Communication
132
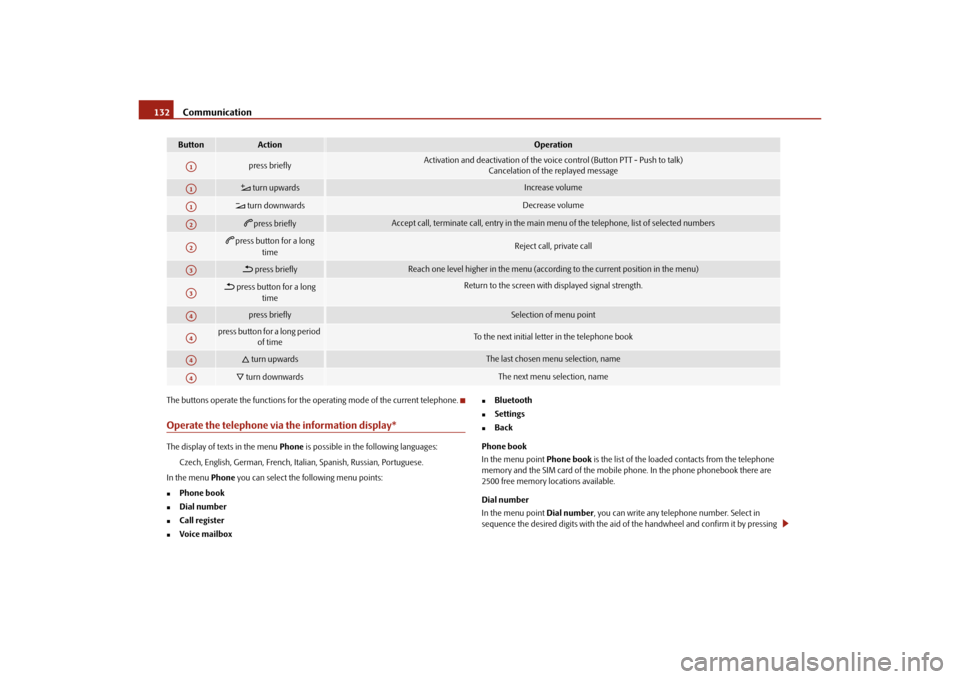
The buttons operate the functions for the operating mode of the current telephone.Operate the telephone via the information display*The display of texts in the menu Phone is possible in the following languages:
Czech, English, German, French, Italia n, Spanish, Russian, Portuguese.
In the menu Phone you can select the following menu points:
Phone book
Dial number
Call register
Voice mailbox
Bluetooth
Settings
Back
Phone book
In the menu point Phone book is the list of the loaded contacts from the telephone
memory and the SIM card of the mobile phone. In the phone phonebook there are
2500 free memory locations available.
Dial number
In the menu point Dial number, you can write any telephone number. Select in
sequence the desired digits with the aid of the handwheel and confirm it by pressing
Button
Action
Operation
press briefly
Activation and deactivation of the voice control (Button PTT - Push to talk)
Cancelation of the replayed message
turn upwards
Increase volume
turn downwards
Decrease volume
press briefly
Accept call, terminate call, entry in the main menu of the telephone, list of selected numbers
press button for a long
time
Reject call, private call
press briefly
Reach one level higher in the menu (according to the current position in the menu)
press button for a long time
Return to the screen with displayed signal strength.
press briefly
Selection of menu point
press button for a long period of time
To the next initial letter in the telephone book
turn upwards
The last chosen me nu selection, name
turn downwards
The next menu selection, name
A1A1A1A2A2A3A3A4A4A4A4
s2ug.6.book Page 132 Friday, April 9, 2010 2:24 PM
Page 134 of 271
Communication133
Using the system
Safety
Driving Tips
General Maintenance
Breakdown assistance
Technical Data
the handwheel. You can select the numbers
0 - 9, the symbols +,
, # and the func-
tions Delete, Call, Cancel .
Call register
In the menu point Call register, you can select the following menu points:
Missed calls
Received calls
Last calls
Voice mailbox
In the menu Voice mailbox , it is possible to set the number of the voice mailbox and
then dial the number.
Bluetooth
In the menu Bluetooth you can select the following menu points:
User - the overview of the stored users
New user - Search for new telephones which are in the reception range
Visibility - Switching on the visibility of the telephone unit for other devices
Media player
Active device
Paired devices
Search
Phone name - the possibility to change the name of the telephone unit (pre-set
SKODA_BT)
Settings
In the menu Settings you can select the following menu points:
Phone book
Update
List
Surname
First name
Ring tone Back
Return in the basic menu of the telephone.
Voice controlDialogueThe period, in which the telephone system is ready to receive voice commands and
carry out the voice commands, is called DIALOGUE. The system gives audible feedback
and guides you if necessary th
rough the relevant functions.
Switch on voice control (dialogue)
You can start or end the dialogue at any time by pressing the PTT button
on the
adapter* page 131, fig. 120 or on the multifunction steering wheel* page 131.
If the system does not recognise your command, it repeats the first part of the aid and
thus a new entry is possible. After the 2nd error the system repeats the second part of
the aid. After the 3rd error the answer “ Cancel” is given and the dialogue is ended.
Switching off voice control (dialogue)
You can end the dialogue at any time by pressing the PTT button
on the adapter*
page 131, fig. 120 or on the multifunction steering wheel* page 131 or with the
voice command CANCEL.
Only the message just repeated can be ended by briefly pressing the PTT button
during the message.
When receiving an incoming call, the dialog ue is immediately interrupted and you can
accept the call by pressing the button
on the multifunction steering wheel* or by
pressing the button for receiving a call directly on your telephone.
Optimum understanding of the voice commands depends on the following
factors:
Speak with a normal tone of voice withou t intonation and excessive voice pauses.
Avoid insufficient articulation.
Close the doors, windows and sliding roof, in order to reduce or stop disturbing
exterior noise.
s2ug.6.book Page 133 Friday, April 9, 2010 2:24 PM
Page 135 of 271
Communication
134
It is recommended to speak louder at higher speeds, so that the tone of your voice
is louder than the increased surrounding noise.
During the dialogue avoid additional nois e in the vehicle, e.g. simultaneously
talking occupants.
Do not speak, if the system makes an announcement.
The microphone for voice control is directed to the driver. Therefore, the device
may respond less well to commands of the front passenger.
Voice commandsThe voice control is possible in the following languages:
Czech, English, German, French, Italian, Spanish, Russian, Portuguese, Dutch.
Voice commands for operating the telephone control unit After giving the command
DIAL NUMBER, the system requests the entry of a tele-
phone number. The telephone number can be entered as an interconnected spoken
row of digits (complete number), in the form of order of digits (separation through a
brief voice pause) or through individually spoken digits. After each order of digits
(separation through brief voice pause) all of the digits detected up to now are repeated
by the system.
The digits 0 - 9, symbols +,
, # are permitted. The system detects no continuous digit
combinations such as twenty-three, but only individually spoken digits (two, three).
Call name– Press the PTT button.
– Give the command CALL XYZ after the signal tone.
Example for calling the name from the phone bookMusic playback via Bluetooth
®
The universal telephone preinstallation GSM II makes it possible to play back music via
Bluetooth
® from the devices such as MP3 player, mobile phone or notebook.
In order to enable the music playback via Bluetooth
®, it is necessary to connect the
terminal device with the ha nds-free system in the menu Phone - Bluetooth - Media
player .
The operation of the music playback from the connected device can be performed via
the hands-free system with the voice control page 134 or directly via the connected
device.
Voice command
Action
HELP
After this command the system repeats all possible
commands.
CALL XYZ
With this command you call up the contact from the
phone book page 134.
PHONE BOOK
After this command, for example the phone book can
be repeated, a contact can be updated or deleted etc.
CALL REGISTER
List of dialed numbe rs, missed calls etc.
DIAL NUMBER
After this command a phone number can be entered
which establishes a connection to the requested party.
REDIAL
After this command the system selects the last selected
number.
MUSIC
Play music from the mobile phone or another paired
device.
OTHER OPTIONS
Selection for setting Bluetooth
®, dialogue etc.
SETTINGS
Selection for setting Bluetooth
®, dialogue etc.
CANCEL
The dialogue is ended.
Voice command
Announcement
CALL XYZ
“Say home, work, mobile ”
e.g. WORK
“XYZ work is dialed. ”
CALL XYZ WORK
“XYZ work is dialed. ”
s2ug.6.book Page 134 Friday, April 9, 2010 2:24 PM
Page 136 of 271
Communication135
Using the system
Safety
Driving Tips
General Maintenance
Breakdown assistance
Technical Data
Note
The device to be connected must support the Bluetooth
® profile A2DP, see Owner's
manual of the device to be connected.
MultimediaInputs AUX-IN* and MDI*The input AUX-IN is located below the armrest* of the front seats and is marked with
.
The input MDI is located in the front centre console.
The inputs AUX-IN and MDI connect the ex ternal audio sources (e.g. iPod or MP3
player) and play back music fr om these devices via your radio* or navigation system*
installed in the factory.
The description of the operation can be found in the relevant Owner's Manual of your
radio* or your navigation*.Note
The loudspeakers in the vehicle are matched to a power output of the radio and
navigation system of 4x 20°W.
For the equipment sound system*, the loudspeakers are matched to a power
output of the amplifier of 4x40°W + 6x20 W.
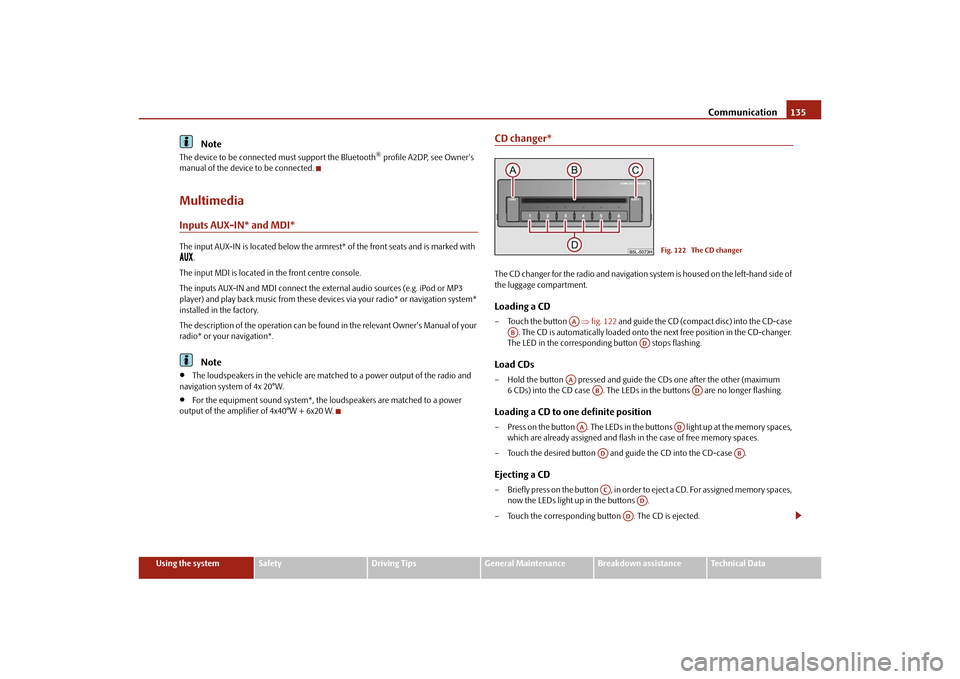
CD changer*The CD changer for the radio and navigation sy stem is housed on the left-hand side of
the luggage compartment.Loading a CD– Touch the button fig. 122 and guide the CD (compact disc) into the CD-case
. The CD is automatically loaded onto the next free position in the CD-changer.
The LED in the correspondin g button stops flashing.Load CDs– Hold the button pressed and guide the CDs one after the other (maximum
6 CDs) into the CD case . The LEDs in the buttons are no longer flashing.Loading a CD to one definite position– Press on the button . The LEDs in the buttons light up at the memory spaces,
which are already assigned and flash in the case of free memory spaces.
– Touch the desired button and guide the CD into the CD-case .Ejecting a CD– Briefly press on the button , in order to eject a CD. For assigned memory spaces, now the LEDs light up in the buttons .
– Touch the corresponding button . The CD is ejected.
Fig. 122 The CD changer
AA
AB
AD
AA
AB
AD
AA
AD
AD
AB
AC
AD
AD
s2ug.6.book Page 135 Friday, April 9, 2010 2:24 PM
Page 137 of 271
Communication
136
Ejecting all CDs
– Hold the button pressed for more than 2 seconds, in order to eject the CDs. All CDs in the CD-changer are ejected consecutively.
Note
Always guide the CD into the CD-case with the printed side pointing upwards.
Never push the CD with force into the CD-case as the insertion is performed auto-
matically.
After loading a CD into the CD-changer, yo u must wait until the LED of the corre-
sponding button lights up. Then the CD -case is free to load the next CD.
If you have selected a position, on which a CD is already located, this CD will be
ejected. Take out the ejected CD and load the desired CD.
AC
AB
AD
AB
s2ug.6.book Page 136 Friday, April 9, 2010 2:24 PM
Page 138 of 271
Passive Safety137
Using the system
Safety
Driving Tips
General Maintenance
Breakdown assistance
Technical Data
SafetyPassive SafetyBasic informationDriving the safe way
Passive safety measures reduce the risk of injury in accident situations.In this section you will find important info rmation, tips and notes on the subject of
passive safety in your vehicle. We have combined everything here which you should
be familiar with, for example, regarding seat belts, airbags, child seats and safety of
children. It is therefore important, in partic ular, to comply with the notes and warnings
in this section for your own interest and in the interest of those travelling with you.
WARNING
This chapter contains important information on how to use the vehicle for
the driver and his occupants. You will find further information on safety, which
concerns you and those travelling with you, in the following chapters of this
Owner's Manual.
The complete on-board literature should always be in the vehicle. This
applies in particular, if you rent out or sell the vehicle.
Safety equipment
The safety equipment is part of the occupant protection and it can
reduce the risk of injuries in accident situations.“Do not put at risk” your safety and the safety of those travelling with you . In the event
of an accident, the safety equipment can redu ce the risk of injuries. The following list
contains part of the safety equipment in your vehicle:
Three-point seat belts for all the seats,
belt force limiter for front seats,
belt tensioner for front seats,
seat belt height adjuster for front seats,
front airbag for the driver and front passenger,
driver's knee airbag*,
front side airbags*,
rear side airbags*,
head airbags*,
anchoring points for child seat using the “ISOFIX” system,
anchoring points for child seat using the “Top Tether” system,
head restraint adjustable for height,
adjustable steering column.
The specified safety equipment works togeth er, in order to optimally protect you and
those travelling with you in accident situat ions. The safety equipment does not protect
you or the people travelling with you, if you or your occupants adopt an incorrect
seated position or the equipment is not correctly adjusted or used.
For this reason you will be provided with information on why this equipment is very
important, how it protects you and the occupants, what should be observed when
using the equipment and how you and the peop le travelling with you can make full use
of the existing safety equipment. This Owner's Manual contains important warning
notes, which you and those travelling with you should pay attention to in order to
reduce a risk of injury.
Safety concerns everybody!
Before setting off
The driver is always fully responsibl e for his occupants and for the oper-
ating safety of the vehicle.For your own safety and the safety of the pe ople travelling with you, please pay atten-
tion to the following points before setting off:
s2ug.6.book Page 137 Friday, April 9, 2010 2:24 PM
Page 139 of 271
Passive Safety
138
Ensure that the lighting and the turn signal system are functioning properly.
Inspect the tyre inflation pressure.
Ensure that all the windows offer a good visibility to the outside.
Safely attach the items of luggage page 78, “Loading the luggage compartment”.
Ensure that no objects can obstruct the pedal.
Adjust the mirror, the front seat and the head restraint to match your body size.
Point out to your occupants that the head restraints must be adjusted to match
their body size.
Protect the children in suitable child seats with correctly fastened seat belts
page 156, “Transporting children safely”.
Adopt the correct seated position page 138, “Correct seated position”. Also
inform your occupants to adopt the correct seated position.
Fasten the seat belt correctly. Also inform your occupants to properly fasten the
seat belts page 143, “How are seat belts correctly fastened?”.
What influences the driving safety?
The driving safety is primarily determined by the style of driving and the
personal behaviour of all the occupants.The driver is fully responsible for himself an d his occupants. If your driving safety is
effected, you place yourself and the oncomi ng traffic at risk. Please refer to the
following guidelines.
Do not get distracted from concentrating on the traffic situation, e.g. by your occu-
pants or mobile phone calls.
Never drive when your driving ability is impaired, e.g. through medication, alcohol,
drugs.
Keep to the traffic regulations and the permissible speed limit.
Adjust the driving speed at all times to the road condition as well as to the traffic
and weather conditions.
Take regular breaks on long journe ys - at the latest every two hours.
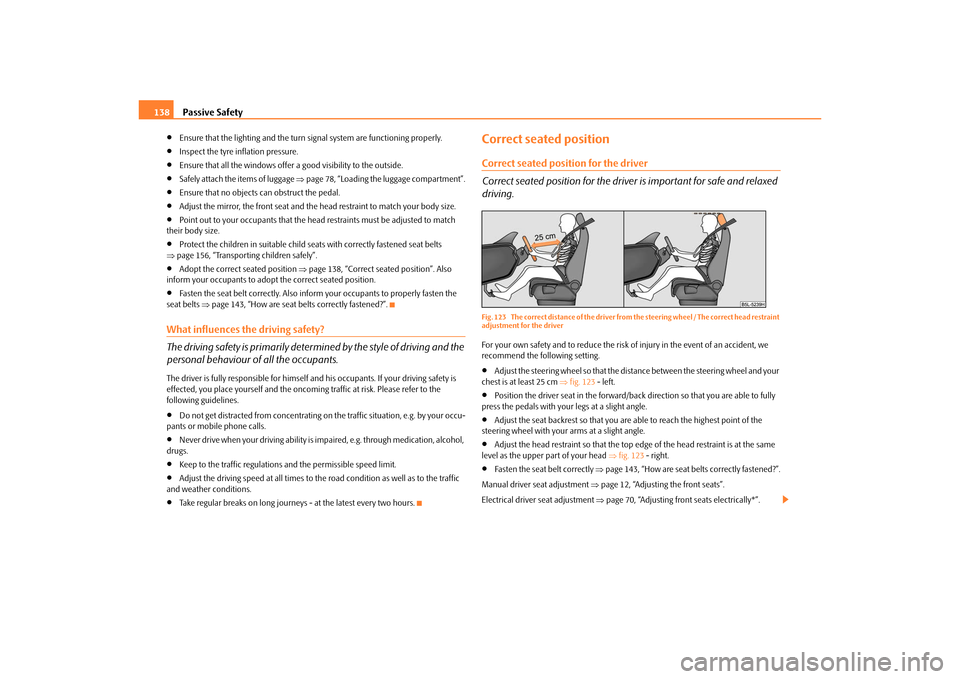
Correct seated positionCorrect seated position for the driver
Correct seated position for the driver is important for safe and relaxed
driving.Fig. 123 The correct distance of the driver from the steering wheel / The correct head restraint
adjustment for the driverFor your own safety and to reduce the risk of injury in the event of an accident, we
recommend the following setting.
Adjust the steering wheel so that the distance between the steering wheel and your
chest is at least 25 cm fig. 123 - left.
Position the driver seat in the forward/back direction so that you are able to fully
press the pedals with your legs at a slight angle.
Adjust the seat backrest so that you are able to reach the highest point of the
steering wheel with your arms at a slight angle.
Adjust the head restraint so that the top edge of the head restraint is at the same
level as the upper part of your head fig. 123 - right.
Fasten the seat belt correctly page 143, “How are seat belts correctly fastened?”.
Manual driver se at adjustment page 12, “Adjusting the front seats”.
Electrical driver seat adjustment page 70, “Adjusting front seats electrically*”.
s2ug.6.book Page 138 Friday, April 9, 2010 2:24 PM
Page 140 of 271
Passive Safety139
Using the system
Safety
Driving Tips
General Maintenance
Breakdown assistance
Technical Data
WARNING
The front seats and the head restraints must always be adjusted to match
the body size of the seat occupant as well as the seat belts must always be
correctly fastened in order to provide an optimal protection for you and your
occupants.
The driver must maintain a distance of at least 25 cm to the steering wheel
page 138, fig. 123 . Not maintaining this minimum distance will mean that
the airbag system will not be able to properly protect you - hazard!
When driving, hold the st eering wheel with both hands firmly on the outer
edge in the 9 o'clock and 3 o'clock po sition. Never hold the steering wheel
firmly in the 12 o'clock position or in another way (e.g. in the middle of the
steering wheel or at the inner steering wheel edge). In such cases, injuries to the
arms, the hands and the head can occur when the driver airbag is deployed.
The seat backrests must not be angled too far back when driving otherwise
this will affect proper operation of the se at belts and of the airbag system - risk
of injury!
Ensure that there are no objects in the footwell as any objects may get
behind the pedals during a driving or braking manoeuvre. You would then no
longer be able to operate the clutch, to brake or accelerate.
Correct seated position for the front passenger
The fro n t p assen ger must mai n tai n a d i stan ce of a t l ea st 25 c m from th e
dash panel so that the airbag offers him the greatest possible safety it is
deployed.For the safety of the front passenger and to reduce the risk of injury in the event of an
accident, we recommend the following setting.
Adjust the front passenger seat as far as possible to the rear.
Adjust the head restraint so that the top edge of the head restraint is at the same
level as the upper part of your head page 138, fig. 123 - right.
Fasten the seat belt correctly page 143, “How are seat belts correctly fastened?”.
In exceptional cases the front pass enger airbag can be deactivated page 154,
“Deactivating an airbag”. Manual front passenger adjustment
page 12, “Adjusting the front seats”.
Electrical front passenger seat adjustment page 70, “Adjusting front seats electri-
cally*”.
WARNING
The front seats and the head restraints must always be adjusted to match
the body size of the seat occupant as well as the seat belts must always be
correctly fastened in order to provide an optimal protection for you and your
occupants.
The front passenger must maintain a distance of at least 25 cm to the dash
panel. Not maintaining this minimum distance will mean that the airbag
system will not be able to properly protect you - hazard!
Always keep your feet in the footwel l when the vehicle is being driven -
never place your feet on the instrument panel, out of the window or on the
surfaces of the seats. You will be exposed to increased risk of injury if it becomes
necessary to apply the brake or in the ev ent of an accident. If an airbag is
deployed, you may suffer fatal injuries wh en adopting an incorrect seated posi-
tion!
The seat backrests must not be angled too far back when driving otherwise
this will affect proper operation of the se at belts and of the airbag system - risk
of injury!
Correct seated position for the occupants on the rear seats
Occupants on the rear seats must sit upright, keep the feet in the foot-
well and must have their se at belts correctly fastened.To reduce the risk of injury in the event of a sudden braking manoeuvre or an accident,
the occupants on the rear seats must observe the following:
Adjust the head restraints so that the top edge of the head restraints is at the same
level as the upper part of your head page 138, fig. 123 .
Fasten the seat belt correctly page 143, “How are seat belts correctly fastened?”.
If you are transporting page 156, “Transporting children safely” children in the
vehicle, please use a suitable child restraint system.
s2ug.6.book Page 139 Friday, April 9, 2010 2:24 PM