lock SKODA YETI 2010 1.G / 5L User Guide
[x] Cancel search | Manufacturer: SKODA, Model Year: 2010, Model line: YETI, Model: SKODA YETI 2010 1.G / 5LPages: 271, PDF Size: 14.71 MB
Page 30 of 271

Instruments and warning lights29
Using the system
Safety
Driving Tips
General Maintenance
Breakdown assistance
Technical Data
WARNING
If you do not pay attention to the warning lights coming on and the corre-
sponding descriptions and warning notes, this may result in severe body inju-
ries or major vehicle damage.
The engine compartment of your car is a hazardous area. There is a risk of
injuries, scalding, accidents and fire wh en working in the engine compartment,
e.g. inspecting and replenishing oil and other fluids. It is also essential to
observe all warnings page 204, “Working in the engine compartment”.Note
The arrangement of the indicator lights depends on the model version. The
symbols shown in the following functional description are to be found as indicator
lights in the instrument cluster.
Operational faults are shown in the instrument cluster as red symbols (priority 1 -
danger) or yellow symbols (priority 2 - warning).
Turn signal system
Either the left
or right
indicator light flashes depending on the position of the turn
signal lever.
The indicator light flashes at twice its normal rate if a turn signal light fails. This does
not apply when towing a trailer.
Switching off the hazard warning light system is switched on will cause all of the turn
signal lights as well as both indicator lights to flash.
Engine oil page 31
EPC fault light (petrol engine) page 32
Glow plug system (diesel engine) page 32
Coolant temperature/coolant level page 33
Traction control system (TCS) page 33
Electronic stability programme (ESP)* page 34
Switch off traction control system (TCS) page 33
Selector lever lock* page 34
Tyre pressure* page 34
Antilock brake system (ABS) page 34
Boot lid page 35
Open door page 35
Seat belt warning light page 35
Brake pad wear* page 35
Fluid level in windshield washer system* page 36
Brake system page 36
Dynamo page 36
Fuel reserve page 36
Downhill Drive Support* page 37
Overheated clutches of the automatic gearbox
DSG*
page 37
s2ug.6.book Page 29 Friday, April 9, 2010 2:24 PM
Page 35 of 271
Instruments and warning lights
34
Electronic stability programme (ESP)*
The warning light
comes on for a few seconds when the ignition is switched on.
When the ESP helps to stabilise the vehicle (for example when applying and releasing
a braking force to an individual wheel), then the warning light
flashes in the infor-
mation display.
The ESP system cannot be switched off, only the TCS system can be switched off by
pressing the button page 163, fig. 146 , the warning light
lights up.
The warning light lights up permanently if there is a fault in the ESP system.
The fact that the ESP system operates together with the ABS means that the ESP
warning light will also come on if the ABS system is not operating properly.
If the warning light
comes on immediately after starting the engine, the ESP system
can be switched off for technical reasons. In this case, the ESP system can be switched
on again by switching the ignition on and off. If the warning light goes out, the ESP
system is fully functional again.
Further information on the ESP page 163, “Electronic stability programme (ESP)*”.
Electronic Differential Lock (EDL)*
The EDL is a part of the ESP. A fault in the EDL is indicated by the lighting up of the ESP
warning light in the instrument cluster. Have the vehicle inspected immediately by
your specialist garage. Further information on the EDL page 164, “Electronic Differ-
ential Lock (EDL)*”.
Note
If the battery has been disconnected and reconnected, the warning light
comes on
after switching on the ignition. The warning light must go out after driving a short
distance.
Selector lever lock*
If the green warning light
lights up, operate the brake pedal. This is necessary, in
order to be able to move the selector lever out of the position P or N.
Further information about the selector lever lock page 122.
Tyre inflation pressure*
The warning light
lights up, if there is a substantial drop in inflation pressure in one
of the tyres. Reduce the speed and check or correct as soon as possible the inflation
pressure in the tyres page 216.
An audible signal sounds as an additional warning signal.
If the warning light flashes, there is a system fault. Visit the nearest specialist garage and
have the fault rectified.
Further information about the tyre pressure monitoring system page 169.
WARNING
When the warning light
lights up, immediately reduce the speed and
avoid sudden steering and brake manoeuvr es. Please stop the vehicle without
delay at the nearest possible stop and in spect the tyres and their inflation pres-
sures.
Under certain circumstances (e.g. sporty style of driving, wintry or unpaved
roads) the warning light
can be delayed or does not light up at all.
Note
If the battery has been disconnected, the warning light
comes on after switching on
the ignition. The warning light must go out after driving a short distance.
Antilock brake system (ABS)
The warning light
shows the functionality of the ABS.
The warning light comes on for a few seconds after the ignition has been switched on
or when starting the engine. The warning light goes out after an automatic check
sequence has been completed.
A fault in the ABS
The system is not functioning properly if the ABS warning light
does not go out
within a few seconds after switching on the igni tion, does not light up at all or lights up
while driving. The vehicle will only be br aked by the normal brake system. Visit a
s2ug.6.book Page 34 Friday, April 9, 2010 2:24 PM
Page 36 of 271

Instruments and warning lights35
Using the system
Safety
Driving Tips
General Maintenance
Breakdown assistance
Technical Data
specialist garage immediately and adjust your style of driving appropriately as you will
not know how grea
t the damage is.
Further information about ABS page 167, “Antilock brake system (ABS)”.
A fault in the entire brake system
If the ABS warning light
comes on together with the brake system warning light
(handbrake must be released), there is a fa ult not only in the ABS but also in another
part of the brake system .
WARNING
If the brake system warning light
comes on together with the ABS
warning light
stop the vehicle immediately and check the brake fluid level in
the reservoir page 209, “Brake fluid”. If the fluid level has dropped below the
MIN marking, do not drive any further - risk of accident! Obtain professional
assistance.
Pay attention to the following instruct ions before checking the brake fluid
level and opening the bonnet page 204, “Working in the engine compart-
ment”.
If the brake fluid is at the correct leve l, the ABS control function has failed.
The rear wheels may then block very ra pidly when braking. In certain circum-
stances, this can result in the rear end of the car breaking away - risk of skid-
ding! Drive carefully to the nearest specialist garage and have the fault
rectified.
Seat belt warning light
The warning light
comes on after the ignition is sw itched on as a reminder for the
driver and front passenger to fasten the seat belt. The warning light only goes out if the
driver or front passenger has fastened his seat belt.
If the seat belt has not been fastened by the driver or front passenger, a permanent
warning signal sounds at vehicle speeds gr eater than 20 km/h and simultaneously the
warning light
flashes.
If the seat belt is not fastened by the dr iver or front passenger during the next 90
seconds, the warning signal is deactivated and the warning light
lights up perma-
nently. Further information on the seat belts
page 141, “Seat belts”.
Thickness of the brake pads*
The warning light comes on for a few seconds
5) when the ignition is switched on.
If the warning light
comes on, contact a specialist garage immediately and have the
brake pads on all of the wheels inspected.
The following text will be displayed in the information display*: Check brake pads!
Boot lid
The warning light
comes on when the ignition is switched on if the luggage
compartment door is open. If th e boot lid opens while driving
, the warning light
lights up and an audible signal sounds.
An audible signal sounds as an additional warning signal.
The warning light comes on even when the ignition is switched off. The warning light
lights up for a maximum of 5 minutes.
O n v e h i c l e s w i t h i n f o r m a t i o n d i s p l a y * t h i s w a rning light is replaced by a vehicle symbol
page 25.
Open door
The warning light
comes on, if one or several doors are opened. If one of the doors
opens while driving, th e warning light lights
up and an audible signal sounds.
The warning light comes on even when the ignition is switched off. The warning light
lights up for a maximum of 5 minutes.
O n v e h i c l e s w i t h i n f o r m a t i o n d i s p l a y * t h i s w a rning light is replaced by a vehicle symbol
page 25.
5)The warning light on vehicles fitted with information display does not come on after switching
the ignition on, but only if a fault exists.
s2ug.6.book Page 35 Friday, April 9, 2010 2:24 PM
Page 39 of 271

Unlocking and locking
38
Unlocking and lockingKeyFig. 22 Set of keys without remote control / set of keys with remote control keyTwo keys are provided with the vehicle. Depending on the equipment, your vehicle can
be equipped with keys without radio remote control or with radio remote control keys*
fig. 22 .
WARNING
Always withdraw the key whenever you leave the vehicle - even if it is only
for a short time. This is particularly important if children are left in the vehicle.
The children might otherwise start the en gine or operate electrical equipment
(e.g. power windows) - risk of injury!
Do not withdraw the ignition key from the ignition lock until the vehicle has
come to a stop. The steerin g lock might otherwise enga ge unintentionally - risk
of accident!Caution
Each key contains electronic components; therefore protect them against moisture
and severe shocks.
Keep the groove of the keys absolutely clean as impurities (textile fibres, dust etc.)
have a negative effect on the proper operation of the locking cylinder and the ignition
lock.
Note
Please approach a specialist garage if you lose a key since he can obtain a new one for
you.Changing the battery in the remote control keyFig. 23 Disconnect key with radio remote control / change batteryEach remote control key contains a ba ttery which is housed in the cover fig. 23
of the transmitter housing. If the battery is discharged, the red indicator light
fig. 22 does not light up after pressing a button on the remote control key. We
recommend that you have the batteries of the key replaced by an authorised Škoda
Service Partner. You should, however, proceed as follows if you wish to replace the
battery yourself:
– Fold open the key.
– Press off the battery cover with your thumb or using a flat screwdriver at the points of the arrows fig. 23 .
– Remove the discharged battery from the key by pressing the battery downwards at the point of the arrow fig. 23 .
– Insert the new battery. Ensure that the “+” symbol on the battery is facing upwards. The correct polarity is shown on the battery cover.
– Position the battery cover on the key and pres s on it until it is heard to lock in place.
AB
AA
A1
A2
s2ug.6.book Page 38 Friday, April 9, 2010 2:24 PM
Page 40 of 271
Unlocking and locking39
Using the system
Safety
Driving Tips
General Maintenance
Breakdown assistance
Technical Data
For the sake of the environment
Dispose of a used battery in accord ance with environmental regulations.
Note
Pay attention to the correct pola rity when changing the battery.
The replacement battery must have the same specification as the original battery.
If it is still not be possible to unlock or lock the vehicle with the remote control key
even after replacing the battery, this means that the system has to be synchronised
page 45.
Electronic immobiliserThe electronic immobiliser prevents the vehicle being operated by an
unauthorised person.An electronic chip is integrated in the he ad of the key. The immobiliser is deactivated
with the aid of this chip when the key is in serted in the ignition lock. The electronic
immobiliser is automatically activated when you withdraw the ignition key from the
lock.
Note
It is only possible to start the engine of your car with a Genuine Škoda key with the
matching code.
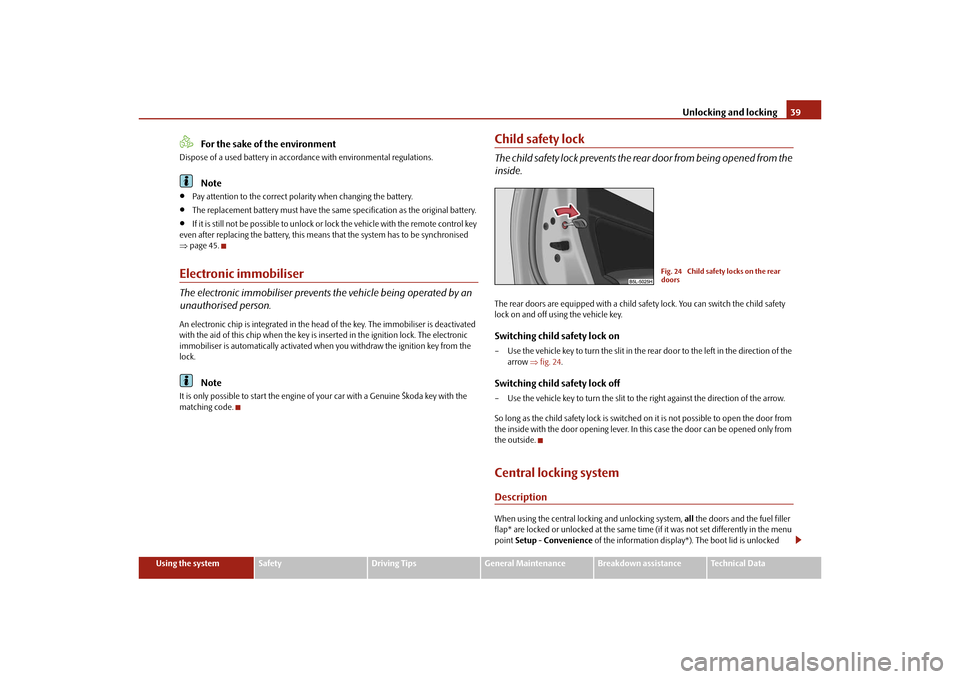
Child safety lockThe child safety lock prev ents the rear door from being opened from the
inside.The rear doors are equipped with a child safe ty lock. You can switch the child safety
lock on and off using the vehicle key.Switching child safety lock on– Use the vehicle key to turn the slit in the rear door to the left in the direction of the
arrow fig. 24 .Switching child safety lock off– Use the vehicle key to turn the slit to the right against the direction of the arrow.
So long as the child safety lock is switched on it is not possible to open the door from
the inside with the door opening lever. In this case the door can be opened only from
the outside.Central locking systemDescriptionWhen using the central locking and unlocking system, all the doors and the fuel filler
flap* are locked or unlocked at the same time (if it was not set differently in the menu
point Setup - Convenience of the information display*). The boot lid is unlocked
Fig. 24 Child safety locks on the rear
doors
s2ug.6.book Page 39 Friday, April 9, 2010 2:24 PM
Page 41 of 271
Unlocking and locking
40
when opening. It can be opened by pressing the hand grip above the licence plate
page 43.
Operation of the central locking system is possible:
from the outside using the vehicle key page 41,
using the button for the central locking system page 42,
by using the remote control page 44.
Indicator light in the driver's door on vehicles without anti-theft alarm system
After the car is locked, the indica tor light flashes after 2 seconds.
After the car is locked with the deactivate d safe securing system, the indicator light
flashes only after 30 seconds.
Indicator light in the driver's door on vehicles with anti-theft alarm system
After locking the vehicle the indicator light fl ashes for 2 seconds fast, then more slowly.
If the vehicle is locked and the safe securing system page 41 is not operating, the
indicator light in the driver door flashes for about 2 seconds fast, goes out and starts to
flash slowly after about 30 seconds.
If the indicator light first of all flashes fast for about 2 seconds, afterwards lights up for
about 30 seconds and then flashes slowly, there is a fault in the system of the central
locking or the interior monitor* page 46. Visit a specialist garage to obtain assist-
ance.
Convenience operatio n of the windows
One can open and close the electrically powered windows when unlocking and
locking the vehicle page 49.
Opening a single door*
This function makes it possible to only unlock the driver's door. The other doors and
the fuel filler flap* remain locked and ar e only unlocked after repetitive unlocking.
If you wish, you can have a sp ecialist garage activate the function of the single door
opening mode or you can activate it yourself in the menu of the information display*
page 24. Unlocking a vehicle side door*
This selection function enables to unlock bo
th doors on the driver's side. The other
doors and the fuel filler flap remain locked and are only unlocked after repetitive
unlocking.
You can have the function opening a single door activated by an authorised Škoda
Service Partner on request or you can activate it yourself with the aid of the Informa-
tion display* page 26.
Automatic locking and unlocking*
All the doors and the boot lid are locked automatically once the car reaches a speed of
about 15 km/h.
If the ignition key is withdr awn, the car is then automati cally unlocked again. In addi-
tion, it is possible for the driver to unlock the car by pressing the central locking button
page 39 or by pulling the door opening lever.
If you wish, you can have a specialist gara ge activate the automatic function of the
single door locking mode or you can activate it yourself in the menu of the information
display* page 24.
WARNING
Locking the doors prevents involuntary op ening in an exceptional situation (an
accident). Locked doors prevent unwanted entry into the vehicle from outside,
for example at road crossings. Locked do ors do, however, make it more difficult
for rescuers to get into the vehicle in an emergency - danger to life!
Note
In the event of an accident in which the airbags are deployed, the locked doors are
automatically unlocked in order to enable rescuers to gain access to the vehicle.
Only the front doors can be unlocked and locked using the key if the central locking
system fails. You can lock or unlock ma nually the other doors and the boot lid.
Emergency locking of the door page 43.
Emergency unlocking of the boot lid page 44.
s2ug.6.book Page 40 Friday, April 9, 2010 2:24 PM
Page 42 of 271

Unlocking and locking41
Using the system
Safety
Driving Tips
General Maintenance
Breakdown assistance
Technical Data
Safe securingThe central locking system is equipped with a safe securing
6) system. Locking the
vehicle from the outside causes the door locks to be automatically blocked. It is not
possible to open the doors with the door handle either from the inside or from the
outside. This acts as an effective deterren t for attempts to break into your vehicle.
You can deactivate the safe securing system by locking twice within 2 seconds.
If the safe securing system is not operating, the warning light in the driver door flashes
for about 2 seconds fast, goes out and st arts to flash slowly again after about
30°seconds.
The safe securing system is again activated the next time the vehicle is unlocked and
locked again.
If the vehicle is locked and the safe securing system is deactivated, you can open the
vehicle from the inside by pulling on the d oor opening lever. The door is unlocked and
opened at the same time.
WARNING
If the vehicle is locked from the outside and the safe securing system is acti-
vated, there must not be any person and animals in the vehicle as it is then not
possible to open either a door or a window from the inside. The locked doors
make it more difficult for rescuers to get into the vehicle in an emergency -
hazard!
Note
The anti-theft alarm system* is also activated with the deactivated safe securing
system when locking the vehicle. The interior monitor* is however not activated.
Unlocking the vehicle using the key– Turn the key in the locking cylinder of the driver's door in the direction of travel
(unlock position) fig. 25 .
– Pull on the door handle and open the door.
All the doors (only the driver's door on ve hicles with anti-theft alarm system) and
the fuel filler flap* are unlocked.
The boot lid is then unlocked.
The switched on interior lights come on over the door contact.
The safe securing system is deactivated.
The windows open provided the key is held* in the unlock position. On vehicles
fitted with anti-theft alarm system the window operation is only possible 45 seconds
after deactivation of the warning system.
The indicator light in the driver's door stops flashing if the vehicle is not fitted with
an anti-theft alarm system* page 45.Note
If the vehicle is equipped with an anti-theft alarm system*, you must insert the key into
the ignition lock and switch the ignition on within 15 seconds after unlocking the door
in order to deactivate the anti-theft alarm system. The alarm will be triggered if you
do not switch on the ignition within 15 seconds.
6)Only valid for some countries.
Fig. 25 Turning the key for unlocking and
locking the vehicle
AA
s2ug.6.book Page 41 Friday, April 9, 2010 2:24 PM
Page 43 of 271

Unlocking and locking
42
Locking the vehicle with the key– Turn the key in the locking cylinder of the driver's door in the opposite direction of
travel (lock position) page 41, fig. 25.
The doors, the boot lid and the fuel filler flap* are locked.
The switched on interior lights wi ll switch off over the door contact.
The windows and the electric sliding/tilting roof* close provided the key is held in
the lock position.
The safe securing system is activated immediately.
The indicator light in the driver door begins flashing.Note
The opened driver door cannot be locked. It must be locked separately after closing
it.Button for the central locking systemIf the vehicle was not locked from outside, you can also unlock and lock it with the
rocker switch on the centre console without the ignition switched on.Locking all doors and the boot lid– Press button fig. 26 . The symbol
in the button comes on.
Unlocking all doors and the boot lid– Press button fig. 26 . The symbol
goes out in the button.
The following applies if you have lo cked your vehicle using the button :
It is not possible to open the doors or the boot lid from the outside (safety feature,
e.g. when stopping at traffic lights etc.).
You can unlock the doors individually from the inside and open them by pulling the
door opening lever.
As long as one door is opened
7), the doors cannot be locked in order to avoid inad-
vertently locking the key in the vehicle.
In the event of an accident in which the airbags are deployed, the locked doors are
automatically unlocked from the inside in orde r to enable rescuers to gain access to
the vehicle.
By pressing and holding the button or , you can conveniently close or open the
windows page 49.
WARNING
The central locking system al so operates if the ignition is switched off. All the
doors and the boot lid are locked. Children should never be left unattended in
the vehicle since it is difficult to provide assistance from the outside when the
doors are locked. Locked doors make it difficult for rescuers to get into the
vehicle in an emergency - hazard!
Note
The door opening lever and the buttons for the central locking system do not operate
if the safe securing system is activated.
AB
Fig. 26 Centre console: Buttons for
central locking
A1
7)Is not valid for the boot lid.
A2
A1
A1
A2
s2ug.6.book Page 42 Friday, April 9, 2010 2:24 PM
Page 44 of 271

Unlocking and locking43
Using the system
Safety
Driving Tips
General Maintenance
Breakdown assistance
Technical Data
Emergency locking of the doorsAll the other doors without locking cylinder have an emergency locking which is only
visible once the door is opened. The emergency locking must be used in particular if
the vehicle battery fails.Locking– Remove the panel fig. 27 .
– Insert the key into the slot and turn it into the horizontal position in the direc-
tion of the arrow (mirror-inverted on the right doors).
– Re-insert the panel.
After closing the door, you can no longer open it from outside. If the child safety lock
is not switched on, it is possible to open the door from the inside by pulling once on
the door opening lever. If the child safety lock is activated (only on the rear doors), first
of all it is necessary to pull once on the i nner door handle and then open the door from
the outside.
Boot lidOpen the boot lid by pressing the hand grip above the licence plate after unlocking the
vehicle using the key or the radio remote control.Opening the boot lid– Press on the handle fig. 28 and at the same time raise the boot lid.Closing the boot lid– Pull the boot lid down and close it with a slight swing .
A handle which makes the closing easier is located on the inner paneling of the boot
lid.
WARNING
Ensure that the lock is properly enga ged after closing the boot lid. Other-
wise, the boot lid might open suddenly when driving even if the boot lid lock is
closed - risk of accident!
Never drive with the boot lid fully open ed or slightly ajar otherwise exhaust
gases may get into the interior of the vehicle - risk of poisoning!
Do not press on the rear window when closing the boot lid, it could crack -
risk of injury!
Fig. 27 Rear door: Emergency locking of
the door
AA
AB
Fig. 28 Handle of boot lid
s2ug.6.book Page 43 Friday, April 9, 2010 2:24 PM
Page 45 of 271

Unlocking and locking
44Note
After closing the boot lid, it is automatically locked within 2 seconds and the
anti-theft alarm sy stem* is activated. This applies only if the vehicle was locked
before closing the boot lid.
The function of the hand grip above the li cence plate is deactivated when starting
off or as of a speed of more than 5 km/hour for vehicles with central locking. The func-
tion of the hand grip is activated again when the vehicle has stopped and a door is
opened.
Emergency unlocking of the boot lidIf there is a fault in the central lockin g, you can open the boot lid as follows:
– Fold one of the outer rear seats forwards.
– Move the operating lever with the aid of a narrow object, e.g. a screwdriver, up to
the stop in the direction of arrow and then unlock the boot lid in the direction
of arrow .
– Open the boot lid from the outside.Remote control*DescriptionYou can use the remote control:
to unlock and lock the car,
unlocking boot lid,
electrically open and close the windows.
The transmitter with the battery is incorporated in the handle of the remote control
key. The receiver is located in the interior of the car. The operating range of the remote
control key is approx. 10 m. But this range can be reduced if the batteries are weak.
The remote control key has a fold-open key bit which can be used for unlocking and
locking the car manually and also for starting the engine.
If a lost key is replaced or if the receiver unit has been repaired or a new unit installed,
it is then necessary for a specialist garage to adapt the system. Only after this is it
possible to again use the remote control.Note
The remote control is automatically deacti vated when the ignition is switched on.
The operation of the remote control may temporarily be affected by interference
from transmitters close to the car and which operate in the same frequency range (e.g.
mobile phone, TV transmitter).
The battery must be replaced, ideally by a specialist garage, if the central locking or
anti-theft alarm system does react to the remote control at less than 3 metres away.
If the driver door is opened, the vehicle cannot be locked using the remote
control.
Unlocking and locking car
Fig. 29 Emergency unlocking of the boot
lid
A1
A2
Fig. 30 Remote control key
s2ug.6.book Page 44 Friday, April 9, 2010 2:24 PM