buttons SKODA YETI 2012 1.G / 5L Owner's Manual
[x] Cancel search | Manufacturer: SKODA, Model Year: 2012, Model line: YETI, Model: SKODA YETI 2012 1.G / 5LPages: 225, PDF Size: 5.47 MB
Page 9 of 225
Using the system
Cockpit
Overview
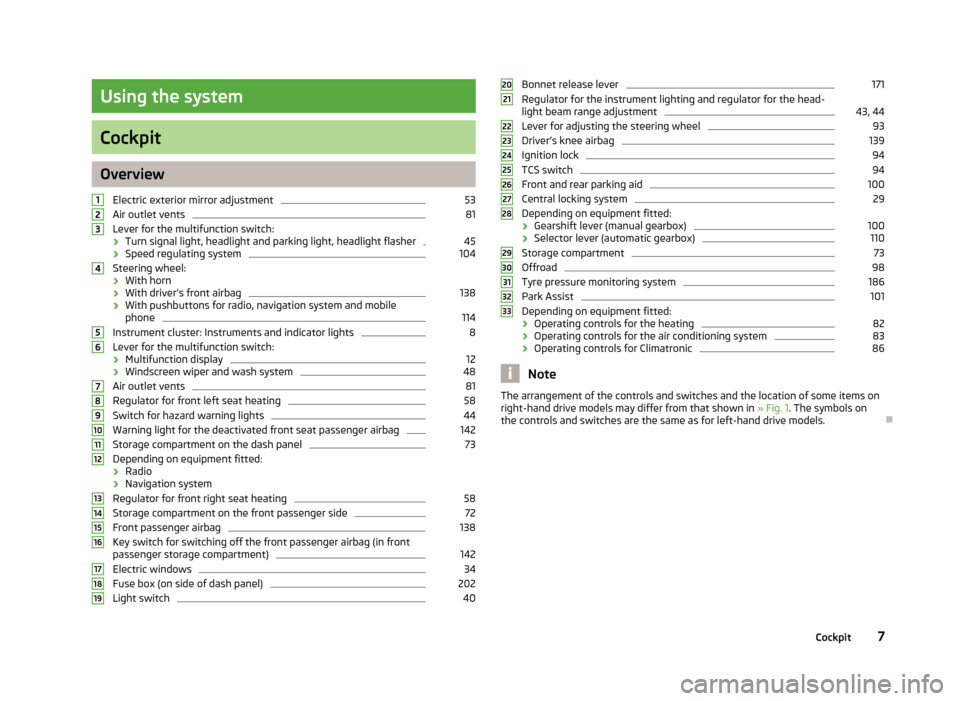
Electric exterior mirror adjustment 53
Air outlet vents 81
Lever for the multifunction switch:
› Turn signal light, headlight and parking light, headlight flasher 45
› Speed regulating system 104
Steering wheel:
› With horn
› With driver’s front airbag 138
› With pushbuttons for radio, navigation system and mobile
phone 114
Instrument cluster: Instruments and indicator lights 8
Lever for the multifunction switch:
› Multifunction display 12
› Windscreen wiper and wash system 48
Air outlet vents 81
Regulator for front left seat heating 58
Switch for hazard warning lights 44
Warning light for the deactivated front seat passenger airbag 142
Storage compartment on the dash panel 73
Depending on equipment fitted:
› Radio
› Navigation system
Regulator for front right seat heating 58
Storage compartment on the front passenger side 72
Front passenger airbag 138
Key switch for switching off the front passenger airbag (in front
passenger storage compartment) 142
Electric windows 34
Fuse box (on side of dash panel) 202
Light switch 401
2
3
4
5
6
7
8
9
10
11
12
13
14
15
16
17
18
19 Bonnet release lever 171
Regulator for the instrument lighting and regulator for the head-
light beam range adjustment 43, 44
Lever for adjusting the steering wheel 93
Driver’s knee airbag 139
Ignition lock 94
TCS switch 94
Front and rear parking aid 100
Central locking system 29
Depending on equipment fitted:
› Gearshift lever (manual gearbox) 100
› Selector lever (automatic gearbox) 110
Storage compartment 73
Offroad 98
Tyre pressure monitoring system 186
Park Assist 101
Depending on equipment fitted:
› Operating controls for the heating 82
› Operating controls for the air conditioning system 83
› Operating controls for Climatronic 86
Note
The arrangement of the controls and switches and the location of some items on
right-hand drive models may differ from that shown in »
Fig. 1. The symbols on
the controls and switches are the same as for left-hand drive models. Ð 20
21
22
23
24
25
26
27
28
29
30
31
32
33
7
Cockpit
Page 13 of 225
The following will be displayed in the information display for 10
seconds:
Service in ... km or ... days.
Resetting Service Interval Display
It is only possible to reset the Service Interval Display, if a service message or at
least a pre-warning is shown in the instrument cluster display.
We recommend that this reset is completed by a
ŠKODA specialist garage.
The ŠKODA specialist garage: › Resets the memory of the display after the appropriate inspection
› Adds an entry to the Service Schedule
› Affixes the sticker with the entry of the following service interval to the side of
the dashboard on the driver's side
Reset the service interval display by using the reset button 7
»
Fig. 2 on page 8.
On vehicles which are equipped with the information display, you can reset the
Service Interval Display in the menu Settings » page 16.CAUTION
We recommend that you do not reset the Service Interval Display yourself as this
can result in the incorrect setting of the Service Interval Display, which can also
cause possible problems with the operation of your vehicle. Note
■ Never reset the display between service intervals, as this will result in the incor-
rect display. ■ Information is retained in the Service Interval Display even after the vehicle bat-
tery is disconnected.
■ If the instrument cluster is exchanged after a repair, the correct values must be
entered in the counter for the Service Interval Display. This work is carried out by
a ŠKODA specialist garage. ■ After resetting the display with flexible service intervals, the displayed data is
the same as that for a vehicle with fixed service intervals. We therefore recom-
mend that the Service Interval Display is only reset by a
ŠKODA Service Partner,
who will reset the display with a vehicle system tester. ■ For more information on the service intervals » Service Plan. Ð Digital clock
First read and observe the introductory information and safety warn-
ings on page 8.
The clock is set with the buttons 3
and 7
» Fig. 2 on page 8.
Select the display that you wish to change with the button 3
and carry out the
change with the button 7
.
On vehicles that are fitted with the information display, it is also possible to set
the clock in the menu Time » page 16. Ð Recommended gear
Fig. 4
Recommended gear
First read and observe the introductory information and safety warn-
ings on page 8.
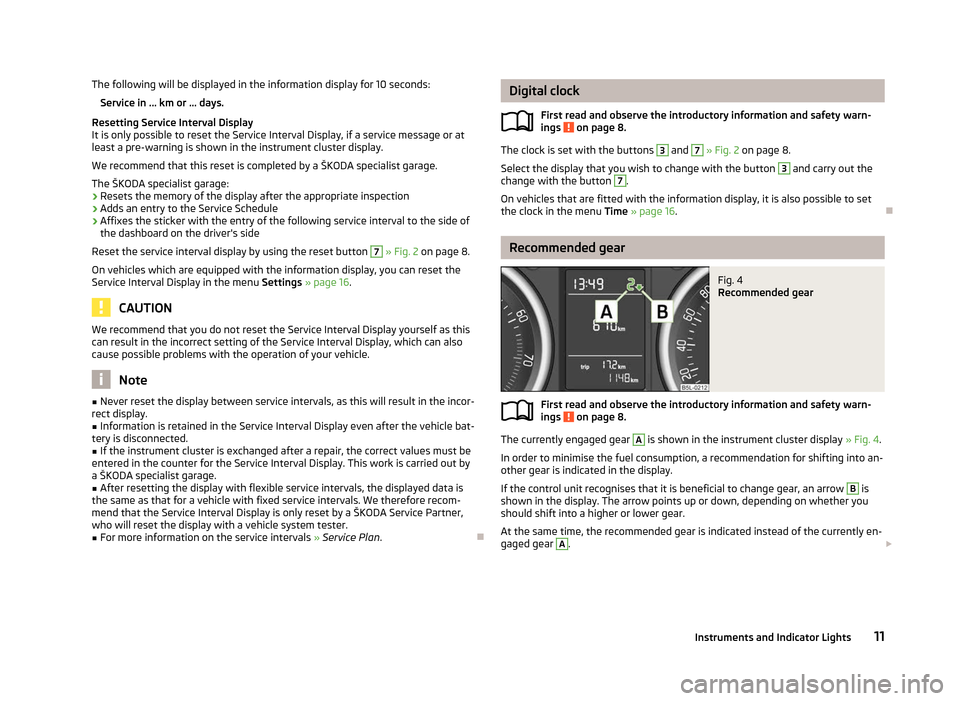
The currently engaged gear A
is shown in the instrument cluster display
» Fig. 4.
In order to minimise the fuel consumption, a recommendation for shifting into an-
other gear is indicated in the display.
If the control unit recognises that it is beneficial to change gear, an arrow B
is
shown in the display. The arrow points up or down, depending on whether you
should shift into a higher or lower gear.
At the same time, the recommended gear is indicated instead of the currently en-
gaged gear A
.
£
ä
ä
11
Instruments and Indicator Lights
Page 17 of 225
Adjusting the speed limit while the vehicle is moving
›
With the button A
» Fig. 6
on page 13 or the adjustment wheel D
, select the
menu item Warning against excessive speeds .
› Drive at the desired speed, e.g. 50 km/h.
› Press the button B
or the adjustment wheel D
to accept the current speed as
the speed limit (the value flashes).
If you wish to change the set speed limit, it is changed in 5
km/h intervals (e.g. the
accepted speed of 47 km/h increases to 50 km/h or decreases to 45 km/h).
› Press again the button B
or the adjustment wheel D
to confirm the speed
limit, or wait approx. 5 seconds and the setting is saved automatically (the value
stops flashing).
Change or delete speed limit
› With the button A
» Fig. 6
on page
13 or the adjustment wheel D
, select the
menu item Warning against excessive speeds .
› Pressing the button B
or the adjustment wheel D
deletes the speed limit.
› Pressing the button B
or the adjustment wheel D
again activates change
mode for the speed limit.
If the set speed limit is exceeded, an audible signal will sound as a warning. At
the same time the message Warning against excessive speeds appears on the
display with the set limit value.
The set speed limit value remains stored even after switching off the ignition. ÐMAXI DOT (information display)
ä
Introduction
This chapter contains information on the following subjects:
Main menu 15
Settings 16
Door, boot lid and bonnet warning 17
Auto Check Control 17
The information display provides you with information on the current operating
state of your vehicle . The information system also provides you with data (de-
pending on the equipment installed in the vehicle) relating to the radio, mobile
phone, multi-functional indicator, navigation system, the unit connected to the
MDI input and the automatic gearbox » page 109. WARNING
Concentrate fully at all times on your driving! As the driver you are fully re-
sponsible for the operation of your vehicle. CAUTION
Pull out the ignition key if coming in contact with the display (e.g. when cleaning)
to prevent any possible damage. Ð Main menu
Fig. 7
Information display: Control elements on the windscreen wiper lever/
control elements on the multifunction steering wheel
First read and observe the introductory information and safety warn-
ings on page 15.
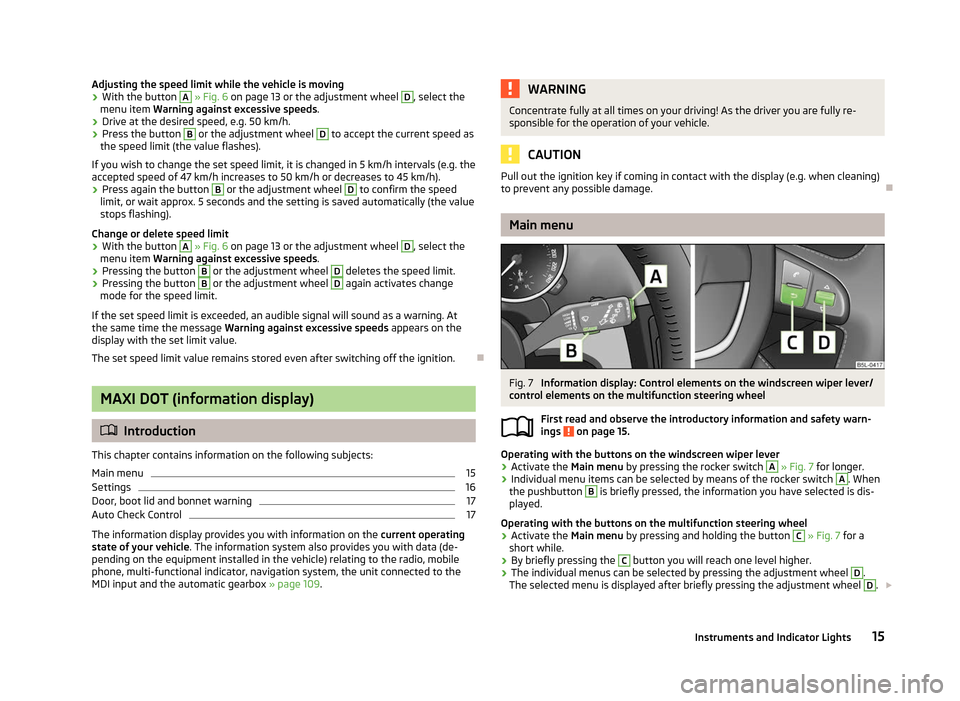
Operating with the buttons on the windscreen wiper lever
›
Activate the Main menu
by pressing the rocker switch A
» Fig. 7 for longer.
› Individual menu items can be selected by means of the rocker switch A
. When
the pushbutton B
is briefly pressed, the information you have selected is dis-
played.
Operating with the buttons on the multifunction steering wheel
› Activate the Main menu
by pressing and holding the button C
» Fig. 7
for a
short while.
› By briefly pressing the C
button you will reach one level higher.
› The individual menus can be selected by pressing the adjustment wheel D
.
The selected menu is displayed after briefly pressing the adjustment wheel D
.
£
ä
15
Instruments and Indicator Lights
Page 32 of 225
Note
If the safe securing system is activated » page 28, the door opening lever and the
central locking buttons do not operate. ÐRemote control
Introductory information
You can use the remote control key to:
› unlock and lock the vehicle,
› unlocking boot lid;
› open and close the windows
» page 36, Window convenience operation .
The transmitter with the battery is housed in the handle of the remote control
key. The receiver is located in the interior of the vehicle. The operating range of
the remote control key is approx. 30 m. But this range of the remote control can
be reduced if the batteries are weak.
The key has a fold-open key bit which can be used for unlocking and locking the
car manually and also for starting the engine.
If a lost key is replaced or if the receiver unit has been repaired or replaced, the
system must be initialised by a ŠKODA Service Partner. Only then can the remote
control key be used again. Note
■ The remote control is automatically deactivated when the ignition is switched
on. ■ The operation of the remote control may temporarily be affected by interfer-
ence from transmitters close to the car and which operate in the same frequency
range (e.g. mobile phone, TV transmitter).
■ The battery must be replaced if the central locking or anti-theft alarm system
does react to the remote control at less than 3 metres away » page 26.
■ If the driver door is open, the vehicle cannot be locked using the remote control
key. Ð Locking/unlocking
Fig. 13
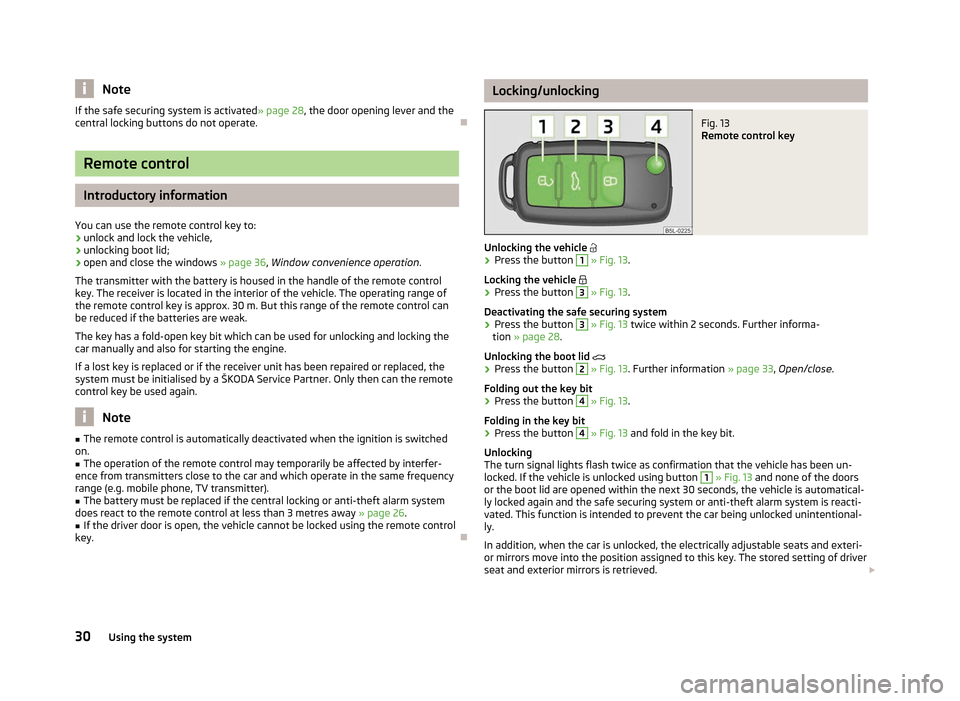
Remote control key
Unlocking the vehicle
› Press the button 1
» Fig. 13.
Locking the vehicle
› Press the button 3
» Fig. 13.
Deactivating the safe securing system
› Press the button 3
» Fig. 13
twice within 2 seconds. Further informa-
tion » page 28.
Unlocking the boot lid
› Press the button 2
» Fig. 13. Further information
» page 33, Open/close.
Folding out the key bit
› Press the button 4
» Fig. 13.
Folding in the key bit
› Press the button 4
» Fig. 13
and fold in the key bit.
Unlocking
The turn signal lights flash twice as confirmation that the vehicle has been un-
locked. If the vehicle is unlocked using button 1
» Fig. 13 and none of the doors
or the boot lid are opened within the next 30 seconds, the vehicle is automatical-
ly locked again and the safe securing system or anti-theft alarm system is reacti-
vated. This function is intended to prevent the car being unlocked unintentional-
ly.
In addition, when the car is unlocked, the electrically adjustable seats and exteri-
or mirrors move into the position assigned to this key. The stored setting of driver
seat and exterior mirrors is retrieved. £
30 Using the system
Page 33 of 225
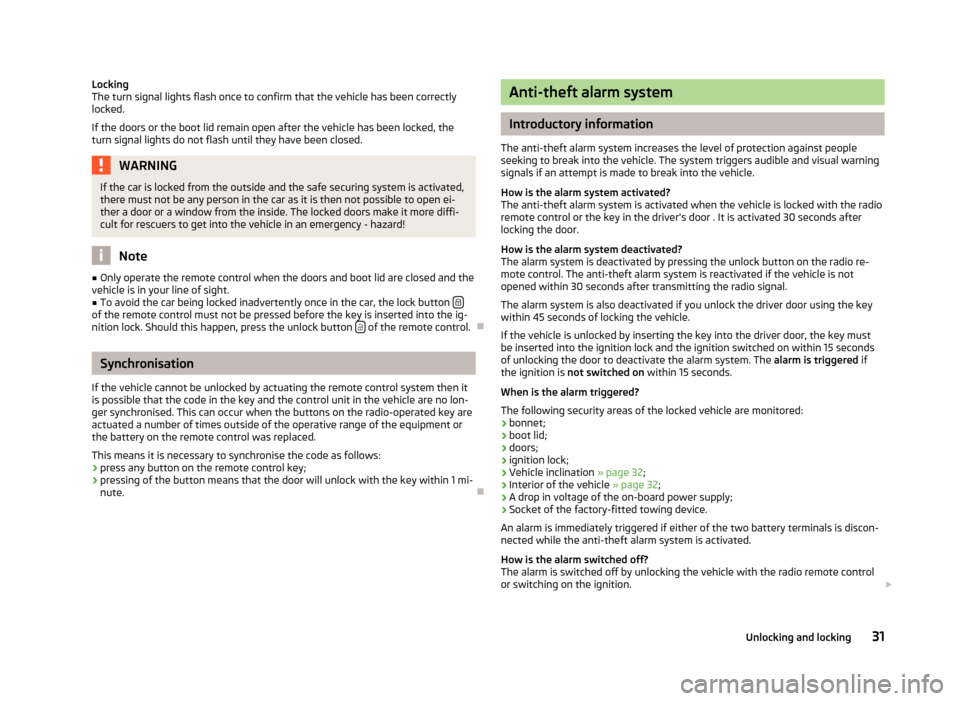
Locking
The turn signal lights flash once to confirm that the vehicle has been correctly
locked.
If the doors or the boot lid remain open after the vehicle has been locked, the
turn signal lights do not flash until they have been closed.
WARNING
If the car is locked from the outside and the safe securing system is activated,
there must not be any person in the car as it is then not possible to open ei-
ther a door or a window from the inside. The locked doors make it more diffi-
cult for rescuers to get into the vehicle in an emergency - hazard! Note
■ Only operate the remote control when the doors and boot lid are closed and the
vehicle is in your line of sight. ■ To avoid the car being locked inadvertently once in the car, the lock button of the remote control must not be pressed before the key is inserted into the ig-
nition lock. Should this happen, press the unlock button
of the remote control.
ÐSynchronisation
If the vehicle cannot be unlocked by actuating the remote control system then it
is possible that the code in the key and the control unit in the vehicle are no lon-
ger synchronised. This can occur when the buttons on the radio-operated key are
actuated a number of times outside of the operative range of the equipment or
the battery on the remote control was replaced.
This means it is necessary to synchronise the code as follows:
› press any button on the remote control key;
› pressing of the button means that the door will unlock with the key within 1 mi-
nute. Ð Anti-theft alarm system
Introductory information
The anti-theft alarm system increases the level of protection against people
seeking to break into the vehicle. The system triggers audible and visual warning
signals if an attempt is made to break into the vehicle.
How is the alarm system activated?
The anti-theft alarm system is activated when the vehicle is locked with the radio
remote control or the key in the driver's door . It is activated 30 seconds after
locking the door.
How is the alarm system deactivated?
The alarm system is deactivated by pressing the unlock button on the radio re-
mote control. The anti-theft alarm system is reactivated if the vehicle is not
opened within 30 seconds after transmitting the radio signal.
The alarm system is also deactivated if you unlock the driver door using the key
within 45 seconds of locking the vehicle.
If the vehicle is unlocked by inserting the key into the driver door, the key must
be inserted into the ignition lock and the ignition switched on within 15
seconds
of unlocking the door to deactivate the alarm system. The alarm is triggered if
the ignition is not switched on within 15 seconds.
When is the alarm triggered?
The following security areas of the locked vehicle are monitored: › bonnet;
› boot lid;
› doors;
› ignition lock;
› Vehicle inclination
» page 32;
› Interior of the vehicle
» page 32;
› A drop in voltage of the on-board power supply;
› Socket of the factory-fitted towing device.
An alarm is immediately triggered if either of the two battery terminals is discon-
nected while the anti-theft alarm system is activated.
How is the alarm switched off?
The alarm is switched off by unlocking the vehicle with the radio remote control
or switching on the ignition. £
31
Unlocking and locking
Page 37 of 225
Window open/close
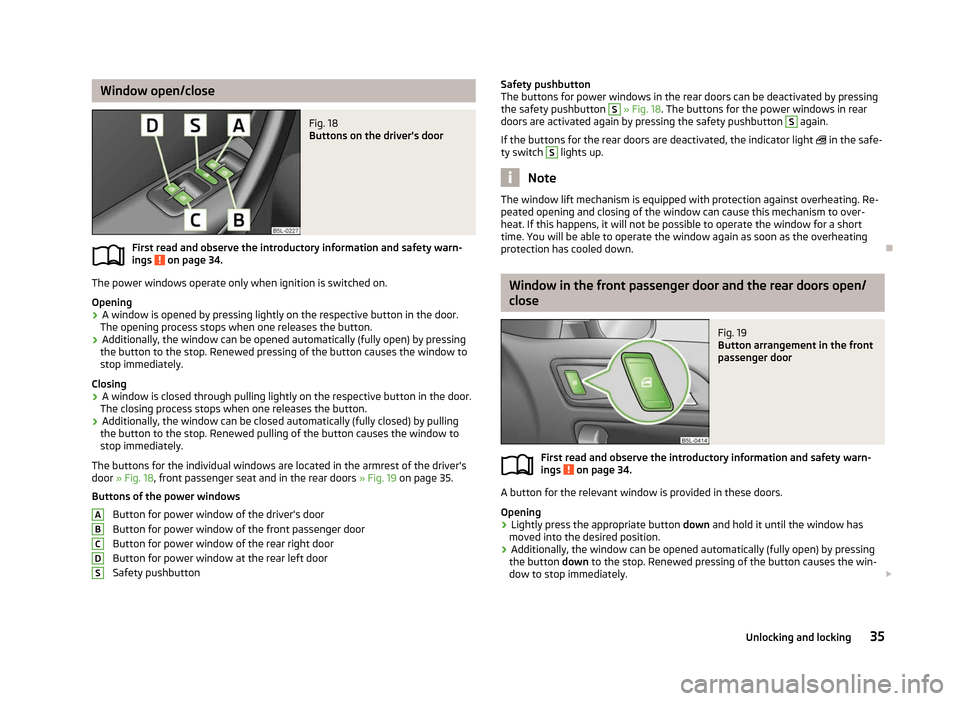
Fig. 18
Buttons on the driver's door
First read and observe the introductory information and safety warn-
ings on page 34.
The power windows operate only when ignition is switched on.
Opening
›
A window is opened by pressing lightly on the respective button in the door.
The opening process stops when one releases the button.
› Additionally, the window can be opened automatically (fully open) by pressing
the button to the stop. Renewed pressing of the button causes the window to
stop immediately.
Closing
› A window is closed through pulling lightly on the respective button in the door.
The closing process stops when one releases the button.
› Additionally, the window can be closed automatically (fully closed) by pulling
the button to the stop. Renewed pulling of the button causes the window to
stop immediately.
The buttons for the individual windows are located in the armrest of the driver's
door » Fig. 18, front passenger seat and in the rear doors » Fig. 19 on page
35.
Buttons of the power windows Button for power window of the driver's door
Button for power window of the front passenger door
Button for power window of the rear right door
Button for power window at the rear left door
Safety pushbutton
ä
A
B
C
D
S Safety pushbutton
The buttons for power windows in the rear doors can be deactivated by pressing
the safety pushbutton
S
» Fig. 18. The buttons for the power windows in rear
doors are activated again by pressing the safety pushbutton S
again.
If the buttons for the rear doors are deactivated, the indicator light in the safe-
ty switch S
lights up.
Note
The window lift mechanism is equipped with protection against overheating. Re-
peated opening and closing of the window can cause this mechanism to over-
heat. If this happens, it will not be possible to operate the window for a short
time. You will be able to operate the window again as soon as the overheating
protection has cooled down. Ð Window in the front passenger door and the rear doors open/
close
Fig. 19
Button arrangement in the front
passenger door
First read and observe the introductory information and safety warn-
ings on page 34.
A button for the relevant window is provided in these doors.
Opening
›
Lightly press the appropriate button
down and hold it until the window has
moved into the desired position.
› Additionally, the window can be opened automatically (fully open) by pressing
the button down to the stop. Renewed pressing of the button causes the win-
dow to stop immediately. £
ä
35
Unlocking and locking
Page 39 of 225

Note
If the battery has been disconnected and reconnected, it is possible that the slid-
ing/tilting roof does not close fully. This is why the rotary switch must be set to
the switch position A
» Fig. 20 on page 37
and pressed forward for about
10 seconds. ÐUsing the system
Fig. 20
Control dial for the panoramic
sliding roof
Comfort position
› Turn the switch to position C
» Fig. 20.
Open partially
› Turn the switch to a position in area D
» Fig. 20.
Open fully
› Turn the switch to position B
» Fig. 20 and hold it in this position (spring-ten-
sioned position).
Tilting and closing
› To tilt, press the switch on the recess in the direction of the roof.
› To close, press the switch on the recess down and then push it forwards.
Closing
› Turn the switch to position A
» Fig. 20.
Force limiter
The panoramic sliding roof is fitted with a force limiter. The panoramic sliding roof
stops and moves back several centimetres when it cannot be closed because
there is something in the way (e.g. ice). The panoramic sliding roof can be fully
closed without a force limiter by pressing the switch on the recess down and then
pushing it forward until the panoramic sliding roof is fully closed » . WARNING
Close the panoramic sliding roof carefully - risk of injury! CAUTION
During the winter it may be necessary to remove any ice and snow in the vicinity
of the panoramic sliding roof before opening it to prevent any damage to the
opening mechanism. Note
When the panoramic sliding roof is in the comfort position, the intensity of the
wind noise is reduced. Ð Sunshade open/close
Fig. 21
Buttons for sun screen
The sun screen can be closed or opened separately using the buttons » Fig. 21.
Opening
› Briefly press the button E
» Fig. 21 to open fully.
› Press and hold the button E
to open in the desired position. The opening proc-
ess stops when one releases the button.
Closing
› Briefly press the button F
» Fig. 21 to close fully.
› Press and hold the button F
to close in the desired position. The closing proc-
ess stops when one releases the button. Ð
37
Unlocking and locking
Page 59 of 225

WARNING (Continued)
■ If the front passenger seat backrest is folded, passengers may only be con-
veyed on the outer seat behind the driver.
■ Never transport objects on the seat backrest which was folded forwards,
which: ■ impair driver visibility;
■ make it impossible for the driver to control the vehicle, e.g. if they are
placed under the pedals, or could protrude into the driver's zone;
■ could lead to injury to passengers due to a change of direction or braking
manouvre when accelerating sharply. ÐAdjusting front seats electrically
Fig. 44
Controls for the electric seat adjustment
First read and observe the introductory information and safety warn-
ings on page 55.
Adjusting a seat in a forward/back direction
›
Press the switch B
» Fig. 44
forwards or backwards in the direction of arrow 1.
Set the height of the seat cushion
› Press the switch B
»
Fig. 44
upwards or downwards.
Adjust the angle of the seat cushion
› Press the switch B
»
Fig. 44
in the direction of the arrow 2 or 3.
Adjusting the angle of the seat backrest
› Press the switch C
»
Fig. 44
in the direction of the desired setting.
ä Reducing or increasing the curvature of the lumbar support
› Press the switch A
»
Fig. 44
forwards or backwards.
Raising or lowering the curvature of the lumbar support
› Press the switch A
»
Fig. 44
upwards or downwards.
The adjusted driver's seat position can be set in the memory of the
seat » page 57 or the remote control key » page 58. Note
If the movement of the seat is inadvertently interrupted during an adjustment,
once again press the switch in the appropriate direction and complete the adjust-
ment of the seat. Ð Memory function of the power seat
Fig. 45
Memory buttons and SET button
First read and observe the introductory information and safety warn-
ings on page 55.
The memory function for the driver's seat provides the option to store the individ-
ual positions of the driver's seat and the external mirrors. A setting position can
be allocated to each of the three memory buttons B
» Fig. 45, i.e. three in total.
Storing seat and exterior mirror settings for driving forward
› Switch on the ignition.
› Adjust the seat to the desired position.
› Adjust both of the exterior mirrors
» page 53.
› Press the button
SET A
» Fig. 45.
› Within 10 seconds after pressing the
SET button, press the desired memory
button B
.
An acknowledgment sound confirms the storage in the seat memory. £
ä
57
Seats and Stowage
Page 88 of 225

Climatronic (automatic air conditioning system)
Introductory information
The Climatronic maintains fully automatically a convenience temperature. This is
achieved by automatically varying the temperature of the air flow, the blower
stages and air distribution. The system also takes sunlight into account, which
eliminates the need to alter the settings manually. The automatic
mode » page 87 ensures maximum well-being of the occupants at all times of
the year.
Description of Climatronic system
The cooling system only operates if the following conditions are met:
› engine running;
› outside temperature above approx. +2 °C;
› AC 13
» Fig. 91 on page 86
switched on.
The AC compressor is switched off at a high coolant temperature in order to pro-
vide cooling at a high load of the engine.
Recommended setting for all periods of the year.
› Set the desired temperature, we recommend 22 °C.
› Press the button
AUTO 8
» Fig. 91
on page 86.
› Move the air outlet vents
3 and 4 » Fig. 87 on page 81 so that the air flow is
directed slightly upwards. Note
■ We recommend that you have the Climatronic system cleaned by a
ŠKODA spe-
cialist garage once every year. ■ On vehicles equipped with a factory-fitted radio or radio navigation system, the
Climatronic information is also shown on their displays. This function can be
switched off, see operating instructions for the radio or navigation system. Ð Overview of the control elements
Fig. 91
Climatronic: Control elements
The buttons Defrost windscreen intensively Air flow to the windows
Air flow to head
Air flow in the footwell
Recirculated air mode
with air quality sensor
Rear window heater The buttons/control dial
Setting of the temperature for the left side, operation of the seat heating of
the left front seat
Automatic mode AUTO Switching off Climatronic
OFF Setting the blower speed
Depending upon vehicle equipment: Button for directly switching on/off the
auxiliary heating » Fig. 92
on page
89 or switching on/off the windscreen
heater » Fig. 34 on page 47
Switching on/off of the temperature setting in dual mode DUAL Switching the cooling system on and off
AC Setting of the temperature for the right side, operation of the seat heating of
the right front seat £ 1
2
3
4
5
6
7
8
9
10
11
12
13
14
86
Using the system
Page 89 of 225

Note
Below the top row of buttons is located the interior temperature sensor. Do not
stick anything on or cover the sensor, otherwise it could have an unfavourable ef-
fect on the Climatronic. ÐAutomatic mode
The automatic mode is used in order to maintain a constant temperature and to
demist the windows in the interior of the car.
Switching on
› Set a temperature between +18 °C and +26
℃.
› Move the air outlet vents
3 and 4 » Fig. 87 on page 81 so that the air flow is
directed slightly upwards.
› Press the button
AUTO 8
» Fig. 91 on page 86
. The indicator light in the top
right or left corner lights up, depending on which mode was last selected.
If the warning light in the top right corner of the button AUTO lights up, the Cli-
matronic operates in
“HIGH” mode. The “HIGH” mode is the standard setting of
the Climatronic.
When pressing again the button AUTO , the Climatronic changes into the “LOW”
mode and the indicator light in the top left corner lights up. The Climatronic uses
only in this mode the lower blower speed. However taking into account the noise
level, this is more comfortable, yet be aware that the effectiveness of the air con-
ditioning system is reduced particularly if the vehicle is fully occupied.
By pressing the button AUTO again, it is changed to “HIGH” mode.
Automatic mode is switched off by pressing one of the buttons for the air distri-
bution or by increasing/decreasing the blower speed. The temperature is never-
theless regulated. ÐSwitching the cooling system on and off
Switching the cooling system on and off › Press the button
AC » Fig. 91 on page 86
. The indicator light lights up in the
button.
› When you again press the button
AC , the air conditioning system is switched
off. The indicator light in the button goes out. Only the function of the ventila-
tion remains active when no lower temperature than the outside temperature
can be reached. Ð Setting temperature
The interior temperature for the left and right side can be set separately.
› The temperature for both sides can be set with the control dial 7
» Fig. 91 on
page 86
after switching on the ignition.
› If you wish to set the temperature for the right side, turn the control dial 14
.
The indicator light in the button DUAL lights up, this indicates that differing
temperatures for the left and right side can be set.
If the indicator light in the button DUAL is illuminated, the temperature for both
sides cannot be set with the control dial 7
. You can reactivate this function by
pressing the button DUAL . The indicator light in the button goes out.
The interior temperature can be set between +18 °C and +26 ℃. The interior tem-
perature is regulated automatically within this range. If a temperature lower than
+18 °C is selected, a blue symbol lights up at the start of the numerical scale. If a
temperature higher than +26 °C is selected, a red symbol lights up at the start of
the numerical scale. In both limit positions the Climatronic operates at maximum
cooling or heating capacity, respectively. The temperature is not controlled in this
case.
Lengthy and uneven distribution of the air flow out of the vents (especially
around the feet) and large differences in temperature, for example, when getting
out of the vehicle, can cause susceptible individuals to catch a cold. Ð Recirculated air mode
Recirculated air mode prevents polluted air outside the vehicle from getting into
the vehicle, for example when driving through a tunnel or when standing in a
traffic jam. If a considerable increase in concentration of pollutants is recognized
by the air quality sensor, when the automatic air distribution control is switched
on, the air distribution control will temporarily be switched off. If the concentra-
tion of pollutants decreases to the normal level, the air distribution control is au-
tomatically switched off so that fresh air can be guided into the vehicle interior. In
recirculated air mode air is sucked out of the interior of the vehicle and then fed
back into the interior. When the automatic air distribution control is switched on,
an air quality sensor measures the concentration of pollutants in the drawn in air.
Switching recirculated air mode on
› Repeatedly press the button
5
» Fig. 91 on page 86
until the indicator
light on the left side of the button is illuminated. £
87
Heating and air conditioning system