instrument cluster SKODA YETI 2013 1.G / 5L Owner's Guide
[x] Cancel search | Manufacturer: SKODA, Model Year: 2013, Model line: YETI, Model: SKODA YETI 2013 1.G / 5LPages: 266, PDF Size: 26.71 MB
Page 140 of 266
Antilock brake system (ABS)First read and observe the introductory information and safety warn-
ings
on page 136.
ABS prevents the wheels locking when braking. Thus helping the driver to main- tain control of the vehicle.
The intervention of the ABS is noticeable from the pulsating movements of the
brake pedal which is accompanied by noises.
When the ABS system is active, do not brake periodically or reduce the pressure on the brake pedal.
Traction Control System (TCS)
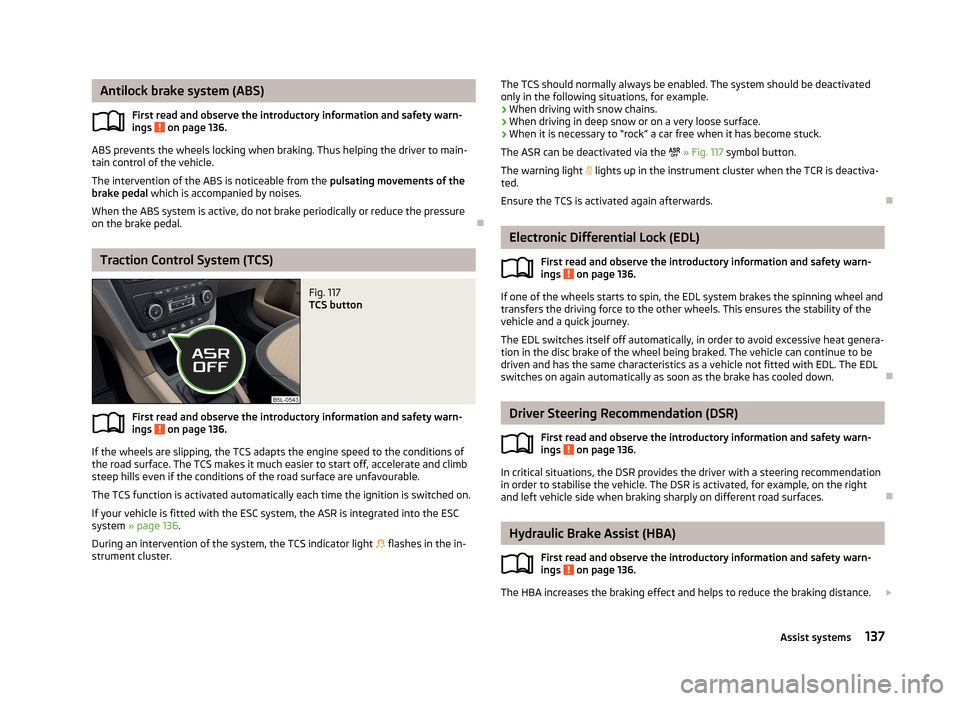
Fig. 117
TCS button
First read and observe the introductory information and safety warn- ings on page 136.
If the wheels are slipping, the TCS adapts the engine speed to the conditions ofthe road surface. The TCS makes it much easier to start off, accelerate and climb
steep hills even if the conditions of the road surface are unfavourable.
The TCS function is activated automatically each time the ignition is switched on.
If your vehicle is fitted with the ESC system, the ASR is integrated into the ESC
system » page 136 .
During an intervention of the system, the TCS indicator light flashes in the in-
strument cluster.
The TCS should normally always be enabled. The system should be deactivated
only in the following situations, for example.
› When driving with snow chains.
› When driving in deep snow or on a very loose surface.
› When it is necessary to “rock” a car free when it has become stuck.
The ASR can be deactivated via the
» Fig. 117 symbol button.
The warning light lights up in the instrument cluster when the TCR is deactiva-
ted.
Ensure the TCS is activated again afterwards.
Electronic Differential Lock (EDL)
First read and observe the introductory information and safety warn-
ings
on page 136.
If one of the wheels starts to spin, the EDL system brakes the spinning wheel and transfers the driving force to the other wheels. This ensures the stability of the
vehicle and a quick journey.
The EDL switches itself off automatically, in order to avoid excessive heat genera-
tion in the disc brake of the wheel being braked. The vehicle can continue to be
driven and has the same characteristics as a vehicle not fitted with EDL. The EDL switches on again automatically as soon as the brake has cooled down.
Driver Steering Recommendation (DSR)
First read and observe the introductory information and safety warn-ings
on page 136.
In critical situations, the DSR provides the driver with a steering recommendationin order to stabilise the vehicle. The DSR is activated, for example, on the right
and left vehicle side when braking sharply on different road surfaces.
Hydraulic Brake Assist (HBA)
First read and observe the introductory information and safety warn-ings
on page 136.
The HBA increases the braking effect and helps to reduce the braking distance.
137Assist systems
Page 141 of 266
The HBA is activated by very quick operation of the brake pedal. In order to ach-
ieve the shortest possible braking distance, the brake pedal must be applied firm-
ly until the vehicle has come to a standstill.
The HBA function is automatically deactivated when the brake pedal is released.
The ABS is activated faster and more effectively with the intervention of the HBA.
Hill Hold Control (HHC)
First read and observe the introductory information and safety warn-ings
on page 136.
When driving on slopes, HHC allows you to move your foot from the brake pedalto the accelerator pedal without having to use the handbrake.
The system holds the brake pressure produced by the activation of the brakepedal for approx. 2 seconds after the brake pedal is released.
The brake pressure drops gradually the more you operate the accelerator pedal. If the vehicle does not start off within 2 seconds, it starts to roll back.
The HHC is active from a 5% slope if the driver's door is closed. HHC is only ever
active on slopes when in forward or reverse start off. When driving downhill, it is
inactive.
OFF ROAD-mode
Introduction
This chapter contains information on the following subjects:
Operation
138
Activation / deactivation
140
The OFF ROAD mode supports the driver when driving away from paved roads.
But even with OFF ROAD mode activated, your vehicle is never a true SUV.
WARNING■ A lack of fuel can cause irregular engine running or cause the engine to shut
down. This would lead the OFF ROAD mode to lose its effectiveness - risk of accident!■
Adjust the speed and driving style to the current visibility, weather, road and
traffic conditions.
■
The increased safety offered by the OFF ROAD mode must not tempt you to
take greater risks than otherwise - risk of an accident!
CAUTION
■ The OFF ROAD mode is not designed for the use on common roads.■All four wheels must be fitted with the same tyres approved by the manufactur-
er to ensure theOFF ROAD mode operates correctly.
Operation
First read and observe the introductory information and safety warn-
ings
on page 138.
The OFF ROAD mode is ready to intervene at speeds below 30 km / hr. The readi-
ness of the system is the warning light
displayed in the instrument cluster.
The following functions are integrated in the OFF ROAD mode.
› Downhill Drive Support.
› Start-Off Assist.
› ABS OFF ROAD.
› TCS OFF ROAD.
› EDL OFF ROAD.
Downhill Drive Support
The hill descent assistant, with its automatic braking action on all wheels, en-
sures a constant speed on a steep slope when driving forwards and reversing.
The speed maintained corresponds to the speed of the vehicle at the time the As- sistant was first engaged.
During an intervention of the Assistants, the warning light
flashes in the in-
strument cluster.
By pressing the accelerator or brake pedal, the speed can be increased or re- duced. This is true even if the shift lever is in the neutral position and the selector
lever in the N position.
138Driving
Page 142 of 266
The intervention of the wizard is cancelled when you press the pedal and re-
sumed after the pedal is released again.
The hill descent assistant is automatically engaged under the following condi-tions.
The OFF ROAD mode is switched on and the warning light lights up in the
instrument cluster.
The vehicle engine is running and either the 1st, 2nd or 3rd gear, reverse gear
or no gear is engaged and the selector lever is in position R, N, D, S or Tip- tronic.
The downhill gradient is at least 10 % (when driving over sleepers, the limit can briefly drop to 8 %).
Neither the accelerator nor the brake pedal is operated.
It is however a requirement that the vehicle has sufficient grip on the soil. The Downhill Drive Support cannot properly fulfil its function on slushy soil due to
physical reasons (e.g. ice or mud).
For vehicles with manual transmission, the speed is maintained as follows.
› 1st gear - approx. 8 1)
- 30 km/h
› 2nd gear - approx. 13 1)
- 30 km/h
› 3rd gear - approx. 22 1)
- 30 km/h
› Reverse gear - approx. 9 1)
- 30 km/h
› Neutral for driving forwards - as well as driving backwards - approx. 2 - 30 km/h
On vehicles with automatic transmission, the speed is maintained as follows.
› Position D, S, R or Tiptronic (for 1st, 2nd, 3rd gear - approx. 2 - 30 km/h
› Neutral for driving forwards - as well as reversing - approx. 2 - 30 km/h
Start-Off Assist
The assistant supports the driver when starting eg on a steep slope. When the
driver presses the accelerator, the maximum engine speed is electronically limited so that a gentle approach is possible.
The overspeed trip unit is automatically deactivated after terminating the start-
up procedure.
As part of the Assist System, the accelerator pedal is adapted in its characteristics for an easier start-off on slippery and loose soil.ABS OFF ROAD
The ABS OFF ROAD supports the driver when braking on an unpaved surface such
as gravel, snow, etc.
The system generated by a controlled locking of the wheels braked wheel before a “wedge” of piled material, which shortens the braking distance.
The system is only available, if the front wheels are in the straight-ahead posi-
tion.
The system operates at speeds of up to 50 km/h.
TCS OFF ROAD
The ASR OFF ROAD makes starting and driving on an unpaved surface easier as it partially allows wheel-spin.
EDL OFF ROAD
The EDS supports OFF ROAD vehicle traction when driving on a surface with dif- ferent grip under the drive wheels or when driving over bumps.
A spinning wheel or wheels are braked earlier and with more force than with the
intervention of the standard EDS system.
Note
■ During an active intervention of the Downhill Drive Support, the brake lights do
not light up.■
When disabled, ASR » Fig. 116 on page 136 the OFF ROAD mode works without
the support of the ASR OFF ROAD.
1)
The indicated values represent the average of the lower speed limits if a gear is engaged (depending
on the type of gearbox or engine).
139Assist systems
Page 150 of 266
Driver steering intervention: Please take over steering!
The parking procedure is terminated due to a driver steering intervention. Park Assist finished. ASR deactivated.
The parking procedure cannot be carried out because the TCS system is deactiva- ted. Activate the TCS.
ASR deactivated. Please take over steering!
The parking procedure was ended because TCS was deactivated during the park-
ing procedure.
Trailer: Park Assist finished.
The parking procedure cannot be carried out because a trailer is hitched. Time limit exceeded. Please take over steering!
The parking procedure was ended because the time limit of 6 minutes was
passed.
Park Assist currently not available.
The system cannot be activated because a fault exists on the vehicle. Seek help
from a specialist garage.
Park Assist ended. System currently not available.
The parking procedure was ended because a fault exists on the vehicle. Seek help
from a specialist garage.
Park Assist faulty. Workshop!
The parking procedure is not possible because a fault exists in the system. Seek help from a specialist garage.
ASR intervention! Please take over steering!
The parking procedure is terminated by a TCS intervention. PARK ASSIST Turn on turn signal and select reverse gear
The prerequisites for manoeuvring out of a parking space using the system have
been met. Switch on the turn signals and shift into reverse.
Automatic space departure not possible. Space too small
The manoeuvring procedure using the system is not possible. The parking gap is too small.
Park Assist Brake interv. Speed too high
The driving speed during the parking procedure was too high - automatic brake
assist is initiated.
Cruise Control System
Introduction
This chapter contains information on the following subjects:
Activating/deactivating
148
Storing and maintaining speed
148
Changing the stored speed
148
Switching off temporarily
148
The Cruise Control System (CCS) maintains a set speed, more than 25 km/h, with-
out you having to actuate the accelerator pedal.
This is only possible within the range which is permitted by the power output and
braking power of the engine.
The warning light
illuminates in the instrument cluster when the cruise control
system is switched on.
WARNING■ For safety reasons, the cruise control system must not be used in dense
traffic or on unfavourable road surfaces (such as icy roads, slippery roads,
loose gravel) – risk of accident!■
The saved speed may only be resumed if it is not too high for the current
traffic conditions.
■
Always deactivate the cruise control system after use to prevent the system
being switched on unintentionally.
CAUTION
■ The cruise control system is not able to maintain a constant speed when driving
in areas with steeper gradients. The weight of the vehicle increases the speed at which it travels. In such cases, a lower gear should be engaged or the footbrake
applied.■
It is not possible to switch on the cruise control system if the first gear or re-
verse gear is engaged (Vehicles fitted with a manual transmission)
147Assist systems
Page 152 of 266
Briefly push the rocker button B into the RES/+ position in order to resume the
stored speed after the clutch or brake pedal is released.
START-STOP
Introduction
This chapter contains information on the following subjects:
Starting/shutting down the engine
149
Operating conditions of the system
150
Manually activating/deactivating the system
150
Information messages
151
The START-STOP system helps you to save fuel while at the same time reducing
harmful exhaust emissions and CO 2 emissions.
The function is automatically activated each time the ignition is switched on. In the start-stop mode, the engine automatically switches to the vehicle's idle phase, e.g. when stopped at traffic lights. The engine restarts automatically
where necessary.
The system can work only if the following basic conditions are met. The driver's door is closed.
The driver has fastened the seat belt.
The bonnet is closed.The driving speed was higher than 4 km.h after the last stop.
No trailer is coupled.
WARNING■ The brake servo unit and power steering only operate if the engine is run-
ning.■
Never let the vehicle roll with the engine switched off.
CAUTION
Always deactivate the START-STOP system before driving through wa-
ter » page 134 .Note■
If the driver's seat belt is removed for more than approx. 30 seconds or the driv-
er's door is opened during stop mode on vehicles with manual transmission or au- tomatic transmission (when the selector lever in position P), the engine must be
started manually » page 120.■
After manually starting the engine on vehicles with manual transmission, auto-
matic engine shut down is not possible until the vehicle has travelled the re-
quired minimum distance for START-STOPP mode.
■
If, on vehicles with automatic transmission, the selector lever positions D, S or N
are selected after driving in reverse, the vehicle will first need to achieve a speed
of over 10 km/h before automatic engine shut down can take place again.
■
Changes to the outdoor temperature can have an effect on the internal temper-
ature of the vehicle battery even after several hours. If the vehicle remains out- doors for a long time in minus temperatures or in direct sunlight, it can take sev-
eral hours until the internal temperature of the vehicle battery reaches a suitable
temperature for proper operation of the START STOP system.
■
If the Climatronic is running in automatic mode, it is possible that under certain
conditions the engine may not switch off automatically.
Starting/shutting down the engine
First read and observe the introductory information and safety warn-ings
on page 149.
Vehicles with manual transmission
›
Stop the vehicle (where necessary, apply the handbrake).
›
Put the gear stick into Neutral.
›
Release the clutch pedal.
Automatic engine shut down (STOP phase) takes place. The warning symbol
appears in the instrument cluster display.
›
Depress the clutch pedal.
The automatic start procedure takes place again (START phase). The warning
symbol
goes out.
Vehicles with automatic transmission
›
Bring the vehicle to a stop and depress the brake pedal.
Automatic engine shut down takes place. The warning symbol
appears in the
instrument cluster display.
›
Release the brake pedal.
149Assist systems
Page 153 of 266
The automatic start procedure takes place again. The warning symbol goes
out.
Further information on automatic transmission Engine shut down takes place when the selector lever is in positions P, D , S and N
and in Tiptronic mode.
When the selector lever is in position P the engine remains shut down after you
release the brake pedal. Start the engine by pressing the gas pedal or by moving
the selector lever into a different mode and releasing the brake pedal.
If the selector lever is moved into position R during the STOP phase , the engine
will re-start.
No automatic engine shutdown takes place when the vehicle is moving at low
speed (e.g. during a traffic jam or when tuning) and remains stationary after pressing the brake pedal lightly. Automatic engine shutdown takes place if you
press the brake pedal down with more force.
Operating conditions of the system
First read and observe the introductory information and safety warn-ings
on page 149.
The START-STOP system is very complex. Some of the procedures are hard to check without servicing.
No engine shut down is carried out
Before each STOP phase, the system checks whether certain conditions have
been met. No engine shut down takes place in the following situations.
› The engine has not reached the minimum temperature for START STOP mode.
› The temperature inside the vehicle has not reached the desired temperature
set in the air-conditioning system/heating.
› The external temperature is very low/high.
› The intensive windscreen heater (Climatronic) or windscreen heater/ventilation
is switched on with the maximum air temperature setting (manual air condition-
ing system).
› The parking aid/Park Assist is switched on.
› The charge state of the vehicle battery is too low.
› The stationary vehicle is on a steep slope or a steep downhill section.
› The idling speed is too high.
› The steering angle is too large (manoeuvring).
› The selector lever position
R is selected (e.g. when parking).
The warning symbol appears in the instrument cluster display.
The automatic start procedure takes place again
During the STOP phase, the engine fires up without any active driver intervention, e.g. in the following situations.
› The vehicle begins to roll, e.g. on a slope.
› The difference between the temperature setting of the air-conditioning sys-
tem/heating and the temperature of the interior is too large.
› The intensive windscreen heater (Climatronic) or windscreen heater/ventilation
is switched on with the maximum air temperature setting (manual air condition-
ing system).
› The brake pedal was pressed several times (the pressure in the braking system
is too low).
› The charge state of the vehicle battery is too low.
› The current consumption is too high.
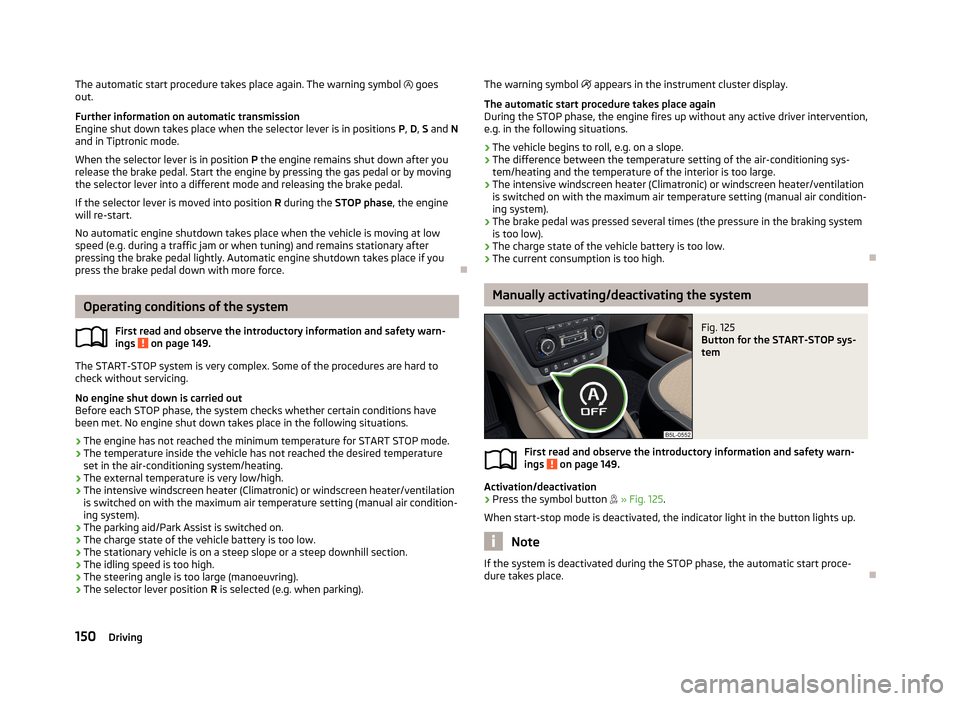
Manually activating/deactivating the system
Fig. 125
Button for the START-STOP sys-
tem
First read and observe the introductory information and safety warn-
ings on page 149.
Activation/deactivation
›
Press the symbol button
» Fig. 125 .
When start-stop mode is deactivated, the indicator light in the button lights up.
Note
If the system is deactivated during the STOP phase, the automatic start proce-
dure takes place.
150Driving
Page 154 of 266
Information messagesFirst read and observe the introductory information and safety warn-
ings
on page 149.
The messages and information are indicated in the instrument cluster display.
Start engine manually!
START MANUALLY
The driver sees this message when the conditions for the automatic start proce-
dure are not met during the STOP phase. The engine must be started manual-
ly » page 122 .
Error: Start-Stop
ERROR START-STOP
There is an error in the START-STOP system. Seek help from a specialist garage.
Fatigue detection (break recommendation)
Introduction
This chapter contains information on the following subjects:
Function
151
Information messages
151WARNING■ For the driving ability is always the driver's responsibility. Never drive if you
feel tired.■
The system may not detect all cases where a break is needed.
■
Therefore, take regular, sufficient breaks during long trips.
■
There will be no system warning during the so-called micro-sleep.
Note
■ In some situations, the system may evaluate the driving incorrectly and thus
mistakenly recommend a break (e.g. sporty driving, adverse weather conditions or poor road conditions).■
The fatigue detection system is designed primarily for motorway driving.
Function
First read and observe the introductory information and safety warn-ings
on page 151.
The fatigue detection system advises the driver on the basis of information about
the steering behaviour, to take a break from driving. The system recommends a
break at speeds of 65-200 km/h.
After the ignition has been switched on, the system evaluates the steering be-
haviour for 15 minutes. This baseline analysis is constantly compared with the
current steering behaviour.
If the system detects deviations from normal steering behaviour due to possible
fatigue of the driver, it recommends to take a break from driving.
The system deletes the stored baseline analysis if one of the following condi-
tions is met.
› The vehicle is stopped and the ignition switched off.
› The vehicle is stopped, the seat belt removed and the driver's door opened.
› The vehicle is stopped for more than 15 minutes.
If none of these conditions are met or if the driving style is not changed, the sys-
tem recommends a driving break again after 15 minutes.
Activation/deactivation
The system can be activated/deactivated via the MAXI DOT display in the Assis-
tants menu option » page 28.
Information messages
First read and observe the introductory information and safety warn-
ings
on page 151.
The symbol will appear in the MAXI DOT display for a few seconds, along with
the following message.
Driver alert. Take a break!
An audible signal is also emitted.
151Assist systems
Page 161 of 266
Adjust the headlights using the headlight beam control » page 48, Headlight
beam control 1)
.
Driving speed
For safety reasons, do not drive faster than 80 km/h when towing a trailer.
Immediately reduce your speed as soon as even the slightest swaying of the trail-
er is detected. Never attempt to stop the trailer from “swaying” by accelerating.
Brakes
Apply the brakes in good time! If the trailer is fitted with a trailer brake, apply the
brakes gently at first, then brake firmly. This will avoid brake jolts resulting from
the trailer wheels locking.
On downhill sections shift down a gear in good time to also use the engine as a
brake.
Engine overheating
If the needle for the coolant temperature gauge moves into the right-hand area
or the red area of the scale, the speed must be reduced immediately.
Stop and switch off the engine if the indicator light
in the instrument cluster
starts to flash. Wait a few minutes and check the level of coolant » page 205,
Checking the coolant level .
The following guidelines must be observed » page 16,
Coolant .
The coolant temperature can be reduced by switching on the heating.WARNING■ Never use the safety eyelet for towing!■Adapt your speed to the conditions of the road surface and to the traffic sit-
uation.■
Improper or incorrectly connected electric cables can energise the trailer and
cause functional faults to the vehicle's entire electrical system as well as acci-
dents and severe injuries.
■
Work on the electrical system must only be carried out by specialist garages.
■
Never directly connect the trailer's electrical system with the electrical con-
nections for the tail lights or other current sources.
Note■ After coupling the trailer and connecting the power socket, check that the rear
lights on the trailer are working correctly.■
If there is an error in the trailer lighting, check the fuses in the fuse box in the
dash panel » page 236.
■
Contact between the breakaway cable and the safety eyelet can result in me-
chanical wear on the surface protection of the eyelet. Such wear does not impair
the functioning of the safety eyelet and does not constitute a fault. It is excluded from the warranty coverage.
■
If you tow a trailer frequently, you should also have your vehicle inspected be-
tween service intervals.
■
The handbrake on the towing vehicle must be applied when coupling and un-
coupling the trailer.
Trailer stabilisation (TSA)
First read and observe the introductory information and safety warn-
ings
on page 156.
The trailer stabilisation is an extension of the stabilisation control that works in
conjunction with the counter-steering assistance to reduce the amount the trail-
er "sways".
After turning on the ignition, the ESC indicator light
in the instrument cluster
lights up for about 2 seconds longer than the ABS indicator light.
Function requirements for trailer stabilisation. The trailer was shipped from the factory or purchased from the ŠKODA genu-
ine accessories range.
The ESC system is active (in the instrument cluster, the warning lights illumi-
nates
or
) » page 18 does not .
The trailer is electrically connected to the towing vehicle via the trailer sock-
et.
The speed is higher than approx. 60 km/h.
The trailer has a rigid drawbar.
1)
Applies to vehicles with bi-xenon headlights.
158Driving
Page 172 of 266
Airbag system
Description of the airbag system
Introduction
This chapter contains information on the following subjects:
System description
169
Airbag deployment
169WARNING■ An airbag can only offer you optimal protection in combination with a fas-
tened seat belt .■
The airbag is not a substitute for the seat belt, but instead forms part of the
complete passive vehicle safety concept.
■
To ensure passengers are protected with the greatest possible effect when
the airbag is deployed, the front seats must be correctly adjusted to match
the body size » page 161, Correct seated position .
■
If you do not fasten the seat belts when driving, lean too far forward or
adopt an incorrect seated position, you are exposing yourself to increased risk of injury in the event of an accident.
WARNINGInformation on the use of the airbag system■If there is a fault, the airbag system must be checked by a specialist garage
immediately. Otherwise, there is a risk of the airbag not being activated in the
event of an accident.■
No modifications of any kind must be made to parts of the airbag system.
■
Any work on the airbag system including the installation and removal of sys-
tem components due to other repair work (e.g. removal of the steering wheel) must only be carried out by a specialist garage.
■
Never make any changes to the front bumper or bodywork.
■
It is prohibited to manipulate individual parts of the airbag system as this
might result in the airbag being deployed.
■
The protective function of the airbag system is sufficient for only one acci-
dent. The airbag system must then be replaced if the airbag has been de-
ployed.
System description
First read and observe the introductory information and safety warn-ings
on page 169.
The functional status of the airbag system is indicated by the indicator light in
the instrument cluster » page 21.
When the airbags are deployed, they fill with gas and inflate.
A grey white or red, non-harmful gas is released when the airbag is inflated. This
is perfectly normal and is not an indication of a fire in the vehicle.
Depending on the vehicle equipment, the airbag system consists of the
following modules.
› Electronic control unit.
› Front airbag for the driver and the front passenger
» page 171.
› Driver’s knee airbag
» page 172.
› Side airbags
» page 173.
› Head airbags
» page 174.
› Airbag warning light in the instrument cluster
» page 21.
› Key switch for the front passenger airbag
» page 176.
› Warning light for the front passenger airbag deactivation/activation in the mid-
dle of the dash panel » page 176.
Note
■
The airbag system needs no maintenance during its working life.■If you sell your vehicle, provide the complete vehicle documentation to the new
owner. Please note that the information relating to the possibility of deactivating
the front passenger airbag must be included!■
When disposing of vehicle or parts of the airbag system, it is important to com-
ply with the national legal requirements.
Airbag deployment
First read and observe the introductory information and safety warn-
ings
on page 169.
The airbags inflate in fractions of a second and at a high speed in order to be able
to offer additional protection in the event of an accident.
The airbag system is only functional when the ignition is switched on.
169Airbag system
Page 185 of 266
General Maintenance
Vehicle care
Service intervals
Introduction
This chapter contains information on the following subjects:
Overview of service intervals
182
Fixed service intervals QI1 - QI4
183
Variable service interval QI6
183
Information about the ŠKODA service
183
The service interval display in the instrument cluster will remind you to carry out
every service stipulated by the manufacturer at the right time in order to prevent you from forgetting any.
Timely and proper performance of servicing works is one of the requirements for the settlement of potential warranty claims.
The completion of services can be verified by the validated service certificate andthe corresponding receipts.
The specified service intervals are tailored to normal operating conditions.
In the case of difficult operating conditions, it is necessary to have some service
work performed before the date of the next service or between the specified
service intervals. This applies mainly to the cleaning or the replacement of the air
filter insert in regions with heavy dust pollution as well as checking and replacing
the toothed belt, but also to vehicles with diesel particle filters, which can put
greater strain on the engine oil.
Difficult operating conditions
› Sulphur-containing diesel fuel.
› Frequent short trips.
› Longer periods of engine idling (e.g. taxis).
› Operation in areas with heavy dust pollution.
› Frequent trailer operation.
›
Predominantly stop-and-go traffic as is often the case in city driving, for exam-
ple.
› Operation predominantly during winter.
A service consultant at the specialist garage will tell you whether the operating conditions of your vehicle may make it necessary for service work to be carried
out between the normal service intervals.
Different service charges may apply from the particular scope of work required,
depending on the vehicle type and equipment and the status of your vehicle.
Note
■ The customer is responsible for covering the cost of all services including
changing or replenishing the oil, even during the warranty period, unless stated otherwise in the ŠKODA AUTO a.s. warranty terms or other agreements.■
You will be informed about the current service scopes for the particular service
work by the specialist garage.
Overview of service intervals
Fig. 154
Vehicle data sticker: Service in-
terval
First read and observe the introductory information given on page 182.
The service interval specified by the manufacturer is indicated on the vehicle data
sticker » Fig. 154 under the floor covering in the boot.
One of the following service intervals applies for your vehicle:
› Fixed service interval QI1.
› Fixed service interval QI2.
› Fixed service interval QI3.
› Fixed service interval QI4.
› Variable service interval QI6.
182General Maintenance