roof SKODA YETI 2013 1.G / 5L Owner's Manual
[x] Cancel search | Manufacturer: SKODA, Model Year: 2013, Model line: YETI, Model: SKODA YETI 2013 1.G / 5LPages: 266, PDF Size: 26.71 MB
Page 6 of 266
Table of Contents
Materials defect liability and ŠKODA warranty for
new cars5
Mobility warranty and ŠKODA extended
warranty
6
Abbreviations
Using the system
Cockpit
9
Overview
8
Instruments and Indicator Lights
10
Instrument cluster
10
Warning lights
14
Information system
23
Driver information system
23
Multifunction display (MFD)
25
MAXI DOT display
28
Service interval display
30
Unlocking and opening
32
Unlocking and locking
32
KESSY
38
Anti-theft alarm system
39
Luggage compartment lid
40
Electric power windows
41
Panorama sliding/tilting roof
44
Lights and visibility
47
Lights
47
Interior lights
53
Visibility
55
Windscreen wipers and washers
56
Rear mirror
58Seats and useful equipment61Front seats61
Front seat functions
64
Head restraints
66
Rear seats
67
Practical equipment
70
Luggage compartment
81
Variable loading floor in the luggage
compartment (Estate)
88
Roof rack system
90
Heating and air-conditioning
91
Heating, ventilation, cooling
91
Auxiliary heating (auxiliary heating and ventilation)
97
Communication and multimedia
100
General information
100
Universal telephone preinstallation GSM II
103
Universal telephone preinstallation GSM IIl
105
Wi-Fi
109
Voice control
110
Multimedia
113
Driving
Starting-off and Driving
117
Steering
117
Starting and stopping the engine using the
key
118
Starting and stopping the engine - KESSY
120
Brakes
124
Manual gear changing and pedals
125
Automatic transmission
126
Running in
129
Economical driving and environmental
sustainability
130
Water crossing and drive outside paved roads
134
Driving abroad
135Assist systems136Brake assist systems136
OFF ROAD-mode
138
Parking aid
140
Optical Parking Assist (Rear view camera)
141
Park assist
143
Cruise Control System
147
START-STOP
149
Fatigue detection (break recommendation)
151
Towing a trailer
152
Towing device
152
Trailer
156
Safety
Passive Safety
160
General information
160
Correct seated position
161
Seat belts
164
Using seat belts
164
Inertia reels and belt tensioners
167
Airbag system
169
Description of the airbag system
169
Airbag overview
170
Deactivating airbags
175
Transporting children safely
177
Child seat
177
Fastening systems
180
General Maintenance
Vehicle care
182
Service intervals
182
Service work, adjustments and technical alterations
184
Washing your car
1873Table of Contents
Page 7 of 266
Taking care of your vehicle exterior189Taking care of the interior192
Inspecting and replenishing
196
Fuel
196
Engine compartment
199
Engine oil
202
Coolant
204
Brake fluid
206
Vehicle battery
207
Wheels
212
Tyres and wheel rims
212
Winter operation
217
Do-it-yourself
Emergency equipment and self-help
219
Emergency equipment
219
Changing a wheel
221
Tyre repair
224
Jump-starting
226
Towing the vehicle
228
Remote control and removable light
230
Emergency unlocking/locking
232
Emergency operation of the sliding/tilting roof
234
Replacing windscreen wiper blades
234
Fuses and light bulbs
236
Fuses
236
Bulbs
238
Technical data
Technical data
244
Vehicle data
244
Index
4Table of Contents
Page 32 of 266
Main menu points
The following information can be selected (depending on the equipment installed in the vehicle).
■ MFD (Multifunction display) » page 25
■ Audio » Operating instructions for the radio
■ Navigation » Operating instructions for the navigation system
■ Phone » page 100 ;
■ Aux. heating » page 97
■ Assistants » page 151
■ Vehicle status » page 13
■ Settings » page 29
The Audio and Navigation menu items are only displayed when the factory-fitted
radio or navigation system is switched on.
The Aux. heating menu item is only displayed if the vehicle is equipped with fac-
tory-fitted auxiliary heating.
The menu item Assistants is only displayed if the vehicle is fitted with fatigue de-
tection.
Note
■ If warning messages are displayed, these messages must be verified to access
the main menu » page 23, Using the information system .■
If the display is not activated at that moment, the menu always shifts to one of
the higher levels after approx. 10 seconds.
■
Using the factory-fitted radio or navigation system » Radio operating instruc-
tions or» navigation system operating instructions .
Settings
First read and observe the introductory information and safety warn-
ings
on page 28.
You can change certain settings by means of the MAXI DOT display. The current
menu item is shown in the top of the display under a line.
The following information can be selected (depending on the equipment installed in the vehicle).
Language
You can set the language for the display texts here.
MFD data
Activate or deactivate certain displays of the multifunction display here.
Convenience
The following functions can be activated, deactivated or adjusted here:
Rain closing
Switch on/off the function for automatically closing the window and panoramic tilt/slide sunroof in a locked ve-
hicle when it starts raining a)
. If the function is set and it
is not raining, the windows including the panoramic tilt/
slide sunroof will close automatically after approx.
12 hours.ATA confirmSwitch on/off the audible signal indicating activation of the anti-theft alarm system. Further informa-
tion » page 39 , Anti-theft alarm system .Central lockingSwitch on/off the central locking and automatic locking
function. Further information » page 36, Individual
settings .Window op.Only convenience mode for the driver window or for all
of the windows can be adjusted here. Further informa-tion » page 43 , Window convenience operation .
Mirror down
Switch on/off the function for mirror lowering on the
front passenger side when engaging the reverse gear b)
.
Further information » page 60, Fold in passenger's
mirror .
Mirror adjust.
Switch on/off the function for left and right exterior
mirror setting simultaneously. Further informa-
tion » page 59 , Synchronous adjustment of both mirr-
rors .Factory settingRestore the Convenience factory setting.a)
This function is only available on vehicles with a rain sensor.
b)
This function is only available on vehicles with an electrically adjustable driver seat.
Lights & Vision
The following functions can be activated, deactivated or adjusted here:
29Information system
Page 38 of 266
Unlocking/locking – KESSYFig. 14
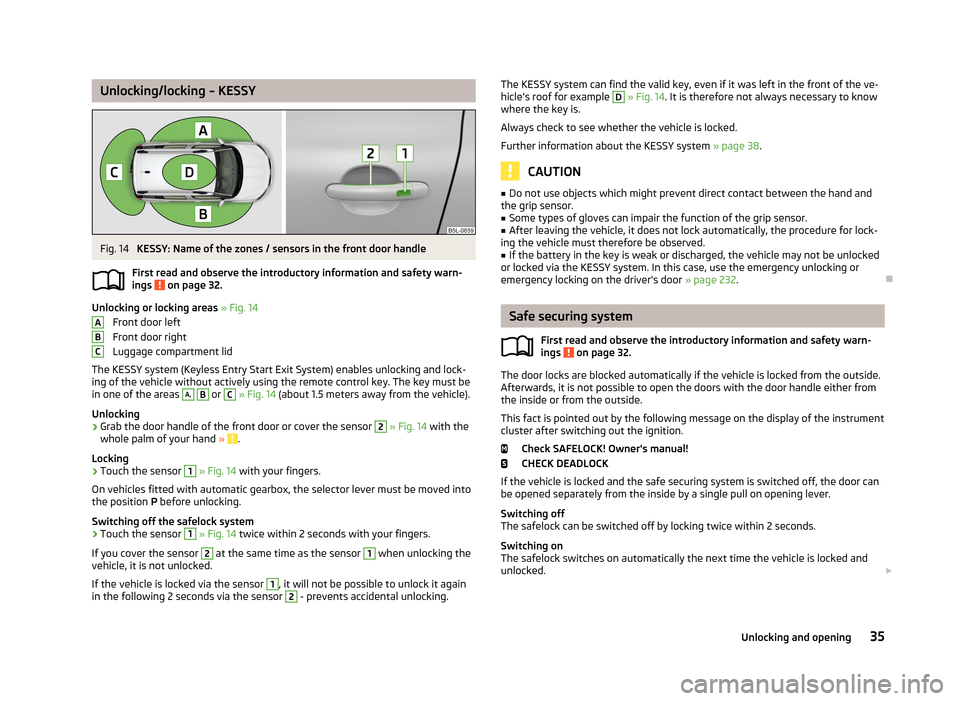
KESSY: Name of the zones / sensors in the front door handle
First read and observe the introductory information and safety warn- ings
on page 32.
Unlocking or locking areas » Fig. 14
Front door left
Front door right
Luggage compartment lid
The KESSY system (Keyless Entry Start Exit System) enables unlocking and lock-
ing of the vehicle without actively using the remote control key. The key must be
in one of the areas
A,
B
or
C
» Fig. 14 (about 1.5 meters away from the vehicle).
Unlocking
›
Grab the door handle of the front door or cover the sensor
2
» Fig. 14 with the
whole palm of your hand » .
Locking
›
Touch the sensor
1
» Fig. 14 with your fingers.
On vehicles fitted with automatic gearbox, the selector lever must be moved into the position P before unlocking.
Switching off the safelock system
›
Touch the sensor
1
» Fig. 14 twice within 2 seconds with your fingers.
If you cover the sensor
2
at the same time as the sensor
1
when unlocking the
vehicle, it is not unlocked.
If the vehicle is locked via the sensor
1
, it will not be possible to unlock it again
in the following 2 seconds via the sensor
2
- prevents accidental unlocking.
ABCThe KESSY system can find the valid key, even if it was left in the front of the ve-
hicle's roof for example D » Fig. 14 . It is therefore not always necessary to know
where the key is.
Always check to see whether the vehicle is locked. Further information about the KESSY system » page 38.
CAUTION
■
Do not use objects which might prevent direct contact between the hand and
the grip sensor.■
Some types of gloves can impair the function of the grip sensor.
■
After leaving the vehicle, it does not lock automatically, the procedure for lock-
ing the vehicle must therefore be observed.
■
If the battery in the key is weak or discharged, the vehicle may not be unlocked
or locked via the KESSY system. In this case, use the emergency unlocking or
emergency locking on the driver's door » page 232.
Safe securing system
First read and observe the introductory information and safety warn-
ings
on page 32.
The door locks are blocked automatically if the vehicle is locked from the outside.
Afterwards, it is not possible to open the doors with the door handle either from
the inside or from the outside.
This fact is pointed out by the following message on the display of the instrument
cluster after switching out the ignition.
Check SAFELOCK! Owner's manual!
CHECK DEADLOCK
If the vehicle is locked and the safe securing system is switched off, the door can
be opened separately from the inside by a single pull on opening lever.
Switching off
The safelock can be switched off by locking twice within 2 seconds.
Switching on
The safelock switches on automatically the next time the vehicle is locked and unlocked.
35Unlocking and opening
Page 42 of 266
Activation after 90 hours›Unlock the vehicle using the symbol button on the remote control key.›
Unlocking the driver's door in an emergency » page 232.
Anti-theft alarm system
Introduction
This chapter contains information on the following subjects:
Activating/deactivating
39
Interior monitor and towing protection
40
The anti-theft alarm system (hereinafter referred to only as alarm system) increa-
ses protection against break-in attempts into the vehicle.
The alarm system triggers audible and visual signals if an attempt is made to
break into the vehicle (hereafter referred to only as alarm).
An alarm is triggered when the following monitored areas of the vehicle have a
fault.
› Bonnet.
› Boot lid.
› Doors.
› Ignition lock.
› Vehicle inclination
» page 40, Interior monitor and towing protection .
› Interior of car
» page 40, Interior monitor and towing protection .
› A drop in voltage of the on-board power supply.
› Socket of the factory-fitted towing device
» page 157, Driving with a trailer .
An alarm is immediately triggered if either of the two battery terminals is discon-
nected while the anti-theft alarm system is activated.
The alarm is switched off by unlocking the vehicle or switching on the ignition.
CAUTION
Before leaving the vehicle, it must be checked that all of the windows, doors and
the sliding/tilting roof are locked in order to ensure the full functionality of the
anti-theft alarm system.
Note
The working life of the alarm siren is 5 years.
Activating/deactivating
First read and observe the introductory information and safety warn-ings
on page 39.
Activating
The anti-theft alarm system is activated automatically approximately 30 seconds
after the vehicle is locked.
If you unlock the vehicle and do not open a door or the boot lid within the next
30 seconds, the vehicle will lock again automatically and the safelock system or
anti-theft alarm system will be switched on. This function is intended to prevent
the car being unlocked unintentionally.
Deactivating
The anti-theft alarm system is deactivated automatically after the vehicle is un-
locked. If the vehicle is not opened within 30 seconds, the anti-theft alarm sys-
tem is automatically activated again.
The alarm system is also deactivated if you unlock the driver door using the key
within 45 seconds of locking the vehicle.
Note
■ When the Vehicle is unlocked using the key on the driver's door, insert the key
into the ignition and switch on the ignition in order to deactivate the alarm sys-
tem.■
You can switch the audible signalling of the activation of the warning system on
and off in the Maxi DOT display in the menu item ATA confirm » page 29 .
39Unlocking and opening
Page 47 of 266
Closing›Press and hold the symbol button on the key.›
Hold the key in the driver's lock in the lock position.
›
Press and hold he central locking button in the area of the symbol » Fig. 15 on
page 36.
›
Hold Button
A
1) in the closing position » Fig. 21 on page 42.
›
In the KESSY system, hold a finger on the sensor
1
» Fig. 14 on page 35.
The speed limit for winter tyres can be set in the MAXI DOT display in the menu
item Window op. . » page 29 .
The prerequisite for ensuring that the convenience operating feature correctly is the automatic opening/closing of all windows is operational.
You can interrupt the opening or closing process for the windows immediately byreleasing the key or the button
A
and interrupting the locking/unlocking.
Convenience opening or closing the window using the key in the driver's lock is
only possible within 45 seconds after locking the vehicle.
Operational faults
First read and observe the introductory information and safety warn-
ings
on page 41.
The automatic power windows do not work if the vehicle battery has been dis-
connected and connected again while a window was open. The system must be
activated.
Activation sequence:
›
Switch on the ignition.
›
Pull the top edge of the button and close the window.
›
Release the button.
›
Pull the relevant button upwards again for approx. 3 seconds, and keep it press- ed down.
Panorama sliding/tilting roof
Introduction
This chapter contains information on the following subjects:
Operation
45
Opening/closing the sun screen
45
Convenience operation of sliding / tilting roof
46
The panoramic sliding/tilting roof (abbreviated in the following as 'sliding/tilting
roof') can only be operated when the ignition is turned on and when the outdoor temperature is higher than -20 °C.
The sliding/tilting roof can still be operated for approx. 10 minutes after switchingthe ignition off. However, as soon as the driver or front passenger's door is
opened it is no longer possible to operate the sliding/tilting roof.
CAUTION
■ Always close the sliding/tilting roof before disconnecting the battery.■If, for example, the battery has been disconnected and reconnected, it is possi-
ble that the sliding/tilting roof does not operate correctly. Next, move the rotary
switch into position A
» Fig. 23 on page 45 , pull the recess firmly downwards
and hold forwards firmly. The sliding/tilting roof opens and closes again after
around 10 seconds. Do not release the control dial until it has done so.
■
If, for example, the battery has been disconnected and reconnected, it is possi-
ble that the sun screen does not operate correctly. Then turn the switch to posi-
tion
A
» Fig. 23 on page 45 and press and hold the button » Fig. 24 on
page 45. The sun screen opens and closes again after around 10 seconds. Do
not release the control dial until it has done so.
1)
Convenience opening and closing the windows with the button
A
is possible immediately after un-
locking the vehicle or turning off the ignition and opening the driver's or front passenger's door.
44Using the system
Page 48 of 266
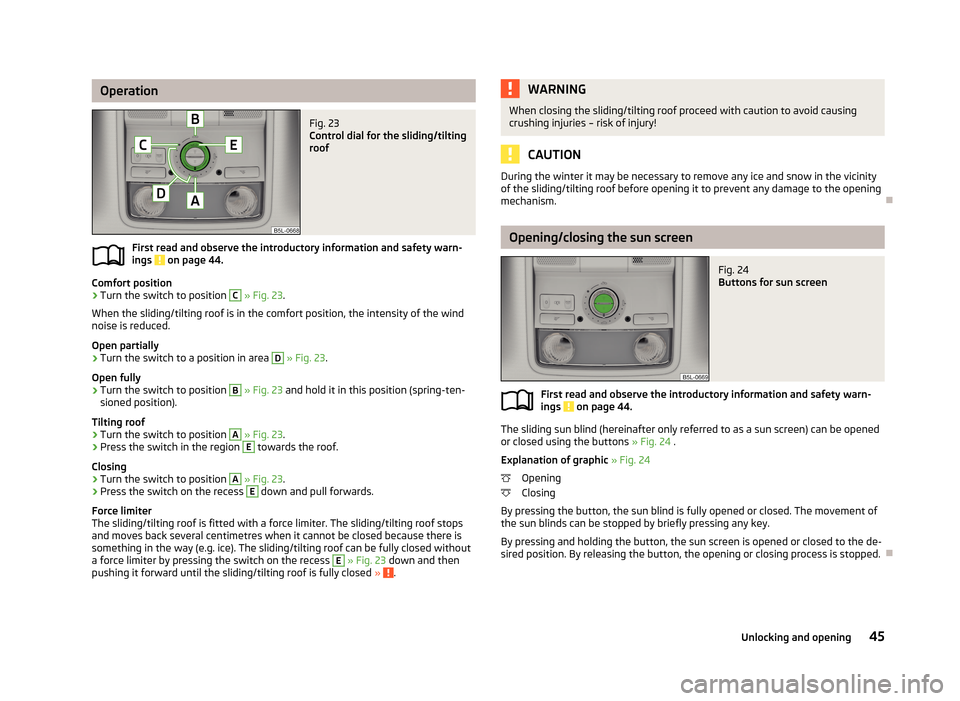
OperationFig. 23
Control dial for the sliding/tilting
roof
First read and observe the introductory information and safety warn-
ings on page 44.
Comfort position
›
Turn the switch to position
C
» Fig. 23 .
When the sliding/tilting roof is in the comfort position, the intensity of the wind
noise is reduced.
Open partially
›
Turn the switch to a position in area
D
» Fig. 23 .
Open fully
›
Turn the switch to position
B
» Fig. 23 and hold it in this position (spring-ten-
sioned position).
Tilting roof
›
Turn the switch to position
A
» Fig. 23 .
›
Press the switch in the region
E
towards the roof.
Closing
›
Turn the switch to position
A
» Fig. 23 .
›
Press the switch on the recess
E
down and pull forwards.
Force limiter
The sliding/tilting roof is fitted with a force limiter. The sliding/tilting roof stops and moves back several centimetres when it cannot be closed because there is
something in the way (e.g. ice). The sliding/tilting roof can be fully closed without
a force limiter by pressing the switch on the recess
E
» Fig. 23 down and then
pushing it forward until the sliding/tilting roof is fully closed » .
WARNINGWhen closing the sliding/tilting roof proceed with caution to avoid causing
crushing injuries – risk of injury!
CAUTION
During the winter it may be necessary to remove any ice and snow in the vicinity
of the sliding/tilting roof before opening it to prevent any damage to the opening
mechanism.
Opening/closing the sun screen
Fig. 24
Buttons for sun screen
First read and observe the introductory information and safety warn- ings on page 44.
The sliding sun blind (hereinafter only referred to as a sun screen) can be opened
or closed using the buttons » Fig. 24 .
Explanation of graphic » Fig. 24
Opening
Closing
By pressing the button, the sun blind is fully opened or closed. The movement of the sun blinds can be stopped by briefly pressing any key.
By pressing and holding the button, the sun screen is opened or closed to the de-
sired position. By releasing the button, the opening or closing process is stopped.
45Unlocking and opening
Page 49 of 266
Convenience operation of sliding / tilting roofFirst read and observe the introductory information and safety warn-ings
on page 44.
The sliding / tilting roof can be operated by locking or unlocking using the key or
using the KESSY system with the aid of the sensor
1
» Fig. 14 on page 35.
Closing
›
Press and hold the symbol button on the key or hold the key in the locking
cylinder of the driver's door in the lock position, or for the KESSY system, keep your finger on the sensor
1
» Fig. 14 on page 35 » .
By releasing the lock or lifting your finger off the sensor
1
when using the KESSY
system, the closing process is immediately interrupted.
Tilting roof
›
Press and hold the symbol button
on the key.
WARNINGClose the sliding/tilting roof carefully – risk of injury! The force limiter does not
work when convenience closing is in operation.
46Using the system
Page 93 of 266
Using the variable loading floor with a spare wheelFig. 90
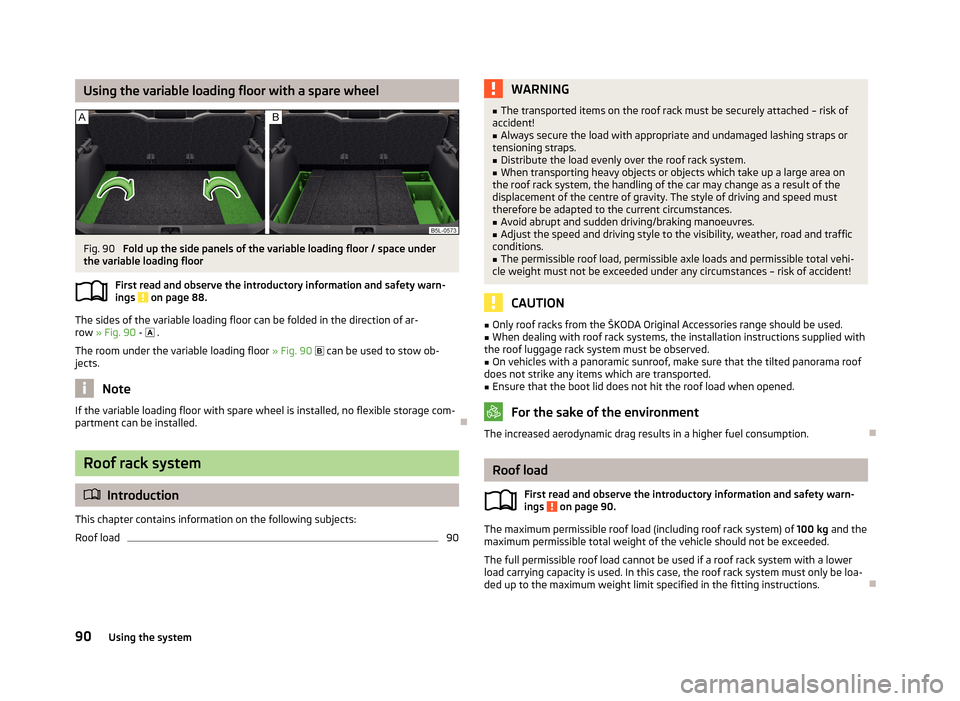
Fold up the side panels of the variable loading floor / space under
the variable loading floor
First read and observe the introductory information and safety warn-ings
on page 88.
The sides of the variable loading floor can be folded in the direction of ar-row » Fig. 90 -
.
The room under the variable loading floor » Fig. 90
can be used to stow ob-
jects.
Note
If the variable loading floor with spare wheel is installed, no flexible storage com-
partment can be installed.
Roof rack system
Introduction
This chapter contains information on the following subjects:
Roof load
90WARNING■ The transported items on the roof rack must be securely attached – risk of
accident!■
Always secure the load with appropriate and undamaged lashing straps or
tensioning straps.
■
Distribute the load evenly over the roof rack system.
■
When transporting heavy objects or objects which take up a large area on
the roof rack system, the handling of the car may change as a result of the displacement of the centre of gravity. The style of driving and speed musttherefore be adapted to the current circumstances.
■
Avoid abrupt and sudden driving/braking manoeuvres.
■
Adjust the speed and driving style to the visibility, weather, road and traffic
conditions.
■
The permissible roof load, permissible axle loads and permissible total vehi-
cle weight must not be exceeded under any circumstances – risk of accident!
CAUTION
■ Only roof racks from the ŠKODA Original Accessories range should be used.■When dealing with roof rack systems, the installation instructions supplied with
the roof luggage rack system must be observed.■
On vehicles with a panoramic sunroof, make sure that the tilted panorama roof
does not strike any items which are transported.
■
Ensure that the boot lid does not hit the roof load when opened.
For the sake of the environment
The increased aerodynamic drag results in a higher fuel consumption.
Roof load
First read and observe the introductory information and safety warn-
ings
on page 90.
The maximum permissible roof load (including roof rack system) of 100 kg and the
maximum permissible total weight of the vehicle should not be exceeded.
The full permissible roof load cannot be used if a roof rack system with a lower
load carrying capacity is used. In this case, the roof rack system must only be loa-
ded up to the maximum weight limit specified in the fitting instructions.
90Using the system
Page 114 of 266
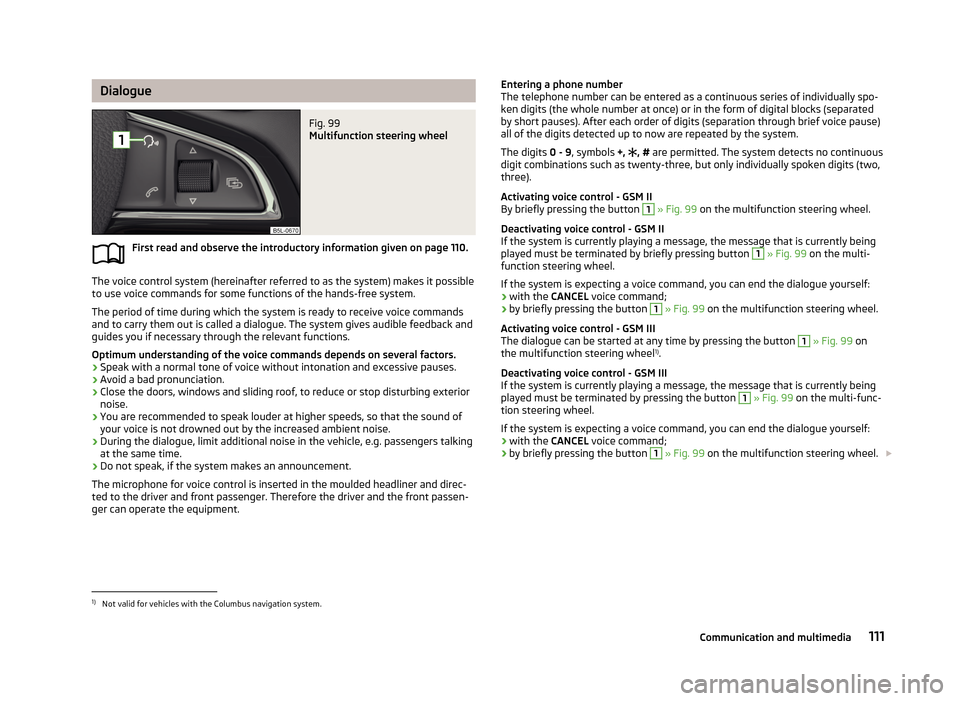
DialogueFig. 99
Multifunction steering wheel
First read and observe the introductory information given on page 110.
The voice control system (hereinafter referred to as the system) makes it possibleto use voice commands for some functions of the hands-free system.
The period of time during which the system is ready to receive voice commandsand to carry them out is called a dialogue. The system gives audible feedback and guides you if necessary through the relevant functions.
Optimum understanding of the voice commands depends on several factors. › Speak with a normal tone of voice without intonation and excessive pauses.
› Avoid a bad pronunciation.
› Close the doors, windows and sliding roof, to reduce or stop disturbing exterior
noise.
› You are recommended to speak louder at higher speeds, so that the sound of
your voice is not drowned out by the increased ambient noise.
› During the dialogue, limit additional noise in the vehicle, e.g. passengers talking
at the same time.
› Do not speak, if the system makes an announcement.
The microphone for voice control is inserted in the moulded headliner and direc- ted to the driver and front passenger. Therefore the driver and the front passen-ger can operate the equipment.
Entering a phone number
The telephone number can be entered as a continuous series of individually spo- ken digits (the whole number at once) or in the form of digital blocks (separated
by short pauses). After each order of digits (separation through brief voice pause)
all of the digits detected up to now are repeated by the system.
The digits 0 - 9, symbols +, , # are permitted. The system detects no continuous
digit combinations such as twenty-three, but only individually spoken digits (two,
three).
Activating voice control - GSM II
By briefly pressing the button 1
» Fig. 99 on the multifunction steering wheel.
Deactivating voice control - GSM II If the system is currently playing a message, the message that is currently being played must be terminated by briefly pressing button
1
» Fig. 99 on the multi-
function steering wheel.
If the system is expecting a voice command, you can end the dialogue yourself:
› with the
CANCEL voice command;
› by briefly pressing the button
1
» Fig. 99 on the multifunction steering wheel.
Activating voice control - GSM III The dialogue can be started at any time by pressing the button
1
» Fig. 99 on
the multifunction steering wheel 1)
.
Deactivating voice control - GSM III
If the system is currently playing a message, the message that is currently being
played must be terminated by pressing the button
1
» Fig. 99 on the multi-func-
tion steering wheel.
If the system is expecting a voice command, you can end the dialogue yourself:
› with the
CANCEL voice command;
› by briefly pressing the button
1
» Fig. 99 on the multifunction steering wheel.
1)
Not valid for vehicles with the Columbus navigation system.
111Communication and multimedia