infotainment SKODA YETI 2014 1.G / 5L Amundsen Infotainment Navigation System Manual
[x] Cancel search | Manufacturer: SKODA, Model Year: 2014, Model line: YETI, Model: SKODA YETI 2014 1.G / 5LPages: 88, PDF Size: 8.18 MB
Page 1 of 88
SIMPLY CLEVER
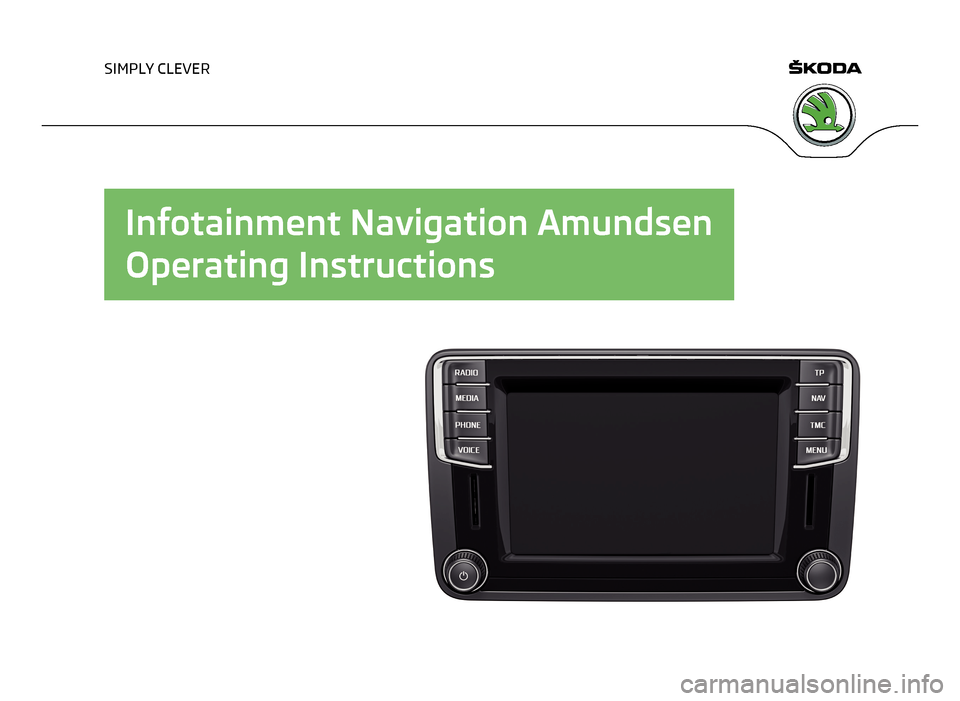
Infotainment Navigation AmundsenOperating Instructions
Page 4 of 88
Preface
You have chosen a ŠKODA vehicle, which is fitted with the Infotainment Navigation Amundsen (here-
after called the unit) – we thank you for your confidence in us.
Please read these Operating Instructions carefully, because the operation in accordance with these instructions is a prerequisite for proper use of the unit. 5L0012720DA
Page 8 of 88
Declaration of conformity
ŠKODA AUTO a.s. hereby declares that the ŠKODA Infotainment systems meet
the basic requirements and additional provisions of Directive 1999/5/EC with
reference to radio equipment and telecommunications devices.
ŠKODA AUTO a.s. hereby declares that the “connection and the use of this
communication device is granted by the Nigerian Communications Commis-
sion.”5Declaration of conformity
Page 10 of 88
Familiarization with the unit
Introductory information
Important notes
Introduction
This chapter contains information on the following subjects:
Component protection
7WARNING■ Concentrate fully at all times on your driving! As the driver, you are fully
responsible for the operation of your vehicle.■
Only use the device in such a way that you are in full control of your vehi-
cle in every traffic situation – there is the risk of accidents!
■
Adjust the volume to ensure that acoustic signals from outside the vehi-
cle, e.g. sirens from emerging vehicles instructing you to give way to, such
as the police, ambulance and fire brigade, can be heard at all times.
■
High volumes can cause hearing damage!
Component protection
Read and observe
on page 7 first.
Some electronic control units are factory-equipped with component protec-tion.
Component protection serves as a protection mechanism for the following:
› for the impairment of factory- or garage-fitted control units after installation
in another vehicle (for example, after a theft).
› for the impairment of components operated outside of the vehicle.
› for the possibility of a legitimate installation or change of control units for re-
pairs at a ŠKODA specialist garage 1)
.
When component protection is enabled, the following message appears on the
unit display Component theft protection: The infotainment system is not fully
available at present. Please switch on the ignition.
If the component protection does not activate by switching on the ignition,
please contact a ŠKODA specialist garage.
Equipment overview
Introduction
This chapter contains information on the following subjects:
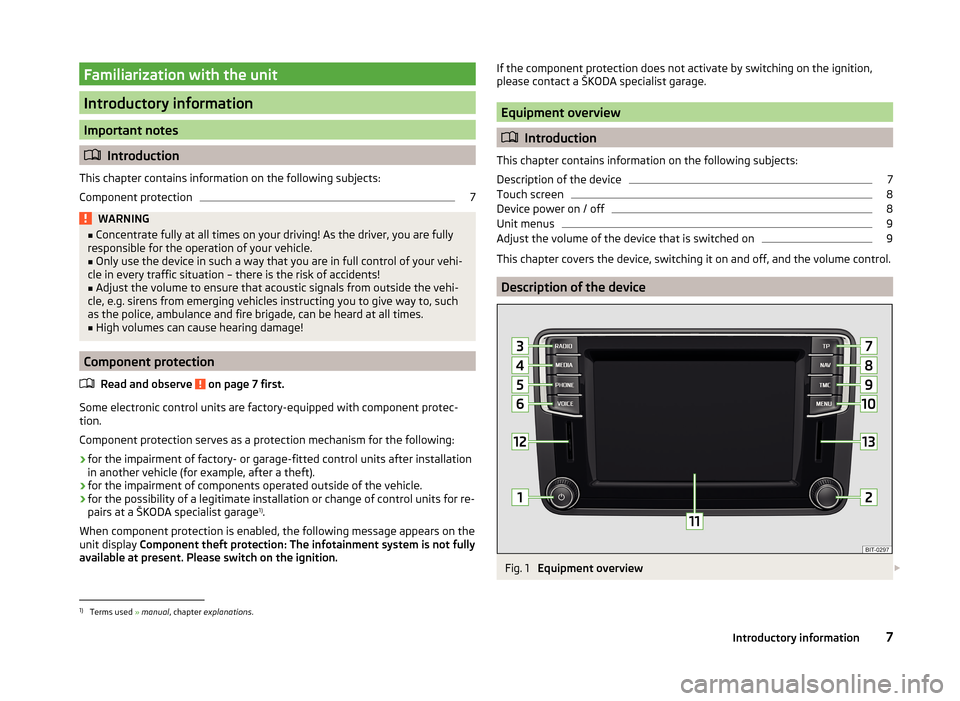
Description of the device
7
Touch screen
8
Device power on / off
8
Unit menus
9
Adjust the volume of the device that is switched on
9
This chapter covers the device, switching it on and off, and the volume control.
Description of the device
Fig. 1
Equipment overview
1)
Terms used
» manual , chapter explanations .
7Introductory information
Page 11 of 88
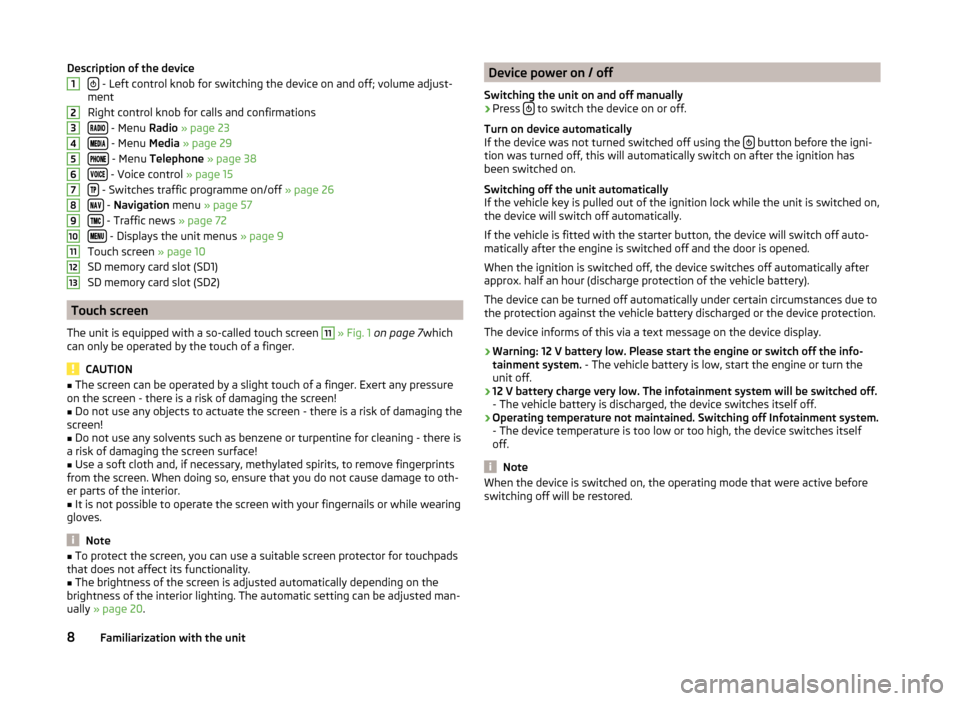
Description of the device
- Left control knob for switching the device on and off; volume adjust-
ment
Right control knob for calls and confirmations
- Menu Radio » page 23
- Menu Media » page 29
- Menu Telephone » page 38
- Voice control » page 15
- Switches traffic programme on/off » page 26
- Navigation menu » page 57
- Traffic news » page 72
- Displays the unit menus » page 9
Touch screen » page 10
SD memory card slot (SD1)
SD memory card slot (SD2)
Touch screen
The unit is equipped with a so-called touch screen
11
» Fig. 1 on page 7 which
can only be operated by the touch of a finger.
CAUTION
■ The screen can be operated by a slight touch of a finger. Exert any pressure
on the screen - there is a risk of damaging the screen!■
Do not use any objects to actuate the screen - there is a risk of damaging the
screen!
■
Do not use any solvents such as benzene or turpentine for cleaning - there is
a risk of damaging the screen surface!
■
Use a soft cloth and, if necessary, methylated spirits, to remove fingerprints
from the screen. When doing so, ensure that you do not cause damage to oth-
er parts of the interior.
■
It is not possible to operate the screen with your fingernails or while wearing
gloves.
Note
■ To protect the screen, you can use a suitable screen protector for touchpads
that does not affect its functionality.■
The brightness of the screen is adjusted automatically depending on the
brightness of the interior lighting. The automatic setting can be adjusted man-
ually » page 20 .
12345678910111213Device power on / off
Switching the unit on and off manually›
Press to switch the device on or off.
Turn on device automatically
If the device was not turned switched off using the
button before the igni-
tion was turned off, this will automatically switch on after the ignition has
been switched on.
Switching off the unit automatically
If the vehicle key is pulled out of the ignition lock while the unit is switched on,
the device will switch off automatically.
If the vehicle is fitted with the starter button, the device will switch off auto-
matically after the engine is switched off and the door is opened.
When the ignition is switched off, the device switches off automatically after
approx. half an hour (discharge protection of the vehicle battery).
The device can be turned off automatically under certain circumstances due to
the protection against the vehicle battery discharged or the device protection.
The device informs of this via a text message on the device display.
› Warning: 12 V battery low. Please start the engine or switch off the info-
tainment system. - The vehicle battery is low, start the engine or turn the
unit off.
› 12 V battery charge very low. The infotainment system will be switched off.
- The vehicle battery is discharged, the device switches itself off.
› Operating temperature not maintained. Switching off Infotainment system.
- The device temperature is too low or too high, the device switches itself
off.
Note
When the device is switched on, the operating mode that were active before
switching off will be restored.8Familiarization with the unit
Page 25 of 88
■Bluetooth - Switch on/off Bluetooth ®
function
■ Visibility: - Switch on/off the visibility of the Bluetooth ®
device for other de-
vices
■ Visible - Visibility is always on
■ Hidden - Visibility is off
■ Name: - Open the input screen with keyboard - Change the device name
■ Paired devices - Display the list of paired Bluetooth ®
devices; connect or de-
lete a paired device; delete the list of paired devices ■ Delete all - Delete all paired Bluetooth ®
devices
■ - Delete the paired Bluetooth ®
device
■ Find devices - Searches for available external devices with enabled Blue-
tooth ®
functions and activated visibility
■ Bluetooth audio (A2DP/AVRCP) - Switch on/off the connection option for
Bluetooth ®
profiles A2DP or AVRCP 1)
System Information
›
Press the button
→
→ System Information .
■ Device part number: ... - Part number of the unit
■ Hardware: ... - Version of the hardware used
■ Software: ... - Version of the software used
■ Navigation database: ... - Version of the navigation data
■ Media Codec: ... - Media codec version
■ Update software - the function key for the software update
The information about available software updates can be found on the ŠKODA
Internet pages www.infotainment.skoda-auto.com .
1)
A2DP or AVRCP are Bluetooth®
profiles that support multimedia functions.
22Familiarization with the unit
Page 29 of 88
A radio station can be stored in the device memory in one of the following
ways.
Save station from the menu Radio›
In the menu Radio hold the desired station button
C
» Fig. 12 on page 23
until you hear an acoustic signal.
If a station was already stored in the desired position it is replaced with the
currently selected station.
Save station from the station list
›
In the list of available stations » page 24 press the function key of the de-
sired station longer.
A list of the station keys
C
is shown as well as a list of the functions keys for
the storage groups
E
» Fig. 12 on page 23 .
›
Select a storage group.
›
Press the station button.
The station is stored under the selected station button.
Station logos
Read and observe
on page 23 first.
With the present buttons
C
» Fig. 12 on page 23 logos (images) can be linked
or removed to/from the radio stations.
Store station logos automatically (FM / DAB)
›
Before you store the radio station to a station button function key press in
the Radio menu the function key
→ Advanced setup .
›
Activate the menu item Auto-save station logos » page 27 , Advanced Set-
tings (FM) and » page 27 , Advanced setup (DAB) .
When you save the station to a station button, the station is assigned a logo
from the device memory if the logo is available in the memory.
Assign channel logo manually
A logo can be assigned or removed manually from the previously stored sta-
tions.
›
Press the function key
→ Station logos .
A menu with preset buttons for radio stations is displayed.
›
Press the preset button for the station, which a logo is to be assigned to.
A menu of media (CD, SD card, USB) is displayed.
› In the relevant media select the image you want to have.
By selection of the image it is assigned to the relevant station button.
Remove channel logo manually›
Press the function key
→ Station logos .
A menu with preset buttons for radio stations is displayed.
›
Press the preset button for the station, which a logo is to be removed from.
The logo is removed from the station button.
Note
■ The following image formats are supported: jpg, gif, png, bmp.■We recommend a resolution of up to 500 x 500 pixels.■
The information about radio station updates can be found on the ŠKODA In-
ternet pages www.infotainment.skoda-auto.com .
TP Traffic programme
Read and observe
on page 23 first.
The function allows the reception of traffic information.
Switching the traffic information station on and off manually
›
Press the button.
or
›
In the Radio menu, press the function key
.
›
Enable or disable the menu item
Traffic programme (TP).
Current traffic reports
During a traffic announcement, the following menu is displayed.
›
Cancel - interruption of the current traffic report. The TP function remains
activated.
›
Deactivate - Interrupt the current traffic report and turn off TP function.
Note
■
Should this radio station not transmit traffic reports or the signal is not avail-
able, then the device automatically searches in the background for another TP
station.■
During playback in menu Media or a radio station in the AM range, traffic
news is received from the previously selected FM radio station.
26Familiarization with the unit
Page 57 of 88
MirrorLink ™
Introduction
This chapter contains information on the following subjects:
Connection conditions
54
Start function
54
Operation
55
Settings
55
Function problems
55
First and foremost, pay attention to the safety instructions » page 7 , Impor-
tant notes .
MirrorLink ™
provides a function for the operation of some installed applica-
tions in the communication facility (e.g. telephone, hereinafter referred to only
as facility) by using the device.
Using this function is only for specially designed and certified applications. For
reasons of safety, the operation of some applications while driving is limited or
not possible (function keys of the applications are inactive).
WARNING■ No objects such as mobile telephone mounts, etc. must be attached to
the covers of the airbag modules or be located within their immediate vicin-
ity.■
Never leave communication facility in the deployment area of an airbag,
on a seat, on the dash panel or in another area, from which it can be
thrown during a sudden braking manoeuvre, an accident or a collision -
there is a risk of injury. There are storage compartments with lids and if
necessary there is the multimedia storage compartments to hold this » Ve-
hicle owner's manual , chapter Transport and practical equipment .
CAUTION
■
MirrorLink ™
Applications that use a mobile data connection, are dependent
on the quality of the signal supplied by your telephone service provider. ŠKODA
accepts no responsibility for the transmitted data volume.■
An intensive use of the function MirrorLink ™
and the work associated with
applications (e.g., GPS, mobile data, fully-backlit display and the like.) can lead
to battery discharge of the connected facility.
Connection conditions
Read and observe
and on page 54 first.
The connection between the facility and the device using the function
MirrorLink ™
is operational under the following conditions.
The ignition is switched on.
The facility supports the function MirrorLink ™
and contains applications
that support this feature.
The display of the equipment is unlocked.
The facility is connected to the USB input » Fig. 20 on page 34 .
Note
Before connecting the MirrorLink - Functions, unlock the device screen. While
using the function the display may automatically darken or the screen com-
pletely turns off.
Start function
Read and observe
and on page 54 first.
›
Press the button
→
™
→ Selection .
A list of the facilities connected to the USB input is displayed.
›
Select one of the MirrorLink ™
function supporting facilities.
If the facility is separated from the USB cable and the ignition is not off, it au- tomatically reconnects when a new connection to the device is made.
Note
■ If the facility is connected by means of the function MirrorLink ™
, it cannot be
used as a USB audio source Media menu.■
The list of available facilities and applications, which support the MirrorLink ™
function, can be seed in the ŠKODA Internet pages www.infotainment.skoda-
auto.com .
54Familiarization with the unit
Page 60 of 88
Navigation
Description of the navigation system
Preface to navigation
Introduction
This chapter contains information on the following subjects:
Navigation data
57
Main menu
58
Map display
58
Map Orientation
59
Map scale
59
Options for map display
60
Split screen
60
First and foremost, pay attention to the safety instructions » page 7 , Impor-
tant notes .
The unit uses the GPS (Global Positioning System) satellite system for route
guidance. The satellite signal allows you to determine your current vehicle po-
sition.
Outside the range of the GPS satellite signal (e.g. in dense vegetation, in tun-
nels, parking garages, etc.), the unit navigates only with restrictions using on-
vehicle sensors.
The route guidance is as follows.
› With graphical driving recommendations in the device screen and MAXI DOT
display.
› With navigation announcements.
WARNING■
Information about traffic lights, stop and right of way signs, parking and
stopping restrictions as well as lane constrictions and speed restrictions is
not taken into account for route guidance by the unit.■
The navigation announcements provided may vary from the actual situa-
tions, e.g. due out-of-date navigation data.
■
The volume should be adjusted to ensure that acoustic signals from out-
side, e.g. sirens from vehicles which have the right of way, such as police,
ambulance and fire brigade vehicles, can be heard at all time.
CAUTIONIn some countries, some unit features can no longer be selected when the ve-
hicle is running faster than a certain speed. This is not a malfunction, but com-
plies with the national legal regulations.
Navigation data
Read and observe
and on page 57 first.
Navigation data source
You received the SD memory card with navigation data together with the unit.
For correct functioning of the device, the card must be inserted into slots
12
or
13
» Fig. 1 on page 7 during the entire route guidance.
Insert the memory card » page 33, SD memory card .
Data update
The navigation data is subject to constant changes (such as new streets,
changes of street names and house numbers) and are no longer valid after
some time. Therefore the route guidance may be inaccurate of incorrect. We
recommend that you update the navigation data on a regular basis.
For more information on updating the data, please visit the ŠKODA website
www.infotainment.skoda-auto.com or contact a ŠKODA Partner.
The version of the navigation data for maps can be found in the navigation
settings
→
→ Version information .
Card has been damaged or lost
If the SD memory card with the navigation data has been damaged or lost, a
new card can be obtained from ŠKODA original accessories. The navigation da-
ta can be loaded only on the original card.
57Description of the navigation system
Page 70 of 88
Home address
The menu provides a quick destination guide to a stored home address.›
Press in the menu Navigation function key
Destinations → Home address .
The route calculation and the route guidance is started or after the route cal-
culation the route type can be selected then the route guidance starts.
If the home address has not been entered, a message with the following menu
is displayed.
Please select as your home address: your current position or a new address.
› Position
- Entry of the home address through taking the current position of
the vehicle;
› Address
- Enter the home address in writing.
The position of the “Home address”is displayed in the map by the symbol -
D
» Fig. 32 on page 58 .
The home address is also available in the menu Navigation, by pressing the
symbol key
→ Manage memory → Define home address .
Custom destination (vCard)
Custom destinations can be loaded onto the device from an SD memory card or
a USB flash drive in vCard format.
›
Press in the menu Navigation function key
→ Import destinations .
A list of possible data import sources is displayed.
After selecting the source and confirming the menu item Import all vCards
from this folder the importing the data stored in vCard format into the device
memory begins.
For more information on creating and importing your custom destination see
the ŠKODA Web pages www.infotainment.skoda-auto.com .
Image with GPS coordinates
If an image contains the GPS coordinates, viewing causes the function key
» Fig. 21 on page 36 to be shown.
›
Press the function key
and the destination details opens
» page 75.
POI
Introduction
This chapter contains information on the following subjects:
Entering a new POI
67
Search area for POI
68
Search and selecting a POI
68
Quick search and selecting a POI
68
Personal POI
68
First and foremost, pay attention to the safety instructions » page 7 , Impor-
tant notes .
This chapter covers the search and entry options of a POI.
Entering a new POI
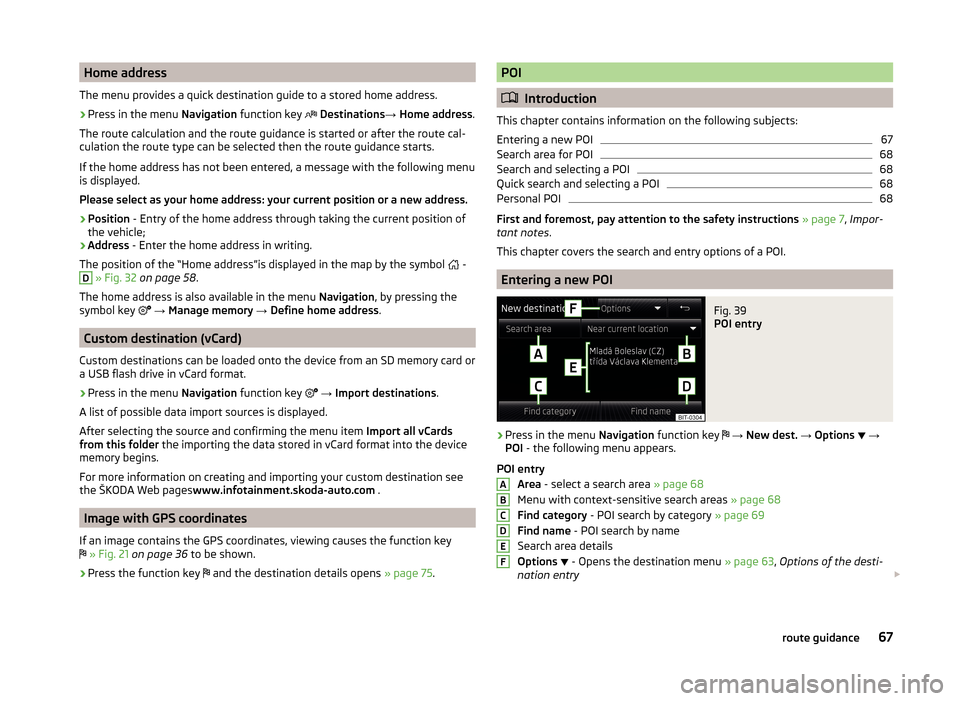
Fig. 39
POI entry
›
Press in the menu Navigation function key
→ New dest. → Options
→
POI - the following menu appears.
POI entry Area - select a search area » page 68
Menu with context-sensitive search areas » page 68
Find category - POI search by category » page 69
Find name - POI search by name
Search area details
Options
- Opens the destination menu
» page 63, Options of the desti-
nation entry
ABCDEF67route guidance