battery SKODA YETI 2014 1.G / 5L Owner's Manual
[x] Cancel search | Manufacturer: SKODA, Model Year: 2014, Model line: YETI, Model: SKODA YETI 2014 1.G / 5LPages: 248, PDF Size: 29.49 MB
Page 6 of 248
Cleaning vehicle exterior170Interior care174
Inspecting and replenishing
177
Fuel
177
Engine compartment
180
Engine oil
183
Coolant
184
Brake fluid
186
Vehicle battery
187
Wheels
191
Tyres and wheel rims
191
Manufacturer-approved tyre variants
193
Winter operation
195
Do-it-yourself
Emergency equipment and self-help
197
Emergency equipment
197
Reserve and temporary spare
199
Changing a wheel
200
Puncture repair kit
203
Jump-starting
206
Towing the vehicle
207
Remote control and removable light
209
Emergency unlocking/locking
211
Replacing windscreen wiper blades
212
Fuses and light bulbs
214
Fuses
214
Replacing bulbs
217
Technical data
Technical data
222
Vehicle data
222
Index
3Table of Contents
Page 10 of 248
AbbreviationsAbbreviationDefinitionrpmEngine revolutions per minuteA2DPa Bluetooth software profile for a one-way transfer of audio
dataABSAnti-lock brake systemAFMulti-purpose vehiclesAFSAdaptive headlightsAGAutomatic gearboxAGMVehicle battery typeAPNAn access point name for the Wi-Fi connectionTCSTraction controlCO 2Carbon dioxideDPFDiesel particle filterDSGAutomatic double clutch gearboxDSRActive driver-steering recommendationEDLElectronic differential lockECEEconomic Commission for EuropeEPCEPC fault lightESCElectronic Stability ControlDRim depthEUEuropean UnionGSMGlobal system for mobile communicationsHBAHydraulic brake assistHFPConnection of a mobile device by means of its Bluetooth ®
profileHHCUphill start assistKESSYkeyless unlocking, starting and lockingkWKilowatt, measuring unit for the engine outputMDIInputs for connecting external devicesMFDMultifunction displayMGManual gearboxAbbreviationDefinitionMPIGasoline engine with a multi-point fuel injectionN1Panel van intended exclusively or mainly for the transporta-
tion of goodsNmNewton meter, measuring unit for the engine torquePINpersonal identification numberrSAPa Bluetooth ®
software profile for the remote transmission
of the SIM dataSIM carda card for the identification of the mobile network operatorSSPConnect two devices using Bluetooth ®
profileTDI CRDiesel engine with turbo-charging and common rail injection
systemTSATrailer stabilisationTSIPetrol engine with turbocharging and direct injectionUMTSthe next generation of the GSM network (3G)VINVehicle identification numberWi-Fiwireless data networkWLANwireless connection of electronic devices for data transfer
(wireless)WPSwireless connection of devices for electronic data transfer
(WiFi) using an automatically generated key7Abbreviations
Page 40 of 248

If the warning light or illuminates again, then immediately obtain help
from an authorised dealer.
Steering lock (KESSY system)
As long as the warning light
is flashing , the steering lock cannot be re-
leased.
If the warning light
flashes , a signal tone sounds, and the following mes-
sage appears in the MAXI DOT- display, Steering column lock: Workshop! ap-
pears the electrical steering lock is faulty. Seek assistance from a specialist ga-
rage immediately.
If the warning light
flashes , a beep sounds and in the MAXI DOT display the
message Steering column lock faulty. appears, then the electric steering lock
is broken. Park the vehicle, stop driving
. After switching off the ignition, it is
then no longer possible to lock the steering, to activate the electrical compo-
nents (e.g. radio, navigation system), to switch on the ignition again and to
start the engine. Seek help from a specialist garage.
Note
If the vehicle's battery has been disconnected and reconnected, the warning
light comes on after switching on the ignition. If the warning light does
not go out after moving a short distance, this means there is an error in the
system. Seek assistance from a specialist garage immediately.
Engine oil
Read and observe
on page 35 first.
The warning light flashes (low oil pressure)
The following message is shown in the MAXI DOT display.
Oil pressure: Engine off! Owner's manual!
› Stop the vehicle, switch off the engine, and check the engine oil lev-
el » page 184 .
If the warning light flashes,
do not drive any further , even if the oil level is
correct! Also do not leave the engine running at an idling speed.
Seek help from a specialist garage.
The indicator light lights up (oil quantity too low)
The following message is shown in the MAXI DOT display.
Check oil level!
›Stop the vehicle, switch off the engine, and check the engine oil lev-
el » page 184 .
The warning light will go out if the bonnet is left open for more than 30 sec-
onds. If no engine oil has been replenished, the warning light will come on
again after driving about 100 km.
The indicator light
flashes (engine oil level sensor faulty)
The following message is shown in the MAXI DOT display.
Oil sensor: Workshop!
If the engine oil level sensor is faulty, the warning light
flashes several
times and an audible signal sounds when the ignition is turned on.
Seek assistance from a specialist garage immediately.
CAUTION
Stop driving if for some reason it is not possible to top up the engine oil un-
der the current conditions. Switch off the engine and seek assistance from a
specialist garage.
Traction Control System (ASR)
Read and observe
on page 35 first.
The warning light
flashes to show that the ASR is currently operating.
If the warning light
illuminates , there is a fault in the ASR.
The following message is shown in the MAXI DOT display. Error: Traction control (ASR)
Seek assistance from a specialist garage immediately.
If the warning light
illuminates immediately after you start the engine, the
ASR might be switched off due to technical reasons.
›
Switch the ignition off and on again.
The ASR is fully functional again if the warning light
no longer illuminates
after you switch the engine back on.
Further information » page 143, Traction Control System (TCS) .
37Instruments and Indicator Lights
Page 41 of 248
NoteIf the vehicle's battery has been disconnected and reconnected, the warning
light comes on after switching on the ignition. If the warning light does
not go out after moving a short distance, this means there is an error in the
system. Seek assistance from a specialist garage immediately.
Electronic Stability Control (ESC)
Read and observe
on page 35 first.
The warning light
flashes to show that the ESC is currently operating.
If the warning light
illuminates , there is a fault in the ESC.
The following message is shown in the MAXI DOT display. Error: Electronic Stability Control (ESC)
Seek assistance from a specialist garage immediately.
If the warning light
illuminates immediately after you start the engine, the
ESC might be switched off due to technical reasons.
›
Switch the ignition off and on again.
The ESC is fully functional again if the warning light
no longer illuminates
after you switch the engine back on.
Further information » page 143, Electronic Stability Control (ESC) .
Note
If the vehicle's battery has been disconnected and reconnected, the warning
light comes on after switching on the ignition. If the warning light does
not go out after moving a short distance, this means there is an error in the
system. Seek assistance from a specialist garage immediately.
Traction control (ASR) switched off
Read and observe
on page 35 first.
The warning light
lights up when the ASR is turned off by pressing the Sym-
bol key
» page 143 , Traction Control System (TCS) or
» page 143 , Elec-
tronic Stability Control (ESC) .
The following message is shown in the MAXI DOT display. Traction control (ASR) is deactivated.
Antilock brake system (ABS)
Read and observe
on page 35 first.
If the warning light
is lit , there is a fault in the ABS.
The following message is shown in the MAXI DOT display. Error: ABS
The vehicle will only be braked by the normal brake system without the ABS.
Seek assistance from a specialist garage immediately.
In the event of an ABS fault, the other braking and stabilization systems are
turned off » page 142 , Braking and stabilisation systems .
WARNING■
A fault to the ABS system or the braking system can increase the vehi-
cle's braking distance – risk of accident!■
If the warning light
lights up together with the warning light
» page 35 ,
stop driving! Seek help from a specialist garage.
Rear fog light
Read and observe
on page 35 first.
The warning light
illuminates when the rear fog light is switched on.
Lamp failure
Read and observe
on page 35 first.
The indicator light
illuminates if a lamp is faulty .
The indicator light
illuminates within a few seconds after switching on the
ignition or when a light with a faulty lamp is switched on .
The following message, for example, may be shown in the MAXI DOT display. INFORMATION Check front right low beam!
38Using the system
Page 44 of 248
If the warning light flashes again after the engine has started, there is a
system error.
Seek help from a specialist garage.
The following reasons can explain the warning light
being illuminated.
› The vehicle is loaded on one side. Distribute loads as evenly as possible.
› The wheels of one axle are loaded more heavily (e.g. when towing a trailer or
when driving uphill or downhill).
› Snow chains are mounted.
› A wheel has been changed.
Save the tyre pressure values in the system » page 158.
CAUTION
Under certain circumstances (e.g. sporty style of driving, wintry or unpaved
roads) the warning light can be delayed or does not light up at all.
Note
If the vehicle's battery has been disconnected and reconnected, the warning
light comes on after switching on the ignition. If the indicator light does not
go out after moving a short distance, this means that there is an error in the
system. Seek help from a specialist garage.
Windscreen washer fluid level
Read and observe
on page 35 first.
If the windscreen washer fluid level is too low, the warning light
illumi-
nates .
The following message is shown in the MAXI DOT display.
Top up wash fluid!
Top up with liquid » page 182, Windscreen washer system .
Turn-signal system
Read and observe
on page 35 first.
Either the left
or right
warning light flashes depending on the position of
the turn signal lever.
If there is a fault in the turn signal system, the warning light flashes at twice
its normal rate. This does not apply when towing a trailer.
Switching off the hazard warning light system is switched on will cause all of
the turn signal lights as well as both warning lights to flash.
Fog lights
Read and observe
on page 35 first.
The warning light
illuminates when the fog lights are operating.
Cruise control system
Read and observe
on page 35 first.
The warning light
illuminates when the cruise control is active » page 154.
Brake pedal (automatic gearbox)
Read and observe
on page 35 first.
If the warning light
illuminates , operate the brake pedal.
OFF ROADmode
Read and observe
on page 35 first.
When the indicator light is
lit, then the conditions for the engagement of
OFF ROAD mode are met » page 144 .
When the indicator
flashes, it indicates the hill descent assistant is current-
ly engaged.
Further information » page 144, OFF ROAD-mode .
Main beam
Read and observe
on page 35 first.
The warning light
illuminates when the main beam or the headlight flasher
is operated.
41Instruments and Indicator Lights
Page 48 of 248
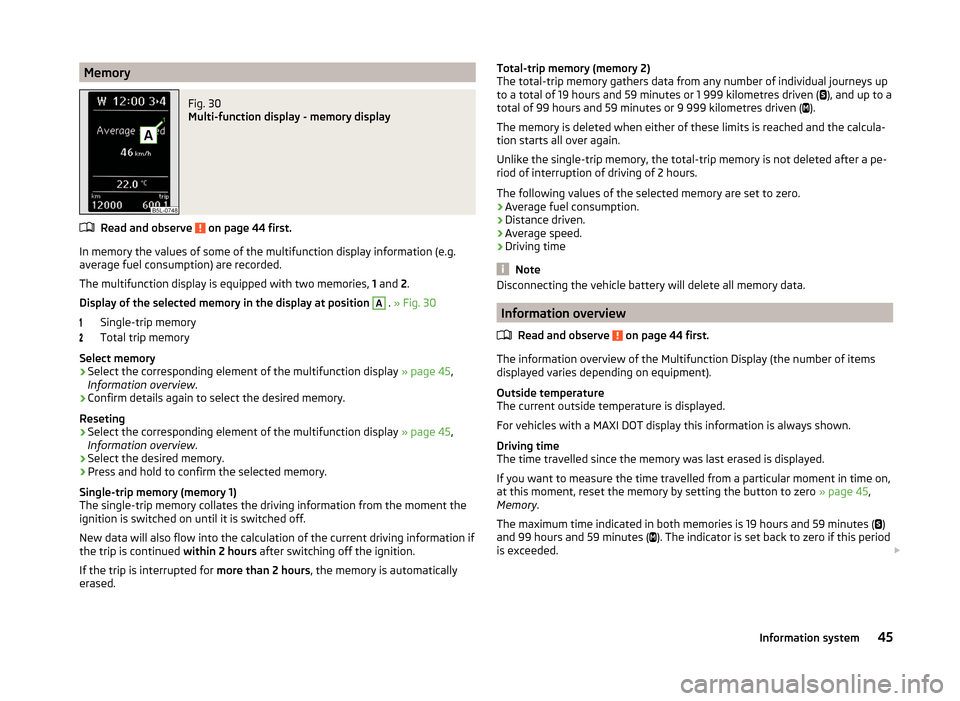
MemoryFig. 30
Multi-function display - memory display
Read and observe on page 44 first.
In memory the values of some of the multifunction display information (e.g.
average fuel consumption) are recorded.
The multifunction display is equipped with two memories, 1 and 2.
Display of the selected memory in the display at position
A
. » Fig. 30
Single-trip memory
Total trip memory
Select memory
›
Select the corresponding element of the multifunction display » page 45,
Information overview .
›
Confirm details again to select the desired memory.
Reseting
›
Select the corresponding element of the multifunction display » page 45,
Information overview .
›
Select the desired memory.
›
Press and hold to confirm the selected memory.
Single-trip memory (memory 1)
The single-trip memory collates the driving information from the moment the
ignition is switched on until it is switched off.
New data will also flow into the calculation of the current driving information if the trip is continued within 2 hours after switching off the ignition.
If the trip is interrupted for more than 2 hours, the memory is automatically
erased.
Total-trip memory (memory 2)
The total-trip memory gathers data from any number of individual journeys up
to a total of 19 hours and 59 minutes or 1 999 kilometres driven (
), and up to a
total of 99 hours and 59 minutes or 9 999 kilometres driven (
).
The memory is deleted when either of these limits is reached and the calcula-
tion starts all over again.
Unlike the single-trip memory, the total-trip memory is not deleted after a pe-
riod of interruption of driving of 2 hours.
The following values of the selected memory are set to zero. › Average fuel consumption.
› Distance driven.
› Average speed.
› Driving time
Note
Disconnecting the vehicle battery will delete all memory data.
Information overview
Read and observe
on page 44 first.
The information overview of the Multifunction Display (the number of itemsdisplayed varies depending on equipment).
Outside temperature
The current outside temperature is displayed.
For vehicles with a MAXI DOT display this information is always shown.
Driving time
The time travelled since the memory was last erased is displayed.
If you want to measure the time travelled from a particular moment in time on,
at this moment, reset the memory by setting the button to zero » page 45,
Memory .
The maximum time indicated in both memories is 19 hours and 59 minutes ( )
and 99 hours and 59 minutes ( ). The indicator is set back to zero if this period
is exceeded.
45Information system
Page 49 of 248

Current fuel consumption
The current fuel consumption level is displayed in litres/100 km 1)
. You can use
this information to adapt your driving style to the desired fuel consumption.
The display appears in litres/hour if the vehicle is stationary or driving at a low
speed 2)
.
Average fuel consumption
The average fuel consumption since the memory was last erased is displayed
in litres/100 km 1 )
.
If you wish to determine the average fuel consumption over a certain period of
time, you must set the memory at the start of the new measurement to
zero » page 45 , Memory . After erasing the memory, no value is displayed until
you have driven approx. 300 m.
The display is updated regularly while you are driving.
Range
The range indicates the distance you can still drive with your vehicle based on
the level of fuel in the tank and the same style of driving as before.
The display is shown in steps of 10 km. After lighting up of the indicator light
the display is shown in steps of 5 km.
The fuel consumption over the last 50 km is used to calculate the information.
The range will increase if you drive in a more economical manner.
If the memory is set to zero (after disconnecting the battery), a fuel consump-
tion of 10 l./100 km is calculated for the range; afterwards the value is updated
according to the style of driving.
Distance travelled
The distance travelled since the memory was last erased is displayed.
If you want to measure the distance travelled from a particular moment in time
on, at this moment, reset the memory by setting the button to zero » page 45,
Memory .
The maximum distance indicated in both memories is 1 999 km ( ) and
9 999 km ( ). The indicator is set back to zero if this period is exceeded.Average speed
The average speed since the memory was last erased is displayed in km/hour .
To determine the average speed over a certain period of time, set the memory
to zero at the start of the measurement » page 45, Memory .
After erasing the memory, no data will appear for the first 300 m driven.
The display is updated regularly while you are driving.
Current driving speed
The current speed displayed is identical to the display on the speedometer2
» Fig. 23 on page 30 .
Oil temperature 3)
If the engine oil temperature is in the range 80-110 °C, the engine operating
temperature is reached.
If the oil temperature is lower than 80 °C or above 110 °C, avoid high engine
revs, full throttle and high engine loads.
If the oil temperature is lower than 50 °C or if a there is fault in the system for
checking the oil temperature,
.
symbols are displayed instead of the oil
temperature.
Warning against excessive speeds
Set the speed limit, for example, for the maximum permissible speed in
town » page 46 , Warning at excessive speeds .
Warning at excessive speeds
Read and observe
on page 44 first.
Adjust the speed limit while the vehicle is stationary
›
Select the menu item Speed warning at (
) or
(
).
›
Activate the speed limit option by confirming this menu item 4)
.
›
Set the desired speed limit, e.g. 50 km/h.
›
Store the speed limit by confirming the set value, or wait several seconds;
your settings will be saved automatically.
1)
On some models in certain countries, the display appears in kilometres/litre.
2)
On some models in certain countries, – -.- km/ltr. is displayed when the vehicle is stationary.
3)
Applies to vehicles using the MAXI DOT display.
4)
If no value is set the output value 30 km/h is automatically displayed.
46Using the system
Page 52 of 248

Further information » page 146, Parking aid .
Alt. speed dis.
Here, the display of the second speed in mph 1)
can be activated.
Further information » page 33, Display of the second speed .
Service
The days and kilometres remaining until the next service can be displayed
here.
Further information » page 49, Service interval display .
Factory setting
The display functions can be restored to their factory settings here.
Service interval display
Introduction
This chapter contains information on the following subjects:
Prompt in the MAXI DOT display
49
Prompt in the segment display
49
Resetting the service interval display
50
The service interval display shows the time and mileage to the next service
event.
The service due date is automatically displayed on the display and this infor-
mation can be displayed manually if necessary.
The kilometre indicator or the days indicator reduces in steps of 100 km or,
where applicable, days until the service due date is reached.
The information regarding the service intervals can be found in the service
schedule.
Note
Information is retained in the Service Interval Display even after the vehicle
battery is disconnected.Prompt in the MAXI DOT display
Oil change service
If an oil change service is due, the following message appears: Oil change in …
km or … days.
As soon as the service interval date has been reached, the message Oil
change now! appears once the ignition has been switched on!
Inspection
If an inspection is due, the following message appears: Inspection in ... km
or ... days.
As soon as the service interval date has been reached, the message Inspec-
tion now! appears once the ignition has been switched on!
Displaying the distance and days until the next service interval
You can view the remaining distance and days until the next service appoint-
ment at any time when the ignition is switched on by going to the Service
menu item » page 47, Settings or from the Vehicle status in the main menu of
the Maxi DOTdisplay. » page 47, Main menu .
The following message is displayed for 10 seconds. Oil change ... km / ... days
Inspection ... km / ... days
Prompt in the segment display
Fig. 31
Segment display: Example of a
message
1)
For models with the speedometer in mph, the second speed is displayed in km/h.
49Information system
Page 54 of 248
Unlocking and opening
Unlocking and locking
Introduction
This chapter contains information on the following subjects:
Unlock / lock using key and lock
52
Unlocking / locking with the remote control key
52
Opening/closing a door
52
Unlocking / locking - KESSY
53
Safe securing system
54
Individual settings
54
Locking / unlocking the vehicle with the central locking button
54
Child safety lock
55
Malfunctions
55
Your car is equipped with a central locking system.
The central locking system allows you to lock and unlock all doors, the fuel fill-
er flap and boot lid at the same time.
Depending on the equipment configuration, the following is true after
unlocking
› The turn signal lights flash twice as confirmation that the vehicle has been
unlocked.
› The doors, the boot lid and the fuel filler flap are unlocked.
› The interior light operated via the door contact illuminates.
› The SafeLock system is switched off.
› The indicator light in the driver door stops flashing.
› The anti-theft alarm system is deactivated.
If you unlock the vehicle and do not open a door or the boot lid within the next
30 seconds, the vehicle will lock again automatically and the SafeLock system
or anti-theft alarm system will be switched on. This function is intended to
prevent the car being unlocked unintentionally.
Depending on the equipment configuration, the following is true after
locking
› The turn signal lights flash once as confirmation that the vehicle has been
locked.
› The doors, the boot lid and the fuel filler flap are locked.
›The interior light operated via the door contact goes out.
› The SafeLock system is switched on.
› The indicator light in the driver door begins flashing.
› The anti-theft alarm system is activated.
If the doors or the boot lid remain open after the vehicle has been locked, the
turn signal lights do not flash until they have been closed.WARNING■ Never leave the key in the vehicle when you exit the vehicle. Unauthor-
ized persons, such as children, for example, could lock the car, turn on the
ignition or start the engine - there is a danger of injury and accidents!■
When leaving the vehicle, never leave persons who are not completely in-
dependent, such as children, unattended in the vehicle. The children might,
for example, release the handbrake or take the vehicle out of gear. The ve-
hicle could then start to move – risk of injury and accidents! These individu-
als might also not be able to leave the vehicle on their own or to help
themselves. Can be fatal at very high or very low temperatures!
CAUTION
■ Each key contains electronic components; therefore it must be protected
against moisture and severe shocks.■
Keep the groove of the keys absolutely clean. Impurities (textile fibres, dust,
etc.) have a negative effect on the functionality of the locking cylinder and ig-
nition lock.
■
The battery must be replaced if the central locking or anti-theft alarm system
does react to the remote control at less than approx. 3 metres
away » page 210 .
■
When leaving the vehicle, always check if it is locked.
■
If the driver's door has been opened, the vehicle cannot be locked.
Note
In the event of an accident in which the airbags are deployed, the locked doors
are automatically unlocked in order to enable rescuers to gain access to the
vehicle.51Unlocking and opening
Page 58 of 248

Unlocking / locking » Fig. 36
Locking
Unlocking
If the icon in the button
is lit, the vehicle is locked.
If the icon in the button
is not lit, the vehicle is not locked.
The central locking system also operates if the ignition is switched off.
The following applies after locking.
› Opening the doors and the boot lid from the outside is not possible.
› The doors can be unlocked and opened from the inside by a single pull on the
opening lever of the respective door.
› In the event of an accident in which the airbags are deployed, the locked
doors are automatically unlocked in order to enable rescuers to gain access
to the vehicle.WARNING■ Doors locked from the inside make it difficult for rescuers to get into the
vehicle in an emergency – risk to life!■
If the Safelock system is switched on » page 54, the door opening levers
and the central locking buttons do not operate.
CAUTION
If at least one door has been opened, the vehicle cannot be locked.
Child safety lock
Fig. 37
Back door: left / right
Read and observe and on page 51 first.
The child safety lock prevents the rear door from being opened from the in- side. The door can only be opened from the outside.
Switching the child safety system on and off » Fig. 37
Switching on
Switching off
You can switch the child safety lock on and off using the vehicle key.
Malfunctions
Read and observe
and on page 51 first.
Failure of the central locking
If the central locking system fails, only the driver's door can be locked / un-
locked with the key. The other doors and the tailgate can be emergency-
locked or unlocked.
› Unlocking / locking
» page 52 for vehicles without remote control.
› Unlocking / locking for vehicles with remote control
» page 211.
› Emergency locking of the door
» page 211.
› Emergency unlocking of the boot lid
» page 212.
Displaying an error
If the warning light in the driver's door initially flashes quickly for around 2 sec-
onds, and then lights up for 30 seconds without interruption before flashing
again slowly, you will need to seek the assistance of a specialist garage.
Discharged battery in the remote control key
If the red indicator light
B
» Fig. 33 on page 52 does not flash when you press
a button on the remote control key, the battery is empty.
If the voltage of the battery in the remote control key is too low, the following
message appears in the display of the instrument cluster.
Renew key battery!
KEY BATTERY
Replace the battery » page 210.
55Unlocking and opening