ECU SKODA YETI 2015 1.G / 5L User Guide
[x] Cancel search | Manufacturer: SKODA, Model Year: 2015, Model line: YETI, Model: SKODA YETI 2015 1.G / 5LPages: 232, PDF Size: 30.84 MB
Page 57 of 232
This function is pointed out by the following message on the instrument clus-
ter display after switching off the ignition.Check SAFELOCK! Owner´s manual!CHECK DEADLOCK
After locking the vehicle, the warning light in the driver's door flashes for
around 2 seconds in quick succession, afterwards it begins to flash evenly at
longer intervals.
Switching off
The safe lock can be switched off in one of the following ways.
▶ By locking twice within 2 seconds.
▶ By disabling the button for interior monitoring and anti-towing » page 57,
Interior monitor and towing protection .
The indicator light in the driver door flashes for about 2 seconds fast, goes out and starts to flash at longer intervals after about 30 seconds.
If the vehicle is locked and the safe securing system is switched off, the door
can be opened separately from the inside by a single pull on opening lever.
The Safelock system switches back on when the vehicle is locked.
WARNINGIf the car is locked and the safe securing system activated, no people must
remain in the car as it will then not be possible to either unlock a door or
open a window from the inside. The locked doors make it more difficult for
rescuers to get into the vehicle in an emergency – risk to life!
Individual settings
Read and observe
and on page 52 first.
The following central locking functions can be individually set via the MAXI
DOT display » page 47, Menu item
Settings
.
Opening a single door
The function allows you to unlock only the driver's door and the fuel filler flap
with the radio remote control. KESSY makes it possible to release individual
doors as well as the fuel filler flap, depending on the area in which the key is
located. The other doors and the boot lid are only unlocked when the unlock-
ing is repeated.
Unlocking a vehicle side door
This function enables you to unlock both doors on the driver's side and the
fuel filler flap with the radio remote control unit. KESSY makes it possible to
release of both doors on one side as well as the fuel filler flap, depending on
the area in which the key is located. The other doors and the boot lid are only
unlocked when the unlocking is repeated.
Unlock all doors
The function allows you to unlock all doors, the boot lid and the fuel filler flap.
Automatic locking/unlocking
The function allows you to lock all doors and the boot lid from a speed of
about 15 km/h. The button in the handle of the boot lid is deactivated.
All doors and the boot lid are automatically unlocked again by removing the ig-
nition key or by opening any of the doors. In vehicles with the KESSY system,
this is when any door is opened.
The vehicle can also be unlocked by pressing the Central Locking Button in
the centre console » page 54.
Acoustic signals when locking / unlocking
For vehicles with anti-theft alarm system, the acoustic signals can be activa-
ted / deactivated by means of the MAXI DOT display » page 47.
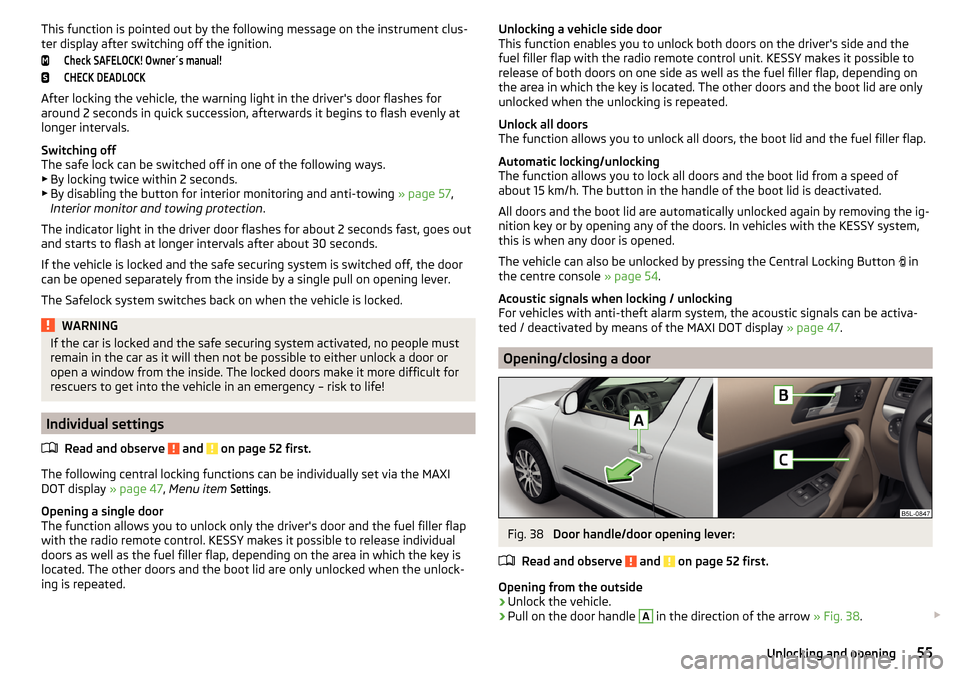
Opening/closing a door
Fig. 38
Door handle/door opening lever:
Read and observe
and on page 52 first.
Opening from the outside
›
Unlock the vehicle.
›
Pull on the door handle
A
in the direction of the arrow » Fig. 38.
55Unlocking and opening
Page 80 of 232
Front seat functions
Introduction
This chapter contains information on the following subjects:
Front seat heating
78
Armrest setting
78
Folding front passenger seat
79
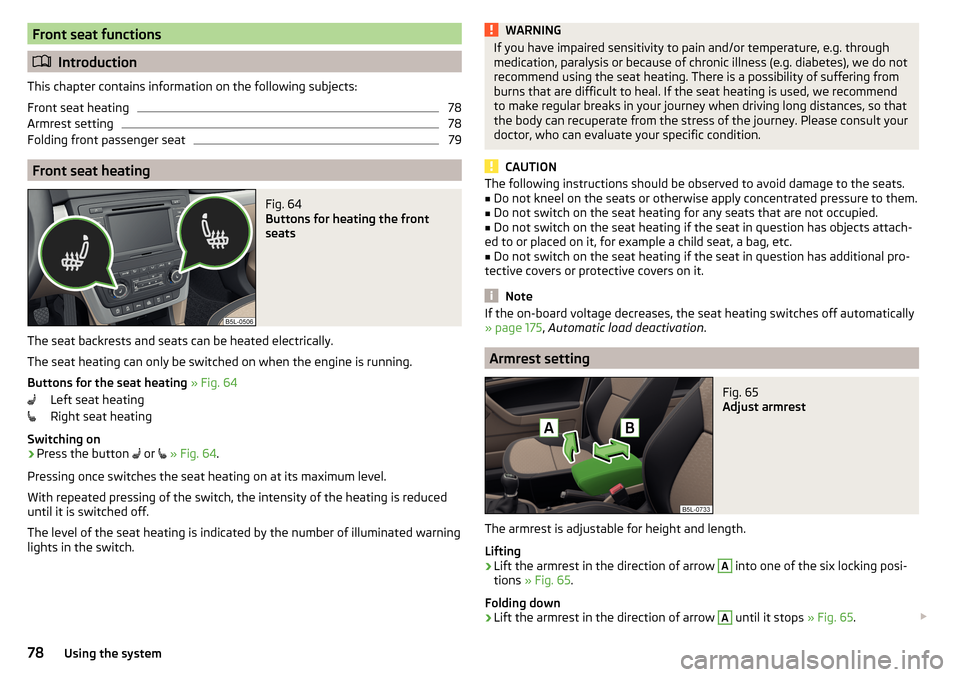
Front seat heating
Fig. 64
Buttons for heating the front
seats
The seat backrests and seats can be heated electrically.
The seat heating can only be switched on when the engine is running.
Buttons for the seat heating » Fig. 64
Left seat heating
Right seat heating
Switching on
›
Press the button or
» Fig. 64 .
Pressing once switches the seat heating on at its maximum level.
With repeated pressing of the switch, the intensity of the heating is reduced
until it is switched off.
The level of the seat heating is indicated by the number of illuminated warning
lights in the switch.
WARNINGIf you have impaired sensitivity to pain and/or temperature, e.g. through
medication, paralysis or because of chronic illness (e.g. diabetes), we do not recommend using the seat heating. There is a possibility of suffering from
burns that are difficult to heal. If the seat heating is used, we recommend
to make regular breaks in your journey when driving long distances, so that
the body can recuperate from the stress of the journey. Please consult your
doctor, who can evaluate your specific condition.
CAUTION
The following instructions should be observed to avoid damage to the seats.■Do not kneel on the seats or otherwise apply concentrated pressure to them.■
Do not switch on the seat heating for any seats that are not occupied.
■
Do not switch on the seat heating if the seat in question has objects attach-
ed to or placed on it, for example a child seat, a bag, etc.
■
Do not switch on the seat heating if the seat in question has additional pro-
tective covers or protective covers on it.
Note
If the on-board voltage decreases, the seat heating switches off automatically
» page 175 , Automatic load deactivation .
Armrest setting
Fig. 65
Adjust armrest
The armrest is adjustable for height and length.
Lifting
›
Lift the armrest in the direction of arrow
A
into one of the six locking posi-
tions » Fig. 65 .
Folding down
›
Lift the armrest in the direction of arrow
A
until it stops » Fig. 65.
78Using the system
Page 81 of 232
›Fold down the rear armrest.
Move›
Move the cover into the desired position in the direction of the arrow
B
» Fig. 65 .
Note
Push the armrest cover all the way back to the stop before applying the hand-
brake.
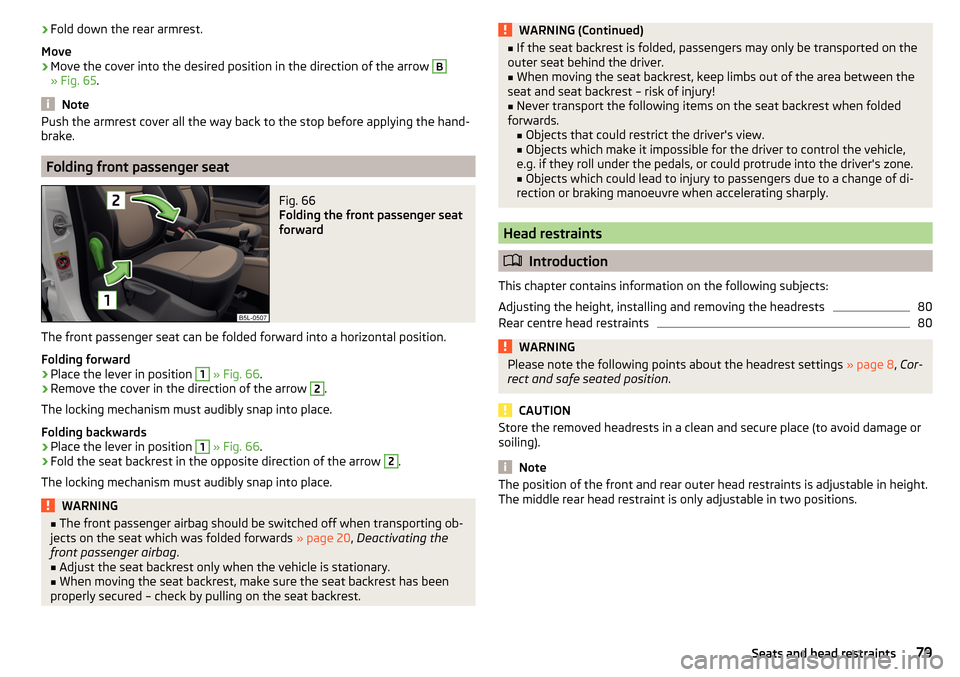
Folding front passenger seat
Fig. 66
Folding the front passenger seat
forward
The front passenger seat can be folded forward into a horizontal position.
Folding forward
›
Place the lever in position
1
» Fig. 66 .
›
Remove the cover in the direction of the arrow
2
.
The locking mechanism must audibly snap into place.
Folding backwards
›
Place the lever in position
1
» Fig. 66 .
›
Fold the seat backrest in the opposite direction of the arrow
2
.
The locking mechanism must audibly snap into place.
WARNING■ The front passenger airbag should be switched off when transporting ob-
jects on the seat which was folded forwards » page 20, Deactivating the
front passenger airbag .■
Adjust the seat backrest only when the vehicle is stationary.
■
When moving the seat backrest, make sure the seat backrest has been
properly secured – check by pulling on the seat backrest.
WARNING (Continued)■ If the seat backrest is folded, passengers may only be transported on the
outer seat behind the driver.■
When moving the seat backrest, keep limbs out of the area between the
seat and seat backrest – risk of injury!
■
Never transport the following items on the seat backrest when folded
forwards. ■Objects that could restrict the driver's view.
■ Objects which make it impossible for the driver to control the vehicle,
e.g. if they roll under the pedals, or could protrude into the driver's zone. ■ Objects which could lead to injury to passengers due to a change of di-
rection or braking manoeuvre when accelerating sharply.
Head restraints
Introduction
This chapter contains information on the following subjects:
Adjusting the height, installing and removing the headrests
80
Rear centre head restraints
80WARNINGPlease note the following points about the headrest settings » page 8, Cor-
rect and safe seated position .
CAUTION
Store the removed headrests in a clean and secure place (to avoid damage or
soiling).
Note
The position of the front and rear outer head restraints is adjustable in height.
The middle rear head restraint is only adjustable in two positions.79Seats and head restraints
Page 82 of 232
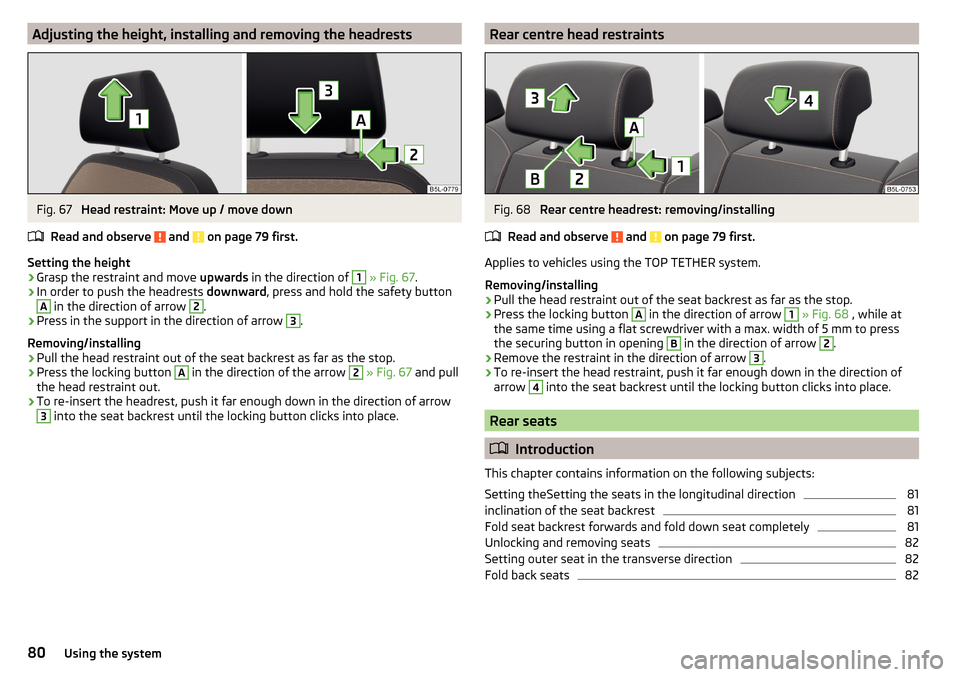
Adjusting the height, installing and removing the headrestsFig. 67
Head restraint: Move up / move down
Read and observe
and on page 79 first.
Setting the height
›
Grasp the restraint and move upwards in the direction of
1
» Fig. 67 .
›
In order to push the headrests downward, press and hold the safety button
A
in the direction of arrow
2
.
›
Press in the support in the direction of arrow
3
.
Removing/installing
›
Pull the head restraint out of the seat backrest as far as the stop.
›
Press the locking button
A
in the direction of the arrow
2
» Fig. 67 and pull
the head restraint out.
›
To re-insert the headrest, push it far enough down in the direction of arrow
3
into the seat backrest until the locking button clicks into place.
Rear centre head restraintsFig. 68
Rear centre headrest: removing/installing
Read and observe
and on page 79 first.
Applies to vehicles using the TOP TETHER system.
Removing/installing
›
Pull the head restraint out of the seat backrest as far as the stop.
›
Press the locking button
A
in the direction of arrow
1
» Fig. 68 , while at
the same time using a flat screwdriver with a max. width of 5 mm to press
the securing button in opening
B
in the direction of arrow
2
.
›
Remove the restraint in the direction of arrow
3
.
›
To re-insert the head restraint, push it far enough down in the direction of
arrow
4
into the seat backrest until the locking button clicks into place.
Rear seats
Introduction
This chapter contains information on the following subjects:
Setting theSetting the seats in the longitudinal direction
81
inclination of the seat backrest
81
Fold seat backrest forwards and fold down seat completely
81
Unlocking and removing seats
82
Setting outer seat in the transverse direction
82
Fold back seats
8280Using the system
Page 83 of 232
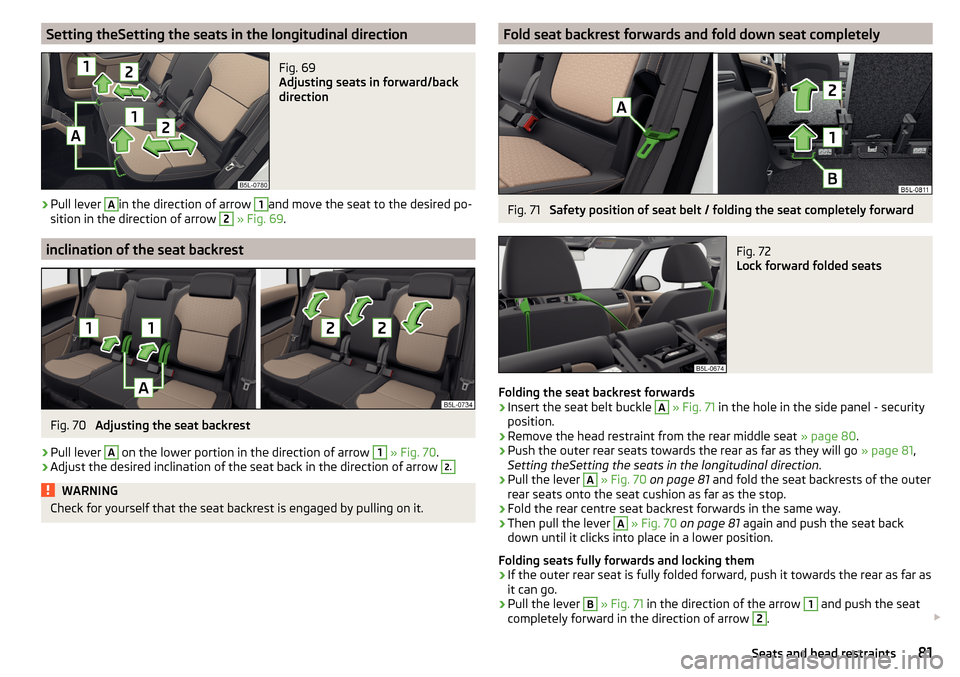
Setting theSetting the seats in the longitudinal directionFig. 69
Adjusting seats in forward/back
direction
›
Pull lever
A
in the direction of arrow
1
and move the seat to the desired po-
sition in the direction of arrow
2
» Fig. 69 .
inclination of the seat backrest
Fig. 70
Adjusting the seat backrest
›
Pull lever
A
on the lower portion in the direction of arrow
1
» Fig. 70 .
›
Adjust the desired inclination of the seat back in the direction of arrow
2.WARNINGCheck for yourself that the seat backrest is engaged by pulling on it.Fold seat backrest forwards and fold down seat completelyFig. 71
Safety position of seat belt / folding the seat completely forward
Fig. 72
Lock forward folded seats
Folding the seat backrest forwards
›
Insert the seat belt buckle
A
» Fig. 71 in the hole in the side panel - security
position.
›
Remove the head restraint from the rear middle seat » page 80.
›
Push the outer rear seats towards the rear as far as they will go
» page 81,
Setting theSetting the seats in the longitudinal direction .
›
Pull the lever
A
» Fig. 70 on page 81 and fold the seat backrests of the outer
rear seats onto the seat cushion as far as the stop.
›
Fold the rear centre seat backrest forwards in the same way.
›
Then pull the lever
A
» Fig. 70 on page 81 again and push the seat back
down until it clicks into place in a lower position.
Folding seats fully forwards and locking them
›
If the outer rear seat is fully folded forward, push it towards the rear as far as
it can go.
›
Pull the lever
B
» Fig. 71 in the direction of the arrow
1
and push the seat
completely forward in the direction of arrow
2
.
81Seats and head restraints
Page 84 of 232
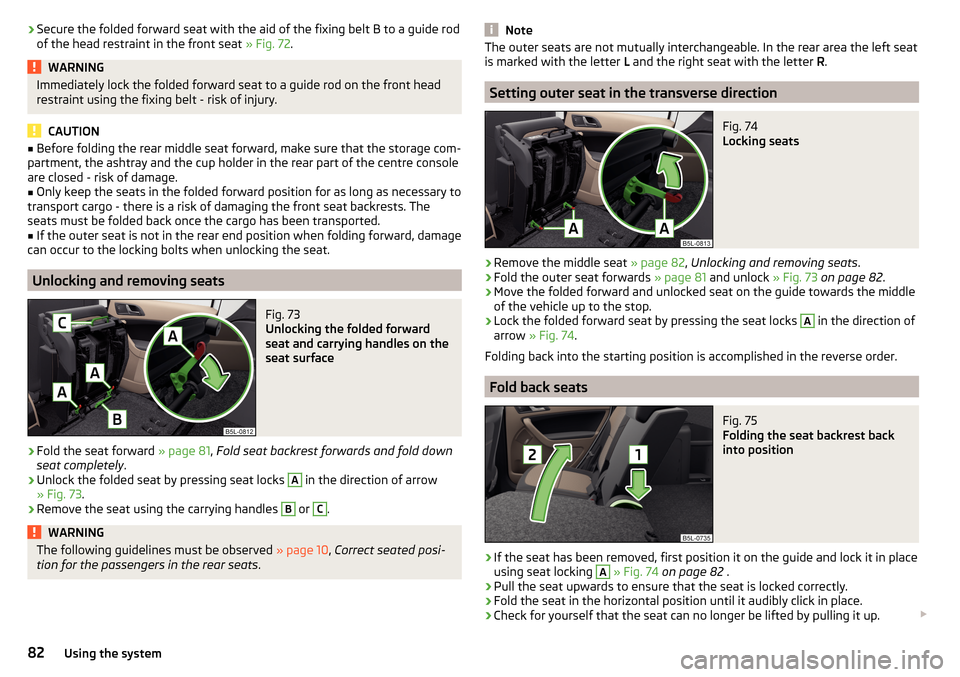
›Secure the folded forward seat with the aid of the fixing belt B to a guide rod
of the head restraint in the front seat » Fig. 72.WARNINGImmediately lock the folded forward seat to a guide rod on the front head
restraint using the fixing belt - risk of injury.
CAUTION
■ Before folding the rear middle seat forward, make sure that the storage com-
partment, the ashtray and the cup holder in the rear part of the centre console
are closed - risk of damage.■
Only keep the seats in the folded forward position for as long as necessary to
transport cargo - there is a risk of damaging the front seat backrests. The
seats must be folded back once the cargo has been transported.
■
If the outer seat is not in the rear end position when folding forward, damage
can occur to the locking bolts when unlocking the seat.
Unlocking and removing seats
Fig. 73
Unlocking the folded forward
seat and carrying handles on the
seat surface
›
Fold the seat forward » page 81, Fold seat backrest forwards and fold down
seat completely .
›
Unlock the folded seat by pressing seat locks
A
in the direction of arrow
» Fig. 73 .
›
Remove the seat using the carrying handles
B
or
C
.
WARNINGThe following guidelines must be observed » page 10, Correct seated posi-
tion for the passengers in the rear seats .NoteThe outer seats are not mutually interchangeable. In the rear area the left seat
is marked with the letter L and the right seat with the letter R.
Setting outer seat in the transverse direction
Fig. 74
Locking seats
›
Remove the middle seat » page 82, Unlocking and removing seats .
›
Fold the outer seat forwards » page 81 and unlock » Fig. 73 on page 82 .
›
Move the folded forward and unlocked seat on the guide towards the middle
of the vehicle up to the stop.
›
Lock the folded forward seat by pressing the seat locks
A
in the direction of
arrow » Fig. 74 .
Folding back into the starting position is accomplished in the reverse order.
Fold back seats
Fig. 75
Folding the seat backrest back
into position
›
If the seat has been removed, first position it on the guide and lock it in place
using seat locking
A
» Fig. 74 on page 82 .
›
Pull the seat upwards to ensure that the seat is locked correctly.
›
Fold the seat in the horizontal position until it audibly click in place.
›
Check for yourself that the seat can no longer be lifted by pulling it up.
82Using the system
Page 85 of 232
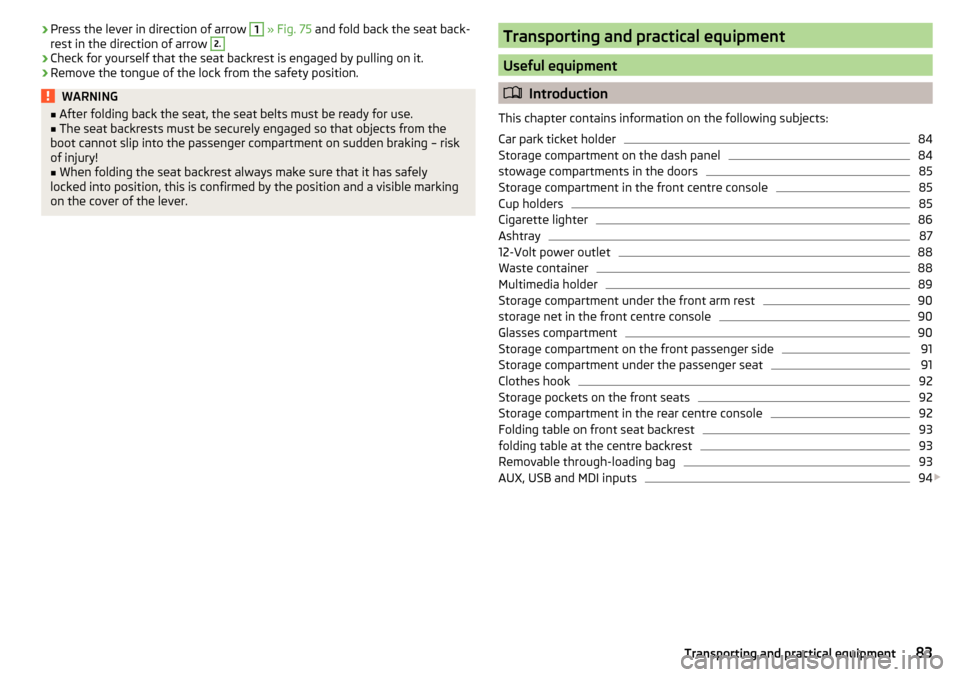
›Press the lever in direction of arrow 1
» Fig. 75 and fold back the seat back-
rest in the direction of arrow 2.›
Check for yourself that the seat backrest is engaged by pulling on it.
›
Remove the tongue of the lock from the safety position.
WARNING■ After folding back the seat, the seat belts must be ready for use.■The seat backrests must be securely engaged so that objects from the
boot cannot slip into the passenger compartment on sudden braking – risk
of injury!■
When folding the seat backrest always make sure that it has safely
locked into position, this is confirmed by the position and a visible marking
on the cover of the lever.
Transporting and practical equipment
Useful equipment
Introduction
This chapter contains information on the following subjects:
Car park ticket holder
84
Storage compartment on the dash panel
84
stowage compartments in the doors
85
Storage compartment in the front centre console
85
Cup holders
85
Cigarette lighter
86
Ashtray
87
12-Volt power outlet
88
Waste container
88
Multimedia holder
89
Storage compartment under the front arm rest
90
storage net in the front centre console
90
Glasses compartment
90
Storage compartment on the front passenger side
91
Storage compartment under the passenger seat
91
Clothes hook
92
Storage pockets on the front seats
92
Storage compartment in the rear centre console
92
Folding table on front seat backrest
93
folding table at the centre backrest
93
Removable through-loading bag
93
AUX, USB and MDI inputs
94
83Transporting and practical equipment
Page 86 of 232
WARNING■Do not place anything on the dash panel. These objects might slide or fall
down when driving (when accelerating, cornering or following a bad ma-
noeuvre) and may distract you from concentrating on the traffic – there is a
risk of an accident!■
When driving, ensure that no objects from the centre console or from oth-
er storage compartments can get into the driver's footwell. You would not
be able to brake, operate the clutch pedal or accelerate - danger of causing
an accident!
■
No objects should be placed in the storage compartments nor in the
drinks holders; the vehicle occupants could be endangered if there is sud-
den braking or the vehicle collides with something.
■
Ash, cigarettes, cigars and the like. may only be placed in the ashtray!
Car park ticket holder
Fig. 76
Parking ticket holder
Read and observe on page 84 first.
The parking ticket holder » Fig. 76 is designed e.g. for securing car park tickets.
WARNINGThe ticket should always be removed before starting off so that the driver's
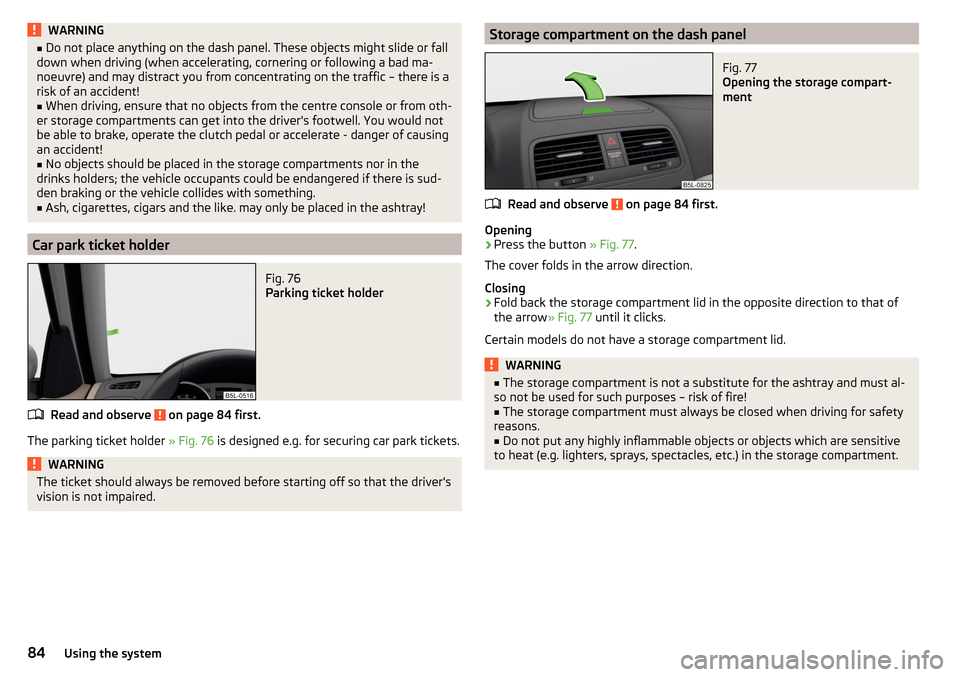
vision is not impaired.Storage compartment on the dash panelFig. 77
Opening the storage compart-
ment
Read and observe on page 84 first.
Opening
›
Press the button » Fig. 77.
The cover folds in the arrow direction.
Closing
›
Fold back the storage compartment lid in the opposite direction to that of
the arrow » Fig. 77 until it clicks.
Certain models do not have a storage compartment lid.
WARNING■ The storage compartment is not a substitute for the ashtray and must al-
so not be used for such purposes – risk of fire!■
The storage compartment must always be closed when driving for safety
reasons.
■
Do not put any highly inflammable objects or objects which are sensitive
to heat (e.g. lighters, sprays, spectacles, etc.) in the storage compartment.
84Using the system
Page 92 of 232
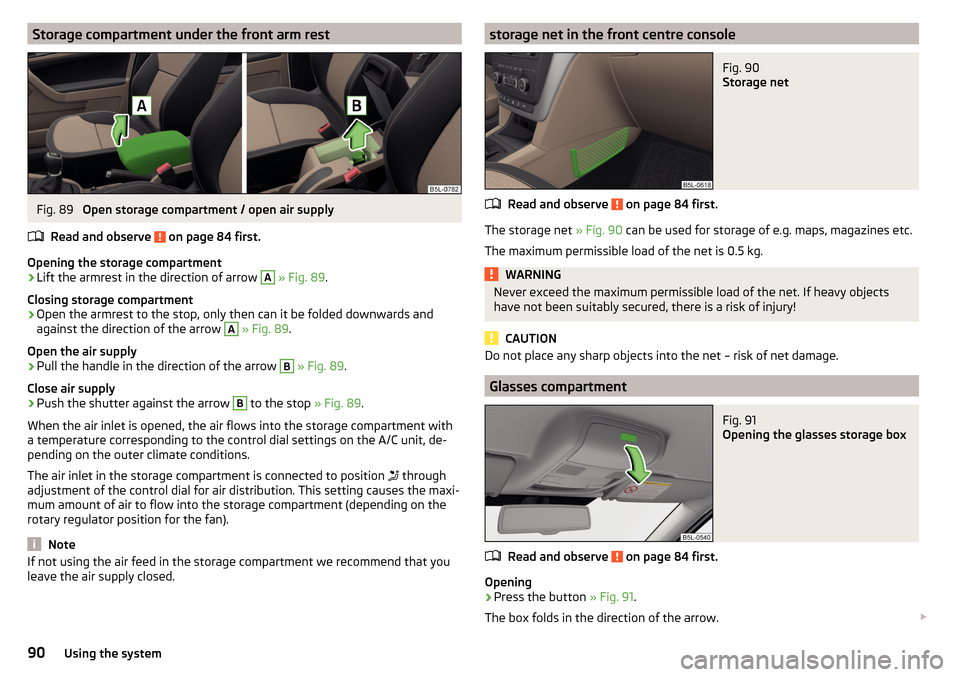
Storage compartment under the front arm restFig. 89
Open storage compartment / open air supply
Read and observe
on page 84 first.
Opening the storage compartment
›
Lift the armrest in the direction of arrow
A
» Fig. 89 .
Closing storage compartment
›
Open the armrest to the stop, only then can it be folded downwards and
against the direction of the arrow
A
» Fig. 89 .
Open the air supply
›
Pull the handle in the direction of the arrow
B
» Fig. 89 .
Close air supply
›
Push the shutter against the arrow
B
to the stop » Fig. 89.
When the air inlet is opened, the air flows into the storage compartment with
a temperature corresponding to the control dial settings on the A/C unit, de-
pending on the outer climate conditions.
The air inlet in the storage compartment is connected to position through
adjustment of the control dial for air distribution. This setting causes the maxi-
mum amount of air to flow into the storage compartment (depending on the
rotary regulator position for the fan).
Note
If not using the air feed in the storage compartment we recommend that you
leave the air supply closed.storage net in the front centre consoleFig. 90
Storage net
Read and observe on page 84 first.
The storage net » Fig. 90 can be used for storage of e.g. maps, magazines etc.
The maximum permissible load of the net is 0.5 kg.
WARNINGNever exceed the maximum permissible load of the net. If heavy objects
have not been suitably secured, there is a risk of injury!
CAUTION
Do not place any sharp objects into the net – risk of net damage.
Glasses compartment
Fig. 91
Opening the glasses storage box
Read and observe on page 84 first.
Opening
›
Press the button » Fig. 91.
The box folds in the direction of the arrow.
90Using the system
Page 95 of 232
WARNINGThe storage compartment is not a substitute for the ashtray and must also
not be used for such purposes – risk of fire!
CAUTION
Before folding forward, the rear centre seat storage compartment must be
closed - there is a risk of damage to the storage compartment.
Folding table on front seat backrest
Fig. 97
Fold down the folding table
Read and observe on page 84 first.
Folding up/folding down
›
Fold the table into the horizontal position by pulling in the direction of arrow
» Fig. 97 .
›
Pushing against the direction of the arrow folds the table back into the verti-
cal position.
The maximum permissible load for the table is 10 kg.
WARNING■ The table must not be in the horizontal position while driving - risk of in-
jury.■
Do not put any hot drinks in the cup holder in the folding table. If the ve-
hicle moves, they may spill – risk of scalding!
■
Do not use any cups or beakers which are made of brittle material (e.g.
glass, porcelain). This could lead to injuries in the event of an accident.
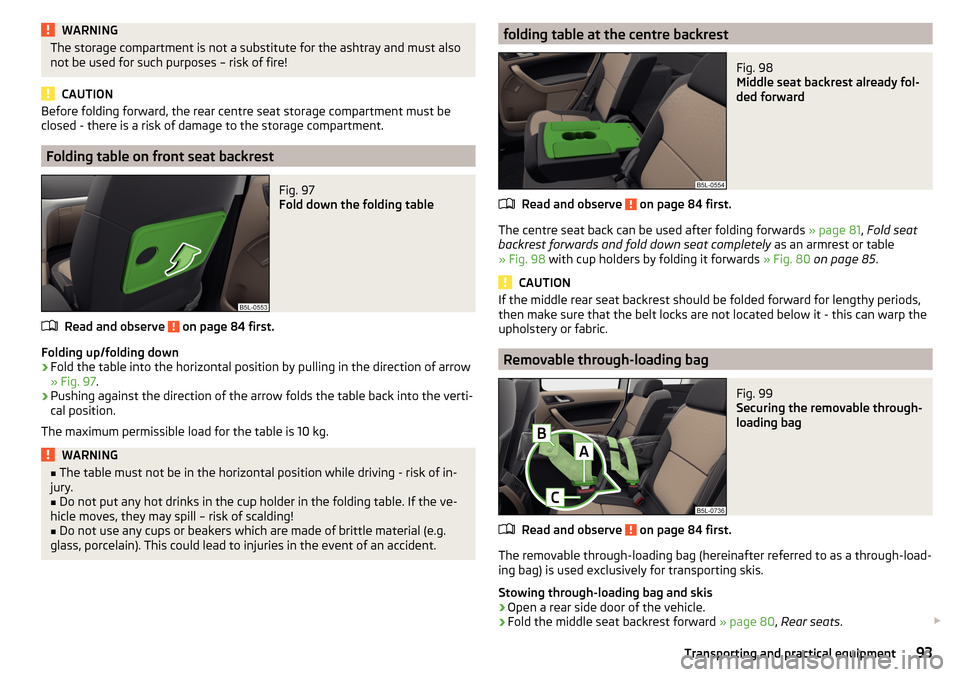
folding table at the centre backrestFig. 98
Middle seat backrest already fol-
ded forward
Read and observe on page 84 first.
The centre seat back can be used after folding forwards » page 81, Fold seat
backrest forwards and fold down seat completely as an armrest or table
» Fig. 98 with cup holders by folding it forwards » Fig. 80 on page 85 .
CAUTION
If the middle rear seat backrest should be folded forward for lengthy periods,
then make sure that the belt locks are not located below it - this can warp the
upholstery or fabric.
Removable through-loading bag
Fig. 99
Securing the removable through-
loading bag
Read and observe on page 84 first.
The removable through-loading bag (hereinafter referred to as a through-load-
ing bag) is used exclusively for transporting skis.
Stowing through-loading bag and skis
›
Open a rear side door of the vehicle.
›
Fold the middle seat backrest forward » page 80, Rear seats .
93Transporting and practical equipment