ECU SKODA YETI 2015 1.G / 5L Service Manual
[x] Cancel search | Manufacturer: SKODA, Model Year: 2015, Model line: YETI, Model: SKODA YETI 2015 1.G / 5LPages: 232, PDF Size: 30.84 MB
Page 185 of 232
Remove the wheel / fix186Follow-up tasks186
For your own safety and the safety of the passengers, the following instruc-
tions must be observed before changing a wheel on the road.
Switch on the hazard warning lights system.
Place the warning triangle at the prescribed distance.
Park the vehicle as far away as possible from flowing traffic.
Choose a location with a flat, solid surface.
Have all the occupants get out. The passengers should not stand on the
road (instead they should remain behind a crash barrier, for instance) while
the wheel is being changed.
Tyres with increased puncture resistance
Some vehicles may be fitted with tyres at the factory that have increased
puncture resistance (“SEAL” tyres).
These vehicles are delivered without a puncture repair kit, spare wheel and appropriate hand tools.
If tyres with increased puncture resistance are replaced with tyres that have
no increased puncture resistance, then the vehicle should be equipped with a
puncture repair kit, spare wheel and appropriate hand tools.
Preparation
Before changing the wheel, the following work must be carried out.
›
Switch off the engine.
›
For vehicles with manual transmission select 1st gear.
›
On vehicles with automatic transmission place the selector lever in the P po-
sition.
›
Firmly apply the handbrake.
›
Uncouple any trailers.
Removing/stowing the wheelFig. 180
Take out wheel
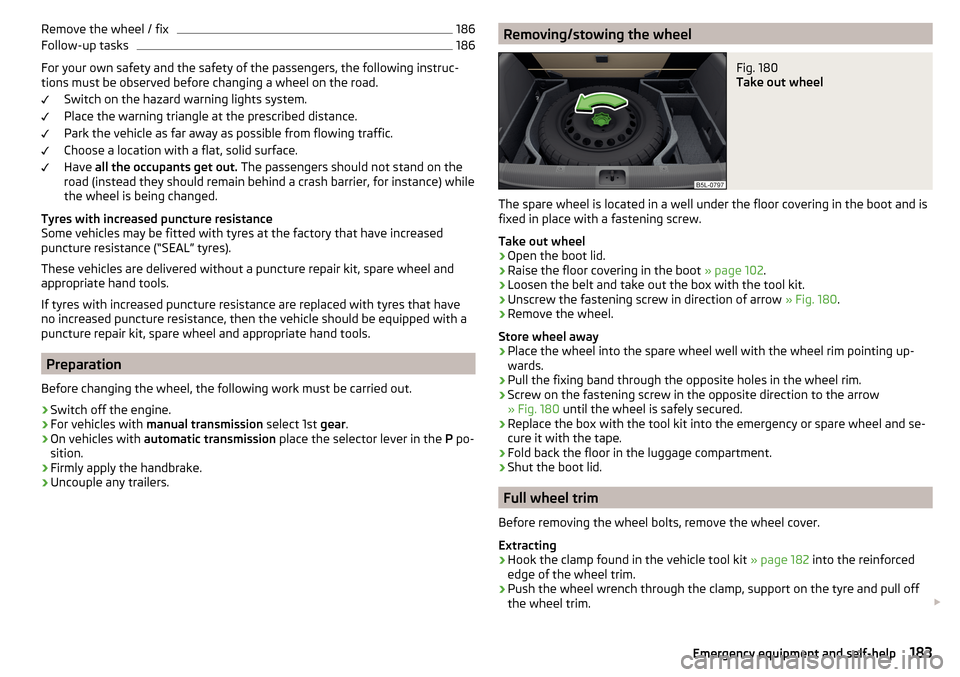
The spare wheel is located in a well under the floor covering in the boot and is
fixed in place with a fastening screw.
Take out wheel
›
Open the boot lid.
›
Raise the floor covering in the boot » page 102.
›
Loosen the belt and take out the box with the tool kit.
›
Unscrew the fastening screw in direction of arrow » Fig. 180.
›
Remove the wheel.
Store wheel away
›
Place the wheel into the spare wheel well with the wheel rim pointing up-
wards.
›
Pull the fixing band through the opposite holes in the wheel rim.
›
Screw on the fastening screw in the opposite direction to the arrow
» Fig. 180 until the wheel is safely secured.
›
Replace the box with the tool kit into the emergency or spare wheel and se-
cure it with the tape.
›
Fold back the floor in the luggage compartment.
›
Shut the boot lid.
Full wheel trim
Before removing the wheel bolts, remove the wheel cover.
Extracting
›
Hook the clamp found in the vehicle tool kit » page 182 into the reinforced
edge of the wheel trim.
›
Push the wheel wrench through the clamp, support on the tyre and pull off
the wheel trim.
183Emergency equipment and self-help
Page 188 of 232
WARNING■If the wheel has to be changed on a slope, first of all block the opposite
wheel with a stone or similar object to prevent the vehicle from unexpect-
edly rolling away.■
Secure the base plate of the lifting jack with suitable means to prevent
possible moving. A soft and slippery ground under the base plate may move
the lifting jack, causing the vehicle to fall down. It is therefore always nec-
essary to place the lifting jack on a solid surface or use a wide and stable
base. If the surface is smooth, such as on cobbled stones, tiled floor, etc.,
use a non-slip base (e.g. a rubber foot mat).
■
Only attach the lifting jack to the attachment points provided for this pur-
pose.
■
Always raise the vehicle with the doors closed.
■
Never position any body parts, such as arms or legs under the vehicle,
while the vehicle is raised with a lifting jack.
■
When the vehicle is raised, never start the engine.
CAUTION
It is important to ensure that the jack is correctly attached to the web of the
lower fork leg - risk of damage to the vehicle.
Remove the wheel / fix
When changing a wheel, the following instructions must be followed.
›
Remove the full wheel trim or the caps of the wheel bolts.
›
First of all slacken the anti-theft wheel bolt and then the other wheel bolts.
›
Jack up the vehicle until the wheel that needs changing is clear of the
ground.
›
Unscrew the wheel bolts and place them on a clean surface (cloth, paper,
etc.).
›
Remove the wheel carefully.
›
Attach the wheel and slightly screw on the wheel bolts.
›
Lower the vehicle.
›
Tighten the wheel bolts opposite each other using the wheel wrench (alter-
nating crosswise). Tighten the anti-theft wheel bolt last.
›
Replace the wheel trim or the caps.
When fitting unidirectional tyres, ensure that the direction of rotation is cor-
rect » page 178 .
All bolts must be clean and must turn easily.
If it is established when changing a wheel that the wheel bolts are corroded and difficult to move, then these must be replaced.
Under no circumstances grease or oil the wheel bolts.WARNINGUndo the wheel bolts only a little (about one turn) as long as the vehicle
has not yet been jacked up. Otherwise the wheel could become loose and
fall off.
Follow-up tasks
After changing the wheel, the following work must be carried out.
›
Stow the replaced wheel in the wheel well and secure it with a special nut.
›
Stow the tool kit in the space provided and secure using the band.
›
Check the tyre pressure on the fitted wheel as soon as possible.
›
Have the tightening torque of the wheel bolts checked with a torque wrench
as soon as possible.
After changing the wheel, the tyre pressure should be adjusted. In vehicles
with tyre pressure monitoring, save tyre pressure values » page 141.
Replace the damaged wheel or consult a specialist garage about repair op-
tions.
The prescribed tightening torque of the wheel bolts is 120 Nm.
WARNING■
If the wheel bolts are tightened to a too low tightening torque, the rim
can come loose when the car is moving. A tightening torque which is too
high can damage the bolts and threads and this can result in permanent
deformation of the contact surfaces on the rim.■
Drive cautiously and only at a moderate speed until the tightening torque
has been checked.
Puncture repair kit
Introduction
This chapter contains information on the following subjects:
Components of the puncture repair kits
187
General information
187
186Do-it-yourself
Page 197 of 232
›Insert a screwdriver or similar tool into the opening in the trim
» Fig. 197 as
far as the stop.›
Unlock the lid by moving it in the direction of the arrow.
›
Open the boot lid.
Selector lever-emergency unlocking
Fig. 198
Selector lever-emergency unlocking
›
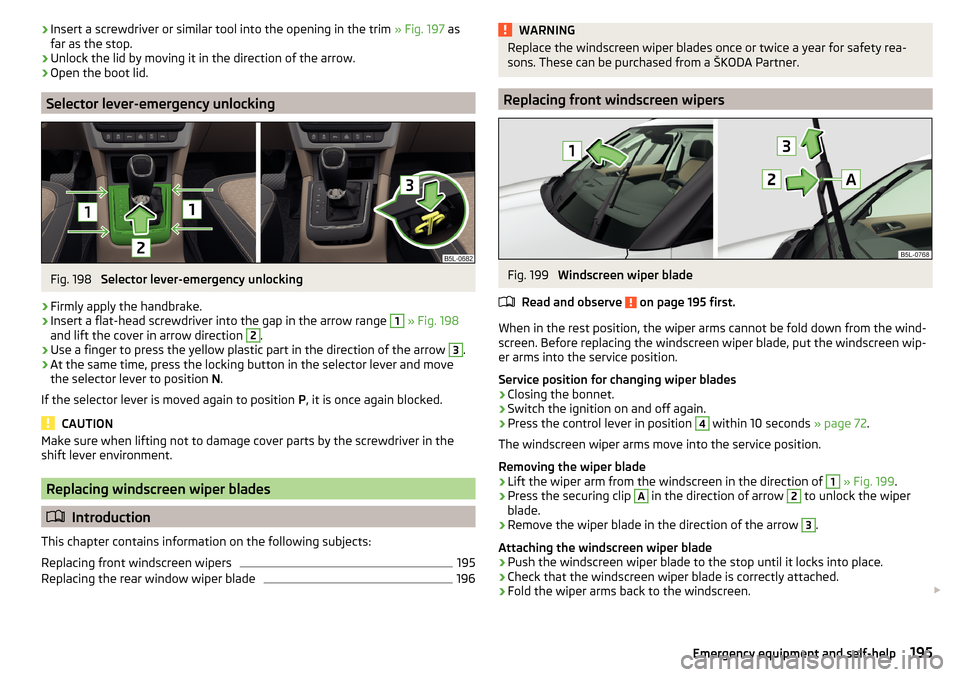
Firmly apply the handbrake.
›
Insert a flat-head screwdriver into the gap in the arrow range
1
» Fig. 198
and lift the cover in arrow direction
2
.
›
Use a finger to press the yellow plastic part in the direction of the arrow
3
.
›
At the same time, press the locking button in the selector lever and move
the selector lever to position N.
If the selector lever is moved again to position P, it is once again blocked.
CAUTION
Make sure when lifting not to damage cover parts by the screwdriver in the
shift lever environment.
Replacing windscreen wiper blades
Introduction
This chapter contains information on the following subjects:
Replacing front windscreen wipers
195
Replacing the rear window wiper blade
196WARNINGReplace the windscreen wiper blades once or twice a year for safety rea-
sons. These can be purchased from a ŠKODA Partner.
Replacing front windscreen wipers
Fig. 199
Windscreen wiper blade
Read and observe
on page 195 first.
When in the rest position, the wiper arms cannot be fold down from the wind-
screen. Before replacing the windscreen wiper blade, put the windscreen wip-
er arms into the service position.
Service position for changing wiper blades
›
Closing the bonnet.
›
Switch the ignition on and off again.
›
Press the control lever in position
4
within 10 seconds » page 72.
The windscreen wiper arms move into the service position.
Removing the wiper blade
›
Lift the wiper arm from the windscreen in the direction of
1
» Fig. 199 .
›
Press the securing clip
A
in the direction of arrow
2
to unlock the wiper
blade.
›
Remove the wiper blade in the direction of the arrow
3
.
Attaching the windscreen wiper blade
›
Push the windscreen wiper blade to the stop until it locks into place.
›
Check that the windscreen wiper blade is correctly attached.
›
Fold the wiper arms back to the windscreen.
195Emergency equipment and self-help
Page 198 of 232
The windscreen wiper arms move back into the rest position - after switching
on the ignition and changing the position of the window wiper lever or when
driving at a speed of more than 6°km/h.
CAUTION
If the windscreen wipers are handled carelessly, there is a risk of damage to
the windscreen.
Replacing the rear window wiper blade
Fig. 200
Rear window wiper blade
Read and observe
on page 195 first.
Removing the wiper blade
›
Lift the wiper arm from the windscreen in the direction of
1
» Fig. 200 .
›
Tilt the wiper blade to the stop in the same direction.
›
Hold the upper part of the wiper arm and press the securing mechanism
A
in the direction of arrow
2
.
›
Remove the wiper blade in the direction of the arrow
3
.
Attaching the windscreen wiper blade
›
Push the windscreen wiper blade to the stop until it locks into place.
›
Check that the windscreen wiper blade is correctly attached.
›
Fold the wiper arm back to the windscreen.
Fuses and light bulbs
Fuses
Introduction
This chapter contains information on the following subjects:
Fuses in the dash panel
197
Assignment of the fuses in the dash panel
197
Fuses in the engine compartment
198
Assignment of fuses in the engine compartment
198
Individual electrical circuits are protected by fuses.
Switch off the ignition and the corresponding power consuming device before
replacing a fuse.
Find out which fuse belongs to the component that is not operating
» page 197 , Fuses in the dash panel or » page 198 , Fuses in the engine com-
partment .
Colour coding of fuses
Fuse colourMaximum amperagelight brown5dark brown7.5red10blue15yellow20white25green30orange40red50WARNINGAlways read and observe the warnings before completing any work in the
engine compartment » page 165. 196Do-it-yourself
Page 200 of 232
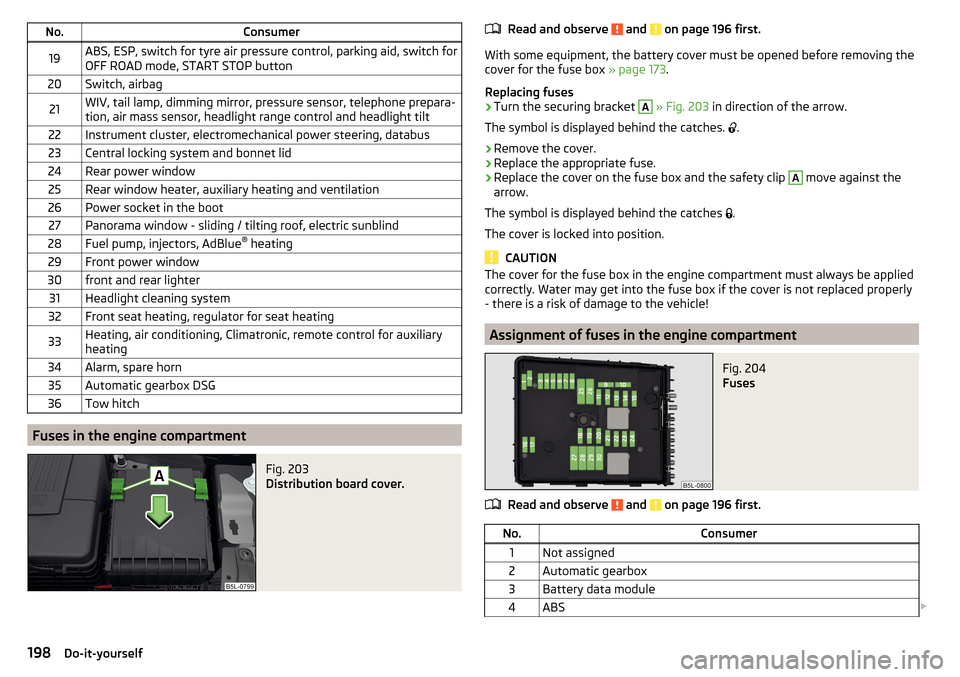
No.Consumer19ABS, ESP, switch for tyre air pressure control, parking aid, switch for
OFF ROAD mode, START STOP button20Switch, airbag21WIV, tail lamp, dimming mirror, pressure sensor, telephone prepara-
tion, air mass sensor, headlight range control and headlight tilt22Instrument cluster, electromechanical power steering, databus23Central locking system and bonnet lid24Rear power window25Rear window heater, auxiliary heating and ventilation26Power socket in the boot27Panorama window - sliding / tilting roof, electric sunblind28Fuel pump, injectors, AdBlue ®
heating29Front power window30front and rear lighter31Headlight cleaning system32Front seat heating, regulator for seat heating33Heating, air conditioning, Climatronic, remote control for auxiliary
heating34Alarm, spare horn35Automatic gearbox DSG36Tow hitch
Fuses in the engine compartment
Fig. 203
Distribution board cover.
Read and observe and on page 196 first.
With some equipment, the battery cover must be opened before removing the
cover for the fuse box » page 173.
Replacing fuses
›
Turn the securing bracket
A
» Fig. 203 in direction of the arrow.
The symbol is displayed behind the catches.
.
›
Remove the cover.
›
Replace the appropriate fuse.
›
Replace the cover on the fuse box and the safety clip
A
move against the
arrow.
The symbol is displayed behind the catches .
The cover is locked into position.
CAUTION
The cover for the fuse box in the engine compartment must always be applied
correctly. Water may get into the fuse box if the cover is not replaced properly
- there is a risk of damage to the vehicle!
Assignment of fuses in the engine compartment
Fig. 204
Fuses
Read and observe and on page 196 first.
No.Consumer1Not assigned2Automatic gearbox3Battery data module4ABS 198Do-it-yourself
Page 204 of 232
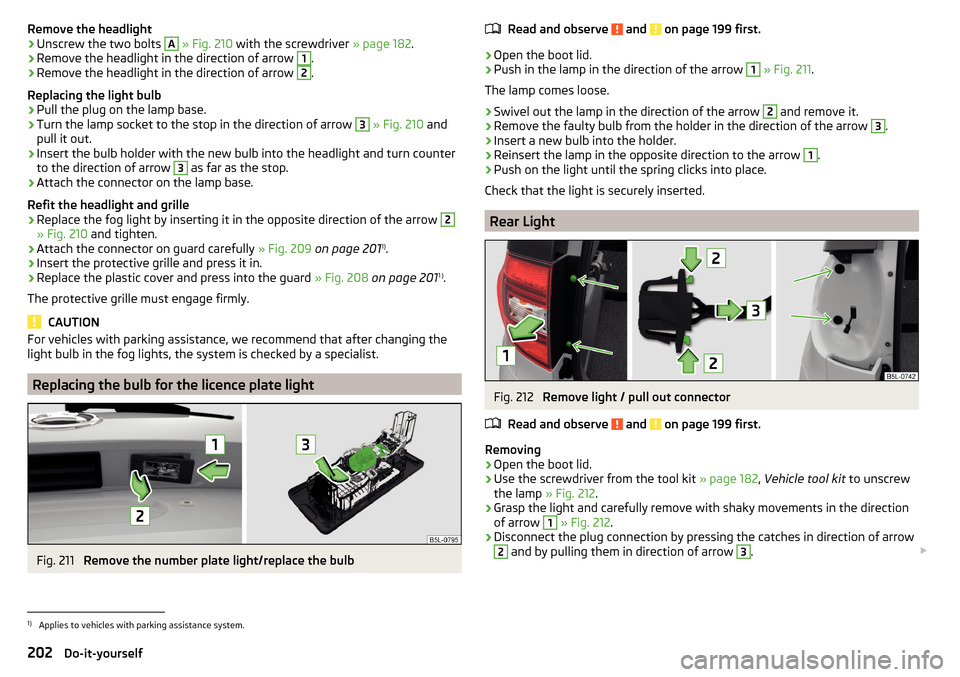
Remove the headlight›Unscrew the two bolts A » Fig. 210 with the screwdriver » page 182.›
Remove the headlight in the direction of arrow
1
.
›
Remove the headlight in the direction of arrow
2
.
Replacing the light bulb
›
Pull the plug on the lamp base.
›
Turn the lamp socket to the stop in the direction of arrow
3
» Fig. 210 and
pull it out.
›
Insert the bulb holder with the new bulb into the headlight and turn counter
to the direction of arrow
3
as far as the stop.
›
Attach the connector on the lamp base.
Refit the headlight and grille
›
Replace the fog light by inserting it in the opposite direction of the arrow
2
» Fig. 210 and tighten.
›
Attach the connector on guard carefully » Fig. 209 on page 201 1)
.
›
Insert the protective grille and press it in.
›
Replace the plastic cover and press into the guard » Fig. 208 on page 201 1 )
.
The protective grille must engage firmly.
CAUTION
For vehicles with parking assistance, we recommend that after changing the
light bulb in the fog lights, the system is checked by a specialist.
Replacing the bulb for the licence plate light
Fig. 211
Remove the number plate light/replace the bulb
Read and observe and on page 199 first.›
Open the boot lid.
›
Push in the lamp in the direction of the arrow
1
» Fig. 211 .
The lamp comes loose.
›
Swivel out the lamp in the direction of the arrow
2
and remove it.
›
Remove the faulty bulb from the holder in the direction of the arrow
3
.
›
Insert a new bulb into the holder.
›
Reinsert the lamp in the opposite direction to the arrow
1
.
›
Push on the light until the spring clicks into place.
Check that the light is securely inserted.
Rear Light
Fig. 212
Remove light / pull out connector
Read and observe
and on page 199 first.
Removing
›
Open the boot lid.
›
Use the screwdriver from the tool kit » page 182, Vehicle tool kit to unscrew
the lamp » Fig. 212.
›
Grasp the light and carefully remove with shaky movements in the direction
of arrow
1
» Fig. 212 .
›
Disconnect the plug connection by pressing the catches in direction of arrow
2
and by pulling them in direction of arrow
3
.
1)
Applies to vehicles with parking assistance system.
202Do-it-yourself
Page 205 of 232
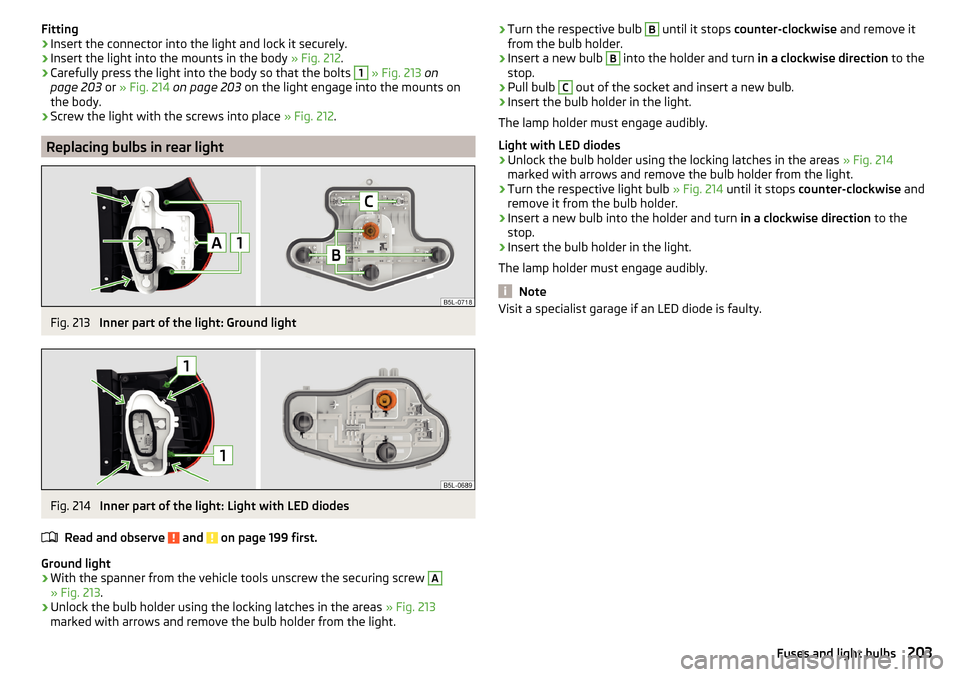
Fitting›Insert the connector into the light and lock it securely.›
Insert the light into the mounts in the body » Fig. 212.
›
Carefully press the light into the body so that the bolts
1
» Fig. 213 on
page 203 or » Fig. 214 on page 203 on the light engage into the mounts on
the body.
›
Screw the light with the screws into place » Fig. 212.
Replacing bulbs in rear light
Fig. 213
Inner part of the light: Ground light
Fig. 214
Inner part of the light: Light with LED diodes
Read and observe
and on page 199 first.
Ground light
›
With the spanner from the vehicle tools unscrew the securing screw
A
» Fig. 213 .
›
Unlock the bulb holder using the locking latches in the areas » Fig. 213
marked with arrows and remove the bulb holder from the light.
› Turn the respective bulb B until it stops
counter-clockwise and remove it
from the bulb holder.›
Insert a new bulb
B
into the holder and turn in a clockwise direction to the
stop.
›
Pull bulb
C
out of the socket and insert a new bulb.
›
Insert the bulb holder in the light.
The lamp holder must engage audibly.
Light with LED diodes
›
Unlock the bulb holder using the locking latches in the areas » Fig. 214
marked with arrows and remove the bulb holder from the light.
›
Turn the respective light bulb » Fig. 214 until it stops counter-clockwise and
remove it from the bulb holder.
›
Insert a new bulb into the holder and turn in a clockwise direction to the
stop.
›
Insert the bulb holder in the light.
The lamp holder must engage audibly.
Note
Visit a specialist garage if an LED diode is faulty.203Fuses and light bulbs
Page 222 of 232
rear seatsin the longitudinal direction81
Rear seats80
Fold back82
fold down seat back81
Fold down seat fully81
Removing seats82
Setting outer seat in the transverse direction82
Rear View Camera133
Function keys134
Operation134
Orientation Lines134
Rear view mirror Interior mirror
73
Rear window - heater70
Refuelling160
Fuel160
Remote control Locking
53
Replacing the battery193
Synchronisation process193
Unlocking53
Remote control key Replacing the battery
193
Removable light Removing light
101
replace batteries of the lights193
Removable through-loading bag93
Removing the variable loading floor
102
Repairs and technical alterations149
Replace Bulb for dipped beam (Halogen headlamp)
200
Bulb for main beam (Halogen headlamp)200
the battery in the auxiliary heating (auxiliary heating) in the remote control
193
replace - batteries of the lights193
Replacing bulb for fog lights
201
Bulb for the licence plate light202
Bulb in rear light203
Bulbs199
Fuses196
Fuses in the dash panel197
Fuses in the engine compartment198
Vehicle battery175
windscreen wiper blades195
Replacing windscreen wiper blades195
Replenishing Coolant
171
Engine oil169
Windscreen washer fluid167
Reversing camera Lens care
156
Revolutions counter29
Roof Load
104
Roof rack103
Roof load104
Rubber seals155
Running-in Brake linings
124
Engine124
Tyres124
S
SAFE See Safe securing system
54
SAFELOCK See Safe securing system
54
Safe securing system54
Safety8
Child safety21
Child safety seats21
Correct seated position8
Head restraints79
ISOFIX23
TOP TETHER25
Safety belts rear middle seat
13
Save electrical energy125
Save fuel125
Seals Vehicle care
155
Seat Front seat adjustment
75
Seat belt height adjustment
12
warning light33
Seat belts11
Belt tensioners14
fastening and unfastening13
Seatbelts Inertia reels
14
Seat belts The physical principle of a head-on collision
12
Seat electrical adjustment76
Seat functions78
Seats Electrical adjustment
76
Folding front passenger seat79
Front armrest78
Head restraints79
Heating78
Manual adjustment76
Memory Function of the electrically adjustable seat
76
Storing in memory of remote control key77
Seats and head restraint75
Securing the variable load floor in the raised position
103
Selector lever Refer to Selector lever
122
Selector lever lock (automatic gearbox) Warning light
39
Service150
Service interval display48
Setting Seat belt height
12
220Index