light SMART FORTWO 2016 Owner's Manual
[x] Cancel search | Manufacturer: SMART, Model Year: 2016, Model line: FORTWO, Model: SMART FORTWO 2016Pages: 214, PDF Size: 4.93 MB
Page 45 of 214
heat or cold, there is a risk of injury, pos-
sibly even fatal. Never leave children
unattended in the vehicle.
GWARNING
If the child restraint system is subjected to
direct sunlight, parts may get very hot.
Children may burn themselves on these
parts, particularly on the metal parts of the
child restraint system. There is a risk of
injury.
If you leave the vehicle, taking the child
with you, always ensure that the child
restraint system is not exposed to direct
sunlight. Protect it with a blanket, for
example. If the child restraint system has
been exposed to direct sunlight, let it cool
down before securing the child in it. Never
leave children unattended in the vehicle.
Always ensure that all vehicle occupants have
their seat belts fastened correctly and are
sitting properly. Particular attention must
be paid to children.
Read and follow the safety notes on the seat
belt (
Ypage 31) and the notes on correct use of
the seat belts (Ypage 32).
A booster seat may be necessary to achieve
proper seat belt positioning for children
over 41 lbs (18 kg) until they reach a height
where a lap/shoulder belt fits properly with-
out a booster seat.
Special seat belt retractor
GWARNING
If the seat belt is released while driving,
the child restraint system will no longer be
secured properly. The special seat belt
retractor is disabled and the inertia real
draws in a portion of the seat belt. The seat belt cannot be immediately refastened.
There is an increased risk of injury, pos-
sibly even fatal.
Stop the vehicle immediately, paying
attention to road and traffic conditions.
Reactivate the special seat belt retractor
and secure the child restraint system prop-erly.
The seat belt on the front-passenger side is
equipped with a special seat belt retractor.
When activated, the special seat belt retrac-
tor ensures that the seat belt will not slacken once the child restraint system has been
secured.
Installing a child restraint system:
XAlways comply with the child restraint sys-
tem manufacturer's installation instruc-
tions.
XPull the seat belt smoothly from the belt
loop.
XEngage the seat belt tongue in the belt
buckle.
Activating the special seat belt retractor:
XPull the seat belt out fully and let the seat
belt retractor retract it again.
While the seat belt is retracting, you
should hear a ratcheting sound. The special seat belt retractor is activated.
XPress the child restraint system down so
that the seat belt fits tightly and does not
slacken.
Removing a child restraint system and deac-
tivating the special seat belt retractor:
XAlways comply with the child restraint sys-
tem manufacturer's installation instruc-
tions.
XPress the seat belt buckle release button,
hold the belt tongue firmly and guide it
back towards the belt outlet.
The special seat belt retractor is deacti-
vated.
Child restraint system
The use of seat belts and child restraint sys- tems is required by law in:
Rall 50 states
Rthe U.S. territories
Rthe District of Columbia
Rall Canadian provinces
You can obtain further information about the correct child restraint system from any
authorized Mercedes-Benz Center.
Children in the vehicle43
>> Safety.
Z
Page 49 of 214
Switching off the alarm
XTo switch off the alarm:press the0036
button on the key.
The alarm is switched off.
or
XSwitch on the ignition.
The alarm is switched off.
The alarm is not switched off, even if you
close the open door that triggered it, for
example.
Driving safety systems
Overview of driving safety systems
In this section, you will find information
about the following driving safety systems:
RABS (Anti-lock BrakingSystem)
(Ypage 47)
RDistance warning function (Ypage 48)
Resp®(Electronic StabilityProgram)
(Ypage 49)
REBD (Electronic Brake forceDistribution)
(Ypage 50)
Important safety notes
If you fail to adapt your driving style or
become distracted, the driving safety sys-
tems can neither reduce the risk of accident
nor override the laws of physics. Driving
safety systems are merely aids designed to
assist driving. You are responsible for the
distance to the vehicle in front, for vehicle
speed and for braking in good time. Always
adapt your driving style to suit the prevail-
ing road, weather and traffic conditions and
maintain a safe distance from the vehicle in
front. Drive carefully.
The driving safety systems described only
work as effectively as possible when there is
adequate contact between the tires and the
road surface. Please pay special attention to
the notes on tires, recommended minimum
tire tread depths, etc. (
Ypage 177).
In wintry driving conditions, always use win-
ter tires (M+S tires) and if necessary, snow
chains. Only in this way will the driving
safety systems described in this section work
as effectively as possible. For safety reasons, smart recommends that you
only use snow chains that have been specially
approved for your vehicle by smart, or fine-
link snow chains that are of a corresponding
standard of quality. For more information,
please contact a qualified specialist work-
shop.
ABS (Anti-lock Braking System)
General information
ABS regulates brake pressure in such a way
that the wheels do not lock when you brake.
This allows you to continue steering the vehi-
cle when braking.
The 0025 (Canada only) or 00DF(USA only) abs
warning lamp in the instrument cluster lights up when the ignition is switched on. It goes
out when the engine is running.
Important safety notes
iObserve the "Important safety notes" sec-
tion for driving safety systems (Ypage 47).
When ABS is malfunctioning, other systems,
including driving safety systems, will also
become inoperative. Observe the information
on the ABS warning lamp (
Ypage 132) and
display messages which may be shown in the
instrument cluster (
Ypage 121).
GWARNING
If ABS is faulty, the wheels could lock when
braking. The steerability and braking
characteristics may be severely impaired.
Additionally, further driving safety sys-
tems are deactivated. There is an increased
danger of skidding and accidents.
Drive on carefully. Have ABS checked imme-
diately at a qualified specialist workshop.
abs works from a speed of about 4 mph (6 km/h),
regardless of road-surface conditions. ABS
works on slippery surfaces, even if you only
brake gently.
Driving safety systems47
>> Safety.
Z
Page 51 of 214
XTo switch off:press button0044.
Indicator lamp 0043lights up.
XTo switch on: press button0044.
Indicator lamp 0043goes out.
Starting at a speed of around 4 mph (7 km/h),
the distance warning function warns you if
you rapidly approach a vehicle in front. An
intermittent warning tone will then sound
and the 00BAdistance warning lamp will
light up in the instrument cluster.
XBrake immediately in order to increase the distance from the vehicle in front.
or
XTake evasive action, provided it is safe to
do so.
Due to the nature of the system, particularly
complicated but non-critical driving condi-
tions may also cause the system to display a
warning.
With the help of the radar sensor system, the
distance warning function can detect obsta-
cles that are in the path of your vehicle for an
extended period of time.
Up to a speed of around 45 mph (70 km/h), the
distance warning function can also react to
stationary obstacles, such as stopped or
parked vehicles.
ESP®(Electronic Stability Program)
General notes
iObserve the "Important safety notes" sec-
tion (Ypage 47).
esp
®monitors driving stability and traction,
i.e. power transmission between the tires and the road surface.
If esp
®detects that the vehicle is deviating
from the direction desired by the driver, one
or more wheels are braked to stabilize the
vehicle. The engine output is also modified
to keep the vehicle on the desired course
within physical limits. esp
®assists the
driver when pulling away on wet or slippery
roads. esp
®can also stabilize the vehicle
during braking.
ETS (Electronic Traction System)
iObserve the "Important safety notes" sec-
tion (Ypage 47).
ETS traction control is part of esp
®.
ETS brakes the drive wheels individually if
they spin. This enables you to pull away and
accelerate on slippery surfaces, for example if the road surface is slippery on one side. In
addition, more drive torque is transferred to
the wheel with traction.
Important safety notes
GWARNING
If ESP
®is malfunctioning, ESP®is unable to
stabilize the vehicle. Additionally, fur-
ther driving safety systems are deactiva-
ted. This increases the risk of skidding and
an accident.
Drive on carefully. Have ESP
®checked at a
qualified specialist workshop.
!If you test the parking brake using a brake
dynamometer, switch the ignition off.
Application of the brakes by ESP
®may oth-
erwise destroy the brake system.
When towing the vehicle with the rear axle
raised, observe the notes on esp
®
(Ypage 171).
If the 00E5esp®warning lamp lights up per-
manently, esp®or hill start assist are
unavailable due to a malfunction.
Observe the information on warning lamps
(
Ypage 134) and display messages which may
be shown in the instrument cluster
(
Ypage 121).
iOnly use wheels with the recommended
tire sizes. Only then will esp®function
properly.
Characteristics of ESP®
General information
If the 00E5esp®warning lamp goes out before
the journey begins, esp®is automatically
active.
If esp
®intervenes, the 00E5esp®warning
lamp flashes in the instrument cluster.
Driving safety systems49
>> Safety.
Z
Page 55 of 214
Problems with the SmartKey
ProblemPossible causes/consequences and0050Solutions
You cannot lock or
unlock the vehicle
using the SmartKey.The SmartKey battery is discharged or nearly discharged.
XTry again to lock/unlock the vehicle using the remote control
function of the SmartKey. Do this by pressing the 0036or0037
button in the immediate vicinity of the vehicle.
If this does not work:
XChange the key battery if necessary (Ypage 52).
XUnlock the vehicle with the key in the emergency lock
(Ypage 55) or lock the vehicle with the emergency locking
(Ypage 55).
There is interference from a powerful source of radio waves.
XTry again to lock/unlock the vehicle using the remote control
function of the SmartKey. Do this by pressing the 0036or0037
button in the immediate vicinity of the vehicle.
The SmartKey is faulty.
XUnlock the vehicle with the key in the emergency lock
(Ypage 55) or lock the vehicle with the emergency locking
(Ypage 55).
XHave the SmartKey checked at a qualified specialist workshop.
You have lost a Smart-
Key.XHave the SmartKey deactivated at a qualified specialist work-
shop.
XReport the loss immediately to the vehicle insurers.
XIf necessary, have the locks changed as well.
The engine cannot be
started using the
SmartKey.the on-board voltage is too low.
XSwitch off non-essential consumers, e.g. seat heating or inte-
rior lighting, and try to start the engine again.
If this does not work:
XCheck the starter battery and charge it if necessary
(Ypage 164).
or
XJump-start the vehicle (Ypage 168).
or
XConsult a qualified specialist workshop.
The steering lock is mechanically blocked.
XRemove the SmartKey and reinsert it into the ignition lock.
When you turn the key, turn the steering wheel in both direc-
tions.
SmartKey53
>> Opening and closing.
Z
Page 56 of 214
Doors
Important safety notes
GWARNING
If children are left unsupervised in the
vehicle, they could:
Ropen the doors, thus endangering other
people or road users.
Rget out and disrupt traffic.
Roperate the vehicle's equipment.
Additionally, children could set the vehi-
cle in motion if, for example, they:
Rrelease the parking brake.
Rshift the automatic transmission out of
park position P or shift manual trans-
mission into neutral.
Rstart the engine.
There is a risk of an accident and injury.
When leaving the vehicle, always take the
SmartKey with you and lock the vehicle.
Never leave children or animals unattended
in the vehicle. Always keep the SmartKey
out of reach of children.
Preferably stow luggage or loads in the lug-
gage compartment. Observe the loading
guidelines (
Ypage 142).
Unlocking and opening doors from the
inside
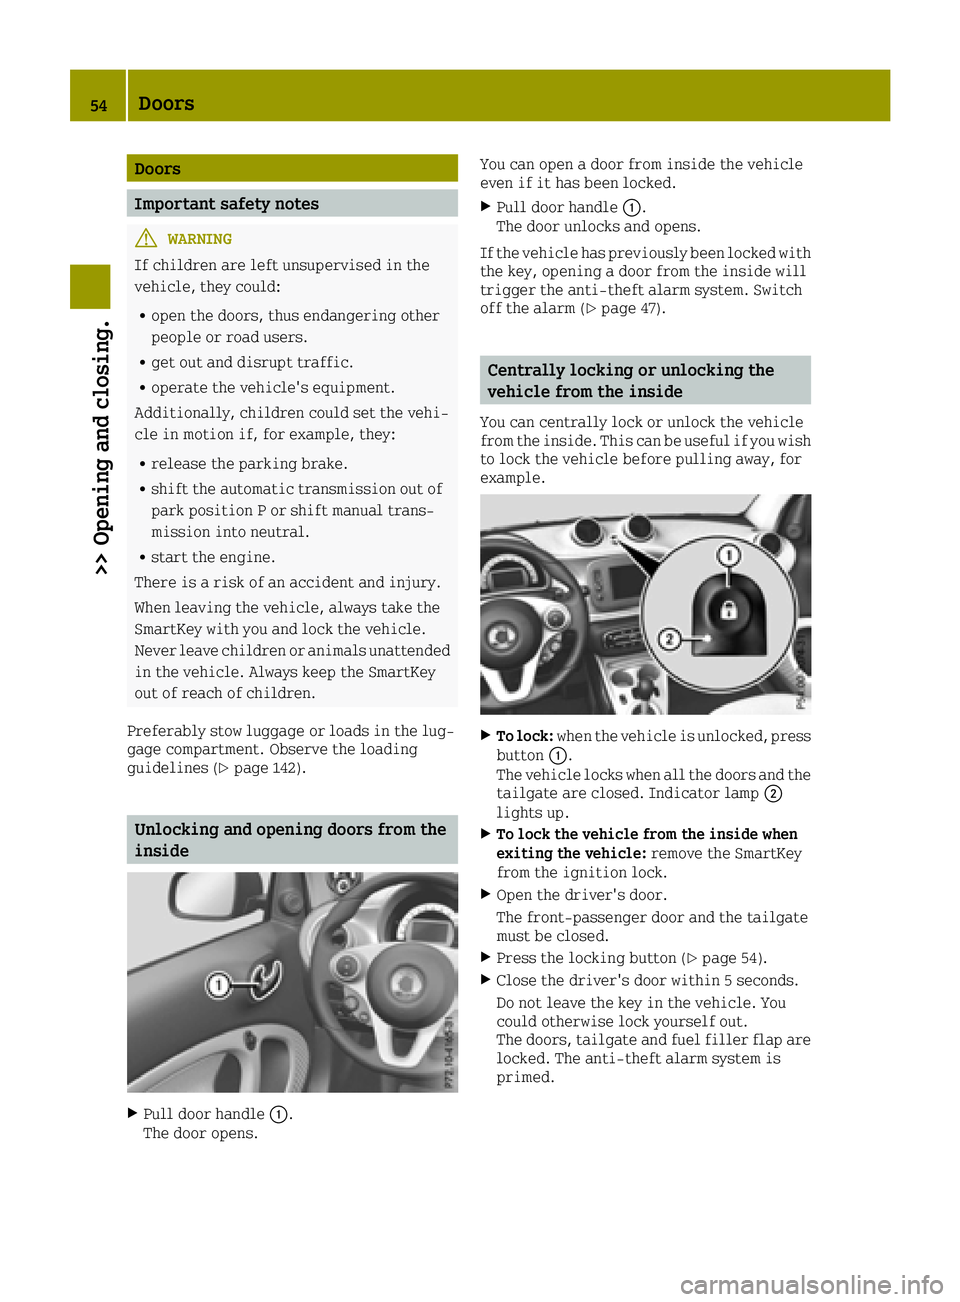
XPull door handle 0043.
The door opens. You can open a door from inside the vehicle
even if it has been locked.
XPull door handle
0043.
The door unlocks and opens.
If the vehicle has previously been locked with
the key, opening a door from the inside will
trigger the anti-theft alarm system. Switch
off the alarm (
Ypage 47).
Centrally locking or unlocking the
vehicle from the inside
You can centrally lock or unlock the vehicle
from the inside. This can be useful if you wish
to lock the vehicle before pulling away, for
example.
XTo lock: when the vehicle is unlocked, press
button 0043.
The vehicle locks when all the doors and the tailgate are closed. Indicator lamp 0044
lights up.
XTo lock the vehicle from the inside when
exiting the vehicle: remove the SmartKey
from the ignition lock.
XOpen the driver's door.
The front-passenger door and the tailgate
must be closed.
XPress the locking button (Ypage 54).
XClose the driver's door within 5 seconds.
Do not leave the key in the vehicle. You
could otherwise lock yourself out.
The doors, tailgate and fuel filler flap are
locked. The anti-theft alarm system is
primed.
54Doors
>> Opening and closing.
Page 59 of 214
Opening or closing
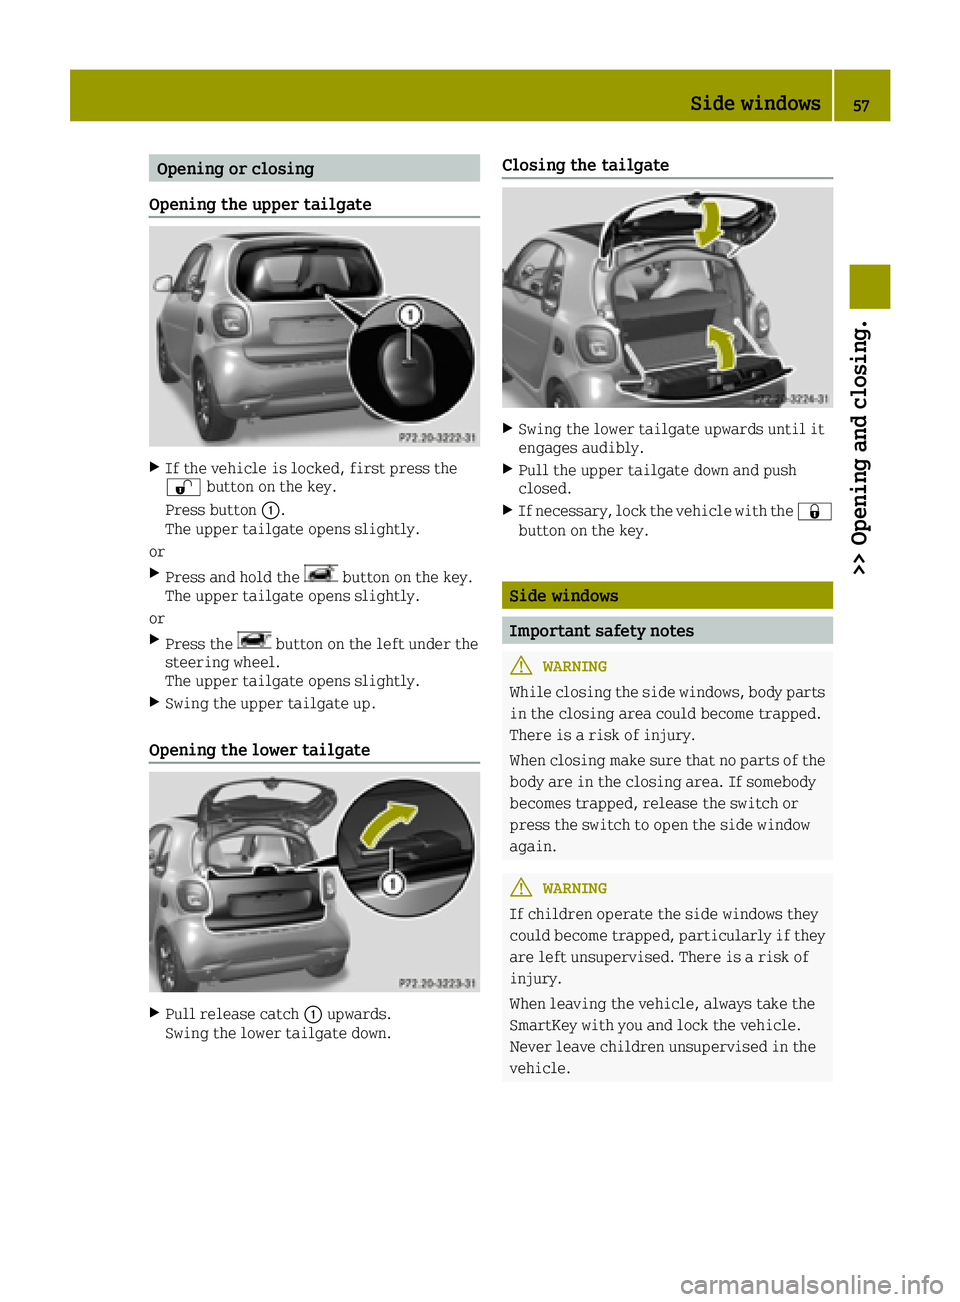
Opening the upper tailgate
XIf the vehicle is locked, first press the
0036 button on the key.
Press button 0043.
The upper tailgate opens slightly.
or
XPress and hold thebutton on the key.
The upper tailgate opens slightly.
or
XPress thebutton on the left under the
steering wheel.
The upper tailgate opens slightly.
XSwing the upper tailgate up.
Opening the lower tailgate
XPull release catch 0043upwards.
Swing the lower tailgate down.
Closing the tailgate
XSwing the lower tailgate upwards until it
engages audibly.
XPull the upper tailgate down and push
closed.
XIf necessary, lock the vehicle with the 0037
button on the key.
Side windows
Important safety notes
GWARNING
While closing the side windows, body parts in the closing area could become trapped.
There is a risk of injury.
When closing make sure that no parts of the
body are in the closing area. If somebody
becomes trapped, release the switch or
press the switch to open the side window
again.
GWARNING
If children operate the side windows they
could become trapped, particularly if they
are left unsupervised. There is a risk of
injury.
When leaving the vehicle, always take the
SmartKey with you and lock the vehicle.
Never leave children unsupervised in the
vehicle.
Side windows57
>> Opening and closing.
Z
Page 60 of 214
Side window reversing feature
In vehicles with the convenience feature, theside windows are equipped with an automatic
reversing feature. If a solid object blocks or
restricts a side window from traveling
upwards during the automatic closing proc-
ess, the side window opens again automati-
cally. During the manual closing process, the side window only opens again automatically
after the corresponding switch is released.
The automatic reversing feature is only an
aid and is no substitute for your attention
when closing a side window.
GWARNING
The reversing feature does not react:
Rto soft, light and thin objects, e.g. small
fingers
Rwhile resetting
This means that the reversing feature can-
not prevent someone being trapped in these
situations. There is a risk of injury.
Make sure that no body parts are in close
proximity during the closing procedure. If
someone becomes trapped, press the switch
to open the side window again.
GWARNING
If you close a side window again immedi-
ately after it has been blocked or reset, the
side window closes with increased or max-
imum force. The reversing feature is then
not active. Parts of the body could be trap-
ped in the closing area in the process. This
poses an increased risk of injury or even
fatal injury.
Make sure that no parts of the body are in
the closing area. To stop the closing proc- ess, release the switch or push the switch
again to reopen the side window.
Opening or closing the side windows
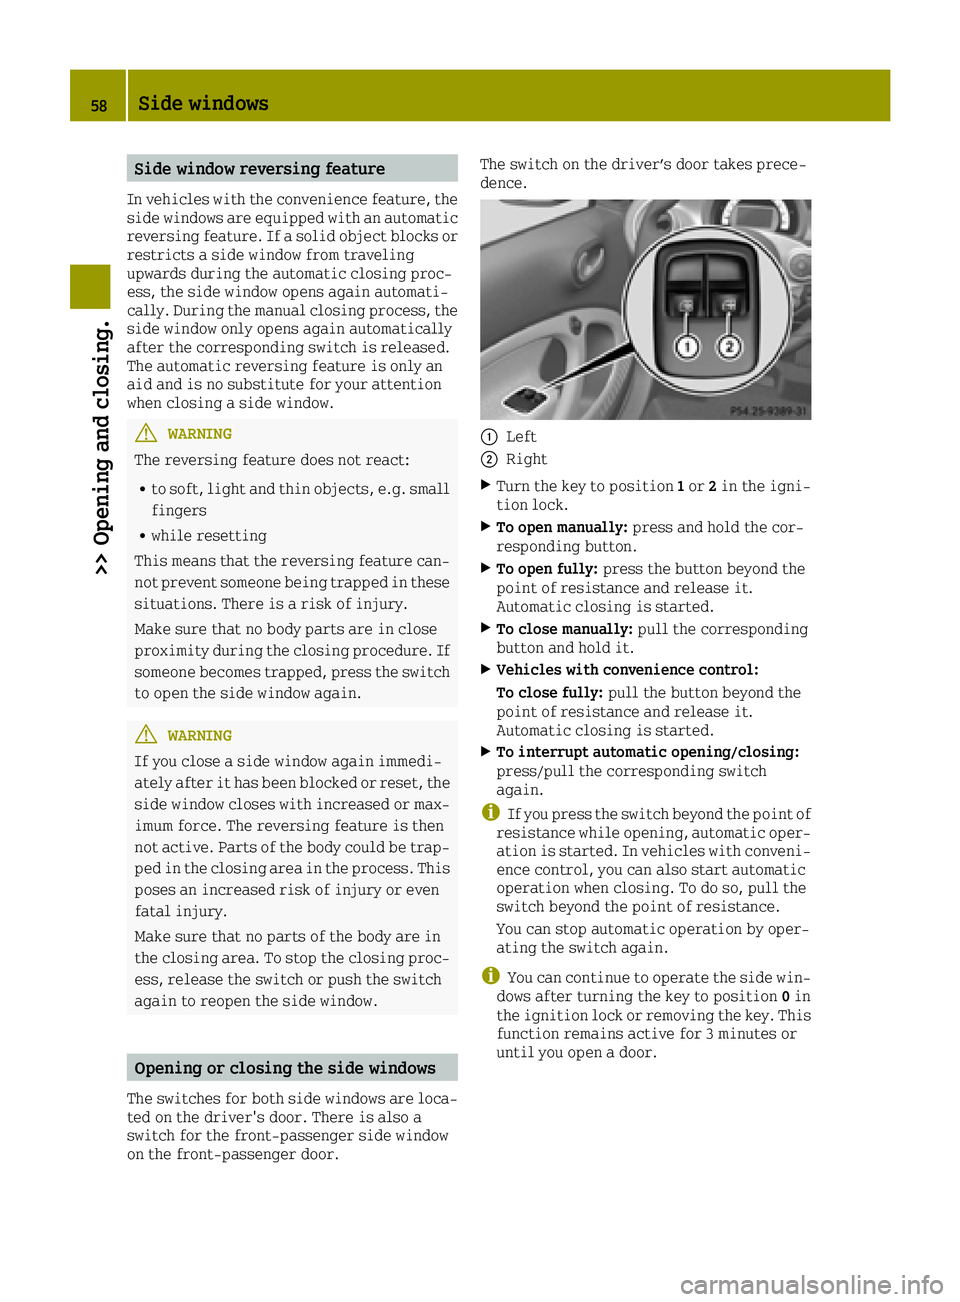
The switches for both side windows are loca-
ted on the driver's door. There is also a
switch for the front-passenger side window
on the front-passenger door. The switch on the driver’s door takes prece-
dence.
0043Left
0044Right
XTurn the key to position
1or 2in the igni-
tion lock.
XTo open manually: press and hold the cor-
responding button.
XTo open fully: press the button beyond the
point of resistance and release it.
Automatic closing is started.
XTo close manually: pull the corresponding
button and hold it.
XVehicles with convenience control:
To close fully: pull the button beyond the
point of resistance and release it.
Automatic closing is started.
XTo interrupt automatic opening/closing:
press/pull the corresponding switch
again.
iIf you press the switch beyond the point of
resistance while opening, automatic oper-
ation is started. In vehicles with conveni-
ence control, you can also start automatic
operation when closing. To do so, pull the
switch beyond the point of resistance.
You can stop automatic operation by oper-
ating the switch again.
iYou can continue to operate the side win-
dows after turning the key to position 0in
the ignition lock or removing the key. This
function remains active for 3 minutes or
until you open a door.
58Side windows
>> Opening and closing.
Page 61 of 214
Resetting the side windows
You must reset each side window if:
Rthe side window opens again slightly after
being closed fully.
Rthe side window can no longer be fully
opened or closed.
XClose all the doors.
XTurn the SmartKey to position2in the igni-
tion lock.
XPull the corresponding switch on the door
control panel until the side window is com- pletely closed (
Ypage 58).
XHold the switch for an additional second.
If the side window opens again slightly:
XImmediately pull the corresponding switch
on the door control panel until the side
window is completely closed (
Ypage 58).
XHold the switch for an additional second.
XIf the respective side window remains
closed after the button is released, then it
has been set correctly. If this is not the
case, repeat the steps above again.
Side windows59
>> Opening and closing.
Z
Page 62 of 214
Problems with the side windows
GWARNING
If you close a side window again immediately after it has been blocked or reset, the side
window closes with increased or maximum force. The reversing feature is then not active.
Parts of the body could be trapped in the closing area in the process. This poses an increased
risk of injury or even fatal injury.
Make sure that no parts of the body are in the closing area. To stop the closing process,
release the switch or push the switch again to reopen the side window.
ProblemPossible causes/consequences and 0050Solutions
A side window cannot be
closed because it is
blocked by objects, e.g.
leaves in the window
guide.XRemove the objects.
XClose the side window.
A side window cannot be
closed and you cannot
see the cause.If a side window is obstructed during closing and reopens again
slightly:
XImmediately after the window blocks, pull the corresponding
switch again until the side window has closed.
The side window is closed with increased force.
If a side window is obstructed again during closing and reopens
again slightly:
XImmediately after the window blocks, pull the corresponding
switch again until the side window has closed.
The side window is closed without the anti-entrapment feature.
Operating the roller sunblind for the
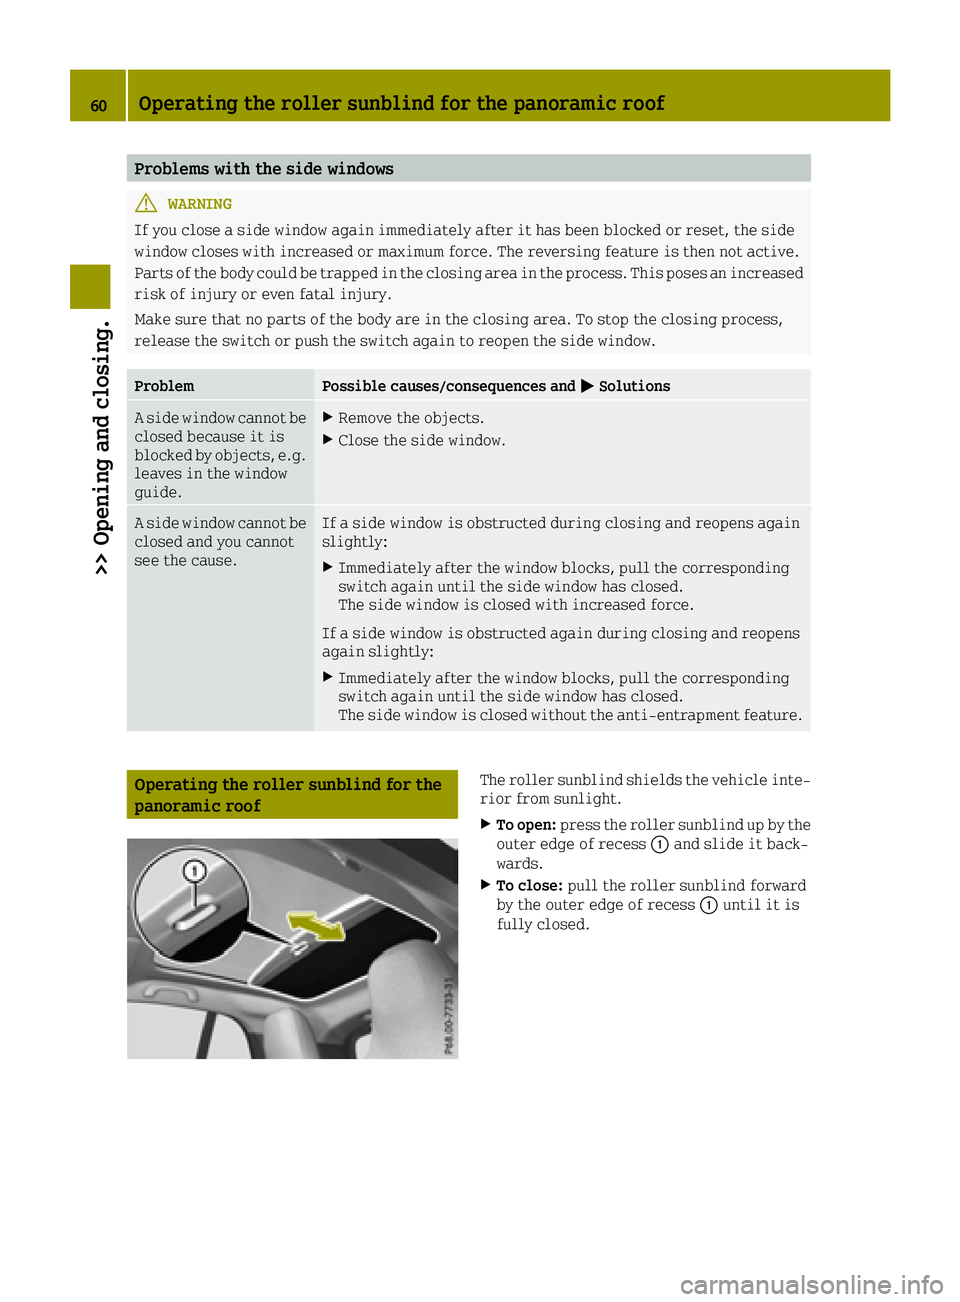
panoramic roofThe roller sunblind shields the vehicle inte-
rior from sunlight.
XTo open: press the roller sunblind up by the
outer edge of recess 0043and slide it back-
wards.
XTo close: pull the roller sunblind forward
by the outer edge of recess 0043until it is
fully closed.
60Operating the roller sunblind for the panoramic roof
>> Opening and closing.
Page 63 of 214
Useful information
i
This Operator's Manual describes all
models and all standard and optional
equipment of your vehicle available at the
time of publication of the Operator's Man- ual. Country-specific differences are pos-
sible. Bear in mind that your vehicle may
not feature all functions described here.
This also applies to safety-relevant sys-
tems and functions.
iRead the information on qualified spe-
cialist workshops: (Ypage 20).
Correcting the driver's seat position
GWARNING
You could lose control of your vehicle if you
do the following while driving:
Radjust the driver's seat, steering wheel
or mirrors
Rfasten the seat belt
There is a risk of an accident.
Adjust the driver's seat, steering wheel or
mirrors and fasten your seat belt before
starting the engine.
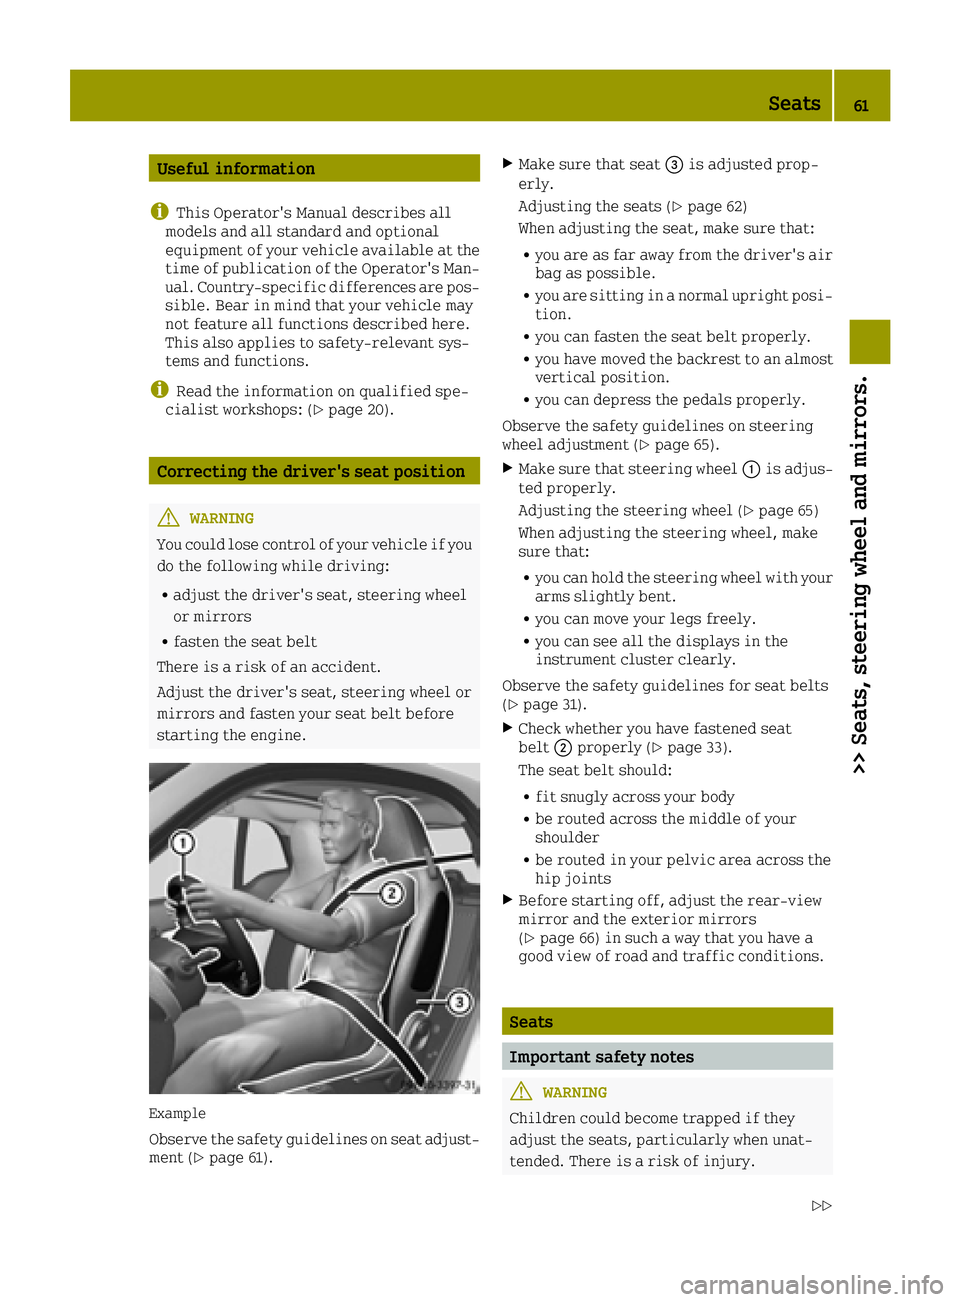
Example
Observe the safety guidelines on seat adjust-
ment (Ypage 61).
XMake sure that seat 0087is adjusted prop-
erly.
Adjusting the seats (
Ypage 62)
When adjusting the seat, make sure that:
Ryou are as far away from the driver's air
bag as possible.
Ryou are sitting in a normal upright posi-
tion.
Ryou can fasten the seat belt properly.
Ryou have moved the backrest to an almost
vertical position.
Ryou can depress the pedals properly.
Observe the safety guidelines on steering
wheel adjustment (
Ypage 65).
XMake sure that steering wheel 0043is adjus-
ted properly.
Adjusting the steering wheel (
Ypage 65)
When adjusting the steering wheel, make
sure that:
Ryou can hold the steering wheel with your
arms slightly bent.
Ryou can move your legs freely.
Ryou can see all the displays in the
instrument cluster clearly.
Observe the safety guidelines for seat belts
(
Ypage 31).
XCheck whether you have fastened seat
belt 0044properly (Ypage 33).
The seat belt should:
Rfit snugly across your body
Rbe routed across the middle of your
shoulder
Rbe routed in your pelvic area across the
hip joints
XBefore starting off, adjust the rear-view
mirror and the exterior mirrors
(
Ypage 66) in such a way that you have a
good view of road and traffic conditions.
Seats
Important safety notes
GWARNING
Children could become trapped if they
adjust the seats, particularly when unat-
tended. There is a risk of injury.
Seats61
>> Seats, steering wheel and mirrors.
Z