ESP SMART FORTWO COUPE 2010 Service Manual
[x] Cancel search | Manufacturer: SMART, Model Year: 2010, Model line: FORTWO COUPE, Model: SMART FORTWO COUPE 2010Pages: 216, PDF Size: 9.7 MB
Page 172 of 216
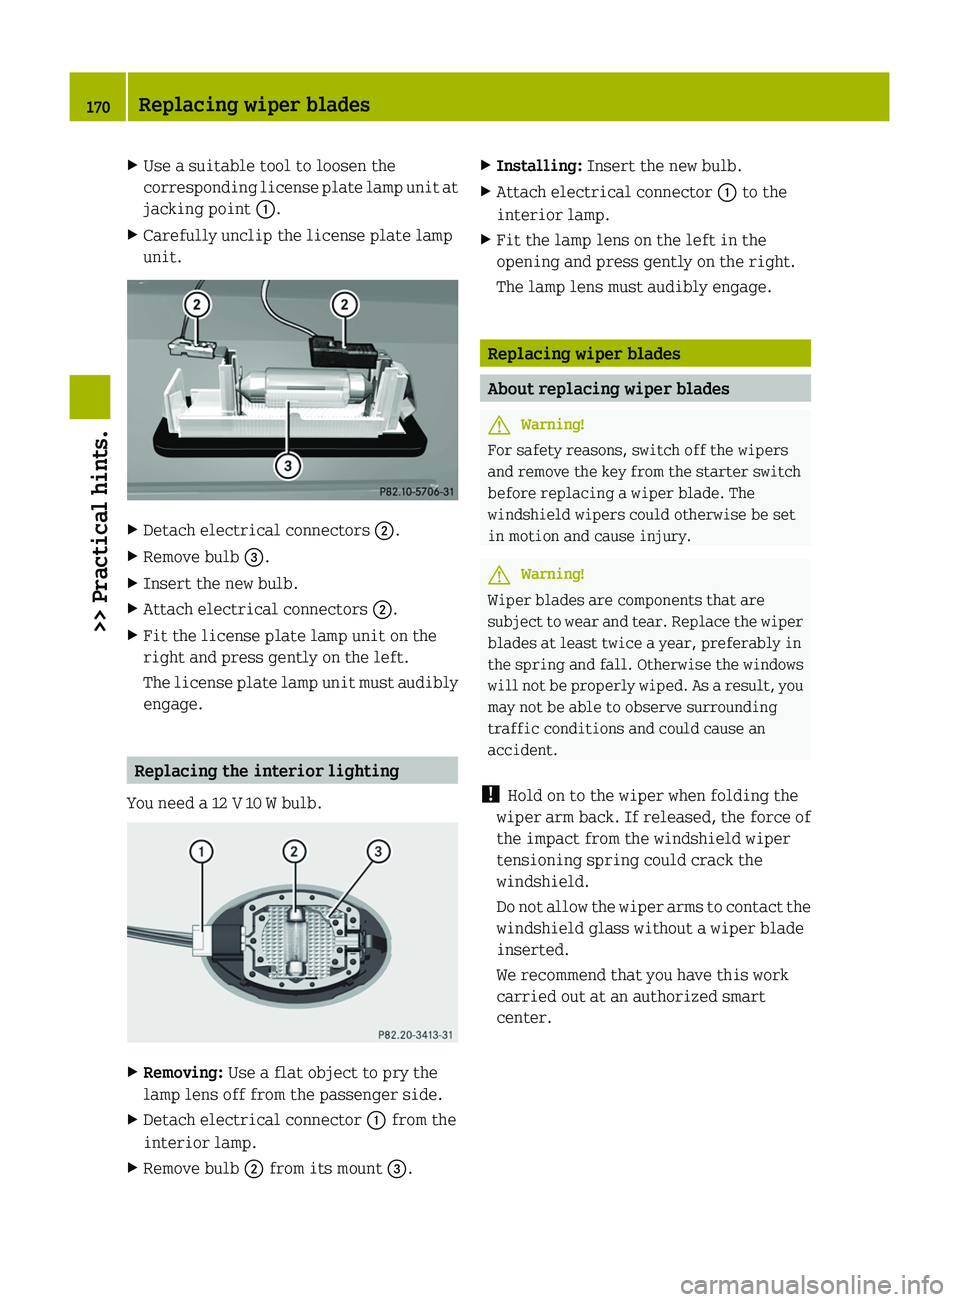
XUse a suitable tool to loosen the
corresponding license plate lamp unit at
jacking point 0046.XCarefully unclip the license plate lamp
unit.XDetach electrical connectors 0047.XRemove bulb 008A.XInsert the new bulb.XAttach electrical connectors 0047.XFit the license plate lamp unit on the
right and press gently on the left.
The license plate lamp unit must audibly
engage.
Replacing the interior lighting
You need a 12 V 10 W bulb.
XRemoving: Use a flat object to pry the
lamp lens off from the passenger side.XDetach electrical connector 0046 from the
interior lamp.XRemove bulb 0047 from its mount 008A.XInstalling: Insert the new bulb.XAttach electrical connector 0046 to the
interior lamp.XFit the lamp lens on the left in the
opening and press gently on the right.
The lamp lens must audibly engage.
Replacing wiper blades
About replacing wiper blades
GWarning!
For safety reasons, switch off the wipers
and remove the key from the starter switch
before replacing a wiper blade. The
windshield wipers could otherwise be set
in motion and cause injury.
GWarning!
Wiper blades are components that are
subject to wear and tear. Replace the wiper
blades at least twice a year, preferably in
the spring and fall. Otherwise the windows
will not be properly wiped. As a result, you
may not be able to observe surrounding
traffic conditions and could cause an
accident.
! Hold on to the wiper when folding the
wiper arm back. If released, the force of
the impact from the windshield wiper
tensioning spring could crack the
windshield.
Do not allow the wiper arms to contact the
windshield glass without a wiper blade
inserted.
We recommend that you have this work
carried out at an authorized smart
center.
170Replacing wiper blades>> Practical hints.
451_AKB; 3; 22, en-USd2ureepe,Version: 2.11.8.12009-07-27T09:36:34+02:00 - Seite 170
Page 175 of 216
The tire repair kit can be used to seal
punctures of up to approximately 0.16 in
(4 mm) on the tire tread.
The tire repair kit enables you to drive on
the sealed tire to the nearest authorized
smart center.XYou should have the sealed tire replaced
at an authorized smart center.GWarning!
Take care not to allow the contents of the
tire sealant to come in contact with hair,
eyes or clothing. The tire sealant is
harmful if inhaled, swallowed or absorbed
through the skin - causes skin, eye and
respiratory irritation. Wear gloves while
using this product if they are available.
Any contact with eyes or skin should be
flushed immediately with plenty of water.
If clothing comes in contact with the tire
sealant, change clothing as soon as
possible.
In case of allergic reaction or rash, consult
a physician immediately.
Notes
R Small tire punctures, particularly those
in the tread, can be sealed with the tire
sealant.
R The tire sealant can be used in ambient
temperatures from ‑4 ¦ (‑20 ¥) to
104 ¦ (+40 ¥).
R Do not remove any foreign objects such as
nails or screws that have penetrated the
tire.
R Do not use the tire sealant if the tire has
been damaged by being driven when
insufficiently inflated (e.g. bumps,
cuts, cracks etc. on the tire).
R Allow escaped tire sealant to dry, then
peel it off.
R Immediately wash all painted surfaces
that came into contact with the tire
sealant using a damp cloth.
R Avoid skin and eye contact with the tire
sealant.
R Do not swallow the tire sealant.
R Allow the tire sealant that is inside the
damaged tire to dry and dispose of
together with the tire.
R Do not use the tire sealant after the
expiration date has elapsed (see top of
container).
Instead, have it replaced at an
authorized smart center.GWarning!
The tire sealant is a limited repair device.
The tire sealant cannot be used for cuts or
punctures larger than approximately
0.16 in (4 mm) and tire damage caused by
driving with extremely low tire inflation
pressure, or on a flat tire, or a damaged
wheel.
Do not drive the vehicle under such
circumstances.
If you are unsure of the condition of the tire
or have any question whatsoever about its
suitability for driving contact the nearest
smart center for assistance or call
Roadside Assistance.
GWarning!
Please review the instructions below for
using the tire repair kit. If you are not
confident that you can competently follow
the instructions for using this kit, do not
use the kit, but instead call for Roadside
Assistance.
GWarning!
Keep the tire sealant out of reach of
children. If swallowed, rinse mouth
immediately with plenty of water and drink
plenty of water.
Do not induce vomiting!
Flat tire173>> Practical hints.451_AKB; 3; 22, en-USd2ureepe,Version: 2.11.8.12009-07-27T09:36:34+02:00 - Seite 173Z
Page 182 of 216

loose if they are not tightened to a torque
of 80 lb-ft (110 Nm).
Steel rim with wheel cover
XVehicles with wheel cover on steel rim:
Position wheel cover aperture 0046 so
valve 0047 fits through.XPush the wheel cover evenly onto the
wheel rim with both hands.XCheck that the wheel cover is fixed
securely to the wheel rim.
i The Tire Pressure Monitoring System
(TPMS)* only functions on wheels that are
equipped with the proper electronic
sensors ( Y page 117).
Battery
About the battery
Your vehicle’s battery is located in the
passenger footwell below the footrest
( Y page 182).
The battery should always be sufficiently
charged in order to achieve its rated
service life. Refer to Maintenance Booklet
for battery maintenance intervals.
If you use your vehicle mostly for short-
distance trips, you will need to have the
battery charge checked more frequently.
When replacing the battery, always use
batteries approved by smart.
Battery: 12 V and 42 Ah
If you do not intend to operate your vehicle
for an extended period of time, consult an
authorized smart center about steps you
need to observe.GWarning!
Observe all safety instructions and
precautions when handling automotive
batteries.
Risk of explosion.Fire, open flames and
smoking are prohibited
when handling batteries.
Avoid creating sparks.Battery acid is caustic.
Do not allow it to come
into contact with skin,
eyes or clothing.
Wear suitable protective
clothing, especially
gloves, apron and
faceguard.Wear eye protection.
Rinse any acid spills
immediately with clear
water. Contact a physician
if necessary.Keep children away.Follow the instructions in
this Operator’s Manual.
Batteries contain materials that can harm
the environment if disposed of improperly.
Recycling of batteries is the preferred
method of disposal. Many states require
sellers of batteries to accept old batteries
for recycling.
180Battery>> Practical hints.* optional451_AKB; 3; 22, en-USd2ureepe,Version: 2.11.8.12009-07-27T09:36:34+02:00 - Seite 180
Page 188 of 216
GWarning!
With the engine not running, there is no
power assistance for the brake and
steering* systems. In this case, it is
important to keep in mind that a
considerably higher degree of effort is
necessary to brake and steer the vehicle.
Adapt your driving accordingly.
! Do not tow the vehicle with the front
axle raised. Doing so may cause serious
damage to the brake system which is not
covered by the smart Limited Warranty.
! Before towing the vehicle observe the
following instructions:
R Do not tow with sling-type equipment
attached to suspension parts. This may
cause damage to the radiator and other
supports if towing on a bumpy road.
R Towing the vehicle should only be done
using the properly installed towing
eye bolt. Never attach a tow cable, tow
rope, or tow rod to the vehicle chassis,
frame, or suspension parts.
! Make sure the ignition is switched off
while towing the vehicle. Doing
otherwise may result in
R the ESP ®
being activated. Active
braking action through the ESP ®
may
seriously damage the brake system
which is not covered by the smart
Limited Warranty.
R a discharged battery.
! Make sure the gear selector lever is in
neutral position N while towing the
vehicle. Doing otherwise may result in
significant transmission damage.
! Towing the vehicle with a luggage
rack* mounted is not permissible. The
vehicle must not be towed by the luggage
rack*.
i If the battery is disconnected or
discharged, the gear selector lever will
remain locked in park position P.
Contact an authorized smart center for
assistance or call Roadside Assistance.
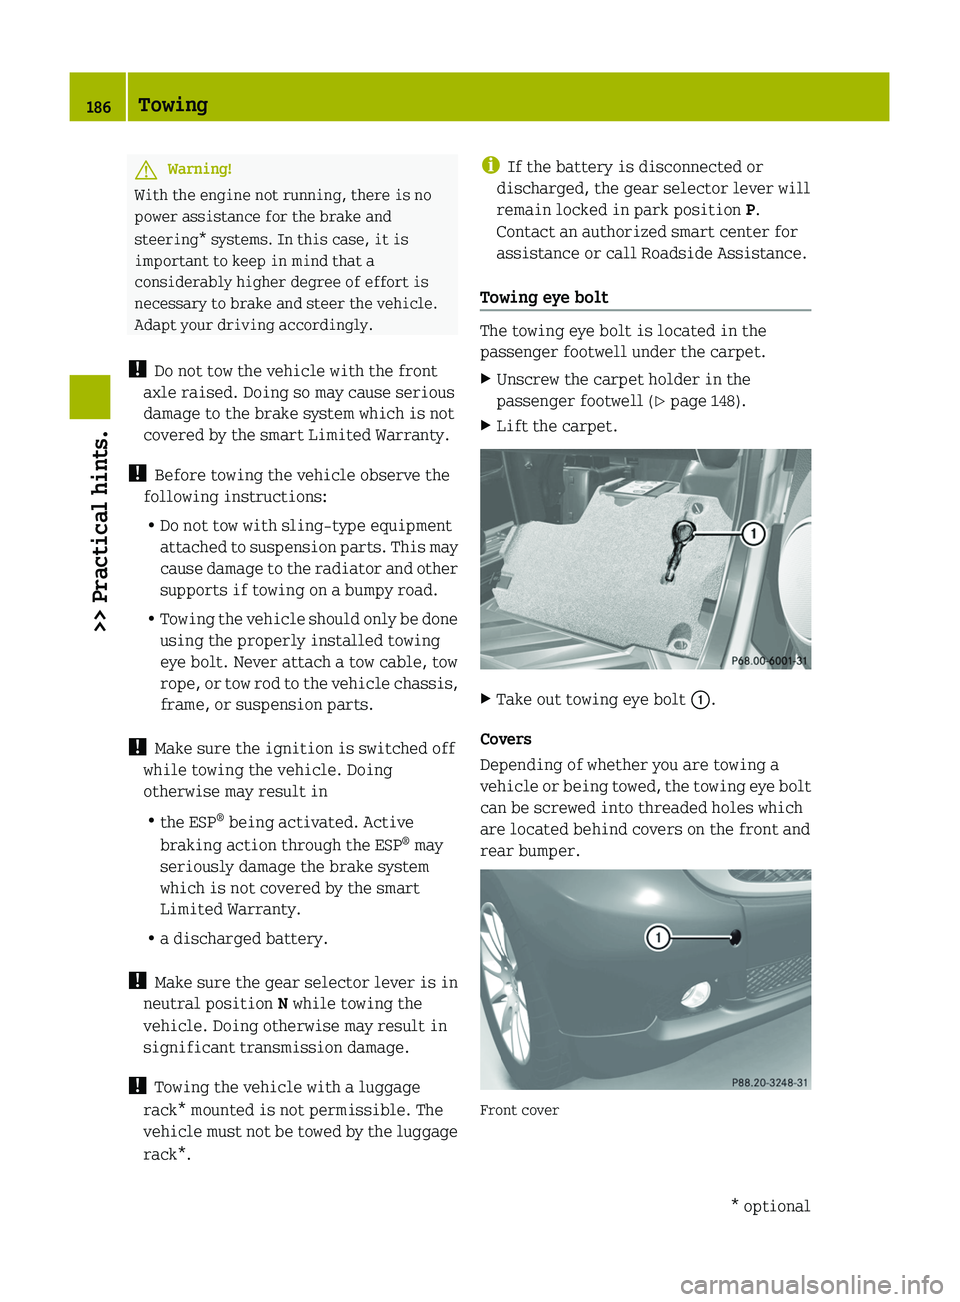
Towing eye bolt
The towing eye bolt is located in the
passenger footwell under the carpet.
XUnscrew the carpet holder in the
passenger footwell ( Y page 148).XLift the carpet.XTake out towing eye bolt 0046.
Covers
Depending of whether you are towing a
vehicle or being towed, the towing eye bolt
can be screwed into threaded holes which
are located behind covers on the front and
rear bumper.
Front cover
186Towing>> Practical hints.* optional451_AKB; 3; 22, en-USd2ureepe,Version: 2.11.8.12009-07-27T09:36:34+02:00 - Seite 186
Page 190 of 216

left as it will go when switching off the
ignition.XSwitch off the ignition.XLeave the key in the starter switch.XWait approximately 30 seconds until the
multifunction display in the instrument
cluster is completely blank.XTurn the battery off using the previously
installed battery switch.XRelease the parking brake.XDuring towing: Make sure the gear
selector lever remains in neutral
position N with the ignition switched
off.XAfter towing: Engage the parking brake.XTurn the battery on using the previously
installed battery switch.XMove the gear selector lever to park
position P.XRemove the key from the starter switch.XLock the doors.
!
Do not flat tow the vehicle with the front
axle raised. Doing so may cause serious
damage to the brake system which is not
covered by the smart Limited Warranty.
! Failure to follow the recommendations
for flat towing can cause damage to your
vehicle:
R Not following the battery disconnect
procedure in the proper sequence may
result in data loss in the vehicle’s
control units.
R Not disconnecting the battery and
leaving the key in starter switch
position 1 (ignition on) may result in
- the vehicle locking. The vehicle will
lock if the wheels are turning at
vehicle speeds of approximately
8 mph (14 km/h) or more.
- the ESP ®
being activated. Active
braking action through the ESP ®
may
seriously damage the brake system
which is not covered by the smart
Limited Warranty.
R Not moving the gear selector lever to
neutral position N may result in
significant transmission damage.
R in a discharged battery.
Fuses
The electrical fuses in your vehicle serve
to switch off malfunctioning power
circuits.
If a fuse is blown, the components and
systems secured by that fuse will stop
operating.
GWarning!
Only use fuses approved by smart with the
specified amperage for the system in
question and do not attempt to repair or
bridge a blown fuse this may cause an
overload leading to a fire, and/or cause
damage to electrical components and/or
systems. Contact a smart center if you
encounter any electrical problems.
! A blown fuse must be replaced by an
appropriate spare fuse (recognizable by
its color or the fuse rating given on the
fuse) of the amperage recommended in
the fuse chart. Any smart center will be
glad to advise you on this subject.
If a newly inserted fuse blows again, have
the cause determined and rectified at an
authorized smart center.
Before replacing fuses:
R Engage the parking brake.
R Make sure the gear selector lever is in
park position P.
R Turn off all electrical accessories.
188Fuses>> Practical hints.
451_AKB; 3; 22, en-USd2ureepe,Version: 2.11.8.12009-07-27T09:36:34+02:00 - Seite 188
Page 191 of 216

RTurn off the engine.
R Remove the key from the starter switch.
Replacing a fuse
The fuse box is located on the driver’s side
below the dashboard.
XFrom the fuse chart ( Y page 192),
determine which fuse belongs to the
malfunctioning accessory or component.XRemove the respective fuse.XReplace the defective fuse with a new one
of the same amperage.Fuses189>> Practical hints.451_AKB; 3; 22, en-USd2ureepe,Version: 2.11.8.12009-07-27T09:36:34+02:00 - Seite 189Z
Page 194 of 216
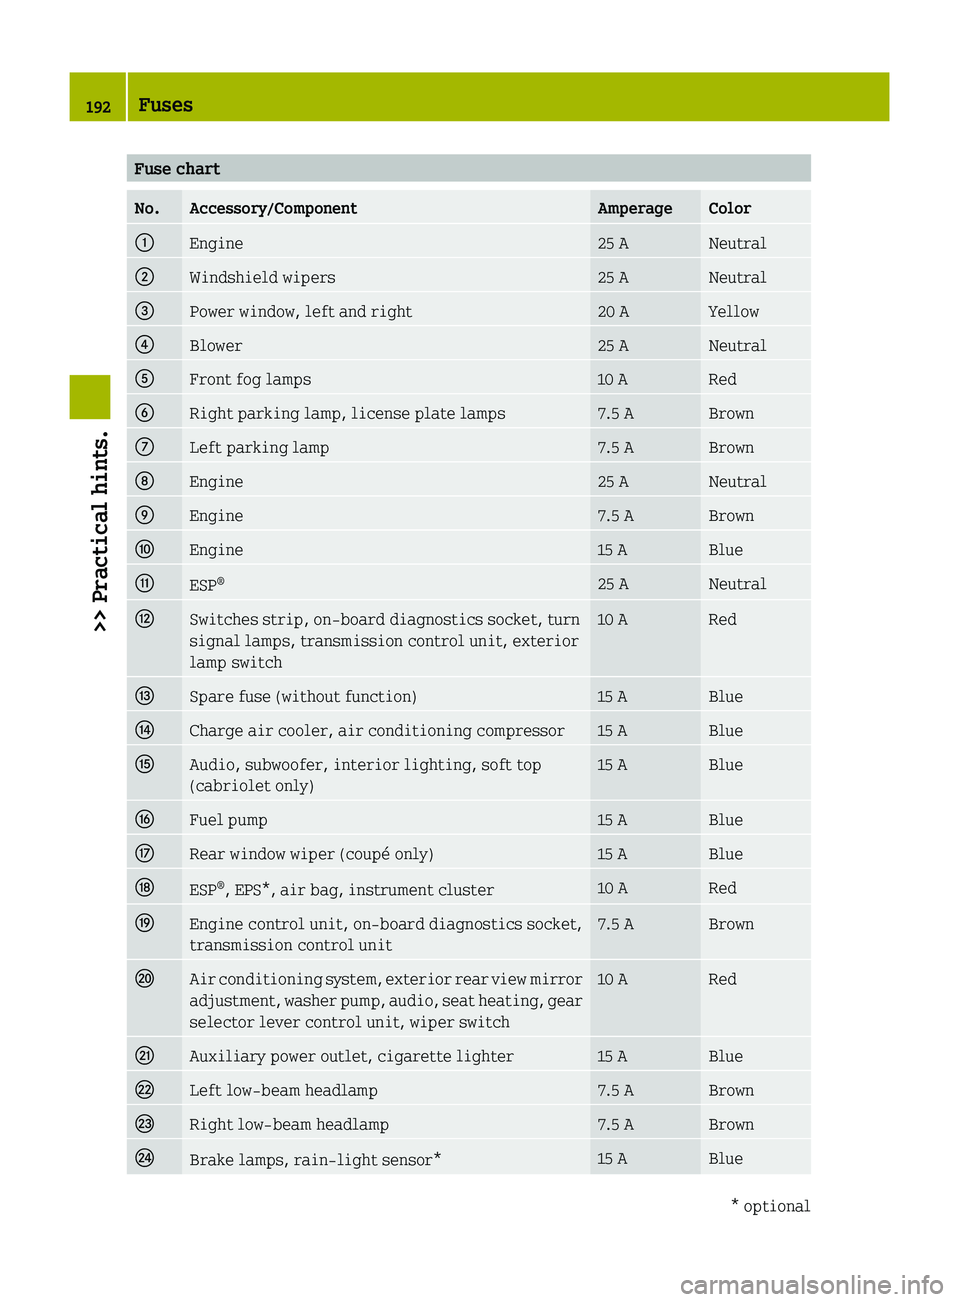
Fuse chart No.Accessory/ComponentAmperageColor0046Engine25 ANeutral0047Windshield wipers25 ANeutral008APower window, left and right20 AYellow0088Blower25 ANeutral0086Front fog lamps10 ARed0087Right parking lamp, license plate lamps7.5 ABrown006ELeft parking lamp7.5 ABrown006FEngine25 ANeutral0070Engine7.5 ABrown0071Engine15 ABlue0072ESP®25 ANeutral0073Switches strip, on-board diagnostics socket, turn
signal lamps, transmission control unit, exterior
lamp switch10 ARed0074Spare fuse (without function)15 ABlue0075Charge air cooler, air conditioning compressor15 ABlue0076Audio, subwoofer, interior lighting, soft top
(cabriolet only)15 ABlue0077Fuel pump15 ABlue0078Rear window wiper (coupé only)15 ABlue0079ESP ®
, EPS*, air bag, instrument cluster10 ARed007AEngine control unit, on-board diagnostics socket,
transmission control unit7.5 ABrown007BAir conditioning system, exterior rear view mirror
adjustment, washer pump, audio, seat heating, gear
selector lever control unit, wiper switch10 ARed007CAuxiliary power outlet, cigarette lighter15 ABlue007DLeft low‑beam headlamp7.5 ABrown007ERight low‑beam headlamp7.5 ABrown007FBrake lamps, rain-light sensor*15 ABlue192Fuses>> Practical hints.* optional451_AKB; 3; 22, en-USd2ureepe,Version: 2.11.8.12009-07-27T09:36:34+02:00 - Seite 192
Page 195 of 216

No.Accessory/ComponentAmperageColor0080Right high‑beam headlamp7.5 ABrown0081Left high‑beam headlamp7.5 ABrown0082Engine7.5 ABrown0083Rear window defroster, radiator fan40 AOrange0084Soft top (cabriolet only)30 AGreen0085Transmission40 AOrange006DHorn, doors, central locking20 AYellow006C———006BIgnition50 ARed0069ESP®40 AOrange00BAEPS*30 AGreen009DExterior rear view mirror heating7.5 ABrown009E———009FBackup (ignition)——00A0Backup (ignition)——00A1Backup (batt. +)——00A2Backup (batt. +)——00A3Backup (batt. +)——00A4Backup (batt. +)——00A5Seat heating20 AYellowFuses193>> Practical hints.* optional451_AKB; 3; 22, en-USd2ureepe,Version: 2.11.8.12009-07-27T09:36:34+02:00 - Seite 193Z
Page 201 of 216

Example certification label (Canada vehicles)
0047Vehicle Identification Number (VIN)008APaintwork code
Vehicle Identification Number (VIN)
The
Vehicle Identification Number (VIN)
can be found in the following locations:
R on the certification label on the driver’s
door B‑pillar ( Y page 198)
R on the rear right on the cargo
compartment floor ( Y page 199)
R in the lower edge of the windshield
( Y page 198)
XOpen the cargo compartment.XFold back the carpet.0046VIN (on the cargo compartment floor)
Engine number
The engine number is engraved into the
engine block. For more information,
contact any authorized smart center.
i When ordering parts, please specify
vehicle identification and engine
number.
Vehicle specification (model pure)
The quoted data apply only to the standard
vehicle. Contact an authorized smart
center for the corresponding data of all
special bodies and special equipment.
Engine (model pure)Engine, type132Mode of operation4‑stroke engine,
gasoline injectionNo. of cylinders3Valves per
cylinder4Bore2.83 in (72.00 mm)Stroke3.22 in (81.80 mm)Total piston
displacement61.0 cu in (999 cm 3
)Compression ratio10.0:1Output acc. to
SAE J 134970 hp/5 800 rpm
(52 kW/5 800 rpm)Maximum torque
acc. to SAE J 134968 lb-ft/4 500 rpm
(92 Nm/4 500 rpm)Maximum engine
speed6 400 rpmFiring order1-2-3Poly‑V‑belt802 mmElectrical system (model pure)Alternator14 V/90 AStarter motor12 V/0.95 kWBattery12 V/42 AhVehicle specification (model pure)199>> Technical data.451_AKB; 3; 22, en-USd2ureepe,Version: 2.11.8.12009-07-27T09:36:34+02:00 - Seite 199Z
Page 202 of 216
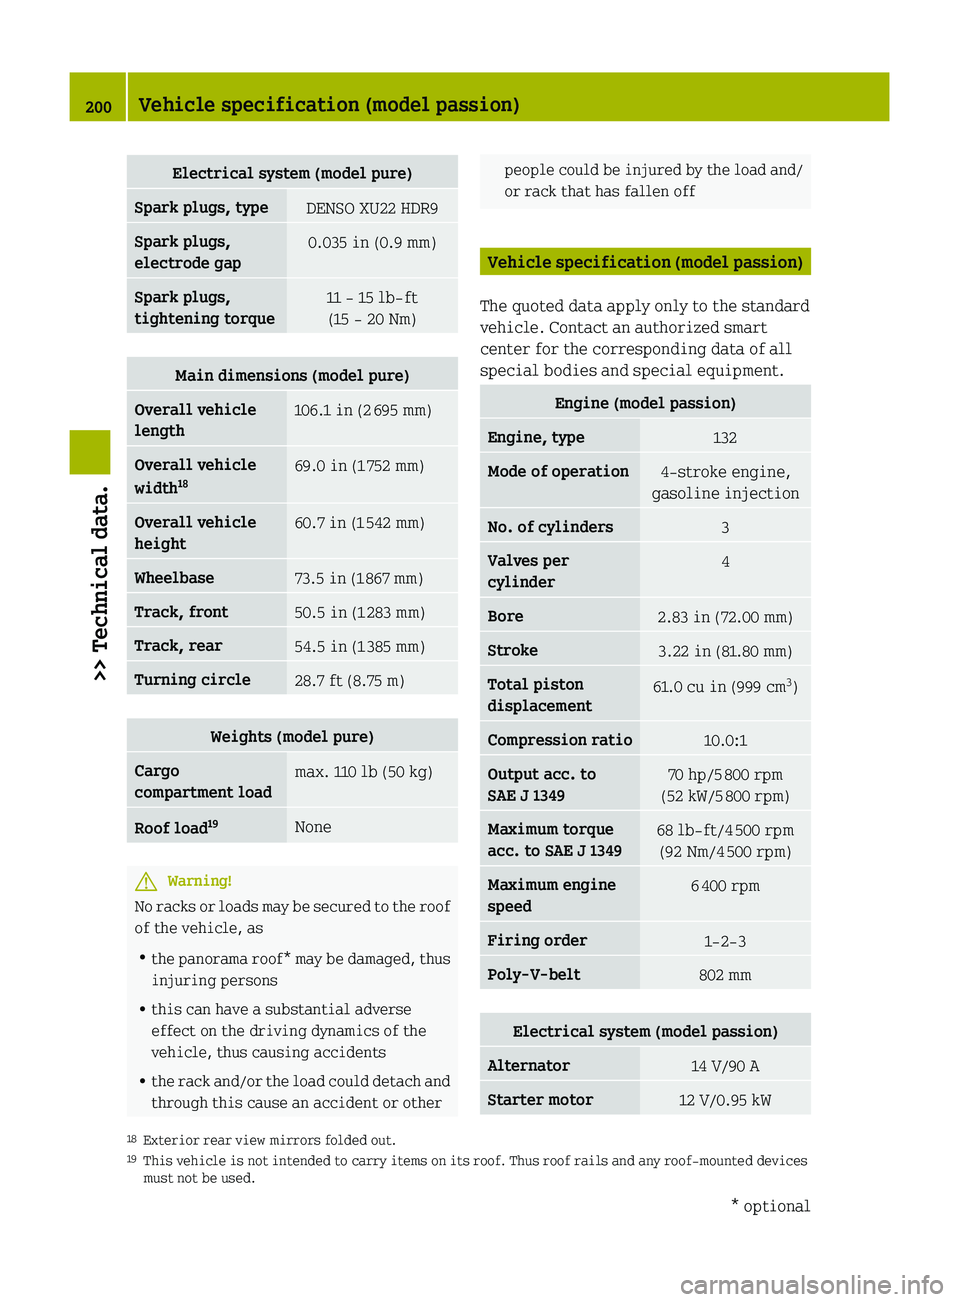
Electrical system (model pure)Spark plugs, typeDENSO XU22 HDR9Spark plugs,
electrode gap0.035 in (0.9 mm)Spark plugs,
tightening torque11 - 15 lb-ft (15 - 20 Nm)Main dimensions (model pure)Overall vehicle
length106.1 in (2 695 mm)Overall vehicle
width 1869.0 in (1
752 mm)Overall vehicle
height60.7 in (1 542 mm)Wheelbase73.5 in (1 867 mm)Track, front50.5 in (1 283 mm)Track, rear54.5 in (1 385 mm)Turning circle28.7 ft (8.75 m)Weights (model pure)Cargo
compartment loadmax. 110 lb (50 kg)Roof load 19NoneGWarning!
No racks or loads may be secured to the roof
of the vehicle, as
R the panorama roof* may be damaged, thus
injuring persons
R this can have a substantial adverse
effect on the driving dynamics of the
vehicle, thus causing accidents
R the rack and/or the load could detach and
through this cause an accident or other
people could be injured by the load and/
or rack that has fallen off
Vehicle specification (model passion)
The quoted data apply only to the standard
vehicle. Contact an authorized smart
center for the corresponding data of all
special bodies and special equipment.
Engine (model passion)Engine, type132Mode of operation4‑stroke engine,
gasoline injectionNo. of cylinders3Valves per
cylinder4Bore2.83 in (72.00 mm)Stroke3.22 in (81.80 mm)Total piston
displacement61.0 cu in (999 cm 3
)Compression ratio10.0:1Output acc. to
SAE J 134970 hp/5 800 rpm
(52 kW/5 800 rpm)Maximum torque
acc. to SAE J 134968 lb-ft/4 500 rpm
(92 Nm/4 500 rpm)Maximum engine
speed6 400 rpmFiring order1-2-3Poly‑V‑belt802 mmElectrical system (model passion)Alternator14 V/90 AStarter motor12 V/0.95 kW18
Exterior rear view mirrors folded out.
19 This vehicle is not intended to carry items on its roof. Thus roof rails and any roof-mounted devices
must not be used.200Vehicle specification (model passion)>> Technical data.* optional451_AKB; 3; 22, en-USd2ureepe,Version: 2.11.8.12009-07-27T09:36:34+02:00 - Seite 200