ESP SMART FORTWO COUPE 2010 User Guide
[x] Cancel search | Manufacturer: SMART, Model Year: 2010, Model line: FORTWO COUPE, Model: SMART FORTWO COUPE 2010Pages: 216, PDF Size: 9.7 MB
Page 36 of 216
have any breathing difficulty but cannot
get out of the vehicle after the air bag
inflates, then get fresh air by opening a
window or door.GWarning!
To reduce the risk of injury when the front
air bags inflate, it is very important for
the driver and passenger to always be in a
properly seated position and to wear their
respective seat belt.
For maximum protection in the event of a
collision always be in normal seated
position with your back against the
backrest. Fasten your seat belt and ensure
it is properly positioned on your body.
Since the air bag inflates with
considerable speed and force, a proper
seating and hands on steering wheel
position will help to keep you at a safe
distance from the air bag.
Occupants who are unbelted, out of position
or too close to the air bag can be seriously
injured or killed by an air bag as it
inflates extremely quickly and with great
force:
R Sit properly belted in a position that is
as upright as possible with your back
against the seat backrest.
R Adjust the driver’s seat as far as possible
rearward, still permitting proper
operation of vehicle controls. The
distance from the center of the driver’s
breastbone to the center of the air bag
cover on the steering wheel must be at
least 10 inches (25 cm) or more. You should
be able to accomplish this by
adjustments to the seat. If you have any
problems, please contact an authorized
smart center.
R Do not lean your head or chest close to the
steering wheel or dashboard.
R Keep hands on the outside of the steering
wheel rim. Placing hands and arms inside
the rim can increase the risk and
potential severity of hand/arm injury
when the driver’s front air bag inflates.
R Adjust the passenger seat as far as
possible rearward from the dashboard
when the seat is occupied.
R Occupants, especially children, should
always sit as upright as possible,
properly use the seat belts and use an
appropriately sized infant restraint,
toddler restraint, or booster seat
recommended for the size and weight of
the child.
Failure to follow these instructions can
result in severe injuries to you or other
occupants.
If you sell your vehicle, it is important that
you make the buyer aware of this safety
information. Be sure to give the buyer this
Operator’s Manual.
i Air bags are designed to deploy only in
certain frontal impacts (front air bags),
and in side impacts (head-thorax air
bags) which exceed preset thresholds.
Only during these events will they
provide their supplemental protection.
The driver and passenger should always
wear their seat belts. Otherwise it is not
possible for air bags to provide their
supplemental protection.
In case of other types of impacts and
impacts below air bag deployment
thresholds, air bags will not deploy. The
driver and passenger will then be
protected to the extent possible by a
properly fastened seat belt. A properly
fastened seat belt is also needed to
provide the best possible protection in
a rollover.
We caution you not to rely on the presence
of the air bags in order to avoid wearing
your seat belt.34Occupant safety>> Safety.
451_AKB; 3; 22, en-USd2ureepe,Version: 2.11.8.12009-07-27T09:36:34+02:00 - Seite 34
Page 38 of 216
the SRS indicator lamp in the instrument
cluster illuminates.
! If the air bags are activated, you will
hear a loud noise and some dust may be
generated. The explosion fundamentally
represents no risk to your hearing.
The inflated air bag slows down and
reduces the movement of the occupant. When
the occupant makes contact with the air
bag, hot gas flows out of the inflated front
air bags and head-thorax air bags. This
reduces the load on the occupant’s head and
upper body. These air bags are
consequently deflated after the accident.
Head-thorax air bags GWarning!
There is a possibility for a head-thorax air
bag related injury if occupants, especially
children, are not properly seated or
restrained when next to a head-thorax air
bag which needs to deploy rapidly in a side
impact in order to do its job.
To help avoid the possibility of injury,
please follow these guidelines:
(1)Occupants, especially children,
should never place their bodies
or lean their heads in the area of
the door where the head-thorax
air bag inflates. This could
result in serious injuries or
death should the head-thorax air
bag be deployed.(2)Always sit as upright as
possible, properly use the seat
belts, and for all children
12 years old or under, use an
appropriately sized infant
restraint, toddler restraint, or
booster seat recommended for
the size and weight of the child.(3)Always wear seat belts properly.GWarning!
Only use seat covers which have been tested
and approved by smart for your vehicle
model. Using other seat covers may
interfere with or prevent the deployment of
the head-thorax air bags. Contact an
authorized smart center for availability.
If activated, the head-thorax air bags are
intended to provide increased protection
for the head and thorax (but not arms) of the
occupants on the side of the vehicle that is
struck.
The head-thorax air bags are deployed
R on the side of the vehicle that is struck
(when passenger side is struck only if the
seat is occupied)
R at the start of an accident with high
vehicle deceleration or acceleration
acting in a lateral direction, e.g. a side
impact
R regardless of whether or not the seat belt
is in use
R independently of the front air bags
being deployed
R independently of the emergency
tensioning device
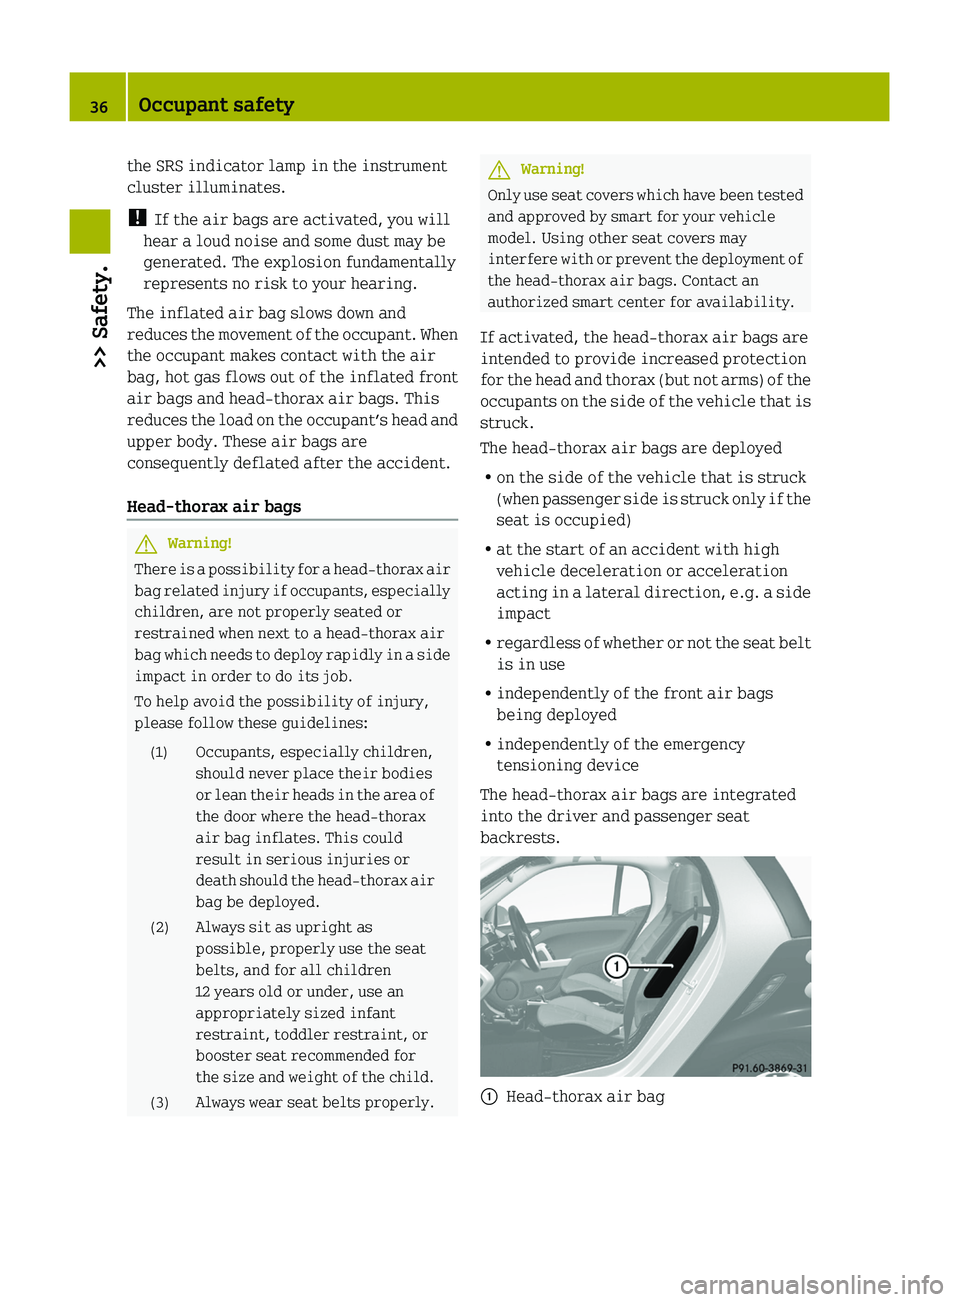
The head-thorax air bags are integrated
into the driver and passenger seat
backrests.
0046Head-thorax air bag36Occupant safety>> Safety.
451_AKB; 3; 22, en-USd2ureepe,Version: 2.11.8.12009-07-27T09:36:34+02:00 - Seite 36
Page 44 of 216
instruction manual provided with the
restraint.
When using any infant restraint, toddler
restraint, or booster seat be sure to
carefully read and follow all
manufacturer’s instructions for
installation and use.
Please read and observe warning labels
affixed to the inside of the vehicle and to
infant or child restraints.GWarning!
Children 12 years old and under must be
seated and properly secured in an
appropriately sized infant restraint,
toddler restraint, or booster seat
recommended for the size and weight of the
child.
The infant or child restraint must be
properly secured with the vehicle’s seat
belt fully in accordance with the child seat
manufacturer’s instructions.
Occupants, especially children, should
never place their bodies or lean their
heads in the area of the door where the
head-thorax air bag inflates. This could
result in serious injuries or death should
the head-thorax air bag be triggered.
Always sit as upright as possible, properly
use the seat belt and use an appropriately
sized infant restraint, toddler restraint,
or booster seat recommended for the size
and weight of the child.
Children can be killed or seriously injured
by an inflating air bag. Note the following
important information when circumstances
require you to place a child in the
passenger seat:
R Your vehicle is equipped with air bag
technology designed to turn off the
passenger front air bag in your vehicle
when the Occupant Classification System
senses the weight of a typical
12‑month‑old child or less along with the
weight of an appropriate child restraint
on the passenger seat.
R A child in a rear-facing child restraint
on the passenger seat may be seriously
injured or even killed if the passenger
front air bag inflates in a collision.
R If you install a rear-facing child
restraint on the passenger seat, make
sure the 007F 007B indicator lamp
is illuminated, indicating that the
passenger front air bag is deactivated.
Should the 007F 007B indicator
lamp not illuminate or go out while the
restraint is installed, please check
installation. Periodically check the
007F 007B indicator lamp while
driving to make sure the
007F 007B indicator lamp is
illuminated. If the 007F 007B
indicator lamp goes out or remains out,
do not transport a child on the passenger
seat until the system has been repaired.
A child in a rear-facing child restraint
on the passenger seat may be seriously
injured or even killed if the passenger
front air bag inflates.
R If you place a child in a forward-facing
child restraint on the passenger seat,
move the seat as far back as possible, use
a proper child restraint recommended
for the age, size and weight of the child,
and secure child restraint with the
vehicle’s seat belt according to the child
seat manufacturer’s instructions. For
children larger than the typical
12‑month‑old child, the passenger front
air bag may or may not be activated.GWarning!
Infants and small children should never
share a seat belt with another occupant.
During an accident, they could be crushed
between the occupant and seat belt.
A child’s risk of serious or fatal injuries
is significantly increased if the child
42Occupant safety>> Safety.
451_AKB; 3; 22, en-USd2ureepe,Version: 2.11.8.12009-07-27T09:36:34+02:00 - Seite 42
Page 46 of 216
would no longer be properly supported or
positioned to provide its intended
benefit. That could cause serious or even
fatal injuries.
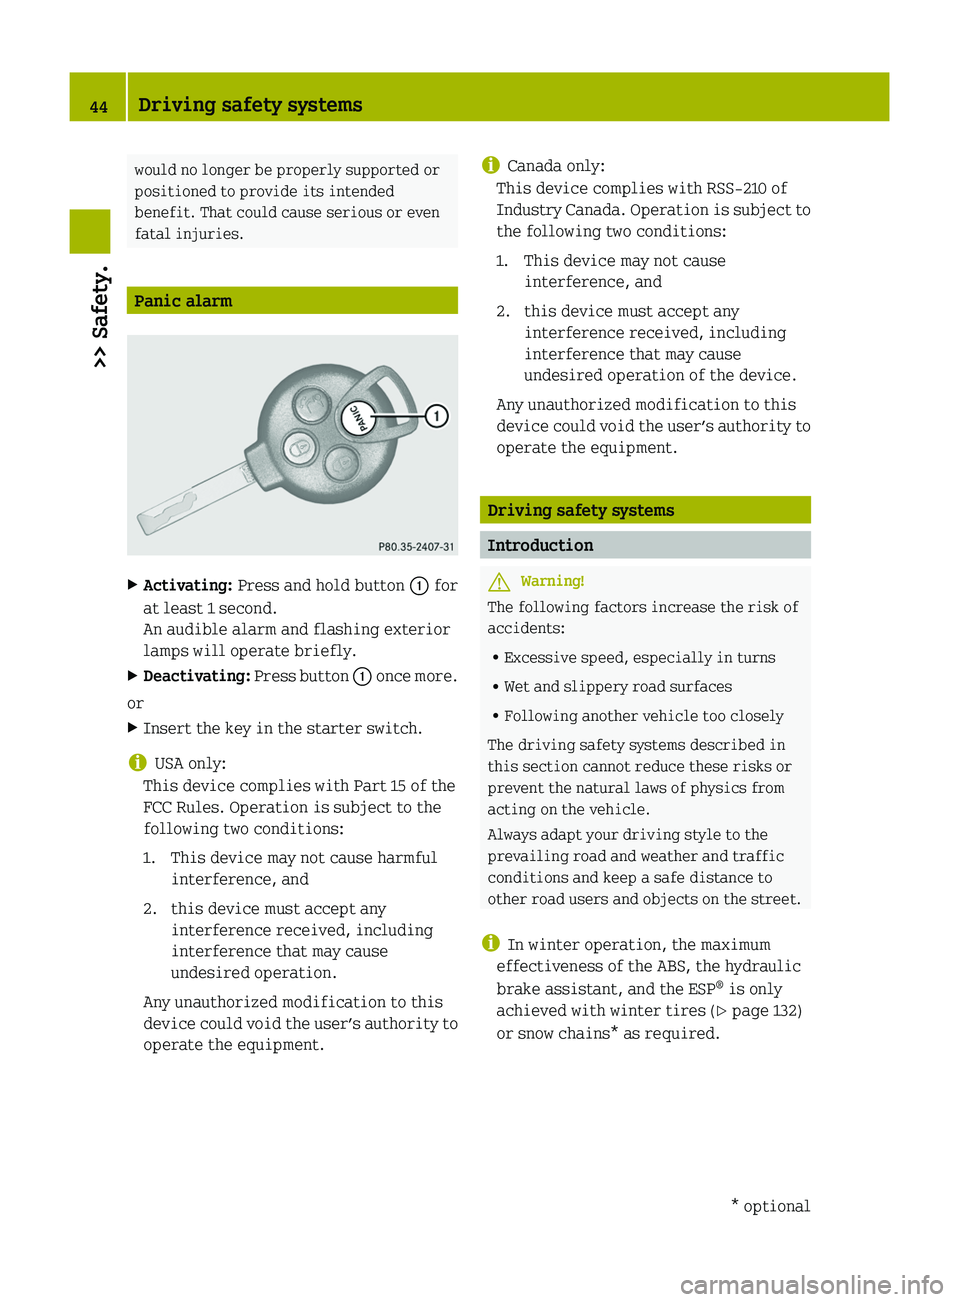
Panic alarm
XActivating: Press and hold button 0046 for
at least 1 second.
An audible alarm and flashing exterior
lamps will operate briefly.XDeactivating: Press button 0046 once more.
or
XInsert the key in the starter switch.
i USA only:
This device complies with Part 15 of the
FCC Rules. Operation is subject to the
following two conditions:
1. This device may not cause harmful interference, and
2. this device must accept any interference received, including
interference that may cause
undesired operation.
Any unauthorized modification to this
device could void the user’s authority to
operate the equipment.
i Canada only:
This device complies with RSS‑210 of
Industry Canada. Operation is subject to
the following two conditions:
1. This device may not cause interference, and
2. this device must accept any interference received, including
interference that may cause
undesired operation of the device.
Any unauthorized modification to this
device could void the user’s authority to
operate the equipment.
Driving safety systems
Introduction
GWarning!
The following factors increase the risk of
accidents:
R Excessive speed, especially in turns
R Wet and slippery road surfaces
R Following another vehicle too closely
The driving safety systems described in
this section cannot reduce these risks or
prevent the natural laws of physics from
acting on the vehicle.
Always adapt your driving style to the
prevailing road and weather and traffic
conditions and keep a safe distance to
other road users and objects on the street.
i In winter operation, the maximum
effectiveness of the ABS, the hydraulic
brake assistant, and the ESP ®
is only
achieved with winter tires ( Y page 132)
or snow chains* as required.
44Driving safety systems>> Safety.* optional451_AKB; 3; 22, en-USd2ureepe,Version: 2.11.8.12009-07-27T09:36:34+02:00 - Seite 44
Page 47 of 216
Antilock Brake System (ABS)GWarning!
Do not pump the brake pedal. Use firm,
steady brake pedal pressure instead.
Pumping the brake pedal defeats the
purpose of the ABS and significantly
reduces braking effectiveness.
The
Antilock Brake System (ABS) regulates
the brake pressure so that the wheels do not
lock during braking. This allows you to
maintain the ability to steer your vehicle.
On slippery road surfaces, the ABS will
respond even to light brake pressure.
The ABS indicator lamp in the instrument
cluster ( Y page 22) comes on when you
switch on the ignition. It goes out when the
engine is running.
Braking
At the instant one of the wheels is about to
lock up, a slight pulsation can be felt in
the brake pedal, indicating that the ABS is
regulating the brake pressure.
XKeep firm and steady pressure on the
brake pedal while experiencing the
pulsation.
Continuous, steady brake pedal pressure
yields the advantages provided by the ABS,
namely braking power and the ability to
steer the vehicle.
A pulsating brake pedal can be an
indication of hazardous road conditions
and functions as a reminder to take extra
care while driving.
Emergency brake maneuver
XKeep continuous full pressure on the
brake pedal.GWarning!
When the ABS is malfunctioning, the
hydraulic brake assistant and the ESP ®
are
also switched off.
When the ABS is malfunctioning, the wheels
may lock during hard braking, reducing
steering capability and extending the
braking distance.GWarning!
The ABS cannot prevent the natural laws of
physics from acting on the vehicle, nor can
it increase braking or steering efficiency
beyond that afforded by the condition of the
vehicle brakes and tires or the traction
afforded. The ABS cannot prevent
accidents, including those resulting from
excessive speed in turns, following
another vehicle too closely, or
hydroplaning. Only a safe, attentive, and
skillful driver can prevent accidents. The
capabilities of an ABS equipped vehicle
must never be exploited in a reckless or
dangerous manner which could jeopardize
the user’s safety or the safety of others.
Electronic Stability Program (ESP ®
)
Your vehicle is equipped with the
Electronic Stability Program (ESP ®
). The
ESP ®
is operational as soon as the engine
is running and it monitors the vehicle’s
traction (force of adhesive friction
between the tires and the road surface) and
handling.
The ESP ®
recognizes when a wheel is
spinning or if the vehicle starts to skid.
By applying brakes to the appropriate
wheel and by limiting the engine output,
the ESP ®
works to stabilize the vehicle. The
ESP ®
is especially useful while driving off
and on wet or slippery road surfaces. The
ESP ®
also stabilizes the vehicle during
braking and steering maneuvers.
The ESP ®
warning lamp 0067 in the
instrument cluster flashes when the ESP ®
is
engaged.
The ESP ®
warning lamp 0067 in the
instrument cluster comes on when you
Driving safety systems45>> Safety.451_AKB; 3; 22, en-USd2ureepe,Version: 2.11.8.12009-07-27T09:36:34+02:00 - Seite 45Z
Page 48 of 216
switch on the ignition. It goes out when the
engine is running.
Depending on the driving situation, the
ESP ®
R reduces the speed
R selectively brakes individual wheels
R equalizes the speed of the driven wheels
R stabilizes the vehicle when braking
R assists you in evasive maneuvers on all
roadsGWarning!
If the ESP ®
warning lamp 0067 in the
instrument cluster flashes, proceed as
follows:
R While driving off, apply as little
throttle as possible.
R While driving, ease up on the accelerator
pedal.
R Adapt your speed and driving style to the
prevailing road conditions.
Failure to observe these guidelines could
cause the vehicle to skid.
The ESP ®
cannot prevent accidents
resulting from excessive speed.
GWarning!
The ESP ®
cannot prevent the natural laws of
physics from acting on the vehicle, nor can
it increase the traction afforded. The
ESP ®
cannot prevent accidents, including
those resulting from excessive speed in
turns, or hydroplaning. Only a safe,
attentive, and skillful driver can prevent
accidents. The capabilities of an ESP ®
equipped vehicle must never be exploited
in a reckless or dangerous manner which
could jeopardize the user’s safety or the
safety of others.
! Because the ESP ®
operates
automatically, the engine must be turned
off (ignition switched off) when the
parking brake is being tested on a brake
test dynamometer. Active braking action
through the ESP ®
may otherwise seriously
damage the brake system which is not
covered by the smart Limited Warranty.
i The ESP ®
will only function properly if
you use wheels of the recommended tire
size ( Y page 202).
Hydraulic brake assistant
The hydraulic brake assistant operates in
emergency situations. If you apply the
brakes very quickly, the hydraulic brake
assistant automatically provides full
brake boost, thereby potentially reducing
the braking distance.
XApply continuous full braking pressure
until the emergency braking situation is
over.
The ABS will prevent the wheels from
locking.
When you release the brake pedal, the
brakes function again as normal. The
hydraulic brake assistant is then
deactivated.
GWarning!
When the hydraulic brake assistant is
malfunctioning, the brake system is still
functioning normally, but without the
additional brake boost that would normally
be provided during an emergency braking
maneuver. Therefore, the braking distance
may increase.
GWarning!
The hydraulic brake assistant cannot
prevent the natural laws of physics from
acting on the vehicle, nor can it increase
braking efficiency beyond that afforded by
the condition of the vehicle brakes and
tires or the traction afforded. The
hydraulic brake assistant cannot prevent
accidents, including those resulting from
excessive speed in turns, following
46Driving safety systems>> Safety.
451_AKB; 3; 22, en-USd2ureepe,Version: 2.11.8.12009-07-27T09:36:34+02:00 - Seite 46
Page 55 of 216
XPress button 0034 on the key twice.XPress and hold button 0035 on the key for
approximately two seconds.
or
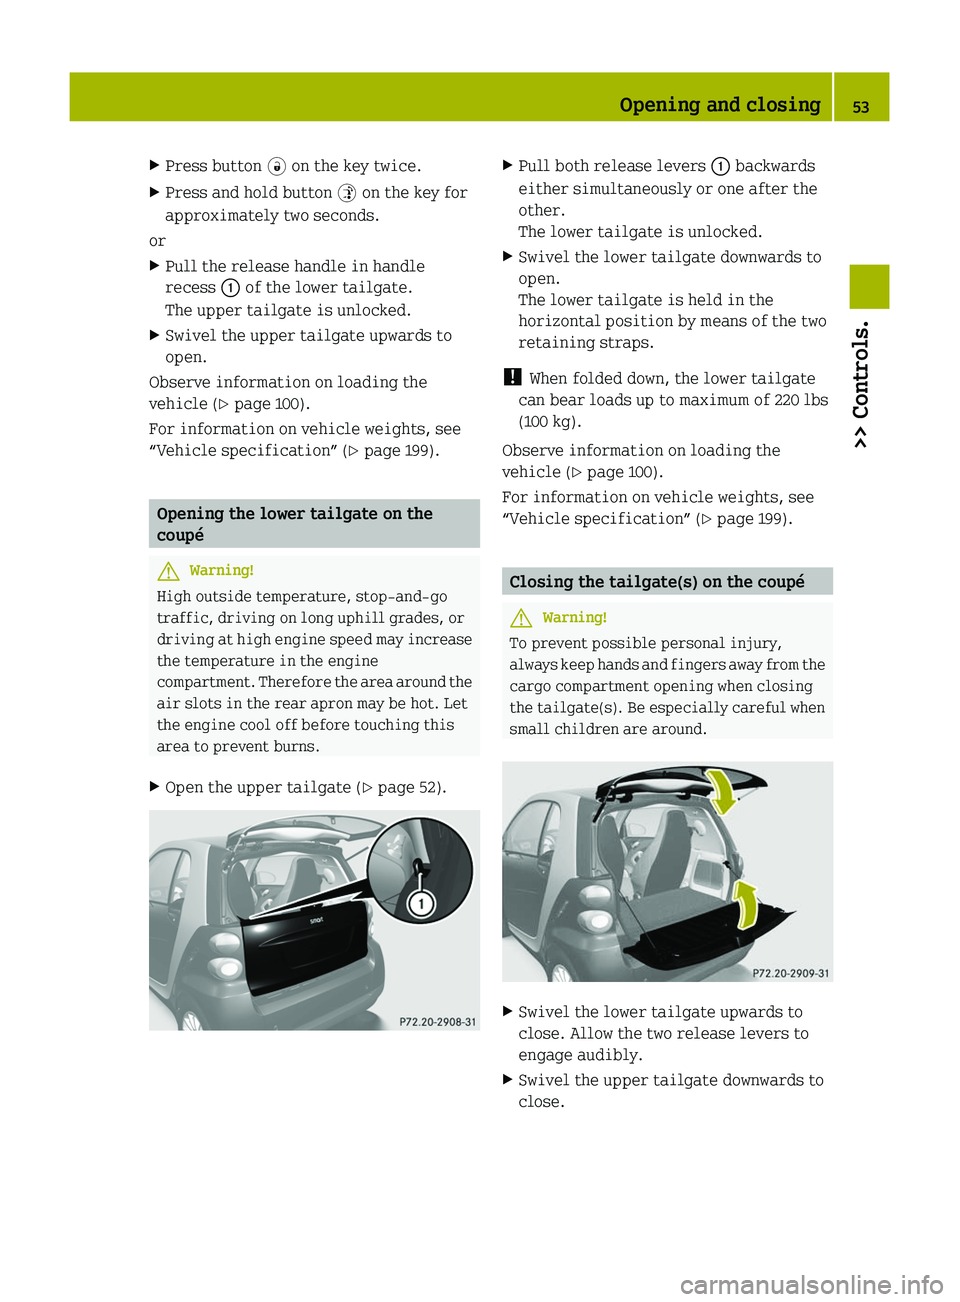
XPull the release handle in handle
recess 0046 of the lower tailgate.
The upper tailgate is unlocked.XSwivel the upper tailgate upwards to
open.
Observe information on loading the
vehicle ( Y page 100).
For information on vehicle weights, see
“Vehicle specification” ( Y page 199).
Opening the lower tailgate on the
coupé
GWarning!
High outside temperature, stop-and-go
traffic, driving on long uphill grades, or
driving at high engine speed may increase
the temperature in the engine
compartment. Therefore the area around the
air slots in the rear apron may be hot. Let
the engine cool off before touching this
area to prevent burns.
XOpen the upper tailgate ( Y page 52).XPull both release levers 0046 backwards
either simultaneously or one after the
other.
The lower tailgate is unlocked.XSwivel the lower tailgate downwards to
open.
The lower tailgate is held in the
horizontal position by means of the two
retaining straps.
! When folded down, the lower tailgate
can bear loads up to maximum of 220 lbs
(100 kg).
Observe information on loading the
vehicle ( Y page 100).
For information on vehicle weights, see
“Vehicle specification” ( Y page 199).
Closing the tailgate(s) on the coupé
GWarning!
To prevent possible personal injury,
always keep hands and fingers away from the
cargo compartment opening when closing
the tailgate(s). Be especially careful when
small children are around.
XSwivel the lower tailgate upwards to
close. Allow the two release levers to
engage audibly.XSwivel the upper tailgate downwards to
close.Opening and closing53>> Controls.451_AKB; 3; 22, en-USd2ureepe,Version: 2.11.8.12009-07-27T09:36:34+02:00 - Seite 53Z
Page 57 of 216
XPress button 0034 on the key twice.XPull the release handle in handle
recess 0046 of the tailgate.
The tailgate is unlocked.XSwivel the tailgate downwards to open.
Opening and closing the rear soft top
(cabriolet only)
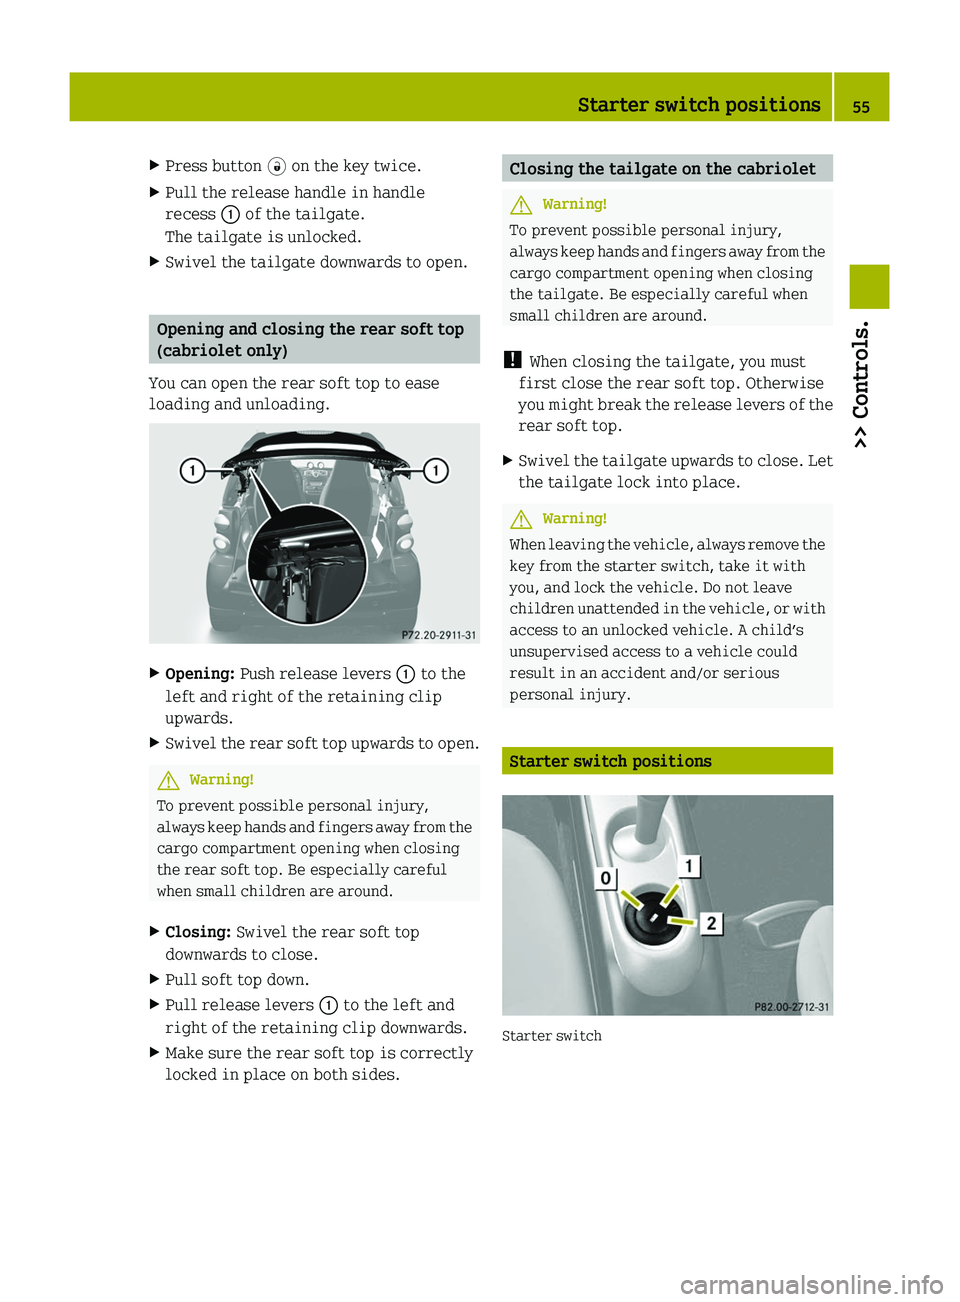
You can open the rear soft top to ease
loading and unloading.
XOpening: Push release levers 0046 to the
left and right of the retaining clip
upwards.XSwivel the rear soft top upwards to open.GWarning!
To prevent possible personal injury,
always keep hands and fingers away from the
cargo compartment opening when closing
the rear soft top. Be especially careful
when small children are around.
XClosing: Swivel the rear soft top
downwards to close.XPull soft top down.XPull release levers 0046 to the left and
right of the retaining clip downwards.XMake sure the rear soft top is correctly
locked in place on both sides.Closing the tailgate on the cabrioletGWarning!
To prevent possible personal injury,
always keep hands and fingers away from the
cargo compartment opening when closing
the tailgate. Be especially careful when
small children are around.
! When closing the tailgate, you must
first close the rear soft top. Otherwise
you might break the release levers of the
rear soft top.
XSwivel the tailgate upwards to close. Let
the tailgate lock into place.GWarning!
When leaving the vehicle, always remove the
key from the starter switch, take it with
you, and lock the vehicle. Do not leave
children unattended in the vehicle, or with
access to an unlocked vehicle. A child’s
unsupervised access to a vehicle could
result in an accident and/or serious
personal injury.
Starter switch positions
Starter switch
Starter switch positions55>> Controls.451_AKB; 3; 22, en-USd2ureepe,Version: 2.11.8.12009-07-27T09:36:34+02:00 - Seite 55Z
Page 58 of 216
005DFor removing key004AIgnition (power supply for all
electrical consumers) and driving
position
All lamps (except low‑beam
headlamp indicator lamp,
high‑beam headlamp indicator
lamp, and turn signal indicator
lamps unless activated) in the
instrument cluster come on. If a
lamp in the instrument cluster fails
to come on when the ignition is
switched on, have it checked and
replaced if necessary. If a lamp in
the instrument cluster remains on
after starting the engine or comes
on while driving, refer to “Warning
and indicator lamps in the
instrument cluster” ( Y page 149).004BStarting ( Y page 75)
i
When you switch on the ignition, the
indicator and warning lamps (except
low‑beam headlamp indicator lamp,
high‑beam headlamp indicator lamp, and
turn signal indicator lamps unless
activated) in the instrument cluster
come on. The indicator and warning
lamps (except low‑beam headlamp
indicator lamp, high‑beam headlamp
indicator lamp, and turn signal
indicator lamps if activated) will go out
when the engine is running. This
indicates that the respective systems
are operational.
Seats
Safety notes
GWarning!
All seat adjustments, as well as fastening
of seat belts, must be done before the
vehicle is operated.
GWarning!
When adjusting the seat, make sure no one
becomes trapped.
Do not adjust the driver’s seat while
driving. Adjusting the seat while driving
could cause the driver to lose control of the
vehicle.
Never ride in a moving vehicle with the seat
backrest in an excessively reclined
position as this can be dangerous. You
could slide under the seat belt in a
collision. If you slide under the seat belt,
it could apply force at the abdomen or neck,
potentially causing serious or fatal
injuries. The seat backrest and seat belts
provide the best restraint when the wearer
is in a position that is as upright as
possible and seat belts are properly
positioned on the body.
Your seat must be adjusted so that you can
correctly fasten your seat belt.
Observe the following points:
R Adjust the seat backrest until your arms
are slightly angled when holding the
steering wheel.
R Adjust the seat to a comfortable seating
position that still allows you to reach the
accelerator/brake pedal safely. The
position should be as far back as
possible with the driver still able to
operate the controls properly.
R Never place hands under the seat or near
any moving parts while a seat is being
adjusted.
Failure to do so could result in an accident
and/or serious personal injury.
Observe the notes on the air bag system.
GWarning!
Children 12 years old and under must be
seated and properly secured in an
appropriately sized infant restraint,
toddler restraint, or booster seat
recommended for the size and weight of the
56Seats>> Controls.
451_AKB; 3; 22, en-USd2ureepe,Version: 2.11.8.12009-07-27T09:36:34+02:00 - Seite 56
Page 65 of 216
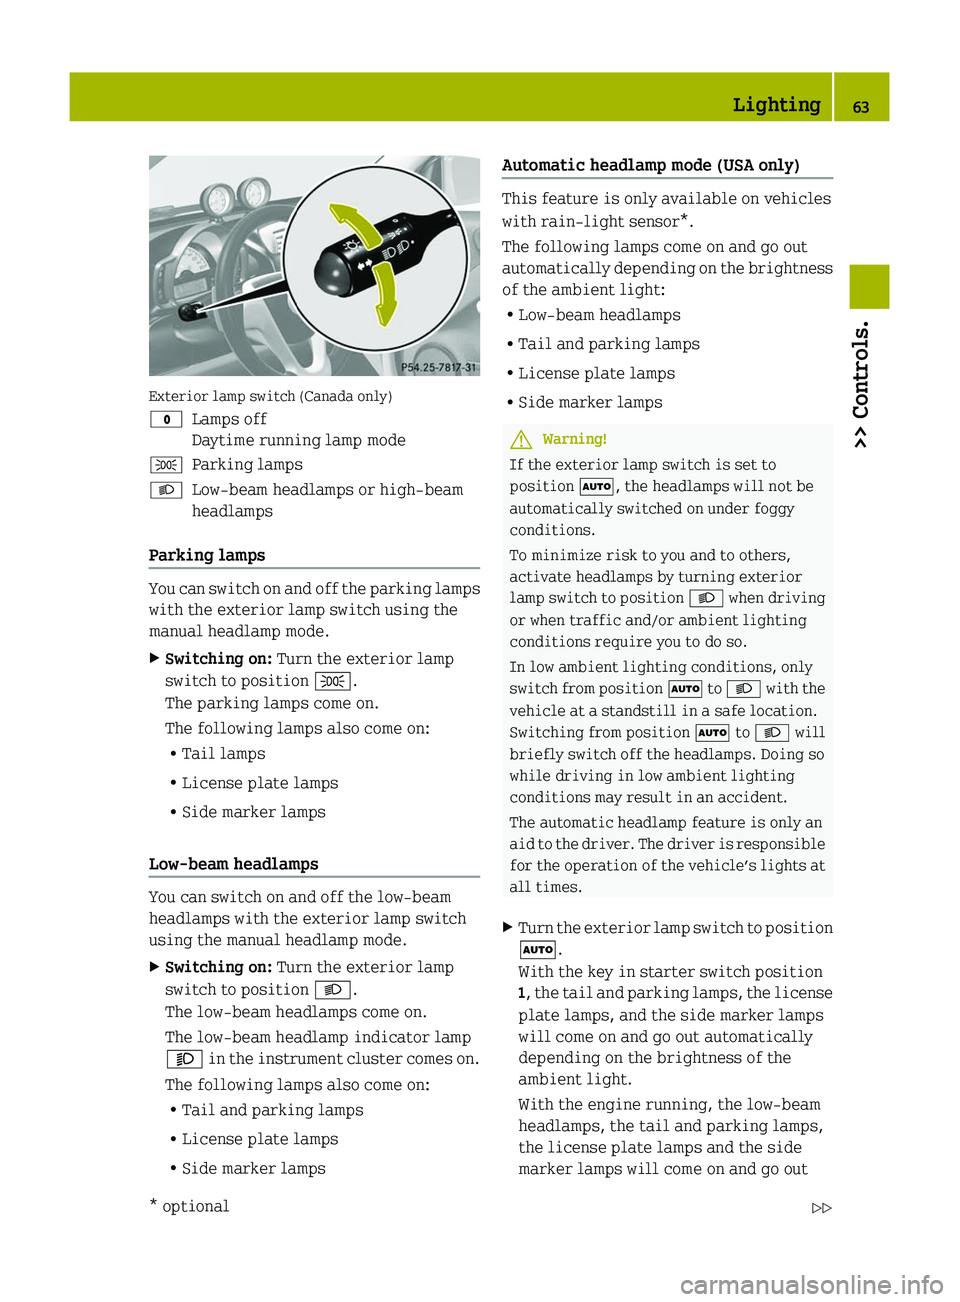
Exterior lamp switch (Canada only)
0027Lamps off
Daytime running lamp mode006CParking lamps0064Low‑beam headlamps or high‑beam
headlamps
Parking lamps
You can switch on and off the parking lamps
with the exterior lamp switch using the
manual headlamp mode.
XSwitching on: Turn the exterior lamp
switch to position 006C.
The parking lamps come on.
The following lamps also come on:
R Tail lamps
R License plate lamps
R Side marker lamps
Low‑beam headlamps
You can switch on and off the low‑beam
headlamps with the exterior lamp switch
using the manual headlamp mode.
XSwitching on: Turn the exterior lamp
switch to position 0064.
The low‑beam headlamps come on.
The low‑beam headlamp indicator lamp
0065 in the instrument cluster comes on.
The following lamps also come on:
R Tail and parking lamps
R License plate lamps
R Side marker lampsAutomatic headlamp mode (USA only)
This feature is only available on vehicles
with rain-light sensor*.
The following lamps come on and go out
automatically depending on the brightness
of the ambient light:
R Low‑beam headlamps
R Tail and parking lamps
R License plate lamps
R Side marker lamps
GWarning!
If the exterior lamp switch is set to
position 005A, the headlamps will not be
automatically switched on under foggy
conditions.
To minimize risk to you and to others,
activate headlamps by turning exterior
lamp switch to position 0064 when driving
or when traffic and/or ambient lighting
conditions require you to do so.
In low ambient lighting conditions, only
switch from position 005A to 0064 with the
vehicle at a standstill in a safe location.
Switching from position 005A to 0064 will
briefly switch off the headlamps. Doing so
while driving in low ambient lighting
conditions may result in an accident.
The automatic headlamp feature is only an
aid to the driver. The driver is responsible
for the operation of the vehicle’s lights at
all times.
XTurn the exterior lamp switch to position
005A .
With the key in starter switch position
1 , the tail and parking lamps, the license
plate lamps, and the side marker lamps
will come on and go out automatically
depending on the brightness of the
ambient light.
With the engine running, the low‑beam
headlamps, the tail and parking lamps,
the license plate lamps and the side
marker lamps will come on and go outLighting63>> Controls.* optional451_AKB; 3; 22, en-USd2ureepe,Version: 2.11.8.12009-07-27T09:36:34+02:00 - Seite 63Z