oil SMART FORTWO COUPE 2012 User Guide
[x] Cancel search | Manufacturer: SMART, Model Year: 2012, Model line: FORTWO COUPE, Model: SMART FORTWO COUPE 2012Pages: 228, PDF Size: 12.76 MB
Page 121 of 228
When checking the engine oil level
R
the vehicle must be parked on level
ground
R the
vehicle must have been stationary for
at least five minutes with the engine
turned off
X Turn off the engine.
X Engage the parking brake.
X Open the tailgate.
X Open the engine compartment cover
(Y page 117).
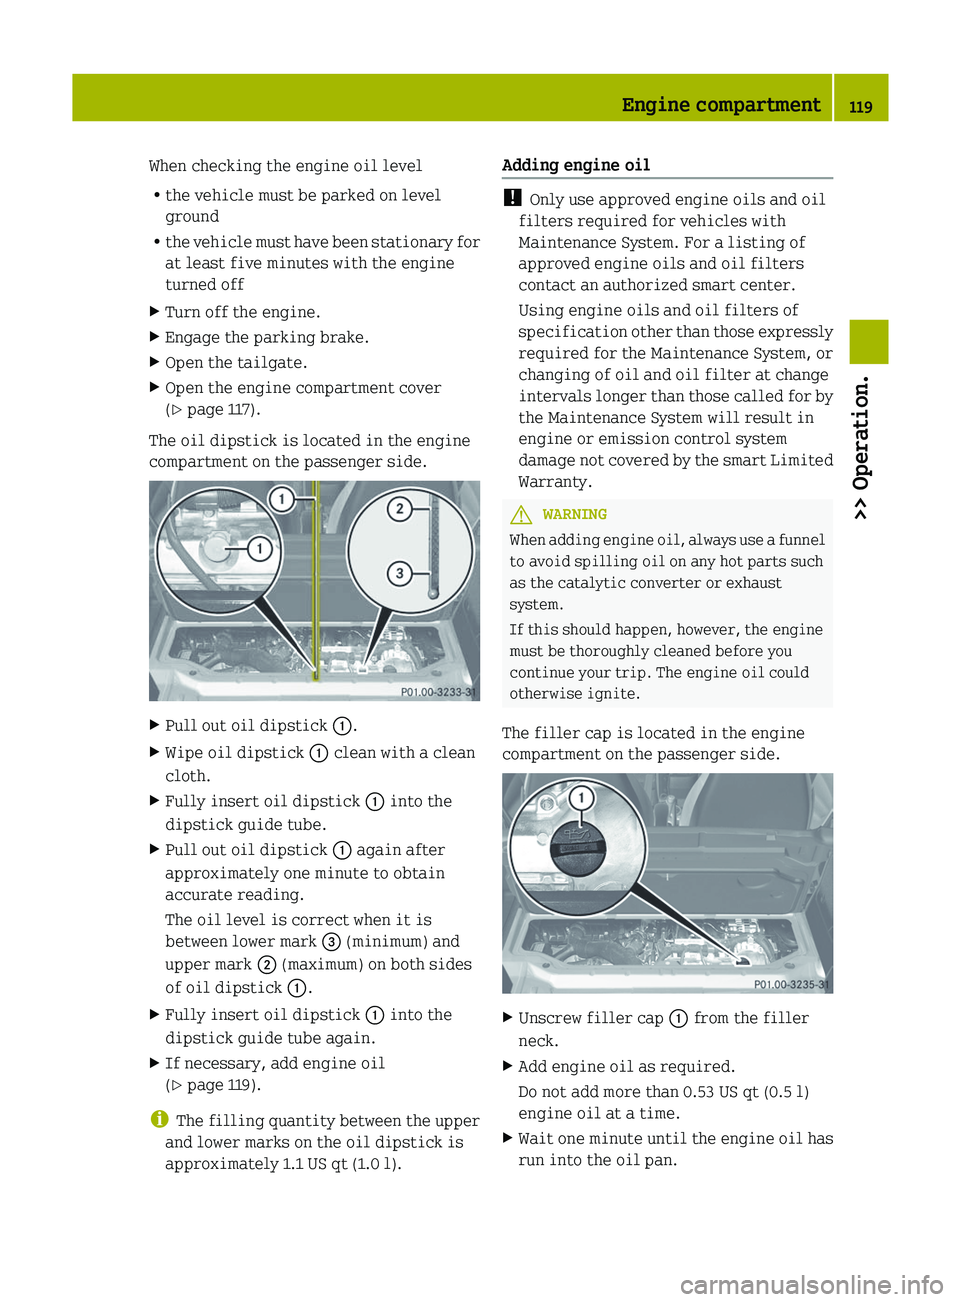
The oil dipstick is located in the engine
compartment on the passenger side. X
Pull out oil dipstick :.
X Wipe oil dipstick : clean with a clean
cloth.
X Fully insert oil dipstick : into the
dipstick guide tube.
X Pull out oil dipstick : again after
approximately one minute to obtain
accurate reading.
The oil level is correct when it is
between lower mark = (minimum) and
upper mark ; (maximum) on both sides
of oil dipstick :.
X Fully insert oil dipstick : into the
dipstick guide tube again.
X If necessary, add engine oil
(Y page 119).
i The
filling quantity between the upper
and lower marks on the oil dipstick is
approximately 1.1 US qt (1.0 l). Adding engine oil !
Only use approved engine oils and oil
filters required for vehicles with
Maintenance System. For a listing of
approved engine oils and oil filters
contact an authorized smart center.
Using engine oils and oil filters of
specification
other than those expressly
required for the Maintenance System, or
changing of oil and oil filter at change
intervals longer than those called for by
the Maintenance System will result in
engine or emission control system
damage not covered by the smart Limited
Warranty. G
WARNING
When adding engine oil, always use a funnel
to avoid spilling oil on any hot parts such
as the catalytic converter or exhaust
system.
If this should happen, however, the engine
must be thoroughly cleaned before you
continue your trip. The engine oil could
otherwise ignite.
The filler cap is located in the engine
compartment on the passenger side. X
Unscrew filler cap : from the filler
neck.
X Add engine oil as required.
Do not add more than 0.53 US qt (0.5 l)
engine oil at a time.
X Wait one minute until the engine oil has
run into the oil pan. Engine compartment
119
>> Operation. Z
Page 122 of 228
X
Check the engine oil level once more.
X Add engine oil once more if necessary.
Be careful not to spill any oil when adding
to avoid environmental damage caused by
oil entering the ground and water.
! Excess engine oil must be siphoned or
drained
off. It could cause damage to the
engine or emission control system not
covered by the smart Limited Warranty.
X Screw filler cap : back on the filler
neck.
X Close the engine compartment cover
(Y page 117). Front compartment
Service flap
Remove the service flap to check the
coolant
level, windshield washer reservoir
level, and brake fluid level.
Insert the service flap on the front of the
vehicle so that it does not get damaged or
dirty.
i The service flap has a strap on the rear
side that ties it to the vehicle body. G
WARNING
Always turn the key to starter switch
position 0 and remove the key from the
starter switch before opening the service
flap.
If the windshield wipers should
inadvertently be switched on, you could be
seriously injured by the wiper washer
drive, which is located just below the
service flap. G
WARNING
Make sure the service flap is locked while
driving. Otherwise, the service flap could
become detached and pose a hazard to you
or others. G
WARNING
To help prevent personal injury, stay clear
of moving parts when the service flap is
open.
The radiator fan may continue to run for
approximately 30 seconds or may even
restart after the engine has been turned
off. Stay clear of fan blades.
! Check the fill levels at regular
intervals.
! Carefully remove ice, snow, and any
other deposits from the air intake
grilles above the service flap to ensure
air intake at all times.
X Park the vehicle on level ground.
X Turn off the engine.
X Engage the parking brake.
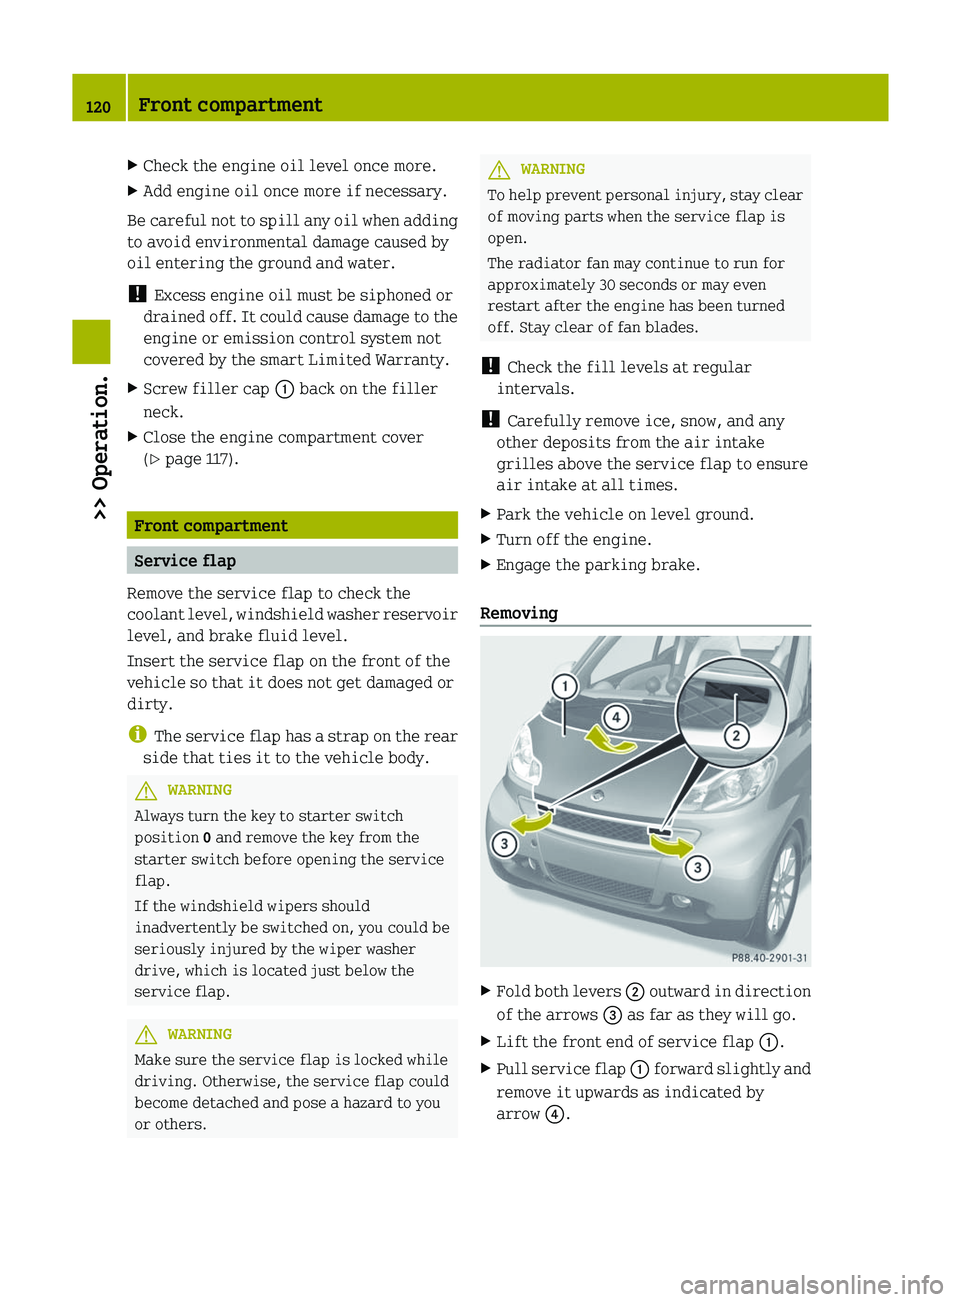
Removing X
Fold both levers ;
outward in direction
of the arrows = as far as they will go.
X Lift the front end of service flap :.
X Pull service flap :
forward slightly and
remove it upwards as indicated by
arrow ?. 120
Front compartment
>> Operation.
Page 125 of 228
G
WARNING
Windshield washer concentrate is highly
flammable. Fire, naked flames and smoking
are prohibited when windshield washer
concentrate is being handled.
X Use a windshield washer concentrate
labeled for summer and water for
temperatures above freezing point.
X Use a windshield washer concentrate
labeled for winter and water for
temperatures below freezing point.
! Always use a windshield washer
concentrate labeled for winter where
temperatures may fall below freezing
point. Failure to do so could result in
damage to the washer system/reservoir.
X Premix the windshield washer fluid in a
suitable container.
Observe mixing ratios depending on the
outside temperature
(Y page 222).
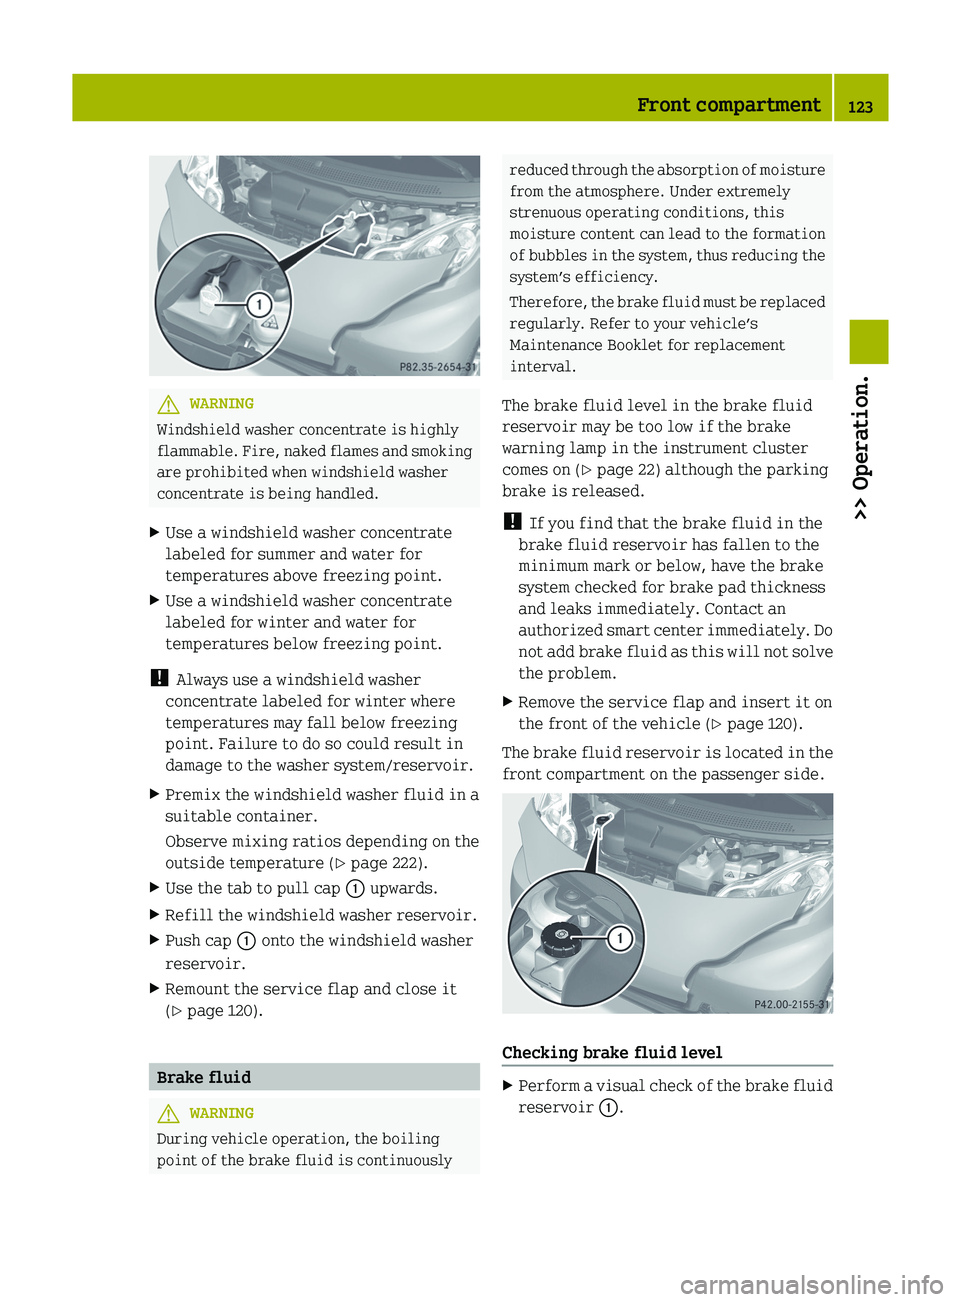
X Use the tab to pull cap : upwards.
X Refill the windshield washer reservoir.
X Push cap : onto the windshield washer
reservoir.
X Remount the service flap and close it
(Y page 120). Brake fluid
G
WARNING
During vehicle operation, the boiling
point of the brake fluid is continuously reduced through the absorption of moisture
from the atmosphere. Under extremely
strenuous operating conditions, this
moisture content can lead to the formation
of
bubbles in the system, thus reducing the
system’s efficiency.
Therefore, the brake fluid must be replaced
regularly. Refer to your vehicle’s
Maintenance Booklet for replacement
interval.
The brake fluid level in the brake fluid
reservoir may be too low if the brake
warning lamp in the instrument cluster
comes on (Y page 22) although the parking
brake is released.
! If you find that the brake fluid in the
brake fluid reservoir has fallen to the
minimum mark or below, have the brake
system checked for brake pad thickness
and leaks immediately. Contact an
authorized smart center immediately. Do
not add brake fluid as this will not solve
the problem.
X Remove the service flap and insert it on
the front of the vehicle ( Y page 120).
The brake fluid reservoir is located in the
front compartment on the passenger side. Checking brake fluid level
X
Perform a visual check of the brake fluid
reservoir :. Front compartment
123
>> Operation. Z
Page 136 of 228
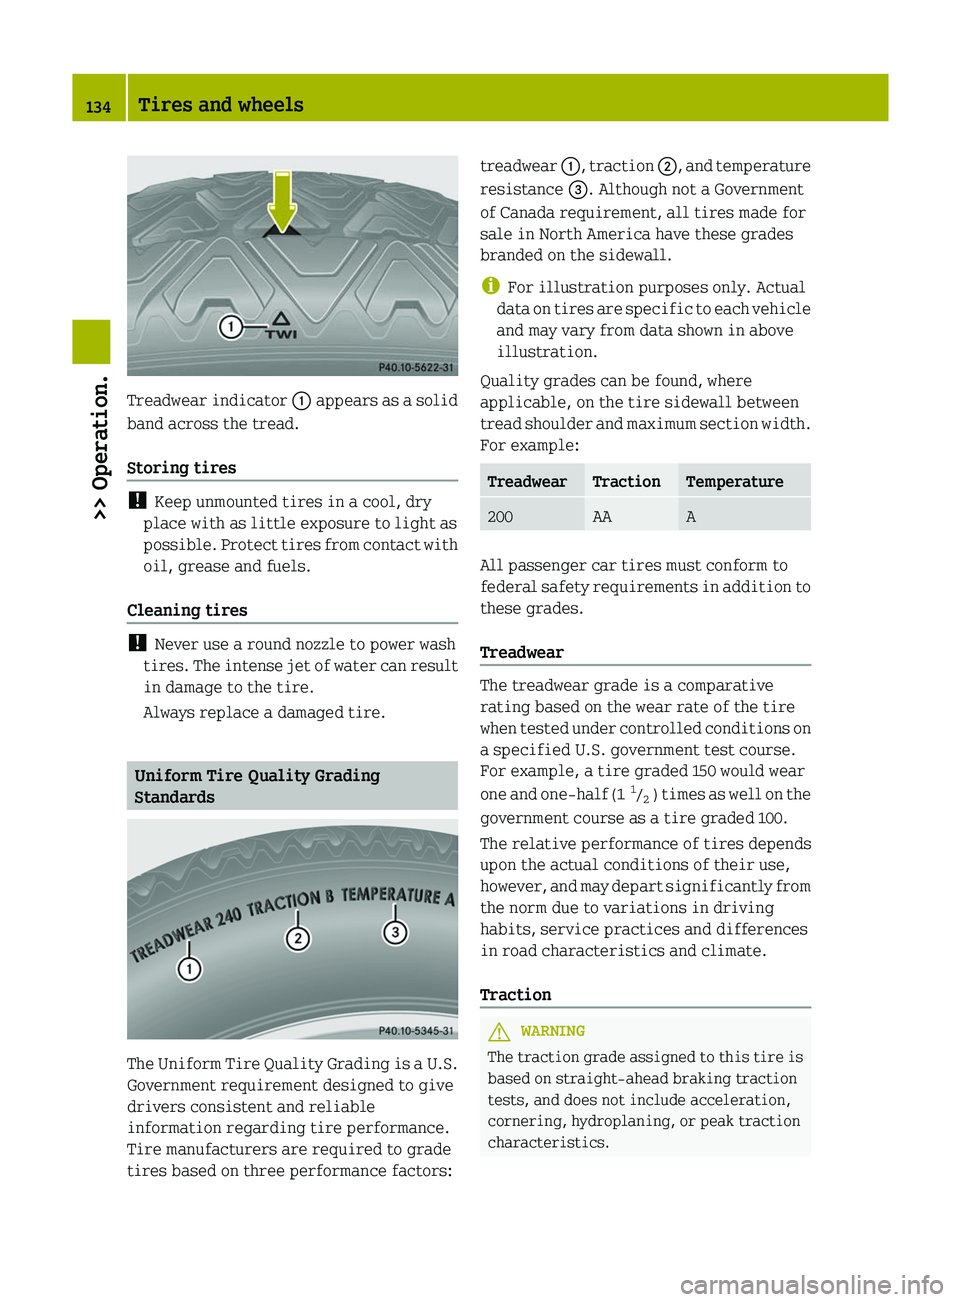
Treadwear indicator
: appears as a solid
band across the tread.
Storing tires !
Keep unmounted tires in a cool, dry
place with as little exposure to light as
possible.
Protect tires from contact with
oil, grease and fuels.
Cleaning tires !
Never use a round nozzle to power wash
tires.
The intense jet of water can result
in damage to the tire.
Always replace a damaged tire. Uniform Tire Quality Grading
Standards
The Uniform Tire Quality Grading is a U.S.
Government requirement designed to give
drivers consistent and reliable
information regarding tire performance.
Tire manufacturers are required to grade
tires based on three performance factors: treadwear
:,
traction ;, and temperature
resistance =. Although not a Government
of Canada requirement, all tires made for
sale in North America have these grades
branded on the sidewall.
i For illustration purposes only. Actual
data on tires are specific to each vehicle
and may vary from data shown in above
illustration.
Quality grades can be found, where
applicable, on the tire sidewall between
tread shoulder and maximum section width.
For example: Treadwear Traction Temperature
200 AA A
All passenger car tires must conform to
federal
safety requirements in addition to
these grades.
Treadwear The treadwear grade is a comparative
rating based on the wear rate of the tire
when
tested under controlled conditions on
a specified U.S. government test course.
For example, a tire graded 150 would wear
one and one-half (1 1
/ 2 ) times as well on the
government course as a tire graded 100.
The relative performance of tires depends
upon the actual conditions of their use,
however, and may depart significantly from
the norm due to variations in driving
habits, service practices and differences
in road characteristics and climate.
Traction G
WARNING
The traction grade assigned to this tire is
based on straight-ahead braking traction
tests, and does not include acceleration,
cornering, hydroplaning, or peak traction
characteristics. 134
Tires and wheels
>> Operation.
Page 142 of 228
radio, and heater, to the extent that these
items are available as factory-installed
equipment (whether installed or not).
Air pressure
The amount of air inside the tire pressing
outward
on each square inch of the tire. Air
pressure is expressed in pounds per square
inch (psi), or kilopascal (kPa) or bars.
Aspect ratio Dimensional relationship between tire
section
height and section width expressed
in percentage.
Bar Another metric unit for air pressure. There
are
14.5038 pounds per square inch (psi) to
1 bar; there are 100 kilopascals (kPa) to
1 bar.
Bead The tire bead contains steel wires wrapped
by steel cords that hold the tire onto the
rim.
Cold tire inflation pressure
Tire inflation pressure when your vehicle
has been sitting for at least 3 hours or
driven no more than 1 mile (1.6 km).
Curb weight
The weight of a motor vehicle with standard
equipment including the maximum
capacity of fuel, oil, and coolant, and, if
so equipped, air conditioning and
additional optional equipment, but
without passengers and cargo.
DOT (Department of Transportation)
A tire branding symbol which denotes the
tire meets requirements of the U.S.
Department of Transportation. GAWR (Gross Axle Weight Rating) The GAWR is the maximum permissible axle
weight. The gross vehicle weight on each
axle must never exceed the GAWR for the
front and rear axle indicated on the
certification
label located on the driver’s
door B‑pillar.
GVW (Gross Vehicle Weight) The GVW comprises the weight of the
vehicle including fuel, tools, installed
accessories, passengers and cargo. The
GVW
must never exceed the GVWR indicated
on the certification label located on the
driver’s door B‑pillar.
GVWR (Gross Vehicle Weight Rating) This is the maximum permissible vehicle
weight of the fully loaded vehicle (weight
of the vehicle including all options,
passengers,
fuel, and cargo. It is indicated
on certification label located on the
driver’s door B‑pillar.
Kilopascal (kPa) The metric unit for air pressure. There are
6.9
kPa to 1 psi; another metric unit for air
pressure is bars. There are
100 kilopascals (kPa) to 1 bar.
Maximum load rating The maximum load in kilograms and pounds
that can be carried by the tire.
Maximum loaded vehicle weight
The sum of curb weight, accessory weight,
total load limit and production options
weight.
Maximum permissible tire inflation
pressure
This number is the greatest amount of air
pressure
that should ever be put in the tire.140
Tires and wheels
>> Operation.
Page 153 of 228
Such damage is caused not only by extreme
and varying climatic conditions, but also
by:
R
Air pollution
R Road salt
R Tar
R Gravel and stone chipping
To avoid paint damage, you should
immediately remove:
R Insects
R Bird droppings
R Tree sap, etc.
R Grease and oil
R Brake fluid
R Coolant
R Fuel
R Tar spots
! Failure to remove such dirt
immediately can cause damage to the
paint or the soft top fabric*
.
Environmental influences are not
covered by the smart Limited Warranty.
Frequent washing reduces and/or
eliminates the aggressiveness and potency
of the above adverse influences.
More frequent washings are necessary to
deal with unfavorable conditions:
R near the ocean
R in industrial areas (smoke, exhaust
emissions)
R during winter operation
You should check your vehicle from time to
time for stone chipping or other damage.
Any damage should be repaired as soon as
possible to prevent corrosion.
In doing so, do not neglect the underbody
of the vehicle. A prerequisite for a
thorough check is a washing of the
underbody followed by a thorough
inspection. Damaged areas need to be re-
undercoated.
Your vehicle has been treated at the factory
with a wax-base rustproofing in the body cavities which will last for the lifetime of
the vehicle. Post-production treatment is
neither necessary nor recommended by
smart because of the possibility of
incompatibility
between materials used in
the production process and others applied
later.
We have selected vehicle-care products
and compiled recommendations which are
specially matched to our vehicles and
which always reflect the latest technology.
You can obtain smart approved vehicle-
care products at an authorized smart
center.
Scratches, corrosive deposits, corrosion
or damage due to negligent or incorrect
care cannot always be removed or repaired
with the vehicle-care products
recommended here. In such cases it is best
to seek aid at an authorized smart center.
The following topics deal with the cleaning
and care of your vehicle and give important
“how-to” information as well as references
to smart approved vehicle-care products. Vehicle care
Contact an authorized smart center for
recommended and approved care products.
i Advice on caring for the soft top
system, see (Y page 154). G
WARNING
After washing the vehicle, the brakes may
still be wet and thus their functionality
impaired. Therefore, when you start off,
brake lightly several times without
endangering traffic. Vehicle care
151
>> Operation.
* optional Z
Page 154 of 228
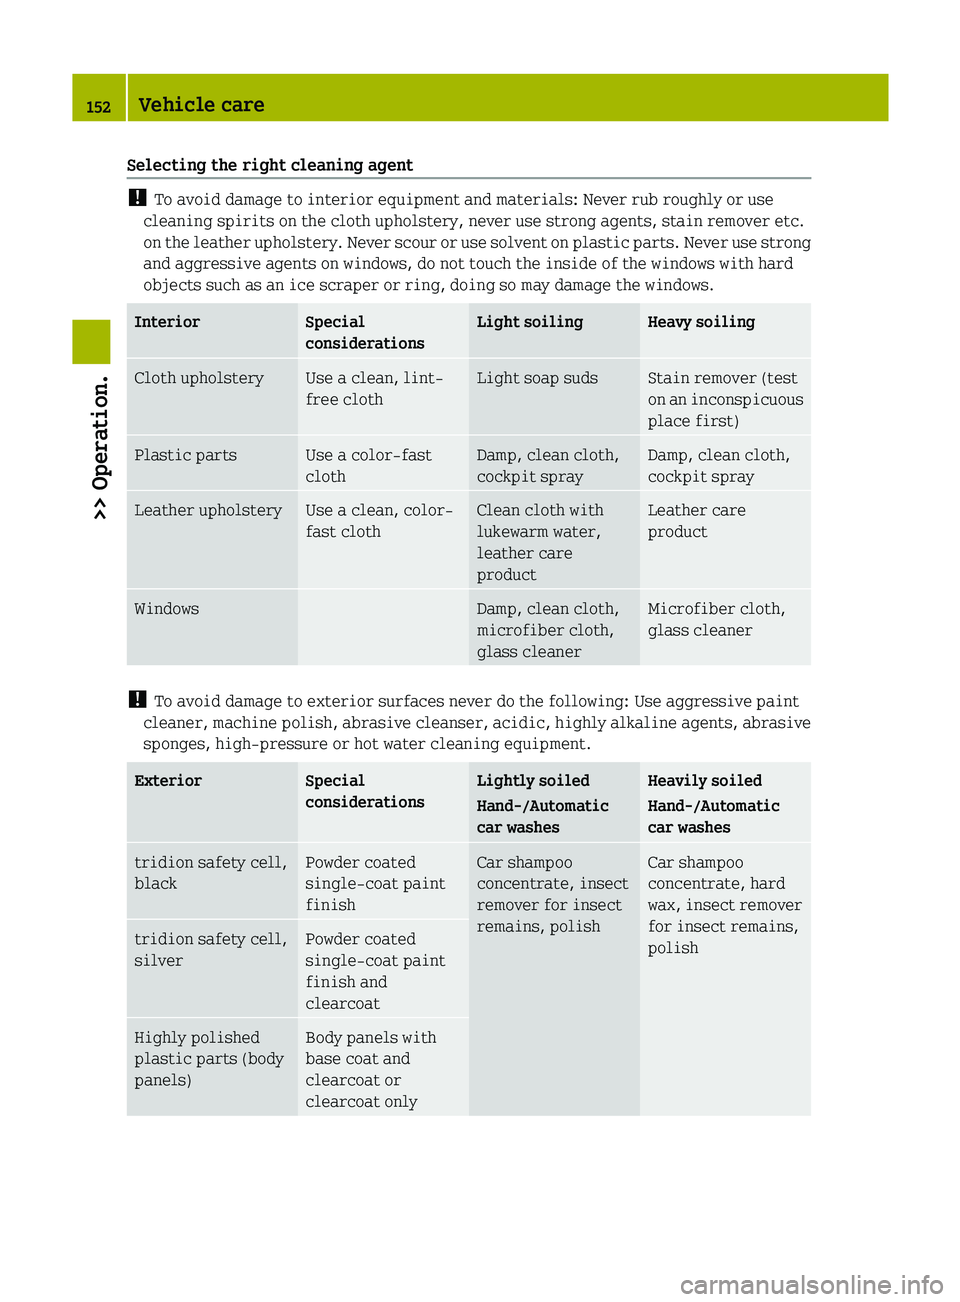
Selecting the right cleaning agent
!
To avoid damage to interior equipment and materials: Never rub roughly or use
cleaning spirits on the cloth upholstery, never use strong agents, stain remover etc.
on
the leather upholstery. Never scour or use solvent on plastic parts. Never use strong
and aggressive agents on windows, do not touch the inside of the windows with hard
objects such as an ice scraper or ring, doing so may damage the windows. Interior Special
considerations Light soiling Heavy soiling
Cloth upholstery Use a clean, lint-
free cloth Light soap suds Stain remover (test
on
an inconspicuous
place first) Plastic parts Use a color-fast
cloth Damp, clean cloth,
cockpit spray Damp, clean cloth,
cockpit spray
Leather upholstery Use a clean, color-
fast cloth Clean cloth with
lukewarm water,
leather care
product Leather care
product
Windows Damp, clean cloth,
microfiber cloth,
glass cleaner Microfiber cloth,
glass cleaner
!
To avoid damage to exterior surfaces never do the following: Use aggressive paint
cleaner, machine polish, abrasive cleanser, acidic, highly alkaline agents, abrasive
sponges, high-pressure or hot water cleaning equipment. Exterior Special
considerations Lightly soiled
Hand-/Automatic
car washes Heavily soiled
Hand-/Automatic
car washes
tridion safety cell,
black Powder coated
single-coat paint
finish Car shampoo
concentrate, insect
remover for insect
remains, polish Car shampoo
concentrate, hard
wax, insect remover
for insect remains,
polish
tridion safety cell,
silver Powder coated
single-coat paint
finish and
clearcoat
Highly polished
plastic parts (body
panels) Body panels with
base coat and
clearcoat or
clearcoat only152
Vehicle care
>> Operation.
Page 155 of 228
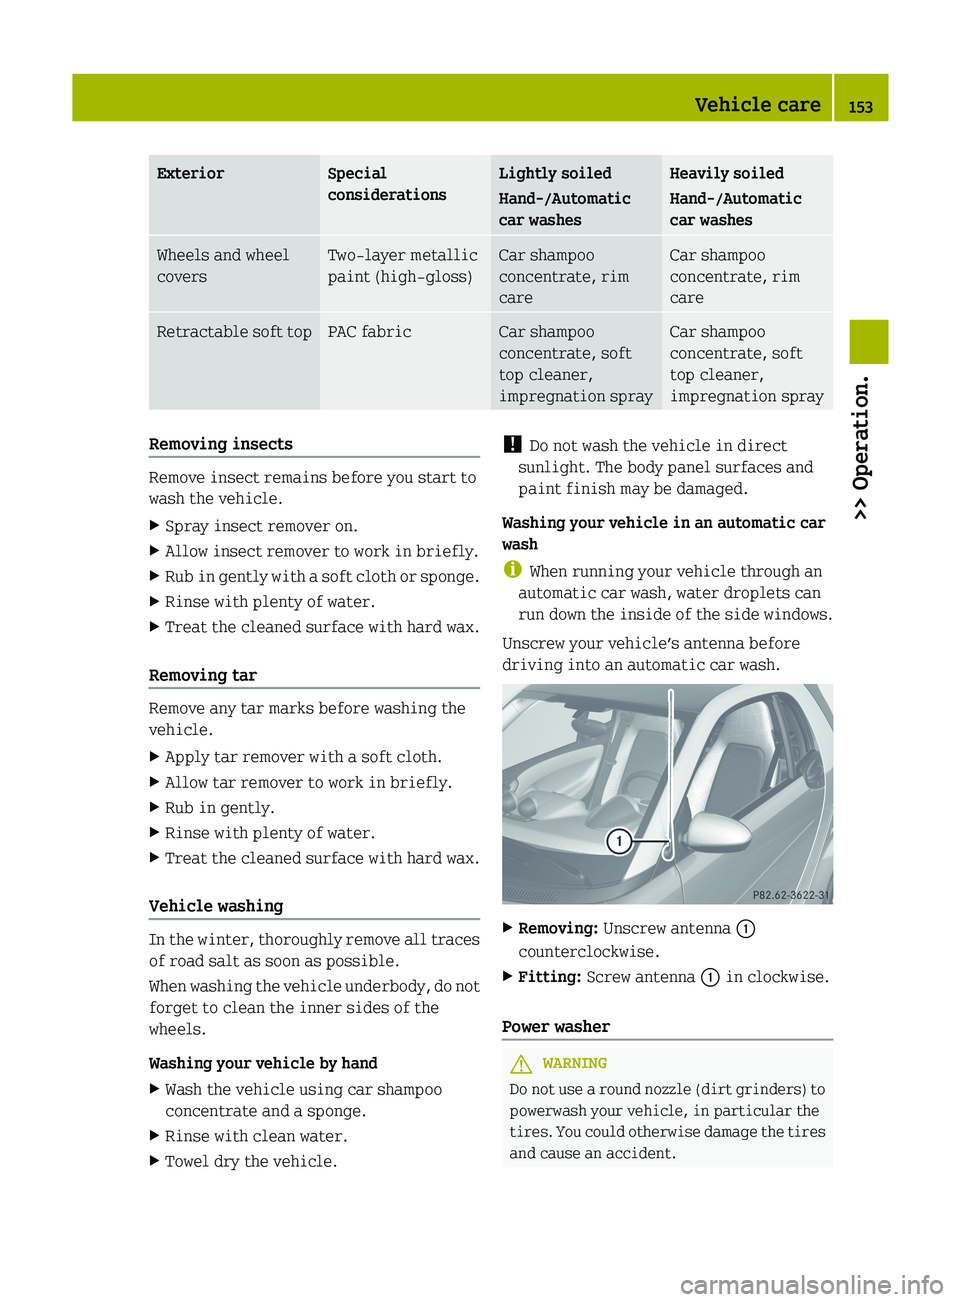
Exterior Special
considerations Lightly soiled
Hand-/Automatic
car washes Heavily soiled
Hand-/Automatic
car washes
Wheels and wheel
covers Two-layer metallic
paint (high-gloss) Car shampoo
concentrate, rim
care Car shampoo
concentrate, rim
care
Retractable soft top PAC fabric Car shampoo
concentrate, soft
top cleaner,
impregnation spray Car shampoo
concentrate, soft
top cleaner,
impregnation spray
Removing insects
Remove insect remains before you start to
wash the vehicle.
X
Spray insect remover on.
X Allow insect remover to work in briefly.
X Rub in gently with a soft cloth or sponge.
X Rinse with plenty of water.
X Treat the cleaned surface with hard wax.
Removing tar Remove any tar marks before washing the
vehicle.
X
Apply tar remover with a soft cloth.
X Allow tar remover to work in briefly.
X Rub in gently.
X Rinse with plenty of water.
X Treat the cleaned surface with hard wax.
Vehicle washing In the winter, thoroughly remove all traces
of road salt as soon as possible.
When
washing the vehicle underbody, do not
forget to clean the inner sides of the
wheels.
Washing your vehicle by hand
X Wash the vehicle using car shampoo
concentrate and a sponge.
X Rinse with clean water.
X Towel dry the vehicle. !
Do not wash the vehicle in direct
sunlight. The body panel surfaces and
paint finish may be damaged.
Washing your vehicle in an automatic car
wash
i When running your vehicle through an
automatic car wash, water droplets can
run
down the inside of the side windows.
Unscrew your vehicle’s antenna before
driving into an automatic car wash. X
Removing: Unscrew antenna :
counterclockwise.
X Fitting: Screw antenna : in clockwise.
Power washer G
WARNING
Do not use a round nozzle (dirt grinders) to
powerwash your vehicle, in particular the
tires.
You could otherwise damage the tires
and cause an accident. Vehicle care
153
>> Operation. Z
Page 156 of 228
!
Do not aim directly at
R electrical parts
R electrical connectors
R seals
R other rubber parts
The distance should be at least 3.9 in
(10 cm) and the water temperature must
not exceed 140¦ (60¥). Follow the
instructions provided by the power
washer manufacturer on maintaining a
distance between the vehicle and the
nozzle of the power washer.
Always keep the jet of water moving
across the surface.
! Powerwashing could damage
R the high-voltage battery
R the drive system
R the engine compartment
Do not powerwash these components.
Wheel cover* X
Wash the wheel cover with shampoo and a
soft brush or in the car wash.
Decorative foils !
Decorative foils are permanently
adhered to the painted parts of the
vehicle and cannot be removed.
! Do not expose the foils to solvents,
gasoline or diesel.
i When
cleaning with a power washer, note
the following guideline values:
R Water temperature max. 176 ¦ (80¥)
R Minimum distance 11.8 in (30 cm)
R Jet of water strike at a right angle Paintwork care
The
frequency with which you care for your
paintwork is dependent on
R how much the vehicle is used
R where you normally park the vehicle (e.g.
in a garage or under a tree)
R the season
R weather and environmental influences
Rectifying paintwork damage You can use a touch-up paint pen to repair
minimal stone chip damage and scratches.
Recommended touch-up paint pens can be
obtained in a smart center.
i
For
any major paintwork damage, please
contact a smart center. Exterior Repair options
Plastic parts (body
panels) with
clearcoat Clearcoat touch-up
paint pen
Body panels with
base coat and
clearcoat recommended
touch-up paint pen
set in the relevant
color
tridion safety cell recommended
touch-up paint pen
set in the relevant
color
Soft top system (cabriolet only)
Regular care will protect the retractable
soft top and the rear soft top against
external influences, helping to preserve
its value. Use only an approved soft top
cleaner when removing dirt from the soft
top.
! Never clean the soft top using a power
washer,
as water could get into the inside
of the vehicle. 154
Vehicle care
>> Operation.
* optional
Page 162 of 228
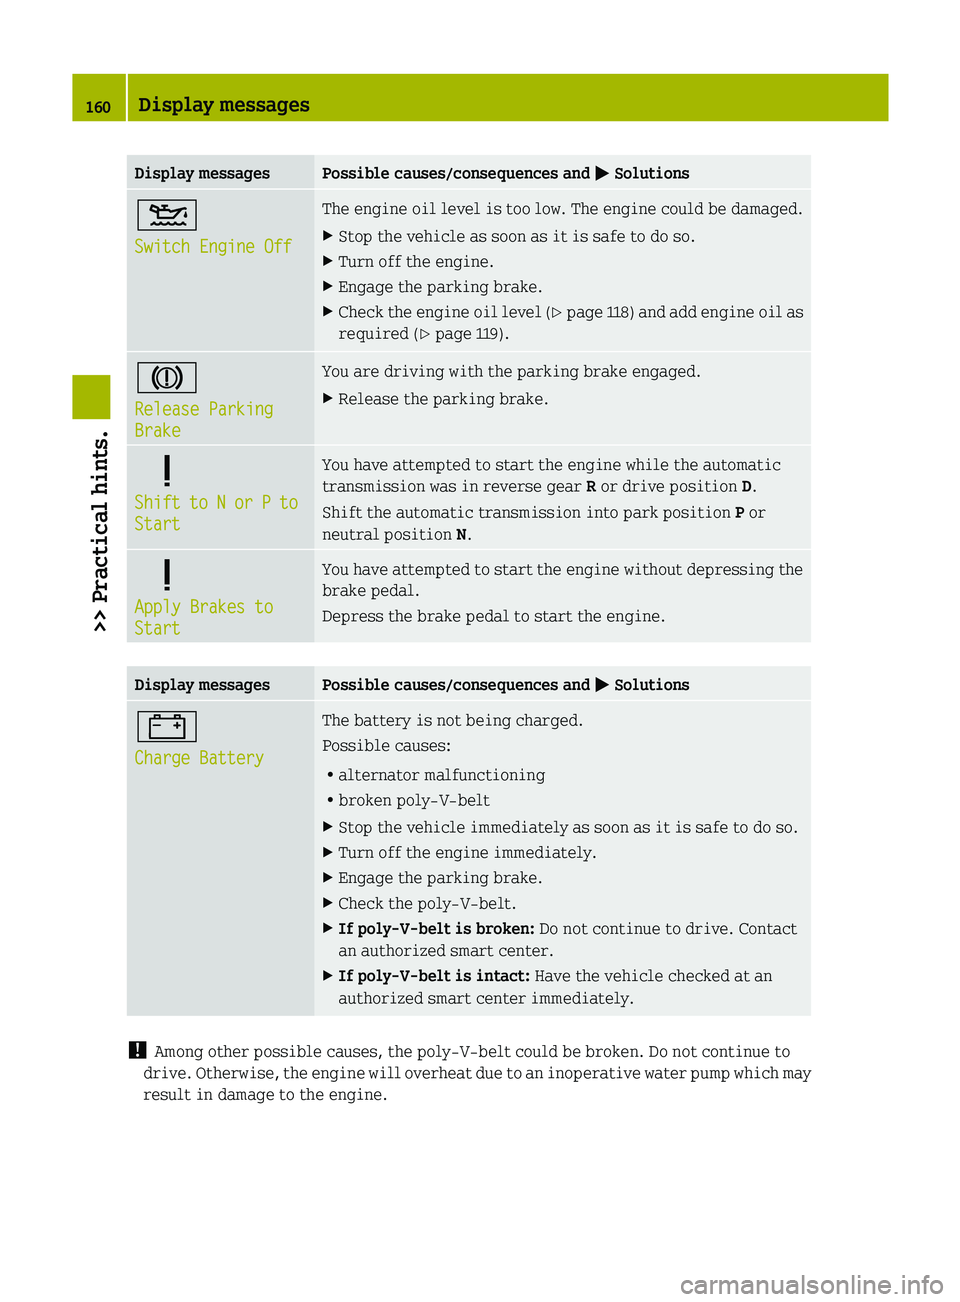
Display messages Possible causes/consequences and
M Solutions4
Switch Engine Off The engine oil level is too low. The engine could be damaged.
X
Stop the vehicle as soon as it is safe to do so.
X Turn off the engine.
X Engage the parking brake.
X Check the engine oil level (Y page 118) and add engine oil as
required (Y page 119). J
Release Parking
Brake You are driving with the parking brake engaged.
X
Release the parking brake. 5
Shift
to N or P to
Start You have attempted to start the engine while the automatic
transmission was in reverse gear
R or drive position D.
Shift the automatic transmission into park position P or
neutral position N.5
Apply Brakes to
Start You have attempted to start the engine without depressing the
brake pedal.
Depress the brake pedal to start the engine.
Display messages Possible causes/consequences and
M Solutions#
Charge Battery The battery is not being charged.
Possible causes:
R
alternator malfunctioning
R broken poly-V-belt
X Stop the vehicle immediately as soon as it is safe to do so.
X Turn off the engine immediately.
X Engage the parking brake.
X Check the poly-V-belt.
X If poly-V-belt is broken: Do not continue to drive. Contact
an authorized smart center.
X If poly-V-belt is intact: Have the vehicle checked at an
authorized smart center immediately. !
Among other possible causes, the poly-V-belt could be broken. Do not continue to
drive.
Otherwise, the engine will overheat due to an inoperative water pump which may
result in damage to the engine. 160
Display messages
>> Practical hints.