oil level SSANGYONG KORANDO 1997 Service User Guide
[x] Cancel search | Manufacturer: SSANGYONG, Model Year: 1997, Model line: KORANDO, Model: SSANGYONG KORANDO 1997Pages: 2053, PDF Size: 88.33 MB
Page 387 of 2053
M161 ENGINE MECHANICAL 1B2 -- 99
D AEW OO M Y_2000
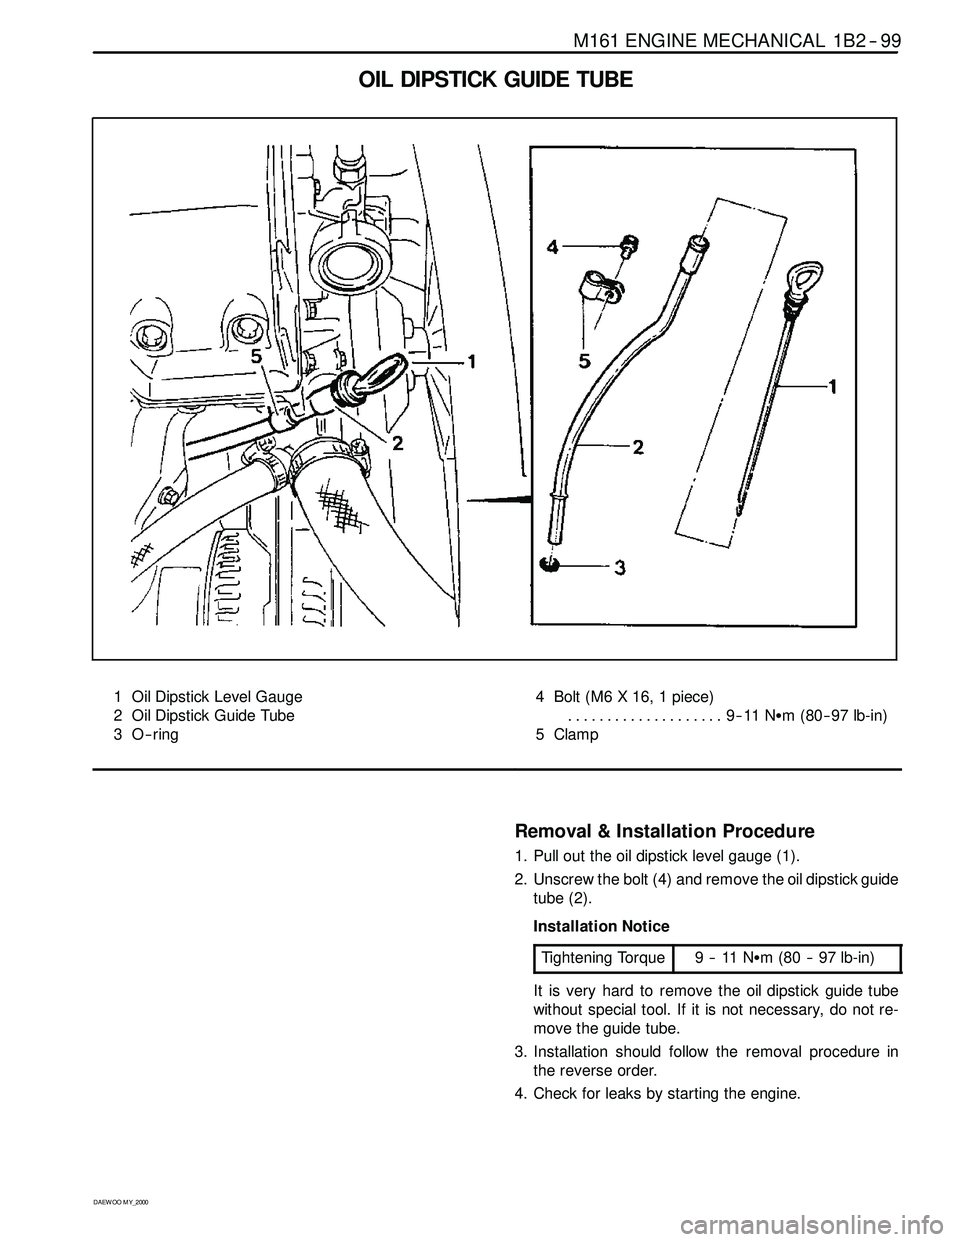
OIL DIPSTICK GUIDE TUBE
1 Oil Dipstick Level Gauge
2 Oil Dipstick Guide Tube
3O--ring4 Bolt (M6 X 16, 1 piece)
9--11 NSm (80-- 97 lb-in) ....................
5 Clamp
Removal & Installation Procedure
1. Pull out the oil dipstick level gauge (1).
2. Unscrew the bolt (4) and remove the oil dipstick guide
tube (2).
Installation Notice
Tightening Torque
9--11NSm (80 -- 97 lb-in)
It is very hard to remove the oil dipstick guide tube
without special tool. If it is not necessary, do not re-
move the guide tube.
3. Installation should follow the removal procedure in
the reverse order.
4. Check for leaks by starting the engine.
Page 545 of 2053
1A3 -- 10 GENERAL ENGINE INFORMATION
D AEW OO M Y_2000
DIAGNOSIS
OIL LEAK DIAGNOSIS
Most fluid oil leaks are easily located and repaired by
visually finding the leak and replacing or repairing the
necessary parts. On some occasions a fluid leak may be
difficult to locate or repair. The following procedures may
help you in locating and repairing most leaks.
Finding the Leak
1. Identify the fluid. Determine whether it is engine oil,
automatic transmission fluid, power steering fluid,
etc.
2. Identify where the fluid is leaking from.
2.1 After running the vehicle at normal operating
temperature, park the vehicle over a large sheet
of paper.
2.2 Wait a few minutes.
2.3 You should be able to find the approximate loca-
tion of the leak by the drippings on the paper.
3. Visually check around the suspected component.
Check around all the gasket mating surfaces for
leaks. A mirror is useful for finding leaks in areas that
are hard to reach.
4. If the leak still cannot be found, it may be necessary
to clean the suspected area with a degreaser, steam
or spray solvent.
4.1 Clean the area well.
4.2 Dry the area.
4.3 Operate the vehicle for several miles at normal
operating temperature and varying speeds.
4.4 After operating the vehicle, visually check the
suspected component.
4.5 If you still cannot locate the leak, try using the
powder or black light and dye method.
Powder Method
1. Clean the suspected area.
2. Apply an aerosol-- type powder (such as foot powder)
to the suspected area.
3. Operate the vehicle under normal operating condi-
tions.
4. Visually inspect the suspected component. You
should be able to trace the leak path over the white
powder surface to the source.
Black Light and Dye Method
A dye and light kit is available for finding leaks, Refer to
the manufacturer ’s directions when using the kit.
1. Pour the specified amount of dye into the engine oil fill
tube.
2. Operate the vehicle normal operating conditions as
directed in the kit.
3. Direct the light toward the suspected area. The dyed
fluid willappear as a yellow path leading to the
source.
Repairing the Leak
Once the origin of the leak has been pinpointed and
traced back to its source, the cause of the leak must be
determined n order for it to be repaired properly. If a gas-
ket is replaced, but the sealing flange is bent, the new
gasket will not repair the leak. Thebent flange must be
repaired also. Before attempting to repair a leak, check
for the following conditions and correct them as they
may cause a leak.
Gaskets
DThe fluid level/pressure is too high.
DThe crankcase ventilation system is malfunctioning.
DThe fasteners are tightened improperly or the threads
are dirty or damaged.
DThe flanges or the sealing surface is warped.
DThere are scratches, burrs or other damage to the
sealing surface.
DThe gasket is damaged or worn.
DThere is cracking or porosity of the component.
DAn improper seal was used (where applicable).
Seals
DThe fluid level/pressure is too high.
DThe crankcase ventilation system is malfunctioning.
DThe seal bore is damaged (scratched, burred or
nicked).
DThe seal is damaged or worn.
DImproper installation is evident.
DThere are cracks in the components.
DThe shaft surface is scratched, nicked or damaged.
DA loose or worn bearing is causing excess seal wear.
Page 549 of 2053
1A3 -- 14 GENERAL ENGINE INFORMATION
D AEW OO M Y_2000
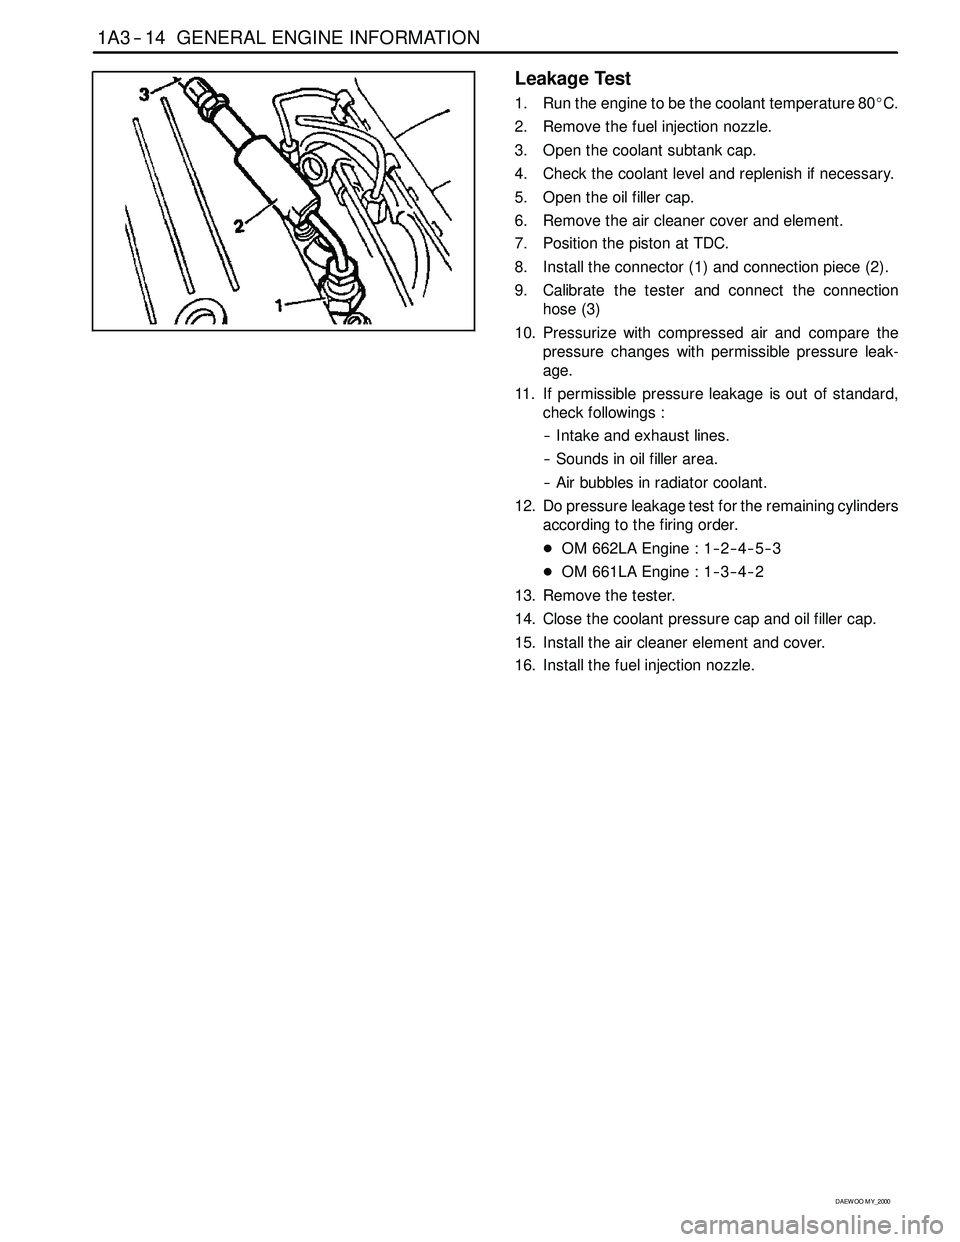
Leakage Test
1. Run the engine to be the coolant temperature 80_C.
2. Remove the fuel injection nozzle.
3. Open the coolant subtank cap.
4. Check the coolant level and replenish if necessary.
5. Open the oil filler cap.
6. Remove the air cleaner cover and element.
7. Position the piston at TDC.
8. Install the connector (1) and connection piece (2).
9. Calibrate the tester and connect the connection
hose (3)
10. Pressurize with compressed air and compare the
pressure changes with permissible pressure leak-
age.
11. If permissible pressure leakage is out of standard,
check followings :
-- Intake and exhaust lines.
-- Sounds in oil filler area.
-- Air bubbles in radiator coolant.
12. Do pressure leakage test for the remaining cylinders
according to the firing order.
DOM 662LA Engine : 1-- 2-- 4-- 5-- 3
DOM 661LA Engine : 1-- 3-- 4-- 2
13. Remove the tester.
14. Close the coolant pressure cap and oil filler cap.
15. Install the air cleaner element and cover.
16. Install the fuel injection nozzle.
Page 641 of 2053

1B3 -- 92 OM600 ENGINE MECHANICAL
D AEW OO M Y_2000
24. Insert the new connecting rod bearing shells into the
connecting rod and connecting rod bearing cap and
tighten the 12--sided stretch bolts (11).
Tightening Torque40 N∙m (30 lb-ft) + 90_
25. Measure inner diameter of connecting rod bearing.
26. Measure connecting rod bearing journal diameter
(K).
Notice
Refer to measurement of the crankshaft bearing
journal diameter.
27. Measure the radial clearance (L) of the connecting
rod bearing.
Example) Measured value ’J’ = 47.700mm
Measured value ’K’ = 47.653mm
——————————————
Clearance ’L’ = 0.047mm
Radial Clearance ’L’0.026 -- 0.068mm
Notice
If the clearance is out of standard, adjust the radial
clearance of connecting rod bearing by replacing the
connecting rod bearing shells.
28. Remove the connecting rod bearing cap.
29. Install the piston.
30. Rotate the crankshaft by hand and check whether it
rotates smoothly.
31. If the bearings are damaged,
-- replace the oil presser relief valve.
-- clean the oil pump and oil filter housing carefully
and replace the hose if necessary.
Notice
After assembling the engine, check the camshaft
timing, adjust the start of fuel injection and check the
TDC sensor bracket setting.
32. Fill oil and run the engine and then check the oil
pressure and oil level.
Notice
Install the original oil filter element and then change
the engine oil and oil filter element after 1,000 --
1,500km.
Page 651 of 2053
1B3 -- 102 OM600 ENGINE MECHANICAL
D AEW OO M Y_2000
Checking
Notice
The noise which continues short time during short
travel (frequent starting of the engine) or engine
starting after a long time storage is normal operating
conditions. So, it does not need to be repaired. De-
termine the malfunctions in valve clearance com-
pensation device with noise through following tests.
If defective, replace as respectively.
1. Run the engine at more than 3000rpm for approx. 4
minutes.
2. Stop the engine. After 5minutes, check the engine
oil level and adjust if necessary.
3. Remove the cylinder head cover.
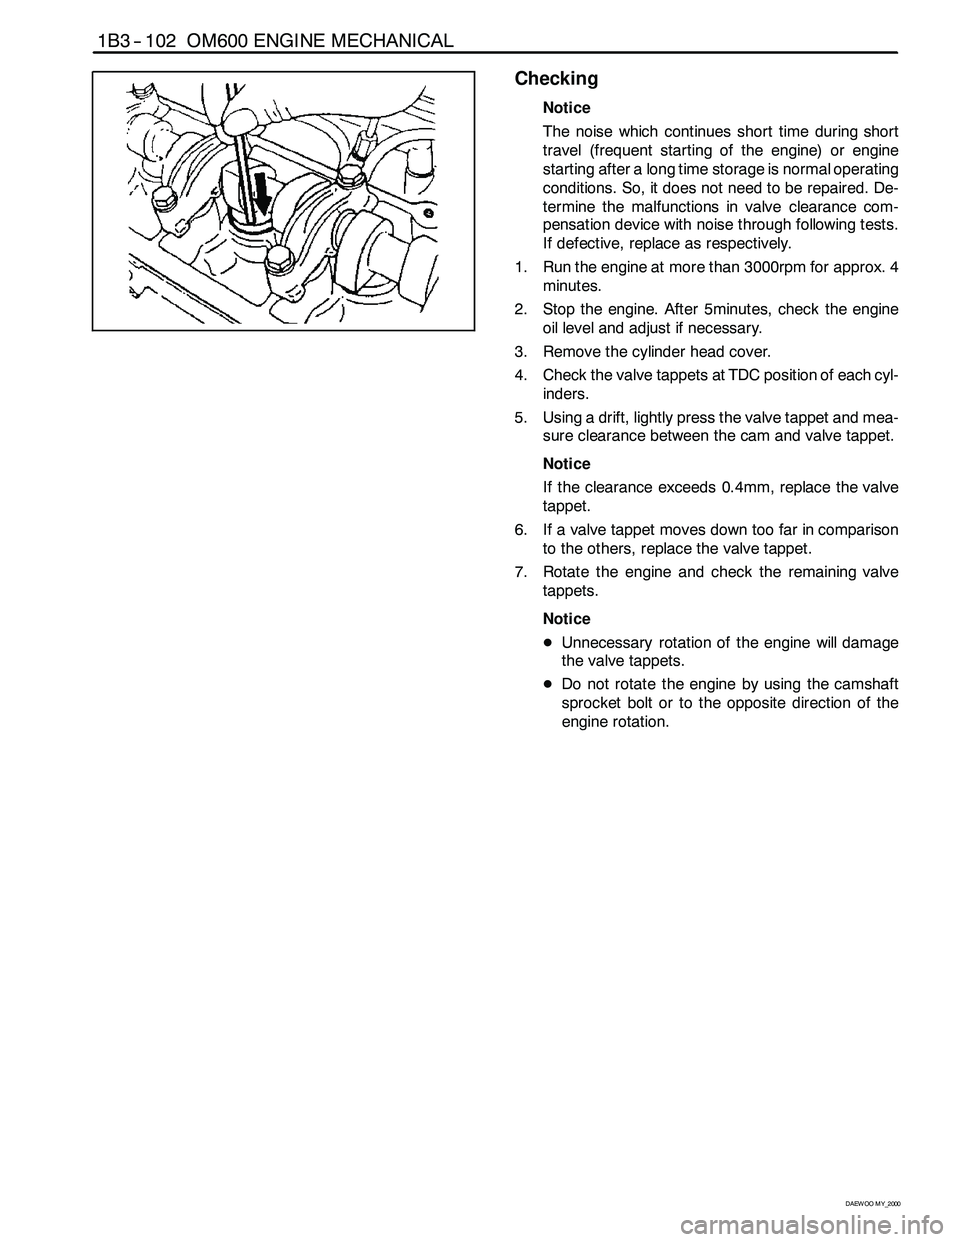
4. Check the valve tappets at TDC position of each cyl-
inders.
5. Using a drift, lightly press the valve tappet and mea-
sure clearance between the cam and valve tappet.
Notice
If the clearance exceeds 0.4mm, replace the valve
tappet.
6. If a valve tappet moves down too far in comparison
to the others, replace the valve tappet.
7. Rotate the engine and check the remaining valve
tappets.
Notice
DUnnecessary rotation of the engine will damage
the valve tappets.
DDo not rotate the engine by using the camshaft
sprocket bolt or to the opposite direction of the
engine rotation.
Page 797 of 2053
1F3 -- 40 OM600 ENGINE CONTROLS
D AEW OO M Y_2000
Tools Required
617 589 09 21 00 Rl Sensor
617589102100 TimingTester
667589002100 TDCPulseGenerator
Commercial Tools
ItemTools
Digigal TesterWith Pulse GeneratorBosch, MOT 001.03gg
Hartmann & Braun, EOMT3
Without Pulse GeneratorBosch, ETD 019.00
Sun, DIT 9000
ALV, Diesel -- Tester 875
Test Procedure
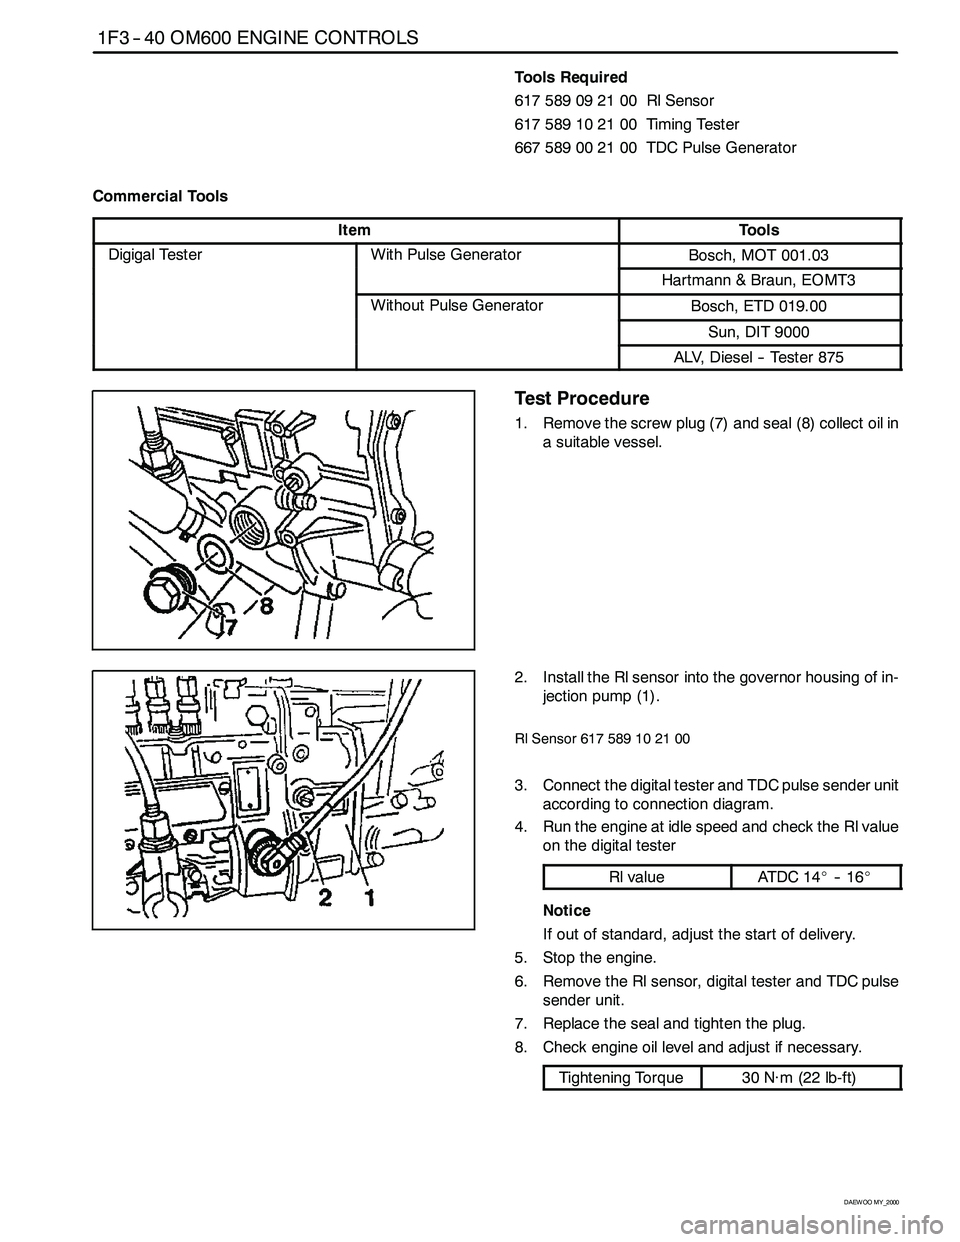
1. Remove the screw plug (7) and seal (8) collect oil in
a suitable vessel.
2. Install the Rl sensor into the governor housing of in-
jection pump (1).
Rl Sensor 617 589 10 21 00
3. Connect the digital tester and TDC pulse sender unit
according to connection diagram.
4. Run the engine at idle speed and check the Rl value
on the digital tester
Rl valueAT DC 1 4_-- 1 6_
Notice
If out of standard, adjust the start of delivery.
5. Stop the engine.
6. Remove the Rl sensor, digital tester and TDC pulse
sender unit.
7. Replace the seal and tighten the plug.
8. Check engine oil level and adjust if necessary.
Tightening Torque30 N∙m (22 lb-ft)
Page 922 of 2053

SSAMGYONG MY2002
4A-2 HYDRAULIC BRAKES
DESCRIPTION AND OPERATION
GENERAL DESCRIPTION
Brake fluid should meet the DOT 4 specification. Use
only clear fluid from a sealed container.
Fluid that is exposed to the air will absorb moisture.
Water in the brake fluid will cause the fluid to boil and
the rubber components to deteriorate.
Thoroughly clean the master cylinder reservoir cap be-
fore removing it. Do not let any dirt or foreign material
fall into the fluid reservoir.
There is a brake fluid level switch under the master
cylinder reservoir.When the fluid level is low, the BRAKE lamp in the
instrument cluster will turn on.
The correct brake fluid level is marked on the both
side of the brake fluid reservoir. If the fluid level is
below the MIN indicator mark, check the hydraulic brake
system for leaks. Fix any leaks. Then refill the reservoir
to the MAX indicator mark.
The hydraulic brake system is parallel split on Antilock
Brake Systems. This means the left front and left rear
brakes are on one hydraulic circuit and the right front
and right rear are on the other.
Page 923 of 2053
HYDRAULIC BRAKES 4A-3
SSANGYONG MY2002
DIAGNOSTIC INFORMATION AND PROCEDURES
BRAKE SYSTEM TESTING
Brakes should be tested on a dry, clean, reasonably
smooth and level roadway. A true test of brake perfor-
mance cannot be made if the roadway is wet, greasy,
or covered with loose dirt which can cause tires not to
grip the road unequally. Testing also will be inaccurate
on a crowned roadway because the wheels tend to
bounce.
Test the brakes at different vehicle speeds with both
light-and heavy-pedal pressure; however, avoid locking
the brakes and sliding the tires. Locked brakes and
slid-ing tires do not indicate brake efficiency since
heavily braked but turning wheels will stop the vehicle
in less distance than locked brakes. More tire-to-road
friction is present with a heavily braked, turning tire
than with a sliding tire.
Because of the high deceleration capability, a firmer
pedal may be felt at higher deceleration levels.
There are three major external conditions that affect
brake performance:
•Tires having unequal contact and grip of the road
will cause unequal braking. Tires must be equally
inflated, and the tread pattern of the right and the
left tires must be approximately equal.
Unequal loading of the vehicle can affect the brake
performance since the most heavily loaded wheels
require more braking power, and thus more braking
effort, than the others.
Misalignment of the wheels, particularly conditions
of excessive camber and caster, will cause the
brakes to pull to one side.
To check for brake fluid leaks, hold constant foot pres-
sure on the pedal with the engine running at idle and
the shift lever in NEUTRAL. If the pedal gradually falls
away with the constant pressure, the hydraulic system
may be leaking. Perform a visual check to confirm any
suspected leaks.
Check the master cylinder fluid level. While a slight
drop in the reservoir level results from normal lining
wear, an abnormally low level indicates a leak in the
system. The hydraulic system may be leaking either
internally or externally. Refer to the procedure below
to check the master cylinder. The system may appear
to pass this test while still having a slight leak. If the
fluid level is normal, check the vacuum booster pushrod
length. If an incorrect pushrod length is found, adjust
or replace the rod.Check the master cylinder using the following proce
dure:
Check for a cracked master cylinder casting or a
brake fluid leak around the master cylinder. Leaks
are indicated only if there is at least one drop of
fluid. A damp condition is not abnormal.
Check for a binding pedal linkage and for an
incorrect pushrod length. If both of these parts are
in satisfactory condition, disassemble the master
cylinder and check for an elongated or swollen
primary cylinder or piston seals. If swollen seals
are found, substandard or contaminated brake fluid
should be suspected. If contaminated brake fluid
is found, all the components should be
disassembled and cleaned, and all the rubber
components should be replaced. All of the pipes
must also be flushed.
Improper brake fluid, or mineral oil or water in the fluid,
may cause the brake fluid to boil or cause deterioration
of the rubber components. If the primary piston cups in
the master cylinder are swollen, the rubber parts have
deteriorated.
If deterioration of the rubber is evident, disassemble
all the hydraulic parts and wash the parts with alcohol.
Dry these parts with compressed air before reassembly
to keep the alcohol out of the system. Replace all the
rubber parts in the system, including the hoses. When
working on the brake mechanisms, check for fluid on
the linings. If excessive fluid is found, replace the
linings.
If the master cylinder piston seals are in satisfactory
condition, check for leaks or excessive heat conditions.
If these conditions are not found, drain the fluid, flush
the master cylinder with brake fluid, refill the master
cylinder, and bleed the system.
BRAKE HOSE INSPECTION
The hydraulic brake hoses should be inspected at least
twice a year. The brake hose assembly should be
checked for road hazard damage, cracks, chafing of
the outer cover, and for leaks or blisters. Inspect the
hoses for proper routing and mounting. A brake hose
that rubs on a suspension component will wear and
eventually fail. A light and a mirror may be needed for
an adequate inspection. If any of the above conditions
are observed on the brake hose, adjust or replace the
hose as necessary.
Page 937 of 2053

Description and Operation...................................4B-2
General Description.............................................4B-2
Component Locator.............................................4B-3
Repair Instructions................................................4B-4
On-Vehicle Service.................................................4B-4Brake Oil Level Switch .........................................4B-4
Brake Fluid Reservoir ...........................................4B-4
Master Cylinder...................................................4B-5
Specifications.......................................................4B-8
Fastener Tightening Specifications.......................4B-8
SECTION 4B
MASTER CYLINDER
TABLE OF CONTENTS
Page 938 of 2053

SSANGYONG MY2002
4B-2 MASTER CYLINDER
DESCRIPTION AND OPERATION
GENERAL DESCRIPTION
The master cylinder is designed for use in a parallel
split system. One front and one parallel to rear brakes
are served by the primary piston. The opposite front
and rear brakes are served by the secondary piston.
The master cylinder incorporates the functions of the
standard dual master cylinder, plus a low fluid level
indicator. The brake fluid level switch is attached under
the body of the plastic brake master cylinder reservoir.
Notice: Do not use lubricated shop air on the brake
parts, because oil will damage the rubber components.Important:•Replace all the components included in the repair
kits used to service the master cylinder.
Lubricate the rubber parts with clean brake fluid to
ease assembly.
If any hydraulic component is removed or discon-
nected, it may be necessary to bleed all or part of
the brake system. Refer to Section 4F, Antilock
Brake System and Traction Control System.
The torque values specified are for dry, unlubricated
fasteners.
Perform all service operations on a clean bench,
free from all traces of mineral oil.